
WS-4700 - Weather Station ALECTO - Free user manual and instructions
Find the device manual for free WS-4700 ALECTO in PDF.


| Product type | Wireless weather station |
| Brand | Alecto |
| Model | WS-4700 |
| Indoor unit dimensions | 130 x 100 x 25 mm |
| Indoor unit weight | 180 g |
| Outdoor sensor dimensions | 65 x 45 x 120 mm |
| Outdoor sensor weight | 80 g |
| Indoor unit power supply | 2 AAA batteries (not included) or AC adapter (not included) |
| Outdoor sensor power supply | 2 AA batteries (not included) |
| Display type | Backlit LCD |
| Indoor temperature | 0 °C to 50 °C |
| Outdoor temperature | -20 °C to 60 °C |
| Indoor humidity | 20% to 95% |
| Outdoor humidity | 20% to 95% |
| Transmission range | Up to 100 m in open field |
| Transmission frequency | 868 MHz |
| Main functions | Indoor/outdoor temperature, humidity, weather forecast (icons), radio-controlled clock, alarm, calendar, moon phase, barometric trend |
| Care and cleaning | Wipe with a soft, dry cloth. Do not use abrasive products or solvents. |
| Safety | Do not expose to extreme temperatures, excessive humidity, or direct sunlight. Keep out of reach of children. |
| Spare parts and repairability | Batteries are user-replaceable. For any other repairs, contact Alecto after-sales service. |
| General information | 2-year warranty. Made in China. |
Frequently Asked Questions - WS-4700 ALECTO
User questions about WS-4700 ALECTO
0 question about this device. Answer the ones you know or ask your own.
Ask a new question about this device
Download the instructions for your Weather Station in PDF format for free! Find your manual WS-4700 - ALECTO and take your electronic device back in hand. On this page are published all the documents necessary for the use of your device. WS-4700 by ALECTO.
USER MANUAL WS-4700 ALECTO
Weather station with wireless outdoor sensor
(NL / EN / FR / DE / DA / SE / FI)
VERKLARING VAN CONFORMITEIT
3.2 Koppelen binnen-unit / buiten-unit:
Automatisch:

Opmerkingen:
Pascal), in inHg (inchkwikdruk) of in

regen in in (inch) of in mm (millimeter)
*11: STORM = ≥ 88 km/h (≥ 55 mph)
STRONG = 42-87 km/h (26-54 mph)
MODERATE = 14-41 km/h (9-25 mph)
LIGHT = 3-13km/h (2-8mph)
km/h (kilometer per uur) of in Knots
4.8 Feels like / Wind chill / Heat index / Dewpoint:

resolutie: 0.5mph of 0.5knot of 0.5m/s
nauwkeurigheid: < 5m/s: +/- 0.5m/s
5m/s: +/- 6%
Alecto is a brand of Commaxx B.V. Wiebachstraat 37, 6466 NG Kerkrade, The Netherlands

Service / Help ? www.alecto.nl Support.alecto.nl
DECLARATION OF CONFORMITY
Hereby, Commaxx declares that the radio equipment type Alecto WS-4700 is in compliance with directive 2014/53/EU. The full text of the EU declaration of conformity is available at the following internet address: Weather station with wireless outdoor sensor
ENVIRONMENT
At the end of its lifespan, this product should not be discarded as normal domestic waste, but is must be taken to a collection point for the recycling of electric and electronic equipment.
Don't throw away exhausted batteries, take them to your local depot for small chemical waste

SYSTEM MALFUNCTION
When you suspect a system malfunction, please remove the batteries from the indoor unit and from the outdoor unit. Now wait several minutes and then replace the batteries. If the doesn't resolve the problem, please contact the Alecto customer service at www.alecto.nl
WARRANTY
For the Alecto WS-4700 you have a warranty of 24 months from the date of purchase. During this period, we guarantee the free repair of defects caused by material and workmanship errors. All this subjected to the final assessment of the importer.
HOW TO HANDLE:
If you notice any defect, first refer to the user's manual. If you can't find a decisive answer here, please contact your dealer with a clear complaint description. The dealer will then accept the product with this proof of warranty and the dated proof of purchase and ensure a speedy repair or otherwise send it post paid to the importer.
THE WARRANTY BECOMES NULL AND VOID:
In case of improper use, incorrect connections, leaking and/or incorrectly installed batteries, use of unoriginal parts or accessories, negligence and in case of defects caused by moisture, fire, flooding, lightning and natural disasters. In case of unauthorised modifications and/or repairs performed by third parties. In case of incorrect transportation of the device without adequate packaging and when the device is not accompanied by this warranty card and proof of purchase. The warranty does not cover connecting cables, plugs and batteries.
All further liability, especially concerning any consequential damages, is excluded
1. INDEX
2. OVERVIEW
2.1 Indoor unit 4
2.2 Outdoor unit....5
3. INSTALLATION
3.1 Power supply....5
3.2 Pairing the indoor unit/outdoor unit 6
3.3 Positioning....6
3.4 Clock 7
3.5 To reset measurement data 7
4. OPERATION
4.1 Basic functions 8
4.2 Indoor temperature and humidity 9
4.3 Outdoor temperature and air humidity 9
4.4 Weather forecast 9
4.5 Barometer (air pressure)....10
4.6 Rain 10
4.7 Wind (direction + speed)....11
4.8 Feels like / Wind chill / Heat index / Dewpoint....11
4.9 Display lighting 12
5. ALARM CLOCK
5.1 Introduction.... 12
5.2 Alarm time setup 12
5.3 Alarm function setup 12
5.4 Operation....12
6. HISTORY
6.1 Introduction....12
6.2 To view the history.... 12
6.3 To delete the history....12
7. MAX-MIN ALARM
7.1 Introduction.... 13
7.2 To set Hi-Lo limits....13
7.3 Hi-Lo Alarm function setup....13
7.4 Operation....13
8. RELATIVE AIR PRESSURE
8.1 Introduction.... 13
8.2 Relative air pressure setup 13
9. PROBLEM SOLVING 14
10. MAINTENANCE
10.1 Rain meter.... 14
10.2 Outdoor temperature and humidity sensor 14
- SPECIFICATIONS.... 14
2. OVERVIEW
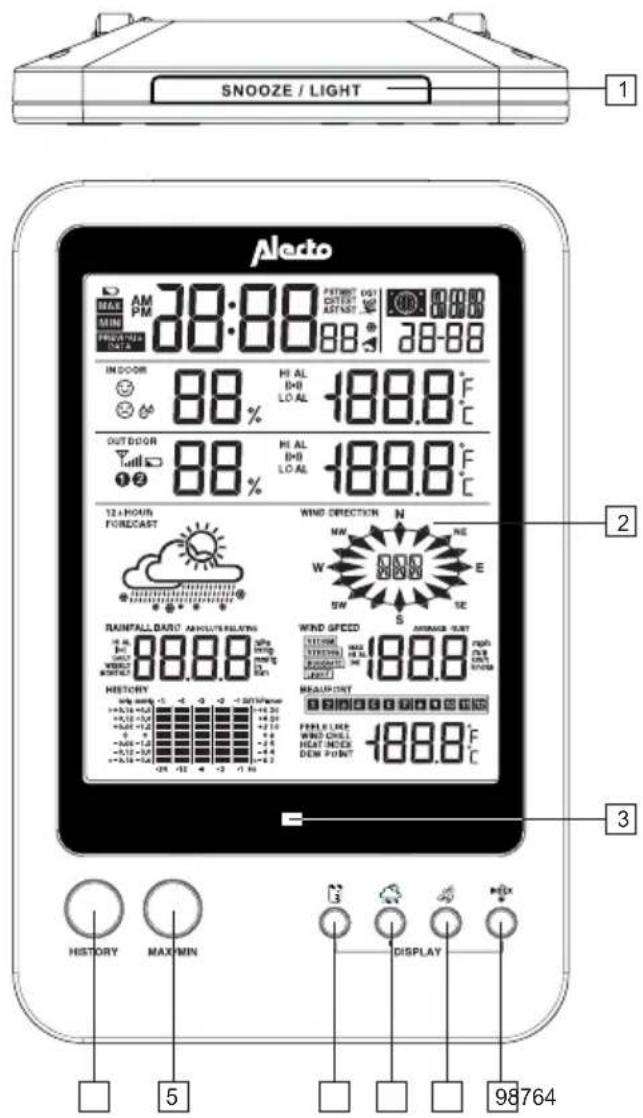
2.1 Indoor unit:

- SNOOZE/LIGHT button:
snooze button in alarm mode, also for activating the display lighting
- Display
(the following pages will explain what everything on the display means)
-
Alert LED for the MAX/MIN alarm
-
HISTORY button:
displays the data of the past 24 hours
- MAX/MIN button:
displays the measured minimum and maximum values, including at what time and on which date the measurement was taken
-
button: 'rainfall' button
-
button: 'barometer' button
-
button: 'wind' button
-
* button: 'index' button

- Ⓤ button: clock setup button
- 🔔 button: alarm clock setup button
- ✉ button: alarm setup button
- v button: down button
- ^ button: up button
- °C/°F switch:
to set the temperature display to degrees Celsius or degrees Fahrenheit
- Battery compartment
- RCC button: to switch the DCF receiver on or off
- SCAN button: to have the indoor unit search for the outdoor unit
- RESET button: to reboot the indoor unit in case of a (possible) fault
2.2 Outdoor unit:

Side view Bottom view

- Rain meter
- Antenna
- Wind speed meter
-
Temperature + air humidity sensor
-
Wind direction vane
-
LED (transmit indicator)
-
RESET button
-
Battery compartment
3. INSTALLATION

Attention: after the installation, it may take several hours up to a day before the correct values are displayed. Additionally, after replacing exhausted batteries in the indoor unit, all measured the indoor unit will be erased.
3.1 Power supply:
Advice regarding batteries:
We advise you to use normal alkaline batteries of high quality for the indoor unit. Alkaline batteries with a capacity of 2000mAh have a lifespan of over one year. Rechargeable batteries are not recommended because of their lower supply voltage.
Also the outdoor unit is powered by 3 AA 1.5Volt batteries, but because normal Alkaline batteries perform poorly or not at all at temperatures of around or below 0°C, it's not recommended to use standard Alkaline batteries for the outdoor unit.
For that reason, we advise you to use Lithium batteries for the outdoor unit that are designed to function well within a temperature range of -20°C to 60°C. These batteries can be ordered via the service department of Alecto via www.alecto.info
Lithium batteries with a capacity of 2900mAh have a lifespan of over one year.
Indoor unit:
Slide down the battery cover at the rear of the unit and insert 3 AA 1.5V batteries according to the markings inside the battery compartment. Slide the battery cover back onto the indoor unit. (Batteries are not included) The indoor unit will now start a 1 minute scan to search for the outdoor unit. Therefore, you'll need to insert the batteries into the outdoor unit within that minute.
Outdoor unit:
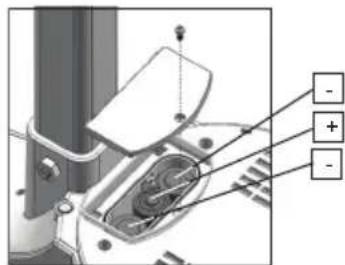
Open the battery compartment by loosening the battery cover using a small crosshead screwdriver. Install 3 AA 1.5V batteries according to the picture below, paying attention to the correct polarity (+ and -). Replace the cover and fasten the screw (batteries are not included).
3.2 Pairing the indoor unit/outdoor unit:
Automatically:
As soon as you insert the batteries into the indoor unit, the indoor unit will start a 1 minute scan to search for the signal of the outdoor unit. Therefore, if you insert the batteries into the outdoor unit within that minute and the units will 'find' each other, they will be automatically paired and the display of the indoor unit will show the temperature transmitted by the outdoor unit.
Manually:
If the units cannot be paired automatically, or after replacing the batteries, you can pair the outdoor unit (again) with the indoor unit as follows:
- press and hold the SCAN button on the indoor unit for 2 seconds until the antenna symbol starts flashing in the display
- Press briefly press the RESET button on the outdoor unit
- the units will have found each other (again) after several seconds
3.3 Positioning: reset
Indoor unit:
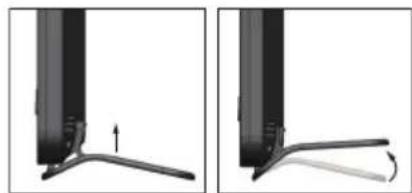
You may suspend the indoor unit from a simple screw in a wall or use it as a desk model with the supplied support. In any case, never place the indoor unit in direct sunlight or next to heat radiating lights or stoves.
reset

Outdoor unit:
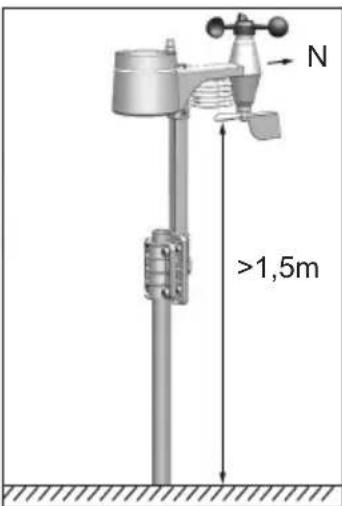
You may place the outdoor unit on a flat surface (such as a fence or railing) or on top of a pole (not included). In any case, make sure the unit is placed at least 1.5 meters above the ground and ensure the unit is standing freely in the rain and wind.
Outdoor unit positioning tips:
To ensure that the rain meter is functioning as accurate as possible, the outdoor unit must be standing exactly horizontal. You can verify this by using the built-in spirit level at the top of the outdoor unit.


To be able to check from which direction to wind is
coming, the outdoor unit should be aimed to the North. To do this, use the N marking on top of the outdoor unit. Use an accurate compass (not included) to properly orient the unit.
Make sure that the distance between the outdoor unit and indoor unit is no greater than 50 to 100 meters.
3.4 Clock:
Introduction
The WS-4700 is provided with a built-in DCF receiver which receives the DCF time signal from Frankfurt. This signal ensures that the clock shows the time very accurately, provided a strong enough signal is being received.
Automatically:
As soon as you insert the batteries into the indoor unit, the clock will start searching for the DCF radio signal for the time while the antenna symbol is flashing. After several seconds or minutes the WS-4700 will start showing the correct time. In extreme cases, it can take over a day before the DCF time is shown.
Manually:
If the clock cannot receive the radio signal or cannot receive it well enough, you can set the clock manually as follows:
- press and hold the button Ⓤ for 2 seconds, 12Hr or 24Hr will appear in the display
- Use v A to set the time format, then briefly press the @ button
- use ∨ ∧ to set the hours and then briefly press the Ⓗ button
- use v λ to set the minutes and then briefly press the Ⓗ button
- use V/A to set the seconds to 0 (this allows you to have the clock run synchronously with your own clock) and then briefly press the Ⓤbutton
- use ∨ ∧ to set the year and then briefly press the Ⓤbutton
- use ∨ ∧ to set the month and then briefly press the Ⓤ button
- use v A to set the date and then briefly press the @button
- use V/A to set the hour difference compared to the DCF time. E.g. for use in the Benelux select '0' and then briefly press the Ⓤbutton.
- use v/ʌ to set the language in which the day must be displayed, you may choose from: EN (English), FR (French), DE (German), ES (Spanish) or IT (Italian), now briefly press the Ⓗbutton.
- use V/A to determine whether the clock must switch to daylight saving time or standard time automatically (AUTO) or whether you prefer to do this manually (OFF), now briefly press the Ⓗ button. The clock is now set manually.
When the DCF receiver is enabled and a strong signal is being received, the receiver will overwrite the clock display.
Switching the DCF receiver on/off:
You can turn off the DCF receiver as follows, allowing you to have only the time and date shown on the display according to your programming:
- turn off: press and hold the RCC OFF button at the rear of the indoor unit for 8 seconds until the antenna symbol disappears.
You can turn the receiver back on as follows:
- turn on: press and hold the RCC ON button at the rear of the indoor unit for 8 seconds until the antenna symbol starts flashing.
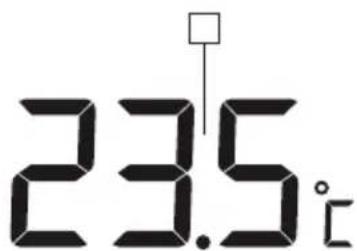
The symbol in the upper middle part of the display shows the status of the DCF clock: no symbol: the DCF receiver is disabled; the displayed time is provided by the internal clock of the WS-4700
flashing: the DCF receiver is enabled and is searching for the DCF signal; the displayed time is provided by the internal clock of the WS-4700
remains lit: the DCF receiver is enabled and is receiving the DCF signal; the displayed time and date are provided by the DCF atomic clock in Frankfurt
3.5 To reset measurement data:
After the installation is completed, press and hold the HISTORY button for 10 seconds to delete all of the measurements made up until that moment. This ensures that you won't see any measurements at a later time that were caused by movements during the installation.
4. OPERATION
4.1 Basic functions:
The display shows the following basic functions/data:

- illuminates when the battery of the indoor unit is running low
- display of the actual time
- illuminates when the alarm clock is set to ice alert (see chapter 5)
- illuminates when the DCF clock radio signal is being received
- illuminates when the daylight saving time is enabled
- display of the moon status (*1)
- display of the day of the week
- illuminates when using the MAX/MIN button to display the maximum or minimum values (*2)
- illuminates when the alarm clock is set (see chapter 5)
- display of the date
- display of the month
*1: The display of the moon status is linked to the settings of the date, month and year. The display can show the following moon statuses:
New mc  moon moon |  | |||
Waxing  nt nt | Waning moon |  | ||
First qua  ast quarter ast quarter |  | |||
Crescer  n n | moon |  | ||
*2: By repeatedly pressing the MAX/MIN button, the following data will appear in the display in order:
1 maximum outdoor temperature 11 maximum heat index
2 minimum outdoor temperature 12 minimum heat index
3 maximum outdoor humidity 13 maximum dew point temperature
4 minimum outdoor humidity 14 minimum dew point temperature
5 maximum indoor temperature 15 maximum air pressure
6 minimum indoor temperature 16 minimum air pressure
7 maximum indoor humidity 17 maximum average wind speed
8 minimum indoor humidity 18 maximum wind gust speed
9 maximum wind chill 19 maximum rainfall
10 minimum wind chill
The upper right part of the display shows on which day and at what time the concerned minimum or maximum value was measured.
Press and hold the MAX/MIN button for 2 seconds to erase this memory
4.2 Indoor temperature and humidity:

- relative indoor air humidity
- illuminates when the max or min alarm is set
- indoor temperature
- comfort icon, this is a combination of temperature and humidity (*3)
*3:
comfortable
😊 comfort not OK (too cold/too dry)
comfort not OK (too warm/too humid) there's no comfort indication at temperatures <0°C (32°F) or >60°C (140°F)
4.3 Outdoor temperature and air humidity:


- relative outdoor air humidity
- illuminates when the max or min alarm is set
- outdoor temperature
- indicates the connection strength of the radio signal with the outdoor unit (*4)
- illuminates when the batteries in the outdoor unit are running low

4.4 Weather forecast:
- here the weather forecast is shown


Remarks:
- the accuracy of a forecast based on air pressure is 70% to 75%; please keep in mind that a correct display of the weather forecast is not guaranteed.
- the prediction is based on the coming 12 hours and does not necessarily represent the current weather conditions.
- the ‘snow’ weather forecast is based on the air pressure combined with the temperature: when the forecast is in fact ‘rain’, but the outdoor temperature is below -3°C (26°F), ‘snow’ will be predicted
4.5 Barometer (air pressure):
If this window is not visible, please first press the button

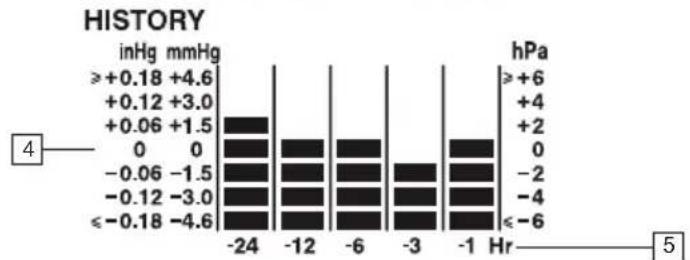
- actual air pressure
- indicates whether the relative or absolute (*5) air pressure is displayed
- indicates whether the air pressure is shown in hPa (hecto Pascals), in inHg (inches of mercury) or in mmHg (millimetres of mercury) (*6)
4+5. this shows the trend of the air pressure over the last 24 hours
*5: An absolute air pressure indicates the air pressure which is present independent from the height on which you're measuring the air pressure. A relative air pressure is the air pressure corrected for the height on which you're measuring the air pressure. For a correct weather forecast the relative air pressure is required.
You can set the desired unit as follows:
- press and hold the button for 2 seconds
- use V/A to select your desired unit
- briefly press the 🎨 button (if the air pressure now starts flashing, press the 🔊 button again) Chapter 8 explains how you can change the relative air pressure display in case you're using the weather station on a much higher level than mean sea level.
*6: In the Benelux one uses the hectoPascal notation. Before, the air pressure was sometimes also expressed in bar; 1 mbar equals 1 hPa.
You may switch between these notations by briefly pressing the button.
4.6 Rain:
If this window is not visible, please first press the button

*7: You can set the desired unit as follows:
- press and hold the button for 2 seconds
- use V/A to select your desired unit
-
briefly press the button
-
amount of rainfall
- indicates how much rain has fallen in in (inches) or in mm (millimetres) (*7)
3+4. this shows the trend of the rainfall over the past 5 days - indicates over which period rainfall is measured (*8)
- illuminates when the max rain alert is set
*8: blank = rainfall of the past hour
(this is updated every 6 minutes and displayed the rainfall of the last 60 minutes.
DAILY = rainfall of today, calculated from midnight. WEEKLY = rainfall from the beginning of the week (Monday)
MONTHLY = rainfall of this month
You can switch between these indications by briefly pressing the 📄button.
4.7 Wind (direction + speed):

*9: AVERAGE = average speed
GUST = wind gust
You can switch between these indications by briefly pressing the button.
*11: STORM = ≥ 88 km/h (≥ 55 mph)
STRONG = 42-87 km/h (26-54 mph)
MODERATE = 14-41 km/h (9-25 mph)
LIGHT = 3-13km/h (2-8mph)
*10: You can set the desired unit as follows:
- press and hold the 🔊button for 2 seconds
- use V/A to select your desired unit
- briefly press the 📋button
4.8 Feels like / Wind chill / Heat index / Dewpoint:
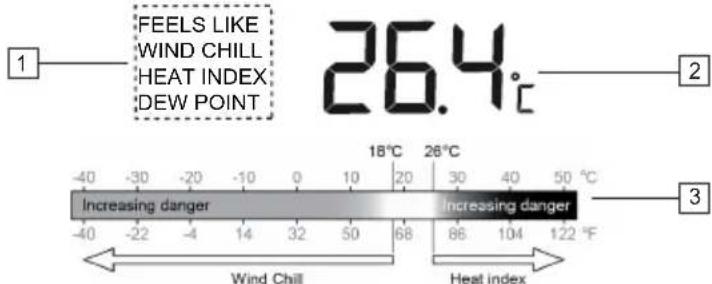
-
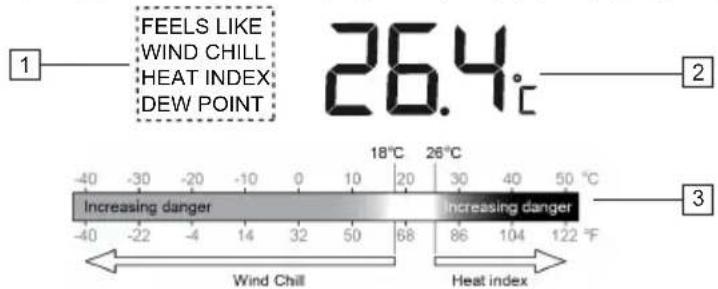
temperature according to the indication shown underneath 1 (*13)
-
effect of Wind chill and Heat index on Feels like temperature
-
indicates whether the displayed temperature is the Feels like, Wind chill, the Heat Index or the Outdoor Dew Point (dew point temperature, outside (*12)
*12:
Feels like: temperature compensated with the wind chill or heat index
Wind chill: combination of the measured temperature and wind speed
Heat index: combination of the measured temperature and air humidity
Dew point temperature, outside: the temperature at which water vapour is converted into water (mist, dew or frost). This temperature depends on the outdoor temperature and the humidity.
You can switch between these indications by briefly pressing the button.
*13: At HEAT INDEX: the alert level is:
< 27°C (display 'LO') no danger
27°C - 32°C (80°F - 90°F) pay attention (risk of exhaustion due to heat)
33°C - 40°C (91°F - 105°F) be careful (risk of dehydration due to heat)
41°C - 54°C (106°F - 129°F) danger (increased risk of exhaustion due to heat)
≥55°C (≥130°F) very dangerous (huge risk of dehydration/stroke)
4.9 Display lighting:
Press the SNOOZE button at the top of the indoor unit to switch on the display lighting. After you release the button, the light will turn off after 5 seconds
5. ALARM CLOCK
5.1 Introduction:
The WS-4700 allows you to program an alarm (wake-up) time.
You may also enable an ice alert for this wake-up function: when the outdoor temperature is below -3°C , the alarm signal will sound 30 minutes before the time you've programmed.
5.2 Alarm time setup:
- press and hold the 🔒 button at the rear of the indoor for 2 seconds until the hour display starts flashing
- use V/A to set the hours, briefly press 🔒 and the minute display starts flashing
- use V/A to set the minutes and briefly press 🔒 to store your alarm time
5.3 Alarm function setup:
-
repeatedly press the 🔒 button to check/enable/disable the alarm
Only "AL" appears: the displayed time is the set alarm time, but the alarm itself is disabled "AL" + "7" appear: the alarm is enabled and the wake-up signal will sound at the set alarm time "AL" + "7" appear: the ice alert is set -
release the 🔒 button; after several seconds the actual time will be displayed again and the alarm status as mentioned above remains visible
5.4 Operation:
- At the set moment of time, the alarm will sound for up to 120 seconds
- Press the 🔒 button to stop the alarm signal beforehand OR press the SNOOZE/LIGHT button on top of the indoor unit to enable the snooze function; the wake-up alarm will sound again after 5 minutes.
- The alarm is repeated daily until you disable it according to the above instructions OR press and hold the SNOOZE/LIGHT buttons for 2 seconds to delay the alarm for 24 hours.
- When you enable the ice alert and outside it's colder than -3°C, the wake-up signal will sound 30 minutes earlier than the alarm time you set. When it's warmer than -3°C outside, the alarm will sound at the set time.
6. HISTORY
6.1 Introduction:
The indoor unit of the WS-4700 automatically saves all measurement data of the past 24 hours, allowing you to check the trend of the last 24 hours at any time
6.2 To view the history:
- press the HISTORY button to show the last saved measurement data in the display, while the upper part of the display shows the time and date of the concerned measurement
- repeatedly press the HISTORY button to scroll the memory
The history memory saves the data of the indoor and outdoor temperature and humidity, air pressure, wind chill, wind speed and rainfall.
6.3 To delete the history:
Press and hold the HISTORY button for 10 seconds to erase all measurement data up until that moment.
7. MAX-MIN ALARM
7.1 Introduction:
For the following measurements you can set an alarm for when a maximum or minimum threshold is exceeded:
Indoor temperature min/max alarm
Indoor humidity min/max alarm
outdoor temperature min/max alarm
outdoor humidity min/max alarm
Rainfall max alarm (only the actual rainfall from 00:00am is considered)
Wind speed max alarm
7.2 To set Hi-Lo limits:
- repeatedly press the ⏻ button until the desired display is flashing with the indication 'HI AL' or 'LO AL' next to it (if applicable)
- use V/A to set the limit
- briefly press the ⏻ button again to save the value
- press the ⏻ button again to select the next display or wait several seconds for the setup mode to end automatically
7.3 Hi-Lo Alarm function setup:
- repeatedly press the ⏻ button until the desired display is flashing with the indication 'HI AL' or 'LO AL' next to it (if applicable)
- briefly press the button to enable or disable the selected alarm
7.4 Operation:
As soon as the set limit is exceeded, an alert tone will sound for up to 2 minutes while the concerned display flashes and the alert indicator underneath the display flashes every 7 seconds. Briefly press the 🔒 button to stop the alert ton. The flashing stops automatically as soon as the concerned measurement returns to within the set limits (or when you adjust the limit or disable the alarm function for the concerned measurement).
8. RELATIVE AIR PRESSURE
8.1 Introduction:
When you're living considerable higher than the mean sea level, you'll be experiencing a lower air pressure. To ensure that the weather forecast is still accurate, you'll need to correct the air pressure according to your where you live.
8.2 Relative air pressure setup:
- refer to the internet or your local authorities for information about your local air pressure
- press and hold the 📋 button for 2 seconds until 'absolute' or 'relative' starts flashing
- use V/A to select 'relative'
- briefly press and the air pressure display starts flashing
- use V/A to correct the display by setting it to the value you've obtained from your local authorities or the internet
- briefly press to save the air pressure
9. PROBLEM SOLVING
| Problems Solutions | |
| No or strange measurements from the rain sensor | Check the drain in the rain meter; it must be opened.Check whether the rain meter sits horizontal.As long as the weather station is searching for the correct time, there is no transmitting from the rain sensor. This can last for about 15 minutes. |
| No or strange measurements from the thermometer and humidity meter. | Check whether the air grooves are open.Check the sensor casing. |
| No or strange measurements of wind speed and wind direction. | Check the weather vane.Check the wind cups of the wind speed meter. |
 and (reception signal lost for 1 minute) and (reception signal lost for 1 minute) | Move the indoor unit closer to the outdoor unit.Make sure that the indoor unit is not placed near other electronic equipment that might cause interference due to wireless transmissions (TV, PC, microwave)When the problem remains, please reset both the indoor and outdoor unit. |
 and (reception signal lost for 1 hour) and (reception signal lost for 1 hour) |
10. MAINTENANCE
10.1 Rain meter:
You can disassemble the rain meter as follows to remove any spiders or other insects:
-
Rotate the upper ring of the rain collector 30° anti-clockwise, making sure that the star sign in the bottom of the funnel is in the "Unlock" position. You can now remove this ring and look at the interior of the rain meter.
-
Use a soft brush with long hairs to clean the rain meter.
- Replace the ring onto the rain meter and rotate it clockwise, making sure that the star sign in the bottom of the funnel is in the "Lock" position.

10.2 Outdoor temperature and humidity sensor:
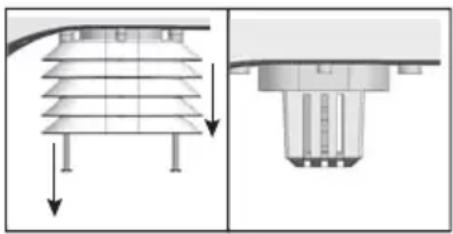
- Remove the wind guides from the outdoor unit according to the illustration.
- Blow into the holder containing the temperature and humidity sensor and use a soft brush with long hairs to clean the wind guides. DO NOT USE WATER.
- Replace and tighten the wind guides.

11. SPECIFICATIONS
Indoor unit:
Dimensions 120 x 190 x 22mm
Weight 370gr (including batteries)
Dimensions 343.5 x 393.5 x 136mm
Weigh 673gr (including batteries)
Power 3x 1,5V AA batteries
Frequency 868MHz
Broadcast every 12 seconds
Indoor temperature:
measuring units: °C, °F
display range: -40°C to 70°C ( -40°F to 158°F ) ('LO' at <-40°C , 'Hi' at >70°C )
functional range: -10°C to 50°C ( 14°F to 122°F )
resolution: 0.1°C or 0.1°F
accuracy: +/-1°C or 2°F at 25°C (77°F)
memory display: history of the past 24 hours, MIN/MAX temperature with time and date
alarm: HI/LO alarm
Outdoor temperature:
measuring units: °C, °F
display range: -40°C to 80°C (-40°F to 176°F) ('LO' at <-40°C, 'Hi' at >80°C)
functional range: -40°C to 60°C ( -40°F to 140°F )
resolution: 0.1°C or 0.1°F
accuracy: +/-0.5°C or 1°F at 25°C (77°F)
memory display: history of the past 24 hours, MIN/MAX temperature with time and date
alarm: HI/LO alarm
Indoor humidity:
display range: 20% to 90% ('LO' at <20%: 'Hi' at >90%) (at temperatures between 0°C and 60°C)
functional range: 20% to 90% relative humidity
resolution: 1%
accuracy: +/-5% at 25°C (77°F)
memory display: history of the past 24 hours, MIN/MAX humidity with time and date
alarm: HI/LO alarm
Outdoor humidity:
display range: 1% to 99% ('LO' at <1%: 'Hi' at >99%)
functional range: 1% to 99% relative humidity
resolution: 1%
accuracy: +/-3% at 25°C (77°F)
memory display: history of the past 24 hours, MIN/MAX humidity with time and date
alarm: HI/LO alarm
Air pressure:
measuring units: hPa, inHg, mmHg
display range: 540 to 1100hPa
resolution: 1hPa, 0.01inHg, 0.1mmHg
accuracy: (540 - 699hPa ± 8hPa @ 0-50°C) / 700 - 1100hPa ± 4hPa @ 0-50°C)
(405 - 524mmHg ± 6mmHg @ 0-50°C) / (525 - 825mmHg ± 3mmHg @ 0-50°C)
(15.95 - 20.66inHg ± 0.24inHg @ 32-122°F) / (20.67 - 32.48inHg ± 0.12inHg @ 32-122°F)
forecasts: sunny, partially cloudy, cloudy, rain, storm, snow
memory display: history of the past 24 hours, MIN/MAX air pressure with time and date
alarm: HI/LO alarm
Wind speed:
measuring units: mph, m/s, km/h, knots
display range: 0\~112mph, 50m/s, 180km/h, 97knots
resolution: 0.5mph or 0.5knot or 0.5m/s
accuracy: < 5m/s: +/- 0.5m/s
5m/s: +/- 6%
display units: average, wind gust
memory display: history of the past 24 hours, MAX wind gust with direction, time and date
alarm: HI alarm (for average and for wind gust)
Wind direction:
number of wind directions: 16
Rainfall:
measuring units: mm, inch
display range: 0-9999mm (0\~393.7inch)
resolution: 0.4 mm (0.0157 in)
accuracy: +/- 7%
display units: actual rainfall, this day, this week, this month
memory display: history of the past 24 hours
alarm: HI alarm
DCF radio controlled clock:
synchronisation automatic or off
display HH:MM:SS/day and date
time format
12hr AM/PM or 24hr
Alecto
Alecto is a brand of Commaxx B.V. Wiebachstraat 37, 6466 NG Kerkrade, The Netherlands

Service / Help ? www.alecto.nl Support.alecto.nl
DÉCLARATION DE CONFORMITÉ
Unité extérieure:
Unité extérieure:


4.7 Vent (direction + vitesse):
*11: STORM = ≥ 88 km/h (≥ 55 mph) STRONG = 42-87 km/h (26-54 mph) MODERATE = 14-41 km/h (9-25 mph) LIGHT = 3-13km/h (2-8mph)
4.8 Feels like / Wind chill / Heat index / Dewpoint:

11. SPECIFICATIONS
Unité intérieure:
dimensions 120 x 190 x 22mm
Alecto is a brand of Commaxx B.V. Wiebachstraat 37, 6466 NG Kerkrade, The Netherlands

Service / Help ? www.alecto.nl Support.alecto.nl
Außeneinheit:


*11: STURM = ≥ 88 km/h (≥ 55 mph)
STARK = 42-87 km/h (26-54 mph)
MÄSSIG = 14-41 km/h (9-25 mph)
LEICHT = 3-13 km/h (2-8 mph)
4.8 Feels like / Wind chill / Heat index / Dewpoint:
Alecto is a brand of Commaxx B.V. Wiebachstraat 37, 6466 NG Kerkrade, The Netherlands

Service / Help ? www.alecto.nl Support.alecto.nl
OVERENSSTEMMELSESERKLÆRING
Udendørsenhed:
11. SPECIFIKATIONER
Indendørsenhed:
Mål 120 x 190 x 22 mm
Alecto is a brand of Commaxx B.V. Wiebachstraat 37, 6466 NG Kerkrade, The Netherlands

Service / Help ? www.alecto.nl Support.alecto.nl
FÖRSÄKRAN OM ÖVERENSSTÄMMELSE
4.8 Feels like / Wind chill / Heat index / Dewpoint:....11
4.9 Displayens belysning:....12
5. VÄCKARKLOCKA
5.1 Inledning:....12
PROGNOS FÖR
MER ÄN
12 TIMMAR

Klart halvklart molnigt regn oväder
(blinkar)
Anmärkningar:
*11: STORM = ≥ 88 km/h (≥ 55 mph)
STRONG = 42–87 km/h (26–54 mph)
MODERATE = 14–41 km/h (9–25 mph)
LIGHT = 3-13km/h (2-8 mph)
4.8 Feels like / Wind chill / Heat index / Dewpoint:

41–54 °C (106–129 °F)
≥55 °C (≥130 °F)
11. SPECIFICATIONER
Inomhusenheten:
Mått 120 x 190 x 22 mm
Alecto is a brand of Commaxx B.V. Wiebachstraat 37, 6466 NG Kerkrade, The Netherlands

Service / Help ? www.alecto.nl Support.alecto.nl
VAATIMUSTENMUKAISUUSVAKUUTUS
11. TEKNISET TIEDOT....14
2. KATSAUS
2.1 Sisäyksikkö:
- SNOOZE / LIGHT-painike:

4.5 Barometri (ilmanpaine):
Pascal), in inHg (inchkwikdruk) of in

*11: STORM = ≥ 88 km/h (≥ 55 mph) STRONG = 42-87 km/h (26-54 mph). MODERATE = 14-41 km/h (9-25 mph). LIGHT = 3-13km/h (2-8mph)
11. TEKNISET TIEDOT
Sisäyksikkö:
Mitat 120 x 190 x 22mm
(15.95 - 20.66inHg ± 0.24inHg @ 32-122oF) / (20.67 - 32.48inHg ± 0.12inHg @ 32-122oF)


- VERKLARING VAN CONFORMITEIT
- 3.2 KOPPELEN BINNEN-UNIT / BUITEN-UNIT
- AUTOMATISCH
- OPMERKINGEN
- 4.8 FEELS LIKE / WIND CHILL / HEAT INDEX / DEWPOINT
- DECLARATION OF CONFORMITY
- ENVIRONMENT
- SYSTEM MALFUNCTION
- WARRANTY
- HOW TO HANDLE
- THE WARRANTY BECOMES NULL AND VOID
- INDEX
- OVERVIEW
- INSTALLATION
- OPERATION
- ALARM CLOCK
- HISTORY
- MAX-MIN ALARM
- RELATIVE AIR PRESSURE
- PROBLEM SOLVING 14
- MAINTENANCE
- 2.1 INDOOR UNIT
- 2.2 OUTDOOR UNIT
- 3.1 POWER SUPPLY
- OUTDOOR UNIT
- 3.2 PAIRING THE INDOOR UNIT/OUTDOOR UNIT
- AUTOMATICALLY
- MANUALLY
- 3.3 POSITIONING: RESET
- INDOOR UNIT
- OUTDOOR UNIT POSITIONING TIPS
- 3.4 CLOCK
- INTRODUCTION
- SWITCHING THE DCF RECEIVER ON/OFF
- 3.5 TO RESET MEASUREMENT DATA
- 4.1 BASIC FUNCTIONS
- 4.2 INDOOR TEMPERATURE AND HUMIDITY
- 4.3 OUTDOOR TEMPERATURE AND AIR HUMIDITY
- 4.4 WEATHER FORECAST
- REMARKS
- 4.5 BAROMETER (AIR PRESSURE)
- 4.6 RAIN
- 4.7 WIND (DIRECTION + SPEED)
- 4.9 DISPLAY LIGHTING
- 5.1 INTRODUCTION
- 5.2 ALARM TIME SETUP
- 5.3 ALARM FUNCTION SETUP
- 5.4 OPERATION
- 6.1 INTRODUCTION
- 6.2 TO VIEW THE HISTORY
- 6.3 TO DELETE THE HISTORY
- 7.1 INTRODUCTION
- 7.2 TO SET HI-LO LIMITS
- 7.3 HI-LO ALARM FUNCTION SETUP
- 7.4 OPERATION
- 8.1 INTRODUCTION
- 8.2 RELATIVE AIR PRESSURE SETUP
- PROBLEM SOLVING
- 10.1 RAIN METER
- 10.2 OUTDOOR TEMPERATURE AND HUMIDITY SENSOR
- SPECIFICATIONS
- OUTDOOR TEMPERATURE
- INDOOR HUMIDITY
- OUTDOOR HUMIDITY
- AIR PRESSURE
- WIND SPEED
- WIND DIRECTION
- RAINFALL
- DCF RADIO CONTROLLED CLOCK
- ALECTO
- DÉCLARATION DE CONFORMITÉ
- 4.7 VENT (DIRECTION + VITESSE)
- UNITÉ INTÉRIEURE
- AUSSENEINHEIT
- OVERENSSTEMMELSESERKLÆRING
- SPECIFIKATIONER
- FÖRSÄKRAN OM ÖVERENSSTÄMMELSE
- VÄCKARKLOCKA
- ANMÄRKNINGAR
- SPECIFICATIONER
- VAATIMUSTENMUKAISUUSVAKUUTUS
- TEKNISET TIEDOT....14
- KATSAUS
- 2.1 SISÄYKSIKKÖ
- 4.5 BAROMETRI (ILMANPAINE)
- TEKNISET TIEDOT
- SISÄYKSIKKÖ
Brand : ALECTO
Model : WS-4700
Category : Weather Station