
WS-1200 - Weather Station ALECTO - Free user manual and instructions
Find the device manual for free WS-1200 ALECTO in PDF.


| Product type | Weather station |
| Brand | Alecto |
| Model | WS-1200 |
| Base station dimensions | 200 x 150 x 50 mm |
| Outdoor sensor dimensions | 150 x 100 x 30 mm |
| Base station weight | 300 g |
| Outdoor sensor weight | 200 g |
| Station power supply | 5V mains adapter (included) |
| Sensor power supply | 2 AA batteries (not included) |
| Main functions | Indoor/outdoor temperature, humidity, barometric pressure, weather forecast, moon phase, clock |
| Display | Backlit LCD |
| Transmission | Wireless 433 MHz |
| Maximum range | 100 meters (open field) |
| Care and cleaning | Clean with a soft, dry cloth. Do not use solvents. |
| Safety | Do not expose to water. Do not open the housing. Keep out of reach of children. |
| Spare parts | Replacement outdoor sensors available. Batteries replaceable. |
| Repairability | User accessible: batteries and mains adapter. For other repairs, contact customer service. |
| General information | 2-year warranty. Made in China. |
Frequently Asked Questions - WS-1200 ALECTO
User questions about WS-1200 ALECTO
0 question about this device. Answer the ones you know or ask your own.
Ask a new question about this device
Download the instructions for your Weather Station in PDF format for free! Find your manual WS-1200 - ALECTO and take your electronic device back in hand. On this page are published all the documents necessary for the use of your device. WS-1200 by ALECTO.
USER MANUAL WS-1200 ALECTO
Thermometer with clock and wireless rain unit with temperature sensor

natural_image
Pure technical line drawing of a mechanical bracket or frame structure without any text, numbers, or symbolsnatural_image
Line drawing of a hand holding a rectangular device with a curved handle, showing a vertical double-headed arrow (no text or symbols)natural_image
Two technical diagrams showing internal components with arrows indicating movement, no text or symbols present.natural_image
Pure technical line drawing of a rectangular frame with a vertical centerline and circular label (13) at the bottom, no text or symbols present.natural_image
Line drawing of a hand holding a rectangular device with a double-headed arrow indicating compression or disassembly (no text or symbols)natural_image
Two technical diagrams showing internal components with arrows indicating direction, no text or symbols present.natural_image
Pure technical line drawing of a rectangular frame with a vertical line and circular marker labeled 13 (no text or symbols beyond the number)natural_image
Line drawing of a hand holding a rectangular device with a curved handle, showing a double-headed arrow indicating compression or disassembly (no text or symbols present)natural_image
Diagram of a device's internal structure showing two views of an open panel with arrows indicating direction (no text or symbols present)- DCF reception icon
- time and date
- indoor temperature
- outdoor temperature
- rain unit reception icon
-
amount of rain
-
alarm clock icon
- temperature display in °C or °F
- temperature display in °C or °F
- low battery indication
- No function
12.rainfall display (mm or inch)

natural_image
Pure technical line drawing of a mechanical bracket or frame structure without any text, numbers, or symbols- rain meter with integrated thermometer + DCF receiver module
INSTALLATION
The rain unit can be installed outdoors on a horizontal or vertical object such as the top of a wall, a beam or shelf, or against a wall.
The rain collector must be placed steady enough to be able to withstand and wind influences.
We recommend you to register the rain unit on the indoor unit before installing the outdoor unit on a suitable spot. The rain unit will measure the outdoor temperature and humidity. Since the temperature sensor is placed inside the plastic box, the displayed temperature can be higher than the actual temperature when exposing the box to direct sunlight Rain unit batteries installation:
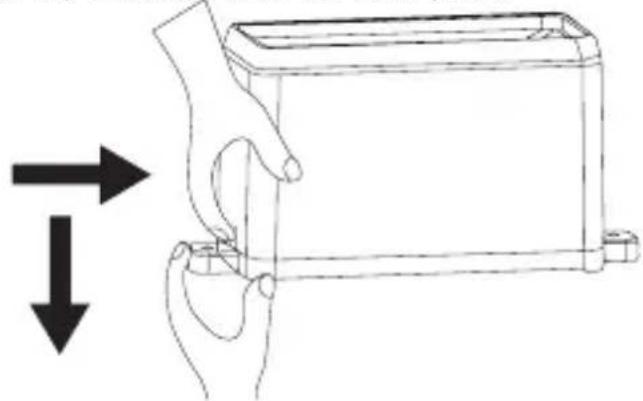
Remove the top container from the base plate.
natural_image
Line drawing of a hand holding a rectangular device with a curved handle, showing a double-headed arrow indicating compression or disassembly (no text or symbols present)When the cover is removed you can remove the battery cover.
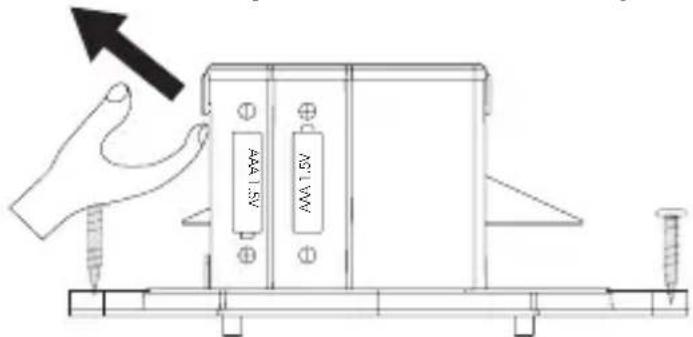
Insert 2 x AAA 1.5V Alkaline batteries into the battery compartment, paying attention to the correct polarity.
Now replace the battery cover.
Because the rain unit and indoor unit operate with a unique code, after installing the batteries into the outdoor unit, the indoor unit should be powered as soon as possible. After this installation, the code will be synchronized within the first 10 minutes.
For the first 70 seconds, the indoor unit will be searching for the DCF clock signal from Frankfurt to set the correct time.
The indoor unit is provided with a built-in DCF receiver. Through this receiver the DCF clock signal from Frankfurt is received. This signal ensures that the clock will display the precise current time, provided the signal is being received properly. The DCF receiver is build into the indoor unit. Each day, the DCF time is synchronized with the signal from Frankfurt at 2am, 8am,
2pm and 8pm. When the reception succeeds, the icon will appear.
It can take up to several hours before the time signal is received. When the reception fails, you can try rotating the indoor unit until it does receive the DCF signal.
Indoor unit:
Insert 2 Alkaline batteries type AA 1.5 Volt into the battery compartment of the indoor unit according to the correct polarity. After the batteries are installed, the indoor unit will emit a short beep tone.
After installing the batteries, the indoor unit will try to make contact with the rain unit for the synchronization. When this succeeds, the indoor temperature and the amount of rain (usually 0) will be displayed. During the
reception the “” icon will appear.
During the first 10 minutes, please don't press any buttons otherwise the synchronization might fail.
If the outdoor temperature doesn't appear after 10 minutes, please repeat the registration procedure.
If the DCF time doesn't appear quick enough, you can set the time manually (see "setup").
ATTENTION: during the registration process, please don't press any buttons.
DISPLAY
General:
The actual temperature will only be shown after both the indoor and outdoor units have been switched on for several hours while not being moved
INDOOR UNIT SETUP
Time and date:
The WS-1200 is provided with a built-in DCF receiver, used for receiving the DCF time signal from Frankfurt.
You can also set the time manually. As soon as the DCF time is being received, the indoor unit will automatically overwrite the time you've set manually.
- Press and hold the "SET" button for 3 seconds until the language option starts flashing. If you're in a different time zone than the DCF clock signal, you can use this option to change the time zone. For example, if you're 1 hour ahead of the DCVF time, you can set the time zone to +1.
- Press the “+” or “-” button to adjust the time zone.
- Press the "SET" button to continue to the next setting.
• 24 hours or 12 hours time format. - Press the “+” or “-” button to switch between 24 hours or 12 hours format.
- Press the "SET" button to the hours.
- Press the “+” or “-” button to set the correct hours.
- Press the "SET" button to set the minutes.
- Press the "+" or "-" button to correct minutes.
- Press the "SET" button to set the year.
- Press the “+” or “-” button to set the correct year.
- Press the "SET" button to set the month-date or date-month format.
- Press the “+” or “-” button to set the format.
- Press the "SET" button to month.
- Press the "+" or "-" button to set the correct month.
- Press the "SET" button to set the date.
- Press the "+" or "-" button to set the correct date.
- Press the “+” or “-” button to correct minutes.
- Press the "SET" button to set the temperature display to ircC or ircF .
- Press the “+” or “-” button to switch between °C and °F.
- Press the "SET" button to set the rain format mm or inch.
- Press the "+" or "-" button to select, mm or inch.
- Press the "SET" button or don't press any button for 10 seconds to exit the programming mode.
You can also press and hold the “+” or “-” button for over 3 seconds to adjust the values quicker.
Amount of rainfall:
The display of your weather station indicates the amount of rainfall, which can be set to per mm of per inch (see indoor unit setup). Most English speaking areas use the inch value.
The amount of rainfall can be displayed per time unit; 1 hour, 24 hours, week, month or everything in total.
- Press the "RAIN" button to switch between the above mentioned time units.
To reset a value, first select the desired value.
- now press and hold the "RAIN" rain button for at least 2 seconds until the value is deleted.
To delete all rainfall values, select "TOTAL" and delete the data.
- now press and hold the "RAIN" rain button for at least 2 seconds until the value is deleted.
Display of the minimum and maximum values:
For the temperature value, the measured minimum or maximum value can be displayed.
For the amount of rainfall, the maximum value per time unit hour and day can be displayed.
- Press the "MIN/MAX" button to display the highest indoor temperature pressure measurement.
- Press the "MIN/MAX" button again to display the lowest indoor temperature measurement.
- Press the "MIN/MAX" button to display the highest outdoor temperature pressure measurement.
- Press the "MIN/MAX" button again to display the lowest outdoor temperature measurement.
- Press the "MIN/MAX" button again to display the maximum rainfall in an hour.
- Press the "MIN/MAX" button again to display the maximum rainfall in a day.
- Press the "MIN/MAX" button again or press no buttons for 10 seconds to exit the max/min display mode.
Deleting minimum and maximum values:
Use the "MIN/MAX" button to go to the data you'd like to delete.
Now press and hold the "MIN/MAX" button for at least 2 seconds until the value changes into the actual value. The minimum and maximum registration of the concerned value will now be reset.
Setting the alarm clock.
The WS-1200 is provided with an alarm clock, after setup you can activate one wake-up time. As soon as the set time is reached, the alarm will sound.
- Press and hold the "ALARM" button for at least 3 seconds until the hours of the alarm time start flashing.
- Press the “+” or “-” button to set the correct hours.
- Press the "ALARM" button to set the minutes.
- Press the “+” or “-” button to set the correct minutes.
- Press the "ALARM" button or wait for 10 seconds to leave the programming mode.
The alarm active “ ” icon will now appear.
This function will be activated immediately while setting the alarm.
Press the "Alarm" button to deactivate the alarm.
Press the "Alarm" button to activate the alarm.
When the alarm time is reached, a beep signal of 1 beep tone will sound for the first 30 seconds. For the next 30 seconds a beep signal of 2 beep tones will be emitted. For the next 30 seconds 3 beep tones and for the last 30 seconds continuous beep tons. After these 2 minutes, the alarm signal will stop en the alarm clock is reset to the next alarm time in 24 hours.
Press a random button to stop the alarm signal beforehand.
POSITIONING TIPS
- Never place the indoor unit in direct sunlight and keep it away from heat generating objects (lights, heaters, etc.)
- For a strong reception of the radio controlled time signals, never place the rain unit next to large metal surfaces or devices with strong electromagnetic fields.
- The effective range between the rain unit and indoor unit can vary depending on local circumstances. Please check whether the connection between the rain unit remains established before fixing the rain unit in a permanent spot.
- The range between the indoor and rain unit may not be over 50 meters
SPECIFICATIONS
Indoor unit:
indoor temperature measurement range:
-9,9°C \~ +80°C - resolution: 0.1°C
alarm time:
maximum 120 seconds
Rain unit:
range in open area:
maximum 100 meters
transmitting frequency:
433,9MHz ±250KHz
Maximum Power:
<-14.95 dBm
outdoor temperature measurement range:
-40ircC +65ircC
resolution: 0.1°C
rainfall volume:
0 - 19.999mm
rain unit measurement interval:
48 seconds
water-proof rating:
IPX3
power usage:
15mA (while transmitting), 10μA (standby)
Power supply:
indoor unit
2x 1,5V LR6 battery, type AA, alkaline
rain unit
2 x 1.5V LR03 batteries, size AAA, alkaline
battery use:
Minimum 12 months for indoor unit and rain unit
DECLARATION OF CONFORMITY
This equipment complies with the essential requirements and provisions as described in the European Directive 2014/53/EU.
The declaration of conformity is available at:
http://DOC.hesdo.com/WS-1200-DOC.pdf
Frequency: 433,9MHz
Maximum Power: < -14.95 dBm
RESET/SYSTEM ERROR
If you've lost the overview of the settings or the WS-1200 appears to be malfunctioning, we recommend you to reset the indoor and rain units.
- Remove the batteries from the indoor and rain unit. Wait at least 10 seconds and then replace the batteries or replace them with new batteries (see "INSTALLATION"). If the fault persists, please contact the Alecto customer service via phone number +31 (0) 73 6411 355
MAINTENANCE
Clean the indoor unit with a slightly moist cloth on a regular basis.
Clean the exterior of the rain meter with a slightly moist cloth. Make sure that all of the holes on the outside (top and bottom) are properly opened. Make sure that the surface of the rain collector is clean. Open the rain unit by pressing the cover at the side and then pulling it up.

natural_image
Two technical diagrams showing internal components of an electronic device, one with arrows indicating direction and the other with a folded paper or cover (no text or symbols present)Clean the interior of the rain meter to remove deposits, dirt and insects. Make sure the shaft of the teeter-totter is clean and check whether the teeter-totter can move freely. After cleaning, replace the cover onto the rain meter.
WARRANTY
Name:
Address:
Post code:
City:
Telephone:
Attach here your
receipt or voucher
For the Alecto WS-1200 you have a warranty of 24 months from the date of purchase. During this period, we guarantee the free repair of defects caused by material and workmanship errors. All this subjected to the final assessment of the importer.
HOW TO HANDLE:
If you notice any defect, first refer to the user's manual or Alecto website. If you can't find a decisive answer here, please contact your dealer with a clear complaint description. The dealer will then accept the product with this proof of warranty and the dated proof of purchase and ensure a speedy repair or otherwise send it post paid to the importer.
THE WARRANTY BECOMES NULL AND VOID:
In case of improper use, incorrect connections, leaking and/or incorrectly installed batteries, use of unoriginal parts or accessories, negligence and in case of defects caused by moisture, fire, flooding, lightning and natural disasters. In case of unauthorised modifications and/or repairs performed by third parties. In case of incorrect transportation of the device without adequate packaging and when the device is not accompanied by this warranty card and proof of purchase.
All further liability, especially concerning any consequential damages, is excluded

ServiceHelp




WWW.ALECTO.NL SERVICE@ALECTO.NL


- INSTALLATION
- Indoor unit:
- DISPLAY
- General:
- INDOOR UNIT SETUP
- Time and date:
- Amount of rainfall:
- Display of the minimum and maximum values:
- Deleting minimum and maximum values:
- Setting the alarm clock.
- POSITIONING TIPS
- SPECIFICATIONS
- Rain unit:
- Power supply:
- DECLARATION OF CONFORMITY
- RESET/SYSTEM ERROR
- MAINTENANCE
- WARRANTY
- HOW TO HANDLE:
- THE WARRANTY BECOMES NULL AND VOID:
Brand : ALECTO
Model : WS-1200
Category : Weather Station