MG2500TJW - Choppers GORENJE - Free user manual and instructions

Find the device manual for free MG2500TJW GORENJE in PDF.

GORENJE MG2500TJW - Choppers
📄 39 pages English EN Download 💬 AI Question 10 questions ⚙️ Specs
Notice GORENJE MG2500TJW - page 13
Pick your language and provide your email: we'll send you a specifically translated version.
Type Meat grinder
Brand Gorenje
Model MG2500TJW
Power 1500 W (estimated)
Color White
Weight 5.5 kg (estimated)
Dimensions (W x D x H) 30 x 20 x 30 cm (estimated)
Cutting blade material Stainless steel
Housing material Plastic
Functions Meat mincing, sausage filling
Safety features Overload protection, non-slip feet
Cleaning Removable parts dishwasher safe
Accessories included Cutting plates (fine, medium, coarse), pusher, sausage funnel
Warranty 2 years
Noise level Approx. 80 dB (A)

Frequently Asked Questions - MG2500TJW GORENJE

How do I assemble the meat grinder?
Insert the auger into the housing, attach the cutting blade and desired plate, then screw on the locking ring. Make sure all parts are aligned correctly.
Can I grind bones?
No, this appliance is only for boneless meat. Grinding bones can damage the blade and motor.
What is the maximum grinding capacity?
The device can grind up to approximately 2 kg per minute, depending on meat type and plate size.
How do I clean the meat grinder?
Disassemble all parts and rinse immediately under warm water. Use a brush for the cutting blade. All removable parts are dishwasher safe.
Does it have a reverse function?
Yes, the reverse button helps clear any jams by reversing the auger direction.
Can I use it for vegetables?
It is designed for meat. Using it for hard vegetables may dull the blade, but soft vegetables like tomatoes can be processed.
What is the power cord length?
The power cord is approximately 1 meter long.
How do I store the accessories?
Store cutting plates and blades in a dry place. The pusher can be stored in the feeding tube.
What should I do if the motor stops during operation?
This is likely due to overload. Let the motor cool for 10 minutes, then press the reverse button to clear the jam.
Is the appliance suitable for commercial use?
No, it is designed for household use only. Continuous commercial use may cause overheating.

User questions about MG2500TJW GORENJE

0 question about this device. Answer the ones you know or ask your own.

Ask a new question about this device

Your email remains private: it is only used to notify you if someone answers your question.

No questions yet. Be the first to ask one.

Download the instructions for your Choppers in PDF format for free! Find your manual MG2500TJW - GORENJE and take your electronic device back in hand. On this page are published all the documents necessary for the use of your device. MG2500TJW by GORENJE.

USER MANUAL MG2500TJW GORENJE

MG2500TJW

Important

3D rendering of a stainless steel kitchen tool with a downward arrow indicating compression (no text or symbols)

3D rendering of a kitchen grater with a handle and control panel, no visible text or symbols

3D rendering of a manual kitchen tool with a handle and base, showing no text or symbols.

Preparing sausages - tips and warnings

Always grind the meat first.

Illustration of a stainless steel meat processing machine with a downward arrow indicating compression (no text or symbols present)

Illustration of a manual cutting tool next to a mounted machine (no text or symbols visible)

Illustration of a manual kitchen tool with a downward arrow indicating compression (no text or symbols present)

Vegetable cutter

Three mechanical components with no visible text or symbols, labeled '1.' (no text or symbols on parts)

3D rendered image of a mechanical device with a pipe fitting and directional arrow (no text or symbols)

Illustration of a stainless steel kitchen tool with a pipe fitting and label (no text or symbols on the device itself)

Preparing cookies - tips and warnings
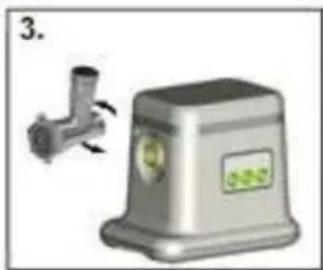
Illustration of a mechanical device with a pipe fitting and a green label (no text or symbols on the device itself)

3D rendering of a manual kitchen tool with a downward arrow indicating compression.

3D rendering of a mechanical feeder or processing unit.

3D rendered image of a mechanical device with a lever and base.

Note:

Exploded view of a medical or laboratory device with internal components.

ENVIRONMENT

Important

Illustration of a manual kitchen tool interacting with a mounted device.

Illustration of a manual kitchen tool with a downward arrow indicating compression.

Exploded view diagram of a mechanical assembly showing components like a bolt, valve, and T-junction.

Illustration of a manual kitchen tool with a downward arrow indicating compression.

Illustration of a manual hand mixer device with rotating ports and control panel.

3D rendering of a manual kitchen grater with a downward arrow indicating force.

Vegetable cutter

Two mechanical components with arrows indicating movement or assembly.

3D rendered image of a mechanical device with a pipe fitting and a label (no readable text or symbols)

Illustration of a stainless steel industrial machine with a pipe fitting (no text or symbols visible)

3D rendering of a manual kitchen tool with a label pointing to the handle (no text or symbols on the device itself)

Preparing tomatoes

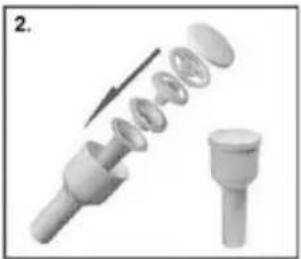
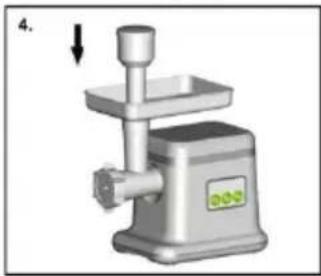
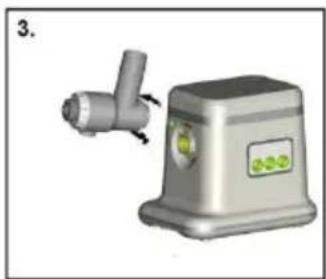
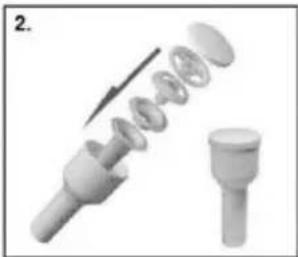
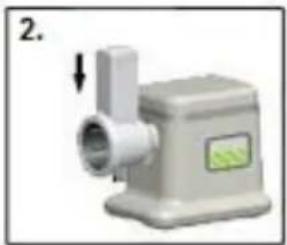
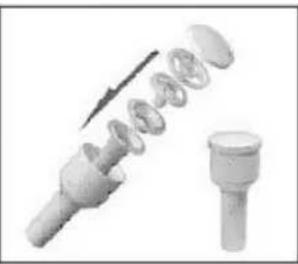
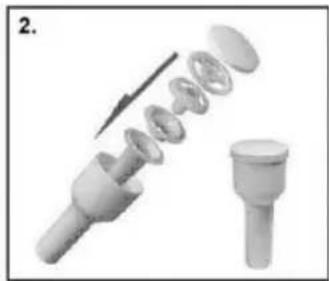
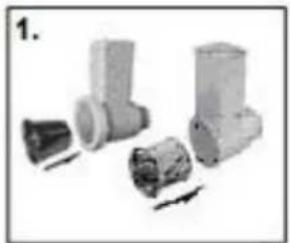
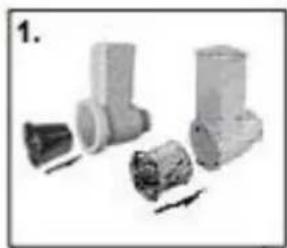
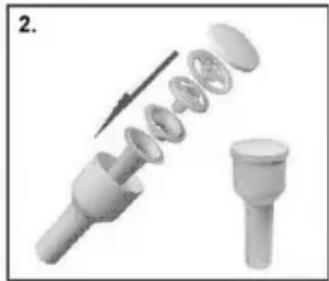
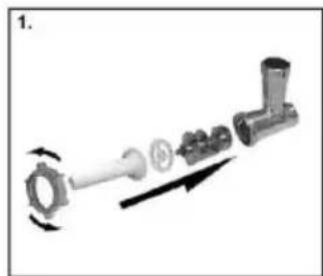
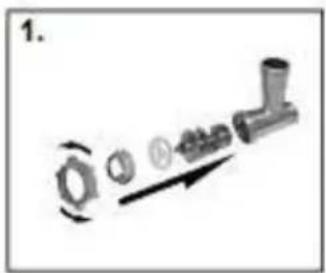
  1. Insert the spiral shaft, with the plastic part facing forward, into the cutter housing. Then insert the cone into the cutter housing, followed by the model, and screw the threaded ring onto the housing.
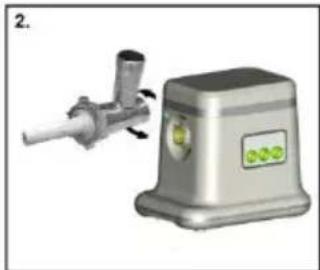
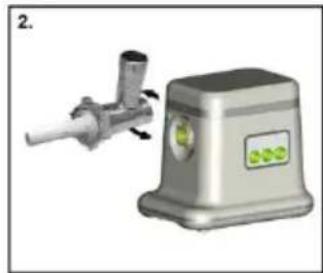
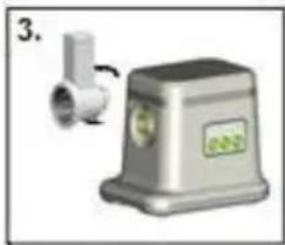
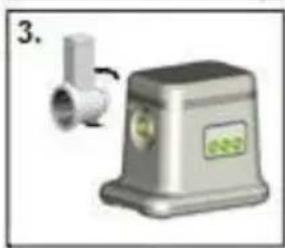
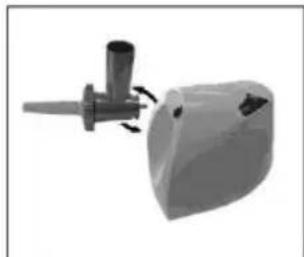
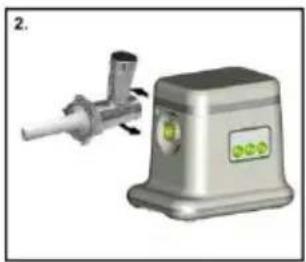
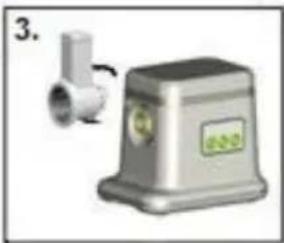
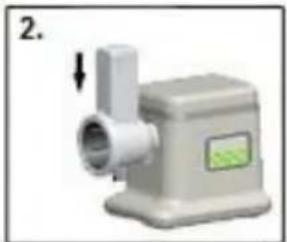
  2. Attach the cutter housing to the drive unit.
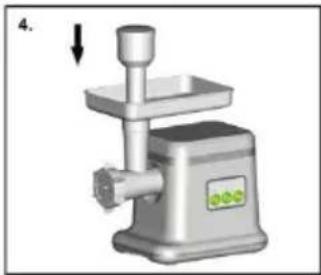
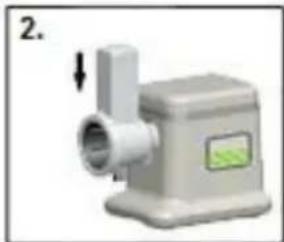
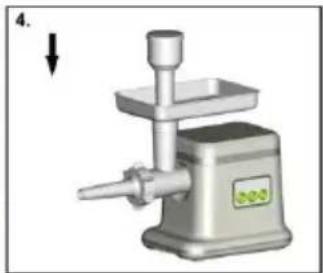
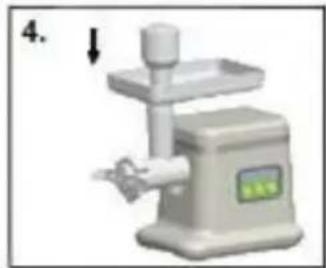
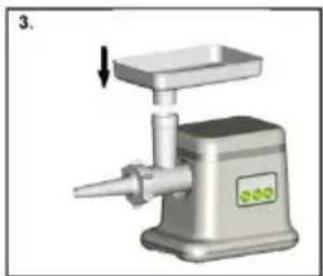
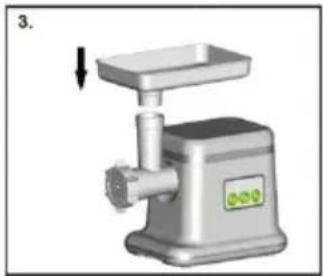
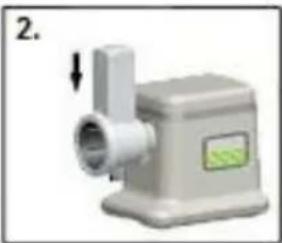
  3. Place the tray on the vertical part of the cutter housing.
  4. The appliance is now ready for preparing tomato puree.

Mechanical assembly diagram showing a pipe fitting with a valve and three separate components, no text or symbols present.

3D rendering of a mechanical device with a cylindrical top and base, labeled '2.' (no text or symbols on the device itself)

3D rendered image of a stainless steel kitchen knife with a button labeled '3' (no text or symbols on the device itself)

Note:

Mechanical assembly diagram showing a cylindrical component with internal components and an arrow indicating motion (no text or symbols)

Environment

The symbol on the product or its packaging indicates that this product must not be treated as household waste. Instead, it should be handed over to an appropriate collection point for the recycling of electrical and electronic equipment. By ensuring this product is disposed of correctly, you will help prevent potential negative consequences for the environment and human health, which could otherwise be caused by inappropriate waste handling of this product. For more detailed information about recycling this product, please contact your local city office, your household waste disposal service, or the shop where you purchased the product.

Warranty and Service

For information or in case of problems, contact the Gorenja Customer Care Center in your country (the telephone number can be found in the international warranty list). If there is no such center in your country, contact your local Gorenja dealer or the Gorenja small household appliances department.

Not for professional use!

GORENJE

WISHES YOU A LOT OF SATISFACTION WITH YOUR APPLIANCE!

Important

Before use, carefully read these instructions and keep them for future reference.

Illustration of a manual kitchen tool interacting with a mounted device (no text or symbols visible)

3D rendering of a manual kitchen tool with handle and base (no text or symbols visible)

Illustration of a manual kitchen tool with a downward arrow indicating compression (no text or symbols present)

Illustration of a manual cutting tool next to a mounted machine (no text or symbols visible).

Illustration of a mechanical tool with a labeled component and directional arrow (no text or symbols on the device itself).

Vegetable cutter

Two mechanical components with arrows indicating assembly or movement, no visible text or symbols.

Illustration of a mechanical device with a directional arrow and label (no readable text or symbols).

Illustration of a stainless steel kitchen tool with a pipe fitting (no text or symbols visible).

Making cookies - tips and warnings

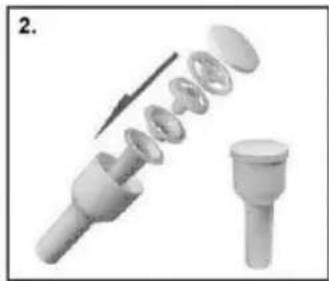
Cut the dough into strips about 3 cm wide. Make sure that the groove of the cookie separator fits into the protruding part on the cutter housing.

Illustration of a manual kitchen tool with a handle and base, no text or symbols present.

Illustration of a stainless steel cutting machine with a handle and green label (no text or symbols on the device itself).

3D rendering of a manual kitchen tool with a handle and control panel (no text or symbols visible).

Preparing tomatoes

  1. Insert the auger shaft, with the plastic part facing forward, into the cutter housing. Then insert the cone into the cutter housing, followed by the model, and screw the threaded ring onto the housing.
  2. Attach the cutter housing to the drive unit.
  3. Place the tray on the vertical part of the cutter housing.
  4. The device is now ready for preparing tomato puree.

Diagram showing a mechanical assembly with multiple components and directional arrows (no text or labels).

3D rendering of a manual kitchen feeder with a cylindrical top and base (no text or symbols visible).

3D rendering of a kitchen grater with a handle and control panel (no text or symbols visible).

Note:

Mechanical assembly diagram showing a cylindrical component with internal components and a separate cylindrical part (no text or symbols).

Environmental protection

The symbol on the product or its packaging indicates that this product must not be treated as household waste. Instead, it should be handed over to the appropriate collection centers for the recycling of electronic and electrical appliances. By disposing of this product correctly, you will prevent potential negative consequences for the environment and human health, which could otherwise be caused by inappropriate handling of this product's waste. For detailed information on treatment, disposal, and recycling of this product, please contact your local authorities, the household waste collection service, or the store where you purchased this product.

GORENJE MG2500TJW - Environmental protection - 1

Warranty and service

For information or in case of problems, contact the Gorenja Customer Care Center in your country (the telephone number can be found in the international warranty document). If there is no such center in your country, contact your local Gorenje dealer or the Gorenje small household appliances department.

Not for commercial use!
Exploded view diagram of a kitchen appliance with numbered parts for identification.

Important

Read these instructions for use carefully before using the appliance and save them for future reference.

  • Noise level: Lc <85 dB(A)
  • This appliance is not intended for use by persons (including children) with reduced physical, sensory or mental capabilities, or lack of experience and knowledge, unless they have been given supervision or instruction concerning use of the appliance by a person responsible for their safety. Children should be supervised to ensure that they do not play with the appliance.
  • Check if the voltage indicated on the appliance corresponds to the local mains voltage before you connect the appliance.
  • In order to avoid a hazardous situation, this appliance must never be connected to a timer switch.
  • Do not use the appliance if the mains cord, the plug or other parts are damaged.
  • If the mains cord is damaged, it must be replaced by Gorenje, a service centre authorized by Gorenje or similarly qualified persons in order to avoid a hazard.
  • Keep the appliance out of the reach of children.
  • Never let the appliance run unattended.
  • Never exceed the maximum operating time of 10 minutes at all applications.
  • Always switch the appliance off by pressing the on/off button.
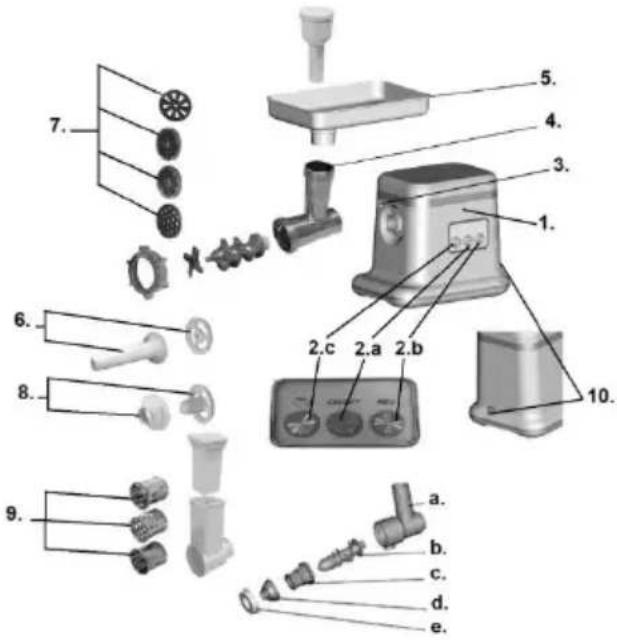
  • Motor unit 2.a On button 2.b Reverse 2.c High&low speed button
  • Release button
  • Cutter housing
  • Feeding tray
  • Sausage horn
  • Grinding disc
  • Separator
  • Cutters
  • Safety switch On/off

a. Cutter housing B b. Worm shaft B c. Cone B d. Shaper B e. Screw ring B

  • Switch the appliance off and unplug it before detaching any accessory.
  • Never immerse the motor unit in water or any other liquid, nor rinse it under the tap.
  • Never use your fingers or an object (e.g. a spatula) to push ingredients into the cutter housing while the appliance is running. Only the pusher is to be used for this purpose.
  • Be very careful when handling the cutter unit, especially when removing it from the worm shaft and during cleaning. The cutting edges are very sharp!
  • Never use any accessories or parts from other manufacturers or that have not been specifically advised by Gorenje, d.d.. Your guarantee will become invalid if such accessories or parts have been used.
  • Thoroughly clean the parts that will come into contact with food before you use the appliance for the first time.
  • Do not clean the metal parts in the dishwasher, as dishwasher detergents will cause these parts to darken or oxidize. See the Cleaning section for instructions on how to clean the various parts.
  • This appliance is meant for household use only.
  • Never connect this appliance to an external timer switch or remote control system in order to avoid a hazardous situation.

This appliance is marked according to the European directive 2002/96/EC on Waste Electrical and Electronic Equipment (WEEE).

This guideline is the frame of a European-wide validity of return and recycling on Waste Electrical and Electronic Equipment.

Safety system

This appliance is equipped with a non-resettable, current-sensitive glass fuse that cuts off the power supply in case of motor failure to prevent overheating of the appliance.

This system will automatically cut off the power supply to the appliance in case of overheating. If your appliance suddenly stops running:

  1. Pull the mains plug out of the socket.
  2. Let the appliance cool down for 60 minutes.
  3. Put the mains plug in the socket.
  4. Press the switch button to turn off the appliance.
  5. Press the circuit breaker button at the bottom of the appliance to turn on the appliance.

Please contact your dealer or an authorized service center if the thermostat system is activated too often.

Mincing meat - tips and warnings

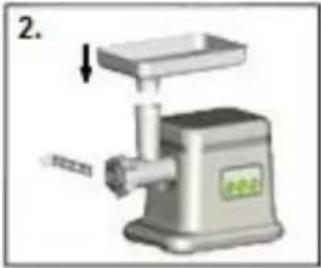
  • Make sure the cutting edges of the cutter unit are pointing outwards.
  • Make sure the notch of the grinding disc fits onto the projection of the cutter housing. • Never use frozen meat!
  • Do not overload the appliance during use by pushing too much meat into the cutter housing.
  • Cut the meat into 10cm-long, 2cm-thick strips.
  • Remove bones, gristles and sinews as much as possible.
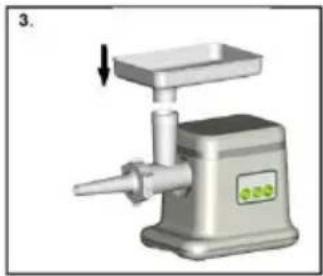
  • Put the prepared meat on the feeding tray.
  • Press the on/off button to switch the appliance on.
  • Use the pusher to gently push the meat into the cutter housing.
  • For steak tartare, mince the meat with the medium grinding disc twice.

GORENJE MG2500TJW - Mincing meat - tips and warnings - 1

Making sausages - tips and warnings

Always mince the meat first.

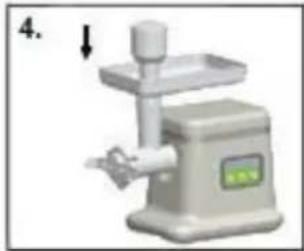
  • Let the sausage skin soak in lukewarm water for 10 minutes. Then slide the wet skin onto the sausage horn. Do not block the air outlet grooves of the horn.
  • Put the minced meat on the feeding tray. Press the ON/OFF button to switch the appliance on.
  • If the skin gets stuck on the sausage horn, wet it with some water.
Exploded view diagram of a mechanical assembly showing components like a bolt, valve, and shaft (no text or labels)

Illustration of a manual kitchen tool with a downward arrow indicating compression (no text or symbols present)

Illustration of a manual hand mixer device with control panel and directional arrows (no text or symbols)

Illustration of a manual kitchen tool with a downward arrow indicating compression (no text or symbols present)

Slicer for vegetables

Three mechanical components with arrows indicating assembly or movement (no visible text or symbols)

3D rendering of a mechanical device with a pipe fitting and a label (no readable text or symbols)

Illustration of a stainless steel industrial machine with a pipe fitting (no visible text or symbols)

Making cookies - tips and warnings

Cut the dough into approx. 3cm-wide strips. Make sure the notch of the cookie separator fits onto the projection of the cutter housing.

Place one strip of dough on the feeding tray.

Press the on/off button to switch the appliance on.

Push the dough gently into the cutter housing with the pusher.

Guide the dough sausage coming out of the appliance onto a baking plate. Then cut the sausage into slices or strips and distribute them over the baking plate.
Mechanical assembly diagram showing a bolt and pipe connection with directional arrows (no text or labels)

Illustration of a manual kitchen tool with a downward arrow indicating compression or lifting (no text or symbols present)

Illustration of a stainless steel manual pump with a valve and label (no text or symbols on the pump itself)

3D rendering of a manual kitchen tool with a downward arrow indicating compression (no text or symbols)

Making Tomato

  1. Insert the worm shaft into the cutter housing, plastic end first. Place the cone in the cutter housing. Place the former on the cutter housing and screw the ring onto the cutter housing.
  2. Attach the cutter housing to the motor unit.
  3. Place the tray on the upright part of the cutter housing.
  4. Now the appliance is ready for making tomato mush.

Diagram showing a mechanical assembly with multiple components and an arrow indicating motion (no text or symbols)

3D rendering of a mechanical feeder or processing unit with no visible text or symbols

3D rendered image of a kitchen tool with a handle and base (no text or symbols visible)

Note:

The tomato juice accessory cannot be used for extracting tomato quantities larger than 3 kg without cleaning it at least once, due to tomato peelings and dregs blocking the mesh filter (c) and hindering the flow of juice through the filter.

Please note: when using large quantities of tomato, disassemble the tomato juice accessory, clean it, and then continue with further use.

Cleaning - tips and warnings

- Remove any meat left in the cutter housing by passing pieces of bread through it.

- Always switch off and unplug the appliance before removing accessories or cleaning the motor unit.

- Remove the pusher and the feeding tray.

- Unscrew the screw ring and remove the grinding disc, the cutter unit and the worm shaft.

- Remove the cutter housing by pressing the release button and by turning the cutter housing to the right (see the Disassembly section,

- The cutter unit and grinding discs should be lightly brushed with fat or oil to prevent rusting.

- Do not clean the metal parts in the dishwasher, as dishwasher detergents will cause these parts to darken or oxidize.

Back view of a rectangular electronic device with internal components and mounting holes (no text or symbols visible)

Exploded view of a mechanical component with multiple cylindrical parts and a separate cylindrical part.

Environment

Do not throw away the appliance with the normal household waste at the end of its life, but hand it in at an official collection point for recycling. By doing this, you help to preserve the environment.

Guarantee & service

If you need information or if you have a problem, please contact the Gorenje Customer Care Centre in your country (you find its phone number in the worldwide guarantee leaflet). If there is no Customer Care Centre in your country, go to your local Gorenje dealer or contact the Service department of Gorenje domestic appliances.

For personal use only!

GORENJE WISHES YOU A LOT OF PLEASURE WHEN USING YOUR APPLIANCE

We reserve the right to any modifications!

INSTRUKCJA OBSŁUGI

PL

Exploded view diagram of a kitchen appliance with numbered parts for identification.

Ważne

3D rendering of a kitchen tool next to a mounted motor.

3D rendering of a manual kitchen tool with a downward arrow indicating compression.

Illustration of a manual meat processing machine with a downward arrow indicating compression.

Illustration of a manual cutting tool next to a mounted machine.

Illustration of a manual kitchen tool with a labeled component and directional arrow.

3D rendered image of a mechanical device with a pipe fitting and directional arrow.

Illustration of a stainless steel industrial machine with a pipe fitting and a green label.

Illustration of a manual kitchen tool with a downward arrow indicating compression or lifting.

Illustration of a mechanical device with a pipe fitting and a base unit.

3D rendering of a manual kitchen tool with a label and arrow indicator (no readable text or symbols)

3D rendering of a manual kitchen feeder with a cylindrical top and base (no text or symbols visible)

3D rendered image of a kitchen grater with a handle and control panel (no text or symbols visible)

Note:

Exploded view of a mechanical component with multiple cylindrical parts and a separate cylindrical part (no text or symbols visible)

Environment

Important

Illustration of a manual kitchen tool next to a mounted electric oven (no text or symbols visible)

3D rendering of a stainless steel manual laboring machine with a downward arrow indicating compression (no text or symbols)

Illustration of a manual kitchen tool with a downward arrow indicating compression (no text or symbols present)

3D rendering of a manual kitchen tool with a lever and control panel (no text or symbols visible)

Illustration of a manual kitchen tool with a downward arrow indicating compression (no text or symbols present)

3D rendered image of a mechanical device with a pipe fitting and a label (no readable text or symbols).

Illustration of a stainless steel kitchen grater with a pipe fitting and a digital display (no text or symbols).

Illustration of a stainless steel industrial machine with a pipe fitting and a green label (no text or symbols on the device itself).

3D rendering of a mechanical device with a downward arrow indicating force or movement (no text or symbols visible).

3D rendering of a mechanical feeder or processing unit with a cylindrical top and base, no visible text or symbols.

3D rendered image of a kitchen grater with a handle and control panel (no text or symbols visible).

Note:

Exploded view of a mechanical component showing internal parts (no text or symbols).

Environment

Important

Mechanical component diagram showing a cylindrical shaft connected to a rectangular housing with directional arrows (no text or symbols).

Mechanical device with a cylindrical component and an arrow indicating downward motion (no text or symbols).

Mechanical component with a cylindrical shaft and a downward arrow indicating force or motion. No text or symbols.

Mechanical component with a cylindrical shaft and housing, showing motion arrows. No text or symbols.

Mechanical device with a cylindrical component and a base, showing a downward arrow indicating motion. No visible text or symbols.

Cleaning - tips and warnings

Exploded view of a mechanical component with internal parts. No visible text or symbols.

Environment

Important!

3D rendering of a stainless steel meat maker with a downward arrow indicating force or movement. No text or symbols.

Illustration of a kitchen tool and a food processor device. No visible text or symbols.

Illustration of a manual kitchen tool with a downward arrow indicating compression. No text or symbols present.

Illustration of a manual meat processing machine with a downward arrow indicating compression. No text or symbols present.

3D rendering of a manual hand mixer with control panel and fan. No visible text or symbols.

Illustration of a manual kitchen tool with a downward arrow indicating compression. No text or symbols present.

3D rendered image of a mechanical device with a pipe fitting and a label (no readable text or symbols).

Illustration of a stainless steel kitchen tool with a pipe fitting (no text or symbols visible).

Illustration of a manual kitchen tool with a handle and base, no text or symbols present.

Illustration of a stainless steel industrial machine with a pipe fitting and a green label (no text or symbols on the machine itself).

3D rendering of a manual kitchen tool with a downward arrow indicating compression (no text or symbols).

3D rendering of a manual kitchen tool with a cylindrical top and base (no text or symbols visible).

3D rendering of a kitchen tool with a handle and control panel (no text or symbols visible).

Note:

Exploded view of a mechanical component with multiple cylindrical parts and a separate cylindrical part (no text or symbols visible).

Environmental protection

Important information

Illustration of a kitchen feeder and a motor (no text or symbols visible).

Illustration of a manual kitchen tool with a handle and base, showing no text or symbols.

Illustration of a manual kitchen tool with a downward arrow indicating compression.

Illustration of a stainless steel robotic arm and a control unit.

Illustration of a manual kitchen tool with a downward arrow indicating compression.

Vegetable grater

Three mechanical components labeled '1.'.

Illustration of a mechanical device with a downward arrow and label.

Illustration of a stainless steel industrial machine with a pipe fitting and label.

Illustration of a manual kitchen tool with a handle and lever.

Illustration of a stainless steel industrial machine with a pipe fitting and a green label.

Illustration of a manual kitchen tool with a handle and base, labeled '4.'.

3D rendering of a mechanical device with a cylindrical top and base, labeled '2.'.

3D rendered image of a metallic kitchen appliance with a handle and control panel.

Note

Exploded view of a mechanical component with internal parts and a separate cylindrical part. No text or symbols visible.

Important

Illustration of a manual kitchen tool next to a mounted electric oven. No text or symbols visible.

Illustration of a manual kitchen tool with a downward arrow indicating compression. No text or symbols present.

Illustration of a manual kitchen tool with a downward arrow indicating compression. No text or symbols present.

Illustration of a stainless steel robotic arm and a digital control unit. No text or symbols visible.

Illustration of a manual kitchen tool with a downward arrow indicating compression. No text or symbols present.

Vegetable knife

Three mechanical components or parts arranged in a row. No visible text or symbols.

3D rendered image of a mechanical device with a pipe fitting and directional arrow. No text or symbols.

Illustration of a stainless steel kitchen tool with a pipe fitting and label. No text or symbols on the device itself.

Illustration of a manual kitchen tool with a handle and base. No text or symbols.

Illustration of a stainless steel kitchen grater with a pipe fitting and a base unit. No text or symbols present.

3D rendering of a manual kitchen tool with a label and arrow indicator (no readable text or symbols)

3D rendering of a mechanical feeder with a cylindrical top and base plate (no text or symbols visible)

3D rendering of a kitchen grater with a handle and control panel (no text or symbols visible)

Note.

Exploded view of a mechanical component showing internal parts and a separate cylindrical part (no text or symbols visible)

Manual assistant
Powered by Anthropic
Waiting for your message
Product information

Brand : GORENJE

Model : MG2500TJW

Category : Choppers