
GAB 8A - Battery charger GUDE - Free user manual and instructions
Find the device manual for free GAB 8A GUDE in PDF.


| Product type | Intelligent battery charger |
| Brand | Güde |
| Model | GAB 8A |
| Input voltage | 230 V ~ 50 Hz |
| Maximum charging current | 8 A |
| Number of charging slots | 4 |
| Compatible battery types | Ni-MH, Ni-Cd, Li-ion (size AA, AAA, C, D, 9V) |
| Fast charging function | Yes, with automatic battery type detection |
| Overcharge protection | Yes, automatic shut-off at end of charge |
| Short-circuit protection | Yes |
| LED display | Charge status indicator (red/green) |
| Dimensions (L x W x H) | 180 x 80 x 50 mm |
| Weight | 350 g |
| Power supply | Mains via removable power cable |
| Maintenance and cleaning | Unplug before cleaning; use a dry, soft cloth |
| Operating temperature | 0 °C to 40 °C |
| Safety | CE compliant; reverse polarity protection |
| Spare parts and repairability | Spare parts are available from Güde customer service; repair by a professional recommended |
| General information | Universal charger for home and workshop use; supplied with user manual |
Frequently Asked Questions - GAB 8A GUDE
User questions about GAB 8A GUDE
0 question about this device. Answer the ones you know or ask your own.
Ask a new question about this device
Download the instructions for your Battery charger in PDF format for free! Find your manual GAB 8A - GUDE and take your electronic device back in hand. On this page are published all the documents necessary for the use of your device. GAB 8A by GUDE.
USER MANUAL GAB 8A GUDE
natural_image
Icon of an open book inside a black circle (no text or symbols)Deutsch
D
Translation of original operating instructions
BATTERY CHARGER AUTOMATIC
Français
F
natural_image
Exterior view of a gray gas station charging device with dual cables and a digital display (no visible text or symbols)33

natural_image
Exterior view of a gray electronic device with control panel and cables (no visible text or symbols)39
45
51

B

C

Einleitung
natural_image
Line drawing of an automotive engine bay with battery, sensors, and wiring (no text or symbols)Schritt 3 (GAB 15A)
To enjoy your new battery charger as long as possible, please read carefully the Operating Instructions and the enclosed safety instructions before putting it into operation. Further, it is recommended to keep this manual for future reference – when features of this product are required to be recalled. Because of the continuous development of our products, we reserve the right to make technical changes. This document represents the original Operating Instructions.
Appliance description
The automatic battery charger is controlled by a micro processor and as a consequence, charging takes place in three levels. At the first level, the battery is charged by almost constant current to approximately 85%. At the second level, the battery is charged to approximately 95% at constant voltage. The third level keeps constant voltage of the battery, i.e. the battery is constantly charged to the full extent.

line
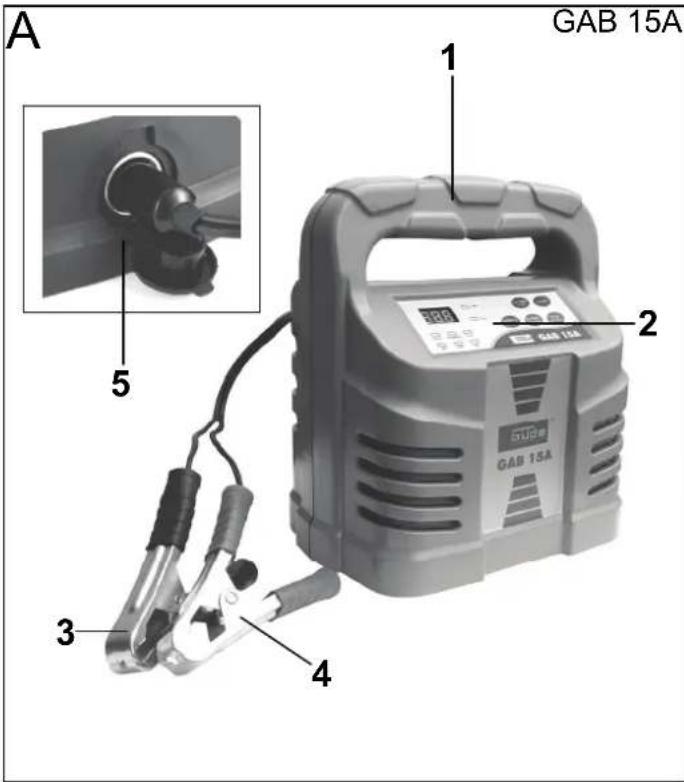
| Time | Battery Voltage | Charging Current | |------|-----------------|-------------------| | 0 | 0 | 0 | | 1 | ~200 | ~100 | | 2 | ~400 | ~200 | | 3 | ~600 | ~300 | | 4 | ~800 | ~400 | | 5 | ~900 | ~500 | | 6 | ~950 | ~600 | | 7 | ~980 | ~700 | | 8 | ~990 | ~800 | | 9 | ~995 | ~900 | | 10 | ~1000 | ~1000 |GAB 15A (pic. A)
- Carrying handle
- Operating panel
- Charging pliers, black (-)
- Charging pliers, red (+)
- 12V DC outlet
GAB 8A (pic. A)
- Carrying handle
- Operating panel
- Charging pliers, black (-)
- Charging pliers, red (+)
- Power cord
GAB 15A operating elements (pic. B)
1. Voltage indication LED
(LED is on when the appliance is in the standby mode or if the 2/8/10/15A button has been pressed)
2. 2/8/10/15A charging current setting button
(One second after pressing, the appliance starts to be charged by appropriate charging current with the existing value being shown on the display)
3. ON/OFF button
(Keep the button pressed for at least 1 second – this will switch the appliance on and "000" will be blinking on the display – now you are in the standby mode)
4. 12V DC outlet button
ON/OFF with signalling by LED
(Pressing the button in the standby mode activates the 12V DC outlet on the back of the appliance. If the button is pressed again, the charger gets back to the standby mode).
5. Button for current battery voltage
(After pressing the button, the appliance shows the current battery voltage for 3 seconds in the standby mode and during the charging process.)
6. "Battery fully charged" LED
7. "Battery charging" LED
8. "Failure" LED
9. Three-digit LED display
(see the table for description)
10. LED signalling current
(this LED is on during the charging process or when the 12V DC outlet is active)
11. LED for WET type battery
12. LED for AGM type battery
13. LED for GEL type battery
| LED display | Description | Failure | removal |
 | Standby mode | ||
 | Check the battery | ||
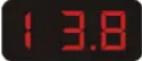 | Battery voltage is shown during the charging process or in the standby mode, e.g. 13.8 V | ||
 | 1. Charging current is shown (e.g. 5.8 A);2. Extraction flow at 12V DC outlet is shown. | ||
 | 1. Battery pole not connected2. Short circuit | 1. Connect the battery pole.2. Faulty battery | |
 | Exchange of connections (reversal of polarity) | Switch the appliance off and disconnect the plug from the outlet and connect correctly | |
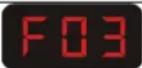 | 1. Battery is significantly discharged2. Faulty battery cell3. 3.6 V battery is connected | Switch off and disconnect from the electric power supply and remove the battery (faulty) | |
 | 1. Battery cell short circuit2. Inappropriate charging current has been selected | Try another charging current, if the failure persists, the battery is probably faulty | |
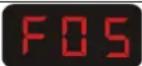 | Battery terminal has got released, the appliance is switching off and activating the warning signal | Check the connection and select the charging current again | |
 | Battery is fully charged, battery voltage remains constant, battery remains charged. |
GAB 8A operating elements (pic. C)
1. 6V/12V battery selection button
Pressing this button switches between the 6V and 12V battery – appropriate LED is on.
2. Battery type selection button
Pressing this button selects the battery type; GEL, AGM or WET-LED are on.
3. "Quickly" or "slowly" button
"Tractor" LED for slow charging is on or "motorcycle" LED for quick charging is on.
4. Voltage
LED
(LED is on when the appliance is in operation)
5. "Battery fully charged" LED
6. "Battery
charging" LED
7. "Failure"
LED
8. Current battery voltage LED
(current battery voltage is shown)
9. "Ready"
LED
(switches on as soon as battery voltage and type and charging speed are set)
10. "START"
button
Pressing this button activates the charging process after selecting the charging values.
Technical specifications
GAB 15A #85063 AUTOMATIC BATTERY CHARGER
Connection/frequency: 230V\~50Hz
Charging voltage: 12 V
Max. input: 280 W
Max. rms charging current: 2/6/10/15A
Battery capacity: 20Ah-200Ah
Weight: app. 1.6kg
GAB 8A #85060 AUTOMATIC BATTERY CHARGER
Connection/frequency: 230V\~50Hz
Charging voltage: 6 V/12 V
Max. input: 141 W
Max. rms charging current: 1A/8A
Battery capacity: 20Ah-160Ah
Weight: app. 1kg
General safety instructions

Please read and follow all these instructions before putting the appliance into operation. Keep the safety instructions for future reference!
Safe work
Keep the place of your work clean!
Mess in the place of work can result in injuries.
Consider the surrounding influences
Do not expose the appliance to rain
Do not use the appliance in a wet or moist environment.
Ensure good lighting.
Do not use the appliance near flammable liquids or gases.
Keep other persons in a sufficient distance!
Do not let other persons, especially children, touch the appliance or the cable. Keep them in a safe distance from the place of your work.
Proper storing!
Appliances that are not used should be stored in a dry, locked place inaccessible to children.
Do not overload the appliance!
Work in the specified power range.
Use the right appliance!
Do not use the appliance for purposes for which it has not been designed.
Treat your appliance with care!
Follow the maintenance regulations and instructions.
Check regularly the appliance cable and have it replaced by an expert if damaged.
Check regularly the extension cables and replace them if damaged.
Keep the appliance handles dry and with no oil and fat.
Be careful!
Pay attention to what you are doing. Use common sense when working. Do not use the appliance if you are tired.
CAUTION!
Use of other accessories may represent a risk of injury.
Have the appliance repaired by a professional!
This appliance corresponds to appropriate safety provisions. Repairs may only be performed by a professional who uses original spare parts; otherwise the user will be subject to the risk of injury.
Appliance-specific safety instructions

- It is necessary to follow the instructions of the manufacturer of the charged battery, especially as far as the acid level and distilled water filling are concerned. Protective goggles and gloves should
always be worn for these works.

- Appropriate ventilation around the battery and charger must be provided during the charging process.
- Never start the engine with the charger being connected.
- The appliance body must not be opened in any case. If the appliance body is damaged, the charger must no longer be used.
- Charge the batteries only at temperatures above 0^ .
- Check whether the voltage and current values specified on the charger output side correspond to those specified on the battery or accumulator before putting the appliance into operation.
- Make sure to prevent other items do not cause short circuit on the appliance contacts.
- Never touch the red and black clip.
- Lay all conductors in a way there is no risk of trip and to prevent cable damage!
- Never pull the plug out of socket by the connecting cable.
- Disconnect the appliance from the power supply - before cleaning - after using it
- Electric devices are no toys for children! Children are unable to estimate the risk an electric device may represent for them. Do not let children use electric devices in any case.
- The appliance must not be operated or used by persons with bodily, sensory or mental disabilities or inexperience.
- Risk of death as a result of electric shock!
- Never touch bare conductors with bare hands, especially conductors in alternating current circuits.
- When working with electrical installation, make sure there is someone around who could help you in case of emergency.
- To disconnect the appliance quickly from the power supply, the outlet must be near the appliance and easily accessible.
- Make sure the supply line and plug are dry before putting the appliance into operation.
- Please be advised that some parts of the appliance may remain under voltage even after activating the protective device (fuse).
• Install the appliance in a dry place protected against spraying water.
- Protect the devices against aggressive vapours and moist air or salt-containing air.
- Protect the appliance and cables against rain and moisture.
- Do not lay the cables over objects with sharp edges.
- Do not bend the cables at a sharp angle.
- Do not pull the cable.
- Ensure appropriate ventilation.
- A minimum distance of 20 cm from other objects should be kept around the battery charger to all directions.
- Keep all objects that may get damaged as a result of high temperatures in a sufficient distance when the charger is being operated.

Do not use the appliance in an environment flammable gases, e.g. in bilges powered by or near propane tanks.
- The appliance must always be switched off after being used.
- Never let the charger unattended during the charging process!
- Charging batteries should solely be used.
- Boat batteries must in principle be charged outside the boat.

Risk of injury! Batteries may contain an ssive and mordant acid. Prevent any contact of body with the liquid in the battery. Should you ained by the battery liquid, rinse thoroughly the briate body part with water.
- Risk of explosion! Prevent metal objects from falling on the battery. This could cause sparking and consequently short circuit between the battery and other parts of the wiring.

Risk of explosion! Make sure the polarity is when connecting: - red clip: positive terminal, - clip: negative terminal.

Wear protective goggles and clothes when g with the battery.
- Do not touch your eyes when working with the battery.
- Ensure stability! The appliance and the battery charged must be positioned in a way they cannot turn over or fall down.
- Follow the instructions of the manufacturer of the battery, equipment or vehicle for which the battery is used.
- Never try to charge frozen batteries.

Do not smoke and make sure there is no ing near the battery.
- If the battery needs to be removed, ground connection must first be disconnected. Disconnect all connections and appliances from the battery before removing.
- Do not charge common batteries.

Caution! If pungent smell of gas is felt, there is the risk of explosion. Switch the appliance off disconnect it from the power supply, ventilate iately and have both the appliance and battery ed by a professional.
Use as designated
The automatic battery charger has been designed for charging maintenance-free and maintenance starting batteries of 12V/6V (lead accumulators) and gel batteries. Any use beyond the above specification is in conflict with the appliance designation. The manufacturer will not be responsible for any damage incurred or injury caused by failing to adhere to the above mentioned. Please be advised that our appliances have not been designed to be used for business purposes.
Putting the appliance into operation
Step 1
Unscrew or remove the battery plug (if any) from the battery and make sure there is an appropriate acid level in the charged battery.

It is necessary to follow instructions of the charged
battery manufacturer, especially as far as the acid level and distilled water filling are concerned. Protective goggles and gloves should always be worn for these works.
Step 2
First connect the battery clip not connected to the chassis. The second connection is made with the body, in a sufficient distance from the battery and petrol line. The charger is then connected to the electrical network.
If you want to charge the battery outside the vehicle, make sure there is the right polarity when connecting – red clip: positive terminal, - black clip: negative terminal.

natural_image
Line drawing of an engine bay with battery, switch, and sensor (no text or symbols)Step 3 (GAB 15A)
- Switch the appliance on by pressing the "ON/OFF" button.
- Depending on the type of the charged battery, perform the settings described in the "Operating elements" section and using the buttons on the display, choose the battery type and charging current intensity.
| Charging current intensity selection | Battery capacity |
| 2 | 6-20Ah |
| 6 | 20 |
| 10 | 40-100Ah |
| 15 | 50-200Ah |
-40Ah
Step 3 (GAB 8)
- Choose the battery voltage – 6V or 12V using the button on the display.
- Choose the battery type and charging speed using the buttons on the display.
| 12 V battery slowly quickly | ||
| GEL | 1Amp per 10-200Ah | 4Amp per 40Ah-200Ah |
| AGM | 2Amp per 5-40Ah | 8Amp per 20Ah-200Ah |
| WET | 2Amp per 5-40Ah | 8Amp per 20Ah-200Ah |
If 6V is selected, the charger is constantly supplying 7.5V.
- "READY" LED is now on
- The "START" button activates the charging process.
- If you want to get back to the selection start, then press the "START" button during the charging process
Step 4
The charger needs to be switched off and disconnected from the power supply after charging has been finished. Connection with the body and then connection with battery are subsequently removed.
12V D.C. CONNECTING OUTLET (GAB 15A)
The charge has been fitted with a 12V D.C. connecting outlet on the back of the appliance. Maximum current of 12A can be consumed from the outlet.
For switching the appliance on, please proceed as follows:
- Connect a 12V D.C. appliance (max. 140 W input) via an appropriate intermediate cable using a 12V plug (cigarette lighter).
- Press the 12V DC OUT button in the standby mode. This will activate the 12V outlet on the back of the appliance.
- Switch the appliance on.
For switching the appliance off, please proceed as follows:
- Switch off the appliance and pull the 12V plug out.
- Press the 12V DC OUT button. This will deactivate the 12V outlet on the back of the appliance and the appliance will return to the standby mode.
- Switch the charger off.

The output voltage on the 12V outlet is 13.0 – 13.5 V, which is roughly identical with the voltage in the automobile cigarette lighter when the engine is running. The appliance input must not exceed 140 W.
Marking
Product safety:
| CE | |
| Product corresponds to appropriate EU standards |
Prohibitions:
 |  |
| No pulling the mains plug! | Protect against rain and moisture! |
Cautions:
 |  |
| Warning/caution | Warning against dangerous voltage |
 | |
| Appliance to be operated in dry places only! |
Commands:
 |  | ||
| General command sign | Read the Operating Instructions before using the appliance | ||
Environment protection:
 |  | ||
| Dispose waste professionally so as not to harm the environment. | Packing cardboard material may be delivered to collecting centres for recycling. | ||
 | |||
| Any damaged and/or disposed electric or electronic appliances must be delivered to appropriate recycling centres. | |||
Package:
 |  | ||
| Protect against moisture This side up | |||
 | |||
| Interseroh recycling | |||
Technical specifications:
 |  | |||
| Connection | Weight | |||
 |  | Ah | ||
| Max. input Battery capacity | ||||
A V
Max. rms charging current Charging voltage
EC DECLARATION OF CONFORMITY
We,
Güde GmbH & Co. KG
Birkichstrasse 6
D-74549 Wolpertshausen
Germany
herewith declare that the following appliance complies with the appropriate basic safety and health requirements of the EU Directives based on its design and type, as brought into circulation by us.
In case of alternation of the machine, not agreed upon by us, this declaration will lose its validity.
Machine description:
GAB 15A AUTOMATIC BATTERY CHARGER
GAB 8A AUTOMATIC BATTERY CHARGER
Art. No.
85063
85060
Applicable EC Directives:
2006/95 ES
2004/108 ES
Applicable harmonised standards:
EN 60335-1:2002+A11:2004+A1:2004
+A12:2006+A2:2006+A13:2008
EN 62233:2008
EN 60335-2-29:2004
EN 55014-1:2006
EN 55014-2:1997/+A1:2001
EN 61000-3-2:2006
EN 61000-3-3:1995/+A1:2001/+A2:2005
Date/authorised signature: 4 Jul, 2010

Title of signatory: Managing Director Mr
Technical documentation: J. Bürkle FBL; QS
Warranty
The warranty exclusively applies to material or manufacturing defects. The original proof of purchase with the purchase date must be submitted when lodging a claim in the warranty period. The warranty does not include any unauthorised use, e.g. appliance overloading, violent use, damage by a third party or foreign item. The failure to follow the Operating Instructions and ordinary wear and tear are not covered by the warranty, either.
Residual risks and protective measures
Residual risks caused by electric current:
| Threat | Description | Protective measures |
| Direct electrical contact | Electric shock FI earth-leakage breaker | |
| Indirect electrical contact | Electric shock by medium | FI earth-leakage breaker |
Other risks:
| Threat | Description | Protective measures |
| Thrown-off items or liquids |  Caustic acid may squirt from the battery and cause severe injuries. Caustic acid may squirt from the battery and cause severe injuries. |  Always wear gloves and protective goggles. Always wear gloves and protective goggles. |
| Slipping, tripping or fall of persons | Power cord and appliance itself may be the cause of tripping. | Depending on the place of installation, take appropriate countermeasures (appropriate place of installation, installation place marking, etc.) |
Behaviour in case of emergency
Provide necessary first aid treatment corresponding to the injury nature and seek qualified medical help as soon as possible. Protect the injured person from other injuries and calm him/her down.
First aid kit must always be available in the place of your work in case of accident in accordance with DIN 13164. Material taken out of the first aid kit needs to be supplemented right away.
If help is needed, please provide the following details:
- Place of accident
- Accident nature
- Number of injured persons
- Injury type
Disposal
The disposal instructions are based on icons placed on the appliance or its package. The description of the meanings can be found in the "Marking" chapter.
Transport package disposal
The package protects the appliance against damage during transport. Packing materials are usually chosen depending on their environmental friendliness and disposal method and can therefore be recycled.
Returning the package to material circulation saves raw materials and reduces waste amount.
Parts of packages (e.g. foils, styropor) can be dangerous
Ato children. Risk of suffocation!
Keep parts of packages away from children and dispose them as soon as possible.

Old batteries should only be disposed through
motor workshops, special collection centres and hazardous waste collection centres.
Operating staff requirements
The operator must carefully read the Operating Instructions before using the appliance.
Qualification
No special qualification is necessary for using the appliance apart from detailed instruction by a qualified person.
Minimum age
The appliance may only be operated by persons over 16 years of age. An exception includes youngsters operating the appliance within their professional education to achieve necessary skills under teacher's supervision.
Training
Using the appliance only requires appropriate instructions by a professional or reading the Operating Instructions. No special training necessary.
Servicing
Do you have any technical questions? A claim? Do you need spare parts or the Operating Instructions?
You will be helped quickly and without needless bureaucracy at our webpage www.guede.com in the Services part. Please help us be able to assist you. To be able to identify your appliance when claimed, we need to know its serial No., order No. and year of production. All these details can be found on the type label. Enter the details below for future reference.
Serial No.
Order No.
Year of production:
Tel.: +49 (0) 79 04 / 700-360
Fax: +49 (0) 79 04 / 700-51999
E-Mail: support@ts.guede.com
Maintenance and storing
Keep the air slots and appliance casing clean, with no dirt and dust.
Use a soft cloth and fine soap solution for cleaning. Avoid direct contact of the appliance with aggressive cleaning agents. Do not use aggressive, volatile or caustic cleaning agents.
Have the automatic battery charger checked by a certified qualified professional once a year.
Protect the appliance against moisture and dust.
If the appliance has not been used for a long time, store it in a covered state in a dry, safe place inapproachable by children.
Introduction
line
| Time | BATTERIESPANNUNG | LADESTROM | |------|-----------------|-----------| | 0 | 0 | 0 | | 1 | ~0.5 | ~0.5 | | 2 | ~1.0 | ~1.0 | | 3 | ~1.5 | ~1.5 | | 4 | ~2.0 | ~2.0 | | 5 | ~2.5 | ~2.5 | | 6 | ~3.0 | ~3.0 | | 7 | ~3.5 | ~3.5 | | 8 | ~4.0 | ~4.0 | | 9 | ~4.5 | ~4.5 | | 10 | ~5.0 | ~5.0 | | 11 | ~5.5 | ~5.5 | | 12 | ~6.0 | ~6.0 | | 13 | ~6.5 | ~6.5 | | 14 | ~7.0 | ~7.0 | | 15 | ~7.5 | ~7.5 | | 16 | ~8.0 | ~8.0 | | 17 | ~8.5 | ~8.5 | | 18 | ~9.0 | ~9.0 | | 19 | ~9.5 | ~9.5 | | 20 | ~10.0 | ~10.0 | | 21 | ~10.5 | ~10.5 | | 22 | ~11.0 | ~11.0 | | 23 | ~11.5 | ~11.5 | | 24 | ~12.0 | ~12.0 | | 25 | ~12.5 | ~12.5 | | 26 | ~13.0 | ~13.0 | | 27 | ~13.5 | ~13.5 | | 28 | ~14.0 | ~14.0 | | 29 | ~14.5 | ~14.5 | | 30 | ~15.0 | ~15.0 | | 31 | ~15.5 | ~15.5 | | 32 | ~16.0 | ~16.0 | | 33 | ~16.5 | ~16.5 | | 34 | ~17.0 | ~17.0 | | 35 | ~17.5 | ~17.5 | | 36 | ~18.0 | ~18.0 | | 37 | ~18.5 | ~18.5 | | 38 | ~19.0 | ~19.0 | | 39 | ~19.5 | ~19.5 | | 40 | ~20.0 | ~20.0 | | 41 | ~20.5 | ~20.5 | | 42 | ~21.0 | ~21.0 | | 43 | ~21.5 | ~21.5 | | 44 | ~22.0 | ~22.0 | | 45 | ~22.5 | ~22.5 | | 46 | ~23.0 | ~23.0 | | 47 | ~23.5 | ~23.5 | | 48 | ~24.0 | ~24.0 | | 49 | ~24.5 | ~24.5 | | 50 | ~25.0 | ~25.0 | | 51 | ~25.5 | ~25.5 | | 52 | ~26.0 | ~26.0 | | 53 | ~26.5 | ~26.5 | | 54 | ~27.0 | ~27.0 | | 55 | ~27.5 | ~27.5 | | 56 | ~28.0 | ~28.0 | | 57 | ~28.5 | ~28.5 | | 58 | ~29.0 | ~29.0 | | 59 | ~29.5 | ~29.5 | | 60 | ~30.0 | ~30.0 | | 61 | ~30.5 | ~30.5 | | 62 | ~31.0 | ~31.0 | | 63 | ~31.5 | ~31.5 | | 64 | ~32.0 | ~32.0 | | 65 | ~32.5 | ~32.5 | | 66 | ~33.0 | ~33.0 | | 67 | ~33.5 | ~33.5 | | 68 | ~34.0 | ~34.0 | | 69 | ~34.5 | ~34.5 | | 70 | ~35.0 | ~35.0 | | 71 | ~35.5 | ~35.5 | | 72 | ~36.0 | ~36.0 | | 73 | ~36.5 | ~36.5 | | 74 | ~37.0 | ~37.0 | | 75 | ~37.5 | ~37.5 | | 76 | ~38.0 | ~38.0 | | 77 | ~38.5 | ~38.5 | | 78 | ~39.0 | ~39.0 | | 79 | ~39.5 | ~39.5 | | 80 | ~40.0 | ~40.0 | | 81 | ~40.5 | ~40.5 | | 82 | ~41.0 | ~41.0 | | 83 | ~41.5 | ~41.5 | | 84 | ~42.0 | ~42.0 | | 85 | ~42.5 | ~42.5 | | 86 | ~43.0 | ~43.0 | | 87 | ~43.5 | ~43.5 | | 88 | ~44.0 | ~44.0 | | 89 | ~44.5 | ~44.5 | | 90 | ~45.0 | ~45.0 | | 91 | ~45.5 | ~45.5 | | 92 | ~46.0 | ~46.0 | | 93 | ~46.5 | ~46.5 | | 94 | ~47.0 | ~47.0 | | 95 | ~47.5 | ~47.5 | | 96 | ~48.0 | ~48.0 | | 97 | ~48.5 | ~48.5 | | 98 | ~49.0 | ~49.0 | | 99 | ~49.5 | ~49.5 | | 100 | >1 | >1 | The chart displays two data series: battery spinnung and Laestrom, both plotted against a grid of time units on the x-axis (ranging from -1 to +∞). The y-axis values for each series are labeled as 'BATTERIESPANNUNG' or 'LAESTROM'. The line labels are explicitly provided in the legend.BATTERIESPANNUNG = TENSION DE LA BATTERIE LADESTROM = COURANT DE CHARGEMENT
GAB 15A (fig. A)
natural_image
Line drawing of an automotive engine bay with battery, switch, and sensor (no text or symbols)Étape 3 (GAB 15A)
DÉCLARATION DE CONFORMITÉ CE
Nous,
Güde GmbH & Co. KG
Birkichstraße 6
D-74549 Wolpertshausen
natural_image
Line drawing of an engine bay with battery, switch, and sensor (no text or symbols)Krok 3 (GAB 15A)
natural_image
Line drawing of an automotive engine bay with battery, sensors, and wiring (no text or symbols)Krok 3 (GAB 15A)
- Prístroj zapnite stlačením tlačidla „ON/OFF“.
- V závislosti od druhu nabijanej batérie vykonajte nastavenia opisané v odseku „Obslužné prvky“ a pomocou tlačidiel na displeji zvolte typ batérie a intenzitu nabíjacieho prúdu.
| Vol'ba intenzity nabíjacieho prúdu | Kapacita batérie |
| 2 6 – 20 Ah | |
| 6 20 – 40 Ah | |
| 10 40 – 100 Ah | |
| 15 50 – 200 Ah |
Krok 3 (GAB 8)
- Pomocou tlačidla na displeji zvolte napätie batérie 6 V alebo 12 V.
- Pomocou tlačidiel na displeji zvolte typ batérie a rýchlost' nabíjania.
| Batéria 12 V pomaly rýchlo | ||
| GEL | 1 Ampna 10 – 200 Ah na | 4 Amp40 Ah – 200 Ah |
| AGM | 2 Ampna 5 – 40 Ah | 8 Ampna 20 Ah – 200 Ah |
| WET | 2 Ampna 5 – 40 Ah | 8 Ampna 20 Ah – 200 Ah |
Ak vyberiete 6 V, dodáva nabíjačka konštantne 7,5 V.
• Teraz svieti LED-dióda „READY“.
• Tlačidlom „START“ spustite proces nabijania.
- Ak sa chcete dostat' opät' na začiatok výberu, stlačte počas nabíjania znovu „START“.
Krok 4
natural_image
Line drawing of an engine bay with battery, switch, and wiring (no text or symbols)Stap 3 (GAB 15A)
line
| Time | BATTERIESPANNUNG | LADESTROM | |------|-----------------|-----------| | 0 | 0 | 0 | | 1 | ~0.5 | ~0.5 | | 2 | ~1.0 | ~1.0 | | 3 | ~1.5 | ~1.5 | | 4 | ~2.0 | ~2.0 | | 5 | ~2.5 | ~2.5 | | 6 | ~3.0 | ~3.0 | | 7 | ~3.5 | ~3.5 | | 8 | ~4.0 | ~4.0 | | 9 | ~4.5 | ~4.5 | | 10 | ~5.0 | ~5.0 | | 11 | ~5.5 | ~5.5 | | 12 | ~6.0 | ~6.0 | | 13 | ~6.5 | ~6.5 | | 14 | ~7.0 | ~7.0 | | 15 | ~7.5 | ~7.5 | | 16 | ~8.0 | ~8.0 | | 17 | ~8.5 | ~8.5 | | 18 | ~9.0 | ~9.0 | | 19 | ~9.5 | ~9.5 | | 20 | ~10.0 | ~10.0 | | 21 | ~10.5 | ~10.5 | | 22 | ~11.0 | ~11.0 | | 23 | ~11.5 | ~11.5 | | 24 | ~12.0 | ~12.0 | | 25 | ~12.5 | ~12.5 | | 26 | ~13.0 | ~13.0 | | 27 | ~13.5 | ~13.5 | | 28 | ~14.0 | ~14.0 | | 29 | ~14.5 | ~14.5 | | 30 | ~15.0 | ~15.0 | | 31 | ~15.5 | ~15.5 | | 32 | ~16.0 | ~16.0 | | 33 | ~16.5 | ~16.5 | | 34 | ~17.0 | ~17.0 | | 35 | ~17.5 | ~17.5 | | 36 | ~18.0 | ~18.0 | | 37 | ~18.5 | ~18.5 | | 38 | ~19.0 | ~19.0 | | 39 | ~19.5 | ~19.5 | | 40 | ~20.0 | ~20.0 | | 41 | ~20.5 | ~20.5 | | 42 | ~21.0 | ~21.0 | | 43 | ~21.5 | ~21.5 | | 44 | ~22.0 | ~22.0 | | 45 | ~22.5 | ~22.5 | | 46 | ~23.0 | ~23.0 | | 47 | ~23.5 | ~23.5 | | 48 | ~24.0 | ~24.0 | | 49 | ~24.5 | ~24.5 | | 50 | ~25.0 | ~25.0 | | 51 | ~25.5 | ~25.5 | | 52 | ~26.0 | ~26.0 | | 53 | ~26.5 | ~26.5 | | 54 | ~27.0 | ~27.0 | | 55 | ~27.5 | ~27.5 | | 56 | ~28.0 | ~28.0 | | 57 | ~28.5 | ~28.5 | | 58 | ~29.0 | ~29.0 | | 59 | ~29.5 | ~29.5 | | 60 | ~30.0 | ~30.0 | | 61 | ~30.5 | ~30.5 | | 62 | ~31.0 | ~31.0 | | 63 | ~31.5 | ~31.5 | | 64 | ~32.0 | ~32.0 | | 65 | ~32.5 | ~32.5 | | 66 | ~33.0 | ~33.0 | | 67 | ~33.5 | ~33.5 | | 68 | ~34.0 | ~34.0 | | 69 | ~34.5 | ~34.5 | | 70 | ~35.0 | ~35.0 | | 71 | ~35.5 | ~35.5 | | 72 | ~36.0 | ~36.0 | | 73 | ~36.5 | ~36.5 | | 74 | ~37.0 | ~37.0 | | 75 | ~37.5 | ~37.5 | | 76 | ~38.0 | ~38.0 | | 77 | ~38.5 | ~38.5 | | 78 | ~39.0 | ~39.0 | | 79 | ~39.5 | ~39.5 | | 80 | ~40.0 | ~40.0 | | 81 | ~40.5 | ~40.5 | | 82 | ~41.0 | ~41.0 | | 83 | ~41.5 | ~41.5 | | 84 | ~42.0 | ~42.0 | | 85 | ~42.5 | ~42.5 | | 86 | ~43.0 | ~43.0 | | 87 | ~43.5 | ~43.5 | | 88 | ~44.0 | ~44.0 | | 89 | ~44.5 | ~44.5 | | 90 | ~45.0 | ~45.0 | | 91 | ~45.5 | ~45.5 | | 92 | ~46.0 | ~46.0 | | 93 | ~46.5 | ~46.5 | | 94 | ~47.0 | ~47.0 | | 95 | ~47.5 | ~47.5 | | 96 | ~48.0 | ~48.0 | | 97 | ~48.5 | ~48.5 | | 98 | ~49.0 | ~49.0 | | 99 | ~49.5 | ~49.5 | | 100 | >1 | >1 | The chart includes two lines: one labeled 'BATTERIESPANNUNG' and one labeled 'LADESTROM'. The x-axis is labeled 'LADESTROM' and the y-axis is labeled 'BAKESTROM'. The line labels are explicitly provided in the code.BATTERIESPANNUNG = TENSIONE DELLA BATTERIA LADESTROM = CORRENTE DI CARICAMENTO
GAB 15A (fig. A)
natural_image
Line drawing of an automotive engine bay with battery, switch, and sensor array (no text or symbols)Passo 3 (GAB 15A)
line
| Time | Batteriespannung | LaDESTROM | |------|-------------------|-----------| | 0 | 0 | 0 | | 1 | ~0.5 | ~0.5 | | 2 | ~1.0 | ~1.0 | | 3 | ~1.5 | ~1.5 | | 4 | ~2.0 | ~2.0 | | 5 | ~2.5 | ~2.5 | | 6 | ~3.0 | ~3.0 | | 7 | ~3.5 | ~3.5 | | 8 | ~4.0 | ~4.0 | | 9 | ~4.5 | ~4.5 | | 10 | ~5.0 | ~5.0 | | 11 | ~5.5 | ~5.5 | | 12 | ~6.0 | ~6.0 | | 13 | ~6.5 | ~6.5 | | 14 | ~7.0 | ~7.0 | | 15 | ~7.5 | ~7.5 | | 16 | ~8.0 | ~8.0 | | 17 | ~8.5 | ~8.5 | | 18 | ~9.0 | ~9.0 | | 19 | ~9.5 | ~9.5 | | 20 | ~10.0 | ~10.0 | | 21 | ~10.5 | ~10.5 | | 22 | ~11.0 | ~11.0 | | 23 | ~11.5 | ~11.5 | | 24 | ~12.0 | ~12.0 | | 25 | ~12.5 | ~12.5 | | 26 | ~13.0 | ~13.0 | | 27 | ~13.5 | ~13.5 | | 28 | ~14.0 | ~14.0 | | 29 | ~14.5 | ~14.5 | | 30 | ~15.0 | ~15.0 | | 31 | ~15.5 | ~15.5 | | 32 | ~16.0 | ~16.0 | | 33 | ~16.5 | ~16.5 | | 34 | ~17.0 | ~17.0 | | 35 | ~17.5 | ~17.5 | | 36 | ~18.0 | ~18.0 | | 37 | ~18.5 | ~18.5 | | 38 | ~19.0 | ~19.0 | | 39 | ~19.5 | ~19.5 | | 40 | ~20.0 | ~20.0 | | 41 | ~20.5 | ~20.5 | | 42 | ~21.0 | ~21.0 | | 43 | ~21.5 | ~21.5 | | 44 | ~22.0 | ~22.0 | | 45 | ~22.5 | ~22.5 | | 46 | ~23.0 | ~23.0 | | 47 | ~23.5 | ~23.5 | | 48 | ~24.0 | ~24.0 | | 49 | ~24.5 | ~24.5 | | 50 | ~25.0 | ~25.0 | | 51 | ~25.5 | ~25.5 | | 52 | ~26.0 | ~26.0 | | 53 | ~26.5 | ~26.5 | | 54 | ~27.0 | ~27.0 | | 55 | ~27.5 | ~27.5 | | 56 | ~28.0 | ~28.0 | | 57 | ~28.5 | ~28.5 | | 58 | ~29.0 | ~29.0 | | 59 | ~29.5 | ~29.5 | | 60 | ~30.0 | ~30.0 | | 61 | ~30.5 | ~30.5 | | 62 | ~31.0 | ~31.0 | | 63 | ~31.5 | ~31.5 | | 64 | ~32.0 | ~32.0 | | 65 | ~32.5 | ~32.5 | | 66 | ~33.0 | ~33.0 | | 67 | ~33.5 | ~33.5 | | 68 | ~34.0 | ~34.0 | | 69 | ~34.5 | ~34.5 | | 70 | ~35.0 | ~35.0 | | 71 | ~35.5 | ~35.5 | | 72 | ~36.0 | ~36.0 | | 73 | ~36.5 | ~36.5 | | 74 | ~37.0 | ~37.0 | | 75 | ~37.5 | ~37.5 | | 76 | ~38.0 | ~38.0 | | 77 | ~38.5 | ~38.5 | | 78 | ~39.0 | ~39.0 | | 79 | ~39.5 | ~39.5 | | 80 | ~40.0 | ~40.0 | | 81 | ~40.5 | ~40.5 | | 82 | ~41.0 | ~41.0 | | 83 | ~41.5 | ~41.5 | | 84 | ~42.0 | ~42.0 | | 85 | ~42.5 | ~42.5 | | 86 | ~43.0 | ~43.0 | | 87 | ~43.5 | ~43.5 | | 88 | ~44.0 | ~44.0 | | 89 | ~44.5 | ~44.5 | | 90 | ~45.0 | ~45.0 | | 91 | ~45.5 | ~45.5 | | 92 | ~46.0 | ~46.0 | | 93 | ~46.5 | ~46.5 | | 94 | ~47.0 | ~47.0 | | 95 | ~47.5 | ~47.5 | | 96 | ~48.0 | ~48.0 | | 97 | ~48.5 | ~48.5 | | 98 | ~49.0 | ~49.0 | | 99 | ~49.5 | ~49.5 | | 100 | >1 | >1 | The chart includes two lines: one labeled 'BATTERIESPANNUNG' and one labeled 'LADESTROM'. The values for the lines are plotted on a grid background with grid labels 'A', 'B', and 'C' respectively.BATTERIESPANNUNG = AZ ELEM FESZÜLTSÉGE LADESTROM = TÖLTŐ ÁRAM
GAB 15A (A.ábra)
natural_image
Line drawing of an automotive engine bay with battery, switch, and sensor (no text or symbols)3. Jépés (GAB 15A)
natural_image
Line drawing of an engine bay with battery, switch, and sensor array (no text or symbols)3 korak (GAB 15A)


- Deutsch
- Français
- Einleitung
- Schritt 3 (GAB 15A)
- Appliance description
- GAB 15A (pic. A)
- GAB 8A (pic. A)
- GAB 15A operating elements (pic. B)
- Voltage indication LED
- 2/8/10/15A charging current setting button
- ON/OFF button
- 12V DC outlet button
- ON/OFF with signalling by LED
- Button for current battery voltage
- "Battery fully charged" LED
- "Battery charging" LED
- "Failure" LED
- Three-digit LED display
- LED signalling current
- LED for WET type battery
- LED for AGM type battery
- LED for GEL type battery
- GAB 8A operating elements (pic. C)
- 6V/12V battery selection button
- Battery type selection button
- "Quickly" or "slowly" button
- Voltage
- LED
- "Battery fully charged" LED
- "Battery
- charging" LED
- "Failure"
- Current battery voltage LED
- "Ready"
- "START"
- button
- Technical specifications
- GAB 15A #85063 AUTOMATIC BATTERY CHARGER
- GAB 8A #85060 AUTOMATIC BATTERY CHARGER
- General safety instructions
- Safe work
- Keep the place of your work clean!
- Consider the surrounding influences
- Keep other persons in a sufficient distance!
- Proper storing!
- Do not overload the appliance!
- Use the right appliance!
- Treat your appliance with care!
- Be careful!
- CAUTION!
- Have the appliance repaired by a professional!
- Appliance-specific safety instructions
- Use as designated
- Putting the appliance into operation
- Step 1
- Step 2
- Step 3 (GAB 15A)
- Step 3 (GAB 8)
- Step 4
- 12V D.C. CONNECTING OUTLET (GAB 15A)
- Marking
- EC DECLARATION OF CONFORMITY
- 85063
- 85060
- Title of signatory: Managing Director Mr
- Warranty
- Residual risks and protective measures
- Behaviour in case of emergency
- Disposal
- Operating staff requirements
- Qualification
- Minimum age
- Training
- Servicing
- Maintenance and storing
- Introduction
- GAB 15A (fig. A)
- Étape 3 (GAB 15A)
- DÉCLARATION DE CONFORMITÉ CE
- Krok 3 (GAB 15A)
- Krok 3 (GAB 8)
- Krok 4
- Stap 3 (GAB 15A)
- Passo 3 (GAB 15A)
- GAB 15A (A.ábra)
- Jépés (GAB 15A)
- korak (GAB 15A)
Brand : GUDE
Model : GAB 8A
Category : Battery charger