
BM900WII - Bread maker GORENJE - Free user manual and instructions
Find the device manual for free BM900WII GORENJE in PDF.


| Product Type | Bread Maker |
| Brand | Gorenje |
| Model | BM900WII |
| Dimensions (W x D x H) | 30 x 30 x 35 cm |
| Weight | 5.5 kg |
| Power Supply | 220-240 V, 50/60 Hz |
| Power Consumption | 600 W |
| Maximum Bread Weight | 1.5 kg |
| Number of Programs | 12 |
| Programs Include | Basic, Whole Wheat, French, Rye, Sweet, Quick, Gluten-Free, Cake, Jam, Dough, Sandwich, Bake Only |
| Crust Control | 3 settings (Light, Medium, Dark) |
| Timer Delay | Up to 15 hours |
| Keep Warm Function | Yes, up to 1 hour |
| Display Type | LCD with backlight |
| Non-Stick Pan | Yes, removable |
| Kneading Blades | 2, removable |
| Viewing Window | Yes |
| Automatic Dispenser | For fruits and nuts |
| Cleaning | Wipe exterior with damp cloth; wash pan and blades in warm soapy water; do not immerse base in water |
| Safety Features | Overheat protection, automatic shut-off, cool-touch handle |
| Spare Parts Availability | Pan, kneading blades, measuring cup, spoon available from Gorenje service |
Frequently Asked Questions - BM900WII GORENJE
User questions about BM900WII GORENJE
0 question about this device. Answer the ones you know or ask your own.
Ask a new question about this device
Download the instructions for your Bread maker in PDF format for free! Find your manual BM900WII - GORENJE and take your electronic device back in hand. On this page are published all the documents necessary for the use of your device. BM900WII by GORENJE.
USER MANUAL BM900WII GORENJE
BM 900 WII
LOAF SIZE
Yeast or baking powder
Dry ingredients (flour, sugar...)
Water or other liquid
- Lid
- Viewing window
- Bread pan
- Kneading blade
- Control panel
- Housing
- Measuring spoon
- Measuring cup
- Removal hook
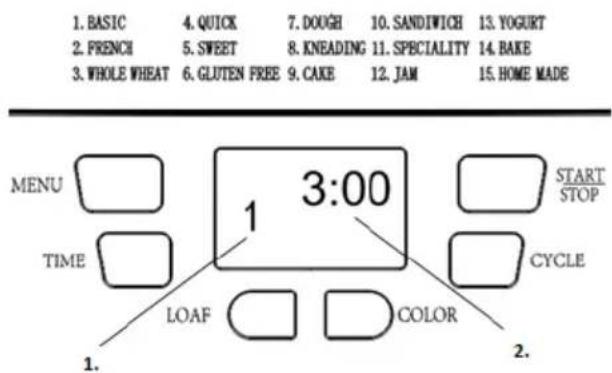
CONTROL PANEL DESCRIPTION
(The screen display may be subject to change without prior notice.)
Yeast or baking powder
Dry ingredients (flour, sugar...)
- Lid
- Viewing window
- Bread pan
- Kneading paddle
- Control panel
- Housing
- Measuring spoon
- Measuring cup
- Removal hook
DESCRIPTION OF THE CONTROL PANEL
Yeast or baking powder
Dry ingredients (flour, sugar...)
Important safeguards:
Before commissioning this machine, please read the instruction manual carefully.
- Before using the electrical appliance, the following basic precautions should always be followed:
- Please keep these instructions, the guaranty certificate, the sales receipt and, if possible, the carton with the inner packaging!
- The machine is intended exclusively for private and not for commercial use!
- Before use, check that the voltage of wall outlet corresponds to the one shown on the rating plate.
- Always remove the plug from the socket whenever the machine is not in use, when attaching accessory parts, cleaning the machine or whenever a disturbance occurs. Switch off the machine beforehand. Pull on the plug, not on the cable.
- In order to protect children from the dangers of electrical appliances, never leave them unsupervised with the machine. Consequently, when selecting the location for your machine, do so in such a way that children do not have access to the machine. Take care to ensure that the cable does not hang down.
- Check the machine and the cable regularly for damage. If there is damage of any kind, the machine should not be used.
- Do not repair the machine by yourself, but rather consult an authorized expert.
- In order to ensure your safety, a broken or damaged plug must be replaced with an equivalent plug from the manufacturer, our customer service department or a similar qualified person.
- Keep the machine and the cable away from heat, direct sunlight, moisture, sharp edges and suchlike.
- Never use the machine unsupervised! Switch the machine off power whenever you do not use it, even if this is only for a moment.
- Use only original accessories.
- Do not use the machine outdoors.
- Under no circumstances must the machine be placed in water or other liquid, or come into contact with such. Do not use the machine with wet or moist hands.
- Should the machine become moist or wet, remove the plug from the socket immediately. Do not reach into the water.
- Use the machine only for the intended purpose, as indicated on the rating label of the machine.
- Do not use the machine with a damaged outlet.
- Do not touch any of the moving or spinning parts of the machine.
- Do not touch hot surfaces. Use handles or knobs.
- This appliance is not intended for use by persons (including children) with reduced physical, sensory or mental capabilities, or lack of experience and knowledge, unless they have been given supervision or instruction concerning use of the appliance by a person responsible for their safety.
- Children should be supervised to ensure that they do not play with the appliance.
- Never beat the bread pan on the top or edge to remove the pan, as this may damage the bread pan.
- Metal foils or other materials must not be inserted into the appliance, as this can give rise to the risk of a fire or short circuit.
- Never cover the appliance with a towel or any other material; heat and steam must be able to escape freely. A fire can be caused if it is covered by, or comes into contact with, combustible material.
- Never connect this appliance to an external timer switch or remote control system in order to avoid a hazardous situation.
- Noise level: Lc < 68 dB(A)
This appliance is marked according to the European directive 2012/19/EU on Waste Electrical and Electronic Equipment (WEEE). This guideline is the frame of a European-wide validity of return and recycling on Waste Electrical and Electronic Equipment.
Using the machine for the first time:
Check the bread pan and clean the rest of the baking chamber. Do not use sharp objects and do not scour! The bread pan is non-stick coated. Grease the bread pan and bake empty for about 10 minutes. Clean once more. Place the kneading bar on the axle in the baking area. Air the room if any unwanted smell.
Electrical connection:
The machine must only be connected to a correctly installed 230V, 50Hz safety socket.
When the machine is connected, a beep is heard and “3:00” appears in the display after a short time. The two dots between the “3” and “00” are not constantly lit.
The machine is now ready to operate and is automatically set to program "1" (normal position), but has not yet started.
FUNCTIONS & OPERATION
Know your bread maker
- Lid
- View window
- Bread pan
- Kneading blade
- Control panel
- Housing
- Measuring spoon
- Measuring cup
- Hook
INTRODUCTION OF CONTROL PANEL
(The silkscreen is subject to change without prior notice.)
- This indicates the program you have chosen
- The operation time for each program
Start/stop
For starting and stopping the selected baking program.
To start a program, touch the "START/STOP" once. A short beep will be heard and the two dots in the time display begin to flash and the program starts. Any other button is inactivated except the START/STOP buttons after a program has begun.
To stop the program, touch the "START/STOP" button for approx. 2 seconds, then a beep will be heard, it means that the program has been switched off.
Pause function
After procedure starts up, you can press START/STOP button once to interrupt at any time, the operation will be paused but the setting will be memorized, the working time will be flashed on the LCD. Touch START/STOP button again or within 10 min without touching any button, the program will continue.
Menu
It is used to set different programs. Each time it is touched (accompanied by a short beep) the program will vary. Touch the button discontinuously, the 15 menus will be cycled to show on the LCD display. Select your desired program. The functions of 15 menus will be explained below.
- Basic: kneading, rise and baking normal bread. You may also add ingredients to increase flavor.
- French: kneading, rise and baking with a longer rise time. The bread baked in this menu will have a crisper crust and loose texture.
- Whole wheat: kneading, rise and baking of whole wheat bread. It is not advised to use the delay function as this can produce poor results.
- Quick: kneading, rise and baking loaf within the time less than Basic bread. But the bread baked on this setting is usually smaller with a dense texture.
- Sweet: kneading, rise and baking sweet bread. You may also add ingredients to add flavor.
- Gluten free: kneading, rise and baking gluten free bread. You may also add ingredients to add flavor.
- Dough: kneading and rise, but without baking. Remove the dough and use for making bread rolls, pizza, steamed bread, etc.
- Kneading: kneading flour and ingredients.
- Cake: kneading, rise and baking, but rise with soda or baking powder.
- Sandwich: kneading, rise and baking sandwich. For baking light texture bread with a thinner crust.
- Speciality: (the loaf size can not be adjusted, only display the default loaf size of 900g) The speciality setting is used for bread types that are required in a shorter time. The bread baked in this setting is smaller with a dense texture.
- Jam: boiling jams and marmalades. Fruit must be chopped before putting it into the bread pan.
- Yogurt: make yogurt
- Bake: only baking, no kneading and rise. Also used for increasing the baking time on selected settings.
- Home made: this program allows you to set programs manually (kneading, rising, baking, keep warm).
The time range of each program as following:
KNEAD1: 0-8 minutes
RISE1: 20-60 minutes
KNEAD2: 0-15 minutes
RISE2: 0-35 minutes
RISE3: 0-60 minutes
BAKE: 0-80 minutes
KEEP WARM: 0-60 minutes
Under the menu of Home Made
a) Press "CYCLE" button once, KNEAD1 will appear on LCD, then press "TIME" button to adjust the time, and press "CYCLE" button again to confirm. b) Press "CYCLE" button for the next step, RISE1 will appear on LCD, then press "TIME" button to adjust the time. By holding "TIME" button, the number will increase rapidly. Press "CYCLE" button to confirm. c) In such way set the remaining steps. When you set all steps, press "START/STOP" button to exit the settings. d) Press "START/STOP" button again to activate the operation.
Note: the setting can be memorized and can be used for next baking.
Color
With the button you can select LIGHT, MEDIUM or DARK color for the crust.
Loaf
Touch this button to select the size of the bread. Please note the total operation time may vary with the different loaf size.
Delay (time)
If you want the appliance do not start working immediately you can use this button to set the delay time.
You must decide how long it will be before your bread is ready by pressing the TIME button. Please note that the delay time should include the baking time of the program. That is, at the completion of the delay time, there is hot bread that can be served. At first, the program and degree of browning must be selected, then press TIME to increase the delay time in increments of 10 minutes. The maximum delay is 13 hours.
Example: Now it is 8:30 p.m. If you would like your bread to be ready in the next morning at 7 o'clock, i.e., in 10 hours and 30 minutes, select your menu, color, and loaf size, then press the TIME button to add time until 10:30 appears on the LCD. Then press the STOP/START button to activate this delay program. You can see the dot flash and the LCD will count down to show the remaining time. You will get fresh bread at 7:00 in the morning. If you don't want to take out the bread immediately, the keeping warm time of 1 hour starts.
Note: For time-delayed baking, do not use any easily perishable ingredients such as eggs, fresh milk, fruits, onions, etc.
KEEP WARM
Bread can be automatically kept warm for 1 hour after baking. During keeping warm, if you would like to take the bread out, switch the program off by touching the START/STOP button.
MEMORY
If the power supply has been interrupted during the course of making bread, the process of making bread will be continued automatically within 10 minutes, even without touching the “START/STOP” button. If the interruption time exceeds 10 minutes, the memory cannot be kept; you must discard the ingredients in the bread pan and add the ingredients into the bread pan again, and the bread maker must be restarted. But if the dough has not entered the rising phase when the power supply breaks off, you can touch the “START/STOP” directly to continue the program from the beginning.
ENVIRONMENT
The machine may work well in a wide range of temperatures, but there may be a difference in loaf size between a very warm room and a very cold room. We suggest that the room temperature should be within the range of 15°C to 34°C.
WARNING DISPLAY:
- If the display shows "HHH" after you have pressed the START/STOP button, the temperature inside is still too high. Then the program has to be stopped. Open the lid and let the machine cool down for 10 to 20 minutes.
- If the display shows "LLL" after pressing the START/STOP button (except for the BAKE programs), it means the temperature inside is too low (accompanied by 5 beep sounds). Stop the sound by pressing the START/STOP button, open the lid, and let the machine rest for 10 to 20 minutes to return to room temperature.
- If the display shows "E E0" or "E E1" after you have touched the START/STOP button, the temperature sensor is malfunctioning. Please check the sensor carefully by an authorized expert.
HOW TO MAKE BREAD
- Place the bread pan in position, then turn it clockwise until it clicks into the correct position. Fix the kneading blade onto the drive shaft. It is recommended to fill the hole with heat-resistant margarine prior to placing the kneading blade to avoid the dough sticking to the kneading blade; this also makes the kneading blade easier to remove from the bread.
- Place ingredients into the bread pan. Please keep to the order mentioned in the recipe. Usually, the water or liquid substance should be put first, then add sugar, salt, and flour. Always add yeast or baking powder as the last ingredient.

Note: The maximum quantities of flour and yeast that may be used refer to the recipe.
- Make a small indentation on the top of the flour with your finger, add yeast into the indentation, and make sure it does not come into contact with the liquid or salt.
- Close the lid gently and plug the power cord into a wall outlet.
- Touch the Menu button until your desired program is selected.
- Touch the COLOR button to select the desired crust color.
- Touch the LOAF SIZE button to select the desired size (750 or 900g).
- Set the delay time by touching the TIME button. This step may be skipped if you want the bread maker to start working immediately.
- Touch the START/STOP button to start working.
- For the programs BASIC, FRENCH, WHOLE WHEAT, QUICK, SWEET, GLUTEN FREE, CAKE, and SANDWICH, beeps will be heard during operation. This is to prompt you to add ingredients. Open the lid and put in some ingredients. It is possible that steam will escape through the vent in the lid during baking. This is normal.
- Once the process has been completed, 10 beeps will be heard. You can touch the START/STOP button for approximately 2 seconds to stop the process and take out the bread. Open the lid and, while using oven mitts, turn the bread pan anti-clockwise and take out the bread pan.
Caution: the Bread pan and bread may be very hot! Always handle with care.
- Let the bread pan cool down before removing the bread. Then use non-stick spatula to gently loosen the sides of the bread from the pan.
- Turn bread pan upside down onto a wire cooling rack or clean cooking surface and gently shake until bread falls out.
- Let the bread cool for about 20 minutes before slicing. It is recommended slicing bread with electric cutter or dentate cutter, had better not with fruit knife or kitchen knife, otherwise the bread may be subject to deformation.
- If you are out of the room or have not touched START/STOP button at the end of operation, the bread will be kept warm automatically for 1 hour, when keep warm is finished, 10 beeps will be heard.
- When do not use or complete operation, unplug the power cord.
Note: Before slicing the loaf, use the hook to remove out the Kneading blade hidden on the bottom of loaf. The loaf is hot, never use the hand to remove the kneading blade.
Note: If bread has not been completely eaten up, advise you to store the remained bread in sealed plastic bag or vessel. Bread can be stored for about three days during room temperature, if you need more days storage, pack it with sealed plastic bag or vessel and then place it in the refrigerator, storage time is at most ten days. As bread made by ourselves does not add preservative, generally storage time is no longer than that for bread in market.
RECIPES
Legend:
Tbs = table spoon
Tsp = tea spoon
Dry yeast (1 packet - 7g) = Yeast (1 packet - 25g)
1. Basic
| SIZE MATERIAL | 700g | 900g | ||
| Water | 280ml | 280g | 340ml | 340g |
| Oil | 2 Tbs | 24g | 3 Tbs | 36g |
| Salt | 1 Tsp | 7g | 1,5 Tsp | 10g |
| Sugar | 2 Tbs | 24g | 3 Tbs | 36g |
| Flour | 3 cups | 420g | 3,5 cups | 490g |
| Yeast | 1 Tsp | 3g | 1 Tsp | 3g |
2. French
| SIZE MATERIAL | 700g | 900g | ||
| Water | 280ml | 280g | 340ml | 340g |
| Oil | 2 Tbs | 24g | 3 Tbs | 36g |
| Salt | 1,5 Tsp | 10g | 2 Tsp | 14g |
| Sugar | 1,5 Tbs | 18g | 2 Tbs | 24g |
| Flour | 3 cups | 420g | 3,5 cups | 490g |
| Yeast | 1 Tsp | 3g | 1 Tsp | 3g |
3. Whole wheat
| SIZE MATERIAL | 700g | 900g | ||
| Water | 260ml | 260g | 340ml | 340g |
| Oil | 2 Tbs | 24g | 3 Tbs | 36g |
| Salt | 1,5 Tsp | 10g | 2 Tsp | 14g |
| Whole wheat | 1 cup | 110g | 2 cups | 220g |
| Flour | 2 cups | 280g | 2 cups | 280g |
| Brown Sugar | 2 Tbs | 18g | 2,5 Tbs | 23g |
| Milk powder | 2 Tbs | 14g | 3 Tbs | 21g |
| Yeast | 1 Tsp | 3g | 1 Tsp | 3g |
4. Quick
| SIZE MATERIAL | 900g | |
| Water (40-50°C) | 320ml | 320g |
| Oil | 2 Tbs | 24g |
| Salt | 1,5 Tsp | 10g |
| Sugar | 2 Tbs | 24g |
| Flour | 3,5 cups | 490g |
| Yeast | 1,5 Tsp | 4,5g |
5. Sweet
| SIZE MATERIAL | 700g | 900g | ||
| Water | 280ml | 280g | 340ml | 340g |
| Oil | 2 Tbs | 24g | 3 Tbs | 36g |
| Salt | 1,5 Tsp | 10g | 2 Tsp | 14g |
| Sugar | 3 Tbs | 36g | 3 Tbs | 48g |
| Flour | 3 cups | 420g | 3,5 cups | 490g |
| Milk powder | 2 Tbs | 14g | 2 Tbs | 14g |
| Yeast | 1 Tsp | 3g | 1 Tsp | 3g |
6. Gluten free
| SIZE MATERIAL | 700g | 900g | ||
| Water | 280ml | 280g | 340ml | 340g |
| Oil | 2 Tbs | 24g | 3 Tbs | 36g |
| Salt | 1 Tsp | 7g | 1,5 Tsp | 10g |
| Sugar | 2 Tbs | 24g | 2 Tbs | 24g |
| Gluten free flour | 3 cups | 420g | 4 cups | 560g |
| Yeast | 1,5 Tsp | 4,5g | 1,5 Tsp | 4,5g |
7. Dough
| SIZE MATERIAL | / | |
| Water | 360ml | 360g |
| Oil | 2 Tbs | 24g |
| Salt | 1,5 Tsp | 10g |
| Sugar | 2 Tbs | 24g |
| Flour | 4 cups | 560g |
| Yeast | 0,5 Tsp | 1,5g |
8. Kneading
| SIZE MATERIAL | / | |
| Water | 360ml | 360g |
| Oil | 2 Tbs | 24g |
| Salt | 1,5 Tsp | 10g |
| Flour | 4 cups | 560g |
| Sugar | 2 Tbs | 24g |
9. Cake
| SIZE MATERIAL | / | |
| Oil | 2 Tbs | 24g |
| Sugar | 8 Tbs | 96g |
| Egg | 6 | 270g |
| Self-raising flour | 250g | |
| Flavouring essence | 1 Tsp | 2g |
| Lemon juice | 1,3 Tbs | 10g |
| Soda or baking powder | 2Tsp | 6g |
10. Sandwich
| SIZE MATERIAL | 700g | 900g | ||
| Water | 270ml | 270g | 340ml | 340g |
| Butter or margarine | 1,5 Tbs | 2 Tbs | ||
| Salt | 1,5 Tsp | 10g | 2 Tsp | 14g |
| Sugar | 1,5 Tbs | 18g | 2 Tbs | 24g |
| Dry milk | 1,5 Tbs | 10g | 2 Tbs | 14g |
| Flour | 3 cups | 420g | 3,5 cups | 490g |
| Yeast | 1 Tsp | 3g | 1 Tsp | 3g |
11. Speciality
| SIZE MATERIAL | 900g | |
| Water | 340ml | 340g |
| Oil | 3 Tbs | 36g |
| Salt | 1 Tsp | 7g |
| Malt extract | 3 Tbs | 36g |
| Flour | 3,5 cups | 490g |
| Brown sugar | 2,5 Tbs | 23g |
| Sultanas | 0,5 cup | 75g |
| Yeast | 1 Tsp | 3g |
12. Jam
| SIZE MATERIAL | / | |
| Fruit | 900g | |
| 2:1 jellifying sugar | 500g | |
| Lemon juice | 1 Tbs | |
13. Yogurt
| Whole milk | 1000ml |
| Yogurt | 100ml |
| Lemon juice | 1 Tbs |
Troubleshooting
| PROBLEM | REASON | SOLUTION |
| Loaf rises, then falls. | Decrease water or milk for 1-2tbsp, use colder liquid.Increase salt for 1/4 tsp.Increase flour for 1-2tbsp, use fresher flour, use right type of flour.Decrease yeast for 1/8-1/4 tsp, use fresh yeast, use right typeof yeast at right setting. | |
| Bread rises too high. | ·Too much yeast added.·Too much flour or incorrect type of flour.·Not enough salt or forgot to add it.·Liquid touched yeast before kneading. | ·Decrease water or milk for 1-2tbs, use colder liquid.·Increase sald for 1⁄4tsp.·Decrease sugar or honey for 1⁄2tsp.·Decrease flour for 1-2tbsp.·Decrease yeast for 1⁄8-1⁄4tsp, use right type of yeast at right setting. |
| Bread does not rise enough. | ·Not enough yeast.·Yeast is too old or wrong type used.·Too much/not enough water/liquid.·Lid has been opened during the rising program.·Wrong type of flour used or stale flour.·Liquid was too cold or too hot.·No sugar added. | ·Increase water or milk for 1-2tbsp.·Decrease salt for 1⁄4tsp.·Increase sugar or honey for 1⁄2tsp.·Use fresherflour, use right type of flour.·Increase yeast for 1⁄8-1⁄4tsp, use right type of yeast at right setting. |
| Loaf is short and heavy. | ·Use fresher flour, use right type of flour.·Add yeast, use fresh yeast, use right type o yeast at right setting. | |
| Crust too light. | ·Increase sugar or honey for 1⁄2tsp. | |
| Loaf is uncooked. | ·Check power supply, select correct settings. | |
| Loaf is overcooked. | ·Decrease sugar or honey for 1⁄2tsp.·Select correct settings. | |
| Bread mixture is unmixed. | ·Place bread pan properly, push kneading blade correctly onto shaft in bread pan. | |
| High altitude adjustment. | ·Decrease water or milk for 1-2tbsp.·Decrease sugar or honey for 1⁄2tsp.·Decrease yeast for 1⁄8-1⁄4tsp. | |
| Bread does not rise at all. | ·Forgot to add yeast or yeast was stale.·Yeast killed by contact with salt or by adding an ingredient that is too hot.·Liquid touched yeast before kneading. | ·Yeast should be discarded 48 hours after opening and not be past its expiry date.·Always place the ingredients in the order stated in the recipe with the liquid first and yeast last.·Only use tepid ingredients. |
| Wholemeal bread has less rise. | ·It is normal for bread made with wholemeal flour to have less rise and a denser texture. | ·For a lighter texture use the 50% wholemeal recipe. |
| Wholemeal bread sometimes has a | ·This is typical for wholemeal bread in your Home Bread | ·You may prefer results using correct program for Rapid |
| wrinkled top or slightly sunken top. | Maker as the gluten gets overstretched in the kneading, rising and baking processes. | Baked Wholemeal bread which has a shorter rising time. • The rustic appearance does not affect the taste and quality of the bread. |
| Loaf had a big air hole inside or top crust has split/erupted. | • Liquid touched yeast before kneading. | • Always place the ingredients in the order stated in the recipe with the liquid first. • When using the delayed start option make sure the yeast is in the centre of the pan. |
| Heavy, lumpy bread. | • Too much liquid. • Not enough yeast. • Too much flour. • Older ingredients or wrong type of flour. | • Reduce the liquid by 1-2 tbsp at a time. Use accurate measures. • Increase yeast by 1/4 tsp at a time. • Reduce quantity of flour. • Use fresh ingredients. |
| Open, moist/too porous bread. | • Too much liquid. • No salt added. | • Use accurate measures. • In high humidity use a little less water. • Different batches of flour may require less liquid. |
| Air bubble under the crust. | • The dough was poorly mixed. | • Unfortunately this does happen on one-off occasions. If the problem persists add an extra tablespoon of liquid. |
| Display "H:HH" after pressing "start/stop" button. | • The temperature in bread maker is too high to make bread. | • Press "start/stop" button and unplug bread maker, then take bread pan out and open cover until the bread maker cools down. |
Quick breads are made with baking powder or baking soda that is activated by moisture and heat. For perfect quick breads, it is suggested that all liquid should be placed in the bottom of the bread pan, and dry ingredients should be placed on top. During the initial mixing of quick bread, dry ingredients may collect in the corners of the pan. It is necessary to help machine mixing to avoid flour clumps.
CLEANING AND MAINTENANCE
Disconnect the machine from the power and let it cool down before you start to clean it.
- Bread pan: Rub inside and outside with a damp cloth. Do not use any sharp or abrasive agents.
- Kneading bar: If the kneading bar is difficult to remove from the axle, soak the bread pan in water beforehand.
- Lid and window: Clean the lid and machine inside and outside with a slightly damp cloth.
This appliance conforms to the CE directives for radio interference suppression and low-voltage safety and has been built to meet current safety requirements.
Environment
Do not throw away the appliance with the normal household waste at the end of its life, but hand it in at an official collection point for recycling. By doing this, you help to preserve the environment.
Guarantee & service
If you need information or if you have a problem, please contact the Gorenje Customer Care Centre in your country (you find its phone number in the worldwide guarantee leaflet). If there is no Customer Care Centre in your country, go to your local Gorenje dealer or contact the Service department of Gorenje domestic appliances.
For personal use only!
GORENJE WISHES YOU A LOT OF PLEASURE WHEN USING YOUR APPLIANCE
We reserve the right to any modifications!
Dry ingredients
Water or liquid
Yeast or soda
Dry ingredients
Yeast or soda
Dry ingredients
Water or liquid
Tbs = tablespoon


- LOAF SIZE
- CONTROL PANEL DESCRIPTION
- DESCRIPTION OF THE CONTROL PANEL
- IMPORTANT SAFEGUARDS
- USING THE MACHINE FOR THE FIRST TIME
- ELECTRICAL CONNECTION
- FUNCTIONS & OPERATION
- INTRODUCTION OF CONTROL PANEL
- START/STOP
- PAUSE FUNCTION
- MENU
- THE TIME RANGE OF EACH PROGRAM AS FOLLOWING
- UNDER THE MENU OF HOME MADE
- COLOR
- LOAF
- DELAY (TIME)
- KEEP WARM
- MEMORY
- ENVIRONMENT
- WARNING DISPLAY
- HOW TO MAKE BREAD
- RECIPES
- BASIC
- FRENCH
- WHOLE WHEAT
- QUICK
- SWEET
- GLUTEN FREE
- DOUGH
- KNEADING
- CAKE
- SANDWICH
- SPECIALITY
- JAM
- YOGURT
- TROUBLESHOOTING
- CLEANING AND MAINTENANCE
- GUARANTEE & SERVICE
- GORENJE WISHES YOU A LOT OF PLEASURE WHEN USING YOUR APPLIANCE
Brand : GORENJE
Model : BM900WII
Category : Bread maker