
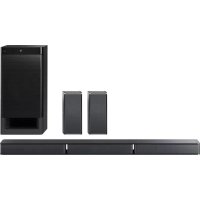
HT-XT100 - Soundbar SONY - Free user manual and instructions
Find the device manual for free HT-XT100 SONY in PDF.


| Product type | Soundbar |
| Brand | Sony |
| Model | HT-XT100 |
| Dimensions (W x H x D) | Approx. 90 x 5.2 x 7.5 cm |
| Weight | Approx. 2.5 kg |
| Power supply | 100-240 V AC, 50/60 Hz |
| Power consumption | 30 W (operating) |
| Output power | 2 x 30 W |
| Main features | Bluetooth, HDMI ARC, optical input, S-Force PRO Front Surround, cinema/music/night mode |
| Inputs | 1 x HDMI (ARC), 1 x optical, 1 x analog (mini-jack) |
| Outputs | 1 x HDMI (ARC) |
| Supported audio formats | Dolby Digital, DTS, Linear PCM |
| Wireless connectivity | Bluetooth version 2.1 + EDR |
| Remote control | Yes, included |
| Care and cleaning | Wipe with a soft, dry cloth. Do not use abrasive products. |
| Safety | Do not expose to moisture. Disconnect during thunderstorms. |
| Spare parts and repairability | Repairability index: 6.5/10. Available parts: power supply, cables. |
Frequently Asked Questions - HT-XT100 SONY
User questions about HT-XT100 SONY
0 question about this device. Answer the ones you know or ask your own.
Ask a new question about this device
Download the instructions for your Soundbar in PDF format for free! Find your manual HT-XT100 - SONY and take your electronic device back in hand. On this page are published all the documents necessary for the use of your device. HT-XT100 by SONY.
USER MANUAL HT-XT100 SONY
Operating Instructions
GB
©2015 Sony Corporation Printed in China
4-559-030-11(1)
HT-XT100
Owner's Record
The model and serial numbers are located on the rear panel of the unit. Record serial numbers in the space provided below. Refer to them whenever you call upon your Sony dealer regarding this product.
Model No. HT-XT100
Serial No.
WARNING
To reduce the risk of fire or electric shock, do not expose this apparatus to rain or moisture.
The unit is not disconnected from the mains as long as it is connected to the AC outlet, even if the unit itself has been turned off.
To reduce the risk of fire, do not cover the ventilation opening of the appliance with newspapers, tablecloths, curtains, etc.
Do not expose the appliance to naked flame sources (for example, lighted candles).
To reduce the risk of fire or electric shock, do not expose this appliance to dripping or splashing, and do not place objects filled with liquids, such as vases, on the appliance.
As the main plug is used to disconnect the unit from the mains, connect the unit to an easily accessible AC outlet. Should you notice an abnormality in the unit, disconnect the main plug from the AC outlet immediately.
Do not install the appliance in a confined space, such as a bookcase or built-in cabinet.
Do not expose batteries or appliances with battery-installed to excessive heat, such as sunshine and fire.
Indoor use only.
For the customers in the U.S.A.

This symbol is intended to alert the user to the presence of uninsulated "dangerous voltage" within the product's enclosure that may be of sufficient magnitude to constitute a risk of electric shock to persons.

This symbol is intended to alert the user to the presence of important operating and maintenance (servicing) instructions in the literature accompanying the appliance.
Important Safety Instructions
1) Read these instructions.
2) Keep these instructions.
3) Heed all warnings.
4) Follow all instructions.
5) Do not use this apparatus near water.
6) Clean only with dry cloth.
7) Do not block any ventilation openings. Install in accordance with the manufacturer's instructions.
8) Do not install near any heat sources such as radiators, heat registers, stoves, or other apparatus (including amplifiers) that produce heat.
9) Do not defeat the safety purpose of the polarized or grounding-type plug. A polarized plug has two blades with one wider than the other. A grounding type plug has two blades and a third grounding prong. The wide blade or the third prong are provided for your safety. If the provided plug does not fit into your outlet, consult an electrician for replacement of the obsolete outlet.
10) Protect the power cord from being walked on or pinched particularly at plugs, convenience receptacles, and the point where they exit from the apparatus.
11) Only use attachments/accessories specified by the manufacturer.
12) Use only with the cart, stand, tripod, bracket, or table specified by the manufacturer, or sold with the apparatus. When a cart is used, use caution when moving the cart/ apparatus combination to avoid injury from tip-over.

13) Unplug this apparatus during lightning storms or when unused for long periods of time.
14) Refer all servicing to qualified service personnel. Servicing is required when the apparatus has been damaged in any way, such as power-supply cord or plug is damaged, liquid has been spilled or objects have fallen into the apparatus, the apparatus has been exposed to rain or moisture, does not operate normally, or has been dropped.
The following FCC statement applies only to the version of this model manufactured for sale in the U.S.A. Other versions may not comply with FCC technical regulations.
NOTE:
This equipment has been tested and found to comply with the limits for a Class B digital device, pursuant to Part 15 of the FCC Rules. These limits are designed to provide reasonable protection against harmful interference in a residential installation. This equipment generates, uses and can radiate radio frequency energy and, if not installed and used in accordance with the instructions, may cause harmful interference to radio communications.
However, there is no guarantee that interference will not occur in a particular installation. If this equipment does cause harmful interference to radio or television reception, which can be determined by turning the equipment off and on, the user is encouraged to try to correct the interference by one or more of the following measures:
- Reorient or relocate the receiving antenna.
- Increase the separation between the equipment and receiver.
- Connect the equipment into an outlet on a circuit different from that to which the receiver is connected.
- Consult the dealer or an experienced radio/TV technician for help.
Properly shielded and grounded cables and connectors must be used for connection to host computers and/or peripherals in order to meet FCC emission limits.
CAUTION
You are cautioned that any changes or modifications not expressly approved in this manual could void your authority to operate this equipment.
This equipment must not be co-located or operated in conjunction with any other antenna or transmitter.
This equipment complies with FCC radiation exposure limits set forth for an uncontrolled environment and meets the FCC radio frequency (RF) Exposure Guidelines. This equipment has very low levels of RF energy that it deemed to comply without maximum permissive exposure evaluation (MPE). But it is desirable that it should be installed and operated keeping the radiator at least
20cm or more away from person's body (excluding extremities: hands, wrists, feet and ankles).
For the customers in Canada
Properly shielded and grounded cables and connectors must be used for connection to host computers and/or peripherals.
This device complies with Industry Canada licence-exempt RSS standard(s).
Operation is subject to the following two conditions:
(1) this device may not cause interference, and (2) this device must accept any interference, including interference that may cause undesired operation of the device.
This equipment complies with IC radiation exposure limits set forth for an uncontrolled environment and meets RSS-102 of the IC radio frequency (RF) Exposure rules.
This equipment has very low levels of RF energy that it deemed to comply without maximum permissive exposure evaluation (MPE). But it is desirable that it should be installed and operated keeping the radiator at least 20cm or more away from person's body (excluding extremities: hands, wrists, feet and ankles).
Copyrights and Trademarks
This system incorporates Dolby* Digital Surround System.
* Manufactured under license from Dolby Laboratories. Dolby, and the double-D symbol are trademarks of Dolby Laboratories.
The BLUETOOTH ^® word mark and logos are registered trademarks owned by Bluetooth SIG, Inc. and any use of such
marks by Sony Corporation is under license.
This system incorporates High-Definition Multimedia Interface (HDMI™) technology. The terms HDMI and HDMI High-Definition Multimedia Interface, and the HDMI Logo are trademarks or registered trademarks of HDMI Licensing LLC in the United States and other countries.
The N Mark is a trademark or registered trademark of NFC Forum, Inc. in the United States and in other countries.
Android is a trademark of Google Inc.
"ClearAudio+" is a trademark of Sony Corporation.
Other trademarks and trade names are those of their respective owners.
About these operating instructions
- The instructions in these Operating Instructions describe the controls on the remote control. You can also use the controls on the main unit if they have the same or similar names as those on the remote control.
- Some illustrations are presented as conceptual drawings, and may be different from the actual products.
Table of Contents
Connecting → Startup Guide (separate document)
About these operating instructions ....5
Listening
Listening to sound from a TV, cable/satellite box, etc. .....7
Listening to music from a USB device ....7
Listening to music from a BLUETOOTH device ....8
Sound Adjustment
Enjoying sound effects (Sports mode, etc.) 8
BLUETOOTH Functions
Listening to music from a BLUETOOTH device ....9
Settings and Adjustments
Using the setup display .....11
Other Functions
Using the Control for HDMI function 13
Saving power in standby mode 14
Additional Information
Precautions 15
Troubleshooting 16
Guide to parts and controls .....20
playable types of files .....23
Supported audio formats .....23
Specifications 24
On BLUETOOTH communication ....26
Listening
Listening to sound from a TV, cable/satellite box, etc.
Press INPUT repeatedly.
When you press INPUT once, the current device appears on the front display, then each time you press INPUT, the device changes cyclically as follows.
$$ \begin{array}{l} \text {[OPT] \longrightarrow [ANALG] \longrightarrow [BT] \longrightarrow [USB] \longrightarrow} \ \text {[HDMI]} \end{array} $$
[OPT]
TV that is connected to the OPTICAL IN jack
[ANALG]
Analog device that is connected to the ANALOG IN jack
[BT]
BLUETOOTH device that supports A2DP (page 9)
[USB]
USB device that is connected to the (USB) port (page 7)
[HDMI]
TV compatible with the Audio Return Channel function that is connected to the HDMI OUT ARC jack
Tip
- If the BLUETOOTH functions are disabled, [BTOFF] appears instead of [BT].
Listening to music from a USB device
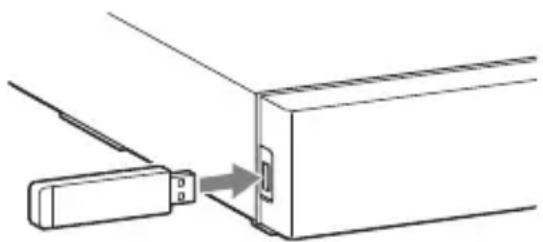
You can play music files on a connected USB device.
For playable types of files, see " playable types of files" (page 23).
1 Connect the USB device to the ⌘ (USB) port.
natural_image
Diagram showing a device being inserted into a rectangular box with a close-up of the internal structure (no text or symbols)2 Press INPUT repeatedly to display [USB].
3 Press ▶ II (play/pause).
4 Press ↑ ↘ to select a folder to be played.
Note
- Turn off the system before removing the USB device to avoid data corruption or damage to the USB device.
Listening to music from a BLUETOOTH device
Refer to "BLUETOOTH Functions" (page 9).
Sound Adjustment
Enjoying sound effects (Sports mode, etc.)
You can easily enjoy pre-programmed sound fields that are tailored to different kinds of sound sources.
Selecting the sound field
Press SOUND FIELD repeatedly until the desired sound field appears on the front panel display.
[CLEARAUDIO+]
The suitable sound setting is automatically selected for the sound source.
[STANDARD]
Corresponds to every source.
[MOVIE]
Sounds are played back with surround effects, and they are realistic and powerful, making them suitable for movies.
[SPORTS]
Commentary is clear, cheers are heard as surround-sound, and sounds are realistic.
[GAME]
Sounds are powerful and realistic, suitable for game play.
[MUSIC]
Sounds are played back to suit to a music program, music Blu-ray Disc™, or DVD.
[PAUDIO (Portable audio)]
Sounds are played back to suit to a portable music player.
Setting the Night mode
Sounds are played back enhanced with sound effects and clarity of dialog.
Press NIGHT to display [N ON].
To inactivate the Night mode, press NIGHT to display [N OFF].
Setting the Voice mode
The Voice mode helps make dialogs clearer.
Press VOICE to display [V ON].
To inactivate the Voice mode, press VOICE to display [V OFF].
BLUETOOTH Functions
Listening to music from a BLUETOOTH device

natural_image
Simple line drawing of a rectangular device emitting sound waves from a smartphone (no text or symbols)Pairing this system with a BLUETOOTH device
Pairing is the process required to create a link between BLUETOOTH devices to allow wireless connection. You must pair a device with the system before you start using the system.
Once BLUETOOTH devices are paired, there is no need to pair them again.
1 Press PAIRING on the system.
The BLUETOOTH indicator (blue) flashes quickly during BLUETOOTH pairing.
2 Turn on the BLUETOOTH function on the BLUETOOTH device, search for devices and select "HT-XT100."
If a Passkey is requested, enter "0000."
3 Make sure that the BLUETOOTH indicator (blue) lights up.
Note
- You can pair up to 8 BLUETOOTH devices. If the 9th BLUETOOTH device is paired, the least recently connected device will be replaced by the new one.
Listening to music of the registered device
1 Press INPUT repeatedly to display [BT].
2 On the BLUETOOTH device, select "HT-XT100."
3 Make sure that the BLUETOOTH indicator (blue) lights up.
4 Start playback on the BLUETOOTH device.
Connecting to a BLUETOOTH device by One-touch functions (NFC)
By holding an NFC-compatible device near to the N-Mark on the system, the system and device proceed to complete pairing and the BLUETOOTH connection automatically.
Compatible devices
Smartphones, tablets, and music players with the NFC function built-in (OS: Android™ 2.3.3 or later, excluding Android 3.x)
1 Download, install, and start the "NFC Easy Connect" application.

Note
• The application may not be available in some countries/regions.
2 Hold the device near to the N-Mark on the system until the device vibrates.

natural_image
Diagram showing a device with a labeled 'N' and a hand holding a small object (no text or symbols present)3 Make sure that the BLUETOOTH indicator (blue) lights up.
Connection has been established.
Notes
- You can connect only one device at a time.
- Depending on a smartphone, you may need to set the NFC function to on beforehand. Refer to the operating instructions of the smartphone.
Tip
- If pairing and the BLUETOOTH connection fail, do the following.
- Relaunch "NFC Easy Connect" and move the device slowly over the N-Mark.
- Remove the case from the device if using a commercially available device case.
Using the setup display
You can set the following items with the menu.
Your settings are retained even if you disconnect the AC power cord (mains lead).
1 Press MENU to turn on the menu on the front panel display.
2 Press BACK/↑↓(select)/ENTER repeatedly to select the item and press ENTER to decide the setting.
3 Press MENU to turn off the menu.
Menu list
The default settings are underlined.
| Menu items Function | ||
| [LEVEL](Level) | [DRC](Dynamic range control) | Useful for enjoying movies at low sound volume. DRC applies to Dolby Digital sources.[ON]: Compresses sound in accordance with the information contained in the content.[OFF]: Sound is not compressed. |
| [TONE](Tone) | [BASS](Bass) | Adjusts the bass level.The parameters range from [-6] to [+6] in 1-step increments. |
| [TRE](Treble) | Adjusts the treble level.The parameters range from [-6] to [+6] in 1-step increments. | |
| [AUDIO](Audio) | [DUAL](Dual mono) | You can enjoy multiplex broadcast sound when the system receives a Dolby Digital multiplex broadcast signal.[M/S]: Main sound is output from the left speaker and sub sound is output from the right speaker.[MAIN] Outputs only the main channel.[SUB]: Outputs only the sub channel. |
| [TV AU](TV audio) | [HDMI]: Select this setting when the system is connected to an HDMI (ARC) jack of a TV with an HDMI cable.[OP]: Select this setting when the system is connected to a TV with the optical digital cable.[ANALG]: Select this setting when the system is connected to a TV with an audio cable. | |
| [EFCT](Sound effect) | [ON]: The sound of the selected sound field is played. It is recommended to use this setting.[OFF]: The input source is down-mixed for 2 channels. | |
| [STRM](Stream) | Shows the current audio stream information.[LPCM]: LPCM[DOLBY D]: Dolby Digital[NO INFO]: No audio format information | |
| [HDMI] [CTRL](Control for HDMI) | [ON]: Turns on the Control for HDMI function.[OFF]: Turns off the function. Select this setting when you want to connect a device not compatible with the Control for HDMI function. | |
| [SETBT](Set BLUETOOTH) | [BT PW](BLUETOOTH power) | Turns on or off the BLUETOOTH function of this system.[ON]: Turns on the BLUETOOTH function.[OFF]: Turns off the BLUETOOTH function.NoteIf you change the setting to [OFF], the BLUETOOTH function is disabled. |
| [BTSTB](BLUETOOTH standby) | When the system has pairing information, the system is in BLUETOOTH standby mode even when it is turned off.[ON]: BLUETOOTH standby mode is enabled.[OFF]: BLUETOOTH standby mode is disabled.NoteDuring BLUETOOTH standby mode, standby power consumption increases. | |
| [USB] [MODE](Playback mode) | [SINGL]: Plays back all tracks in a folder.[REP 1]: Repeats one track.[REPFL]: Repeats all tracks in a folder.[RANDM]: Plays tracks in a folder in random order. | |
| [SYSTM](System) | [ASTBY](Auto standby) | You can reduce power consumption. The system enters standby mode automatically when you do not operate the system for about 20 minutes and the system is not receiving an input signal.[ON]: Turns on the auto standby function.[OFF]: Turns off the function. |
| [VER] (Version) The current firmware version information appears on the front panel display. | ||
Other Functions
Using the Control for HDMI function
By using the Control for HDMI function, and connecting a device that is compatible with the Control for HDMI function via an HDMI cable, operation is simplified with the features below. The Control for HDMI function is enabled by setting [CTRL (Control for HDMI)] to [ON] (page 12). The default setting is [ON].
System Power Off
When you turn off the TV, the system and the connected device will turn off automatically.
System Audio Control
If you turn on the system while you are watching the TV, the TV sound will be output from the speakers of the system automatically.
The volume of the system will be adjusted when you adjust the volume using the TV's remote control. If the TV sound was output from the speakers of the system the last time you watched the TV, the system will be turned on automatically when you turn on the TV again.
Audio Return Channel (ARC)
If the TV is compatible with the Audio Return Channel (ARC) technology, an HDMI cable connection will allow you to listen to the TV sound from the speakers of the system.
Control for HDMI is a mutual control function standard used by HDMI CEC (Consumer Electronics Control) for HDMI (High-Definition Multimedia Interface).
Notes
- The above features may not operate with certain device.
- Depending on the settings of the connected device, the Control for HDMI function may not work correctly. Refer to the operating instructions of the device.
Saving power in standby mode
Check that you have made the following settings:
- [CTRL (Control for HDMI)] in [HDMI] is set to [OFF] (page 12).
- [ASTBY] in [SYSTM] is set to [ON] (page 12).
- [BTSTB] in [SETBT] is set to [OFF] (page 12).
Additional Information
Precautions
On safety
- Should any solid object or liquid fall into the system, unplug the system and have it checked by qualified personnel before operating it any further.
- Do not climb on the system, as you may fall down and injure yourself, or system damage may result.
- Do not place anything other than a TV on the system.
On power sources
- Before operating the system, check that the operating voltage is identical to your local power supply. The operating voltage is indicated on the nameplate at the rear of the system.
- If you are not going to use the system for a long time, be sure to disconnect the system from the wall outlet (mains). To disconnect the AC power cord (mains lead), grasp the plug itself; never pull the cord.
- One blade of the plug is wider than the other for the purpose of safety and will fit into the wall outlet (mains) only one way. If you are unable to insert the plug fully into the outlet, contact your dealer.
- AC power cord (mains lead) must be changed only at a qualified service shop.
On heat buildup
Although the system heats up during operation, this is not a malfunction. If you continuously use this system at high volume, the system temperature at the rear and bottom rises considerably. To avoid burning yourself, do not touch the system.
On placement
- Leave the front of the system open.
- Do not place the system on top of a device that radiates heat.
- Place the system in a location with adequate ventilation to prevent heat buildup and prolong the life of the system.
- Do not place the system near heat sources or in a place subject to direct sunlight, excessive dust, or mechanical shock.
- Do not place anything at the rear of the system that might block the ventilation holes and cause malfunctions.
- If the system is being used in combination with a TV, VCR, or tape deck, noise may result and picture quality may suffer. In such a case, place the system away from the TV, VCR, or tape deck.
- Use caution when placing the system on a surface that has been specially treated (with wax, oil, polish, etc.), as staining or discoloration of the surface may result.
• Take care to avoid any possible injury from the corners of the system.
• Install the system so as not to harm the speaker on the bottom of this system. - The speakers of this system are not of magnetically shielded type.
Do not place magnetic cards or a CRT-type TV set on top of the system or near it. - Do not place anything on this system that weighs over 30 kg (66 lb 2 ^1/4 oz). Such an item can damage the system.
On operation
Before connecting other equipment, be sure to turn off and unplug the system.
On cleaning
Clean the system with a soft, dry cloth. Do not use any type of abrasive pad, scouring powder, or solvent such as alcohol or benzine.
If you have any question or problem concerning your system, please consult your nearest Sony dealer.
Troubleshooting
If you experience any of the following difficulties while using the system, use this troubleshooting guide to help remedy the problem before requesting repairs. Should any problem persist, consult your nearest Sony dealer.
General
The power does not turn on.
→ Check that the AC power cord (mains lead) is connected securely.
The system does not work normally.
→ Disconnect the AC power cord (mains lead) from the wall outlet (mains), then reconnect after several minutes.
The system is turned off automatically.
→ The auto standby function is working. Set [ASTBY] in [SYSTM] to [OFF] (page 12).
Sound
No TV sound is output from the system.
→ Repeatedly press the INPUT button on the remote control to display [HDMI] (when the TV is connected to the HDMI OUT jack) or [OPT] (when the TV is connected to the OPTICAL IN jack) on the display.
→ Check the connection of the HDMI cable, optical digital cable, or audio cable that is connected to the system and the TV (refer to the supplied Startup Guide).
→ Check the sound output of the TV. Refer to the operating instructions of the TV for the TV settings.
→ Increase the volume on the TV or cancel muting.
→ When a TV compatible with the Audio Return Channel (ARC) technology is connected with an HDMI cable, make sure the cable is connected to the HDMI input (ARC) terminal of the TV (refer to the supplied Startup Guide).
→ If the TV is not compatible with the Audio Return Channel (ARC) technology, connect the optical digital cable. TV sound is not output via an HDMI connection (refer to the supplied Startup Guide).
→ If no sound is output from an optical digital output jack or the TV does not have an optical digital output jack, connect the cable box or satellite box directly to the OPTICAL IN jack of the system.
The sound is output from both the system and the TV.
→ Turn off the sound of the TV.
The TV sound from this system lags behind the image.
→ When you are watching movies, you may hear the sound with a slight delay from the image.
No sound or only a very low-level sound of the device connected to this system is heard from this system.
→ Press the △ (volume) + button on the remote control and check the volume level (page 22).
→ Press the ☑ (muting) or
△ (volume) + button on the remote control to cancel the muting function (page 22).
→ Make sure the input source is selected correctly. You should try other input sources by pressing the INPUT button on the remote control several times (page 7).
→ Check that all the cables and cords of the system and the connected device are firmly inserted.
Bass sound is not heard or its volume is low.
→ Press the SW∆ (subwoofer volume) + button on the remote control to increase the subwoofer volume (page 22).
The surround effect cannot be obtained.
→ Depending on the input signal and the sound field setting, surround sound processing may not work effectively. The surround effect may be subtle, depending on the program or disc.
→ To play multi channel audio, check the digital audio output setting on the device connected to the system. For details, refer to the operating instructions supplied with the connected device.
USB device
The USB device is not recognized.
→ Try the following:
① Turn the system off.
② Remove and reconnect the USB device.
③ Turn the system on.
→ Make sure that the USB device is securely connected to the (USB) port.
→ Check if the USB device or a cable is damaged.
→ Check if the USB device is on.
→ If the USB device is connected via a USB hub, disconnect it and connect the USB device directly to the system.
BLUETOOTH device
BLUETOOTH connection cannot be completed.
→ Make sure that the BLUETOOTH indicator (blue) is lit (page 20).
System status BLUETOOTH
| indicator(blue) | |
| During BLUETOOTH pairing | Flashes quickly |
| The system is attempting to connect with a BLUETOOTH device | Flashes |
| The system has established connection with a BLUETOOTH device | Lit |
| The system is in BLUETOOTH standby mode (when the system is off) | Unlit |
→ Make sure the BLUETOOTH device to be connected is turned on and the BLUETOOTH function is enabled.
→ Bring this system and the BLUETOOTH device closer together.
→ Pair this system and the BLUETOOTH device again. You may need to cancel the pairing with this system using your BLUETOOTH device first.
→ If [BT PW] of the system is set to [OFF], set to [ON] (page 12).
Pairing cannot be achieved.
→ Bring this system and the BLUETOOTH device closer together.
→ Make sure this system is not receiving interference from a wireless LAN equipment, other 2.4 GHz wireless devices, or a microwave oven. If a device that generates electromagnetic radiation is nearby, move the device away from this system.
No sound is output from the connected BLUETOOTH device.
→ Make sure that the BLUETOOTH indicator (blue) is lit (page 20).
→ Bring this system and the BLUETOOTH device closer together.
→ If a device that generates electromagnetic radiation, such as a wireless LAN equipment, other BLUETOOTH devices, or a microwave oven is nearby, move the device away from this system.
→ Remove any obstacle between this system and the BLUETOOTH device or move this system away from the obstacle.
→ Reposition the connected BLUETOOTH device.
→ Try changing the wireless frequency of the Wi-Fi router, computer, etc. to 5 GHz band.
→ Increase the volume on the connected BLUETOOTH device.
The sound is not in sync with the image.
→ When you are watching movies, you may hear the sound with a slight delay from the image.
Remote control
The remote control does not function.
→ Point the remote control at the center of the front panel (remote control sensor) of the system (page 20).
→ Remove any obstacles in the path between the remote control and the system.
→ Replace both batteries in the remote control with new ones, if they are weak.
→ Make sure you are pressing the correct button on the remote control (page 22).
Others
The Control for HDMI function does not work properly.
→ Check the HDMI connection (refer to the supplied Startup Guide).
→ Set up the Control for HDMI function on the TV. Refer to the operating instructions supplied with the TV for TV setting.
→ If you connect/disconnect the AC power cord (mains lead), wait more than 15 seconds before operating the system.
→ If you connect the audio output of video device with the system, using a cable other than an HDMI cable, no sound may be output because of the Control for HDMI function. In such a case, set [CTRL (Control for HDMI)] in [HDMI] to [OFF] (page 12) or connect the cable from the audio output jack of the video device directly to the TV.
If [PRTCT] appears on the front panel display of the system
→ Press the I/① (on/standby) button on the system to turn off the system. After the display disappears, disconnect the AC power cord (mains lead) then check that nothing is blocking the ventilation holes of the system.
Reset
If the system still does not operate properly, reset the system as follows:
1 While holding down the I/⏻ (on/ standby) button on the system, hold down the INPUT and VOL (volume) – buttons simultaneously for 5 seconds.
[RESET] appears on the display, and the settings of the menu and sound fields, etc. return to their initial status.
2 Disconnect the AC power cord (mains lead).
Guide to parts and controls
For more information, refer to the pages indicated in parentheses.
Main unit
Front and side panels

flowchart
graph TD
    A["Device 1"] -->|Switch| B["Switch"]
    C["Device 2"] --> D["Server"]
    E["Device 3"] --> D
    F["Device 4"] --> D
    G["Device 5"] --> H["Server"]
    I["Device 6"] --> J["1/按钮"]
    K["Device 7"] --> L["INPUT"]
    M["Device 8"] --> N["PARING"]
    O["Device 9"] --> P["VOL +"]
    Q["Device 10"] --> R["VOL -"]
1 ⬤(USB) port (page 7)
2 BLUETOOTH indicator (blue)
BLUETOOTH status
– During BLUETOOTH pairing: Flashes quickly
- BLUETOOTH connection is being attempted: Flashes
- BLUETOOTH connection has been established: Lit
- BLUETOOTH standby mode (when the system is off): Unlit
3 Front panel display
4 Remote control sensor
5 N-Mark
Position the NFC-compatible device near this indication to activate the NFC function.
6 I/⏻ (on/standby) button
Turns on the system, or sets it to standby mode.
7 INPUT button (page 7)
8 PAIRING button (page 9)
9 VOL (volume) +/- buttons
Rear panel
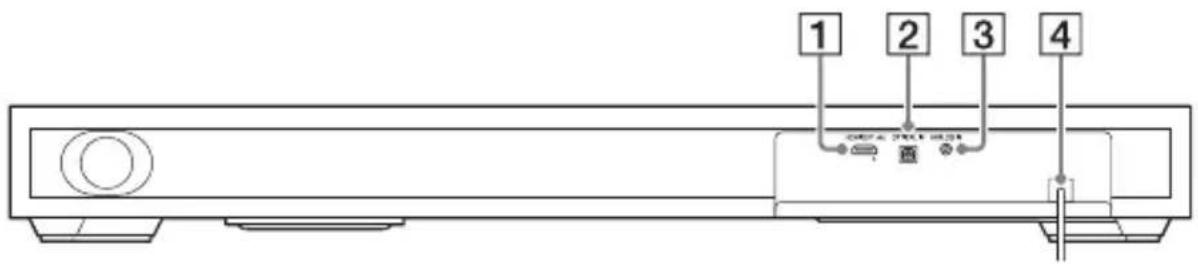
1 HDMI OUT ARC jack
2 OPTICAL IN jack
3 ANALOG IN jack
4 AC power cord (mains lead)
Remote control
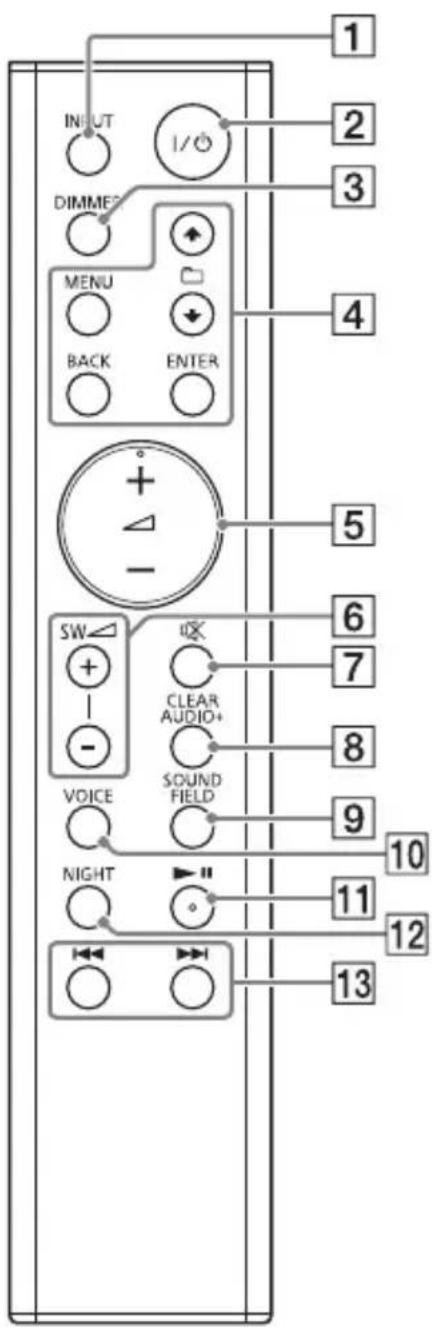
1 INPUT button
2 I /(on/standby) button
3 DIMMER button
The display brightness can be switched.
Bright → Dark → Off
- When the display brightness is set to "Off," the display is turned off after the display shows
operation status for several seconds.
4 MENU/↑ □ ↓ (select)/ENTER/BACK buttons
Press ↑ or ↓ to select the menu items. Then press ENTER to enter the selection.
To return to the previous display, press BACK.
5 △ (volume) +*/- buttons
Adjusts the volume.
Adjusts the volume of bass sound.
7 ☑ (muting) button
Turns off the sound temporarily.
8 CLEARAUDIO+ button
Automatically selects the suitable sound setting for the sound source.
9 SOUND FIELD button (page 8)
Selects a sound mode.
10 VOICE button (page 9)
11 ▶ II* (play/pause) button
Pauses or resumes playback.
12 NIGHT button (page 9)
13 /▶▶ (previous/next) buttons
To go to the beginning of the previous or next file.
* The ▶II and △+ buttons have a tactile dot. Use it as a guide during operation.
playable types of files
| Codec Extension | |
| MP3 (MPEG-1 Audio Layer III) | .mp3 |
| AAC .m4a | |
| WMA9 Standard .wma |
Notes
- Some files edited on a PC may not play.
- The system does not play coded files such as DRM and Lossless.
- The system can recognize the following files or folders in USB devices:
- up to 199 folders
- up to 150 files/folders in a single layer
- Some USB devices may not work with this system.
- The system can recognize Mass Storage Class (MSC) devices.
Supported audio formats
Audio formats supported by this system are as follows.
• Dolby Digital
• Linear PCM 2ch 48 kHz or less
Specifications
Amplifier section
U.S. models:
POWER OUTPUT AND TOTAL HARMONIC DISTORTION:
(FTC)
Front L + Front R:
With 4 ohms loads, both channels driven, from 200 Hz - 20,000 Hz; rated
10 Watts per channel minimum RMS
power, with no more than 1% total harmonic distortion from
250 milliwatts to rated output.
POWER OUTPUT (reference):
Front L/Front R speaker:
20 Watts (per channel at 4 ohms, 1 kHz)
Subwoofer:
40 Watts (at 4 ohms, 100 Hz)
Canadian models:
POWER OUTPUT (rated)
Front L + Front R:
10 W + 10 W (at 4 ohms, 1 kHz, 1% THD)
POWER OUTPUT (reference)
Front L/Front R speaker:
20 Watts (per channel at 4 ohms, 1 kHz)
Subwoofer:
40 Watts (at 4 ohms, 100 Hz)
Inputs
ANALOG IN
DIGITAL IN
Output
HDMI OUT ARC
HDMI Section
Connector
Type A (19pin)
USB Section

(USB) port
Type A
BLUETOOTH section
Communication system
BLUETOOTH Specification version 4.0
Output
BLUETOOTH Specification Power Class 2
Maximum communication range
Line of sight approx. 10 m (33 ft) ^1)
Maximum number of devices to be registered 8 devices
Frequency band
2.4 GHz band (2.4000 GHz - 2.4835 GHz)
Modulation method
FHSS (Freq Hopping Spread Spectrum)
Compatible BLUETOOTH profiles ^2)
A2DP (Advanced Audio Distribution Profile)
AVRCP (Audio Video Remote Control Profile)
Supported Codecs ^3) SBC ^4)
Transmission range (A2DP)
20 Hz - 20,000 Hz (Sampling frequency 44.1 kHz)
^1) The actual range will vary depending on factors such as obstacles between devices, magnetic fields around a microwave oven, static electricity, cordless phone, reception sensitivity, operating system, software application, etc.
^2) BLUETOOTH standard profiles indicate the purpose of BLUETOOTH communication between devices.
^3) Codec: Audio signal compression and conversion format
^4) Subband Codec
Speakers
Front L/Front R speaker section
Speaker system
2-way speaker system, Acoustic suspension
Speaker
Tweeter: 14 mm - 25 mm ( ^9/_16 in - 1 in) balance dome type
Woofer: 43 mm × 120 mm (1 ^3/4 in × 4 ^3/4 in) cone type
Subwoofer section
Speaker system
Subwoofer system
Bass reflex
Speaker
100 mm (4 in) cone type
General
Power requirements
120 V AC, 60 Hz
Power consumption
On: 25 W
Standby mode (Control for HDMI is set to on): 6 W or less
Standby mode (Control for HDMI is set to off): 0.5 W or less
BLUETOOTH Standby mode: 6 W or less
Dimensions (approx.) (w/h/d)
702 mm × 79 mm × 311 mm
(27^3/4in× 3^1/8in× 12^1/_4in)
Mass (approx.)
6.5 kg (14 lb 6 oz)
Design and specifications are subject to change without notice.
On BLUETOOTH communication
- BLUETOOTH devices should be used within approximately 10 meters (33 feet) (unobstructed distance) of each other. The effective communication range may become shorter under the following conditions.
- When a person, metal object, wall or other obstruction is between the devices with a BLUETOOTH connection
- Locations where a wireless LAN is installed
- Around microwave ovens that are in use
- Locations where other electromagnetic waves occur
- BLUETOOTH devices and wireless LAN (IEEE 802.11b/g) use the same frequency band (2.4 GHz). When using your BLUETOOTH device near a device with wireless LAN capability, electromagnetic interference may occur. This could result in lower data transfer rates, noise, or inability to connect. If this happens, try the following remedies:
- Use this system at least 10 meters (33 feet) away from the wireless LAN device.
- Turn off the power to the wireless LAN device when using your BLUETOOTH device within 10 meters (33 feet).
- Install this system and BLUETOOTH device as closer to each other as possible.
- The radio waves broadcast by this system may interfere with the operation of some medical devices. Since this interference may result in malfunction, always turn off the power
on this system and BLUETOOTH device in the following locations:
- In hospitals, on trains, in airplanes, at gas stations, and any place where flammable gasses may be present - Near automatic doors or fire alarms
- This system supports security functions that comply with the BLUETOOTH specification to ensure secure connection during communication using BLUETOOTH technology. However, this security may be insufficient depending on the setting contents and other factors, so always be careful when performing communication using BLUETOOTH technology.
- Sony cannot be held liable in any way for damages or other loss resulting from information leaks during communication using BLUETOOTH technology.
- BLUETOOTH communication is not necessarily guaranteed with all BLUETOOTH devices that have the same profile as this system.
- BLUETOOTH devices connected with this system must comply with the BLUETOOTH specification prescribed by the Bluetooth SIG, Inc., and must be certified to comply. However, even when a device complies with the BLUETOOTH specification, there may be cases where the characteristics or specifications of the BLUETOOTH device make it impossible to connect, or may result in different control methods, display or operation.
- Noise may occur or the audio may cut off depending on the BLUETOOTH device connected with this system, the communications environment, or surrounding conditions.
If you have any questions or problems concerning your system, please consult your nearest Sony dealer.
natural_image
Diagram showing a device being inserted into a rectangular box with a connector (no text or symbols present)natural_image
Simple line drawing of a rectangular device emitting sound waves from a smartphone (no text or symbols)Remarque
natural_image
Illustration of a hand holding a small electronic device next to a rectangular device with a 'N' logo (no text or symbols on the device itself)BLUETOOTH version 4.0
Sortie
FHSS (Freq Hopping Spread Spectrum)
Profils BLUETOOTH compatibles ^2
A2DP (Advanced Audio Distribution Profile)
AVRCP (Audio Video Remote Control Profile)
Codecs pris en charge ^3)
SBC ^4
Plage de transmission (A2DP)
natural_image
Diagram of a device being inserted into a box, showing a cable and connector (no text or symbols)natural_image
Simple line drawing of a rectangular block with musical notes and a smartphone emitting sound waves (no text or symbols)Nota
natural_image
Illustration of a hand holding a small electronic device next to a rectangular device with a 'N' logo (no text or symbols on device)40 watts (a 4 ohms, 100 Hz)
Modelos canadienses:
10 W + 10 W (a 4 ohms, 1 kHz, 1% THD)
40 watts (a 4 ohms, 100 Hz)
Entradas
ANALOG IN
DIGITAL IN
Salida
HDMI OUT ARC
Sección HDMI
Conector
FHSS (Freq Hopping Spread Spectrum)
Perfiles BLUETOOTH compatibles ^2)
A2DP (Advanced Audio Distribution Profile)
AVRCP (Audio Video Remote Control Profile)


- Owner's Record
- WARNING
- To reduce the risk of fire or electric shock, do not expose this apparatus to rain or moisture.
- For the customers in the U.S.A.
- Important Safety Instructions
- NOTE:
- CAUTION
- For the customers in Canada
- Copyrights and Trademarks
- About these operating instructions
- Table of Contents
- Listening
- Sound Adjustment
- BLUETOOTH Functions
- Settings and Adjustments
- Other Functions
- Additional Information
- Listening to sound from a TV, cable/satellite box, etc.
- Press INPUT repeatedly.
- [OPT]
- [ANALG]
- [BT]
- [USB]
- [HDMI]
- Tip
- Listening to music from a USB device
- Note
- Listening to music from a BLUETOOTH device
- Enjoying sound effects (Sports mode, etc.)
- Selecting the sound field
- [CLEARAUDIO+]
- [STANDARD]
- [MOVIE]
- [SPORTS]
- [GAME]
- [MUSIC]
- [PAUDIO (Portable audio)]
- Setting the Night mode
- Press NIGHT to display [N ON].
- Setting the Voice mode
- Press VOICE to display [V ON].
- Pairing this system with a BLUETOOTH device
- Press PAIRING on the system.
- Turn on the BLUETOOTH function on the BLUETOOTH device, search for devices and select "HT-XT100."
- Make sure that the BLUETOOTH indicator (blue) lights up.
- Listening to music of the registered device
- Connecting to a BLUETOOTH device by One-touch functions (NFC)
- Compatible devices
- Download, install, and start the "NFC Easy Connect" application.
- Notes
- Using the setup display
- Menu list
- Using the Control for HDMI function
- System Power Off
- System Audio Control
- Audio Return Channel (ARC)
- Saving power in standby mode
- Precautions
- On safety
- On power sources
- On heat buildup
- On placement
- On operation
- On cleaning
- Troubleshooting
- General
- Sound
- The surround effect cannot be obtained.
- USB device
- The USB device is not recognized.
- BLUETOOTH device
- BLUETOOTH connection cannot be completed.
- Pairing cannot be achieved.
- No sound is output from the connected BLUETOOTH device.
- The sound is not in sync with the image.
- Remote control
- The remote control does not function.
- Others
- The Control for HDMI function does not work properly.
- If [PRTCT] appears on the front panel display of the system
- Reset
- Guide to parts and controls
- Main unit
- Rear panel
- playable types of files
- Supported audio formats
- Specifications
- Amplifier section
- U.S. models:
- Canadian models:
- HDMI Section
- USB Section
- BLUETOOTH section
- Speakers
- Front L/Front R speaker section
- Subwoofer section
- On BLUETOOTH communication
- Remarque
- Nota
- Modelos canadienses:
- Sección HDMI
Brand : SONY
Model : HT-XT100
Category : Soundbar