
Axolute - Vacuum packaging machines Magic Vac - Free user manual and instructions
Find the device manual for free Axolute Magic Vac in PDF.


| Product type | Vacuum packaging machine |
| Brand | Magic Vac |
| Model | Axolute |
| Dimensions (L x W x H) | 40 x 20 x 10 cm |
| Weight | 2.5 kg |
| Power supply | 220-240 V, 50/60 Hz, 120 W |
| Main functions | Vacuum suction and sealing, automatic stop, manual welding |
| Housing material | ABS plastic |
| Welding type | Teflon welding bar, double welding possible |
| Compatible with | Smooth bags, micro-ribbed bags, rolls |
| Suction pressure | -0.8 bar |
| Maximum bag capacity | 30 cm width |
| Included accessories | Roll of 20 x 300 cm, vacuum adapter |
| Maintenance and cleaning | Clean with a damp cloth; do not immerse; dry thoroughly |
| Safety | Overheating protection, automatic shut-off after 2 minutes of inactivity |
| Spare parts and repairability | Welding seal, resistance, motor carbon brush; repairability index not communicated |
| General information | Device designed for domestic use; 2-year warranty |
Frequently Asked Questions - Axolute Magic Vac
User questions about Axolute Magic Vac
0 question about this device. Answer the ones you know or ask your own.
Ask a new question about this device
Download the instructions for your Vacuum packaging machines in PDF format for free! Find your manual Axolute - Magic Vac and take your electronic device back in hand. On this page are published all the documents necessary for the use of your device. Axolute by Magic Vac.
USER MANUAL Axolute Magic Vac
natural_image
Line drawing of a portable air conditioner unit (no text or symbols)ISTRUZIONI D'USO
GB OPERATING MANUAL
F INSTRUCTIONS SUR LE FONCTIONNEMENT
D BETRIEBSANLEITUNG
E INSTRUCCIONES DE USO
P INSTRUÇÕES DE USO



natural_image
Technical line drawing of a mechanical device with internal components and directional arrows indicating movement (no text or symbols)MAGIC VAC® Mod. P0608ED
MACCHINA PROFESSIONALE PER IL SOTTOVUOTO


natural_image
Line drawing of hands operating a printer with a paper roll, showing motion and page number (no text or symbols)
natural_image
Line drawing of a hand using a paper roll presser to press or write on a sheet of paper (no text or symbols present)natural_image
Line drawing of a printer with a hand inserting a slot into the base (no text or symbols)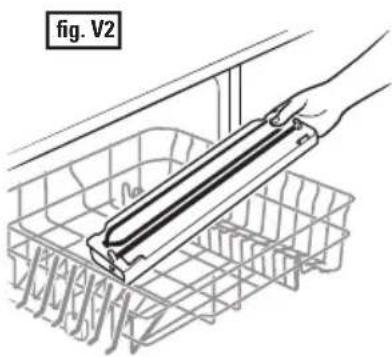
natural_image
Diagram of a hand holding a tool inside a basket, labeled 'fig. V2' (no text or symbols on the diagram itself)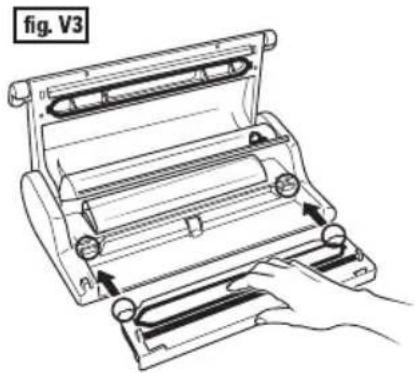
natural_image
Line drawing of a mechanical roller or magazine with a hand holding it, no text or symbols presentSTOCCAGGIO DELLA MACCHINA
We are pleased with your purchase and thank you for your confidence in us.
Please read these instructions carefully so that you can correctly use the MAGIC VAC ^® Mod. P0608ED and achieve the best storage results. We also suggest that you keep this manual for future reference.
TABLE OF CONTENTS
| CLEANING AND USE INSTRUCTIONS | Pages 15-26 |
| Mod. P0608ED MACHINE PART NAMES Page 15DESCRIPTION OF CONTROLS AND FUNCTIONS Page 16IMPORTANT INFORMATION Page 17-18USE INSTRUCTIONS Page 191 - Positioning the machine Page 192 - Connecting the machine Page 193 - Adjustments Page 193.1 - Setting the sealing mode Page 193.2 - Set the Pump suction Speed Page 203.3 - Cancel Button Page 204 - Recommendations for bag use5 - Making bags from MAGIC VAC ^® rolls6 - Automatic bag cycle (pre-cut or see point 5)7 - Manual cycle for vacuum packing in bagsCLEANING INSTRUCTIONS Page 23ACCESSORY COMPARTMENTSTORING THE MACHINETROUBLESHOOTINGTECHNICAL CHARACTERISTICS | Page 20Pages 20-21Pages 21-22Pages 22Page 24Page 24Page 25Page 26 |
For further details regarding use with accessories and for the Vacuum Guide, download the information on www.magicvac.com
AVAILABLE MAGIC VAC® ACCESSORIES
Pages 80-81
Mod. P0608ED MACHINE PART NAMES
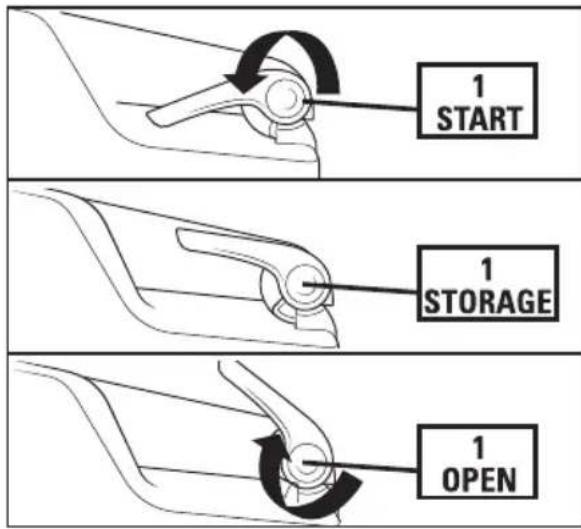
(1) Patented "Lock & Unlock System" - To lock and unlock the bag insertion area, allowing for the packing cycle to be executed in automatic mode and freeing the operator for other activities. The Lock & Unlock System is controlled by two Handles (1), which rotate in three predefined positions to open (OPEN) - close (STORAGE) and activate the machine (START).
(2) Control panel - To set the various functions of the machine (see paragraph: DESCRIPTION OF CONTROLS AND FUNCTIONS).
(3) Lit Window - Patented solution that allows the user to see the correct positioning of the bag in the vacuum Chamber.
(4) Air intake for the Tube (ACCESSORY PORT) - To insert the Tube to perform vacuum packing in all canisters and with all MAGIC VAC® accessories.
(5) Cover - Open in the upper fixed position, it allows for bags to be positioned before proceeding with packing.
(6) Sealing bar - Heating element which seals the bag.
(7) Airtight gasket - Guarantees the vacuum in the chamber allowing for air to be evacuated from the bags MAGIC VAC®.
(8) Vacuum chamber - Is the location for positioning the bag and evacuating the air.
(9) Sealing gasket - Presses the bag on the Sealing Bar.
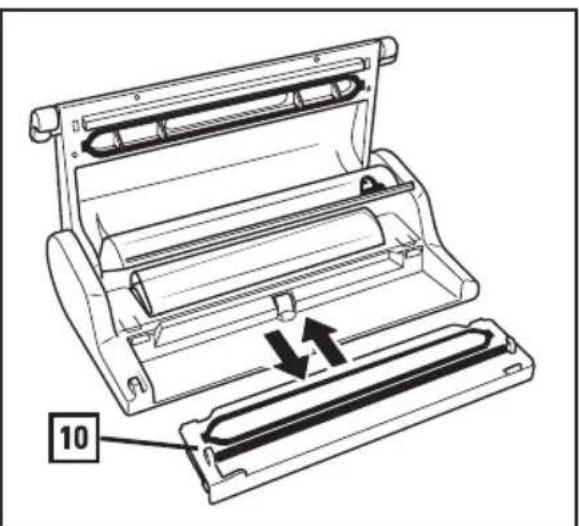
(10) Removable Tray - Patented solution that allows the Vacuum Chamber to be washed in the dishwasher for maximum hygiene.
(11) Roll-Holder Compartment.
(12) Roll-Holder Compartment Cover - It protects the roll from possible soiling during the packing phases.
(13) Bag Cutter - Can be used in both directions.
(14) Anti-skid Feet - Prevent the machine from sliding during use.
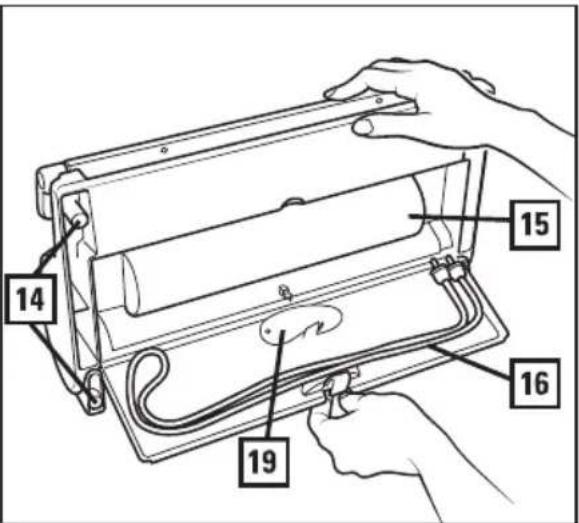
(15) Accessory Compartment - Compartment for storing the Magic Cutter (19) (where applicable) and the Canister Connection Tube, located on the lower part of the machine.
(16) Canister Tube - This connects the machine to all of the MAGIC VAC® accessories.
(17) Power Cable - To connect the machine to power.
(18) Cable Compartment - Compartment for storing the Power Cable, located on the back of the machine.
DESCRIPTION OF CONTROLS AND FUNCTION
flowchart
graph LR
    A["4"] --> B["ACCESSORY PORT"]
    B --> C["2C"]
    C --> D["2A"]
    C --> E["2B"]
    D --> F["seal on"]
    F --> G["2G"]
    F --> H["2H"]
    G --> I["2I"]
    H --> J["2I"]
    I --> K["pulse"]
    J --> L["seal"]
    K --> M["manual functions"]
    L --> N["manual functions"]
    M --> O["pulse & seal"]
    N --> P["canistor"]
    O --> Q["pump speed"]
    P --> R["sealing mode"]
    Q --> S["pump speed"]
    R --> T["seating mode"]
    S --> U["seating mode"]
    T --> V["seating mode"]
    U --> W["seating mode"]
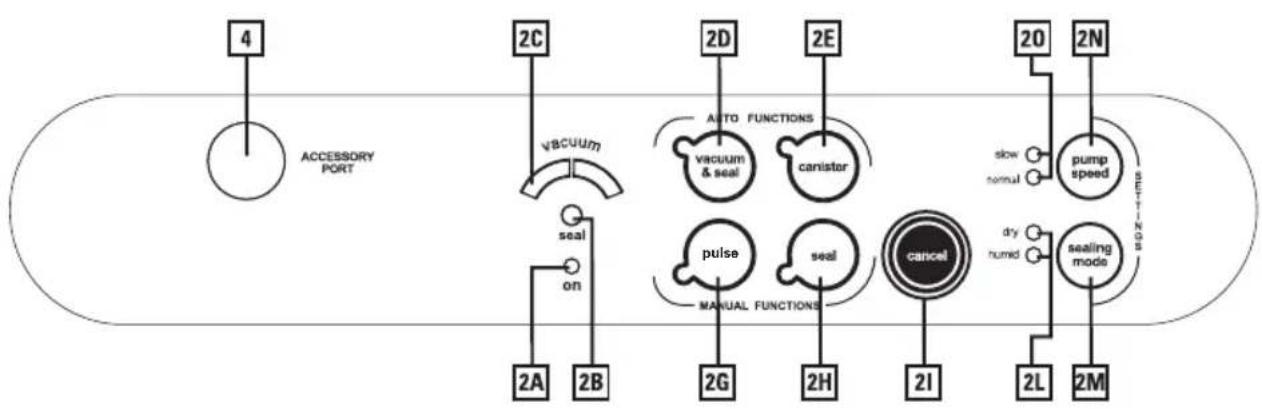
(2A) ON LED - GREEN, it is activated when the Handles (1) are in the START position.
(2B) SEAL LED - Flashing RED when Sealing.
(2C) Progress Display - Indicates the air extraction phases during the packing cycle.
(2D) Auto Vacuum & Seal Button - Start button for the automatic bag packing cycle, including final sealing.
(2E) Canister Button - Start button for the automatic cycle for canisters and MAGIC VAC® accessories.
(2G) Pulse button - Button to start the manual cycle; the machine continues extracting air until the button is released.
(2H) Seal Button - Start button for manual Sealing.
(2I) CANCEL Button - Stops the machine at any time.
(2L) Sealing Mode RED LEDs - indicate the sealing mode selected.
(2M) Sealing Mode Button - Selects from the 2 sealing modes.
(2N) Pump Speed Button - Selects from the 2 Pump Speeds.
(20) Pump Speed BLUE LEDs - indicate the Pump speed selected.
(4) ACCESSORY PORT - Air intake for inserting the Tube in order to vacuum pack Canisters and MAGIC VAC® accessories.
READ THIS IMPORTANT INFORMATION BEFORE USING THE MACHINE!
The manufacturer makes every effort to ensure that all of their products are of the highest quality and safety, however, as with any electric appliance, fundamental safety regulations must be observed in order to avoid hazards to people, animal and/or things.
- This appliance can be used by children aged from 8 years and above and persons with reduced physical, sensory or mental capabilities or lack of experience and knowledge if they have been given supervision or instruction concerning use of the appliance in a safe way and understand the hazards involved. Children shall not play with the appliance. Cleaning and user maintenance shall not be made by children without supervision.
- Before using for the first time, and periodically during the life of the product, check the power cable, to make sure there is no damage; if it is damaged, do not plug it in and immediately take the product to an authorized repair centre or our authorized dealer.
- Carefully read the instructions before using your MAGIC VAC, and keep it handy for future reference.
- The appliance is not designed for continuous operation. Do not carry out more than one complete cycle every 2 minutes. The operating cycle is 50 seconds approx and after then there's the break until 2 minutes. In extreme ambient conditions, an intensive use of the appliance may trigger the automatic thermal protection devices. In such a case allow the appliance to cool down sufficiently to enable resetting of the protection devices.
- Do not use the device near or on hot surfaces.
- The appliance cover is not protected against liquid penetration.
- Do not draw liquids into the vacuum chamber. Should this happen, immediately dry the vacuum chamber.
- Do not submerge the appliance in water and do not use it if the cable or plug is wet; if this should happen during use, immediately unplug it wearing dry rubber gloves. Do not remove or touch the appliance that is submerged in water before unplugging it. Do not use it after having removed it from the water (send it immediately to an authorized repair centre or our authorized dealer).
- Do not touch the sealing bar during use or at the end of the cycle in
order to prevent possible burns.
- Do not use knives or other sharp utensils to remove any residue from the sealing bar; always wait for it to cool off before cleaning it with a sponge dampened with gentle detergent.
- Never use power adapters other than those reported on the device (see information label).
• Always unplug after use. - Do not open or tamper with the device. Repairs must only be performed by authorized personnel. Unauthorized repairs will void the warranty.
- The Manufacturer, Retailer and Importer shall be deemed responsible for the safety, reliability and performance only if: a) the device is used in compliance with the use instructions; b) the electrical system in the area where the device is used is in compliance with current laws.
- The use of original bags is highly recommended. If other types of vacuum bags are used to carry out multiple vacuum packaging operations, the plain side of the film should be laid face down onto the sealing bar.
- No lids or use containers that have cracks or is damaged!
This text is for users in countries except European countries:
- This appliance is not intended for use by persons (including children) with reduced physical, sensory or mental capabilities, or lack of experience and knowledge, unless they have been given supervision or instruction concerning use of the appliance by a person responsible for their safety.
- Children should be supervised to ensure that they do not play with the appliance.
Only use original MAGIC VAC® bags and accessories
USE INSTRUCTIONS
Warning: When not using the machine, keep the Handles (1) in the STORAGE position. Do not close completely in order to avoid damaging the Airtight Gasket (7).
Before each use, carefully clean your machine and accessories that come in contact with food (canisters, lids, jars, etc....) following the instructions provided in paragraph "CLEANING INSTRUCTIONS".
1 - Positioning the machine
Position the machine in a dry place on a horizontal surface, being careful to leave the work zone around the machine itself free of obstacles and wide enough to allow for placing the bags of food to be packaged. Connect the power cable to an electrical outlet corresponding with its voltage (see the information label).
2 - Connecting the machine
Insert the Power Cable Plug (17) in the outlet. Check for correct connection by rotating the Handles (1) in the START position; on the Display of the Mod. P0608ED, the GREEN ON LED (2a), the BLUE LED (20) for the "normal" pump speed and the RED LED (2L) for the "humid" sealing mode will light up.
3 - Adjustments
Adjustments to the Mod. P0608ED must be selected each time a packing cycle is started. These, in fact, reset the Handles (1), rotating them to the OPEN position.
3.1 - Setting the sealing mode
The Mod. P0608ED is equipped with an intelligent sealing function that auto-adjusts the sealing according to the temperature of the Sealing Bar which increases little by little with consecutive packing cycles. Therefore, the final bag sealing result can be influenced by the type of food to be packed or the temperature of the room.
Thus, to optimise the final result you can choose form 2 sealing modes:
- "dry" for dry foods like cookies, rice, coffee, cheeses, dry meats and salami
- "humid" for red meats, which have liquids or blood, and fish
When the machine is turned on, the sealing option is always set to "humid".
To set the sealing mode, before starting the packing cycle, press the "sealing mode" button (2M) to select the mode desired (fig. A).
ATTENTION: The sealing mode selected remains memorized until the Handles (1) are rotated to the OPEN position. The selection must be done at every packing cycle.

3.2 - Set the Pump suction Speed
The Mod. P0608ED is equipped with a pump suction speed regulator to make the packing operation easier. When the machine is activated by rotating the Handles (1) to the START position, the speed is automatically set to "normal" or the highest that can be used in normal packing operations. However, when packing fragile foods in MAGIC VAC® bags, it is best to select the "slow" function which reduces the pump speed, thus allowing control over the performance of the operation by manual activating the sealing process with the "seal" button (2h) at the proper time.
If the "slow" speed is selected and the "canister" function is then activated, the speed will automatically set itself to "normal".
3.3 - Cancel Button - (21)
To stop the machine at any time, press the "cancel" button (2I) as in figure B; then unblock the cover by rotating the two Handles (1) of the "Lock & Unlock System" in the OPEN position.

4 - Recommendations for bag use
MAGIC VAC ^® bags are available in various sizes. Check the ideal bag size for the food that you intend to store. Make sure the length of the bag to be used is at least 8 cm greater than the food to be stored and add another 2 cm for each time the bag is to be reused.
5 - Making bags from MAGIC VAC® rolls
a) Open the machine by rotating the Handles (1) to the OPEN position (fig. C and D).
b) Unroll the correct length from the roll (fig. E).
c) Close the Cover of the Roll Compartment (12) and cut the piece using the Bag Cutter (13), as shown in (fig. F), by running it from one side to the other.


natural_image
Line drawing of a printer with hands operating it, showing paper roll and arrow (no text or symbols)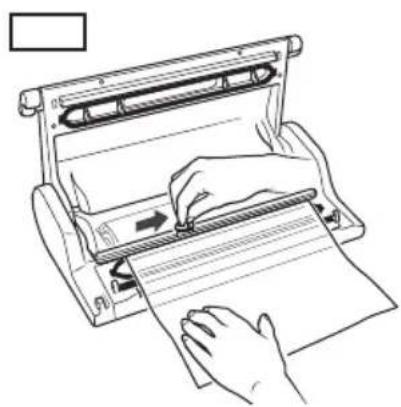
natural_image
Line drawing of hands operating a printing press machine with paper sheets (no text or symbols)Now you can seal one open side of the piece by following these steps:
d) set one of the two open ends of the bag on the Sealing Bar (6) (fig. G and G1).
Attention: do not let the bag protrude into the Vacuum Chamber (8) or on the Airtight Gasket (7), but set the end on the external part of the Airtight Gasket (7) as indicated in figure G1.
e) Close the machine by rotating the Handles (1) to the START position.
f) Seal one open side of the piece by pressing the "seal" button (2H) (fig I and I1).

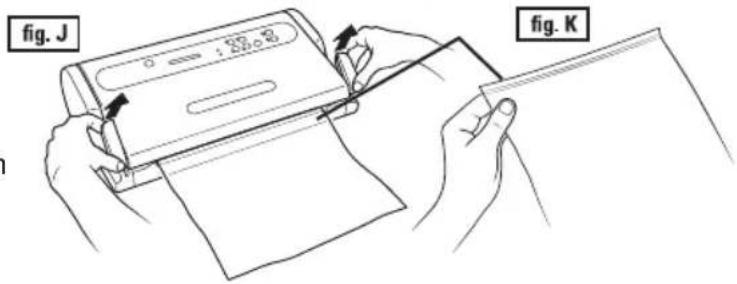
g) Unlock the Cover (5) by rotating one of the two Handles (1) (fig.J) and remove the bag.
h) Check the seal obtained, which should look like a regular horizontal line, smooth and without wrinkles (fig. K).
6 - Automatic cycle for pre-cut MAGIC VAC® bags or those made from the roll
To perform the automatic packing cycling in MAGIC VAC® Bags, proceed as follows:
a) Insert the food in the MAGIC VAC® Bag (see point 4), and eliminate any liquids or food residues from the inside of the end of the bag that must be sealed.
b) Lay the bag with its contents in front of the machine, placing the open end inside the Vacuum Chamber (8) (fig. L and L1).
c) Close the machine by rotating the Handles (1) to the START position (fig. M) and, looking through the Lit WINDOW (3), make sure the open end of the bag is inside the vacuum chamber (8) (fig. M1).
d) Start the automatic cycle by pressing the "vacuum & seal" button (2D) (fig. N and N1). If you want to seal the bag before the automatic completion of the cycle, press the "seal" button.

e) Wait for the LED seal light (2B) in the centre of the Progress Display (2C) to stop flashing.
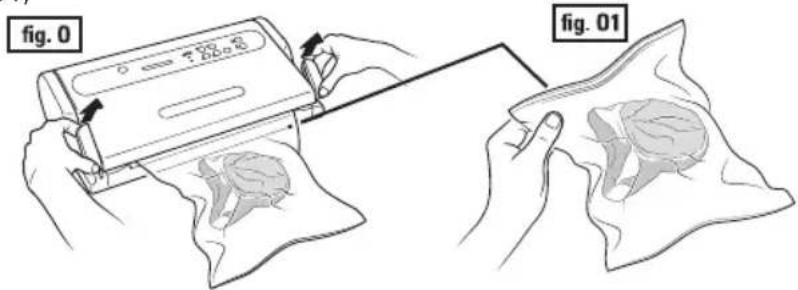
f) Unlock the Cover (5) by rotating one of the two Handles (1) (fig. 0) and remove the bag.
g) Check the seal obtained which should look like a regular horizontal line, smooth and without wrinkles (fig. 01)
7 - Manual cycle for vacuum packing in bags
To limit air extraction so as not to crush delicate and fragile foods or for maximum air extraction even for complex food such as an entire cleaned chicken, a slice of Emmenthal cheese or a fish, proceed as follows:
a) Insert the food in the MAGIC VAC® Bag (see point 4), and eliminate any liquids or food residues from the inside of the end of the bag that must be sealed.
b) Lay the bag with its contents in front of the machine, placing the open end inside the Vacuum Chamber (8) (fig. L and L1).
c) Close the machine by rotating the Handles (1) to the START position (fig. M) and, looking through the Lit WINDOW (3), make sure the open end of the bag is inside the vacuum chamber (8) (fig. M1).
d) Select the "slow" speed using the "pump speed" button (2N) as in the previous point 3.2.
e) Press and hold the "Pulse" button (2G) (fig. P) to start the manual vacuum cycle, release the button to interrupt it. Repeat this operation until you reach the desired vacuum, then activate sealing by pressing the "Seal" button (2H) (fig. P1) to seal the bag.
f) Wait for the LED seal light (2B) in the centre of the Progress Display (2C) to stop flashing.

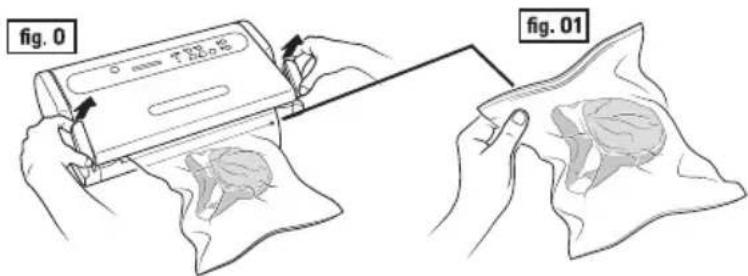
g) Unlock the Cover (5) by rotating one of the two Handles (1) (fig. 0) and remove the bag.
h) Check the seal obtained which should look like a regular horizontal line, smooth and without wrinkles (fig. 01).
CLEANING INSTRUCTIONS
ATTENTION: Always unplug the cable from power before cleaning the MAGIC VAC®.
- Clean hands thoroughly before proceeding with cleaning the machine and accessories.
- Both before and after use, clean the accessible surfaces of the machine with a sponge and neutral detergent or denatured alcohol or white vinegar diluted with water.
ATTENTION: Do not use aggressive detergents or solvents or products based on aromatic substances!
In the event of accidental penetration of liquids inside the structure, do not plug the unit into power, do not use it and contact the nearest authorized service centre or your authorized dealer.
IMPORTANT: Avoid the use of pointed metal items (such as scissors, knives, awls or scrapers) to remove residues as they can ruin the surface.
- To clean MAGIC VAC® accessories (canisters, lids, jars, etc.), refer to the instructions included with the accessories themselves.
Washing the Removable Tray
The machine is equipped with a liquid-collecting Removable Tray (10) that is completely removable and washable, even in the upper dishwasher rack (fig. V2). Clean it like any other kitchen object and allow it to dry completely; then, reinsert the Removable Tray (10) in its location at the bottom of the machine.
To remove the Removable Tray, proceed as follows:
Open the machine, take hold of the Removable Tray and pull it toward yourself (Fig. V1).

natural_image
Line drawing of a printer with a hand holding the cover, showing internal components and a downward arrow indicating a process (no text or symbols)
natural_image
Diagram of a hand holding a tool inside a shopping basket, labeled 'fig. V2' (no text or symbols on the diagram itself)
To reposition the Removable Tray (10) in the machine, insert it into its seat pushing the two teeth located on the sides of the Removable Tray in all the way until they catch (Fig. V3).
ACCESSORY COMPARTMENT
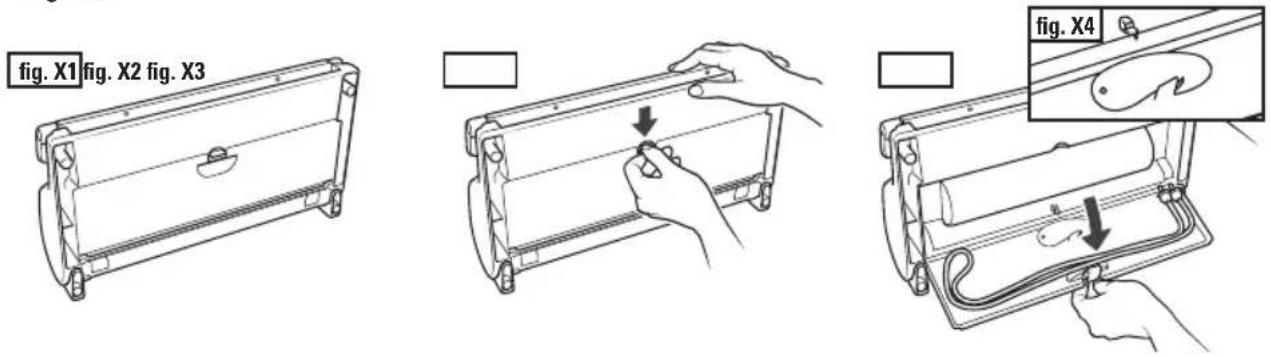
In the upper part of the machine there is a convenient Accessory Compartment (15) where you can keep the Canister Tube (16) (fig. X3) and the Bag Cutter, manual MAGIC Cutter (where applicable) (fig. X4).
STORING THE MACHINE
When you are not using the machine, you can place it in a vertical position to reduce space. Proceed as follows:
a) Insert the Power Cable (17) in the Cable Compartment (18) on the back of the machine (fig. W1).
b) Close the machine by rotating the Handles (1) to the STORAGE position (fig. W2 and W3).
ATTENTION: do not turn the Handles (1) to the START position because complete closure of the machine when it is inactive for a long period of time could damage the Airtight Seal (7) causing a leak in the Vacuum Chamber (8) and subsequent failure of the machine to work properly.
c) Place the machine in a vertical position far from heat sources (fig. W4).

TROUBLESHOOTING
| MAGIC VAC® does not work | Make sure the power cable on the MAGIC VAC® is fully inserted in the machine and in the electrical outlet. Check the electrical outlet by trying another device in the same outlet.Make sure the power cable and/or plug is not defective. If so, do not use the machine. |
| MAGIC VAC® does not perform the first seal on the piece of cut roll. | Check that the piece of cut roll is correctly positioned as described in the paragraph: "5 - Making bags from MAGIC VAC® rolls". Check the position and integrity of the Sealing Gasket |
| MAGIC VAC® does not completely vacuum-pack the bags | In order to correctly seal the bags, the open end must be entirely inside the Vacuum Chamber (8). Check the correct position through the Lit WINDOW (3).Make sure the Sealing Bar(6), the Airtight Gasket (7) and Sealing Gasket (9) are not dirty.The MAGIC VAC® bag may be punctured. To check, seal the bag with air inside, place it under water and squeeze. If you see bubbles, there is a leak. Reseal or use another bag. |
| MAGIC VAC® does not correctly seal the bag | When you can't completely seal the bag, press the "sealing mode" button (2M) and increase the sealing time.If the Sealing Bar (6) overheats and melts the bag, lift the Cover (5) and allow the Sealing Bar (6) to cool for a few minutes.Check the position and integrity of the Sealing Gasket (9)If liquids escape during the vacuum-packing phase, remember that they must first be refrigerated. |
| The MAGIC VAC® bag doesn't maintain its vacuum after sealing | Leaks along the seal can be caused by wrinkles, crumbs, grease or liquids. Open the bag, clean the upper part of the inside of the bag and remove any residue from the Sealing Bar (6) before resealing.Make sure the bag is not punctured and thus did not maintain the vacuum. Protect any pointed edges of the contents in the bag using paper napkins. |
| MAGIC VAC® does not seal containers. | Using the Canister Tube (16), connect the canister lid (or the Lid Attachment if necessary) and the ACCESSORY PORT (4) on the machine.Leave adequate space (at least 3 cm) between the contents and the top of the jar or canister.Make sure that the rim of the jar or canister and universal lid are not damaged in the sealing zone. Clean the rim and the lid with a damp cloth and reseal.Make sure the gasket on the canister lid or universal lid is placed in the correct position and not damaged. |
| MAGIC VAC® Executive canisters or Universal MAGIC VAC® Lids do not maintain the seal | Make sure the knob on the canister lid is set to "VACUUM" before vacuum-packing and that it is set to "CLOSED" after it is complete.Check that the O-Ring under the knob on the canister lid or universal lid is correctly positioned.Makes sure that the rim of the jar or canister and universal lid are not damaged in the sealing zone. Clean the rim and the lid with a damp cloth and reseal.Make sure the gasket on the canister lid or universal lid is placed in the correct position and not damaged.Make sure the connection tube is correctly connected to both the canister knob as well as the ACCESSORY PORT (4) on the machine. |
TECHNICAL CHARACTERISTICS
Mod: P0608ED
Structure: ABS + chrome-plated inserts
Lighted WINDOW
Dishwasher safe Removable Tray
Roll-Holder Compartment with Cover and integrated Bag Cutter
Accessory Storage Compartment
Vertical Storing
Machine Dimensions: 44 (W) x 23.5 (D) x 11 (H) cm
Machine weight: Approx. 3.8 Kg.
Voltage/Power: 230V\~50Hz
Input: 130 W
Stand By: 0 W
Sealing: Auto-adapting and Adjustable on 2 levels
Sealing Bar: Width 315 mm (Professional aluminium type)
Protection: Self-resetting thermal safety
Pump type: Pump with self-lubricating pistons
Pump Speed: Adjustable on 2 levels
Nominal pump capacity: 10 l/min
Max Vacuum: -0,80 bar / 60 cm/Hg / -11.6 PSI
Vacuum chamber venting: Automatic upon opening
Compliant with Directives:
The performance of MAGIC VAC ^® systems has been tested by AITA (Italian Association of Food Technology).
Electromagnetic compatibility
The MAGIC VAC ^® has been engineered to meet current electromagnetic compatibility requirements. However if you suspect that the appliance is interfering with the operation of your TV, radio or other electrical unit, try relocating the appliance until the interference ceases. Alternatively try plugging the appliance into a different power socket.

Disposal: In conformity with Directive 2012/19/EC, the symbol shown on the appliance to be disposed of indicates that this is considered as waste and must therefore undergo "sorted waste collection". The user must therefore take (or have taken) the above waste to a pre-sorted waste collection centre set up by the local authorities, or else give it back to the dealer when purchasing a new appliance of the same type. Pre-sorted waste collection and the subsequent treatment, recovery and disposal operations favour the production of appliances made of recycled materials and limit the negative effects of any incorrect waste management on the environment and public health. The unlawful disposal of the product by the user could result in administrative fines as provided by the laws transposing Directive 2012/19/EC of the European member state in which the product is disposed of.
MAGIC VAC® Mod. P0608ED
natural_image
Line drawing of hands operating a printer with a paper roll and arrow indicating print (no text or symbols present)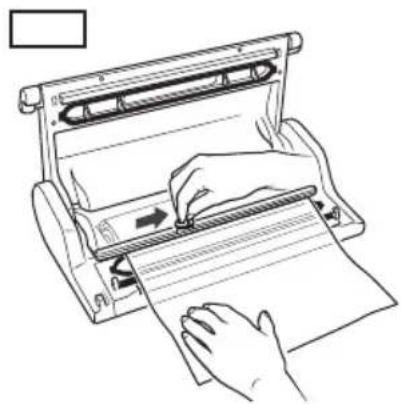
natural_image
Line drawing of hands operating a printer with paper and a ruler, no text or symbols presentnatural_image
Line drawing of a hand holding a plastic tray inside a shopping basket (no text or symbols)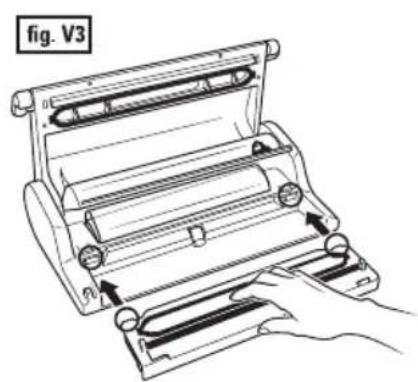
Conforme aux directives:

natural_image
Line drawing of hands operating a mechanical device with rollers (no text or symbols)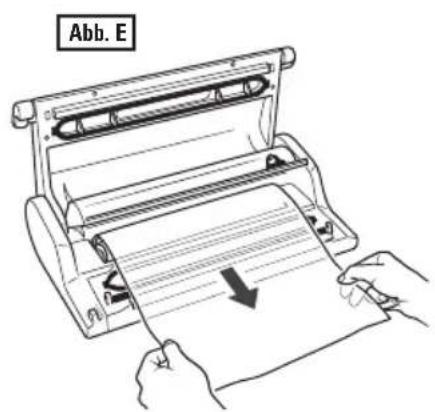

natural_image
Line drawing of a printer with an arrow indicating the process, no text or symbols present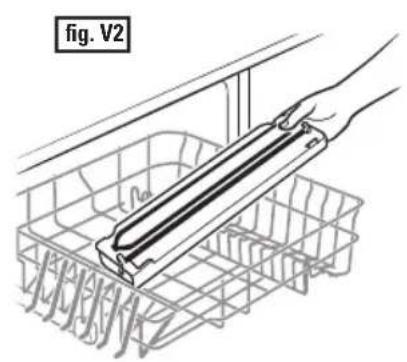
natural_image
Line drawing of a hand holding a plastic tray inside a basket, labeled 'fig. V2' (no text or symbols on the diagram itself)
natural_image
Line drawing of a mechanical roller or printer with a hand operating it (no text or symbols)natural_image
Line drawing of a mechanical device labeled Abb. W4, showing internal components and mounting points (no text or symbols beyond label)SCHADENSSUCHE
natural_image
Line drawing of hands operating a printer with a paper roll and arrow indicating print direction (no text or symbols)
natural_image
Line drawing of hands operating a printer with paper and a ruler, no text or symbols presentnatural_image
Line drawing of a mechanical device with a hand operating it, showing internal components and a highlighted section (no text or symbols)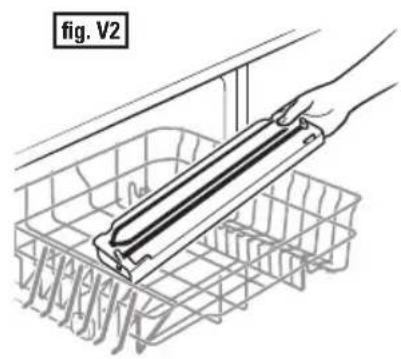
natural_image
Diagram of a hand holding a plastic bag over a basket, labeled 'fig. V2' (no text or symbols on the diagram itself)
natural_image
Line drawing of a mechanical roller presser with hand operating it (no text or symbols)INSTRUÇÕES PARA O US
natural_image
Line drawing of hands operating a printer with a paper roll, showing page number and arrow (no text or symbols)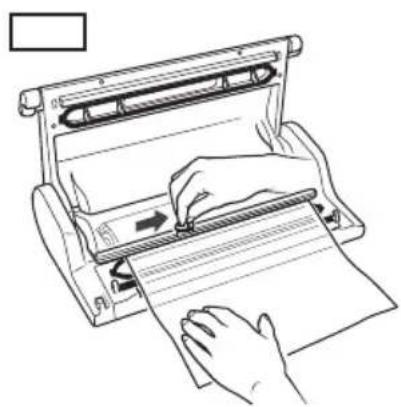
natural_image
Line drawing of hands operating a printing press machine with paper sheets (no text or symbols)natural_image
Line drawing of a printer with a hand inserting a slot into the base (no text or symbols)
natural_image
Diagram of a hand holding a plastic bag over a shopping basket (no text or symbols)
natural_image
Two cylindrical metallic rods with textured surfaces, no visible text or markings*
pcs.

natural_image
Two cylindrical objects, possibly rolled paper or plastic, with no visible text or symbols.*
SACCHETTI - BAGS - SACHETS - BEUTEL - BOLSAS - SACOS

natural_image
Stack of white plastic or foam film with a flat top, no visible text or symbols20x30 cm
*
20x30 cm
*
For additional information on these products please contact your Dealer or visit our website www.magicvac.com
natural_image
Two identical mechanical components with circular bases and central hub (no visible text or symbols)AC01006 ACO1005
natural_image
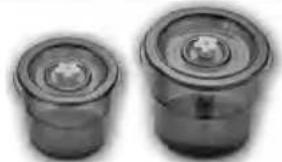
Two identical mechanical components with circular grooves and central hub (no text or symbols visible)1L - 23x17x9(h) cm

AC01093
1.5L - 23x17x12(h) cm

AC01092
ALTRI ACCESSORI - OTHER ACCESSORIES - AUTRES ACCESSOIRES ANDERE ZUBEHÖRTEILE - OTROS ACCESORIOS - OUTRAS ACESSÓRIOS
BOTTLE CAPS - 2 pcs

AC01013
ROLL DISPENSER LARGE VACUUM HOOD

ACO1027 ACO1007

LID-OPENER FOR GLASS JARS MET

ACO1055 ACO1054 / ACO
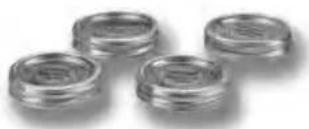
AL RIMS AND LIDS FOR GLASS JARS - 12 pcs BAG CU
natural_image
Four metallic cylindrical components with reflective surfaces, no visible text or markings053 10039

natural_image
Close-up of hands holding a pen, writing on paper (no visible text or symbols)Mod. P0608ED
Food storage naturally!
Conservation naturelle des aliments!
Fabbricante / Manufacturer:
FLAEMNUOVA ^® , s.p.A.


- MAGIC VAC® Mod. P0608ED
- MACCHINA PROFESSIONALE PER IL SOTTOVUOTO
- STOCCAGGIO DELLA MACCHINA
- Mod. P0608ED MACHINE PART NAMES
- DESCRIPTION OF CONTROLS AND FUNCTION
- READ THIS IMPORTANT INFORMATION BEFORE USING THE MACHINE!
- USE INSTRUCTIONS
- - Positioning the machine
- - Connecting the machine
- - Adjustments
- - Setting the sealing mode
- - Set the Pump suction Speed
- - Cancel Button - (21)
- - Recommendations for bag use
- - Making bags from MAGIC VAC® rolls
- - Automatic cycle for pre-cut MAGIC VAC® bags or those made from the roll
- - Manual cycle for vacuum packing in bags
- CLEANING INSTRUCTIONS
- ATTENTION: Always unplug the cable from power before cleaning the MAGIC VAC®.
- ATTENTION: Do not use aggressive detergents or solvents or products based on aromatic substances!
- Washing the Removable Tray
- ACCESSORY COMPARTMENT
- STORING THE MACHINE
- TECHNICAL CHARACTERISTICS
- Mod: P0608ED
- Electromagnetic compatibility
- INSTRUÇÕES PARA O US
- SACCHETTI - BAGS - SACHETS - BEUTEL - BOLSAS - SACOS
- ALTRI ACCESSORI - OTHER ACCESSORIES - AUTRES ACCESSOIRES ANDERE ZUBEHÖRTEILE - OTROS ACCESORIOS - OUTRAS ACESSÓRIOS
- Mod. P0608ED
Brand : Magic Vac
Model : Axolute
Category : Vacuum packaging machines