USP-1060D - Multi-cooker Unit - Free user manual and instructions
Find the device manual for free USP-1060D Unit in PDF.


| Product Type | Multi-cooker |
| Brand | Unit |
| Model | USP-1060D |
| Dimensions (L x W x H) | 30 x 30 x 25 cm (11.8 x 11.8 x 9.8 in) |
| Weight | 4.5 kg (9.9 lbs) |
| Power | 1200 W |
| Capacity | 6 L (6.3 qt) |
| Functions | Pressure cooking, slow cooking, rice cooking, steaming, sautéing, yogurt making, warming |
| Display | LED with timer and preset programs |
| Control Type | Touch panel with buttons |
| Inner Pot Material | Non-stick coated aluminum |
| Lid Type | Removable with gasket seal |
| Pressure Settings | Low and high pressure |
| Safety Features | Automatic pressure release, lid lock, overheat protection |
| Cleaning | Inner pot and lid seal are dishwasher safe; wipe exterior with damp cloth |
| Maintenance | Regularly check and replace sealing ring if worn; clean pressure valve |
| Accessories Included | Inner pot, measuring cup, rice paddle, steamer basket, power cord |
| Spare Parts Available | Sealing ring, inner pot, power cord |
| Warranty | 1 year limited warranty |
| Certifications | CE, RoHS |
Frequently Asked Questions - USP-1060D Unit
User questions about USP-1060D Unit
0 question about this device. Answer the ones you know or ask your own.
Ask a new question about this device
Download the instructions for your Multi-cooker in PDF format for free! Find your manual USP-1060D - Unit and take your electronic device back in hand. On this page are published all the documents necessary for the use of your device. USP-1060D by Unit.
USER MANUAL USP-1060D Unit
Thank you for buying this UNIT product!
Attention! When you buy UNIT products, you must obtain the completed warranty card from the shop assistant. Only with this card can you use the manufacturer's warranty at all UNIT service centers for household appliances.
READ ALL THE INSTRUCTIONS BEFORE USING
Purpose of the appliance: This appliance is designed to prepare various dishes under pressure.
CONTENTS OF THE INSTRUCTION MANUAL
SAFETY NOTICES....3 FEATURES....4 APPLIANCE DESCRIPTION....5 BEFORE USE....7 APPLIANCE USE....7 STEAMER FUNCTION....10 CLEANING....10 TROUBLESHOOTING....10 TECHNICAL CHARACTERISTICS....11 SPECIFICATIONS....11 RECIPES....26
SAFETY NOTICES
When using electrical appliances, basic safety precautions should always be followed to reduce the risk of fire, electric shock, and/or injury to persons, including the following:
• Before use, read these instructions carefully. • Never use the appliance with inflammable products or in a humid location. - The amount of water and food added to the Inner Pot should be determined in line with step 2 of Appliance Use. • Never damage the Sealing Gasket or replace it with other rubber gaskets or tension gaskets. - Never twist the Inner Steel Ring with hand or other tools by force. If the Steel Ring slips off its place, stop using it and replace the Lid. • Never put any weight on the Relief Valve or replace it with other substitutes. - The bottom of the Inner Pot and the Heating Plate surface should be kept clean. Never heat the Inner Pot on other thermal sources or replace it with other pots. - The Inner Pot is covered with an anti-sticking coating. To avoid scratches, wooden or plastic ladles are recommended. - The maximum period for heat preservation is 24 hours. However, a duration of less than 6 hours is recommended to ensure delicious taste. - If a large amount of steam escapes from the edge of the Lid during cooking, remove the plug immediately and send the appliance to an authorized service station for maintenance. - When moving the appliance, it is recommended to hold the Ears instead of the Handle for safety. - Never disassemble the appliance yourself or replace with accessories other than those assembled. - During cooking, if an alarm sound is heard and one of the following malfunction codes is displayed, stop using the appliance immediately and send it to an authorized service station for maintenance.
ENGLISH ENGLISH
Error codes
| Display code E1 E2 E3 E4 | ||||
| The problem Short circuit of the sensor | Open circuit of the sensor | Error of the pressure regulator | Protectionagain-stoverheating | |
WARNING!
- When steam is released, keep your face away from the Relief Valve to avoid an accident.
- Do not touch the hot Lid immediately after cooking to avoid scalding.
- For safety, never cover the Lid edge with a towel.
- Never attempt to open the lid by force if there is pressure inside. It is dangerous.
- After cooking, cut the power before opening the lid.
KEEP THIS INSTRUCTION MANUAL!
FEATURES
The electric pressure cooker is a modern and multifunctional device that helps you cook your favorite dishes quickly and easily. In the electric pressure cooker, products are prepared by steaming or in their own juice, which allows you to avoid using lard or oil. This preserves minerals and vitamins that are lost during normal boiling and frying.
The electric pressure cooker is a perfect device for modern housewives who not only care about their health but also value their time. You don't need to stay at the stove and watch the food cook. You just put all the needed ingredients into the pressure cooker and set the parameters for preparing your dish.
Model USP-1060D is equipped with an adapted menu that allows you to choose the needed regime for the dish you want to cook. Now you don't need to remember temperature values each time you cook a new dish. Advantages of pressure cooker USP-1060D:
Multifunction and easy operation
- This model of pressure cooker combines the functions of a rice cooker, a steamer, and a pressure cooking pan. With the help of this appliance, you can cook rice, porridge, soup, and you can stew, steam, and braise. You don't have to adjust time or pressure rate; just touch the button for a certain product, and the appliance will work automatically. After cooking finishes, you'll hear a sound and the cooker will start keeping warm automatically.
- 24-hour delayed start: if you don't want to start cooking immediately but after some time, you can use the delayed start function. When the set time is up, it will start cooking automatically.
- Memory function: in case of a sudden power cut during cooking, it will resume the former process automatically when power is restored.
Fast Cooking: time and energy saving
- Fast cooking with high pressure (high temperature) that is determined by different types of food. An optimal way of cooking is chosen for every food type, saving more time and energy, reducing cooking time by 15% and energy by 20% compared with conventional cooking.
- It reduces cooking time by as much as 40% and energy by as much as 45% compared with conventional electric cooking when braising.
Preserves nutrition, makes food more delicious and healthy
- When oxygen is mixed with food during heating it destroys vitamins. Airtight cooking with this pressure cooker conserves nutrition and ensures more delicious food as no oxygen is let in during cooking. • Cooking at high temperatures (110-115°C) is more healthy. • No escaping steam and overflowed food, keeps your kitchen clean.
Combination of stylish design, quality and safety
This model has stylish design, is equipped with a modern and comfortable panel and eight degrees of protection, which make the work of the appliance more safety and comfortable.
Safe operation
- Safety set for opening or closing the Lid. When the Lid fails to fit the Inner Pot well, the Inner Pot can not get to high pressure. If there is pressure inside, the Lid can not be opened.
- Safety pressure regulator. If pressure (temperature) control is out of work and the pressure inside is over the maximum working pressure, the Relief Valve will switch to "выпускпара" automatically for safety.
- Safety pressure release set. If pressure regulator is out of work and the pressure inside is over the maximum working pressure the pressure release set will release pressure from the edge of the Lid to avoid burst.
- Safety temperature-limiting set. In case the Inner Pot is empty the power will be cut automatically.
- Safety over-temperature set. In case of over-temperature, the power will be automatically cut.
- Magnetic protective device. If the lid is not covered well the appliance will not work.
- Connective lid – the construction of the lid allows to have the lid clipped to the body of the appliance when it's open.
The main parameters in cooking in a pressure cooker are the following two:
• Time of cooking under pressure - it is the time of a cooking under pressure cycle. If necessary, you can change the time value of cooking under pressure at the Control Panel.
- Warm-up time (the keeping warm function) - when the cooking cycle ends, the keeping warm function turns on automatically and warming-up cycle begins. With this cycle the temperature is maintained in the appliance from 60 to 80°C . The maximum usage time of the keeping warm function is 24 hours, after which you have to turn the appliance off and disconnect it from the power supply.
APPLIANCE DESCRIPTION
- Plastic part of the lid
- Aluminum part of the lid
- Steel part of the lid
- Sealing ring
- Outer plastic part of the body
- Inner bowl with non-stick coating
- Handle for easy movement of the appliance
- Middle steel part of the body
- Control panel with display and automatic programs
Control Panel Buttons
- Indicator of the function of the delayed startup to 24 hours
- Indicator of the "Rice" program
- Delayed start up to 24 hours
- Manual setting of the time of keeping warm
- The "Rice" program
- Indicator of the "Porridge" program
- Indicator of the "Fish" program
- The "Porridge" program
- The "Fish" program
- Indicator of the time of keeping warm
- The "Meat/Chicken" program
- The "Steamer" program
- Indicator of the "Meat/Chicken" program
- Indicator of the "Steamer" program
- The "Soup" program
- Cancel a program, function
- The function of the keeping warm up to 24 hours
- Indicator of the "Soup" program
- Indicator of the function of the temperature maintenance up to 24 hours
Control Panel Buttons
| Button name What for Programmed time,minutes | Comments | ||
| Delayed start(Отложенный старт) | With this function,you can set a count-down to the momentwhen the pressurecooker will startcooking | - Interval – 1 hour; | max – 24 hours |
| Time of the pressure(Времядавления) | This function allowsto increase the timeof pressure mainte-nance manually | - Interval of the in-crease for one-click– 1 minute | |
| Keeping warm(Поддержаниетепла) | Keeping warm func-tion can be turned onmanually by pushingthe button. Also ap-pliance switches tokeeping warm func-tion automaticallyafter completion ofthe cooking program | - Interval – 1 hour; | max – 24 hours |
| Cancel (Отмена) Canceling the func-tion or a program | - | ||
| Rice (Рис) Cooking rice 12 With the button | "pressure time" itis possible to addfrom 1 to 20 minutesmore. | ||
| Porridge (Kаша) Cooking | ng porridge 10 With the | button | "pressure time" it is possible to add from 1 to 20 minutes more. |
| Fish (Рыба) Cooking fish | 5 With the button | "pressure time" it is possible to add from 1 to 20 minutes more. | |
| Meat/Chicken (Мясо/цыпленок) | Cooking meat/chicken | 25 With the button | "pressure time" it is possible to add from 1 to 20 minutes more. |
| Steam-cooking (Пароварка) | Steaming with the use of a special grating | 15 With the button | "pressure time" it is possible to add from 1 to 20 minutes more. |
| Soup (Суп) | Cooking various soups | 20 With the button | "pressure time" it is possible to add from 1 to 20 minutes more. |
Note: The time shown in the table is the average, and in different situations it may need to change it depending on the characteristics of the product. We recommend to identify empirically most appropriate time of cooking.
BEFORE USE
- Remove the packing materials from the inside and outside of the appliance and from the accessories.
- Place the cooker on a flat dry surface.
- Wash all the parts, which may contact with the food including the Inner pot, the Measuring Cup, the Ladle and the Steamer in warm soap water, rinse and dry.
- Wipe inside and outside of the appliance, and the Lid with the wet sponge and than with a clean dry cloth.
- Before connecting the cooker to the supply, check the applicable voltage indicated on the appliance to see whether it corresponds to that of the main supply (220-240 V, 50-60 Hz).
- Don't dip the appliance into water or other liquid!
APPLIANCE USE
- Open the Lid turning it counter-clockwise to the clamping position and then lift it.

- Take out the Inner pot. To do this, take the pot with both hands and pull it upward.

The walls inside of the pot have a dual scale of measurement:
- in portions - 1/5, 2/5, 3/5, 4/5;
- and in cups (CUP) - 2, 4, 6, 8;
- and also FULL (full bowl).
Fill the Inner pot with products that you are going to cook, and water, paying attention to the fact that the level of content should be located between markers 1/5 and 4/5 (minimum level mark - 1/5, maximum level mark - 4/5).
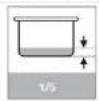

Pic. 1 Minimum and maximum levels of filling the pot
For products that increase in size during the cooking process, the maximum level shall not exceed the 3/5!

Pic.2 Maximum level of filling the pot while cooking the products that increase in size.
Note: to make the process of cooking evenly it is necessary that the product was completely submerged in water, otherwise the product which is above the water level may be half-done. 3. Clean the Inner coating of the appliance and Heating element by wiping them with a clean, slightly moist cloth and dry thoroughly. Before you put the pot into the appliance, make sure that on the surface of the Inner coating and the Heating element are no contamination. 4. Carefully take the pot with food with both hands by the edges and place it gently pushing. After you place the pot, gently turn it to securely lock in the device.

- Next, seal the lid by following these steps:
- Place the elastic ring on the inside of the appliance.
- If the sealing ring is loose or is in incorrect position, fix it in an Inner steel ring in a proper way. - Next take the Lid handle and cover the appliance with it, turn the Lid clockwise until it stops, at the same time you should hear a slight click. This means, that the Lid is securely locked in needed position.

- Set the pressure regulator in the down position, as shown in the figure. In this position, air can not come out of the device, so it becomes possible to increase the pressure inside the device.

- Switch the power on - the display shows "00:00". Now you should preset cooking parameters on the panel.
Timer setting (skip this step if you don't need to postpone the time of starting cooking). In case you want to postpone the time of cooking, then before choosing any program press the "Delayed Start" button as many times as needed. The figures show the time of the delay, for example, if you see "00:30" - it means that cooking will start in 30 minutes. The maximum time setting is 24 hours.
Choose the menu according to different recipes.
Press one of the Menu Buttons in relation to the food you're cooking (press the "Rice" button for rice cooking, for example) and the indicator of this button lights up.
If necessary, you can change the cooking time with the "Pressure Time" button after choosing the appropriate program button.
Note: you should remember that the programmed time is approximate and you can specify it according to your preferences.
Note: in case the food doesn't belong to any group in the menu, you should choose a similar group.
The time of cooking (programmed).
This time is indicated after you choose the exact type of food button and means the time of cooking after the pressure inside achieves working state. It doesn't include the time until achieving working pressure.
- After time setting, wait for some seconds and the process will start.
Pressure holding process begins when pressure inside is high enough.
- When pressurizing is over, you'll hear 3 sound signals, they indicate the end of cooking and the start of keeping warm process.
Press the "Cancel" button to cancel parameter setting or current working status.
- Take out the food in the following steps:
- Turn the Relief Valve to down position to release steam.
Note: When cooking fluid food, such as porridge, to avoid squirting up remember not to release the steam immediately after 3 sound signals. Let the pressure cooker cool down naturally. Otherwise the fluid food may squirt and result in damage.
- Remove the plug from the socket.
- Turn the Handle counter clockwise; open it and take the food out.
STEAMER FUNCTION
The appliance can be used as a Steamer. For this purpose use a special accessory that you have bought with the appliance – the Steamer.
- Add some water (1/5 scale) into the Inner Pot. Put the Steamer with kitchen-stuff into the Inner Pot and close the Lid.
• Turn the Relief Valve to down position. • Power on the appliance with the Power Cord. - Choose the button "Steamer". - Cooking time is up to your preferences – control the cooking time according to your food or menu. For this use the "Pressure Time" button. - Press the "Cancel" button if you would like to stop the cooking process.
CLEANING
- Remove the plug from the socket before cleaning wait until the appliance has normal temperature. • Take out the Inner Pot and clean it with a sponge or nonmetal soft brush, and then dry it with towel.
- Rub the Inner Surface of the appliance with a soft cloth.
- Clean the outer coating of the appliance with a soft slightly wet towel. Never dip it in water for cleaning or run water over it. • Take off the Water Collector and clean it with a wet towel. Put it back as shown in the picture;
- Clean the Sealing Gasket, Relief Valve, and Floating Valve with soap water then dry them with a towel. After cleaning put the parts together again.
Attention! For your safety remember that when the appliance is on it must not contact with water or other liquids especially the cord and the base of the appliance.
You must not dip the appliance into the water to avoid electric shock, fire or injuring. Never wash the appliance in a dishwasher!


TROUBLESHOOTING
| NO. A Problem The Cause The Solution | |||
| 1 Difficult to close the | Lid | The sealing gasket is not fixed well | Fix the sealing gas- ket well |
| 2 Difficult to open the | Lid | The pressure inside is too high | Let the steam out turning the relief valve left or right |
| 3 Steam leaks off the | Lid | There isn't a sealing gasket in the Lid | Put the sealing gasket into the Lid (see “Appliance use” paragraph) |
| The sealing gasket isn't clean | Clean the Sealing Gasket | ||
| The sealing gasket is damaged or deformed | Change a broken or deformed Sealing Gasket to a new one in a UNIT service center | ||
| The Lid isn't fixed properly | Fix the Lid properly | ||
| 4 Indicating lights are | not on | The appliance isn't powered on | Check the power cord and the plug |
| Someotherproblems | Send the appliance to a UNIT service center | ||
| 5 E1 Short circuit of the | sensor | Send the appliance to a UNIT service center | |
| E2 Open circuit of the | sensor | ||
| E3 Error of the pressure regulator | |||
| E4 Protection against | overheating |
SPECIFICATIONS
| Model Rated | Voltage | Power Capacity | Diameter | Working Pressure |
| USP-1060D | 220-240 V | 900 W | 5 L | 22 cm |
| Max Pres-sure | Keeping warm Temperature | Pre-set Time | Pressure-keeping Time | Max keep warm Time |
| 80 kPa | 70-80 C | 0-24 hours | 1-60 min | 0-24 hours |
The head office of the manufacturer:
UNIT Handelsgesellschaft G.m.b.H.
131, Gersthofer Str., A-1180, Vienna, Austria
Exported by:
UNIT Electronics (H. K.) Limited
3905 Two Exchange Square, 8 Connaught
Place, Central, Hong Kong
ENGLISH
Made in People's Republic of China (P.R.C.)
This appliance is to be stored and used under the following conditions: temperature - not less than +5°C; relative humidity - not higher than 80%; aggressive impurities in the air: not allowable.
See the date of manufacture on the sticker on the appliance body or printed on the box. Date format: MMYY (month;year).
As the Manufacturer is constantly working on the improvement of its products, the design and technical specifications are subject to change without prior notice.
MULTICOOKER USP-1060
RUSSIAN
Ingredients:
Ingredients
veal - 500
potatoes - 500 g
radishes - 50 g
ginger - 10 g
onion - 20 g
lard - 20 g
salt - 15 g
water - 100 g
wine - 20 g
Ingredients
rice - 320 g
shrimp - 250 g
onion - 1 pc.
garlic - 2 cloves
Ingredients
chicken - 1 kg
Ingredients
rice - 250 g
Ingredients
Ingredients:
chicken — 1 kg
Ingredients:
pumpkin — 1 kg
potatoes — 3-4 pcs.



- READ ALL THE INSTRUCTIONS BEFORE USING
- CONTENTS OF THE INSTRUCTION MANUAL
- SAFETY NOTICES
- ENGLISH ENGLISH
- WARNING
- KEEP THIS INSTRUCTION MANUAL
- FEATURES
- MULTIFUNCTION AND EASY OPERATION
- FAST COOKING: TIME AND ENERGY SAVING
- PRESERVES NUTRITION, MAKES FOOD MORE DELICIOUS AND HEALTHY
- COMBINATION OF STYLISH DESIGN, QUALITY AND SAFETY
- SAFE OPERATION
- APPLIANCE DESCRIPTION
- CONTROL PANEL BUTTONS
- BEFORE USE
- APPLIANCE USE
- STEAMER FUNCTION
- CLEANING
- ENGLISH
- MADE IN PEOPLE'S REPUBLIC OF CHINA (P.R.C.)
- MULTICOOKER USP
- RUSSIAN
- INGREDIENTS
Brand : Unit
Model : USP-1060D
Category : Multi-cooker