
SEC-PH360 - Intercom KONIG - Free user manual and instructions
Find the device manual for free SEC-PH360 KONIG in PDF.


| Product type | Wired intercom |
| Brand | Konig |
| Model | SEC-PH360 |
| Power supply | 110-240 V AC via transformer |
| Power consumption | 3 W (standby), 8 W (active) |
| Exterior dimensions (outdoor unit) | 130 x 90 x 30 mm |
| Dimensions (indoor unit) | 200 x 150 x 50 mm |
| Weight (outdoor unit) | 0.3 kg |
| Weight (indoor unit) | 0.5 kg |
| Outdoor housing material | Anodized aluminum |
| Communication type | Two-way audio (microphone and speaker) |
| Door opening function | Electric strike control (12 V) |
| Strike power supply | 12 V DC, 500 mA max |
| Number of indoor stations | Up to 3 (extension possible) |
| Maximum distance between units | 100 m (2-pair cable) |
| Operating temperature | -10 °C to +50 °C |
| Outdoor protection rating | IP44 (splash-proof) |
| Installation | Flush or surface-mounted (kit included) |
| Maintenance and cleaning | Wipe with a soft, dry cloth. Do not use abrasive products. |
| Safety | Built-in surge protection |
| Spare parts and repairability | Available from the manufacturer (reference SEC-PH360) |
Frequently Asked Questions - SEC-PH360 KONIG
User questions about SEC-PH360 KONIG
0 question about this device. Answer the ones you know or ask your own.
Ask a new question about this device
Download the instructions for your Intercom in PDF format for free! Find your manual SEC-PH360 - KONIG and take your electronic device back in hand. On this page are published all the documents necessary for the use of your device. SEC-PH360 by KONIG.
USER MANUAL SEC-PH360 KONIG
MANUAL (p. 2)
Video Door Phone System
MODE D'EMPLOI (p. 12)
Interphone-visiophone
MANUALE (p. 22)
MANUAL DE USO (p. 27)
Make sure you don't get caught by surprise when someone's at the door with this smart video intercom system. The outdoor unit consists of a doorbell with pinhole camera, night view, loudspeaker and microphone. With the super thin 7" display, only 1,8 cm, you can see who's at the door and speak with this visitor without the need of picking up a receiver. Just push the button to open the connection. Furthermore, it's hands free.
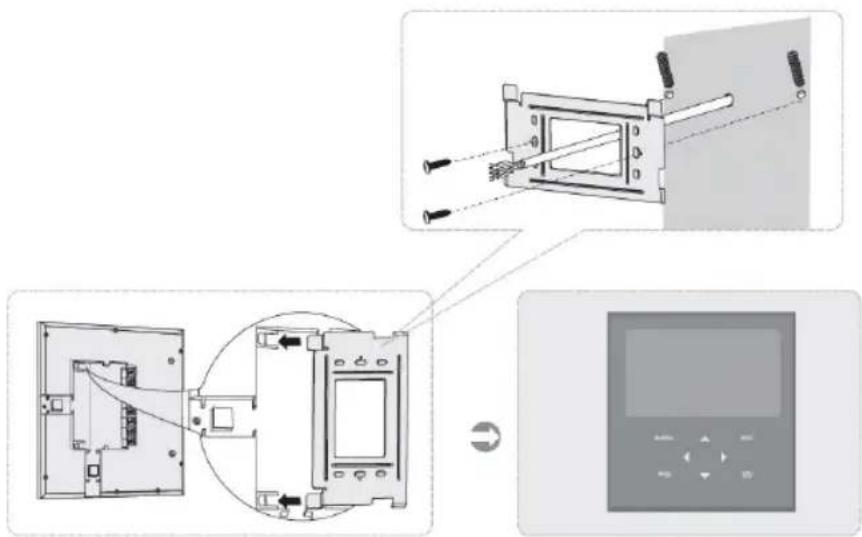
Installation of the indoor monitor:
- Determine the position for the monitor.
- Mount the bracket by drilling holes in the wall.
- Make an extra hole for the cable to pass through.
- Connect the wires as shown in the image below.
- Place the monitor on the bracket with the slots at the backside of the monitor
- White (AUDIO)
- Red (VDD)
- Black (GND)
- Yellow (VIDEO)
A. Power 15 V DC
B. Connection to outdoor unit

Installation of the outdoor unit:

- Drill holes in the wall or other material A1/A2 to mount the outdoor unit and pass the cable through.
- Connect connector B1 to B2 (for electronic lock 12 V, 1 A if installed)
- Connect connector C1 to C2
- Tighten the screws D1 and D2
Note: the connectors B1/B2 and C1/C2 need to be behind the wall or other material and not between the outdoor unit and wall or other material.
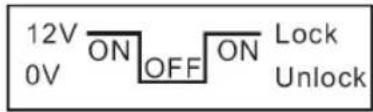
Connection of electronic lock:
Lock without adapter, power supplied via outdoor unit. When the door is closed, the circuit voltage is 0 V. By unlocking the door the circuit voltage 12 V. Delay is 4\~7 seconds.
Lock without adapter, power supplied via outdoor unit. When the door is closed, the circuit voltage is 12 V. By unlocking the door the circuit voltage 0 V. Delay is 4\~7 seconds.

Description and operation of the outdoor unit:
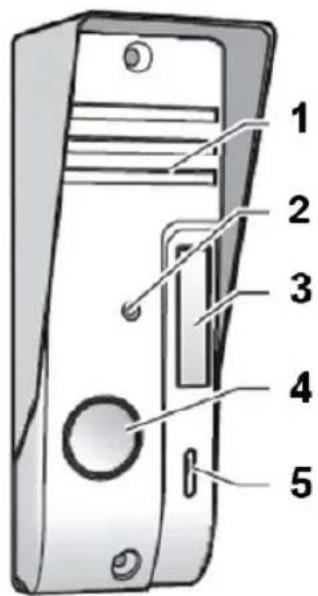
- Loudspeaker
- Camera
- IR LED for night view
- Call button
- Microphone
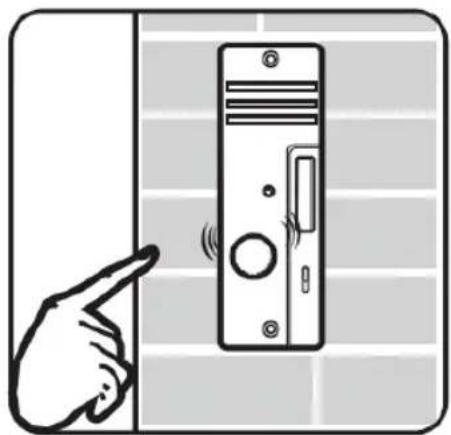
- Press the call button
- The indoor monitor will give a ding dong sound and activate the monitor screen
Description of the indoor monitor:
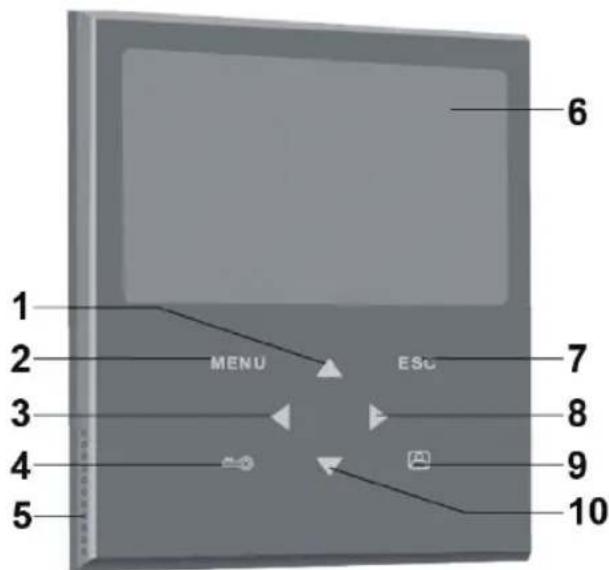
- Cursor button UP
- MENU button
- Cursor button LEFT
- UNLOCK button
- Speaker
- Screen
- ESC button
- Cursor button RIGHT
- MONITOR button
- Cursor button DOWN
Operation of the indoor monitor:
Intercom
When a visitor presses the call button of the outdoor unit, the indoor monitor will give a ding dong sound and activate the monitor screen. The indoor monitor screen will automatically display a picture of the visitor. Press the monitor button and speak to the visitor. When you have finished speaking to the visitor, press the monitor button again to switch off the screen. Or push the unlock button to open the door. The screen will also switch off automatically when a button is not pushed.
Monitor
Press the monitor button. The screen will automatically display a picture with a view of the outside of your front door. Press the button again to switch off the monitor or the monitor will switch off automatically after a while.
Menu
Press the menu button to enter the main menu. Use the UP and DOWN cursor buttons to select a setting and use the LEFT and RIGHT button to adjust the value of the setting. Press the ESC button to leave the menu.

Brightness: adjust the brightness of the picture

Contrast: adjust the contrast of the picture

Colour: adjust the colour of the picture

Volume: adjust the volume (also for the ding dong sound)
Specifications:
Outdoor unit:
- Operating voltage: By answering unit
- Communication system: Semi duplex
• Picture sensor: 1/4" CMOS colour 640x480 - IR LEDs: 4x IR LED, 1x EDS
- Lens: F4.5mm (H:40°, V:45°)
• Water/dust protection: IP44
• Operation temperature: -20°C +50°C - Weight: 100 g
• Dimensions: 127 x 47 x 37 mm
Indoor monitor:
- Operating voltage: 15 V DC with door open function
- Communication system: Semi duplex
• Screen: 7" TFT/LCD colour
• Resolution: 480 x 234 - Weight: 489 g
• Dimensions: 197 x 187 x 18 mm
The connection between the answering unit and the outdoor unit is made via a 4-wire cable and can be extended to 50 m with copper/0.75 mm cable.
Safety precautions:

To reduce risk of electric shock, this product should ONLY be opened by an authorized technician when service is required. Disconnect the product from mains and other equipment if a problem should occur. Do not expose the product to water or moisture.
Maintenance:
Clean only with a dry cloth. Do not use cleaning solvents or abrasives.
Warranty:
No guarantee or liability can be accepted for any changes and modifications of the product or damage caused due to incorrect use of this product.
General:
Designs and specifications are subject to change without notice.
All logos brands and product names are trademarks or registered trademarks of their respective holders and are hereby recognized as such.
Keep this manual and packaging for future reference.
Attention:

This product is marked with this symbol. It means that used electrical and electronic products should not be mixed with general household waste. There is a separate collections system for these products.
DEUTSCH
Einführung:
- Högtalare
- Kamera
- Infraröd (IR) LED för nattvisning
- Anropsknappen
- Mikrofon


- Høyttaler
- Kamera
- IR LED for nattsyn
- Ringeknapp
- Mikrofon


- INSTALLATION OF THE INDOOR MONITOR
- CONNECTION OF ELECTRONIC LOCK
- DESCRIPTION AND OPERATION OF THE OUTDOOR UNIT
- DESCRIPTION OF THE INDOOR MONITOR
- OPERATION OF THE INDOOR MONITOR
- INTERCOM
- MONITOR
- MENU
- SPECIFICATIONS
- OUTDOOR UNIT
- INDOOR MONITOR
- SAFETY PRECAUTIONS
- MAINTENANCE
- WARRANTY
- GENERAL
- ATTENTION
- DEUTSCH
- EINFÜHRUNG
Brand : KONIG
Model : SEC-PH360
Category : Intercom