
JC-221 - Bottle Sterilizer Joycare - Free user manual and instructions
Find the device manual for free JC-221 Joycare in PDF.


| Product type | Electric bottle sterilizer |
| Brand | Joycare |
| Model | JC-221 |
| Dimensions (approx.) | 28 x 22 x 32 cm |
| Weight (approx.) | 1.5 kg |
| Power supply | 220-240 V, 50/60 Hz |
| Power (estimated) | 800 W |
| Capacity | Up to 4 bottles |
| Sterilization method | Steam |
| Drying function | Yes, built-in |
| Timer | Yes, mechanical |
| Auto shut-off | Yes, with audible signal |
| Reservoir material | Heat-resistant plastic (PP) |
| Included accessories | Tongs, bottle rack |
| Care and cleaning | Clean the reservoir with a damp cloth; regular descaling recommended |
| Safety | Overheat protection; lid lock |
| Spare parts and repairability | Lid seal and reservoir available; repair at authorized center |
| General information | Use only with compatible bottles and accessories |
Frequently Asked Questions - JC-221 Joycare
User questions about JC-221 Joycare
0 question about this device. Answer the ones you know or ask your own.
Ask a new question about this device
Download the instructions for your Bottle Sterilizer in PDF format for free! Find your manual JC-221 - Joycare and take your electronic device back in hand. On this page are published all the documents necessary for the use of your device. JC-221 by Joycare.
USER MANUAL JC-221 Joycare
JC-221 MULTI KIT 5 IN 1
IMPORTANTI NORME DI SICUREZZA
JC-221 5-IN-1 MULTI KIT
IMPORTANT SAFETY NOTICE
Do not use the appliance for purposes different from those described in this instruction manual, any other use is deemed improper and hence dangerous.
Check that the appliance voltage requirement on the data plate corresponds to the electric power source before plugging in.
Always unplug appliance in the following cases: when not in use, during cleaning operations and whenever irregular operation is detected. Always unplug appliance by pulling the plug and not the power cord. Never wrap the power cord round the appliance, use the cord storage space placed under the appliance base. Never leave the appliance unguarded in the presence of children to avoid accidents and injuries.
For this reason it is advisable to place the appliance out of the reach of children.
Do not leave the power cord hanging from tables or worktops. Non-dishwasher safe appliance and attachments.
Utmost attention must be paid when the appliance is used in the presence of children.
This appliance is NOT a toy. Do not operate or place the appliance under a towel, blanket or pillow as it could overheat, causing fire and/or electric shock. Never place the appliance on cookers or on other hot surfaces. Always store the appliance away from heat, sunlight, humidity, sharp objects and similar items. Never leave the appliance unattended during operation!
Always unplug when not in use. The electronic parts of the appliance must never be immersed into, or come in contact with, water or other liquids. Do not operate the appliance with moist or wet hands. If the main unit gets wet unplug immediately. DO NOT ATTEMPT TO RECOVER THE APPLIANCE IF IT FALLS INTO THE WATER. Appliance to be exclusively employed for the purpose it was designed for, any other use is deemed improper and hence dangerous. Do not insert any kind of object through the slits present on the appliance. In the case of cord or appliance damage, immediately interrupt operation and call a specialized service centre. Do not tamper with the appliance attempting to fix it or to replace damaged parts. Damaged cords must be replaced immediately. Such operations must be exclusively performed by specialized technicians. Spare parts must be original or perfectly compatible. To avoid appliance overheating unwind the cord completely and switch off when not in use. To avoid the risk of electric shock never open or move the base while the appliance is operating. The tank must be refilled with fresh water at each use to ensure a correct degree of hygiene. It is advisable to use distilled water to prevent limescale build-up inside the tank. Never switch the appliance on when tank is empty. To avoid burns caused by contact with boiling-hot surfaces always use the handles to pick up appliance. Suitable for heat-resistant feeding bottles and containers only. Appliance designed for household use. Packaging (plastic bags, cardboard, polystyrene, etc) are potentially dangerous and must be kept out of the reach of children. They must be then disposed of according to current regulations.
APPLIANCE FUNCTIONS
- Sterilizer: sterilizes heat-resistant feeding bottles, teats and small accessories
- Bottle warmer
- Baby food warmer
- Fruit and vegetable steam cooker and egg cooker attachment
- Defroster
- Citrus squeezer

1-Sterilizer lid
2-Accessory basket
3-Basket holder
4-Bottle rack
5-Tank
6-Bottle warmer attachment lid
7-Bottle warmer attachment
8-Citrus squeezer
9-Tray
10-Egg cooker attachment
11-Heating base
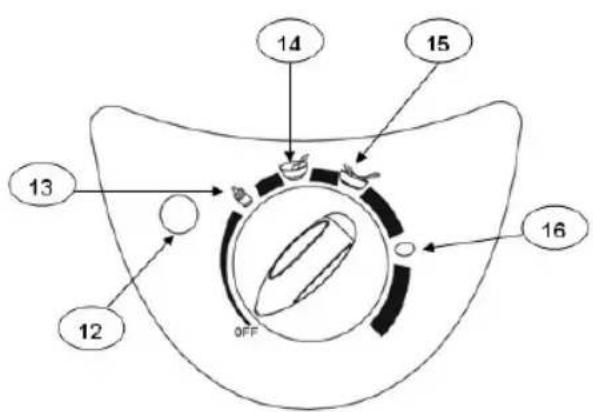
12-LED
13-Bottle warmer mode
14-Pot warmer mode
15-Sterilization mode
16-Egg and vegetables cooker mode / Defrosting function
STERILIZATION MODE
- Fill the heating base with 70ml water
- Place the tank on the heating base and place the bottle rack inside the former. Warning: place the appliance on a horizontal surface.
- Remove (or unscrew) teats and place feeding bottles in the rack (upside down). Such arrangement allows steam to correctly and evenly penetrate inside the bottles.
- Place the teat holder attachment (also suitable for other small accessories to be sterilized) on top of the rack. Then place accessories and teats on the holder.
- Plug appliance in and select the

icon by rotating the command dial. The LED indicator will turn green. The sterilization cycle will start
(duration approx 9 minutes). The appliance turns off automatically once the cycle is over
- It is advisable to unplug the appliance once the sterilization cycle is completed.
Notes: The appliance becomes very hot during, and immediately following, the sterilization process. To avoid burns do not touch internal parts or move the appliance with the hands. Always allow appliance to cool down (a few minutes)
Note: bottles and accessories must be thoroughly washed and rinsed with plenty of fresh water before sterilization.
BOTTLE WARMER MODE
Fill the heating base with distilled water (see following table for correct dosage).
| Milk volume (ml) contained in feeding bottle Initial feeding bottle temperature Required quantity of water | ||
| 240 25°C | approx 260ml | |
| 5°C | approx 100ml | |
| 150 25°C | approx 300ml | |
| 5°C | approx 150ml | |
- Place the feeding bottle warmer lid on the heating base.
- Insert the bottle (filled with milk) through the hole in the lid.
- Then plug appliance in and select the

icon by rotating the command dial. The LED indicator will turn green. The LED indicator turns off once switches off automatically.
milk temperature reaches 40°C and the appliance switches off automatically.
- Unplug the appliance
Notes: always test milk temperature before feeding it to a baby.
Appliance also suitable for defrosting feeding bottles straight from the freezer.
It is advisable to retrieve the heated feeding bottle only when the warm-up cycle is complete and the appliance has automatically switched off.
BABY FOOD POT WARMER MODE
- Remove any attachment present on the heating base.
- Fill the heating base with 100ml water
- Place the baby food warmer tray attachment on the heating base
- Place the baby food pot on the tray attachment
- Fasten the appliance by placing both the bottle warmer lid and the appliance lid on the tray
- Then plug the appliance in and select the

icon by rotating the command dial. The LED indicator will turn green. The pot warming process
lasts approx 7 minutes, the appliance then turns off automatically.
Note: always test milk temperature before feeding it to a baby.
CITRUS SQUEEZER MODE
- Place the heating tray attachment on the heating base.
- Place the citrus squeezer attachment on the heating tray
- Cut an orange or a lemon into two pieces to squeeze
- The citrus squeezer attachment is manually operated (hence the appliance must not be plugged in).
VEGETABLE COOKER MODE (CARROTS, POTATOES, ETC...)
The appliance is also designed for steam cooking vegetables. Cooking time varies according to quantity, type and temperature of the food in the basket.
- Place the appliance on a horizontal and stable surface.
- Remove any attachment present on the heating base.
- Fill the heating base with 180ml water
- Put the large tank on the heating base
- Clean the food (carrots or potatoes, etc.) and cut into small pieces
- Place the cut food inside the tank and set the timer according to desired degree of steam cooking.
- Rotate the command dial to select the

icon.
- Cooking cycle duration varies from 12 to 15 minutes
Note: allow approx 15 minutes cooking time for 100g thin-cut potatoes
Allow approx 12 minutes cooking time for 100g thin-cut carrots
Always test freshly cooked food temperature (on your hand) before feeding it to a child.
EGG COOKER MODE
- Remove any attachment present on the heating base.
- Fill the heating base with 100ml water
- Place the egg cooker attachment on the heating base
- Place the eggs inside the attachment holes
- Fasten the appliance by placing both the feeding bottle lid and the appliance lid on the egg cooker attachment
- Then plug the appliance in and select the icon by rotating the command dial. The LED indicator will turn green. The cooking cycle lasts approx 12 minutes, both the LED indicator and the appliance switch off automatically once the cycle is over.
DEFROSTING
The product has been conceived for defrosting food too. Defrosting time changes according to the
quantity of food and starting temperature of food (refrigerator temperature or room temperature).
Place the product base (1) on a flat and stable surface.
Pour 70ml water in the water bowl (4).
Note: 70ml of water grants a defrost cycle of about 5-7 minutes.
Place the racket on the product base. Place the food (200gr at most) to be defrosted on the racket; close the racket by the steam cover.
Connect the main unit to the mains. Move to
Defrosting cycle lasts about 5-7 minutes (90ml of water)
CLEANING DIRECTIONS
Unplug and allow appliance to thoroughly cool down before cleaning. Clean with a slightly moist cloth. Only use water. Never clean the appliance with abrasive detergents (plastic base and components). Proceed as following to remove limescale deposits, which may build up inside the warming tank or inside other plastic accessories, due to repeated usage (if distilled water is not employed):
- Use pre-boiled or filtered water to operate the sterilizer.
- Pour a solution of approx 200ml cold water and 100ml vinegar directly into the tank and/or inside accessories and leave to settle for around 30 minutes, or for the time needed to eliminate the deposit. Rinse the tank with a moist cloth and dry thoroughly.
- Clean the heating base with a water and vinegar mixture (1 to 2). Pour the diluted vinegar into the sterilizer and plug in the appliance to activate the sterilization process. Then drain the diluted vinegar solution and fill the heating base with water. Run the sterilization cycle again and rinse with a moist cloth as soon as it finishes. Thoroughly dry the tank and all the employed attachments.
TECHNICAL SPECIFICATIONS
Voltage supply: 220-240V / 50-60Hz
Power: 500W
IMPORTANT NOTICE
This appliance is not intended for use by persons (including children) with reduced physical, sensory or mental capabilities, or lack of experience or knowledge, unless they have been given supervision or instruction concerning the use of the appliance by a person responsible for their safety. Children should be supervised to ensure they do not play with the appliance. If the power cord is damaged it must be replaced by the builder or by its technical service or, in any case, by a person holding similar qualification in order to avoid whatsoever hazard.


DISPOSAL
The device (including its removable parts and accessories) must not be disposed of together with municipal waste at the end of its life, but in compliance with European Directive 2002/96/EC. Since it must be handled separately from household waste, either carry it to a separately collected waste disposal centre for electrical and electronic appliances or give it back to the retailer on purchasing a new device with the same purpose. Any infringement will be severely prosecuted. Specifications and designs are based on the latest information available at the time of printing and subject to change without notice.
JC-221 APPAREIL MULTI FONCTIONS 5 EN 1
NORMES DE SÉCURITÉ IMPORTANTES
Joycare S.p.A., a company with a sole shareholder, offers a period of 2 year warranty after the date of purchase. The warranty does not cover damage caused by accidental breakage, transportation, incorrect maintenance or cleaning, misuse, tampering or repairs carried out by non authorised third parties. The following is also excluded: damage caused by incorrect product installation, and damage caused by wear and tear, obviously including parts subject to wear and tear. In order to obtain the replacement/repair of products under warranty in cases other
than those mentioned above, but which are instead caused by manufacturing defects, please contact your local importer/distributor. Goods that are not held to be in good condition because of the aforesaid causes must be accompanied by this certificate, duly filled-in, as well as a receipt for the goods (invoices and transport documents) and purchasing documentation.
Please keep the original packaging of the product.
F: CARTE DE GARANTIE
- JC-221 MULTI KIT 5 IN 1
- IMPORTANTI NORME DI SICUREZZA
- JC-221 5-IN-1 MULTI KIT
- IMPORTANT SAFETY NOTICE
- APPLIANCE FUNCTIONS
- STERILIZATION MODE
- BOTTLE WARMER MODE
- BABY FOOD POT WARMER MODE
- CITRUS SQUEEZER MODE
- VEGETABLE COOKER MODE (CARROTS, POTATOES, ETC...)
- EGG COOKER MODE
- DEFROSTING
- CLEANING DIRECTIONS
- TECHNICAL SPECIFICATIONS
- IMPORTANT NOTICE
- DISPOSAL
- JC-221 APPAREIL MULTI FONCTIONS 5 EN 1
- NORMES DE SÉCURITÉ IMPORTANTES
- F: CARTE DE GARANTIE
Brand : Joycare
Model : JC-221
Category : Bottle Sterilizer