
KS-4250 - Baby monitor TOPCOM - Free user manual and instructions
Find the device manual for free KS-4250 TOPCOM in PDF.


| Product type | Audio baby monitor |
| Brand | Topcom |
| Model | KS-4250 |
| Dimensions (parent unit) | Approximately 10 x 6 x 3 cm |
| Dimensions (baby unit) | Approximately 8 x 5 x 4 cm |
| Weight (parent unit) | Approximately 150 g |
| Weight (baby unit) | Approximately 130 g |
| Power supply | Rechargeable batteries or mains adapter (included) |
| Main features | Two-way audio communication, night light, sound level indicator, range up to 300 m outdoors |
| Transmission type | Wireless (radio frequency) |
| Indoor range | Approximately 50 m |
| Outdoor range | Up to 300 m |
| Channels | Multiple channels to avoid interference |
| Volume control | Adjustable on the parent unit |
| Night light | Integrated into the baby unit, can be turned on remotely |
| Range indication | Connection loss indicator |
| Care and cleaning | Clean with a soft, dry cloth. Do not use abrasive products. |
| Safety | Do not expose to water. Use batteries recommended by the manufacturer. |
| Spare parts and repairability | Mains adapter, rechargeable batteries available as optional |
| General information | 2-year warranty. Manufactured for Topcom. |
Frequently Asked Questions - KS-4250 TOPCOM
User questions about KS-4250 TOPCOM
0 question about this device. Answer the ones you know or ask your own.
Ask a new question about this device
Download the instructions for your Baby monitor in PDF format for free! Find your manual KS-4250 - TOPCOM and take your electronic device back in hand. On this page are published all the documents necessary for the use of your device. KS-4250 by TOPCOM.
USER MANUAL KS-4250 TOPCOM
KS-4250
USER GUIDE / GEBRUIKSHANDLEIDING MANUEL D'UTILISATEUR / BEDIENUNGSANLEITUNG MANUAL DE USUARIO / ANVÄNDARHANDBOK MANUALE D'USO / MANUAL DO UTILIZADOR UŽIVATELSKÁ PŘÍRUČKA / INSTRUKCJA OBSŁUGI UŽÍVATEL'SKÝ MANUÁL
V 1.0 - 10/13
CE
UK The features described in this manual are published with reservation to modifications.
NL De in deze handleiding beschreven mogelijkheden worden gepubliceerd onder voorbehoud van wijzigingen.
F Les possibilités décrites dans ce manuel sont publiées sous réserve de modifications.
D Die in dieser Bedienungsanleitung umschriebenen Möglichkeiten, werden vorbehaltlich Änderungen publiziert.
ES Las características descritas en este manual pueden ser objeto de futuras modificaciones.
S Funktionerna i denna bruksanvisning publiceras med reservation för ändringar.
IT Le caratteristiche descritte nel presente manuale vengono pubblicate con riserva di modifica.
PT As características descritas neste manual são publicadas sob reserva de modificação.
CZ Možnost úpravy funkcí popsaných v této příručce vyhrazena.
PL Właściwości opisane w niniejszej instrukcji obsługi są publikowane z zatrzeżeniem prawa wprowadzenia zmian.
SK Vlastnosti popísané v tejto príručke sú publikované s vyhradeným právom na zmenu.
A

B
1 General
Dear customer,
We request that you read this information in order to quickly become familiar with this equipment and learn how to use its functions.
2 Information regarding this user guide
IMPORTANT: Due to application (APP) software updates, the installation and user instructions can change. Check the website http://service.tristar.eu/ for user guide updates.
This user guide contains information on the KS-4250 babyphone (referred to as 'the equipment' in the following) and provides important instructions on the initial use, safety, proper use and maintenance of this equipment. Always keep the user guide available near the equipment. Every person responsible for operating, repairing or cleaning the equipment must read and/or consult the user guide. Keep this user guide in a safe place and give it to the next owner of the equipment.
3 Copyright
This document is protected by copyright legislation.
All rights are reserved, including rights of photo mechanical reproduction, copying or distribution using specific means such as data processing, data storage media or data networks, either in full or in part, as well as technical changes and changes to the contents.
4 W a r n i n g s

DANGER
This warning points out an imminent hazardous situation.
Death or severe injuries may result if the hazardous situation cannot be avoided.

CAUTION
This warning points out a potentially hazardous situation.
Injuries and/or material damage may result if the hazardous situation cannot be avoided.

- This symbol points out information that makes it easier to use the equipment.
5 Proper use
This equipment is exclusively intended for private (non-professional) use in closed rooms for monitoring babies. All other forms of use are improper and can lead to hazards. Always follow the instructions provided in this user guide. No liability is accepted for any loss or damage resulting from improper use. The user of the equipment is exclusively responsible for all risks.
6 Safety
6.1 Risk of electric shock
DANGER
Contact with conductors or components under electrical tension can be lethal.
Observe the following safety instructions in order to avoid the risk of electric shock:
- To avoid the risk of damage to the equipment, use only the AC mains adapter supplied with the equipment.
- Do not use the equipment if the AC mains adapter, the power cable or the plug is damaged.
- Never open the enclosure of the AC mains adapter. There is a risk of electric shock if you touch any contacts or connections under electrical tension or if you modify the electrical or mechanical construction.
- Protect the equipment against moisture and moisture penetration, and keep it free of dust. Unplug the AC mains adapter immediately in case of contact with moisture.
- Unplug the AC mains adapter in case of malfunctions, during thunderstorms, and when cleaning the equipment.
- Protect the cable against contact with hot surfaces or other sources of hazard, and do not allow it to be pinched.
6.2 General rules for safe use
To ensure safe use of the equipment, always observe the following safety instructions:
- The equipment must always be assembled by an adult. During assembly, keep small parts out of the reach of children.
- Do not allow children to play with the equipment or parts of the equipment.
- Ensure that the babyphone and power cable are always out of the reach of the baby.
- Never cover the babyphone with a towel, blanket etc.
- Defective components must always be replaced by original replacement parts, as other components may not fulfil the safety standards.
- Switch off your babyphone whenever this is requested by a sign, poster, or other message. The equipment used in hospitals and other health care facilities may be sensitive to high-frequency signals from external sources.
7 Operation
KS-4250 is a wireless network camera. It can connect with your smartphone or tablet via wireless technology, and monitor everything that matters to you on your smartphone or tablet anywhere and anytime.

The babyphone can never replace proper supervision by an adult; it only provides support.
7.1 Night vision
The camera has 8 high-intensity LED's for picking up clear images in the dark. When the build in light sensor measures the ambient light level as low, the LED's will automatically activate.

The image changes automatically into black and white mode under the night vision mode.
7.2 Product layout
See Figure "A" on the fold-out page.
1 Light sensor
6 Power/Status LED
2 Microphone
7 Power adapter plug
3 Camera lens
8 Reset to factory default button
4 Infrared LEDs
9 Power ON/OFF switch
5 Antenna
8 l n i t i a l u s e
8.1 Before setting up
- Make sure your Wi-Fi router is turned on and it can connect to the Internet.
- Download "Easy iCAM" App from the Apple App Store or Android Market (Google Play).

8.2 Connecting the KS-4250 to the AC mains
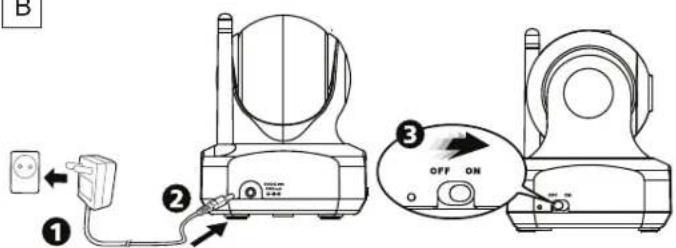
See figure "B" on the fold-out page.
- Insert the small plug of the AC mains adapter in the mains power connector of the baby unit and plug the AC mains adapter into a mains connector (100\~240 V - 50/60 Hz).
- Slide the Power ON/OFF switch to the ON position. The LED on the camera will glow orange and then change to red.
Note: When you power the camera on, it takes around 40 to 60 seconds for initial setup.
CAUTION
- The mains connector must be within easy reach so you can quickly unplug the power cable in an emergency.
- Use only the supplied AC mains adapter (6 V DC / 800 mA).
9 Installing the KS-4250
9.1 Fine tuning
- Place the camera in a convenient location, point the lens of the camera to the observation area.
- Adjust the angle by rotation the camera.
CAUTION
Do not place the camera and wires within the baby's reach!
Fix the camera at least 1 meter away from the baby.
10 Operation and use
10.1 Connect your smartphone or tablet to the camera
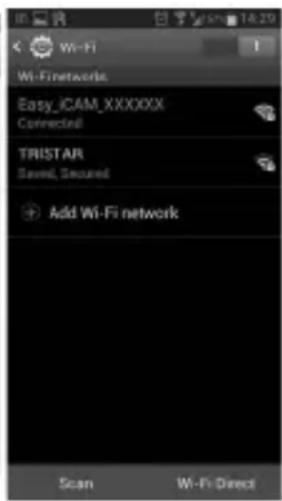
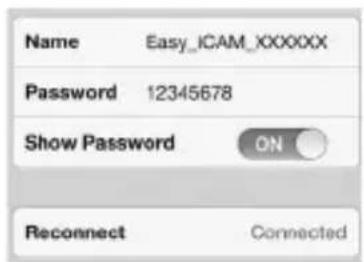
- Turn on the Wi-Fi of your smartphone or tablet and go to the WiFi setting menu.
- Tap the screen to select "Easy_iCAM_XXXXXX" under Wi-Fi Networks.
- Enter the password. The default password is "12345678".
- Launch the Easy iCAM App on your smartphone or tablet.
- Follow the on-screen app instructions.

iOS

Android
10.2 Setting up the camera name (SSID) or password
When launching the app for the first time, the screen will show a message that reminds you to change the Wi-Fi camera name (SSID) or password.
• If you select "Yes", you can change the Wi-Fi camera name or password.
Note: The password must contain at least eight characters.
- When you complete the setup of camera name or password and tap the ok icon, the app will ask you if you want to set up an Internet connection.
• If you select "Yes", Internet setup will be started (see "10.3")
• If you select "No", the camera will restart to change the camera name and password automatically.
Note: When the name has been changed, you have to re-select the camera by its new SSID in WiFi setting of your smartphone or tablet.
• If you select "No", the app will ask you if you want to setup an Internet connection.

10.3 Setting up an Internet connection
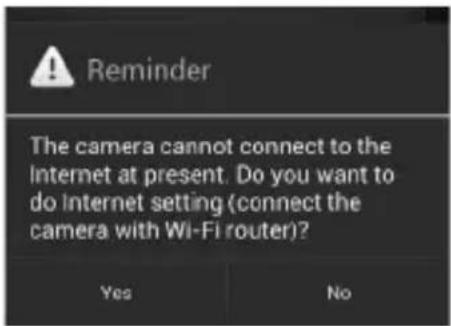
The screen will show a message asking if you want to set up an Internet connection.
- If you select "Yes", the camera will scan for available Wi-Fi networks in range. Tap the name of your Wi-Fi network, and enter the password of your Wi-Fi router if necessary. Then the first-time setup is done.
Note: If the camera cannot find the Wi-Fi network you want to connect to, please tap the scan icon to rescan for available Wi-Fi networks.
If you complete the Internet setup successfully, the power/status LED will glow green after 1 to 2 minutes.
• If you select "No", the first-time setup is done.
Note: If you don't set up an Internet connection, you can only get live video feeds by connecting the camera with your smartphone or tablet directly (Local view)
11 Operation Mode - Local View/Internet View
KS-4250 is a wireless network camera. It can connect with your smartphone or tablet by wireless technology directly.
You can watch live video feeds on your smartphone or tablet in "local view mode" (without internet connection).
In "Internet view mode", your smartphone or tablet needs to connect to the camera through a Wi-Fi router or 3G/4G mobile network, then you can access a live stream of video and audio on your smartphone or tablet from anywhere in the world.
![graph TD A["Local View"] --> B["Easy iCAM"] B --> C["Smartphone, Tablet"] D["Internet View"] --> E["Easy iCAM"] E --> F["Wi-Fi Router"] F --> G["Smartphone, Tablet"] style A fill:#f9f,stroke:#333 style D fill:#f9f,stroke:#333 style B fill:#ccf,stroke:#333 style E fill:#ccf,stroke:#333 style F fill:#…](/content/2026/06/1263368/images/2512bb26f9d35f94ed56c549dbcfdbdb4f77d55589ea70f95dfb3505d748d976.jpg)
11.1 Local view
When your smartphone or tablet connects with the camera directly through Wi-Fi (Point to Point), you can launch the Easy iCAM app to operate it in local view mode.
Make sure you have selected the camera SSID instead of your WiFi SSID in your WiFi settings of your smartphone or tablet.
11.1.1 Description
1 Information
Tap the icon to get information about the camera.
2 Operation mode
This row shows the current operation mode of the app (local view)
3 Camera name (SSID)
This row shows the camera name, which is the same as the Wi-Fi Network (SSID).
4 Image display area
Touch the image display area of the screen with two fingers and move them apart for zoom function. You also can slide on the screen for digital pan-tilt function.
5 Photo
Tap the icon to see all of the photos you have taken.
6 Snapshot
Tap the icon to save a snapshot of the camera on your smartphone or tablet.

7 Audio ON/OFF
Tap the icon can turn on or off the sound.
8 Voice activation function (VOX)
With this function active you can use your smartphone or tablet for other APP in local view mode.
Tap the icon to run voice activation function, tap it again to turn the function off.
If you run on the function and then press the home button on your smartphone or tablet to exit the app, the screen will show a reminder message when the volume level from camera unit is higher than the volume setting level. Tapping or sliding the reminder message icon can launch the app directly.
Note:
- If you turn on the voice activation function and press the home button on your smartphone or tablet to exit the app, the VOX function can still work and remind you of audio events from the camera.
- The voice activation function can only work in local view mode!
- If you want to exit the app completely, please doubleclick the home button on your iPhone/iPad when it is in home screen status, and then tap the Easy iCAM icon until the cancel symbol appears. When you exit the app completely, the voice activation function can't work.
- If you want to exit the app completely, please press the back button on your Android system. When you exit the app completely, the voice activation function can't work.
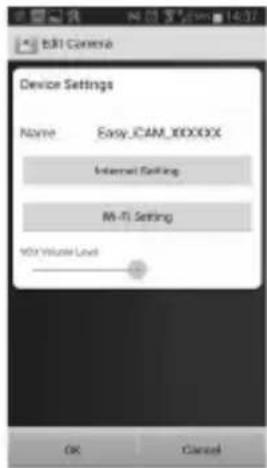
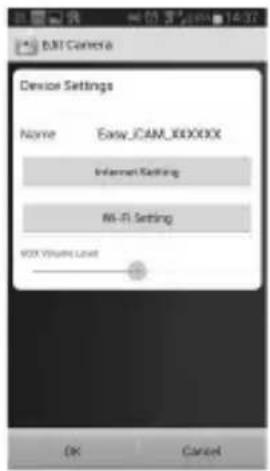
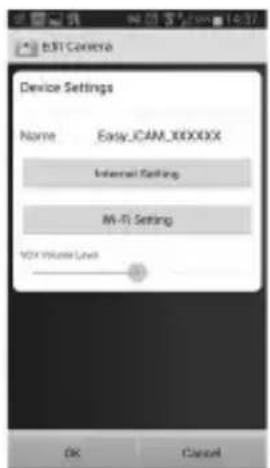
11.1.2 Setting
Tap the icon to set up camera functions.
1 Internet Setting
You can setup an Internet connection, or change the camera connection to another Wi-Fi router.
2 Wi-Fi Setting
If you want to change the camera name (Wi-Fi SSID) or password, please tap this row to carry out the change.
3 VOX Level (volume trigger level)
Tap and slide the VOX Level bar to adjust the volume trigger level.

iOS
Android
11.2 Internet view
If the Internet connection of your camera has been setup and the Power/Status LED glows green, the camera can link to the Internet and you can access a live stream of video and audio on your smartphone or tablet in Internet view from anywhere in the world. Please make sure your smart phone or tablet can link to the Internet by a Wi-Fi router or 3G/4G mobile network, and then launch the Easy iCAM app.
11.2.1 Internet view
1 Camera name (SSID)
When you launch the app, all the cameras you have added will be shown on the screen.
2 Camera status
a Online
If the camera status shows "online" you can tap the camera photo to see the video of the camera.
b Connecting
If the camera status shows "connecting" you need to wait until the status changes to online, and then tap the camera photo to see the video of the camera.

c Offline
If the camera status shows "offline"; you need to tap the arrow icon beside the camera name, and then tap "Reconnect" to re-confirm the Internet connection.
3 Camera photo
Tap the camera photo to see the video of the camera.
4 Tap the arrow icon and you can see the screen shown below:
A. Android
a Reconnect
You need to tap "Reconnect" to re-confirm the Internet connection if the camera status shows offline.
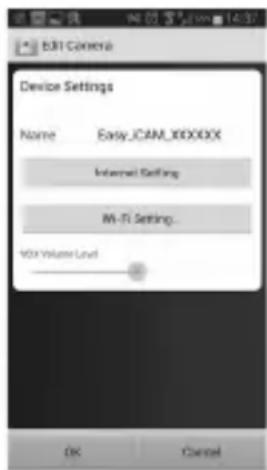
b Edit Camera
If you have changed the camera password with another smartphone or tablet, you need to tap the row to correct the password for Internet connection.
c View Snapshot
Tap the row and you can see all of the photos you have taken.

Reconnect

Edit Camera

View Snapshot

Remove Camera
d Remove Camera
Tap the row if you want to remove the camera.
B. iOS
a Password
If you have changed the camera password with another smartphone or tablet, you need to tap the row to correct the password for Internet connection.
b Reconnect
You need to tap "Reconnect" to re-confirm the Internet connection if the camera status shows offline.
5 Tap the icon and select "Exit" if you want to exit the app.
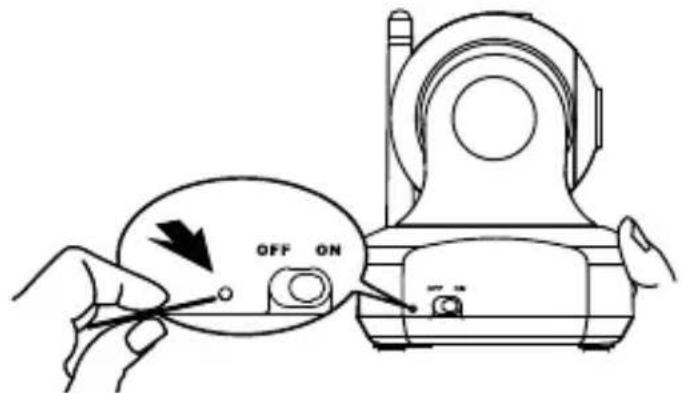
12 Reset the camera to factory defaults
While the camera is powered on for at least 1 minute, press the reset button (using a small object or a pin) for at least 3 seconds, the power/status LED will start blinking. The camera will be reset to factory default, which is useful if you forget the password of the camera.
13 Cleaning and maintenance
This section contains important instructions for cleaning and maintaining the equipment. Follow these instructions to ensure trouble-free use and prevent damage to the equipment due to improper maintenance.
13.1 Safety Instructions

DANGER
Risk of fatal injury due to electric shock!
- Before cleaning the equipment, switch it off and unplug the power cable from the mains receptacle.

CAUTION
- Do not use cleaning products or solvents. They can damage the case or seep into the equipment and cause permanent damage.
13.2 Cleaning
– Clean the equipment with a soft, slightly dampened cloth.
– Clean soiled connectors and contacts with a soft brush.
- If the equipment gets wet, switch it off. Do not use the equipment before it is completely dry.
13.3 Maintenance
- Check the connectors and cables for defects.

CAUTION
- If you suspect that the equipment is damaged, always have it checked by an expert before using it again.
14 Troubleshooting
This section provides important instructions for localising and correcting problems.
Follow these instructions in order to avoid hazards and damage.
14.1 Safety Instructions

DANGER
Risk of fatal injury due to electric shock!
- Unplug the power cable before attempting to correct a problem.

CAUTION
Risk of hazard due to incorrect repairs
Incorrect repairs can expose users to serious hazards and cause damage to the equipment.
- Never attempt to modify or repair the equipment.
• Always have repairs to equipment or cables performed by a specialist or the service centre. - If you suspect that the equipment is damaged (for example, if it has fallen on the floor), have it checked by a specialist before you use it again.
14.2 Problem causes and solutions
Cannot connect the camera to your smartphone or tablet in local view
- Make sure the power plug is pushed all the way in.
- Make sure the camera is turned on and power/status LED glows red or green.
- Make sure the camera and your smartphone/tablet are within range of each other.
- Make sure you have entered the right password of the camera on your smartphone/tablet.
- You may need to reset the camera by pressing the reset button with a thin object (i.e. paper clip). Please refer to 7 - Reset the camera to factory default of this user manual.
Cannot connect the camera to your smartphone/tablet through Wi-Fi router or 3G/4G mobile network in Internet view
- Make sure the power plug is pushed all the way in.
- Make sure the camera is turned on and power/status LED glows green.
- Make sure you type in the right password for the Wi-Fi router in Internet setting. Please refer to 3.4 - Setting up the camera and Internet connection of this user manual.
- Make sure the camera and the Wi-Fi router are within range of each other.
- Make sure your smartphone/tablet is connected to the Internet through Wi-Fi or 3G/4G mobile network. You may need to reset the camera by pressing the reset button with a thin object (i.e. paper clip).
Please refer to 7 - Reset the camera to factory defaults of this user manual and then refer to 3.4 - Setting up the camera and Internet connection of this user manual.
Video streaming is slow or lags
- If there is a microwave oven in use near the camera or Wi-Fi router, remove the microwave oven or him it off.
• Make sure the camera and the Wi-Fi router are within range of each other. - The speed of video feed from the camera depends highly on the speed of the connection you are using.
- The Internet speed either from your Wi-Fi network or 3G/4G mobile network has a high impact on the performance of the product. The faster and more stable connection speed, the faster you can see the video from the camera.
15 Storage and disposal instructions
| i | We recommend that you keep the box and packing materials so you can use them to transport the equipment in the future if necessary. |
15.1 Storage
Store the equipment in a dry location.
15.2 Waste disposal of package materials

The package materials are environmentally friendly materials that can be given to your local waste collector for recycling.
15.3 Waste disposal (environmental protection)

Dispose of the equipment in accordance with the provisions of European Directive 2002/96/EC, Waste Electrical and Electronic Equipment (WEEE), regarding discarded electrical and electronic equipment. Contact your municipal waste disposal department for information.
16 Technical data
| Frequency 2,4GHz | |
| Range Outdoors: up to 300 m (Line of sight)Indoors: up to 50 m | |
| Operating temperature 0°C to 40°C20% to 75% relative humidity | |
| AC mains adapter Manufacturer: Salom electric Co.Model: SSW-2256EUInput: 100~240V AC, 50/60Hz, 0,2A MaxOutput: 6 V DC / 800 mA | |
17 EC conformity declaration
Tristar hereby declares that this device is in compliance with the essential requirements and other relevant provisions of Directive 1999/5/EC.
The declaration of conformity can be found at www.tristar.eu
18 Tristar warranty
18.1 Warranty period
The Tristar units have a 24-month warranty period. The warranty period starts on the day the new unit is purchased. Consumable or defects causing a negligible effect on operation or value of the equipment are not covered. The warranty has to be proven by presentation of the original or copy of the purchase receipt, on which the date of purchase and the unit-model are indicated.
18.2 Warranty exclusions
Damage or defects caused by incorrect treatment or operation and damage resulting from use of non-original parts or accessories are not covered by the warranty. The warranty does not cover damage caused by outside factors, such as lightning, water and fire, nor any damage caused during transportation. No warranty can be claimed if the serial number on the units has been changed, removed or rendered illegible. Any warranty claims will be invalid if the unit has been repaired, altered or modified by the buyer.
1 Algemeen
Beste klant,
6 Voeding/Status-LED
o7 Voredingsadapter-stekker
8 Resetten naar
fabrieksinstellingen-knop
iOS

Android
6 Foto
iOs

Android
11.2 Internet weergave
c Offline
iOS

Android
iOs

Android
11.2 Vue Internet
d Supprimer caméra
b Se reconnecter
iOS

Android
Easy iCAM Smartphone, Tablet
Intemetansicht

Easy iCAM
![graph LR A["Wireless Signal"] --> B["Rout"] B --> C["Internet"] C --> D["Smartphone"] D -.-> C](/content/2026/06/1263368/images/8c889031abf36f919d7c3e231af6267298a68096b3170546cf34cdbd13403fd7.jpg)
WLAN-Router
Smartphone, Tablet
11.1 Lokale Ansicht
5 Foto
Tap the icon can turn on or off the sound.
iOs
Android
a Online
b Erneut verbinden
iOS
Android
iOs

Android
iOS

Android
iOS

Android
11.2 Vista Internet
c Offline

Android
11.1.2 Ustawienia
iOs

Android
iOS

Android
7 Audio ON/OFF
iOS
Android
11.2 Visione Internet
3 Fotocamera
iOS

Android
10.3 Konfigurera en Internetanslutning
7 Ljud PÅ/AV
iOs
Android
11.2 Internetvisning
3 Kamerabild
iOS

Android
6 S n í m e k
iOS

Android
3 Fotografie kamery
13 Čištění a údržba
iOS

Android
6 S n í m k a
iOS

Android
11.2 Sledovanie cez internet
3 Fotografia kamery
b. Opätovne pripojit'
Ak je stav kamery offline, musíte t'uknúť na „Reconnect“ (Opätovne pripojit') za účelom opätovného pripojenia k internetu.
5 Ak chcete aplikáciu opustit', t'uknite na ikonu a vyberte položku „Exit“.
12 Obnova zariadenia do stavu od výroby



- KS-4250
- 1 GENERAL
- 2 INFORMATION REGARDING THIS USER GUIDE
- 3 COPYRIGHT
- 4 W A R N I N G S
- DANGER
- CAUTION
- 5 PROPER USE
- 6 SAFETY
- 6.1 RISK OF ELECTRIC SHOCK
- CONTACT WITH CONDUCTORS OR COMPONENTS UNDER ELECTRICAL TENSION CAN BE LETHAL
- 6.2 GENERAL RULES FOR SAFE USE
- 7 OPERATION
- 7.1 NIGHT VISION
- 7.2 PRODUCT LAYOUT
- 8 L N I T I A L U S E
- 8.1 BEFORE SETTING UP
- 8.2 CONNECTING THE KS-4250 TO THE AC MAINS
- 9 INSTALLING THE KS-4250
- 9.1 FINE TUNING
- 10 OPERATION AND USE
- 10.1 CONNECT YOUR SMARTPHONE OR TABLET TO THE CAMERA
- 10.2 SETTING UP THE CAMERA NAME (SSID) OR PASSWORD
- 10.3 SETTING UP AN INTERNET CONNECTION
- 11 OPERATION MODE - LOCAL VIEW/INTERNET VIEW
- 11.1 LOCAL VIEW
- 11.1.1 DESCRIPTION
- 1 INFORMATION
- 2 OPERATION MODE
- 3 CAMERA NAME (SSID)
- 4 IMAGE DISPLAY AREA
- 5 PHOTO
- 6 SNAPSHOT
- 7 AUDIO ON/OFF
- 8 VOICE ACTIVATION FUNCTION (VOX)
- NOTE
- 11.1.2 SETTING
- 1 INTERNET SETTING
- 2 WI-FI SETTING
- 3 VOX LEVEL (VOLUME TRIGGER LEVEL)
- 11.2 INTERNET VIEW
- 11.2.1 INTERNET VIEW
- 1 CAMERA NAME (SSID)
- 2 CAMERA STATUS
- A ONLINE
- B CONNECTING
- C OFFLINE
- 3 CAMERA PHOTO
- ANDROID
- A RECONNECT
- B EDIT CAMERA
- C VIEW SNAPSHOT
- D REMOVE CAMERA
- IOS
- A PASSWORD
- B RECONNECT
- 12 RESET THE CAMERA TO FACTORY DEFAULTS
- 13 CLEANING AND MAINTENANCE
- 13.1 SAFETY INSTRUCTIONS
- RISK OF FATAL INJURY DUE TO ELECTRIC SHOCK
- 13.2 CLEANING
- 13.3 MAINTENANCE
- 14 TROUBLESHOOTING
- 14.1 SAFETY INSTRUCTIONS
- RISK OF HAZARD DUE TO INCORRECT REPAIRS
- 14.2 PROBLEM CAUSES AND SOLUTIONS
- CANNOT CONNECT THE CAMERA TO YOUR SMARTPHONE OR TABLET IN LOCAL VIEW
- CANNOT CONNECT THE CAMERA TO YOUR SMARTPHONE/TABLET THROUGH WI-FI ROUTER OR 3G/4G MOBILE NETWORK IN INTERNET VIEW
- VIDEO STREAMING IS SLOW OR LAGS
- 15 STORAGE AND DISPOSAL INSTRUCTIONS
- 15.1 STORAGE
- 15.2 WASTE DISPOSAL OF PACKAGE MATERIALS
- 15.3 WASTE DISPOSAL (ENVIRONMENTAL PROTECTION)
- 16 TECHNICAL DATA
- 17 EC CONFORMITY DECLARATION
- 18 TRISTAR WARRANTY
- 18.1 WARRANTY PERIOD
- 18.2 WARRANTY EXCLUSIONS
- 1 ALGEMEEN
- 6 FOTO
- 11.2 INTERNET WEERGAVE
- 11.2 VUE INTERNET
- D SUPPRIMER CAMÉRA
- B SE RECONNECTER
- 11.1 LOKALE ANSICHT
- 5 FOTO
- B ERNEUT VERBINDEN
- 11.2 VISTA INTERNET
- 11.1.2 USTAWIENIA
- 11.2 VISIONE INTERNET
- 3 FOTOCAMERA
- 10.3 KONFIGURERA EN INTERNETANSLUTNING
- 7 LJUD PÅ/AV
- 11.2 INTERNETVISNING
- 3 KAMERABILD
- 3 FOTOGRAFIE KAMERY
- 13 ČIŠTĚNÍ A ÚDRŽBA
- 11.2 SLEDOVANIE CEZ INTERNET
- 3 FOTOGRAFIA KAMERY
- OPÄTOVNE PRIPOJIT
- 5 AK CHCETE APLIKÁCIU OPUSTIT', T'UKNITE NA IKONU A VYBERTE POLOŽKU „EXIT
- 12 OBNOVA ZARIADENIA DO STAVU OD VÝROBY
Brand : TOPCOM
Model : KS-4250
Category : Baby monitor