
PL-30-K - DJ Equipment PIONEER - Free user manual and instructions
Find the device manual for free PL-30-K PIONEER in PDF.


| Product type | DJ vinyl turntable |
| Brand | Pioneer |
| Model | PL-30-K |
| Dimensions (W x D x H) | Approximately 450 x 350 x 160 mm |
| Weight | Approximately 10 kg |
| Power supply | AC 100-240 V, 50/60 Hz |
| Motor | Direct drive |
| Rotation speeds | 33 1/3 and 45 RPM |
| Pitch control | +/- 8% or +/-16% |
| Quartz lock | Yes |
| Tonearm | Statically balanced S-shaped tonearm |
| Adjustable tracking force | 0 to 4 g |
| Adjustable anti-skating | Yes |
| Audio output | Stereo RCA |
| Headphone output | 6.35 mm jack |
| Main functions | Vinyl playback, pitch control, start/stop, reverse play |
| Maintenance and cleaning | Clean the stylus with a brush, dust the platter, avoid moisture |
| Safety | Do not expose to water, unplug before cleaning |
| Spare parts and repairability | Stylus, belt (if applicable), bulbs, fuses |
Frequently Asked Questions - PL-30-K PIONEER
User questions about PL-30-K PIONEER
0 question about this device. Answer the ones you know or ask your own.
Ask a new question about this device
Download the instructions for your DJ Equipment in PDF format for free! Find your manual PL-30-K - PIONEER and take your electronic device back in hand. On this page are published all the documents necessary for the use of your device. PL-30-K by PIONEER.
USER MANUAL PL-30-K PIONEER
Operating Instructions
Mode d'emploi
Bedienungsanleitung
If you want to dispose this product, do not mix it with general household waste. There is a separate collection system for used electronic products in accordance with legislation that requires proper treatment, recovery and recycling.
Private households in the member states of the EU, in Switzerland and Norway may return their use electronic products free of charge to designated or lection facilities or to a retailer (if you purchase a similar new one).
For countries not mentioned above, please contact your local authorities for the correct method of disposal.
By doing so you will ensure that your disposed product undergoes the necessary treatment, recovery and recycling and thus prevent potential negative effects on the environment and human health.
K058b_A1_En
WARNING
This equipment is not waterproof. To prevent a fire or shock hazard, do not place any container filled with liquid near this equipment (such as a vase or flower pct) or expose it to dripping, splashing, rain or moisture.
D3-4-2-1-3_A1_En
WARNING
To prevent a fire hazard, do not place any naked flame sources (such as a lighted candle) on the equipment.
D3-4-2-1-7a A1 En
Operating Environment
Operating environment temperature and humidity:
+5 °C to +35 °C (+41 °F to +95 °F); less than 85 %RH (cooling vents not blocked)
Do not install this unit in a poorly ventilated area, or in locations exposed to high humidity or direct sunlight (or strong artificial light).
D3-4-2-1-7c* A2 En
CAUTION
Since the power cord serves as the main disconnect device for the unit, you will need to unplug it from the AC outlet to shut down all power. Therefore, make sure the unit has been installed so that the power cord can be easily unplugged from the AC outlet in case of an accident. To Angola fire hazard, the power cord should also be unplugged from the AC outlet when left unused for a long period of time (for example, when on vacation).
D3-4-2-2-2a*A1_En
CAUTION
TO PREVENT THE RISK OF ELECTRIC SHOCK, DO NOT REMOVE COVER (OR BACK). NO USER SERVICEABLE PARTS INSIDE. REFER SERVICING TO QUALIFIED SERVICE PERSONNEL.
D3-4-2-1-1_B1_En
POWER-CORD CAUTION
I handle the power cord by the plug. Do not pull out the plug by lugging the cord and never touch the power cord when your hands are wet as this could cause a short circuit or electric shock. Do not place the unit, a piece of furniture, etc., on the power cord, or pinch the cord. Never make a knot in the cord or be it with other cords. The power cords should be routed such that they are not likely to be stepped on. A damaged power cord can cause a fire or give you an electrical shock. Check the power cord once in a while. When you find it damaged, ask your nearest PIONEER authorized service center or your dealer for a replacement.
S002* A1 En
WARNING
Store small parts out of the reach of children and infants. If accidentally swallowed, contact a doctor immediately.
D41-6-4_A1_En
VENTILATION CAUTION
When installing this unit, make sure to leave space around the unit for ventilation to improve heat radiation (at least 15 cm at top, 5 cm at rear, and 5 cm at each side).
D3-4-2-1-7d^A1En
This product is for general household purposes. Any failure due to use for other than household purposes (such as long-term use for business purposes in a restaurant or use in a car or ship) and which requires repair will be charged for even during the warranty period.
K041 A1 En
Thank you for buying this Pioneer product. Please read through these operating instructions so you will know how to operate your model properly.
Contents
01 Before you start
Features 4
Checking what's in the box....4
Assembly 4
02 Operation
Par. namras and funclions....5
Adjustment 5
Connecting your equipment....7
Playback....8
Pausing playback 8
Finishing playback....8
Additional information 8
03 Others
Troubleshooting....10
Cautions on use 10
Maintenance of each part....10
About trademarks and registered trademarks....10
Specifications 11
Features
Simple to use, fully automatic record player
Once you select the record size, all you have to do is press the [START] button to start playing a record. When the record is done, the player's fully automatic function returns the tone arm to its position.
Stable record playing due to low center of gravity chassis
The bottom of the player has a metal plate to give the entire chassis a low center of gravity. That makes it stable while playing records even when there are external vibrations.
Equipped with a phono equalizer that can be switched ON/OFF
Being equipped with its own phono equalizer means the player can be connected directly to amos that don't have a PHONO terminal. If an amp does have a phono equalizer, this function can be turned off.
Comes with a high-performance MM cartridge
Because it comes with a cartridge, you can use it right away.
Comes with a moderately thick rubber mat
The 5 mm thick rubber mat suppresses external vibration while improving the grip between the record and the turntable—or slable record playing.
Unobtrusive design
Its appearance and finish engender a composed ambience so it harmonizes with your components as well as your interior.
Detachable power cord
Cables are not obstacles when the player is moved, thus preventing disconnection problems.
Checking what's in the box
Please check that you've received the following supplied accessories:
- Turrtable
- Turntable sheet
• Dust cover with removable hinges
- Adapter for EP record
• Balance weight
• Headshall with cartridge
- Spare lead wires
- Power cord
- Operating instructions (this document)
- Warranty sheet
WARNING
Store small parts out of the reach of children and
infants. If accidentally swallowed, contact a doctor
immediately.
D41-6-4_A1_En
Assembly
- Do not remove the twist to for clamping the toro arm until assembly is completed.
- Connect the power cord after player assembly and all the connections between other devices have been
1 Set the turntable.
Sel the turntable on the center spindle.
- Be careful rot to hit the turntable on the main unit or drop it.

natural_image
Technical line drawing of a mechanical component with no visible text or symbols2 Turn the turntable so that the roller is visible through the square hole with the ribbon tape for catching the belt.
3 Pinch the ribbon tape and catch the belt on the outer center of the roller.

1 Roller
2 Belt
3 Ribbon tape
4 Square hole
4 Remove the ribbon tape.
5 Turn turntable slowly five or six turns.
Check that the ball is properly caught at the center of the roller.
6 Set the turntable sheet.
- The turnlable mat has a lca and a bottom side. Put the mat on the turnlable so the bellom, which has the Pioneer logo, faces down.

natural_image
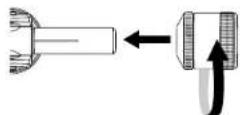
Technical line drawing of a mechanical component with concentric rings and mounting base (no text or symbols)7 Attach the headshell.
Insert the headshell with attached cartridge into the tone arm. Next, while keeping the headshell horizontal, tighten the lock nut.

natural_image
Diagram showing a mechanical component being inserted into a pin (no text or symbols present)8 Attach the balance weight.
Attach the balance weight to the rear shaft of the lone arm.
9 Mount the dust cover.
Insert the hinges of the dust cover securely into their holders on the back of the turntable.

- Insert both hinges fully.
- When removing the dust cover, open the dust cover fully then pull out upward with holding the dust cover near the hinge relannar sections.
10 Remove the twist tie for clamping the tone arm.
Once assembly is finished, remove the twist tie for clamping the tone arm.
Part names and functions
Top panel

1 SPEED button
Changes the speed according to the record to be played.
2 START button
Pressing the button starts rotation of the turntable.
3 STOP button
Pressing the button stops rotation of the turntable.
4 SIZE SELECT lever
Changes the size according to the record to be played.
b Headshell
Used with a cartridge attached.
6 Lock nut
I holds the cartridge attached.
7 Tone arm
8 Arm rest
Serves as the support base for the lone arr.
9 Lifter lever
The tone arm goes up when the lever is pulled up. The tone arm goes down when the lever is pushed down.
10 Arm lifter
This device is used to move the tone arm jo and down. It is operated by the Ifter lever.
ANTI-SKATING dial
When a record is played, there is power to pull the stylus tip toward the inner perimeter. By matching this dial to the stylus pressure value, that power is eliminated.
12 Stylus pressure adjustment ring
Used to match to the appropriate stylus pressure of the cartridge.
Balance weight
Used to balance the lone arm and adjust the stylus pressure.
14 Adapter for EP record
Used to play standard EP records.
Adjustment
Adjusting the tone arm balance
Prepare as follows;
- For cartridges with removable stylus covers, remove the stylus cover.
- Push down the lifter lever
1 Set the [ANTI-SKATING] dial to "0".
2 Keep the tone arm from the arm rest and adjust the balance so it is horizontal.
Turn the balance weight until the tone arm becomes almost horizontal.
- When moving the tone arm, make sure that the stylus tip does not directly touch the turntable and the like.

Balance weigh too far to the back. Balance weigh too far to the front

Adjusting the stylus pressure
1 Return the tone arm to the arm rest.
2 Match the "0" on the stylus pressure adjustment ring to the center line of the arm rear shaft.
While using your finger to hold the balance weight to keep it from moving, turn only the stylus pressure adjustment ring so that the number "0" comes to the black center line of the tone arm rear shaft.

3 Adjust the stylus pressure.
Turn the balance weight to adjust to the appropriate stylus pressure value for your cartridge.
- When turning the balance weight, the stylus pressure adjustment ring turns together. While observing the adjustment ring, adjust the stylus pressure to the appropriate value.
- The appropriate stylus pressure for the included cartridge is 3.5 g. Set to "0.5".

Adjusting anti-skating
This adjustment is made to prevent stylus jumping.
1 Match to the same scale position as the stylus pressure value.
2 Turn the [ANTI-SKATING] dial to match the reference mark to the same value as the cartridge stylus pressure value.

Connecting your equipment
Connecting your equipment
- Be sure to turn off the power and unplug the power cord from the power outlet wherever making or changing connections.
• Refer to the operating instructions for the component to be connected. - Connect the power cord after all the connections between devices have been completed.
Descriptions of terminals
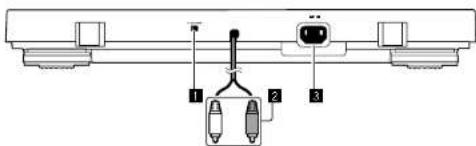
1 Equalizer switch
Move this switch to appropriate position according to the audio input terminal of the pre-main amplifier or other component.
2 RCA output terminals
Connects to the audio input terminal of the pre-main amplifier or other component.
3 AC IN terminal
Connects to a power outlet using the lead power cord. Wait until all connections between the equipment are completed before connecting the power cord.
- Be sure to use the included power cord
Connecting to a pre-main amplifier and component
1 Set the equalizer switch to appropriate position.
PHONO: When connecting to the PHONO input terminal (the built-in equalizer of record player is not used.)
LINE: When connecting a terminal other than the PHONO input terminal (the built-in equalizer of record player is used.)
2 Connect the RCA output terminal to the input terminal of the pre-main amplifier or other component.
3 Connect the power cord.
Connects to a power outlet using the included power cord. Wait until all connections between the equipment are completed before connecting the power cord.
- Before connecting to the outlet (AC outlet) mounted on the connected equipment, check the wallage displayed on the outlet. (This until consumes 2 W of power.)
- If the player starts operating when the power cord is plugged in, press the [STOP] button.
Place of installation
Place the unit on a level surface that is free of external vibration.
• To the extent possible, keep the unit away from the speaker system.
- When the unit is very close to a radio (AM/FM broadcasting), the radio could generate noise. Keep the distance as far away from the unit as possible.
Playback
Prepare as follows;
- Place a record on the turntable.
- Remove the stylus cover while paying attention not to touch the stylus lip.
1 Press the [SPEED] button to set the record's playing speed.
To pray 45's, set the button to the raised position [■]; for 93 1/3 records. the button must be in the depressed position [■].
- To play a standard EP record, attach the EP record adapter to the center spindle and play the EP record.
2 Move the [SIZE SELECT] lever to set the record size.
To play 17 cm records, set the lever position to [17]; for 30 cm records, set the lever position to [30].
• To play a standard EP record, attach the EP record adapter to the center spindle and play the EP record.
3 Press the [START] button for over 1 second.
The turntable starts turning and playback starts automatically.
- Once the record is played, the tone arm returns to its original position and the turntace automatically stops turning.
- Once you have finished playing records, attach the stylus cover to protect the stylus tio.
- This set has an auto return function by which the tone arm automatically returns to its original position once a specific point is reached after a record finishes playing. Through there is no problem with records of normal size, with records including grooves up to this point; the auto return function may be activated before playback is finished.
![PIONEER PL-30-K - Press the [START] button for over 1 second. - 1](/content/2026/06/1262301/images/71559c34f8a88c1105b4169727c8b8b7d740f1b45232a6e813d6f7347f9685f9.jpg)
Notes
- Do not touch the lone arm or turntable or turn off the power while a record is playing.
- The auto play system cannot be used for 25 cm records. In this case operate manually. If the tone arm does not return to its original position after playback stops, press the [STOP] button.
Pausing playback
Pull up the lifter lever.
The stylus of the cartridge lifts away from the record.
• To resume playback, push down the lifter lever.
Finishing playback
1 Pull up the lifter lever to return the tone arm to the arm rest and then push down the lifter
lever.
2 Press the [STOP] button.
- Once you have finished playing records, attach the slyus cover to protect the slyus lip.
Additional information
Replacing the stylus
The included stylus has a service life of about 400 hours. To avoid damaging valuable records, replace the stylus without delay. Purchase a replacement stylus at the store where you purchased the record player or your nearest repair and inquiry outlet. Specify that you want the replacement stylus exclusively for PL30-K.
• Turn off the amplifier's power before replacing the stylus, and unoug the player's power cord.
- The stylus lip is an extremely delicate perl, so handle it very carefully. Use a soft brush to gently remove any dust from the stylus lip.
- Removing the headshell makes it easy to replace the style u.s.
Removing the replaceable stylus
1 Holding the cartridge steady with one hand, grasp the replaceable stylus with the other hand, and then push down it.
2 Pull the stylus off gently in the direction of arrow.

natural_image
Diagram showing a mechanical assembly before and after rotation, with no visible text or symbolsAttaching the replaceable stylus
1 Holding the cartridge steady with one hand, grasp the replaceable stylus with the other hand, point the catch on the replaceable stylus, insert it all the way into the long hole in the cartridge.
2 Push up in the direction of arrow until a click is heard.

natural_image
Diagram showing two mechanical assembly states with arrows indicating motion direction (no text or symbols)Replacing the cartridge
If you wish to mount a different cartridge on this player, use one weighing approximately 4.5 g to 9.5 g. To purchase a headshell only, ask for one exclusively for PL-30-K at your store of purchase or nearest repair and inquiry outlet.
Removing the cartridge
1 Turn the headshell lock nut and remove the headshell.
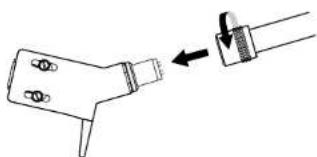
natural_image
Diagram showing a connector being inserted into a socket (no text or symbols present)2 Loosen the cartridge mount screws and remove them.

3 Disconnect the lead wires on the cartridge side.

Attaching the cartridge
1 Connect the lead wires.
They are color-coded as shown below. Be careful to connect them properly.
Color Function
Red Right channel (R)
While left charge (1)
Green Right outer ground (RG)
Blue Left channel ground (LG)
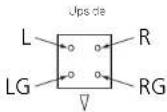
(Outside of car ridge)
2 Attach the cartridge.
To achieve the required overhang, mount in such a way that the stylus tip is positioned about 45 mm from the edge of the headshell's mount surface (the rubber washer), as shown on the diagram below.
• The overhang for this player should be 10 mm.
Back side
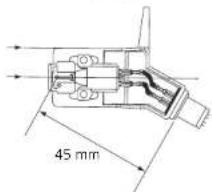
Mount paral e.
Front sides

Mount perpendicularia
3 Tighten the cartridge mount screws to mount the cartridge.
Notes
• After replacing the cartridge, be sure to readjust the horizontal balance, stylus pressure, and anti-skacing value.
- The thickness of the terminal depends on the replacement cartridge, and some may not correct securely. In this case, use the included scope bad wire.
Troubleshooting
- If your player is not working properly, use the table be ow for troubleshooting.
If you cannot resolve the problem, please contact our service center or your sales outlet.
Problem Check Remedy
| The power is not turned on. Is the power cord properly connected? | Property cannot be included power cord in a power out of. | |
| The turntable does not turn, is the belt in place? Check the belt and rollers. If the belt has slipped off the turntable, mount if according to the instructions in Assembly.(Page 4) | ||
| Has the belt been cut? Check the belt and roller. If the belt has been cut, replace it with a new one. | ||
| No sound or small sound. Are the audio cables properly connected? | Connect the audio cables properly. | |
| Are the form nails and plugs dirty? Clean the terminals and plugs before making connections. | ||
| Is the headshell attached properly? Attach the headshell property. | ||
| The sound is distorted. | Is the equalizer switch in the [LINE] position, even though the player is connected to your amp's PIONO terminal? | When the player is connected to a PHONO terminal, put the equalizer switch in the [PHONO] position. |
| The sound is extremely quiet. | Is the equalizer switch in the [PHONO] position, even though the player is connected to your amp's AUX terminal? | When connected to the AUX terminal, put the equalizer switch in the [LINE] position. (Do sure to turn the volume on your amp to its minimum before changing the position of the equalizer switch). |
| The 'elt and right sound are reversed. | Are the left and right connections for each piece of equipment reversed? | Correctly connect the audio cable and the lead wires of headshell part. |
| There is a low num sound humming or buzzing sound during playback. | Is there an electric device such as a fluorescent lamp or its power cord near the connection cord? | Place the power cord of the fluorescent lamp or other device as far away as possible. |
| The stylus tip does not come down on the record. | Is the stylus pressure adjusted properly? | Match the balance weight to the appropriate stylus pressure value for your cartridge. |
| Is the arm horizontally balanced? Turn the one ace weight until the tone arm becomes horizontal state. | ||
| Sly us jumping posture. Is the stylus pressure adjusted properly? | Match the balance weight to the appropriate stylus pressure value for your cartridge. | |
| Is the record warped or does it have scratches? | Check the condition of the record. | |
| Does the stylus tip have a lot of dust on it? | Remove the shell with cartridge and use a soft tip brush or writing brush to carefully remove dust, etc. from the stylus tip. | |
| Is anti-skating adjusted correctly? Adjust anti-skating correctly. | ||
| Is the arm height adjusted correctly? Adjust the arm height correctly. | ||
| The arm stops along the way and does not go ahead. | Does the record have scratches? | Check the condition of the record. |
| Is the arm coming into contact with something? | Check around the arm. If there is an obstacle, remove it. | |
| Sound volume is low or loud. | Is the convection in the simplifier apparatus for the cartridges type (output)? | Compost the convection cables properly. |
Cautions on use
About condensation
Water droplets (condensation) may form inside the unit (on operating parts and lenses) in the winter, for example, if the unit is moved from a circle place into a warm room or if the temperature in the room in which the unit is installed in ses suddenly (through heating, etc.). The unit will not operate properly and will not be playable under condensation inside. Let the unit stand for 1 to 2 hours at room temperature (though this time depends on the conditions of the condensation) without turning on the power. The water droplets will evaporate and the unit will become playable. Condensation can occur in the summer as well if the unit is exposed to the direct wine from an air-conditioner, etc. If this happens, move the unit to a different location.
When transporting the unit to another location
Use the original packing materials to pack the unit
If the original packing materials are not available, be sure to perform the following.
- Detach the turntable sheet and turntable and pack carefully
- Delatch the headshel and balance weight from the arm and pack carefully.
- Use the arm camper to secure the tone arm and use tape to secure it so that it does not move.
- Wrap the main unit in a blanket or soft paper so that it will not be damaged.
Maintenance of each part
When attaching and detaching the headshell, turn off the power of the amplifier.
if you attempt to do so while the volume is loud, the speaker could be damaged.
- Remove the shell with cartridge and use a soft lip brush or writing brush to carefully remove dust, etc. from the
sty us lip.
• Use a good quality record cleaner to clean records. - Use a soll cloth or something similar to clean the head shall term ral and then reattach it to the lone arm.
Cleaning the dust cover, etc.
Use a soft cloth to clean the dust cover and cabinet.
- Do not clean the dust cover while playing. Static electricity could cause the tone arm to be pulled by the dust cover.
About trademarks and registered trademarks
- Pioneer is a registered trademark of PIONEER CORPORATION.
The names of companies and products mentioned herein are the trademarks of their respective owners.
Specifications
| Power requirements | AC 220 V to 240 V, 50 Hz/60 Hz |
| Power consumption | 2 W |
| Main unit weight | 5.0 kg |
| Max. dimensions | 435 mm (W) × 110 mm (H) × 972.0 mm (D) |
| Tolerable operating temperature | +5°C to +35°C |
| Tolerable operating humidity | 5% to 85% (inc condensation) |
Turntable part
| Drive method | Belt drive system |
| Motor | DC serve motor |
| Rotation speed | 23 1/3 rpm, 45 rpm |
| Wow and puller | 0.1 % or less WRMS (JIS WTD) |
| S/N ratio | 60 dF (ON-P) |
| Turn able | Aluminum die-casting |
Tone arm part
| Arm type | Static balance straight type tone arm |
| Effective length | 221.5 mm |
| Overhang | 10 mm |
| Stylus pressure variable range | 0 g to 4.0 g (1 scale 0.1 g) |
| Proper cartridge weight | 4.5 g to 9.5 g (single cartridge) |
| Carriage type | MM type |
| Leachshell weight | 13.0 g (first using screws and nuts) |
Output voltage
| PHONO | 2.5 mV |
| LINE | 150 mV |
- The specifications and design of this product are subject to change without notice.
© 2014 FIONEER HOME ELECTRONICS CORPORATION. All rights reserved.

natural_image
Technical line drawing of a mechanical component with no visible text or symbols1 Gale
2 Cournoie
3. Euban
4 Trousare
4 Retirez le ruban.
natural_image
Technical line drawing of a mechanical component with concentric rings and mounting base (no text or symbols)natural_image
Diagram showing a mechanical component being inserted into a pin (no text or symbols present)natural_image
Diagram showing a mechanical assembly with two components and directional arrows indicating motion (no text or symbols)natural_image
Mechanical assembly diagram showing two stages of a mechanical component with arrows indicating motion (no text or symbols)natural_image
Diagram showing a connector being inserted into a cable, with no text or symbols present.PHONO....2.5 mV
LINE....150 mV
natural_image
Technical line drawing of a mechanical component with no visible text or symbolsnatural_image
Technical line drawing of a mechanical component with concentric rings and mounting base (no text or symbols)natural_image
Diagram showing a mechanical component being inserted into a cylindrical rod (no text or symbols present)natural_image
Diagram showing a mechanical assembly before and after rotation, with no visible text or symbolsnatural_image
Diagram showing two mechanical assembly states with arrows indicating motion direction (no text or symbols)natural_image
Diagram showing a connector being inserted into a socket (no text or symbols present)natural_image
Technical line drawing of a mechanical component with a circular top and base plate (no text or symbols)1 Rull
2 Fascia
3 Nastro adesivo
4 Foro quacrato
natural_image
Technical line drawing of a mechanical component with concentric rings and mounting base (no text or symbols)natural_image
Diagram showing a mechanical component being inserted into a cylindrical part (no text or symbols present)natural_image
Diagram showing two mechanical assembly steps with arrows indicating motion (no text or symbols)natural_image
Mechanical assembly diagram showing a lever mechanism and a rotating component (no text or symbols)natural_image
Diagram showing a connector being inserted into a cable, with no text or symbols present.Wow and flutter....0,1% c inferiore WRMS (JIS WTD)
WAARSCHUWING NETSNOER
Specifications....11
Kenmerken
natural_image
Technical line drawing of a mechanical component with no visible text or symbols1 W 日日
2 Sraar
3 Tape
4 Viervacat cat
4 Verwijder de tape
natural_image
Technical line drawing of a mechanical component with concentric rings and mounting base (no text or symbols)7 Bevestig de headshell.
natural_image
Diagram showing a mechanical component being inserted into a cylindrical part (no text or symbols present)natural_image
Diagram showing a mechanical assembly with two components and directional arrows indicating motion (no text or symbols)natural_image
Mechanical assembly diagram showing a lever mechanism and a rotating component (no text or symbols)natural_image
Diagram showing a connector being inserted into a cable, with no text or symbols present.natural_image
Technical line drawing of a mechanical component with no visible text or symbolsnatural_image
Technical line drawing of a mechanical component with concentric rings and mounting base (no text or symbols)natural_image
Diagram showing a mechanical component being inserted into a cylindrical part (no text or symbols present)natural_image
Diagram showing two mechanical assembly steps with rotating components (no text or symbols)natural_image
Mechanical assembly diagram showing two stages of a device with arrows indicating motion direction (no text or symbols)natural_image
Diagram showing a connector being inserted into a socket (no text or symbols present)natural_image
Technical line drawing of a mechanical component with no visible text or symbolsnatural_image
Technical line drawing of a mechanical component with concentric rings and mounting base (no text or symbols)natural_image
Diagram showing a mechanical component being inserted into a pin (no text or symbols present)8 Установите противовес.
natural_image
Diagram showing a mechanical assembly before and after transformation, with no visible text or symbolsnatural_image
Mechanical assembly diagram showing a lever mechanism and a rotating component (no text or symbols)Замена картриджа
natural_image
Diagram showing a connector being inserted into a socket (no text or symbols present)PIONEER HOME ELECTRONICS CORPORATION
1-1, Shin-ogura, Saiwai-ku, Kawasaki-shi, Kanagawa 212-0031, Japan
PIONEER ELECTRONICS (USA) INC.
P.O. BOX 1540, Long Beach, California 90801-1540, U.S.A. TEL: (800) 421-1404
PIONEER ELECTRONICS OF CANADA, INC.
340 Ferrier Street, Unit 2, Markham, Ontario L3R 2Z5, Canada TEL: 1-877-283-5901, 905-479-4411
PIONEER EUROPE NV
Haven 1087, Keetberglaan 1, B-9120 Melsele, Belgium TEL: 03/570.05.11
PIONEER ELECTRONICS ASIACENTRE PTE. LTD.
253 Alexandra Road, #04-01, Singapore 159936 TEL: 65-6472-7555
PIONEER ELECTRONICS AUSTRALIA PTY. LTD.
5 Arco Lane, Heatherton, Victoria, 3202, Australia, TEL: (03) 9586-6300
PIONEER ELECTRONICS DE MEXICO S.A. DE C.V.
Blvd.Manuel Avila Camacho 138 10 piso Col.Lomas de Chapultepec, Mexico, D.F. 11000 TEL: 55-9178-4270
K002*B5_Ru
© 2014 PIONEER HOME ELECTRONICS CORPORATION.
All rights reserved.
© 2014 PIONEER HOME ELECTRONICS CORPORATION.
Discover the benefits of registering your product online at http://www.pioneer.co.uk (or http://www.pioneer.eu).


- WARNING
- Operating Environment
- CAUTION
- POWER-CORD CAUTION
- VENTILATION CAUTION
- Contents
- Before you start
- Operation
- Others
- Features
- Simple to use, fully automatic record player
- Stable record playing due to low center of gravity chassis
- Equipped with a phono equalizer that can be switched ON/OFF
- Comes with a high-performance MM cartridge
- Comes with a moderately thick rubber mat
- Unobtrusive design
- Detachable power cord
- Checking what's in the box
- Assembly
- Set the turntable.
- Part names and functions
- Adjustment
- Adjusting the tone arm balance
- Adjusting the stylus pressure
- Adjusting anti-skating
- Connecting your equipment
- Connecting to a pre-main amplifier and component
- Place of installation
- Playback
- Press the [SPEED] button to set the record's playing speed.
- Move the [SIZE SELECT] lever to set the record size.
- Press the [START] button for over 1 second.
- Notes
- Pausing playback
- Pull up the lifter lever.
- Finishing playback
- Press the [STOP] button.
- Additional information
- Replacing the stylus
- Removing the replaceable stylus
- Attaching the replaceable stylus
- Replacing the cartridge
- Removing the cartridge
- Attaching the cartridge
- Color Function
- Troubleshooting
- Cautions on use
- About condensation
- When transporting the unit to another location
- Maintenance of each part
- Cleaning the dust cover, etc.
- About trademarks and registered trademarks
- WAARSCHUWING NETSNOER
- Kenmerken
- Замена картриджа
- PIONEER HOME ELECTRONICS CORPORATION
- PIONEER ELECTRONICS (USA) INC.
- PIONEER ELECTRONICS DE MEXICO S.A. DE C.V.
Brand : PIONEER
Model : PL-30-K
Category : DJ Equipment