
AERO 26-21 PC - Vacuum Cleaner NILFISK - Free user manual and instructions
Find the device manual for free AERO 26-21 PC NILFISK in PDF.

 FR
FR
 AR
AR
 BG
BG
 CS
CS
 DA
DA
 DE
DE
 EL
EL
 EN
EN
 ES
ES
 ET
ET
 FI
FI
 HU
HU
 IT
IT
 JA
JA
 KO
KO
 LT
LT
 LV
LV
 NL
NL
 NO
NO
 PL
PL
 PT
PT
 RO
RO
 RU
RU
 SK
SK
 SL
SL
 SV
SV
 TH
TH
 TR
TR
 ZH
ZH
| Product type | Canister vacuum cleaner |
| Brand | Nilfisk |
| Model | AERO 26-21 PC |
| Dimensions (L x W x H) | 40 x 35 x 30 cm |
| Weight | 5 kg |
| Power supply | 230 V, 50 Hz, 1200 W |
| Suction type | Dry |
| Container capacity | 26 L |
| Filter | Washable HEPA |
| Included accessories | Floor nozzle, crevice tool, upholstery brush |
| Cable length | 10 m |
| Operating radius | 15 m |
| Noise level | 72 dB(A) |
| Bag system | With dust bag |
| Maintenance | Washable filter, disposable bag |
| Safety | Automatic shut-off in case of overheating |
| Spare parts | Available from the manufacturer |
| Warranty | 2 years |
| Repairability | Repairability index: 8/10 |
Frequently Asked Questions - AERO 26-21 PC NILFISK
Use only original Nilfisk bags.
User questions about AERO 26-21 PC NILFISK
0 question about this device. Answer the ones you know or ask your own.
Ask a new question about this device
Download the instructions for your Vacuum Cleaner in PDF format for free! Find your manual AERO 26-21 PC - NILFISK and take your electronic device back in hand. On this page are published all the documents necessary for the use of your device. AERO 26-21 PC by NILFISK.
USER MANUAL AERO 26-21 PC NILFISK
Operating instructions
AERO 26
AERO 31 INOX

natural_image
Two Nilfisk ALTO vacuum cleaner units on a red background, no visible text or symbols on the devices themselves.

EN Operating instructions ....1
natural_image
Line drawing of a vacuum cleaner device with handlebars and wheels (no text or symbols)
natural_image
Line drawing of a vacuum cleaner device with control panel and buttons (no text or symbols)AERO 31-21 INOX

natural_image
Line drawing of a vacuum cleaner device with control panel and mounting feet (no text or symbols)AERO 26-2L

natural_image
Line drawing of a vacuum cleaner device with control panel and buttons (no text or symbols)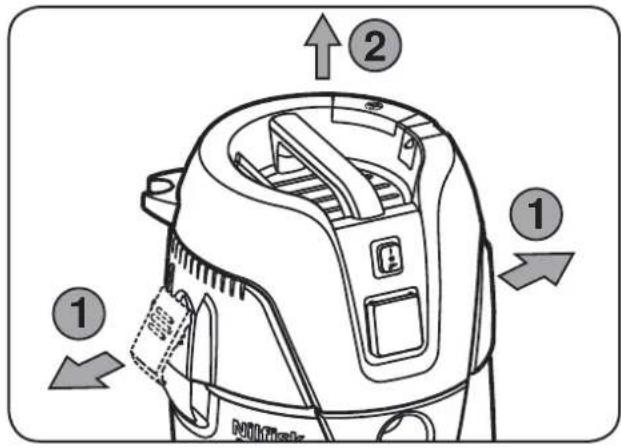




3A ^*
4A



natural_image
Diagram of a pipe with directional arrows indicating flow or movement, no text or symbols present

natural_image
Line drawing of a vacuum cleaner with attached housing and mounting bracket (no text or symbols)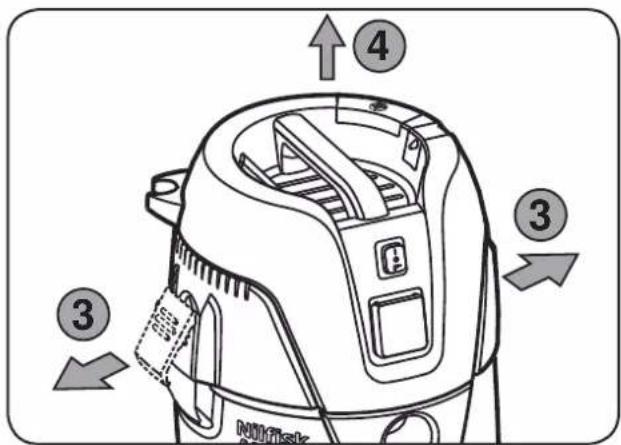

natural_image
Line drawing of a vacuum cleaner with mesh cover and a magnified inset showing internal components (no text or symbols)
natural_image
Line drawing of a vacuum cleaner with internal components and mounting holes (no text or symbols)
2B ^x
3B*)
natural_image
Diagram of a mechanical component with a threaded fitting and a circular component, showing no text or symbols.


natural_image
Diagram of a fiber optic cable with directional arrows indicating flow or movement (no text or symbols)
natural_image
Diagram of a pipe with directional arrows indicating flow or movement, no text or symbols present
4B ^
5B ^

natural_image
Line drawing of a vacuum cleaner with attached cable and power plug (no text or symbols)
natural_image
Line drawing of a vacuum cleaner with coiled hose and control panel (no text or symbols)
natural_image
Line drawing of a vacuum cleaner with attached cable and power plug (no text or symbols)
natural_image
Line drawing of a vacuum cleaner with labeled component (B), no text or symbols present
natural_image
Line drawing of a vacuum cleaner device with attached cable and control panel (no text or symbols)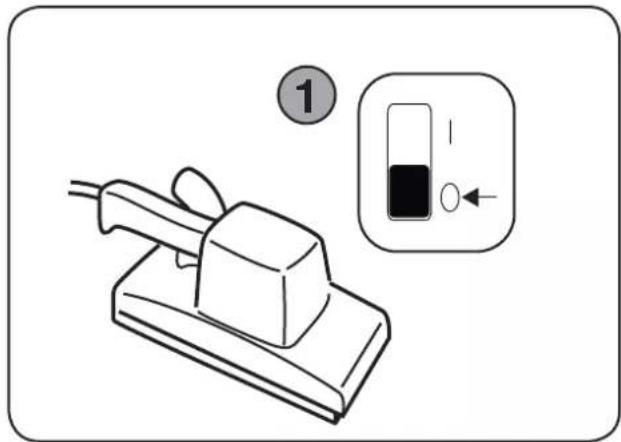

flowchart
graph TD
    A["Raw Material"] --> B{Step 1}
    B -->|2| C["Transfer to Next Strip"]
    B -->|3| D["Transfer to Second Strip"]
    C --> E["Final Product"]
    D --> F["Final Product with Arrow"]
    style A fill:#f9f,stroke:#333
    style E fill:#ccf,stroke:#333
    style F fill:#cfc,stroke:#333


2D


natural_image
Technical line drawing of a mechanical device with internal components and mounting brackets (no text or symbols)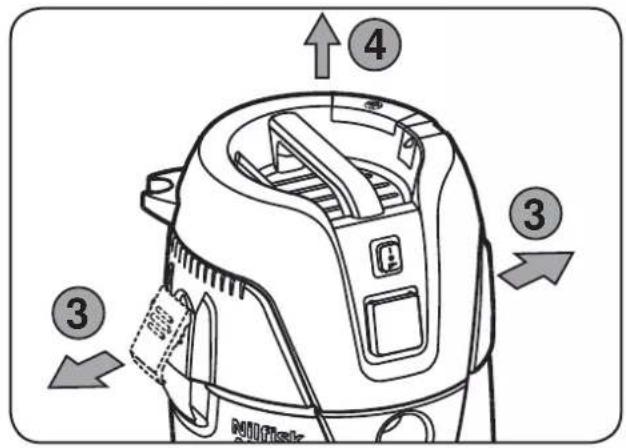


Quick reference guide
The pictorial quick reference guide
The pictorial quick reference guide is designed for helping you when starting up, operating and storing the unit. The guide are subdivided into 4 sections, which are represented by symbols:
A

Before starting
1A - Unpack Accessories
2A - Filter Bag Installation
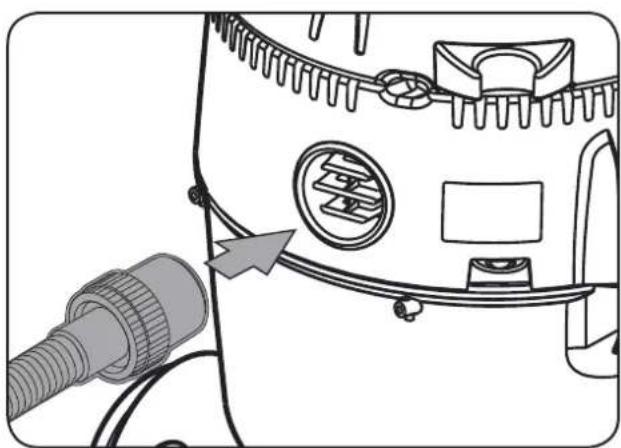
3A - Hose Insert
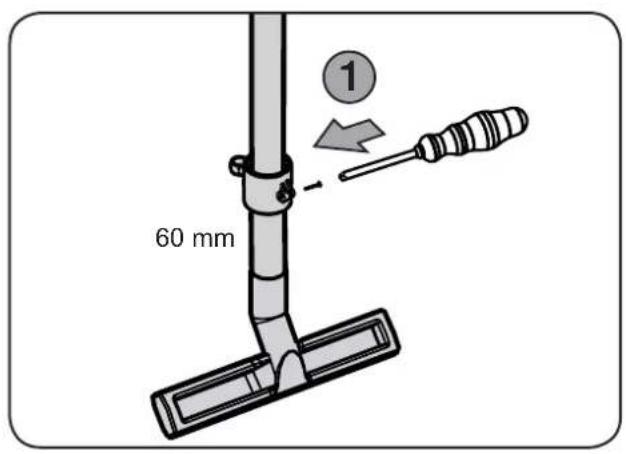
4A - Tube Fixed
5A - Accessories Placement
B

Control/Operation
1B - Emptying Container
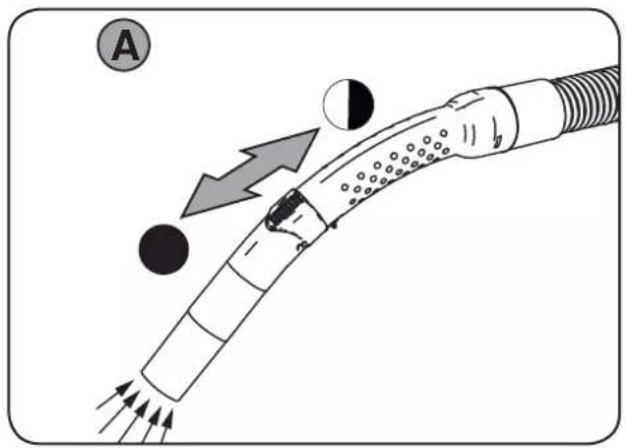
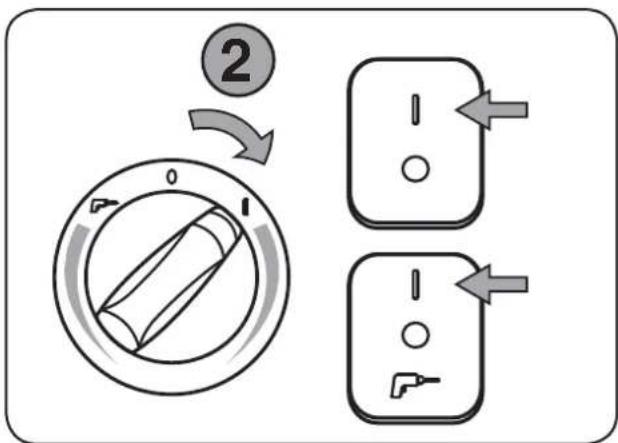
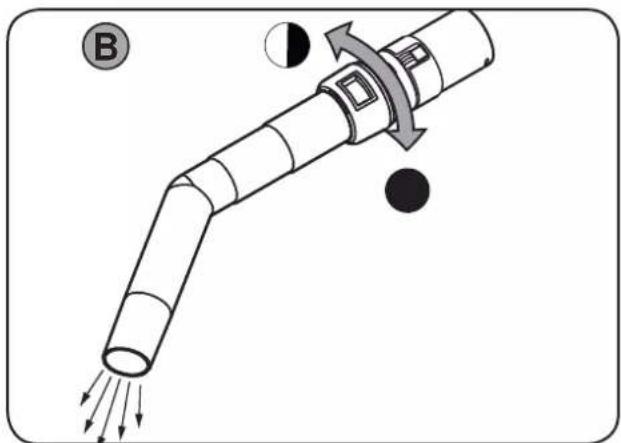
2B - Blow Function
3B - Push & Clean
4B - Cable Storage
5B - Hose Storage
C

Connecting electrical appliances
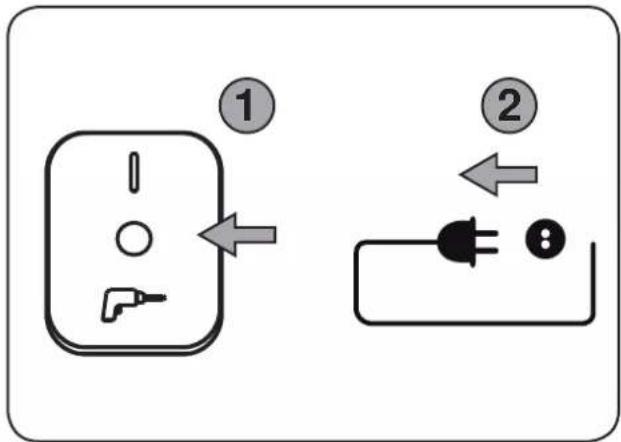
1C - Power Tool
D


Replacement of:
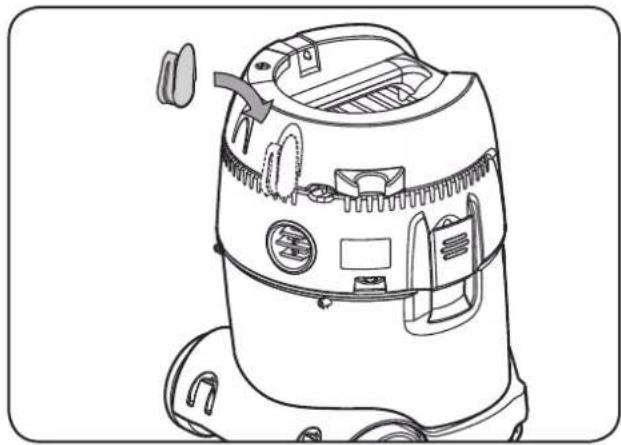
1D - Filter Bag Replacement
2D - Filter Replacement
*) Optional accessories / Option depending on model
Contents
1 Important safety instructions 2
1.1 Symbols used to mark instructions ..... 2
1.2 Instructions for use 2
1.3 Purpose and intended use 2
1.4 Electrical connection 2
1.5 Extension lead 2
1.6 Guarantee 2
1.7 Tests and approvals 2
1.8 Important warnings 3
1.9 Double-insulated appliances* 3
1.9.1 Only applicable to UK. 3
1.9.2 Electrical connections 3
1.9.3 Blue-neutral brown-live 4
2 Risks 4
2.1 Electrical components.... 4
2.2 Picking up liquids 4
2.3 Hazardous materials 4
2.4 Spare parts and accessories 4
2.5 Emptying dirt tank 5
2.6 In explosive or inflammable atmosphere ... 5
2.7 Blower function. 5
3 Control / Operation 5
3.1 Starting and operating of the machine ..... 5
3.2 Auto-On/Off-Operation for power tools* ..... 5
3.3 Before wet pick-up 5
3.4 Emptying after wet pick-up 5
3.5 Emptying after dry pick-up 5
3.6 Push & Clean 6
4 After using the cleaner 6
4.1 After use 6
4.2 Transport 6
4.3 Storage 6
4.4 Recycling the cleaner 6
5 Maintenance 6
5.1 Regular servicing and inspection 6
5.2 Maintenance 6
6 Further information 7
6.1 EU Declaration of conformity 7
6.2 Specifications.... 7
1 Important safety instructions

This document contains the safety information relevant for the appliance along with a quick reference guide. Before starting up your vacuum cleaner for the first time, this instruction manual must be read through carefully. Save the instructions for later use.
Further support
Further information on the appliance can be found on our web site at www.nilfisk-alto.com.
For further queries, please contact the Nilfisk-ALTO service representative responsible for your country. See reverse of this document.
1.1 Symbols used to mark instructions
DANGER

Danger that leads directly to serious or irreversible injuries, or even death.
WARNING

Danger that can lead to serious injuries or even death.
CAUTION

Danger that can lead to minor injuries and damage.
1.2 Instructions for use
The appliance must:
- only be used by persons, who have been instructed in its correct usage and explicitly commissioned with the task of operating it
- only be operated under supervision
- This appliance is not intended for use by persons (including children) with reduced physical, sensory or mental capabilities, or lack of experience and knowledge.
- Children shall be supervised to make sure that they do not play with the appliance.
- Do not use any unsafe work techniques.
- Never use the vacuum cleaner without a filter.
- Switch off the appliance and disconnect the mains plug in the following situations:
• Prior to cleaning and servicing - Prior to replacing components
- Prior to changing over the appliance
• If foam develops or liquid emerges
Besides the operating instructions and the binding accident prevention regulations valid in the country of use, observe recognised regulations for safety and proper use.
1.3 Purpose and intended use
This vacuum cleaner is designed, developed and rigorously tested to function efficiently and safely when properly maintained and used in accordance with the following instructions.
This vacuum cleaner is to be used for commercial or for household use. Accidents due to misuse can only be prevented by those using the machine.
READ AND FOLLOW ALL SAFETY INSTRUCTIONS.
This machine is suitable for picking up dry, non-flammable dust and liquids.
Any other use is considered as improper use. The manufacturer accepts no liability for any damage resulting from such use. The risk for such use is borne solely by the user. Proper use also includes proper operation, servicing and repairs as specified by the manufacturer.
1.4 Electrical connection
- It is recommended that the vacuum cleaner should be connected via a residual current circuit breaker.
- Arrange the electrical parts (sockets, plugs and couplings) and lay down the extension lead so that the protection class is maintained.
- Connectors and couplings of power supply cords and extension leads must be watertight.
1.5 Extension lead
- As an extension lead, only use the version specified by the manufacturer or one of a higher quality.
- When using an extension lead, check the minimum cross-sections of the cable:
| Cable lenth Cross section | ||
| < 16 A < 25 A | ||
| up to 20 m 1.5 mm | ^2 | 2.5 mm ^2 |
| 20 to 50 m 2.5 mm | ^2 | 4.0 mm ^2 |
1.6 Guarantee
Our general conditions of business are applicable with regard to the guarantee.
Unauthorised modifications to the appliance, the use of incorrect brushes in addition to using the appliance in a way other than for the intended purpose exempt the manufacturer from any liability for the resulting damage.
1.7 Tests and approvals
Electrical tests must be performed in accordance with the provisions of safety regulations EN 62638. These tests must be performed at regular intervals and after repairs or modifications.
The vacuum cleaner has been approved in accordance with IEC/EN 60335-2-69.
1.8 Important warnings
WARNING

- To reduce the risk of fire, electric shock, or injury, please read and follow all safety instructions and caution mar-kings before use. This vacuum cleaner is designed to be safe when used for cleaning functions as specified. Should damage occur to electrical or mechanical parts, the cleaner and / or accessory should be repaired by a competent service station or the manufacturer before use in order to avoid further damage to the machine or physical injury to the user.
- Do not leave the machine when it is plugged in. Unplug from the socket when not in use and before maintenance.
- Do not use with damaged cord or plug. To unplug grasp the plug, not the cord. Do not handle plug or cleaner with wet hands. Turn off all controls before unplugging.
- Do not pull or carry by cord, use cord as a handle, close a door on cord, or pull cord around sharp edges or corners. Do not run cleaner over cord. Keep cord away from heated surfaces.
- Keep hair, loose clothing, fingers and all parts of the body away from ope nings and moving parts. Do not put any objects into openings or use with opening blocked. Keep openings free of dust, lint, hair, and anything else that could re du ce the flow of air.
- This machine is not suitable for picking up hazardous dust.
- Do not use to pick up flammable or combustible liquids such as gasoline, or use in areas where they may be pre sent.
- Do not pick up anything that is burning or smoking, such as cigarettes, mat ches or hot ashes.
- Use extra care when cleaning on stairs.
- Do not use unless filters are fitted.
- If the cleaner is not working properly or has been dropped, da ma ged, left outdoors, or dropped into water, re turn it to a service center or dealer.
- If foam or liquid escapes from the machine, switch off immediately.
- The vacuum cleaner may not be used as a water pump. The vacuum cleaner is intended for vacuuming air and water mixtures.
- Connect the vacuum cleaner to a properly earthed mains supply. The socket outlet and the extension cable must have an operative protective conductor.
- Provide for good ventilation at the working place.
- Do not use the vacuum cleaner as a ladder or step ladder. The vacuum cleaner can tip over and become damaged. Danger of injury.
1.9 Double-insulated appliances\*

CAUTION

- Use only as described in this manual and only with the manufacturer's re commen ded attachments.
- BEFORE YOU PLUG IN YOUR CLEANER, check the rating plate at the cleaner to see if the rated vol ta ge agrees within 10% of the voltage available.
- This appliance is provided with double insula tion. Use only identical re pla ce ment parts. See instructions for ser vi cing double insulated appliances.
In a double-insulated appliance, two systems of insulation are provided instead of grounding. No grounding means is provided on a double-insulated appliance, nor should a mean for grounding be added to the appliance. Servicing a double-insulated appliance requires extreme care and knowledge of the system, and should be done only by qualified service personnel. Replacement parts for a double-insulated appliance must be identical to the parts they replace. A double insulated appliance is marked with the words "DOUBLE INSULATION" or "DOUBLE INSULATED." The symbol (square within a square) may also be used on the product.
The machine is equipped with a specially designed cord which if damaged, must be replaced by a cord of the same type. This is available at authorised service centres and dealers and must be installed by trained personnel.
1.9.1 Only applicable to UK.
Please read these essential instructions
These instructions have been prepared with safety and efficiency paramount.
The machine operator must be trained by a suitably qualified instructor and must understand these instructions for use, and be made aware of any relevant regulations and legislation in force at the time of use.
1.9.2 Electrical connections
CAUTION

DOUBLE-INSULATED MACHINES - IMPORTANT:
This 240 volt 50 Hz. machine are fitted with a 13 amp. 3 pin moulded plug. The plug is fitted with a 13 amp. detachable fuse. The correct replacement for the fuse is identified by marking or colour coding. Only fuses that are
ASTA approved to BS 1362 should be fitted. Never use the plug without the fuse cover fitted. Replacement fuse covers are available at any electrical retail outlet.
If the available socket outlet is not suitable for the plug supplied, the plug must be cut off and an appropriate plug fitted. The plug thus cut off MUST BE DESTROYED for safety reasons before being disposed of.
Machines built for other voltages and frequencies are not normally supplied with a fitted plug.
If it is necessary to fit a plug, the wires in this power supply cord are coloured in accordance with the following code:
1.9.3 Blue-neutral brown-live
TO CONNECT THE NEW PLUG:
If using a three-pin plug, do not make any connection to the terminal in the plug which is marked with the letter 'E' or by the safety earth symbol or coloured green or green & yellow.
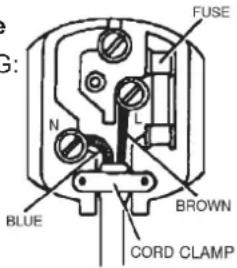
The blue wire must be connected to the terminal in the plug which is marked with the letter 'N' or is coloured black or blue.
The brown wire which must be connected to the terminal in the plug which is marked with the letter 'L' or is coloured red or brown.
If the plug to be fitted does not conform to the above notation then consult a qualified electrician.
2 Risks
2.1 Electrical components
DANGER

The upper section of the vacuum cleaner contains live components.
Contact with live components leads to serious or even fatal injuries.
- Never spray water on to the upper section of the vacuum cleaner.
DANGER

Electric shock due to faulty mains connecting lead.
Touching a faulty mains connecting lead can result in serious or even fatal injuries.
- Do not damage the mains power lead (e.g. by driving over it, pulling or crushing it).
- Regularly check whether the power cord is damaged or shows signs of ageing.
- If the electric cable is damaged, it must be replaced by an authorized Nilfisk distributor or similar qualified person in order to avoid a hazard.
- In no circumstances should the power supply cord be wrapped around fingers or any part of the operators person.
CAUTION

Appliance socket.*
The appliance socket is only designed for the purposes defined in the operating instructions. The connection of different appliances can result in damage.
- Prior to plugging in an appliance, always switch off the vacuum cleaner and the appliance that is to be connected.
- Read the operating instructions to the appliance to be connected and observe the safety notes contained in these.
CAUTION

Damage due to unsuitable mains voltage. The appliance can be damaged as a result of being connected to an unsuitable mains voltage.
- Ensure that the voltage shown on the rating plate corresponds to the voltage of the local mains power supply.
2.2 Picking up liquids
CAUTION

Picking up liquids.
Do not pick up flammable liquids
- Before liquids are picked up, always remove the filter bag/wastebag and check that the float or the water level limit works properly.
- The use of a separate filter element or filter screen is recommended.
- If foam appears, stop work immediately and emty the tank.
2.3 Hazardous materials
WARNING

Hazardous materials.
Vacuuming up hazardous materials can lead to serious or even fatal injuries
- The following materials must not be picked up by the vacuum cleaner:
- hazardous dust
- hot materials (burning cigarettes, hot ash, etc.)
- flammable, explosive, aggressive liquids (e.g. petrol, solvents, acids, alkalis, etc.)
- flammable, explosive dust (e.g. magnesium or aluminium dust, etc.)
2.4 Spare parts and accessories
CAUTION

Spare parts and accessories.
The use of non-genuine spare parts and ac-
cessories can impair the safety of the appli- ance.
- Only use spare parts and accessories from Nilfisk-ALTO.
- Use only the brushes supplied with the vacuum cleaner or specified in the operating manual.
2.5 Emptying dirt tank
CAUTION

Picking up environmentally hazardous materials.
Materials picked up can present a hazard to the environment.
- Dispose of the dirt in accordance with legal regulations.
2.6 In explosive or inflammable atmosphere
CAUTION

This machine is not suitable for use in explosive or inflammable atmospheres or where such atmospheres are likely to be produced by the presence of volatile liquid or inflammable gas or vapour.
2.7 Blower function.
CAUTION

The vacuum cleaner has a blower function. Do not blow the outgoing air randomly in enclosed areas. Use the blower function only with a clean hose. Dusts can be hazardous to one's health.
3 Control / Operation
3.1 Starting and operating of the machine
Check that the electrical switch is switched off (in position 0). Check that suitable filters are installed in the machine. Then connect the suction hose into the suction inlet at the machine by pushing the hose forward until it fits firmly in place at the inlet. Then connect the two tubes with the hose handle, twist the tubes in order to ensure that they are properly fitted. Attach suitable nozzle to the tube. Choose nozzle depending on what type of material that is to be picked-up. Connect the plug into a proper electrical outlet. Put the electrical switch into position 1 in order to start the motor.

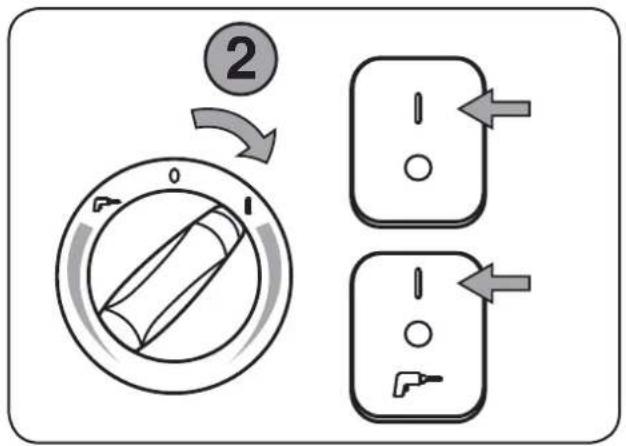
Press I : Activate the machine Press 0 : Stop the machine

Press I : Activate the machine Press 0 : Stop the machine Press ☐ : Activate Auto-On/Off operation

Press I : Activate the machine - turn clockse for speed controlPress 0 : Stop the machine
Press ☐ : Activate Auto-On/Off operation - turn counter clockwise for speed control
3.2 Auto-On/Off-Operation for power tools\*
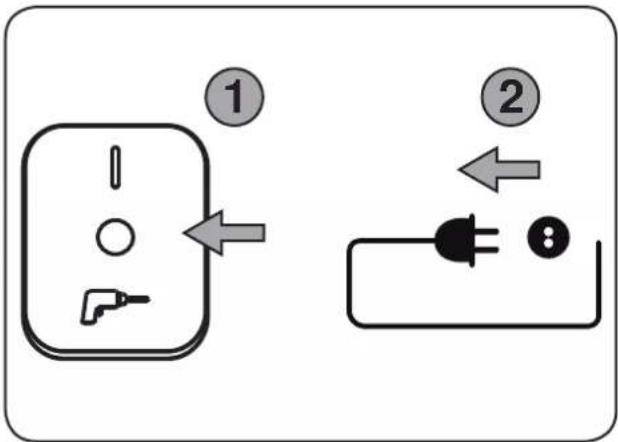
A socket outlet with earthing contact is integrated in the vacuum cleaner. An external power tool can be connected there.
The vacuum cleaner can be switched on and off by the power tool connected. Dirt is picked up from the source of dust immediately.
To comply with regulations, only approved dust producing tools should be connected.
The maximum power consumption of the connected electrical appliance is stated in section "Specifications".
Before switching the switch to position ensure that the tool connected to the appliance socket is switched off.
3.3 Before wet pick-up
CAUTION

The machine is equipped with a float system that shuts off the airflow through the machine when the maximum liquid level is reached. You will hear a noticeable change of the sound from the motor and notice that the suction power decreases. When this occurs, switch the machine off. Disconnect the machine from the socket. Never pick up liquid without the float body in place.
3.4 Emptying after wet pick-up
Before emptying the container, unplug the vacuum cleaner. Disconnect the hose from the inlet by pulling out the hose. Release the latch by pulling them outwards so that the motor top is released. Open up the motor top from container. Always empty and clean the container and the float system after picking-up liquids. Never pick up liquid without the float system and filter installed in the machine.
Empty by tilting the container backwards and pour the liquids into a floor drain or similar.
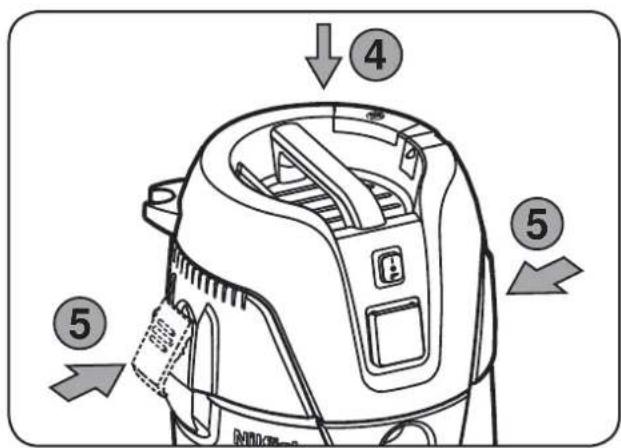
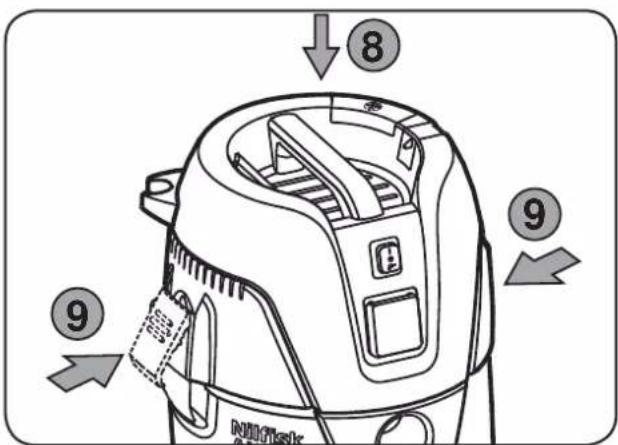
Put back the motor top to the container. Secure the motor top with the latches.
3.5 Emptying after dry pick-up
Remove the electrical plug from the socket before emptying after dry pick-up. Check the filters and dustbag regularly. Release the latch by pulling them outwards so that the motor top is released. Open up the motor top from container.
Cartridge filter: To clean the filter you can either shake, brush or wash it. Wait until it is dry before you reuse it.
Dustbag: check bag to ensure the fill factor. Replace dust bag if necessary. Remove the old bag. The new bag is fitted by passing the cardboard piece with the rubber membrane through the vacuum inlet. Make sure that the rubber membrane is passing past the heightening at the vacuum inlet.
After emptying: Close motor top to the container and secure the motor top with the latches. Never pick up dry material without cartridge filter and dustbag fitted in the machine. The suction efficiency of the vacuum cleaner depends on the size and quality of the filter and dust bag. Therefore - use only Original filter and dust bags.
3.6 Push & Clean
The machine is equipped with a semi automatic filter cleaning system. Push & Clean. The filter cleaning system must be actuated latest when the vacuuming performance is no longer sufficient. Regular use of the filter cleaning feature increases the tool life of the filter.
4 After using the cleaner
4.1 After use
Remove the plug from the socket when machine is not in use. Wind up the cord starting from the machine. The power cord can be wound up around the motor top or at the container. Some variants have special storage places for accessories.
4.2 Transport
- Before transporting the dirt tank, close all the locks.
- Do not tilt the cleaner if there is liquid in the dirt tank.
- Do not use a crane hook to lift the cleaner.
4.3 Storage
- Store the appliance in a dry place, protected from rain and frost.
- The machine shall be stored indoors only.
4.4 Recycling the cleaner
Make the old cleaner unusable.
- Unplug the cleaner.
- Cut the power cord.
- Do not discard of electrical appliances with household waste.

As specified in European Directive 2012/19/EC on old electrical and electronic appliances, used electrical goods must be collected separately and recycled ecologically.
5 Maintenance
5.1 Regular servicing and inspection
Regular servicing and inspection of your machine must be carried out by suitably qualified personnel in accordance with relevant legislation and regulations. In particular, electrical tests for earth continuity, insulation resistance, and condition of the flexible cord should be checked frequently. In the event of any defect, the machine MUST be withdrawn from service, completely checked and repaired by an authorized service technician.
5.2 Maintenance
Remove the plug from the socket before performing maintenance. Before using the machine make sure that the frequency and voltage shown on the rating plate correspond with the mains voltage.
The cleaner is designed for continuous heavy work. Depending on the number of running hours – the dust filter should be renewed. Keep the vacuum cleaner clean with a dry cloth, and a small amount of spray polish.
For details of after sales service contact your dealer or Nilfisk-ALTO service representative responsible for your country. See reverse of this document.
6 Further information
6.1 EU Declaration of conformity
| CE Declaration of Conformity | |
| Product: Vacuum cleaner for wet and dry operation | |
| Type: AERO 26, AERO 31 | |
| The design of the unit corre sponds to the following pertinent regulations: | EC - Machinery Directive 2006/42/ECEC - Directive EMC 2004/108/ECEC - RoHS Directive 2011/65/EC |
| Applied harmonised standards: EN 60335-1:2012, EN 60335-2-69:2012, EN 55014-1:2006+A1+A2, EN 55014-2:1997+A1+A2, EN 61000-3-2:2006+A1+A2, EN 61000-3-3:2008 | |
| Applied international standards and technical specifications: | IEC 60335-2-69:2012IEC 60335-1:2010 |
| Name and address of the person autho rised to compile the technical file: | Anton Sørensen, Senior Vice President – Global R&DNilfisk A/SBanemarksvej 58,DK-2605 Broendby |
| Identity and signature of the person empowered to draw up the declaration on behalf of the manufacturer: | Anton Sørensen, Senior Vice President – Global R&DNilfisk A/SBanemarksvej 58,DK-2605 Broendby |
| Place and date of the declaration: Hadsund 11-03-2015 | |
For Japan, the product complies with IEC 60335-1:2001 & IEC 60335-2-2:2002
6.2 Specifications
| AERO 26, AERO 31 INOX | |||||||||||||
| EU GB CH FR AU / NZ US | |||||||||||||
| 26-01 | 26-21 | 26-2L | 31-21 | 26-21 | 26-21 | 26-2L | 31-21 | 26-21 | 26-21 | 26-21 | 31-21 | ||
| Possible voltage | V | 220-240V | 220-240V | 220-240V | 220-240V | 230V | 110V | 220-240V | 220-240V | 220-240V | 220-240V | 120 | 120 |
| Power P_icc | W | 1000 | 1000 | 1200 | 1000 | 1000 | 1000 | 1200 | 1000 | 1000 | 1000 | 1000 | 1000 |
| Connected load for appliance socket | W | - | 2600 / 1300* | 2400 / 1100* | 2600 / 1300* | 1900 | 750 | 1100 | 1300 | 2600 | 1300 | 400 | 400 |
| Mains frequency | Hz | 50/60 | 50/60 | 50/60 | 50/60 | 50/60 | 50/60 | 50/60 | 50/60 | 50/60 | 50/60 | 50/60 | 50/60 |
| Fuse | A | 16 / 10* | 16 / 10* | 16 / 10* | 16 / 10* | 13 | 16 | 10 | 10 | 16 | 10 | 15 | 15 |
| Protection grade (moist, dust) | IP24 | ||||||||||||
| Protection class (electrical) | II ☐ | I | I | I | I | I | I | I | I | I | I | I | |
| Airflow | l/min m3/h | 3600 216 | 3600 216 | 3700 220 | 3600 216 | 3600 216 | 3600 216 | 3700 220 | 3600 216 | 3600 216 | 3600 216 | 3600 216 | 3600 216 |
| Vacuum | kPa | 21 | 21 | 23,5 | 21 | 21 | 21 | 23,5 | 21 | 21 | 21 | 21 | 21 |
| Sound pressure level 1 m, EN 60704-1 | dB(A)+/-2 | 72 | |||||||||||
| Working sound level | dB(A)+/-2 | 64 | |||||||||||
| Vibration ISO 5349 | m/s2+/-1 | <1,5 | |||||||||||
| Weight | kg | 9 | 9 | 9 | 10,5 | 9 | 9 | 9 | 10,5 | 9 | 9 | 9 | 10,5 |
| * DK | |||||||||||||
Specifications and details are subject to change without prior notice.
Kurzanleitung
2.5 Vuiltank legen 25
2.3 Farliga material
WARNING

Farliga material
LUGEGE LÄBI KÖIK OHUTUSJUHISED JA PIDAGE NEIST KINNI.
Herrera 1855, 6 floor, Of. A-604
Unit 1, 13 Bessemer Street Blacktown
NSW 2148 Australia
www.nilfi sk-alto.com.au
AUSTRIA
Nilfi sk-ALTO
Riverside Business Park
Boulevard Internationalelaan 55
Nilfi sk-Advance Cleaning Equipment
(Shanghai) Co Ltd.
No. 4189, Yindu Road
Xinzhuang Industrial Park
Shanghai 201108
www.nilfi sk.cn
CZECH REPUBLIC
Nilfi sk-Advance s.r.o.
Do Certous 1
VGP Park Horní Pocernice, Budova H2
CZ-190 00 Praha 9
www.nilfi sk.cz
DENMARK
31-39 Wo Tong Tsui St.
Hong Kong, Kwai Chung, N.T.
www.nilfi sk.com
HUNGARY
Nilfi sk-Advance Kereskedelmi Kft.
Pramukh Plaza, 'B' Wing, 4th floor, Unit No. 403
Cardinal Gracious Road, Chakala
Andheri (East), Mumbai 400 099
www.nilfi sk.com
IRELAND
Nilfi sk-Advance
1 Stokes Place
St. Stephen's Green
Dublin 2, Ireland
www.nilfi sk-alto.ie
ITALY
Nilfi sk-Advance S.p.A.
Seongdong-gu, Seoul, Korea
www.nilfi sk.co.kr
MALAYSIA
Nilfi sk-Advance Sdn Bhd
SD 33, Jalan KIP 10
Taman Perindustrian KIP
Sri Damansara
52200 Kuala Lumpur
Malaysia
www.nilfi sk.com
MEXICO
Nilfi sk Advance de Mexico S. de R.L. de C.V.
Agustin M. Chavez 1, PB-004
Col. Centro Ciudad Santa Fe
Sintra Business Park
Zona Industrial Da Abrunheira
Edificio 1, 10 A
Sintra, P-2710-089
www.nilfi sk.pt
RUSSIA
Nilfi sk-Advance LLC
Vyatskaya str. 27, bld. 7, 1st fl oor
Moscow, 127015
www.nilfi sk.ru
SLOVAKIA
Nilfi sk-Advance s.r.o.
Bancíkovej 1/A
SK-821 03 Bratislava
www.nilfi sk.sk
SOUTH AFRICA
WAP South Africa (Pty) Ltd
12 Newton Street
1620 Spartan, Kempton Park
www.wap.co.za
SINGAPORE
Den-Sin
22 Tuas Avenue 2
Singapore
www.nilfi sk.com
SPAIN
Nilfi sk-Advance, S.A.
Torre D'Ara
Passeig del Rengle, 5 Plta.10 ^a
Mataró, E-0830222
www.nilfi sk.es
SWEDEN
Nilfi sk-Advance AB
Taljegårdsgatan 4
431 53 Mölndal
Website: www.nilfi sk-alto.se
SWITZERLAND
NA Sondergger AG
Taiwan Branch (H.K.)
No. 5, Wan Fang Road, Taipei
www.nilfi sk-advance.com.tw
THAILAND
Nilfi sk-Advance Co. Ltd
89 Soi Chokechai-Ruammitr
Viphavadee-Rangsit Road
Jomphol, Jatuchak
Bangkok 10900
www.nilfi sk.com
TURKEY
Nilfi sk-Advance Prof. Tem. Ek. Tic. A.S.
Şerifali Mh. Bayraktar Bulv. Sehit Sk. No:7
Ümraniye, Istanbul 34775
www.nilfi sk.com.tr
UNITED KINGDOM
Nilfi sk-ALTO
Bowerbank Way, Gilwilly Industrial Estate
Penrith, Cumbria
GB-CA11 9BQ
www.nilfi sk-alto.co.uk
UNITED ARAB EMIRATES
Nilfi sk-Advance Middle East Branch
SAIF-Zone, P. O. Box 122298
Sharjah
www.nilfi sk.com
USA
Nilfi sk-Advance
14600 21st Ave. North
Plymouth MN 55447-3408
www.nilfi sk-alto.us
Nilfi sk-Advance, Inc.
Industrial Vacuum Division
740 Hemlock Road, Suite 100
Morgantown, PA 19543
www.nilfi sk-alto.us
VIETNAM
Nilfi sk-Advance Co., Ltd
No.51 Doc Ngu Str. Lieu Giai Ward
Ba Dinh Dist. Hanoi
www.nilfi sk.com


- Operating instructions
- Quick reference guide
- The pictorial quick reference guide
- A
- Before starting
- B
- Control/Operation
- C
- Connecting electrical appliances
- D
- Replacement of:
- Contents
- Important safety instructions 2
- Risks 4
- Control / Operation 5
- After using the cleaner 6
- Maintenance 6
- Further information 7
- Important safety instructions
- Further support
- Symbols used to mark instructions
- DANGER
- WARNING
- CAUTION
- Instructions for use
- Purpose and intended use
- Electrical connection
- Extension lead
- Guarantee
- Tests and approvals
- Important warnings
- Double-insulated appliances\*
- Only applicable to UK.
- Please read these essential instructions
- Electrical connections
- DOUBLE-INSULATED MACHINES - IMPORTANT:
- Blue-neutral brown-live
- Risks
- Electrical components
- Picking up liquids
- Hazardous materials
- Spare parts and accessories
- Emptying dirt tank
- In explosive or inflammable atmosphere
- Blower function.
- Control / Operation
- Starting and operating of the machine
- Auto-On/Off-Operation for power tools\*
- Before wet pick-up
- Emptying after wet pick-up
- Emptying after dry pick-up
- Push & Clean
- After using the cleaner
- After use
- Transport
- Storage
- Recycling the cleaner
- Maintenance
- Regular servicing and inspection
- Maintenance
- Further information
- Kurzanleitung
- Farliga material
- AUSTRIA
- CZECH REPUBLIC
- DENMARK
- HUNGARY
- IRELAND
- ITALY
- MALAYSIA
- MEXICO
- RUSSIA
- SLOVAKIA
- SOUTH AFRICA
- SINGAPORE
- SPAIN
- SWEDEN
- SWITZERLAND
- THAILAND
- TURKEY
- UNITED KINGDOM
- UNITED ARAB EMIRATES
- USA
- VIETNAM
Brand : NILFISK
Model : AERO 26-21 PC
Category : Vacuum Cleaner