
X-HM82D-K - Hi-Fi System PIONEER - Free user manual and instructions
Find the device manual for free X-HM82D-K PIONEER in PDF.


| Product Type | Compact Hi-Fi System |
| Brand | Pioneer |
| Model | X-HM82D-K |
| Dimensions (W x H x D) | 290 x 110 x 290 mm (main unit) |
| Weight | Approximately 4.5 kg (main unit) |
| Power Supply | 230 V ~ 50 Hz |
| Power Consumption | Operating: 45 W; Standby: < 0.5 W |
| Output Power | 2 x 25 W RMS (4 ohms) |
| Supported Audio Formats | CD, CD-R/RW, MP3, WMA, AAC, FLAC, WAV |
| Main Functions | CD player, FM/AM tuner, Bluetooth, USB, auxiliary input, built-in speakers |
| Connectivity | Bluetooth (range up to 10 m), USB (front), analog audio input (RCA), headphone output |
| Speakers | 2-way speakers with 13 cm cone and tweeter |
| Additional Features | Clock, timer, equalizer, remote control included |
| Maintenance and Cleaning | Unplug before cleaning; use a soft, dry cloth |
| Safety | Do not expose to moisture, do not block ventilation openings |
| Spare Parts and Repairability | Spare parts are not available from the manufacturer; contact an authorized service center |
| General Information | Manual available for download at notice-facile.com |
Frequently Asked Questions - X-HM82D-K PIONEER
User questions about X-HM82D-K PIONEER
0 question about this device. Answer the ones you know or ask your own.
Ask a new question about this device
Download the instructions for your Hi-Fi System in PDF format for free! Find your manual X-HM82D-K - PIONEER and take your electronic device back in hand. On this page are published all the documents necessary for the use of your device. X-HM82D-K by PIONEER.
USER MANUAL X-HM82D-K PIONEER
Thank you for buying this Pioneer product. This Quick Start Guide includes instructions for basic connections and operations to allow simple use of the receiver. For detailed descriptions of the receiver, see the "Operating Instructions" provided on the included CD-ROM (P).
CD-ROM (Operating instructions)
AAA size IEC R03 dry cell batteries x2
Pile a secco AAA IEC R03 x2
AAA/IEC/R03 drogecelbatterijen x2
Antenna a cavo DAB/FM
DAB/FM-draadantenne
For detailed descriptions of the receiver, see the "Operating Instructions" provided on the included CD-ROM. The operating instructions can also be downloaded from the Pioneer website (http://www.pioneer.eu). See below for instructions on handling the CD-ROM.
Operating Environment — In regard to viewing the user's manual PDF included on the CD-ROM, operation has been confirmed on the following operating environments. Microsoft® Windows® XP /Windows Vista® / Windows® 7 / Windows® 8 and Apple Mac OS X 10.7 or later, Adobe Reader (Version 10, 11). *Precautions For Use — This CD-ROM is for use with a computer. It cannot be used with a DVD player or music CD player. Attempting to play this CD-ROM with a DVD player or music CD player can damage speakers or cause impaired hearing due to the large volume. License — Please agree to the "Terms of Use" indicated below before using this CD-ROM. Do not use if you are unwilling to consent to the terms of its use. *Terms of Use — Copyright to data provided on this CD-ROM belongs to Onkyo & Pioneer Corporation. Unauthorized transfer, duplication, broadcast, public transmission, translation, sales, lending or other such matters that go beyond the scope of "personal use" or "citation" as defined by Copyright Law may be subject to punitive actions. Permission to use this CD-ROM is granted under license by Onkyo & Pioneer Corporation. *General Disclaimer — Onkyo & Pioneer Corporation does not guarantee the operation of this CD-ROM with respect to computers using any of the applicable OS. In addition, Onkyo & Pioneer Corporation is not liable for any damages incurred as a result of use of this CD-ROM and is not responsible for any compensation. The names of private corporations, products and other entities described herein are the registered trademarks or trademarks of their respective firms.
* When Using a Mac OS: Place the CD-ROM in the CD drive, click the CD drive from Finder, and double click the Index.html (table of contents) for operation instructions.
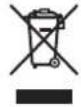
Information for users on collection and disposal of old equipment and used batteries
(Symbol for equipment)
(Symbol examples) for batteries
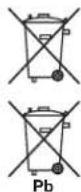
These symbols on the products, packaging, and/or accompanying documents mean that used electrical and electronic products and batteries should not be mixed with general household waste.
For proper treatment, recovery and recycling of old products and used batteries, please take them to applicable collection points in accordance with your national legislation.
By disposing of these products and batteries correctly, you will help to save valuable resources and prevent any potential negative effects on human health and the environment which could otherwise arise from inappropriate waste handling.
For more information about collection and recycling of old products and batteries, please contact your local municipality, your waste disposal service or the point of sale where you purchased the items.
These symbols are only valid in the European Union.
For countries outside the European Union:
If you wish to discard these items, please contact your local authorities or dealer and ask for the correct method of disposal.
K05Ba_A1_En
This product is for general household purposes. Any failure due to use for other than household purposes (such as long-term use for business purposes in a restaurant or use in a car or ship) and which requires repair will be charged for even during the warranty period.
K041_A1_En
POWER-CORD CAUTION
Handle the power cord by the plug. Do not pull out the plug by tugging the cord and never touch the power cord when your hands are wet as this could cause a short circuit or electric shock. Do not place the unit, a piece of furniture, etc., on the power cord, or pinch the cord. Never make a knot in the cord or tie it with other cords. The power cords should be routed such that they are not likely to be stepped on. A damaged power cord can cause a fire or give you an electrical shock. Check the power cord once in a while. When you find it damaged, ask your nearest PIONEER authorized service center or your dealer for a replacement.
S002*A1_En
CAUTION
TO PREVENT THE RISK OF ELECTRIC SHOCK. DO NOT REMOVE COVER (OR BACK). NO USER SERVICEABLE PARTS INSIDE. REFER SERVICING TO QUALIFIED SERVICE PERSONNEL.
D3-4-2-1-1_B1_En
WARNING
This equipment is not waterproof. To prevent a fire or shock hazard, do not place any container filled with liquid near this equipment (such as a vase or flower pot) or expose it to dripping, splashing, rain or moisture.
D3-4-2-1-3 A1 En
WARNING
To prevent a fire hazard, do not place any naked flame sources (such as a lighted candle) on the equipment.
D3-4-2-1-7a_A1_En
VENTILATION CAUTION
When installing this unit, make sure to leave space around the unit for ventilation to improve heat radiation (at least 10 cm at top, 10 cm at rear, and 10 cm at each side).
WARNING
Slots and openings in the cabinet are provided for ventilation to ensure reliable operation of the product, and to protect it from overheating. To prevent fire hazard, the openings should never be blocked or covered with items (such as newspapers, table-cloths, curtains) or by operating the equipment on thick carpet or a bed.
D3-4-2-1-7b*A1_En

natural_image
Illustration of a desktop computer with a prohibition symbol on top (no text or labels)Operating Environment
Operating environment temperature and humidity: +5 °C to +35 °C (+41 °F to +95 °F); less than 85 %RH (cooling vents not blocked) Do not install this unit in a poorly ventilated area, or in locations exposed to high humidity or direct sunlight (or strong artificial light).
D3.4-2-1-7c ^+ A2 En
CAUTION
The ◦ STANDBY/ON switch on this unit will not completely shut off all power from the AC outlet. Since the power cord serves as the main disconnect device for the unit, you will need to unplug it from the AC outlet to shut down all power. Therefore, make sure the unit has been installed so that the power cord can be easily unplugged from the AC outlet in case of an accident. To avoid fire hazard, the power cord should also be unplugged from the AC outlet when left unused for a long period of time (for example, when on vacation).
D3-4-2-2-2a* A1 En
For Norway customers
For Sweden customers
Store small parts out of the reach of children and infants. If accidentally swallowed, contact a doctor immediately.
D41-6-4_A1_En
CAUTION
This product is a class 1 laser product classified under the Safety of laser products, IEC 60825-1:2007.

D58-5-2-2a A1 En
X-HM82, X-HM82D, X-HM72 and X-HM72D only
Do not attach these speakers to the wall or ceiling, as they may cause injury in the event of a fall.
5GK007_A1_En
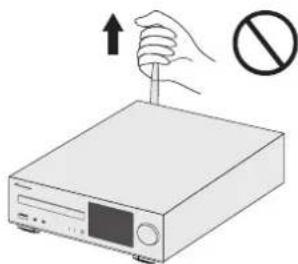
Do not lift this device by holding the wireless LAN antenna, since damage or personal injury may result.
natural_image
Illustration of a hand holding a screwdriver next to a computer monitor, with a prohibition symbol nearby (no text or labels)Radio wave caution
This unit uses a 2.4 GHz radio wave frequency, which is a band used by other wireless systems (Microwave ovens and Cordless phones, etc.). In this event noise appears in your television image, there is the possibility this unit (including products supported by this unit) is causing signal interference with the antenna input connector of your television, video, satellite tuner, etc. In this event, increase the distance between the antenna input connector and this unit (including products supported by this unit).
- Pioneer is not responsible for any malfunction of the compatible Pioneer product due to communication error/malfunctions associated with your network connection and/or your connected equipment. Please contact your Internet service provider or network device manufacturer.
- A separate contract with/payment to an Internet service provider is required to use the Internet.
Connecting the speakers
Be sure to complete all connections before connecting this receiver to the AC power source.
Right speaker Left speaker

Make sure you connect the speaker on the right to the right (R) terminal and the speaker on the left to the left (L) terminal. Also make sure the positive and negative (+/-) terminals on the receiver match those on the speakers. You can use speakers with a nominal impedance between 4 Ω and 16 Ω.
- If not using the provided speaker wire, twist exposed wire strands together.
- Loosen terminal and insert exposed wire.
- Tighten terminal.


Both speakers can be used on either the right or the left side.
CAUTION
• These speaker terminals carry HAZARDOUS LIVE voltage. To prevent the risk of electric shock when connecting or disconnecting the speaker cables, disconnect the power cord before touching any uninsulated parts.
- Make sure that all the bare speaker wire is twisted together and inserted fully into the speaker terminal. If any of the bare speaker wire touches the back panel it may cause the power to cut off as a safety measure.

Red tube
X-HM82, X-HM82D, X-HM72 and X-HM72D provided speaker wire
Cleaning the glossy finish of the speaker (X-HM72-KK, X-HM72-SK, X-HM72-SW, X-HM82, X-HM82D only)
- If you use a dusty or hard cloth or if you rub the screen hard, the finish of the product will be scratched.
- If you clean the surface of the speaker system with a wet cloth, water droplets on the surface may enter into the product, resulting in malfunction.
- When cleaning the finish of the speaker system, gently wipe it with a dry soft cloth.
Connecting a TV and playback component
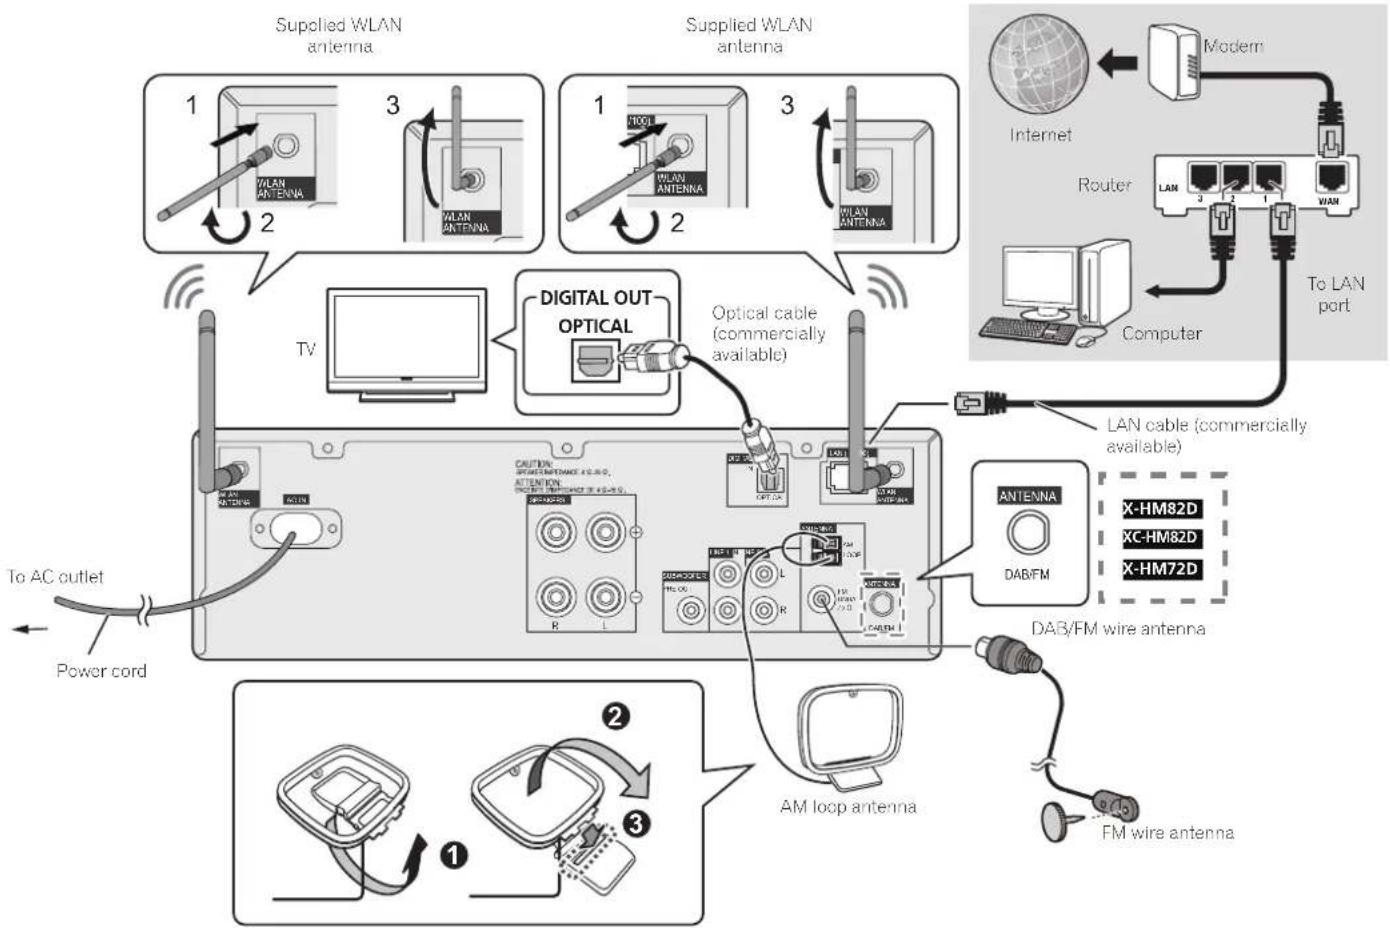
flowchart
graph TD
    A["Supplied WLAN antenna"] --> B["TV"]
    B --> C["Digital OUT Optical"]
    C --> D["Optical cable (commercially available)"]
    D --> E["LAN cable (commercially available)"]
    E --> F["DAB/FM"]
    F --> G["X-HM82D"]
    F --> H["X-CHM82D"]
    F --> I["X-HM72D"]
    G --> J["FM wire antenna"]
    H --> J
    I --> J
    J --> K["AM loop antenna"]
    K --> L["To AC outlet"]
    K --> M["Power cord"]
    N["Supplied WLAN antenna"] --> O["TV"]
    O --> P["Digital OUT Optical"]
    P --> Q["Optical cable (commercially available)"]
    Q --> R["LAN cable (commercially available)"]
    R --> S["Modem"]
    S --> T["Internet"]
    T --> U["Router"]
    U --> V["Computer"]
    V --> W["To LAN port"]
Basic control
Installing the receiver
- When installing this receiver, make sure to put it on a level and stable surface.
Don't install it on the following places:
-on a color TV (the screen may distort) - near a cassette deck (or close to a device that gives off a magnetic field). This may interfere with the sound.
- in direct sunlight
-in damp or wet areas - in extremely hot or cold areas
– in places where there is vibration or other movement - in places that are very dusty in places that have hot fumes or oils (such as a kitchen)
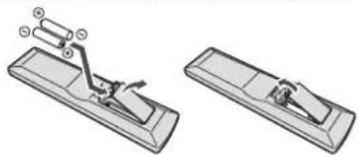
Loading the batteries
The batteries included with the receiver are to check initial operations; they may not last over a long period. We recommend using alkaline batteries that have a longer life.
natural_image
Technical line drawing of a mechanical device with two views (no text or symbols)CAUTION
- Incorrect use of batteries may result in such hazards as leakage and bursting. Observe the following precautions:
- When disposing of used batteries, please comply with governmental regulations or environmental public institution's rules that apply in your country/area.
- Do not use or store batteries in direct sunlight or other excessively hot place, such as inside a car or near a heater. This can cause batteries to leak, overheat, explode or catch fire. It can also reduce the life or performance of batteries.

Switches the receiver between standby and on
Press ⏻ STANDBY/ON (①).
Setting the clock and timer
- Press TIMER (②).
- Use / and ENTER (6) to adjust the day of the week and time.
Control the display brightness
Press DIMMER (3) to switch the display brightness in four steps.
Control sound and adjust volume
- Press SOUND, P.BASS, TREBLE or BASS (10) to adjust sound quality.
- Press VOLUME +/- (12) to adjust the listening volume.
- Press MUTE (12) to mute the sound.
Playing iPod/iPhone/iPad using the USB terminal
- Press iPod/USB (4) and connect your iPod/iPhone/iPad to the USB terminal.
- Press▶ (⑦) to start playback.
Listening to the audio CD
- Press CD (4).
- Press OPEN/CLOSE (9) to open the disc tray and place the disc.
- Press ▶ (7) to start playback. Use numeric buttons (8) or ◀◀/▶▶◆ (7) to select the track.
- Press REPEAT or SHUFFLE (13) to adjust the play mode.
Listening to the radio
- Press TUNER (4).
- Press BAND (5) to select the band. (X-HM82, XC-HM82 and X-HM72 only: FM MONO, FM STEREO, AM) (X-HM82D, XC-HM82D and X-HM72D only: FM MONO, FM STEREO, DAB)
- Use TUNE ↑/↓ (6) to tune.
Listening to the Internet Radio
- Press NET SERVICE ④) repeatedly to select Internet Radio.
- Use ↑/↓ (6) to select the folder and press ENTER (6).
Listening to the audio file on Music Server
- Press NET SERVICE ④) repeatedly to select Music Server.
- Use ↑/↓ (6) to select the folder and press ENTER (6).
- Select the audio file. Press ▶ (7) to start playback.
Listening to the favorite songs
- Press FAVORITES ④) to select Favorites.
- Select the station or the audio file. Press ENTER (6) to start playback.
Connecting to network
The following is one example of how to connect to a network.
For other connections, please refer to the attached Operating Instructions (CD-ROM)
Connecting this receiver using wired LAN
- Be sure your router supports DHCP server function.
- Use the LAN cable to connect this receiver and your router.
- Plug the power cord into an AC outlet. Press ⏻ STANDBY/ON.
Connecting this receiver using wireless LAN
A: Connection settings using an iOS device (with iOS 5.0 or later)
You can apply iPod/iPhone/iPad (iOS device with iOS ver 5.0 or later)'s Wi-Fi settings to this receiver.
- Be sure the LAN cable is not connected to the receiver. Unlock your iPod/iPhone/iPad.
- Plug the power cord into an AC outlet. Press ⏻ STANDBY/ON.
- Unlock your iPod/iPhone/iPad. Check that the Wi-Fi mark is displayed on the iOS device screen.

-
Press iPod/USB on the remote control. Connect the iOS device to the USB terminal.
-
Press SETUP.
-
Select Network Setting → Network Configuration → Wireless → iOS Device and then press ENTER.
-
Tap Allow on iPod/iPhone/iPad.
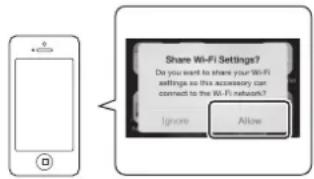
The Wi-Fi settings of your iPod/iPhone/iPad are applied to the receiver.
B: Connecting to a router with WPS-PBC function
- Be sure the LAN cable is not connected to the receiver.
- Plug the power cord into an AC outlet. Press ⏻ STANDBY/ON.
- Press NET SERVICE → SETUP on the remote control.
- Select Network Setting → WPS.
- Use ↑/↓ to select PBC (Push Button Configuration) and then press ENTER.
- Press the WPS button on the router. If the connection does not succeed, refer to Operating Instructions (CD-ROM) (page 44) and redo the setting again.
PBC (Push Button Configuration)
- The wireless connection setting is automatically configured by pressing the WPS button on the WPS compatible wireless LAN device.
C: Connecting to a router without WPS-PBC function
- Be sure the LAN cable is not connected to the receiver.
- Plug the power cord into an AC outlet. Press ⏻ STANDBY/ON.
- Press NET SERVICE → SETUP. The Initial Setup screen is shown on the display.
- Select Network Setting → Network Configuration.
- Use ↑/↓ to select Wireless, then press ENTER.

- Use ↑/↓ to select Auto, then press ENTER.
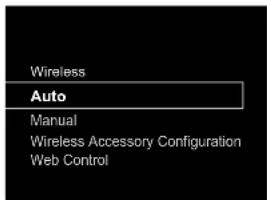
- Use ↑/↓ to select the available wireless network you want to connect to, then press ENTER.
The receiver will only display the names of 2.4 GHz wireless LAN routers (SSID).

- Use ↑/↓/←/→ to enter the Pass Phrase or WEP Key.
![Enter Password [REPEAT] Change Text [CLEAR] Delete One Character](/content/2026/06/1261625/images/fd88c0add5eaba7b7fe6ec96ce485439d87db7c700881f078f4cd7bf1ed28bbd.jpg)
←/→: Moves the adjusting digit.
↑/↓: Changes displayed character.
REPEAT: Switches character types.
CLEAR: Deletes one character at a time.
- Use ↑/↓ to select DHCP On, then press ENTER.
Select Don't Use Proxy Server, then press ENTER.

- In order to activate the setup, press ENTER.
Refer to Operating Instructions (CD-ROM) (Connection method 4 | Have the receiver automatically detect the wireless LAN router and perform settings on page 33) and redo the setting again.
"Pioneer" is a trademark of Pioneer Corporation, and is used under license.
Français
natural_image
Illustration of a desktop computer with a prohibition symbol on top (no text or labels)natural_image
Illustration of a hand using a screwdriver to press a CD or DVD device, with no visible text or symbols.natural_image
Technical line drawing of a mechanical device with two views: top shows a lever mechanism, bottom shows a handle mechanism (no text or symbols)ATTENTION
natural_image
Illustration of a desktop computer with a prohibition symbol on top (no text or labels)natural_image
Illustration of a hand holding a screwdriver next to a computer monitor, with no visible text or symbols.natural_image
Technical line drawing of a mechanical clamp or bracket assembly (no text or symbols)PRECAUCIÓN
natural_image
Illustration of a desktop computer with a prohibition symbol on top (no text or labels)ACHTUNG
natural_image
Illustration of a hand holding a screwdriver above a computer monitor, with a prohibition symbol nearby (no text or labels)natural_image
Two technical diagrams showing mechanical components with no visible text or symbolsACHTUNG
natural_image
Illustration of a portable electronic device with a prohibition symbol on top (no text or labels)natural_image
Illustration of a hand holding a screwdriver next to a computer monitor, with a prohibition symbol nearby (no text or labels)natural_image
Technical line drawing of a mechanical device with two views (no text or symbols)ATTENZIONE
WAARSCHUWING NETSNOER
natural_image
Illustration of a portable electronic device with a prohibition symbol on top (no text or labels)LET OP
natural_image
Illustration of a computer monitor with a hand holding a screwdriver and a prohibition symbol (no text or labels)De receiver installeren
natural_image
Technical line drawing of a mechanical device with two views: top shows a lever mechanism, bottom shows a handle mechanism (no text or symbols)WAARSCHUWING
flowchart
graph TD
    A["Smartphone"] --> B["Wi-Fi Signal"]
    B --> C["App icon: 27, Calendar, Poster, Camera"]
natural_image
Illustration of a desktop computer with a prohibition symbol on top (no text or labels)ВНИМАНИЕ
natural_image
Illustration of a hand using a screwdriver to press a CD or DVD device, with no visible text or symbols.natural_image
Technical line drawing of a mechanical device with two views: top shows a lever mechanism, bottom shows a handle (no text or symbols)ПРЕДУПРЕЖДЕНИЕ
Declaration of Conformity with regard to the R&TTE Directive 1999/5/EC
Manufacturer:
PIONEER HOME ELECTRONICS CORPORATION
1-1, Shin-ogura, Saiwai-ku, Kawasaki-shi, Kanagawa 212-0031, Japan
EU Representative's:
Pioneer Europe NV
Haven 1087, Keetberglaan 1, 9120 Melsele, Belgium http://www.pioneer.eu
[*] X-HM82-S, X-HM82-K, X-HM72-S, X-HM72-K, X-HM82D-K, X-HM72D-S, X-HM72D-K, XC-HM82-S, XC-HM82-K, XC-HM82D-K

English:
Hereby, Pioneer, declares that this [*] is in compliance with the essential requirements and other relevant provisions of Directive 1999/5/EC.
Suomi:
Declaration of Conformity with regard to the R&TTE Directive 1999/5/EC
Manufacturer:
O&P Corporation
2-3-12, Yaesu, Chuo-Ku, Tokyo
104-0028, Japan
EU Representative's:
Pioneer Europe NV
Haven 1087, Keetberglaan 1,
9120 Melsele, Belgium
http://www.pioneer.eu
[*] X-HM72-KK, X-HM72-SK, X-HM72-SW
CE
English:
Hereby, Pioneer, declares that this [*] is in compliance with the essential requirements and other relevant provisions of Directive 1999/5/EC.
Suomi:
Discover the benefits of registering your product online at http://www.pioneer.co.uk (or http://www.pioneer.eu).
Download an electronic version of this manual from our website.
© 2015 Onkyo & Pioneer Corporation.
All rights reserved.
© 2015 Onkyo & Pioneer Corporation.
Anteros Building, Odyssey Business Park, West End Road, South Ruislip, Middlesex, HA4 6QQ United Kingdom
Tel: +44(0)208 836 3612
6, Avenue de Marais F - 95816 Argenteuil Cedex FRANCE
Tel :+33(0)969 368 050
Корпорация О энд Пи



- Information for users on collection and disposal of old equipment and used batteries
- POWER-CORD CAUTION
- CAUTION
- WARNING
- VENTILATION CAUTION
- Operating Environment
- For Norway customers
- For Sweden customers
- X-HM82, X-HM82D, X-HM72 and X-HM72D only
- Radio wave caution
- Connecting the speakers
- Basic control
- Installing the receiver
- Loading the batteries
- Switches the receiver between standby and on
- Setting the clock and timer
- Control the display brightness
- Control sound and adjust volume
- Playing iPod/iPhone/iPad using the USB terminal
- Listening to the audio CD
- Listening to the radio
- Listening to the Internet Radio
- Listening to the audio file on Music Server
- Listening to the favorite songs
- Connecting to network
- Connecting this receiver using wired LAN
- Connecting this receiver using wireless LAN
- A: Connection settings using an iOS device (with iOS 5.0 or later)
- B: Connecting to a router with WPS-PBC function
- PBC (Push Button Configuration)
- C: Connecting to a router without WPS-PBC function
- Français
- ATTENTION
- PRECAUCIÓN
- ACHTUNG
- ATTENZIONE
- WAARSCHUWING NETSNOER
- LET OP
- De receiver installeren
- WAARSCHUWING
- ВНИМАНИЕ
- ПРЕДУПРЕЖДЕНИЕ
- Declaration of Conformity with regard to the R&TTE Directive 1999/5/EC
- PIONEER HOME ELECTRONICS CORPORATION
- Pioneer Europe NV
- English:
- Suomi:
- O&P Corporation
- CE
Brand : PIONEER
Model : X-HM82D-K
Category : Hi-Fi System