
APPR150V2 - Router Approx - Free user manual and instructions
Find the device manual for free APPR150V2 Approx in PDF.


| Product type | Wi-Fi Router |
| Brand | Approx |
| Model | APPR150V2 |
| Dimensions (L x W x H) | 200 x 150 x 50 mm |
| Weight | 300 g |
| Power supply | 12 V DC, 1 A |
| Wi-Fi standards | IEEE 802.11 b/g/n |
| Frequency bands | 2.4 GHz |
| Maximum Wi-Fi speed | 150 Mbps |
| LAN ports | 4 x RJ-45 10/100 Mbps |
| WAN port | 1 x RJ-45 10/100 Mbps |
| Antenna(s) | 1 external detachable antenna |
| Wireless security | WPA, WPA2, WEP |
| Access control | MAC filtering, blacklist/whitelist |
| NAT | Yes |
| DHCP | Built-in DHCP server |
| VPN | VPN pass-through (PPTP, L2TP, IPSec) |
| Operating temperature | 0 °C to 40 °C |
| Operating humidity | 10% to 85% non-condensing |
| Maintenance and cleaning | Unplug before cleaning, use a soft dry cloth |
| Spare parts and repairability | Contact Approx after-sales service for spare parts |
Frequently Asked Questions - APPR150V2 Approx
User questions about APPR150V2 Approx
0 question about this device. Answer the ones you know or ask your own.
Ask a new question about this device
Download the instructions for your Router in PDF format for free! Find your manual APPR150V2 - Approx and take your electronic device back in hand. On this page are published all the documents necessary for the use of your device. APPR150V2 by Approx.
USER MANUAL APPR150V2 Approx
Wireless-N Broadband Router
VERSION 2
Guía de usuario User guide Guide de l'utilisateur Handleiding Guida per l'utente Manual do utilizador
Español 03
English 19
Français 33
Deutsch 47
Italiano.... 62
Português.... 77
http://windows.microsoft.com/es-ES/windows7/Add-a-device-or-computer-to-a-network
http://windows.microsoft.com/es-ES/windows7/Setting-up-a-wireless-network
Please click “TCP/IP Settings→Lan Interfaces” located at the web management interface, the following message will be displayed on your web browser:

Habilitar Red
WPS Desactivar: Activar / Desactivar
1. Introduction and product description
Thank you for choosing Wireless N Broadband Router APPR150V2.
1.1 Product Overview
The Wireless-N Router APPR150V2 is a combined wired/wireless network connection device designed specifically for small business, office, and home office networking requirements. The router features 4 LAN ports to achieve the most effective data transmission. The Wireless Router delivers exceptional range and speed and automatically checks for, downloads, and installs firmware revisions to keep you operating at optimal level.
The Wireless Router offers you a simple and secure way to share your high-speed network connection, and works with older Wireless devices as well as the new Wireless products. It's easy to set up, allowing you to add computers to the network quickly and securely.
1.2 Features
- Complies with IEEE 802.11b/g/n wireless standards.
- 4 x Fast Ethernet port for LAN with MDI-X function.
- 1 x WAN port for ADSL/Cable Modem with MDI-X function.
- IEEE 802.11b/g/n infrastructure operating modes.
- Dynamic data rate scaling at 11, 5.5, 2 and 1 Mbps for 802.11b mode.
- Dynamic data rate scaling at 54, 48, 36, 24, 18, 12 and 6 Mbps for 802.11n mode.
- Dynamic data rate scaling at 150,135,54,48,36,24,18,12 and 6 Mbps for 802.11n mode.
- Allow auto fallback data rate for optimized reliability, throughput and transmission range.
-
Supports wireless data encryption with 64/128-bit WEP standard for security.
• Supports enhance security for WPA-PSK, WPA2-PSK, WPA and WPA2. -
Web-based configuration tools and management via WEB browser.
• Supports PPPoE/PPTP/L2TP protocol for ADSL.
• Supports NAT for share 1 IP address to all LAN user.
• Supports DHCP server/Client.
• Supports firewall protection, virtual server mapping, special application setting. - Supports UPnP.
• Supports statistics information.
2. Package Contents
Before you starting to use this router, please check if there's anything missing in the package, and contact your reseller to claim any missing items:
• 1 Wireless-N Router APPR150V2
- 1 Power adapter
• 1 Quick installation Guide
• 1 RJ-45 Networking Cable
Note:
Make sure that the package contains the above items. If any of the listed items are damaged or missing, please contact your distributor.
3. Specifications
| Specifications Value | |
| Wireless Standards | IEEE 802.11 b/g/n |
| Frequency Range 2.4 - 2.485GHz | |
| Transfer Rates 11/54/150 Mbps | |
| Chipset | Realtek |
| Antenna | 5dBi Omni Directional Antenna |
| Wireless Transmit Power (MAX) | 20dBm |
| Input | Localized to Country of Sale |
| Output | 5 VDC / 1A |
| Certificates | FCC, CE , RoHS |
- Installation Guide
4.1 Hardware Installation
4.1.1 Setting up a Wireless Infrastructure Network
For a typical wireless setup at home (as shown above),
Please do the following:
![graph TD A["Wireless 3G Router"] -->|USB| B["Cable-RSIL Server"] B --> C["Internet"] C --> D["Desktop PCs or Lamps\n(Wireless Adapter Requirements)"] style A fill:#f9f,stroke:#333 style B fill:#ccf,stroke:#333 style C fill:#cfc,stroke:#333 style D fill:#fcc,stroke:#333](/content/2026/06/1256932/images/f6663e1a3b5acd2d8d9897f8f207bc6e56c1a7d9bf3560d6c2a5e44c6ec9dfb8.jpg)
- You will need broadband Internet access (ADSL, Cable Modem line into your home or office).
- Consult with your ADSL or Cable Modem provider for proper installation of the modem.
- Connect the ADSL or Cable modem to the Wireless N Router. Plug in the Power Adapter to the Wireless-N Router.
- Adding computers to the Wireless-N Router.
IMPORTANT NOTE
You can reset your Wireless-N Router to default setting by press the 'RESET' button on the back side of the Router.
You can use this solution if you forget your password.
4.1.2 Adding computers to the Wireless-N Router
-
Log on to the computer.
-
Open Connect to a Network by right-clicking the network icon (or ) in the notification area.
-
Choose the wireless network from the list that appears, and then click Connect.
-
Type the network security key or pass phrase if you are asked to do so, and then click OK.
You'll see a confirmation message when you are connected to the network.
- To confirm that you added the computer, do the following:
Open Network by clicking the Start button 📄, and then clicking Control Panel. In the search box, type network, and then, under Network and Sharing Center, click View network computers and devices.
You should see icons for the computer you added and for the other computers and devices that are part of the network.
Note: If you don't see icons in the Network folder, then network discovery and file sharing might be turned off.
For more information:
http://windows.microsoft.com/es-ES/windows7/Add-a-device-or-computer-to-a-network http://windows.microsoft.com/es-ES/windows7/Setting-up-a-wireless-network
- Configuration Guide 5.1 Configuring via Web Browser
Open web browser and type http://192.168.0.1 in the browser's address box. This number is the default IP address for this device.
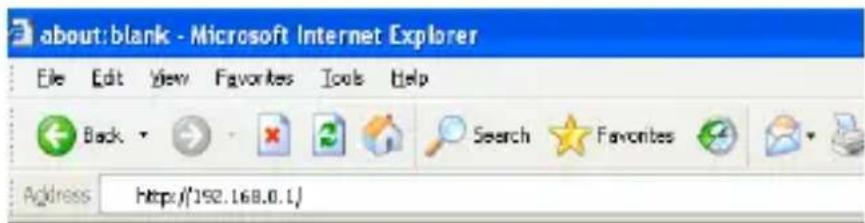

The login screen below will appear. Enter the "User Name" and "Password" and click "OK" to login.
The default User name is “admin” and the Password is “admin”,
5.2 Setup Wizard
After successfully login, the following Router Summary will be displayed on your web browser:
The setup wizard will guide you to configure access point for first time. Please follow the setup wizard step by step.

The Wizard will guide you the through following steps. Begin by clicking on Next.
- Setup Operation Mode
- Choose your Time Zone
- Setup LAN Interface
- Setup WAN Time Zone
- Wireless LAN Setting
- Wireless Security Setting
5.3 Setup the Router mode
To Setup the router mode, please follow the following instructions:
Please click "Operation Mode" located at the web management interface, the following message will be displayed on your web browser:
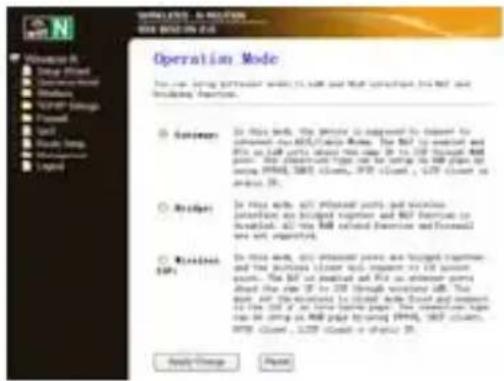
Gateway
In this mode, the device is supposed to connect to internet via ADSL/Cable Modem.
Bridge
In this mode, all Ethernet ports and wireless interface are bridged together and NAT function is disabled. All the WAN related function and firewall are not supported.
Wireless ISP
In this mode, all Ethernet ports are bridged together and the wireless client will connect to ISP access point.
Click the Apply Changes button to Change your Router Mode.
5.4 LAN Settings
Please click "TCP/IP Settings→Lan Interfaces" located at the web management interface, the following message will be displayed on your web browser:

IP Address: Enter the IP address of your Router or reset it in dotted-decimal notation Wireless-N Router (factory default: 192.168.0.1).
Subnet Mask: An address code that determines the size of the network. Normally use 255.255.255.0 as the subnet mask.
DHCP Type: Server, Client or Disable
Note:
1) If you change the IP Address of LAN, you must use the new IP Address to login the Router.
2) If the new LAN IP Address you set is not in the same subnet, the IP Address pool of the DHCP server will change accordingly at the same time, while the Virtual Server and DMZ Host will not take effect until they are re-configured.
5.5 Connect to Internet (Gateway)
Please click “TCP/IP Settings→WAN Interfaces” located at the web management interface, Following example is for “PPPoE” WAN setting.

Enter the “PPPoE Username” and “PPPoE Password” that ISP provided and leave the others. (The “Service Name” can be blank)
Click "Apply Changes" button to save the settings then reboot the router.
After reboot, your router is now ready for Internet connection.
If your ISP provides a static or fixed IP Address, Subnet Mask, Gateway and DNS setting, select 'STATIC (fixed IP)'.
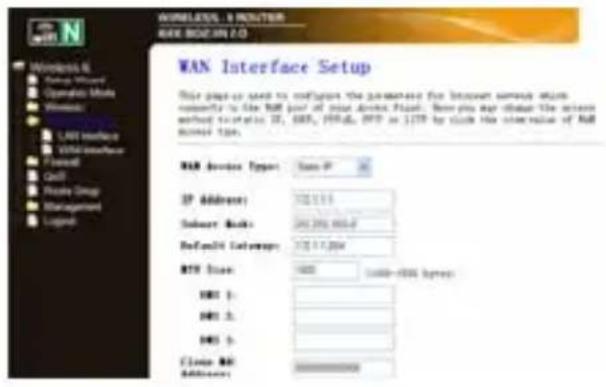
Enter the IP address / Subnet Mask / Default Gateway / MTU / Primary / Secondary DNS in dotted-decimal notation provided by your ISP.
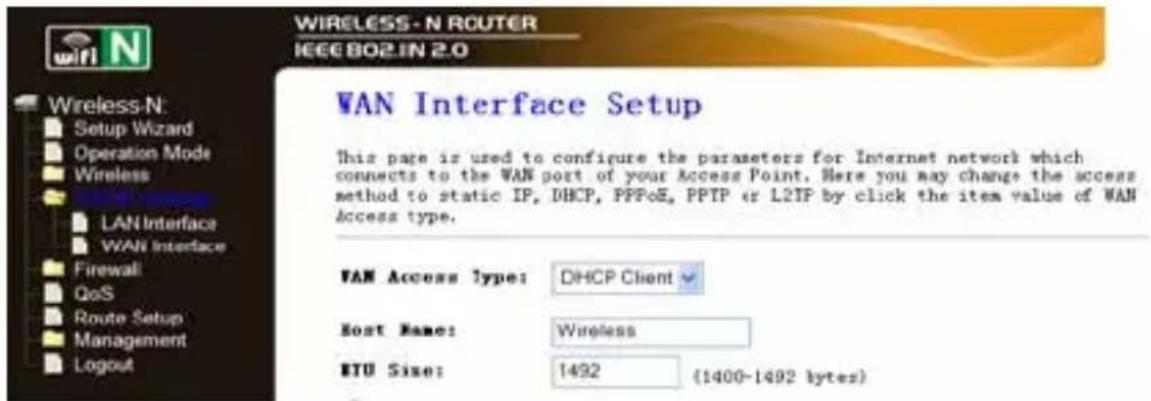
If your ISP provides the DHCP service, please choose 'DHCP Client', and the Router will automatically get IP parameters from your ISP.
This page displays the WAN IP parameters assigned dynamically by your ISP, including IP address, Subnet Mask, Default Gateway, etc.
5.6 Wireless Base Configuration
Please click "Wireless -> Basic Setttings" located at the web management interface, the following message will be displayed on your web browser:
You could configure the minimum number of Wireless settings for communication, such as Network Name (SSID) and Channel. The Access Point can be set simply with only the minimum setting items.

Disable Wireless On/Off
Wireless:
Band: Supports 11G/11G/11N mixed modes.
SSID: Main Service Set Identifier. It's the "name" of your wireless network.
Broadcast Select "enable" to enable the device's SSID to be SSID: visible by wireless clients
Channel Number: This field determines which operating frequency will be used. The default channel is set to Auto, so the AP will choose the best channel automatically. It is not necessary to change the wireless channel unless you notice interference problems with another nearby access point.
5.7 Wireless Security Configuration
Please click "Wireless-> Security" located at the web management interface, the following message will be displayed on your web browser:
Setup the wireless security and encryption to prevent from unauthorized access and monitoring. Supports 64/128-bit WEP, WPA, WPA2 encryption methods.

When you finish, click 'Apply Changes'.
Please click “Wireless-> WPS” located at the web management interface, the following message will be displayed on your web browser:

You can establish a wireless connection between wireless adapter and Router using either Push Button Configuration (PBC) method or PIN method.
Disable WPS: Enable / Disable
PIN method: If the new device supports Wi-Fi Protected Setup and the PIN method, you can add it to the network by PIN.
PBC method: If the wireless adapter supports Wi-Fi Protected Setup and the Push Button Configuration (PBC)
Step 1: Press the WPS button of the Router directly for 2 – 3 seconds or Click web management interface ‘Start PBC’.
Step 2: Press the WPS button of the Adapter directly for 3 seconds.
Step 3: Wait for a while until the next screen appears. Click Finish to complete the WPS configuration.
5.8 Router Administrator Setup
Factory Default and Settings Backup, Restore
You can backup all Setting of this router to a file, so you can make several copied of router configuration for security reason. To backup or restore router setting, please follow the following instructions:
Please click click 'Management-> Save/Reload setting' located at the web management interface, then the following message will be displayed on your web browser:

| Save Settings | Press ‘Save...’ button, and you’ll be prompted to download the configuration as a file, you can please save it as another filename for different versions, and keep it in a safe place. |
| Load Settings | Press ‘Browse...’ to pick a previously-saved configuration file from your computer, and then click ‘Upload...’ to transfer the configuration file to router. After the configuration is uploaded, therouter's configuration will be replaced by the file you just uploaded. |
| Reset Settings Click this ‘Reset’ button to remove all settings you made, and restore the configuration of this router back to factory default settings. | |
5.9 Firmware Upgrade
The system software used by this router is called ‘firmware’, just like any applications on your computer, when you replace the old application with a new one, your computer will be equipped with new function. You can also use this firmware upgrade function to add new functions to your router, even fix the bugs of this router.
Please click ‘Management-> Upgrade Firmware’ located at the web management interface, then the following message will be displayed on your web browser:

Click ‘Browse...’ button first, you’ll be prompted to provide the filename of firmware upgrade file. Please download the latest firmware file from our website, and use it to upgrade your router.
After a firmware upgrade file is selected, click 'Upload' button, and the router will start firmware upgrade procedure automatically. The procedure may take several minutes, please be patient.
NOTE: Never interrupt the upgrade procedure by closing the web browser or physically disconnect your computer from router. If the firmware you uploaded is corrupt, the firmware upgrade will fail, and you may have to return this router to the reseller to ask for help. (Warranty is void if you interrupted the upgrade procedure).
5.10 Change management password
Default password of Wireless Router is “admin”, and it’s displayed on the login prompt when accessed from web browser. There’s a security risk if you don’t change the default password, since everyone can see it. This is very important when you have wireless function enabled.
To change password, please follow the following instructions:
Please click 'Management -> Password menu on the web management interface, the following message will be displayed on your web browser:
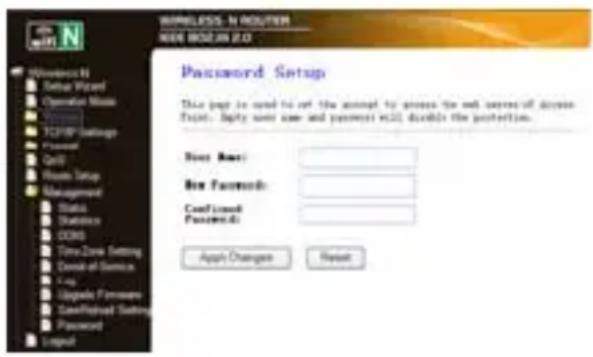
When you finish, click 'Apply Changes'; If you want to keep original password unchanged, click 'Reset'.
6. Obtaining Technical Support
While we hope your experience with the Wireless N Broadband Router APPR150V2 is enjoyable and easy to use, you may experience some difficulties or have some questions that this User Guide has not answered. Please contact your reseller and ask them for help first. If they are unable to resolve your issue, please contact our company.
NOTE: If you cannot make sure of it, please contact with our technical support team directly.
Thank you for your support and attention, for further operation details; please check the full version user manual of our Wireless N Broadband Router APPR150V2
http://www.approx.es/index.php?modo=descargas&idcat=167
http://windows.microsoft.com/es-ES/windows7/Add-a-device-or-computer-to-a-network
http://windows.microsoft.com/es-ES/windows7/Setting-up-a-wireless-network
- Guide de Configuration
5.1 Configuration via navigateur Web
5.2 Assistant de configuration
IP Address: Enter the IP address of your Router or reset it in dotted-decimal notation Wireless-N Router (factory default: 192.168.0.1).
Subnet Mask: An address code that determines the size of the network. Normally use 255.255.255.0 as the subnet mask.
DHCP Type: Server, Client or Disable
Note:
5.6 Configuration de base sans fil
Disable Wireless On/Off Wireless:
Band: Supports 11G/11G/11N mixed modes.
SSID: Main Service Set Identifier. It's the "name" of your wireless network.
Broadcast Select "enable" to enable the device's SSID to be visible by wireless clients
Channel Number: This field determines which operating frequency will be used. The default channel is set to Auto, so the AP will choose the best channel automatically. It is not necessary to change the wireless channel unless you notice interference problems with another nearby access point.
WPS Désactiver: Activer / Désactiver
| Save Settings | Press ‘Save...’ button, and you’ll be prompted to download the configuration as a file, you can please save it as another filename for different versions, and keep it in a safe place. |
| Load Settings | Press ‘Browse...’ to pick a previously-saved configuration file from your computer, and then click ‘Upload...’ to transfer the configuration file to router. After the configuration is uploaded, the router’s configuration will be replaced by the file you just uploaded. |
| Reset Settings | Click this ‘Reset’ button to remove all settings you made, and restore the configuration of this router back to factory default settings |
http://windows.microsoft.com/es-ES/windows7/Add-a-device-or-computer-to-a-network http://windows.microsoft.com/es-ES/windows7/Setting-up-a-wireless-network
5. Konfigurationsanleitung 5.1 Konfiguration via Webbrowser
5.2 Setup-Assistent
IP Address:
5.6 Kabellose Basiskonfiguration
5.9 Firmware Upgrade
- Supporta enhance security per WPA - PSK, WPA2 - PSK, WPA e WPA2.
http://windows.microsoft.com/es-ES/windows7/Add-a-device-or-computer-to-a-network http://windows.microsoft.com/es-ES/windows7/Setting-up-a-wireless-network
Disable
Wireless On/Off
Wireless:
Al termine, fare clic su 'Apply Changes'.
http://windows.microsoft.com/es-ES/windows7/Add-a-device-or-computer-to-a-network http://windows.microsoft.com/es-ES/windows7/Setting-up-a-wireless-network
Gateway Neste modo, o dispositivo é ligado à Internet através de ADSL/ Cable Modem.
para ajuste WAN "PPPoE".
Desactivar Wireless: Wireless On/Off
Banda: Suporta modos mistos 11G/11G/11N.
SSID: Main Service Set Identifier. É o "nome" da rede Wireless.
Desactivar WPS: Activar / Desactivar

- WIRELESS-N BROADBAND ROUTER
- GUÍA DE USUARIO USER GUIDE GUIDE DE L'UTILISATEUR HANDLEIDING GUIDA PER L'UTENTE MANUAL DO UTILIZADOR
- INTRODUCTION AND PRODUCT DESCRIPTION
- 1.1 PRODUCT OVERVIEW
- 1.2 FEATURES
- PACKAGE CONTENTS
- NOTE
- SPECIFICATIONS
- IMPORTANT NOTE
- 5.2 SETUP WIZARD
- 5.3 SETUP THE ROUTER MODE
- 5.4 LAN SETTINGS
- 5.5 CONNECT TO INTERNET (GATEWAY)
- 5.6 WIRELESS BASE CONFIGURATION
- 5.7 WIRELESS SECURITY CONFIGURATION
- 5.8 ROUTER ADMINISTRATOR SETUP
- 5.9 FIRMWARE UPGRADE
- 5.10 CHANGE MANAGEMENT PASSWORD
- OBTAINING TECHNICAL SUPPORT
- 5.2 ASSISTANT DE CONFIGURATION
- 5.6 CONFIGURATION DE BASE SANS FIL
- KONFIGURATIONSANLEITUNG 5.1 KONFIGURATION VIA WEBBROWSER
- 5.2 SETUP-ASSISTENT
- 5.6 KABELLOSE BASISKONFIGURATION
Brand : Approx
Model : APPR150V2
Category : Router