
BBA 7 - Bread maker TEAM - Free user manual and instructions
Find the device manual for free BBA 7 TEAM in PDF.


| Product Type | Bread Machine |
| Brand | Team |
| Model | BBA 7 |
| Pan Capacity | Up to 1 kg of bread |
| Number of Programs | 12 automatic programs |
| Programs include | White bread, whole wheat, gluten-free, brioche, jam, pizza dough, cake, etc. |
| Delay Timer | Up to 15 hours |
| Keep Warm | Up to 1 hour after baking |
| Crust Control | 3 levels: light, medium, dark |
| Display | LCD screen with backlight |
| Power | 220-240 V, 50/60 Hz, 650 W |
| Dimensions (W x D x H) | 30 x 25 x 35 cm |
| Weight | 5 kg |
| Pan Material | Non-stick steel |
| Accessories Included | Pan, kneading blade, hook, measuring cup, measuring spoon |
| Safety | Safety lock, automatic shut-off in case of overheating |
| Care and Cleaning | Pan and kneading blade dishwasher safe; wipe exterior with a damp cloth |
| Replacement Parts Available | Pan, kneading blade, replacement gaskets |
| Repairability | Repairability index: 7/10 |
| Color | White and stainless steel |
| Warranty | 2 years |
Frequently Asked Questions - BBA 7 TEAM
User questions about BBA 7 TEAM
0 question about this device. Answer the ones you know or ask your own.
Ask a new question about this device
Download the instructions for your Bread maker in PDF format for free! Find your manual BBA 7 - TEAM and take your electronic device back in hand. On this page are published all the documents necessary for the use of your device. BBA 7 by TEAM.
USER MANUAL BBA 7 TEAM
natural_image
White industrial bread maker with control panel and digital display (no visible text or symbols)
Brotbackautomat
Bread maker
Machine à pain
Broodbakmachine

2 TEAM BBA 7-060329
D
Gerät
- Main housing
- Inner case
-
Baking tin (installed in case)
-
Vent
-
Viewing window
-
Lid handle
-
Lid
-
Back vents (not visible here)
-
Control panel
-
Power cord
-
Side vents (on both sides)
-
Kneading blade
-
Wire handle
-
Baking tin
-
Rotating shaft
Control panel
- Display window
- Crust key
-
Select key
-
Start key
- Stop key
- Time set (Minuterie)
- Loaf weight key (Poids)
FR
Appareil
natural_image
Line drawing of a hand pouring liquid into a small container using a tool, no text or symbols present
natural_image
Line drawing of a mechanical component with a downward arrow indicating force or direction (no text or symbols)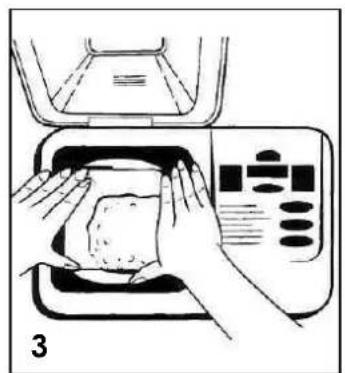
natural_image
Illustration of hands pressing a piece of dough into a microwave oven (no text or symbols)
natural_image
Line drawing of a hand pouring liquid into a small container using a microwave oven (no text or symbols)
natural_image
Illustration of two hands holding a circular object with a bandage, no text or symbols presentProgramm: 11 (Confiture)
Programmdauer: 1:25
☐ Please read these instructions carefully before using the appliance.
☐ Check that your mains voltage corresponds to that stated on the appliance.
☐ Never leave the appliance unsupervised when in use. Keep out of reach of children or incompetent persons.
From time to time check the appliance and its cord for damages. Never use the appliance if cord or appliance shows any signs of damage. All repairs should be made by a competent qualified electrician(*).
☐ Only use the appliance for domestic purposes and in the way indicated in these instructions.
☐ Never immerse the appliance in water or any other liquid for any reason whatsoever. Never place it into the dishwasher.
☐ Be very careful right after the baking process, as the appliance is very hot. Let it cool down completely before storing or cleaning it.
□ Never use the appliance near hot surfaces.
Before cleaning or storing, always unplug the appliance from the power supply.
☐ Never use the appliance outside and always place it in a dry environment.
☐ Never use accessories, which are not recommended by the producer. They could constitute a danger to the user and risk to damage the appliance.
☐ Never move the appliance by pulling the cord. Make sure the cord cannot get caught in any way. Do not wind the cord around the appliance and do not bend it.
☐ Stand the appliance on a table or flat surface to prevent it from falling.
☐ Make sure the cord never comes into contact with the hot parts of the appliance. Never touch the hot parts of the appliance in order to avoid injuries.
☐ Make sure the appliance never comes into contact with inflammable materials, such as curtains, cloth, etc... when it is in use, as a fire might occur.
☐ The temperature of the accessible surfaces may be very high when the appliance is in use. Never touch those surfaces during use. Use oven mitts to handle the baking tin after
the baking process in order to avoid injuries. Should the symbol be indicated on a certain surface, you need to be careful when handling the product. This symbol means CAUTION, this surface may get very hot during use.
☐ Be careful not to scratch the special coating of the baking tin and kneading blade, as this would damage the non-stick feature.
☐ Never exceed the amounts of flour and yeast that are recommended in the recipes of this manual. Otherwise, the dough might flow over the baking tin.
☐ Never cover the appliance (e.g. with a cloth), as this would hinder the steam outlet.
☐ Never put any object in the baking tin, as this could cause electric shocks or damage the non-stick coating of the tin.
(1) Competent qualified electrician: after sales department of the producer or importer or any person who is qualified, approved and competent to perform this kind of repairs in order to avoid all danger. In any case you should return the appliance to this electrician.
SHORT CORD INSTRUCTIONS
A short power supply cord is provided to reduce the risk resulting from becoming entangled in, or tripping over a longer cord. Extension cords may be used if care is exercised in their use.
- The electrical rating of the extension cord should be at least that of the appliance. If the electrical rating of the extension cord is too low, it could overheat and burn.
- The longer cord should be arranged so that it will not drape over the counter top or tabletop where it can be pulled on by children or tripped over.
BEFORE THE FIRST OPERATION
Unpack the appliance and remove all packaging material. Clean the lid, the accessories and the baking tin with a soft damp cloth and dry these parts thoroughly. The quality of the bread can depend on many factors. Therefore, it is very important to know all ingredients and their interaction. This will allow you obtaining satisfactory results.
Temperature
All ingredients that you pour in the bread maker should be at an ambient temperature. The room where you use the appliance should be at a temperature of about 20 to 23°C.
Measuring the ingredients
- Your appliance is equipped with a combined graduated spoon (small and large). Measure the ingredients with this spoon only. The recipes of this instruction manual are based upon the measures of this accessory.
- When talking about "cup" in this instruction manual, it refers to one measuring cup supplied.
- On the combined graduated spoon, you'll see the following marks:
$$ \begin{array}{l} \text {Tbs = "table spoon"} \ \text {Tsp = "teaspoon"} \end{array} $$
- To measure liquid ingredients, fill the measuring cup and place it on a flat surface. The liquid level line must be aligned to the mark of measurement. An approximate measurement is not sufficient and could have a bad influence on the balance of the recipe.
- To measure dry ingredients, lightly spoon the ingredients into the measuring cup and once filled, level off with a straight-edged utensil. Scooping or tapping a measuring cup will pack the ingredients and you will end up with more than is required. This extra amount could affect the balance of the recipe. Do not sift the flour. To measure small amounts, use the graduated spoon and make sure it is level, not heaped.
Geographic situation
At altitude above 3,000 feet, flour tends to be drier and absorbs less liquid. Slightly more liquid or less flour may be required.
Dough rises faster at higher altitude. Either sugar, yeast or liquid should be adjusted slightly to prevent over-rising. See table below for guidelines.
| ALTITUDE | |||
| Adjustment | 3,000 ft | 5,000 ft | 7,000 ft |
| Reduce yeast: For each tsp in the recipe, decrease by | 1/8 tsp | 1/8 – 1/4 tsp | + 1/4 tsp |
| Reduce sugar: For each tbs in the recipe, decrease by | 0-1 tsp | 0-2 tsp | 1-2 tsp |
| Increase liquid: For each cup in the recipe, add | 1 -2 tbs | 2-4 tbs | 3-4 tbs |
Ingredients
One of the most important factors involved when making bread is the quality and freshness of the ingredients. Moreover, it is absolutely necessary to follow the amounts prescribed accurately.
All-purpose flour
All-purpose flour is a blend of refined hard and soft wheat flours especially suited for making breads and cakes. While this type of flour may give acceptable results from your bread maker, we recommend using bread flour.
Bread flour
Bread flour is high gluten/protein flour that has been treated with conditioners that give dough a greater tolerance during kneading. Bread flour typically has a higher gluten concentration than all-purpose flour, however, depending on different milling practices this may vary. Bread flour is recommended for use with this bread maker, but all-purpose flour will give acceptable results.
Whole-wheat flour
Whole-wheat flour is milled from the entire wheat kernel, which contains the bran and germ and makes it heavier and richer in nutrients than all-purpose flour. Bread made with this flour is usually smaller and heavier than white loaves. To overcome this, whole-wheat flour is usually mixed with all-purpose flour, bread flour or gluten to produce taller, light-textured bread.
Rye flour
Rye flour is a high fibre flour similar to whole-wheat flour. Rye flour must always be mixed with a high proportion of all-purpose flour, bread flour or gluten, as it does not contain enough gluten to develop the structure for a tall, even-grained loaf.
Gluten
Gluten is the protein in the wheat that makes the dough elastic. Gluten is usually available at most health food and bulk stores and is sometimes used in small portions with dense, low gluten flours such as a whole-wheat to increase volume and lighten texture.
Cake flour
Cake flour is low gluten/protein flour and is specially designed for use in cake recipes. It is not recommended for bread recipes.
Self-rising flour
Self-rising flours contain unnecessary leavening ingredients that will interfere with bread and cake making. It is not recommended for use in your bread maker.
Bran
Bran (unprocessed) and wheat germ are the coarse outer portions of the wheat or rye grains separated from the flour. They are often added in small quantities to bread for nutritional enrichment, heartiness and flavour. They are also used to enhance the texture of bread.
Cornmeal and oatmeal
Cornmeal and oatmeal come from the coarsely ground white or yellow corn and from rolled or steel-cut oats. They are used primarily to enhance the flavour and texture of bread.
Cracked wheat
Cracked wheat is very coarse in texture. It comes from wheat kernels cut into angular fragments. It gives whole grain bread a nutty flavour and crunchy texture.
Seven-grain cereal blend
Seven-grain cereal blend is a blend of cracked wheat, oats, bran, rye, cornmeal, flax seeds and hulled millet.
Yeast
Yeast, through a fermentation process procedures gas (carbon dioxide) necessary to make bread rise. Yeast must be able to feed on sugar and flour carbohydrates in order to produce this gas. Active dry granular yeast is used in all recipes that call for yeast. There are basically four different types of yeast available; fresh, dry, quick-rising and bread machine. It is recommended that traditional dry yeast be used, however, quick-rising yeast can also be used in lesser amounts. Fresh or compressed cake yeast is not recommended, as they will produce poor results.
Yeast must always be stored in a refrigerator to keep it fresh. Too much heat will kill it. Ensure that your yeast is opened, it is important that the remaining contents be immediately resealed and refrigerated as soon as possible for future use. Often bread or dough, which fails to rise, is due to stale yeast being used. The following test can be done to determine whether your yeast is stale and inactive:
- Place 12 cup of lukewarm water into a small bowl or cup.
• Stir 1 tsp of sugar into the water then sprinkle 2 tsp of yeast over the surface. - Place the cup in a warm area and allow sitting for 10 minutes undisturbed.
- The mixture should foam and produce a strong yeast aroma. If this does not occur, fresh yeast should be purchased.
Sugar
Sugar is important for the colour and flavour of breads. It is also food for yeast as it supports the fermentation process. Recipes that call for sugar require granulated sugar. Do not substitute powdered sugar or brown sugar unless indicated. Artificial sweeteners cannot be used as a substitute for sugar as yeast will not react properly with them.
Salt
Salt is necessary to balance the flavour of breads and cakes, as well as for the crust colour that develops during baking. For dietary reasons, it may even be eliminated entirely, however, your bread may over-proof and rise higher than normal.
Liquids/milk
Liquid such as milk or a combination of powdered milk and water can be used when making bread. Milk will improve flavour, provide a velvety texture and soften the crust, while water alone will produce a crispier crust. Use only powdered milk when using the delay timer. Some recipes call for juice (orange, apple, etc.) to be added as a flavour enhancer.
Eggs
Eggs add richness and velvety texture to bread dough and cakes. Use only large-size eggs in these recipes.
Butter and margarine
Butter and margarine shorten or tenderise the texture of yeast breads. However, breads that call for butter stay fresh longer. If butter or margarine is used directly from the refrigerator, it should be cut into small pieces for easier blending during the kneading cycle.
Baking powder
Baking powder is a leavening agent used in quick breads and cakes. This type of leavening agent does not require rising time before baking as the chemical reaction works during baking process.
Baking soda
Baking soda is another leavening agent not to be confused with nor substituted for baking powder. It also does not require rising time before baking as the chemical reaction works during baking process.
Special glazes for yeast breads
Select one of the following glazes to enhance your bread:
Egg glaze: Beat 1 large egg and 1 tsp of water together, brush generously. Apply to dough only, before baking in your regular oven.
Melted Butter Crust: Brush melted butter over just-baked bread for a softer, tender crust.
Milk Glaze: For a softer, shiny crust, brush just-baked bread with milk or cream.
Sweet icing glaze: Mix 1 cup sifted icing sugar with 1 to 2 tsp of milk to make a consistent glaze. Drizzle over sweet breads.
Poppy/sesame/caraway seed/cornmeal/oatmeal:
Sprinkle your choice of these seeds generously over just-glazed bread.
Displays the programme number.
Displays a minute-by-minute baking time countdown.
Displays an error (error warning codes "E")
Arrows up and down:
Allow setting the timer to delay the baking process.
The arrows allow to set the time up or down in 10-minute increments.
To quickly advance or set the time back, press and hold down the arrows.
SELECT key:
Press to select a programme of your choice (from 1 to 12)
Each time you press this key, the display switches to the next programme.
START key:
Allows starting a programme.
STOP key:
Press and hold until you hear a beep to stop operation or cancel a timer setting. (Note: it is not necessary to press the stop key when you open the lid to check the progress of your bread).
Crust key (Croûte):
Press this key to select the crust colour between light, medium and dark (respectively clair/moyen/foncé) (some programmes do not allow this choice). Each time you press this key, the pilot light will switch to the next crust colour.
Weight key (Poids):
Allows you to choose the loaf size (some programmes do not allow this choice). Each time you press this key, the display switches to the next weight).
BEEP SIGNALS
The appliance emits several beeps:
1 long beep: - Power is turned on - An invalid programme key is pressed
1 short beep: A valid programme key is pressed
2 short beeps: the "add ingredients" function is activated.
Short-long-short-long-short-long beeps: the programme is completed.
2 long beeps: the temperature is too high or too low when the baking cycle starts.
USE
- Open the lid and remove the baking pan by pulling straight up on the handle (Fig. 1, page 5). It is important to remove the baking pan from the unit. Do not add ingredients to the baking pan while it is in the unit to avoid the risk of spilling ingredients into the inner case.
Place your bread maker where it is level, stable and secure.
-
Attach the kneading blade onto the shaft inside the baking pan by lining up the flat side of the blade with the flat side of the shaft (Fig. 2, page 5). Push the blade firmly onto the shaft. Important: Be sure to set the kneading blade firmly into place, otherwise, the blade may come off during operation. This will affect the kneading or mixing. Be sure the shaft is clean of any particles to ensure the kneading blade will fully seat into place.
-
Select a recipe from the "Recipes" section below. When following the recipe:
-
Measure the ingredients carefully and accurately. Refer to the section "Measuring your ingredients".
• Always add ingredients into the baking tin in the order they are listed. -
Yeast is always added last. Be sure that the yeast does not touch the liquid ingredients.
-
Return the baking pan to the unit. The word FRONT on the upper rim of the baking pan faces toward the front of the bread maker (Fig. 3, page 5). Push down on the pan until you hear it click firmly into place. Fold the handle down. Important: If the baking pan is not installed in the proper position or firmly clicked into place, the kneading blade will fail to operate. The baking pan can only be installed in the one position as indicated.
-
Close the lid and connect the plug to the power outlet. You hear a beep and the display window will flash "000". Caution:
-
Select the appropriate programme for your recipe by pressing the SELECT button on the control panel. Each time SELECT is pressed, the number in the display window will advance to the next setting. Be sure to press the button until you hear a beep.
-
Select the appropriate colour setting for your bread crust by pressing the crust button (Croûle). For bread programmes 1 to 5, the preset crust colour is medium (moyen). Each time the crust key is pressed, the pilot light will cycle from medium (moyen) to dark (foncé) and then back to medium again.
-
Select the appropriate setting for loaf size by pressing the weight button (poids). Each time this button is pressed, the display will cycle form one weight to another.
-
Press the START key. The baking time in hours and minutes will appear in the LED display. For instance, if you choose a recipe using the standard bread programme for medium crust and 675gr size, the display will show 2:45. It will count down the remaining processing time in one-minute increments (2:44, 2:43, etc.) until the bread is done. When the baking time is completed, a signal beep will sound three times and the display window will flash "0:0". To avoid damaging the bread maker surface, do not put any object or hot baking tin on top of the unit.
-
This bread maker is designed with a "keep warm" function that begins automatically when baking time is done. The colon in the "0:00" will continue to flash for up to 60 minutes after baking is completed and will keep the bread warm during that time. At the end of the hour, the colon will stop flashing, but the "0:0" will remain in the display window. You may remove the baking pan any time during the "keep warm" cycle. To turn off the "keep warm" feature before 60 minutes are up, simply press the STOP key and hold it until it beeps. "0:00" will disappear and the display window will be empty. Unplug the unit when finished. The "keep warm" feature is not provided for the dough (pâte) setting. If you leave finished dough in the unit too long, it may over-rise and produce poor results. For best
results, remove the dough at the end of the cycle and follow the recipe directions for shaping, resting and baking.
-
This bread maker has a convenient viewing window so that you may watch the progress of the bread as it is mixed, kneaded and baked. Occasionally, some moisture may form on the window during processing. You may lift the lid to look inside during the mixing and kneading stages, however, DO NOT OPEN THE LID DURING THE BAKING CYCLE (approximately the last hour) as this may cause the bread to collapse.
-
To remove the bread from the baking pan, use potholders or oven mitts and pull straight up on the baking pan handle (Fig. 4, page 5). Turn the pan upside down and shake the bread out onto a wire cooling rack (Fig. 5, page 5). The baking pan has a non-stick coated finish so that the bread should come out easily. Do not use metal utensils to remove bread as they may scratch the non-stick coating. If needed, slide a flat rubber or plastic spatula along the sides of the pan to loosen the loaf. If the kneading paddle remains in the bottom of your loaf, use the end of a plastic spoon or other non-metal utensil to remove it. Do not use a knife or other sharp metal object, as this will scratch the non-stick coating on the kneading blade. Always check to see where the kneading blade is when removing a baked loaf of bread. If it remains stuck to the bread you may accidentally damage it by cutting into it while slicing.
-
Allow bread to cool on a rack for at least 60 minutes before slicing, to release steam. Use a good serrated bread knife or electric knife.
Use the timer when you wish to delay the completion of your bread. This feature allows you to delay the baking time for up to 12 hours. For example, you can set the timer at 8 p.m. and wake up to fresh bread by 8 a.m. the following morning.
To set the timer, follow the instructions below:
- Note: Do not use the timer and delay function with recipes that call for fresh ingredients that might spoil such as eggs, fresh milk, sour cream or cheese.
- To set the timer, determine when you would like your bread to be ready and count the number of hours until then. For example, if it is 8 p.m. when you place all your ingredients in the baking tin and you would like to wake up to the aroma of fresh bread at 8 a.m. the next morning, you need a total of 12 hours before your bread is complete. Once you have chosen the appropriate settings for your recipe, simply set the timer for the total number of hours – in this case, 12 hours.
- Press the up arrow on the control panel and 2:50 – the time for this setting – will automatically show in the display window. Continue to press up until the display indicates 12:00. You do not need to mathematically calculate the difference between the setting time (2:50) and the total hours you want (12:00). The bread maker will automatically adjust to include the setting time. Simply set the timer for your total hours (12). If you pass the 12:00, press the down arrow to go back. You may press and hold down either arrow to quickly advance the time in the display.
- Once you have set the time, press START. The colon (😊 in the display will flash to indicate that the timer has been set and the countdown will begin. The timer will count down in one-minute increments. When the display reaches 0:00, your bread is complete and the signal beep will sound.
- If you make a mistake while setting the timer, press and hold the STOP key until it beeps. This will clear the display and you can set the timer again.
TROUBLESHOOTING GUIDE - OPERATION PROBLEMS
| Problem | Solution |
| Flour spilled out of the bread tin into the inner case | Unplug the unit and allow to cool, wipe out inner case with a clean cloth. Use care when cleaning around the heating element. |
| Bread did not bake properly | Ensure the kneading blade is properly seated on the mounting shaft. |
| [E:01] appears in the display window | Temperature is too high in the inner case. Open the lid and remove the baking tin to cool inside. After the message disappears, put the baking pan back into the inner case and press START again. |
| [E:02] [E:03] [E:04] [E:05] [E:08] appears in the display window | Unplug the unit and contact an authorized service centre for service information. |
If the result is not satisfactory, please check the following points:
Caution: Try one solution at a time per loaf.
A) Measurement problems
Loaf rises then falls
• Decrease the amount of water/milk by 2 tbs.
- Increase the amount of salt by 1/4 tsp.
• Decrease the amount of yeast by 1/4 tsp.
Loaf rises too much
• Decrease the amount of flour by 2 tbs.
• Decrease the amount of water/milk by 2 tbs.
- Increase the amount of salt by 1/4 tsp.
• Decrease the amount of sugar/honey by 1 tsp.
• Decrease the amount of yeast by 1/4 tsp.
Loaf does not rise enough
- Increase the amount of water/milk by 2 tbs.
• Decrease the amount of salt by/4 tsp. - Increase the amount of sugar/honey by 1 tsp.
- Increase the amount of yeast by 1/4 tsp.
Crust is too dark
• Decrease the amount of sugar/honey by 1 tsp.
Loaf partially cooked
• Decrease the amount of water/milk by 2 tbs.
Top of the loaf is not smooth
• Decrease the amount of flour by 2 tbs.
- Increase the amount of water/milk by 2 tbs.
Texture of the loaf is heavy or dense
• Decrease the amount of flour by 2 tbs.
- Increase the amount of sugar by 1 tsp.
- Increase the amount of yeast by 1/4 tsp.
B) Ingredient problems
If the poor result is not due to measurement problems, it can also be due to the ingredients themselves:
Loaf rises then falls
• The flour is too fine.
Loaf rises too much
- You used a wrong type of yeast.
- You forgot to add salt.
Loaf does not rise enough
• The flour is too old
• The flour does not contain enough gluten.
• The flour is too fine.
• You used a wrong type of yeast.
- You put too much salt.
Flat loaf, little to no rising
• The liquid is too hot/cold.
• The flour is too old.
• The flour does not contain enough gluten.
• The flour is too fine.
- You forgot the yeast.
• The yeast is too old.
- You used a wrong type of yeast.
- You put too much salt.
- You forgot to add salt.
If the ingredients are only partially mixed
• The flour is too fine.
If the loaf texture is heavy or dense
- You used a wrong type of yeast.
CLEANING AND CARE
Unplug the appliance and let it cool down before cleaning.
- Baking tin
Take the baking tin out of the appliance before cleaning. Never immerse the tin in water or any other liquid. Clean the inside and outside with a damp cloth. If necessary, use soapy water to clean the inside of the baking tin. Never use scratching or abrasive objects, as they would damage the non-stick coating of the baking tin. After a while, the appearance of the non-stick coating might change because of the steam and humidity. This is normal and does not affect the features and quality of the coating.
- Kneading blade
Clean the kneading blade with a damp cloth. If the kneading blade is difficult to detach, pour some hot water in the baking tin and wait for a few minutes. Hot water will release the connection of the kneading blade. If the hole of the kneading blade is obstructed, clean it with a toothpick, making sure not to scratch the blade.
- Lid with window
To make the cleaning easier, you can detach the lid. To do so, open it and slide the lid upward. Clean it with a damp cloth. Never immerse it in water or any other liquid.
- Inner case
If necessary, you can also clean the inner case. There too, only use a damp cloth. Make sure the inner case has totally cooled down before cleaning it. Make sure it is totally dry before switching on the appliance.
- Housing
Clean the housing of the appliance with a damp cloth. Never immerse the appliance in water or any other liquid.
PROGRAMME DESCRIPTION AND RECIPE SUGGESTIONS
STANDARD WHITE BREAD
Programme: 1 (Standard)– Crust colour: light/medium/dark (clair/moyen/foncé) – Weight: 900gr
Duration: Light crust: 2:38
Medium crust: 2:50
Dark crust: 3:05
This setting is used for breads, which primarily use white flour; though some recipes may include small amounts of whole-wheat flour as well. This setting has the minimum number of rising cycles and the shortest overall baking time. Therefore, loaves will be slightly denser than French or sweet breads.
Ingredients:
1 cup of water
2 tbs of butter or margarine
1 ½ tsp of salt
2 tbs of sugar
1 tbs of powdered milk
3 cups of all-purpose flour or bread flour
1 ¼ tsp of quick-rise yeast
-
Measure the ingredients accurately and add to the baking tin in the order listed above (liquid ingredients first).
-
Insert the baking tin in the bread maker. Close the lid.
-
Select the desired programme.
-
Select the desired crust colour.
-
Select the loaf size.
-
Press the START key.
-
Using oven mitts, remove the bread after the baking time has elapsed.
-
Let it cool down on a wire rack at least one hour before slicing it.
This programme also allows making a loaf of 675gr.
Duration for 675gr:
Light crust: 2:35
Medium crust: 2:45
Dark crust: 3:00
WHOLE-WHEAT BREAD (Blé complet)
Programme: 2 (Blé complet) – Crust colour: light/medium/dark (clair/moyen/foncé) – Weight: 900gr
Duration: Light crust; 4:23
Medium crust: 4:30
Dark crust: 4:39
This setting is used for recipes with significant amounts of whole-wheat or rye flour, oats, or bran. The cycle begins with a delay of 30 minutes during which time the flour or grain soaks in the liquid ingredients. Soaking causes the flour or grain to soften and helps the ingredients to combine well. The appliance will thus be active only 30 minutes after you have selected this programme. This setting also has an extra rise cycle to allow heavy wheat/grains to expand.
Generally, whole-wheat breads are denser and not as tall as standard, French or sweet breads.
Ingredients:
1 cup + 2 tbs of water
2 tbs of honey
1 tsp of salt
1 ½ tbs of butter or margarine
3 cups of whole-wheat flour
2 tbs of powdered milk
2 tsp of quick-rise yeast
Note: you may add 1 ½ lbs of gluten to the ingredients to improve the height and texture of this bread.
- Measure the ingredients accurately and add to the baking tin in the order listed above (liquid ingredients first).
- Insert the baking tin in the bread maker. Close the lid.
- Select the desired programme.
- Select the desired crust colour.
- Select the loaf size.
- Press the START key.
- Using oven mitts, remove the bread after the baking time is elapsed.
- Let it cool down on a wire rack at least one hour before slicing it.
This programme also allows making a loaf of 675gr.
Duration for 675gr:
Light crust: 4:19
Medium crust: 4:25
Dark crust: 4:35
FRENCH BREAD
Programme: 3 (Français) - Crust colour: light/medium/dark (clair/moyen/foncé) - Weight: 900gr
Duration: Light crust: 3:34
Medium crust: 3:40
Dark crust: 3:44
Traditionally, French bread has a crispier crust and lighter inside texture than basic breads.
Ingredients:
1 cup + 2 tbs of water
1 ½ lbs of butter or margarine
1 tsp of salt
1 tbs of sugar
3 cups of all-purpose flour or bread flour
2 tsp of quick-rise yeast
- Measure the ingredients accurately and add to the baking tin in the order listed above (liquid ingredients first).
-
Insert the baking tin in the bread maker. Close the lid.
-
Select the desired programme.
- Select the desired crust colour.
- Select the loaf size.
- Press the START key.
- Using oven mitts, remove the bread after the baking time has elapsed.
- Let it cool down on a wire rack at least one hour before slicing it.
This programme also allows making a loaf of 675gr.
Duration for 675gr:
Light crust: 3:23
Medium crust: 3:36
Dark crust: 3:42
RAPID BREAD
Programme: 4 (Rapide) - Crust colour: light/medium/dark (clair/moyen/foncé) - Weight:
675gr/900gr
Duration:
For 675gr:
Light crust: 1:54
Medium crust: 1:56
Dark crust: 1:58
For 900gr
Light crust: 1:57
Medium crust: 1:58
Dark crust: 2:02
Use this setting for quick bread making. However, the bread will be denser and not as tall.
Ingredients:
| 675 gr | 900 gr |
| 1 cup of water2 tbs of butter or margarine1 1⁄2 tsp of salt2 tbs of sugar1 tbs of powdered milk3 cups of all-purpose flour2 tsp of quick-rise yeast | 1 1/3 cup of water2 tbs of butter or margarine1 1⁄2 tsp of salt3 tbs of sugar2 tbs of powdered milk3 1⁄2 cups of all-purpose flour1 tbs of quick-rise yeast |
- Measure the ingredients accurately and add to the baking tin in the order listed above (liquid ingredients first).
- Insert the baking tin in the bread maker. Close the lid.
- Select the desired programme.
- Select the desired crust colour.
- Select the loaf size
- Press the START key.
- Using oven mitts, remove the bread after the baking time is elapsed.
- Let it cool down on a wire rack at least one hour before slicing it.
SWEET BREAD
Programme: 5 (Brioché) – Crust colour: light/medium/dark (clair/moyen/foncé) – Weight: 675gr
Duration: Light crust: 3:19
Medium crust: 3:22
Dark crust: 3:26
Use this setting for recipes that use fruit juice, additional sugar, or sweet ingredients such as coconut flakes, raisins, dried fruit or chocolate. Baking temperature is reduced to prevent burning and the extra rise cycle gives the loaves a light, airy texture.
Ingredients:
1/3 cup of milk
1/3 cup of water
2 eggs
6 lbs of butter or margarine
12 tsp of salt
2 3/4 cups of all-purpose flour or bread flour
1/3 cup of sugar
1 ½ tsp of quick-rise yeast
-
Measure the ingredients accurately and add to the baking tin in the order listed above (liquid ingredients first).
-
Insert the baking tin in the bread maker. Close the lid.
-
Select the desired programme.
-
Select the desired crust colour.
-
Select the loaf size.
-
Press the START key.
-
Using oven mitts, remove the bread after the baking time has elapsed.
-
Let it cool down on a wire rack at least one hour before slicing it.
This programme also allows making a loaf of 900gr.
Duration for 900gr:
Light crust: 3:21
Medium crust: 3:25
Dark crust: 3:29
RAISIN BREAD
Programme: 5 (Brioché) – Crust colour: medium (moyen) – Weight: 675gr
Duration: Medium crust: 3:22
Ingredients:
1 cup + 2 lbs of water
1 tsp of salt
2 tbs of butter or margarine
3 cups of all-purpose flour or bread flour
2 tbs of powdered milk
3 lbs of granulated sugar
1 ½ tsp of cinnamon
12 tsp of nutmeg
2 tsp of quick-rise yeast
^3/_4 cup of golden raisins
Note: Add the raisins when the "add ingredients" function signals with an audible tone.
- Measure the ingredients accurately and add to the baking tin in the order listed above (liquid ingredients first).
- Insert the baking tin in the bread maker. Close the lid.
- Select the desired programme.
- Select the desired crust colour.
- Select the loaf size.
- Press the START key.
- Using oven mitts, remove the bread after the baking time is elapsed.
- Let it cool down on a wire rack at least one hour before slicing it.
This programme also allows making other colours and another weight. Duration:
675 gr, light colour: 3:19
675 gr, dark colour: 3:26
900 gr, light colour: 3:21
900 gr, medium colour: 3:25
900 gr, dark colour: 3:29
LEMON CAKE
Programme: 6 (Gâteau) – Crust colour: light (clair) – Weight: 675gr
Duration: Light colour: 1:24
Use the "gâteau" setting to make cake.
Ingredients:
4 eggs
14 cup of butter or margarine (in small pieces)
^3/_4 cup of granulated sugar
1 ½ cup of all-purpose flour
1 ½ tsp of baking powder
12 tsp of salt
1 tbs of grated lemon rind
12 tsp of vanilla extract
12 tsp of lemon extract
Hint: Scrape the sides of the pan while mixing to ensure all ingredients are blended.
- Measure the ingredients accurately and add to the baking tin in the order listed above (liquid ingredients first).
- Insert the baking tin in the bread maker. Close the lid.
- Select the desired programme.
- Select the desired crust colour.
- Select the loaf size.
- Press the START key.
- Using oven mitts, remove the cake after the baking time has elapsed.
- Let it cool down on a wire rack before slicing it.
The "gâteau" setting also allows making other colours and another weight.
Duration:
675 gr, medium colour: 1:34
675 gr, dark colour: 1:41
900 gr, light colour: 1:34
900 gr, medium colour: 1:40
900 gr, dark colour: 1:44
CARROT CAKE
Programme: 6(Gâteau) – Crust colour: medium (moyen) – Weight: 675gr
Duration: Medium colour: 1:34
Ingredients:
3 medium carrots, peeled and shredded
^3/_4 cup of granulated sugar
12 cup of oil
2 eggs
1 tsp of baking powder
1 tsp of baking soda
1 tsp of cinnamon
12 tsp of nutmeg
12 tsp of salt
1 ½ cup of all-purpose flour
1/3 cup of crushed pineapple, drained
- Measure the ingredients accurately and add to the baking tin in the order listed above (liquid ingredients first).
- Insert the baking tin in the bread maker. Close the lid.
- Select the desired programme.
- Select the desired crust colour.
- Select the loaf size.
- Press the START key.
- Using oven mitts, remove the cake after the baking time is elapsed.
- Let it cool down on a wire rack at least one hour before slicing it.
The "gâteau" setting also allows making other colours and another weight.
Duration:
675 gr, light colour: 1:24
675 gr, dark colour: 1:41
900 gr, light colour: 1:34
900 gr, medium colour: 1:40
900 gr, dark colour: 1:44
BAKE
Programme: 7 (Cuisson)
Duration: 1:00
Since this programme allows the bread maker to bake for an hour, special attention has to be paid during this process. This programme helps you when:
A power failure occurs during the process:
The bread maker programme will be reset due to "lost memory" in the computer chip. Depending where the bread maker stopped during the cycle, you may be able to leave the dough in the bread maker until it rises to the desired size. Reconnect the electricity and set the programme to "Cuisson" (bake) for immediate baking. The baking time can be controlled manually. Stop the bread maker when the desired crust colour has been reached.
PASTA DOUGH
Use this setting to prepare pasta dough. Once this cycle is completed, remove dough.
DOUGH
Programme: 9 (Pâte)
Duration: 1:30
This setting makes dough only and will not bake the final bread. You may make dough of any kind using this setting. Dough can then be shaped to make pizza, rolls, pretzels, doughnuts and round or braided breads that must be baked in an oven or fried in a deep fryer.
Ingredients:
1 cup of milk
3 tbs of sugar
2 tbs of butter or margarine
1 egg (beaten)
1 tsp of salt
3 ½ cups of all-purpose flour or bread flour
2 ¼ tsp of quick-rise yeast
-
Measure the ingredients accurately and add to the baking tin in the order listed above (liquid ingredients first).
-
Insert the baking tin in the bread maker. Close the lid.
-
Press the START key.
-
After the cycle is completed, remove the dough from the baking tin.
-
Let it rise for 10 minutes.
-
Shape the dough as desired.
-
Cover the dough, let it rise for 30 minutes in a warm, draft-free area.
-
Bake as directed in each shaping variation until golden brown.
Yields 2 loaves of 12 x 24 cm or 24 rolls.
BUTTER
Use this setting to warm butter. The temperature is set to melt butter but not overheat it.
JAM
Programme: 11 (Confiture)
Duration: 1:25
This setting makes jam in small quantities (about 1 cup of jam). The appliance will first preheat for about 15 minutes. The appliance will thus be active only 15 minutes after you have selected this programme.
Ingredients:
1 ½ cup of sliced fresh strawberries
1 cup of sugar
2 tsp of lemon juice
1 tsp of fruit pectin
- Measure the ingredients accurately and add to the baking tin in the order listed above.
- Insert the baking tin in the bread maker. Close the lid.
- Set the desired programme.
- Press the START key.
- Using oven mitts, remove the baking tin after the baking time has elapsed.
- Pour the jam into a clean, sterilized mason jar and cover with a sterilized mason jar lid. Store in the refrigerator.
SUPER RAPID
Programme: 12 (Super rapide)
Duration: 0:59
This setting allows you to make bread in 59 minutes. With this programme, the timer function (to delay the start time) is not available. As the dough has less time to rise, the bread obtained might be a bit smaller than with other settings.
Ingredients:
| White bread | Whole-wheat bread |
| 1 cup of water1 tbs of oil3 cups of all-purpose flour or bread flour1 tbs of sugar 34 tsp of salt2 34 tsp of quick-rise yeast | 1 1/8 cup of water1 tbs of vegetal oil2 cups of all-purpose flour or bread flour1 cup of whole-wheat flour1 tbs of sugar 34 tsp of salt2 34 tsp of quick-rise yeast |
- Measure the ingredients accurately and add to the baking tin in the order listed above (liquid ingredients first).
- Insert the baking tin in the bread maker. Close the lid.
- Select the desired programme.
- Press the START key.
- Using oven mitts, remove the bread after the baking time has elapsed.
- Let it cool down on a wire rack at least one hour before slicing it.
PROTECTION OF THE ENVIRONMENT- DIRECTIVE 2002/96/EC
In order to preserve our environment and protect human health, the waste electrical and electronic equipment should be disposed of in accordance with specific rules with the

implication of both suppliers and users. For this reason, as indicated by the symbol on the rating label or on the packaging, your appliance should not be disposed of as unsorted municipal waste. The user has the right to bring it to a municipal collection point performing waste recovery by means of reuse, recycling or use for other applications in accordance with the directive.
FR MODE D'EMPLOI
CONSIGNES DE SECURITE
1 theelepeltje bakpoeder (baking powder)
Programma: 11 (Confiture)
Duur: 1:25
Programa: 11 (Confiture)
PROBLEMAS E SOLUÇÕES
Programma: 11 (Confiture)
Durata del programma: 1:25

Back cover page (last page)
Assembly page 144/144
- Brotbackautomat
- Bread maker
- Machine à pain
- Broodbakmachine
- D
- Gerät
- Control panel
- FR
- Appareil
- SHORT CORD INSTRUCTIONS
- BEFORE THE FIRST OPERATION
- Temperature
- Measuring the ingredients
- Geographic situation
- Ingredients
- All-purpose flour
- Bread flour
- Whole-wheat flour
- Rye flour
- Gluten
- Cake flour
- Self-rising flour
- Bran
- Cornmeal and oatmeal
- Cracked wheat
- Seven-grain cereal blend
- Yeast
- Sugar
- Salt
- Liquids/milk
- Eggs
- Butter and margarine
- Baking powder
- Baking soda
- Special glazes for yeast breads
- Arrows up and down:
- SELECT key:
- START key:
- STOP key:
- Crust key (Croûte):
- Weight key (Poids):
- BEEP SIGNALS
- USE
- A) Measurement problems
- Loaf rises then falls
- Loaf rises too much
- Loaf does not rise enough
- Crust is too dark
- Loaf partially cooked
- Top of the loaf is not smooth
- Texture of the loaf is heavy or dense
- B) Ingredient problems
- Flat loaf, little to no rising
- If the ingredients are only partially mixed
- If the loaf texture is heavy or dense
- CLEANING AND CARE
- PROGRAMME DESCRIPTION AND RECIPE SUGGESTIONS
- STANDARD WHITE BREAD
- Ingredients:
- This programme also allows making a loaf of 675gr.
- WHOLE-WHEAT BREAD (Blé complet)
- FRENCH BREAD
- Duration for 675gr:
- RAPID BREAD
- SWEET BREAD
- RAISIN BREAD
- This programme also allows making other colours and another weight. Duration:
- LEMON CAKE
- eggs
- The "gâteau" setting also allows making other colours and another weight.
- Duration:
- CARROT CAKE
- BAKE
- PASTA DOUGH
- DOUGH
- BUTTER
- JAM
- SUPER RAPID
- PROTECTION OF THE ENVIRONMENT- DIRECTIVE 2002/96/EC
- FR MODE D'EMPLOI
- CONSIGNES DE SECURITE
Brand : TEAM
Model : BBA 7
Category : Bread maker