
WEA1057 - Welding machine Ferm - Free user manual and instructions
Find the device manual for free WEA1057 Ferm in PDF.


| Product type | Arc welding machine |
| Brand | Ferm |
| Model | WEA1057 |
| Power supply | 230 V / 50 Hz |
| Welding current | 20 A - 100 A |
| Duty cycle | 10% at 100 A |
| Electrode diameter | 1.6 mm - 2.5 mm |
| Weight | 8.5 kg |
| Dimensions (L x W x H) | 340 x 160 x 270 mm |
| Protection rating | IP21 |
| Main functions | MMA welding (coated electrode); intensity adjustment; thermal protection |
| Maintenance and cleaning | Regularly dust the ventilation grilles; check the condition of cables |
| Safety | Thermal circuit breaker; overload protection; welding mask mandatory |
| Spare parts and repairability | Electrodes, electrode holder, ground cable available; repair by approved center |
| General information | Portable welding machine for amateur use; supplied with cables and electrode holder |
Frequently Asked Questions - WEA1057 Ferm
User questions about WEA1057 Ferm
0 question about this device. Answer the ones you know or ask your own.
Ask a new question about this device
Download the instructions for your Welding machine in PDF format for free! Find your manual WEA1057 - Ferm and take your electronic device back in hand. On this page are published all the documents necessary for the use of your device. WEA1057 by Ferm.
USER MANUAL WEA1057 Ferm
Fig. 2

| WELDING PROCESS | ARC CURRENT (AMPERES)SHADE GUIDE | |||||||||||||||||
| 10 20 40 80 125 175 225 275 350 4505 15 30 60 100 150 200 250 300 400 500 | ||||||||||||||||||
| SMAW shielded metal arc welding | 9 | 10 | 11 | 12 | 13 | 14 | ||||||||||||
| MIG on heavy metals | 10 | 11 | 12 | 13 | 14 | |||||||||||||
| MIG on light alloys | 10 | 11 | 12 | 13 | 14 | 15 | ||||||||||||
| TIG, GTAW gas tungsten arc welding | 9 | 10 | 11 | 12 | 13 | 14 | ||||||||||||
| MAG/CO metal actieve gas | 10 | 11 | 12 | 13 | 14 | 15 | ||||||||||||
| SAW shielded semi-automatic welding | 10 | 11 | 12 | 13 | 14 | 15 | ||||||||||||
| PAC plasma arc cutting | 11 | 12 | 13 | |||||||||||||||
| PAW plasma arc welding | 8 | 9 | 10 | 11 | 12 | 13 | 14 | 15 | ||||||||||
Fig. 3
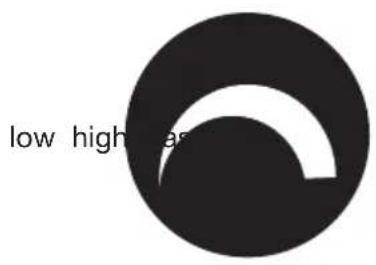

Fig. 4

Fig. 5

natural_image
Technical line drawing of a mechanical component with no visible text or symbolsFig. 6
WELDING MASK
Thank you for buying this Ferm product.
By doing so you now have an excellent product, delivered by one of Europeis leading suppliers. All products delivered to you by Ferm are manufactured according to the highest standards of performance and safety. As part of our philosophy we also provide an excellent customer service, backed by our comprehensive Warranty. We hope you will enjoy using this product for many years to come.
The numbers in the text refer to the diagrams on pages 2.

Read the operating instructions carefully before using this device. Familiarize yourself with its functions and basic operation. Service the device as per the instructions to ensure that it always functions properly. The operating instructions and the accompanying documentation must be kept in the vicinity of the device.
Introduction
High quality variable shade 9-13 cartridge manufactured and tested to EN379. Fully automatic, switches from light to dark on striking arc. Fitted with solar power panel, no batteries required. Features sensitivity and delay speed control for switching dark to light, preventing arc eye when welding at high power, whilst still providing fast switching for tack welding. Deluxe contoured helmet design approved to EN175 gives full neck protection and protects lens from scratching when helmet is laid down. Comfortable headband and non slip quick release ratchet mechanism. Suitable for MIG, TIG and arc welding. (Not suitable for use with laser or gas-welding).
Contents
- Technical data
- Safety instructions
- Instruction for use
- Maintenance
1. Technical data
Technical specifications
Viewing area 97 x 47.5 mm
| Size of Cartridge 110 x 90 x 9 mm | |
| Optical class 1/1/1/2 | |
| UV/IR Protection Up to shade DIN 16 at all times | |
| Light state DIN 3.5 | |
| Variable shade DIN 9 to 13 | |
| Power Supply Solar cells. No battery change required | |
| Power On/Off Fully automatic | |
| Sensitivity Adjustable | |
| Switching time 1/25000 sec. from light to dark | |
| Delay time 0.1 - 1.0 sec. | |
| Operating temperature | -5°C to +55°C |
| Storing temperature | -20°C to +70°C |
| Helmet material | High-impact resistant plastic/polyamide Nylon |
| Total weight | 440 g |
2. Safety instructions
Explanation of symbols

Denotes risk of personal injury, loss of life or damage to the tool in case of non-observance of the instructions in this manual.

This helmet is not suitable for use with laser or gas-welding.
- Ensure all workshop safety rules, regulations, and conditions are complied with when using welding equipment.
- The helmet will not offer protection against mis-use of workshop tools, equipment, or accessories.
- Maintain the helmet in good condition, and protect cartridge from liquid and dirt contact.
- Regularly replace the protective lens and replace any damaged or worn parts.
- Use genuine parts only. Non authorized parts may be dangerous and will invalidate the warranty. NEVER open or tamper with the shade cartridge.
- Select the shade level before use.
- Ensure the front cover lens is securely in place before use.
- Fit the helmet and adjust the head band so the helmet will sit as low and near to your face as possible,
- Use helmet only in temperatures ranging from -20^ to 55^ .
- The eye protective plate in helmet is NOT unbreakable. Helmet will not protect you
against severe impact hazards (such as, but not limited to) fragmenting abrasive discs/grinding wheels, stones and other grinding tools, explosive devices or corrosive fluids. The helmet will only protect the eyes and face from radiation and sparks.
Remove ill fitting clothing, remove ties, • watches, rings, and other loose jewellery. Maintain correct balance and footing. Ensure • the floor is not slippery and wear non slip shoes.
Keep children and unauthorized persons • away from the working area.
The materials which may come into contact with wearer's skin could cause allergic reactions to susceptible individuals.
Warning!
Do not use the helmet if damaged or you • suspect it may be faulty. Do not use helmet unless you have been • instructed in its use by a qualified person. Do not get the helmet wet or use in damp or • wet locations. Do not leave work place with helmet in • lowered position, as bright light source may darken cartridge unexpectedly. Do not place the helmet on a hot surface.• Clean helmet (see section 5.5) and store the • helmet in a safe, dry, childproof location.

If, at any time, the face plate in the cartridge fails to darken when exposed to a welding spark, do not use. Remove cartridge and return to your dealer for checking. Continued use of the product knowing that the auto darkening feature is not functioning may damage your eyes and cause blindness. Continued use of the helmet which is not functioning will invalidate the warranty and could prohibit a successful claim on any insurance company.
3. Instruction for use

Before using the helmet for welding ensure you have read and understood the safety instructions in section 2.
The helmet comes ready assembled but before it can be used it must be adjusted to fit the user properly.
Adjusting the fit of the helmet
Fig. 1
The overall circumference of the headband can be made larger or smaller by first pushing the knob to unlock and thereupon rotating the knob on the back of the headband (Y) This can be done whilst wearing the helmet and allows just the right tension to be set to keep the helmet firmly on the head without it being too tight.
If the headband is riding too high or too low on your head adjust the strap which passes over the top of your head. To do this release the end of the band by pushing the locking pip out of the hole in the band. Slide the two portions of the band to a greater or lesser width as required and push the locking pip through the nearest hole (W).
Test the fit of the headband by lifting up and closing down the helmet a few times whilst wearing it. If the headband moves whilst tilting re-adjust it until it is stable.
Adjusting distance between helmet and face
Fig. 1
To adjust the distance between the helmet and your face in the down position loosen the tilt knobs on either side of the helmet and slide it nearer to or further from your face. (Z) It is important that your eyes are each the same distance from the lens otherwise the darkening effect may appear uneven. Re-tighten the tilt knobs when adjustment is complete.
Adjusting angle of the mask in the down position
Fig. 2
If the lens is not properly aligned with the eyes in the down position the mask angle can be further adjusted into one of three preset positions using the tilt plat.
Behind each pivot knob on the sides of the helmet there is a screw which passes through the side of the mask and into one of the holes in the tilt plate (A, B, C). Partially undo each screw anticlockwise so that it withdraws out of the tilt plate but remains in the side of the mask. Rotate the headband assembly so that one of the alternative positions is aligned with the end of the screw. Turn the screws clockwise again so that they pass through the holes thus fixing the position of the tilt plate.
Selecting shade level
Fig. 3
Select the shade level you require according to the welding process you will use by referring to the "Shade Guide" below for settings. Turn the shade control knob on the side of the helmet to the shade number required.
Selecting delay time
Fig. 4
When welding ceases the viewing window automatically changes from dark back to light but with a pre-set delay to compensate for any bright afterglow on the workpiece. The delay time/response can be set to 'fast' (0.1 secs) or 'slow' (1.0 secs) as you require using the infinity dial knob on the back of the shade cartridge.
Sensitivity
Fig. 4
The sensitivity can be set to 'high' or 'low' using the infinity dial knob on the back of the shade cartridge. The 'high' setting is the normal setting for everyday use. Where the operation of the mask is disturbed by excess light or another welding machine close by, use the 'low' setting.
You are now ready to use the helmet. The shading may be adjusted during use by re-setting potentiometer control.
Marking
The shell and the auto darkening filter are marked accordingly. Classification for eye and face protection is following EN379 and EN175.
Ferm Welding mask FWA-700
4 / 9 - 13 FERM 1 / 1 / 1 / 2 EN379
Light state scale no 4
Lightest dark state scale no 9
Darkest state scale no 13
Manufacturer's identification FERM
Optical class 1
Diffusion of light class 1
Variations in luminous transmittance class 1
Angular dependence 2
Number of this standard EN379
4. Maintenance
Cleaning
Clean helmet by wiping with a soft cloth. Clean cartridge surfaces regularly. Do not use strong cleaning solutions. Clean sensors and solar cells with methylated spirit and a clean cloth and wipe dry with a lint-free cloth.
Problem solving

If, at any time, the face plate in the cartridge fails to darken when exposed to a welding spark, do not use. Remove cartridge and return to your dealer for checking. Continued use of the product with auto darkening feature NOT functioning may damage your eyes and cause blindness. Use of malfunctioning product will invalidate the warranty, and any right of claim on any insurance policy.
Irregular darkening or dimming.
The headband may have been unevenly set • on the two sides of the helmet (unequal distances from the eyes to the shade cartridge).
Readjust the distance of the shade • cartridge.
Shade cartridge does not darken or flickers.
The sensors are soiled or obstructed.
- Clean.
- Front cover lens soiled or damaged.
- Clean or replace.
• Welding current too low.
- Adjust weld amperes.
Poor vision.
- Operative lenses and/or shade cartridge soiled.
- Check, clean or replace.
• Insufficient ambient light.
- Adjust light.
• Shade level incorrectly set.
• Refer to shade guide for setting.
Slow response.
- Operating temperature too low.
- Do not use at temperatures below -5^ ( 23^ ).
Welding helmet slips.
• Headband adjustments incorrect.
• Refer to section 4.
Replacing front cover lens
Fig. 5
Place your finger or thumb into the recess at the bottom edge of the window and flex the window upwards until it releases from one edge. (C).
Remove the protective film from the new window
and pass one edge under the side retaining lip (A). Flex the window upwards and tuck the other edge under the opposite retaining lip as shown at 'B' in fig.4.
Changing the shade cartridge
Fig. 6a - 6b
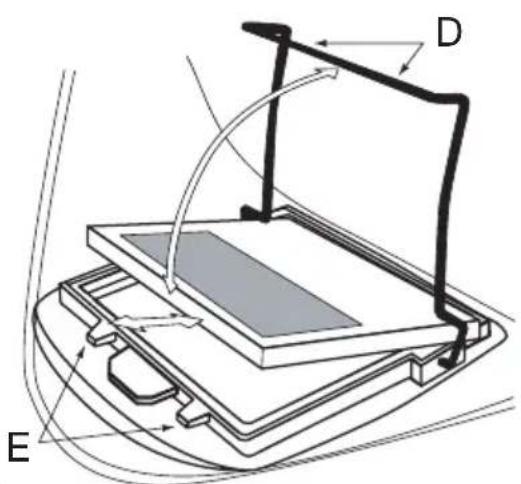
Pull off the shade control knob leaving the shaft protruding through the helmet side. Unfasten the nut on the shaft and leave the potentiometer loose on its cable. The cartridge is retained by a wire loop clip. Release the front edge of the clip (D) from its retaining lugs (E) and hinge it upwards and out of the way. Lift the shade cartridge out of its frame complete with the shade control potentiometer on its lead.
Fitting new cartridge
Fig. 6b
Take the new shade cartridge and pass the potentiometer cable under the wire loop before dropping the cartridge into its retaining frame inside the helmet.
Hinge down the wire loop clip and ensure that the front edge of the loop is properly retained under the retaining lugs.
Fasten the nut on the shaft protruding through the hole. Push the shade control knob onto the shaft.
Faults
Should a fault occur, e.g. after wear of a part, please contact the service address on the warranty card. In the back of this manual you find an exploded view showing the parts that can be ordered.
Environment
To prevent damage during transport, the appliance is delivered in a solid packaging which consists largely of reusable material. Therefore please make use of options for recycling the packaging.
Warranty
The guarantee conditions can be found on the separately enclosed guarantee card.
The product and the user manual are subject to change. Specifications can be changed without further notice.
SCHWEISSMASKE
DECLARATION OF CONFORMITY FWA-700 WELDING HELMET
(GB) We declare under our sole responsibility that this product is in conformity and accordance with the following standards and regulations:
(DE) Der Hersteller erklärt eigenverantwortlich, dass dieses Produkt den folgenden Standards und Vorschriften entspricht:
(NL) Wij verklaren onder onze volledige verantwoordelijk heid dat dit product voldoet aan, en in overeenstem ming is met, de volgende standaarden en reguleringen:
(FR) Nous déclarons sous notre seule responsabilité que ce produit est conforme aux standards et directives suivants:
(ES) Declaramos bajo nuestra exclusiva responsabilidad que este producto cumple con las siguientes normas y estándares de funcionamiento:
(PT) Declaramos por nossa total responsabilida-de que este produto está em conformidade e cumpre as normas e regulamentações que se seguem:
(IT) Dichiariamo, sotto la nostra responsabilità, che questo prodotto è conforme alle normative e ai regolamenti seguenti:
(SV) Vi garanterar på eget ansvar att denna produkt upp fyller och följer följande standarder och bestämmelser:
(FI) Vakuutamme yksinomaan omalla vastuullamme, että tämä tuote täyttää seuraavat standardit ja säädökset:
(NO) Vi erklærer under vårt eget ansvar at dette produktet er i samsvar med følgende standarder og regler:
(DA) Vi erklærer under eget ansvar, at dette produkt er i overensstemmelse med følgende standarder og bestemmelser:
(HU) Felelősségünk teljes tudatában kijelentjük, hogy ez a termék teljes mértékben megfelel az alábbi szabványoknak és előírásoknak:
(CS) Na naši vlastní zodpovědnost prohlašujeme, že je tento výrobek v souladu s následujícími standardy a normami:
(SK) Vyhlasujeme na našu výhradnú zodpovednosť, že tento výrobok je v zhode a súlade s nasledujúcimi normami a predpismi:
(SL) S polno odgovornostjo izjavljamo, da je ta izdelek v skladu in da odgovarja naslednjim standardom terpredpisom:
(PL) Deklarujemy na własną odpowiedzialność, że ten produkt spełnia wymogi zawarte w następujących normach i przepisach:
(LT) Prisiimdami visą atsakomybę deklaruojame, kad šis gaminys atitinka žemiau paminėtus standartus arba nuostatus:
(LV) Apgalvojam ar visu atbildību, ka šis produkts ir saskaņā un atbilst sekojošiem standartiem un nolikumiem:
(ET) Deklareerime meie ainuvastutusel, et see toode on vastavuses ja kooskõlas järgmiste standardite ja määrustega:
(RO) Declarăm prin aceasta cu răspunderea deplină că produsul acesta este în conformitate cu următoarele standarde sau directive:
(HR) Izjavljujemo pod vlastitom odgovornošu da je strojem ukladan sa slijedešim standardima ili standardiziranim dokumentima i u skladu sa odredbama:
(SR) Pod punom odgovornošću izjavljujemo da je usaglašen sa sledećim standardima ili normama:
(RU) Под свою ответственность заявляем, что данное изделие соответствует следующим стандартам и нормам:
(UK) На свою власну відповідальність заявляємо, що дане обладнання відповідає наступним стандартам і нормативам:
(EL) Δηλώνουμε υπεύθυνα ότι προϊόν αυτό συμφωνεί και τηρεί τους παρακάτω κανονισμο ύς και πρότυπα:
(BG) Ние заявяваме, по своя собствена отговорност, че този продукт отговаря на следните стандарти и директиви
EN175, EN379
89/686/EEC
Zwolle, 01-12-2010
J.A. Bakker-vanlagen
CEO Ferm BV
It is our policy to continuously improve our products and we therefore reserve the right to change the product specification without prior notice.
Ferm BV • Lingenstraat 6 • 8028 PM • Zwolle The Netherlands


- WELDING MASK
- Thank you for buying this Ferm product.
- The numbers in the text refer to the diagrams on pages 2.
- Introduction
- Contents
- Technical data
- Safety instructions
- Explanation of symbols
- Warning!
- Instruction for use
- Adjusting the fit of the helmet
- Fig. 1
- Adjusting distance between helmet and face
- Adjusting angle of the mask in the down position
- Fig. 2
- Selecting shade level
- Fig. 3
- Selecting delay time
- Fig. 4
- Sensitivity
- Marking
- Maintenance
- Cleaning
- Problem solving
- Irregular darkening or dimming.
- Shade cartridge does not darken or flickers.
- Poor vision.
- Slow response.
- Welding helmet slips.
- Replacing front cover lens
- Fig. 5
- Changing the shade cartridge
- Fitting new cartridge
- Fig. 6b
- Faults
- Environment
- Warranty
- SCHWEISSMASKE
- DECLARATION OF CONFORMITY FWA-700 WELDING HELMET
Brand : Ferm
Model : WEA1057
Category : Welding machine