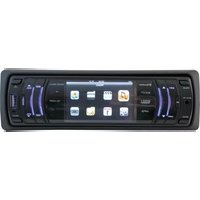
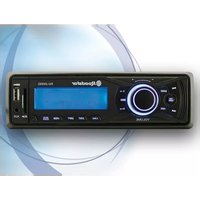
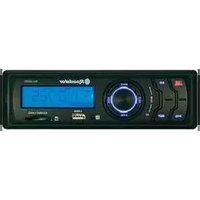
RU-330MP - Car radio ROADSTAR - Free user manual and instructions
Find the device manual for free RU-330MP ROADSTAR in PDF.


| Product Type | FM/MP3 Car Stereo |
| Brand | Roadstar |
| Model | RU-330MP |
| Category | Car Stereo |
| Dimensions (W x H x D) | Approximately 18 x 5 x 10 cm (standard 1 DIN) |
| Weight | Approximately 0.5 kg |
| Power supply | 12 V DC (negative ground) |
| Output power | 4 x 40 W max |
| Supported audio formats | MP3, WMA |
| Radio receiver | FM stereo (87.5 - 108 MHz) |
| Inputs | 1 x USB, 1 x SD/MMC, 1 x Auxiliary (3.5 mm) |
| Outputs | 4 x speaker, 1 x RCA preamp |
| Main functions | MP3 playback, FM radio, USB/SD, auxiliary input, remote control, clock |
| Maintenance and cleaning | Clean with a soft, dry cloth, avoid chemicals |
| Safety | Disconnect the battery before installation or maintenance |
| Spare parts and repairability | Contact Roadstar after-sales service or an authorized repairer |
| Included accessories | Mounting kit, remote control, ISO cable, screws |
| Warranty | 2 years (depending on country) |
Frequently Asked Questions - RU-330MP ROADSTAR
User questions about RU-330MP ROADSTAR
0 question about this device. Answer the ones you know or ask your own.
Ask a new question about this device
Download the instructions for your Car radio in PDF format for free! Find your manual RU-330MP - ROADSTAR and take your electronic device back in hand. On this page are published all the documents necessary for the use of your device. RU-330MP by ROADSTAR.
USER MANUAL RU-330MP ROADSTAR
CE
This product meets the essential requirements laid down by EEC Directive 89/336 and has been built in accordance with European standards EN50013, EN50020.
Car Tuner with MPEG4 / MP3 / JPEG playback, detachable front panel, 3" LCD Display, MW/FM-band Digital RDS adio and multi-function remote control. 4 x 45 Watt Max.
RU-330MP
Instruction manual
Bedienungsanleitung
Car Tuner with 3" LCD Monitor, MP4 / MP3 / JPEG playback, flip-down detachable front panel, AM / FM-band PLL radio with RDS and multi-function remote control. 4 x 45 Watt Max.
INTRODUCTION
Dear Customers
May we take this opportunity to thank you for purchasing this Roadstar MPEG4/MP3/JPEG player. We strongly recommend that you carefully study the operating instructions before attempting to operate the unit and that you note the listed precautions.
Safety Information
• Note:
This unit can be used with 12 V DC.
CAUTION:
* DO NOT OPEN COVERS OR ATTEMPT TO REPAIR THIS PRODUCT BY YOURSELF. ALWAYS REFER SERVICING TO QUALIFIED PERSONNEL.
WARNING:
^a TO REDUCE THE RISK OF FIRE OR ELECTRIC SHOCK, DO NOT EXPOSE THIS EQUIPMENT TO RAIN OR MOISTURE.
* TO REDUCE THE RISK OF FIRE, ELECTRIC SHOCK OR PICTURE & SOUND INTERFERENCE, USE THE RECOMMENDED ACCESSORIES ONLY.
Important Information
Precautions
To avoid a malfunction of this product and to protect against electric shock, fire or personal injury, please observe the following.
^a Hold the plug firmly when connecting or disconnecting the DC power supply to this unit.
^a Do not connect or disconnect the DC power supply when your hands are wet.
- Keep the DC power cord away from heating appliances.
° Never put heavy objects on the power cord.
^a Do not attempt to repair or reconstruct the power cord in any way.
2
EnglishEng
° Placement
Avoid placing the unit in areas of:
° Direct sunlight.
° High temperature (over 35°C) or high humidity (over 90%)
° High levels of dust
° Non-use Periods
° When not in use, switch off the unit.
° When left unused for a long period of time, the unit should be unplugged from the DC supply.
• Foreign Objects
° Touching internal parts of this unit is dangerous and may damage the player. Never attempt to disassemble the unit.
- Keep away from water / magnetic fields
° If liquids are spilled into the unit, serious damage will occur.
° Do not place magnetic objects (such as speakers) close to this unit.
INSTALLATION
PRECAUTIONS
- Choose the mounting location carefully so that the unit will not interfere with the normal driving functions of the driver.
- Avoid installing the unit where it would be subject to high temperatures, such as from direct sunlight or hot air from the heater, or where it would be subject to dust, dirt or excessive vibration.
- Use only the supplied mounting hardware for a safe and secure installation.
- Be sure to remove the front panel before installing the unit.
Mounting angle adjustment
Adjust the mounting angle to less than 20^ .

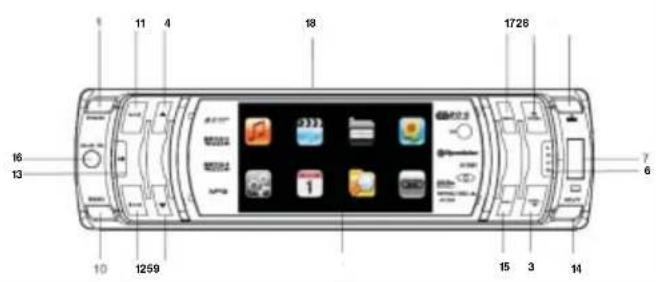
OUR NEW MPEG4 / MP3 PLAYER
- POWER ON/OFF ( ⏻ )
2.3.VOLUME BUTTON UP / DOWN
4.5 PRESET STATIONS UP / DOWN (1,2,3,4,5,...20)
6.LOUDNESS BUTTON - USB PORT
- PANEL RELEASE BUTTON ( )
- LCD DISPLAY
- BAND BUTTON
11,12.AUTOMATIC OR MANUAL TUNING (FREQ U PORFREQ DOWN)MP3-MPEG4TRACK/SEARCHBUTTON - PLAY/PAUSE BUTTON (▶ II)
- MUTE BUTTON (MUTE)
- EXIT BUTTON
- FRONT AUX IN (DA 25)
- MENU BUTTON
- SD/MMC MEMORY CARD SLOT-IN
3
4
EnglishEng
ISO CONNECTOR
![8|| 6|| 4] 2[ A 7|| 5|| 3] 1[ B](/content/2026/06/1245610/images/2cad36c43f13d5f13540532d7e49b53344e0fb666cfd626f3f15e809ea47b6cc.jpg)
Video Line out (yellow)
RCA Jack Line Out -
Red (right)
White (left)
CONNECTOR A
- YELLOW: MEMORY +12V
- WHITE: AUTO ANTENNA OUTPUT
- RED: +12V (TO IGNITION KEY)
- BLACK : GROUND
Note: RED wire (connector A no. 7) must be connected by car ignition key in order to avoid that car battery becomes weak when the car will be not used for long period.
CONNECTOR B
- REAR RIGHT SPEAKER (+)
- REAR RIGHT SPEAKER (-)
- REAR LEFT SPEAKER (+)
- REAR LEFT SPEAKER (-)
- FRONT RIGHT SPEAKER (+)
- FRONT RIGHT SPEAKER (-)
- FRONT LEFT SPEAKER (+)
- FRONT LEFT SPEAKER (-)

5
Maintenance
FUSE REPLACEMENT
If the fuse blows, check the power connection and replace the fuse. If the fuse blows again after the replacement, there may be an internal malfunction. In this case, consult your nearest repairing centre.
Warning
Use the specified amperage fuse for each lead. Use of a higher amperage fuse may cause serious damage.
Note: Keep the release key in the safe place as you may need it in future to remove the unit from the car.
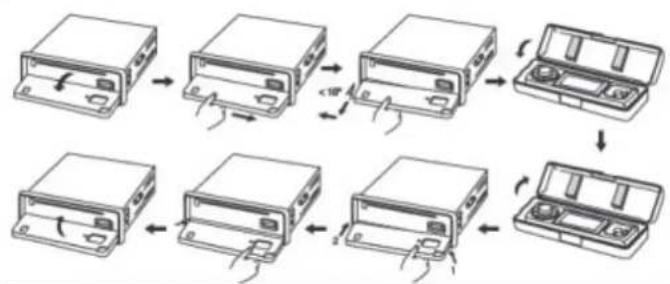
DETACHING AND ATTACHING THE FRONT PANEL
The front panel of this unit can be detached in order to prevent the unit from being stolen.
FOLDING DOWN AND DETACHING THE FRONT PANEL
Before detaching the front panel, be sure to press the POWER ⏻ button (1) OFF first. Then press the OPEN (▲) button (8), let the Front Panel arrive in horizontal position and detach the panel by pulling it towards you as illustrated.
flowchart
graph TD
    A["Device 1"] --> B["Device 2"]
    B --> C["Device 3"]
    C --> D["Device 4"]
    D --> E["Device 5"]
    E --> F["Device 6"]
    F --> G["Device 7"]
    G --> H["Device 8"]

ATTACHING THE FRONT PANEL
Make sure the front panel is the right way up when attaching it to the unit as it cannot be attached upside down.
Notes:
- Do not press the front panel hard against the unit when attaching it. It can be easily attached by pressing it lightly against the unit.
- When you carry the front panel with you, put it in the supplied front panel case.
- Do not press hard or give excessive pressure to the display window of the front panel when attaching it to the unit.
REMOTE CONTROL


USING THE REMOTE CONTROL
Preparing the Remote Control
Note: the remote control contains already 2 x AG10 battery. Just pull out the transparent protection sheet to allow electrical contact.
Battery Replacement:
- Open the Battery drawer by pulling it out.
- Insert a new 2 x AG10 Lithium battery in the Battery drawer.
- Close the Battery drawer.
Using the Remote Control
Face the remote control towards the player front.
The effective operating range of the remote control is 6 m, and 30 left and right degrees from the radio.

BASIC OPERATION
1) Press the MENU button from Remote Control or main unit to enter in the MENU.
2) Press the ▲▼ on Remote Control or main unit to select the desired Menu icon.
3) Press the PLAY / PAUSE button to confirm the selected Menu option.
4) Press the EXIT button to return to the previous MENU.

The MUSIC / MOVIE / FOTO Menu show ONLY for the files stored in the built-in memory of the panel (NOT FROM USB / SD)
SETTING MENU


SET OSD MENU LANGUAGE


CHECK MEMORY STATUS / SYSTEM INFORMATION

RADIO MENU

PRESS THE MENU BUTTON TO SELECT:
Auto-Memory Store Function
Save the station to desired memory channel
PTY search
AF (RDS) ON / OFF
Trafic Announcement (ON / OFF)
10
EnglishEng
![VOLUME LEVEL Radio Radiotelevisione svizzera -RETE DUE- w www.retedue.rsi.ch CLASSICS 00:09 [40] ETON AF RETE DUE AFON TRAFFIC ANUNCEMENT TA 9 < 98.80 > 1 MEMORY NUMBER VOLUME FREQUENCY STATIONINFORMATIONS RF RADIO LEVEL CLOCK TIME STATIONNAME](/content/2026/06/1245610/images/8b31b91d3cde257199a8d13b3e0677d6ee38fdf333cc824e95a779e2074fd3dd.jpg)
RADIO MODE
- BAND BUTTON (BAND) (10)
Each band is toggled cyclically by pressing this key FM / AM.
- RADIO TUNING PREV (▶) AND NEXT (▶) BUTTONS
FORWARD AND REVERSE TRACK SEARCH (or changing songs)
1) In RADIO mode, keep pressed (▶) or (◀) button repeatedly to manually tune up or down for the desired radio station with step by step. Press (▶) or (◀) button hold for more than 0.5 seconds to automatically tune up or down for the radio station of strong signal.
- PRESET STATIONS (1,2,3,4,5 up to 20 for FM and up to 20 for MW)
1) Tune the desired Radio Station.
2) Press the MENU button under RADIO MENU.
2) Select SAVE CHANNEL using ▲▼ buttons.
3) Select the number of channel where you wish to store the station.
4) Press PLAY / PAUSE button to save in the memory.
5) When pressed ▲▼, these keys select a preset station directly.
USING THE RDS FUNCTION
What is RDS?
The RDS (Radio Data System) is a digital information system developed by the EBU (European Broadcast Union). Piggy-backed on normal FM broadcasts, RDS offers a variety of
information services and automatic retuning functions for RDS-compatible car stereos. In 1988, RDS became available in the United Kingdom, France, West Germany, Ireland and Sweden. Test transmissions are being conducted in many other european countries. It is expected that RDS will be available in most western european countries in the near future.
1 'AF/ST' function (ALTERNATIVE FREQUENCIES)
When AF ON is selected and the state of AF switching mode is displayed by AF symbol in the display.
AF switching mode off.
AF switching mode on, and has RDS information.
AF flashing: switching mode on, but RDS information is not received yet.
When AF switching mode is selected, the radio checks the signal strength of AF all the time.
The interval of checking time of each AFs depends on the signal strength of current station, from a few minute for strong station to a few seconds for weak station. Every time that new AF is stronger than current station, it switches over to that frequency for very short time, and NEW FREQUENCY is displayed for 1-2 second. Because the mute time of AF switching Or checking time is very short, it is almost inaudible in case of normal program.
2. 'TA' function (TRAFFIC ANNOUNCEMENT)
When press the button, it is activated as TA mode on or off.
When TA mode is on (TP is displayed on LCD), it will begin to seek TA station.
When traffic announcement is transmitted:
1) If the unit is in CD mode, it will switch to radio mode temporarily.
2) Temporarily switch over to an EON linked station when EON detects a traffic announcement on that other program, and TP will be displayed on LCD
3) If volume level is below 20, volume level is raised to 20, and returns to its previous mode and volume level when the traffic announcement is over. If volume is adjusted during traffic announcement, only the previous volume is valid.
3. 'PTY' function (PROGRAM TYPE)
While selecting PTY type, its selection is implemented by preset buttons as described in preset key. When PTY is selected, the radio starts to search corresponding PTY information, and stops if the corresponding PTY information, is detected.
Press it shortly to display PTY and flash NEWS. Press it hold to display NEWS and then press VOL+ or VOL- button to select one of PTY programs:
PTY music group ---- PTY speech group ---- OFF
MUSIC SPEECH
- POP M. ROCK M 1. NEWS, AFFAIRS, INFO
- M.O.R. M, LIGHT M 2. SPORT, EDUCATE, DRAMA
- CLASSICS, OTHER M 3. CULTURE, SCIENCE, VARIED
- JAZZ, COUNTRY 4. WEATHER, FINANCE, CHILDREN
EnglishEng
The front panel has 1 GB of Built-In internal memory which can be used to store AUDIO/VIDEO or IMAGES files. To load the files in the memory of the panel, connect a USB Cable between front panel and PC.
LOAD FILES IN THE PANEL MEMORY

After connected, the PC recognize the panel as a standard USB memory and the files can be transferred to the respective folders.
IMPORTANT: DO NOT DELETE THE CONTENTS OF THE FILE FILE "FM RADIO"
AUDIO SETTING

1) Under RADIO / MPEG4 / MP3 Menu, keep pressed the MENU button for 5 seconds to enter in the AUDIO menu.
2) Select the BASS/TREBLE/BALANCE/FADER options using the ▲▼ buttons.
3) Press the PLAY / PAUSE button to confirm
4) Press the ▲▼ buttons to adjust the levels.
LOUDNESS (6): Press the LOUDNESS button to increase the bass & treble audio.
FRONT AUX-IN (16): Use this socket to connect external AUdio devices as MP3, Players.
To switch the PANEL VIDEO to REAR RCA Video Out, keep pressed the BAND button for 5 seconds from main MENU.
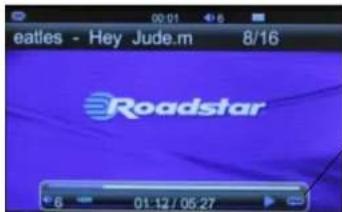
To play an MPEG4 or MP3 file
1 Insert the USB or SD Card memory.
2 Select a desired directory or file from FILE BROWSER menu (Pag. 4).
3 Use the ▲▼ buttons to select an MPEG4 or MP3 file you want to listen to.
4 Press the PLAY / PAUSE button to start playing.
To play an MP3 file repeatedly
1 Press the MENU button for 5 seconds on the unit.
The Play Mode on the bottom will show its submenus in the following sequence:
NO REPEAT > REP-ONE > FOLDER REP

NO REPEAT: Repeat function disabled.

REPEAT ONE: Plays the songs repeatedly.
REPEAT ALL: Repeats all the songs
saved in the proper directory.
EnglishEng
MPEG 4 REPEAT FUNCTION
During MPEG4 playback, press MENU button to enter in the REPEAT option.

TITLE REPEAT ON Choose this mode to play repeatedly the title currently being played.
REP-ALL Choose this mode to play repeatedly the titles of entire memory.
RADOM button to play the tracks in random order
JPEGPLAYBACK
You may have photographic film developed with pictures stored in JPEG format. Then you can playback those JPEG files in this player.
SPECIFICATIONS
Supply Voltage :12V DC (11V-15V)
Current Consumption :2A max.
Signal System :Composite video 1.0Vp-p 75Ohm
LINE-OUT
Output 10kOhm (5 V max)
Characteristics :(1) Frequency Response 20 Hz - 20 KHz
:(2) S/N Ratio 90 dB (JIS)
AM/FMTUNER
FM Frequency range 87.5-108 MHz
Channel step 50 kHz
Intermediate frequency
AM Frequency
10.7 MHz
520 - 1620 KHz
GENERAL
Speaker impedance
Output power
4 ohm
45W × 4CH
Note: Specifications and the design are subject to possible modifications without notice.
RU-330MP
DeutschDe
flowchart
graph TD
    A["Internal Display"] --> B["Device with Left/Right Rotation"]
    B --> C["Device with Inner/Outer Rotation"]
    C --> D["Device with Outer Rotation"]
    D --> E["Device with External Rotation"]
    E --> F["External Display"]
ANBRINGEN DES FRONTBEDIENTEILS
REPLACEMENT DESFUSIBLES
Le MENU MUSIQUE / FILM / FOTO

II MENU MUSICA / FILM / IMMAGINI
LA FUNZIONE RDS. COS'E'IL SISTEMA RDS?
CONECTOR ISO
![8|| 6|| 4] 2[ A 7|| 5|| 3] 1[ B 8|| 6|| 4] 2[ 7|| 5|| 3] 1[](/content/2026/06/1245610/images/e18a1e3403eba72fd54a7cb9fa8a5df7dd35951764d016dfca3aa0e3a87f3573.jpg)
Salida Video (amarillo)
Entrada Audio (negro) Rojo (der.) Blanco (isq.)

- CE
- RU-330MP
- INTRODUCTION
- Safety Information
- CAUTION:
- WARNING:
- Important Information
- Precautions
- 2
- EnglishEng
- INSTALLATION
- Mounting angle adjustment
- OUR NEW MPEG4 / MP3 PLAYER
- ISO CONNECTOR
- CONNECTOR A
- CONNECTOR B
- Maintenance
- FUSE REPLACEMENT
- Warning
- DETACHING AND ATTACHING THE FRONT PANEL
- FOLDING DOWN AND DETACHING THE FRONT PANEL
- ATTACHING THE FRONT PANEL
- Notes:
- USING THE REMOTE CONTROL
- Preparing the Remote Control
- Battery Replacement:
- BASIC OPERATION
- RADIO MODE
- USING THE RDS FUNCTION
- What is RDS?
- 'AF/ST' function (ALTERNATIVE FREQUENCIES)
- 'TA' function (TRAFFIC ANNOUNCEMENT)
- 'PTY' function (PROGRAM TYPE)
- MUSIC SPEECH
- IMPORTANT: DO NOT DELETE THE CONTENTS OF THE FILE FILE "FM RADIO"
- To play an MPEG4 or MP3 file
- To play an MP3 file repeatedly
- MPEG 4 REPEAT FUNCTION
- JPEGPLAYBACK
- SPECIFICATIONS
- LINE-OUT
- AM/FMTUNER
- GENERAL
- DeutschDe
- ANBRINGEN DES FRONTBEDIENTEILS
- REPLACEMENT DESFUSIBLES
- II MENU MUSICA / FILM / IMMAGINI
- LA FUNZIONE RDS. COS'E'IL SISTEMA RDS?
- CONECTOR ISO
Brand : ROADSTAR
Model : RU-330MP
Category : Car radio