M1011 - Surveillance Camera AXIS - Free user manual and instructions
Find the device manual for free M1011 AXIS in PDF.

User questions about M1011 AXIS
0 question about this device. Answer the ones you know or ask your own.
Ask a new question about this device
Download the instructions for your Surveillance Camera in PDF format for free! Find your manual M1011 - AXIS and take your electronic device back in hand. On this page are published all the documents necessary for the use of your device. M1011 by AXIS.
USER MANUAL M1011 AXIS
AXIS M1031-W Network Camera
About this Document
This document includes instructions for installing the AXIS M1011/M1031 on your network. Previous experience of networking will be beneficial when installing the product.
Legal Considerations
Video and audio surveillance can be prohibited by laws that vary from country to country. Check the laws in your local region before using this product for surveillance purposes.
This product includes one (1) H.264 decoder license and (1) MPEG-4 decoder license. To purchase further licenses, contact your reseller.
Electromagnetic Compatibility (EMC)
This equipment generates, uses and can radiate radio frequency energy and, if not installed and used in accordance with the instructions, may cause harmful interference to radio communications. However, there is no guarantee that interference will not occur in a particular installation.
If this equipment does cause harmful interference to radio or television reception, which can be determined by turning the equipment off and on, the user is encouraged to try to correct the interference by one or more of the following measures: Re-orient or relocate the receiving antenna. Increase the separation between the equipment and receiver. Connect the equipment to an outlet on a different circuit to the receiver. Consult your dealer or an experienced radio/TV technician for help. Shielded (STP) network cables must be used with this unit to ensure compliance with EMC standards. See Radio Transmission Regulatory Information & EMC, on page 87 for more information on this product's compliance with radio frequency and safety standards.
Equipment Modifications
This equipment must be installed and used in strict accordance with the instructions given in the user documentation. This equipment contains no user-serviceable components. Unauthorized equipment changes or modifications will invalidate all applicable regulatory certifications and approvals.
Liability
Every care has been taken in the preparation of this document. Please inform your local Axis office of any inaccuracies or omissions. Axis Communications AB cannot be held responsible for any technical or typographical errors and reserves the right to make changes to the product and documentation without prior notice. Axis Communications AB makes no warranty of any kind with regard to the material contained within this document, including, but not limited to, the implied warranties of merchantability and fitness for a particular purpose. Axis Communications AB shall not be liable nor responsible for incidental or consequential damages in connection with the furnishing, performance or use of this material.
RoHS
This product complies with both the European RoHS directive, 2002/95/EC, and the Chinese RoHS regulations, ACPEIP.

WEEE Directive
The European Union has enacted a Directive 2002/96/EC on Waste Electrical and Electronic Equipment (WEEE Directive). This directive is applicable in the European Union member states.

The WEEE marking on this product (see right) or its documentation indicates that the product must not be disposed of together with household waste. To prevent possible harm to human health and/or the environment, the product must be disposed of in an approved and environmentally safe recycling process. For further information on how to dispose of this product correctly, contact the product supplier, or the local authority responsible for waste disposal in your area.
Business users should contact the product supplier for information on how to dispose of this product correctly. This product should not be mixed with other commercial waste. For more information, visit www.axis.com/techsup/.
Support
Should you require any technical assistance, please contact your Axis reseller. If your questions cannot be answered immediately, your reseller will forward your queries through the appropriate channels to ensure a rapid response. If you are connected to the Internet, you can:
- download user documentation and firmware updates
- find answers to resolved problems in the FAQ database. Search by product, category, or phrases
- report problems to Axis support by logging in to your private support area.
AXIS M1011/-W & AXIS M1031-W Installation Guide
This installation guide provides instructions for installing the AXIS M1011/-W / AXIS M1031-W Network Camera on your network. For all other aspects of using the product, please see the User's Manual, available on the CD included in this package, or from www.axis.com/techsup
Installation steps
- Check the package contents against the list below.
- Hardware overview. See page 4.
- Install the hardware. See page 5.
- Assign an IP address. See page 6.
- Set the password. See page 9.
- Configure the wireless connection. See page 11. (AXIS M1011-W/M1031-W only)
Important!
This product must be used in compliance with local laws and regulations.
1 Package contents
| Item Models/variants/notes | |
| Network Camera AXIS M1011 | AXIS M1011-WAXIS M1031-W |
| Indoor power adaptor (country specific) | PS-H* or PS-VEurope, UK, USA/Japan, Australia, Korea, Argentina, China*power adaptor extension cable 1.8m (5.9ft), PS-H only |
| Camera stand Including fitted | extension section and 4 mounting screws/plugs |
| Flexible clamp For shelf mounting | |
| CD | AXIS Network Video Product CD, including product documentation, installation tools and other software |
| Printed Materials AXIS M1011 | /M1011-W/M1031-W Installation Guide (this document)Axis Warranty Document |
② Hardware overview

text_image
Front view AXIS M1031-W Lens with Status Indicator LED Microphone Light PIR sensor Speaker Lens with Status Indicator LED AXIS M1011/-W
text_image
Rear view (both models) Network connector Power connector Lock ring Control button Power Indicator LED Network Indicator LED Wireless Indicator LED (activated on wireless models only) Product number (P/N) & Serial number (S/N). The serial number may be required during the installation.
text_image
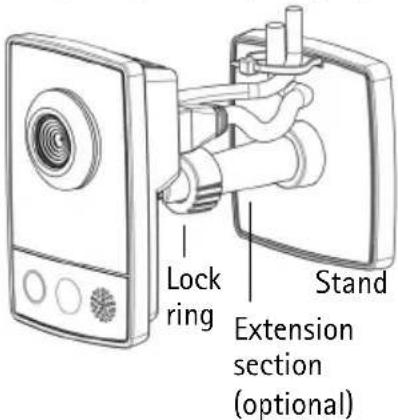
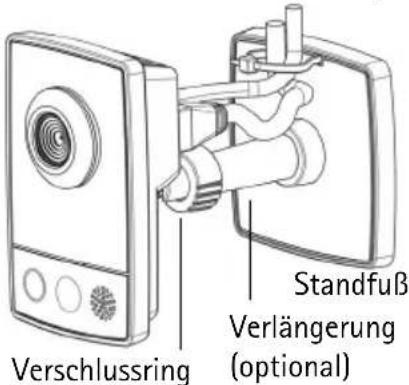
Assembly Network camera Cable tie Base plate Extension section (optional) Stand Rubber washerPlease refer to page 15 for details on the connectors and LED indicators.
3 Install the hardware
IMPORTANT! AXIS M1011/M1011-W/M1031-W is not approved for outdoor use - the product may be installed in indoor environments only.
Mount the camera
AXIS M1011/M1011-W/M1031-W is shipped with the stand and extension section mounted. Disassemble the stand and, depending on the intended installation, follow these instructions for wall mounting or shelf mounting.
Wall mounting
- Unscrew the extension section to release the base plate from the stand.
- Using the supplied screws, fix the base plate to a flat (horizontal or vertical) surface.
- Attach the stand and optionally the extension section.
- Attach the camera, adjust the angle and tighten the lock ring.
- The stand is equipped with a cable tie to secure the cables once connected.
AXIS M1031-W Wall mount
text_image
Lock ring Stand Extension section (optional)Shelf mounting
- Position the clamp and tighten the fixing screw securely.
- Attach the lock ring on the camera to the clamp.
- Adjust the camera angle and tighten the lock ring.
Connect the cables
- Connect the camera to the network using a shielded network cable. AXIS M1011-W/M1031-W: If connecting to a wireless network, the wired connection is temporary in order to configure the camera's wireless settings. See page 11 for more information.
AXIS M1031-W Shelf mount

text_image
Lock ring Clamp Fixing screw- Connect the supplied indoor power adaptor to the power connector on the camera.
- Check that the indicator LEDs indicate the correct conditions. See the table on page 15 for further details. Note that some LEDs can be disabled and may be unlit.
- Proceed to Assign an IP address, on page 6.

Assign an IP address
Most networks today have a DHCP server that automatically assigns IP addresses to connected devices. If your network does not have a DHCP server the AXIS M1011/M1011-W/M1031-W will use 192.168.0.90 as the default IP address.
If you would like to assign a static IP address, the recommended method in Windows is either AXIS IP Utility or AXIS Camera Management. Depending on the number of cameras you wish to install, use the method that best suits your purpose.
Both of these free applications are available on the Axis Network Video Product CD supplied with this product, or they can be downloaded from www.axis.com/techsup
| Method Recommended for Operating system | |||
 | AXIS IP UtilitySee page 7 | Single cameraSmall installations | Windows |
 | AXIS Camera ManagementSee page 8 | Multiple camerasLarge installationsInstallation on a different subnet | Windows 2000Windows XP ProWindows 2003 ServerWindows Vista |
Notes:
- If assigning the IP address fails, check that there is no firewall blocking the operation.
- For other methods of assigning or discovering the IP address of the AXIS M1011/M1011-W/M1031-W, e.g. in other operating systems, see page 14.
AXIS IP Utility - single camera/small installation
AXIS IP Utility automatically discovers and displays Axis devices on your network. The application can also be used to manually assign a static IP address

text_image
AXIS IP Utility File View Tools Help Name IP Address Serial Number AXIS P0301 - 00408C8F6382 10.92.43.39 00408CB6382 AXIS 207WV - 00408CTA69CE 10.92.144.208 00408C769CE AXIS Q7401 - 00408C900AAP 10.92.120.92 00408C900AP AXIS 210 - 00408C16152 10.92.144.210 00408C16152 AXIS 212 P12 - 00409C78C644 10.92.144.212 00408C78CA44 AXIS 269PD - 00408C97547C 10.92.144.209 00408C97547C AXIS 216WPD - 00409C9238DD 10.92.144.216 00408C9238DD AXIS 211A - 00409C96947 10.92.144.211 00408C96947 AXIS 213 - 00409C9695P 10.92.144.213 00408C9695P AXIS 233Q - 00409C916255 10.92.144.215 00408C916255 AXIS 243SA - 00408C913262 10.92.120.243 00408C913262 AXIS P13L1 - 00408C1634LB 10.92.127.50 00408C1634LB AXIS P833-W - 00408C1635DB 10.92.127.174 00408C1635DB Interface: 19.92.127.254Note that the computer running AXIS IP Utility must be on the same network segment (physical subnet) as the AXIS M1011/M1011-W/M1031-W.
Automatic discovery
- Check that the camera is connected to the network and that power has been applied.
- Start AXIS IP Utility.
- When the camera appears in the window, double-click it to open its home page.
- See page 9 for instructions on how to assign the password.
Assign the IP address manually (optional)
- Acquire an unused IP address on the same network segment as your computer.
- Select the camera in the list.
- Click the button IP Assign new IP address to the selected device and enter the IP address.
- Click the Assign button and follow the on-screen instructions. Note that the camera must be restarted within 2 minutes for the new IP address to be set.
- Click the Home Page button to access the camera's web pages.
- See page 9 for instructions on how to set the password.
AXIS Camera Management - multiple cameras/large installations
AXIS Camera Management can automatically discover multiple Axis devices, show connection status, manage firmware upgrades and set IP addresses.

text_image
AXIS Camera Management File Edit View Tools Help Search Assign IP Upgrade Add/Ctrl User Configure Template Editor Apply Template Home Page Refresh Views Groups Add Group All Devices (15.3) New Devices (13.5) Warnings/Errors (15) My Groups corridor entrance store.com Find: Apply Clear Name Status Address Serial Number Model Foreword AXIS 209HFD - 00408C7815E8 OK dh10-94-127-203 s... 00408C7819E8 AXIS 209M... 4.45 AXIS Q7401 - 00408C16326F OK dh10-94-127-25 w... 00408C16324F AXIS Q7401 5.00 AXIS M1031-W - 00408C16300B OK dh10-92-127-174 s... 00408C16350B AXIS M103... 5.00 AXIS M301 - 00408C16348F OK dh10-94-127-232 s... 00408C16348F AXIS M3011 5.01 AXIS P301 - 00408C874F2 Credentials... dh10-98-127-149 s... 00408C874F2 AXIS P301 5.90 AXIS P3301 - 00408C93D288 OK dh10-94-127-13 w... 00408C93D288 AXIS P3301 5.01 AXIS M3014 - 00408C1631E3 OK dh10-94-127-236 s... 00408C1631E3 AXIS M3014 5.00 AXIS Q7401 - 00408C964B31 OK dh10-95-127-235 s... 00408C964B31 AXIS Q7401 5.01 AXIS 223M - 00408C95A78F OK 19.84.12.101 00408C95A78F AXIS 223M... 4.45 AXIS P3301 - 00408C874F8 OK dh10-94-127-245 s... 00408C874F8 AXIS P3301 5.00 AXIS P3301 - 00408C1635D0 OK dh10-94-127-221 s... 00408C1635D0 AXIS P3301 5.00 AXIS M301 - 00408C163611 OK dh10-93-127-180 s... 00408C163611 AXIS Q1755 5.01 AXIS M301 - 00408C93D149 OK dh10-95-127-139 s... 00408C93D149 AXIS M3011 5.01 AXIS 211 - 00408C9A4A9A OK 19.92.43.211 00408C9A4A9A AXIS 211... 4.40 AXIS 211W - 00408C16367C Nar Access... 19.62.5.35 00408C16367C AXIS 211W... 4.40 I objects selectedAutomatic discovery
- Check that the camera is connected to the network and that power has been applied.
- Start AXIS Camera Management. When the camera appears in the window, right-click the link and select Live View Home Page.
- See page 9 for instructions on how to set the password.
Assign an IP address in a single device
- Select AXIS M1011 in AXIS Camera Management and click the Assign IP button
- Select Assign the following IP address and enter the IP address, subnet mask and default router the device will use.
- Click the OK button.
Assign IP addresses in multiple devices
AXIS Camera Management speeds up the process of assigning IP addresses to multiple devices, by suggesting IP addresses from a specified range.
- Select the devices you wish to configure (different models can be selected) and click the Assign IP button.
- Select Assign the following IP address range and enter the range of IP addresses, the subnet mask and default router the devices will use.
- Click the OK button.

text_image
Edit IP Address Obtain an IP address automatically (DHCP) Assign the following IP address: IP address: 10 . 91 . 127 . 62 Subnet mask: 255 . 255 . 0 . 0 Default router: 10 . 91 . 0 . 1 Advanced OK Cancel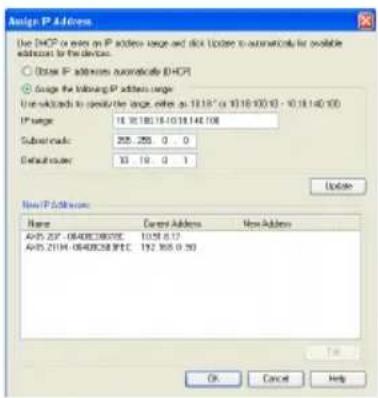
text_image
Assign IP Address Use DHCP or rows on IP address: range and disk. Update to automatically for available addresses to the device. ○ Delete IP addresses automatically DHCP ○ Design the following IP address range Use URLs to specify the range, rows as 10.18" or 10.18.100" - 10.18.140.100 IP name: 10.18.100.18-10.18.140.100 Subscribers: 255, 255, 0, 0 Default number: 10, 19, 0, 1 Update New IP Address: Name Current Address New Address AIVS.ZSP_0840EC38E7EC 1026.617 AIVS.ZI1H_0840EC38E7EC 192.365.0.50 OK Cancel Help
Set the password
To gain access to the product, the password for the default administrator user root must be set. This is done in the 'Configure Root Password' dialog, which is displayed when the AXIS M1011/M1011-W/M1031-W is accessed for the first time.
To prevent network eavesdropping when setting the root password, this can be done via an encrypted HTTPS connection, which requires an HTTPS certificate (see note below).
To set the password via a standard HTTP connection, enter it directly in the first dialog shown below.
To set the password via an encrypted HTTPS connection, follow these steps:
- Click the Create self-signed certificate button.
- Provide the requested information and click OK. The certificate is created and the password can now be set securely. All traffic to and from the AXIS M1011/M1011-W/M1031-W is encrypted from this point on.
- Enter a password and then re-enter it to confirm the spelling. Click OK. The password has now been configured.

text_image
To create an HTTPS connection, start by clicking this button. Configure Root Password User name: root Password: Confirm password: The password for the pre-configured adm before the product can be used. If the password for root is lost, the product settings, by pressing the button located i user documentation for more information. Create Self-Signed Certificate Common name: 10.92.25.211 Validity: 365 days *The name of the entity to be certified, i.e. product. OK Once the certificate is created, this page at configure the root password via HTTPS. To configure the password directly via an unencrypted connection, enter the password here. Configure Root Password using HTTPS User name: root Password: Confirm password: OK The password for the pre-configured administrator root must be changed before the product can be used. If the password for root is lost, the product must be reset to the factory default settings, by pressing the button located in the product's casing. Please see the user documentation for more information.- To log in, enter the user name "root" in the dialog as requested Note: The default administrator user name root cannot be deleted.
- Enter the password as set above, and click OK.
- To log in, enter the user name "root" in the dialog as requested Note: The default administrator user name root cannot be deleted.
- Enter the password as set above, and click OK.
Access the video stream
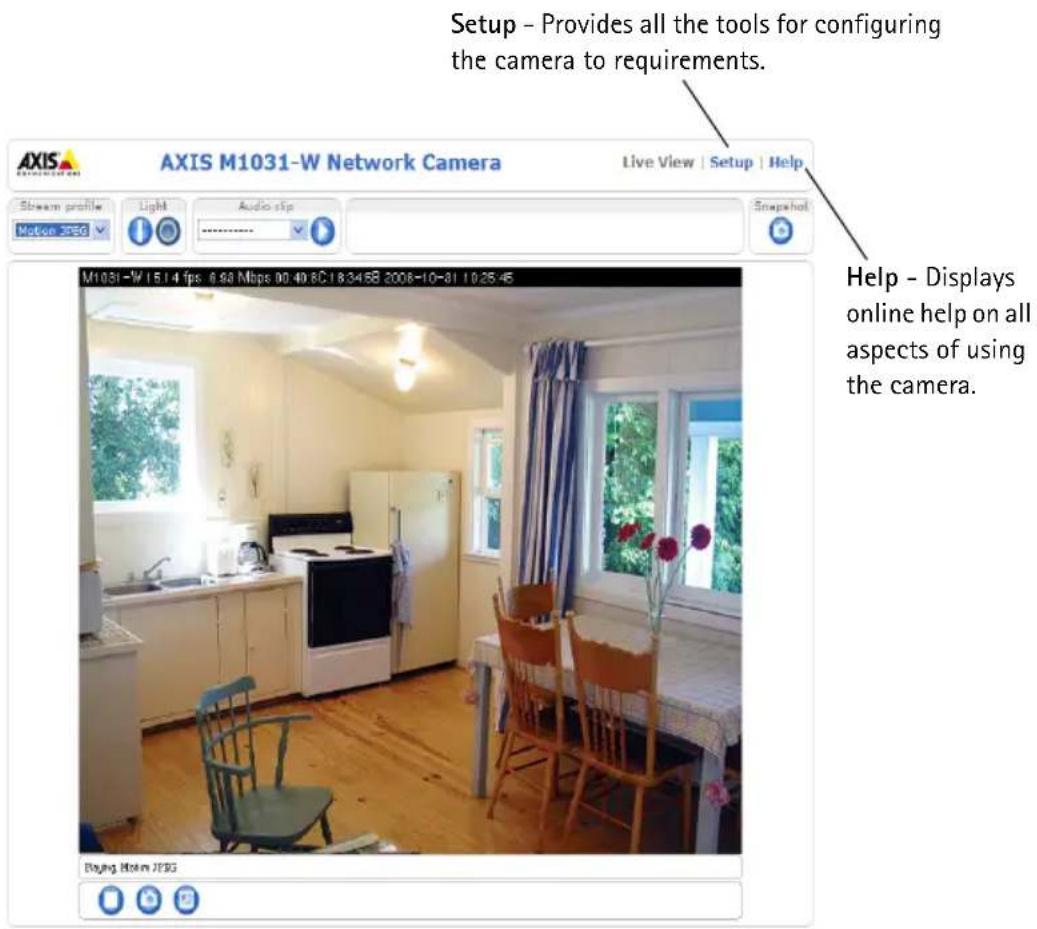
The Live View page of the network camera is displayed, with links to the Setup tools which allow you to customize the camera.
If required, click Yes to install AMC (AXIS Media Control), which allows viewing of the video stream in Internet Explorer. You will need administrator rights on the computer to do this.
text_image
Setup - Provides all the tools for configuring the camera to requirements. M1031-W 15:4 fps: 6.98 Mbps 00:40 8C 18:34:5B 2008-10-31 10:25:45 Help - Displays online help on all aspects of using the camera. M1031-W 15:4 fps: 6.98 Mbps 00:40 8C 18:34:5B 2008-10-31 10:25:45 Buying Hlom JESGNotes:
- HTTPS (Hypertext Transfer Protocol over Secure Socket Layer) is a protocol used to encrypt the traffic between web browsers and servers. The HTTPS certificate controls the encrypted exchange of information.
- The default administrator user root cannot be deleted.
- If the password for root is lost or forgotten, the network camera must be reset to the factory default settings. See Resetting to the Factory Default Settings, on page 16.
AXIS M1011: The installation is now complete.
AXIS M1011-W/M1031-W: Proceed to Configure the wireless connection, on page 11.
6 Configure the wireless connection
AXIS M1011-W/M1031-W is temporarily connected to the wired network to allow configuration of the camera's wireless settings before connecting to the wireless network. Configuring the camera using an unsecured wireless connection is not recommended, as passphrases and keys are sent in plain text.
Note:
For even greater security, use HTTPS. Once the camera has been connected to the wired network, go to Setup > System Options > Security > HTTPS and refer to the camera's online help for instructions.
Status of Wireless Networks
Go to Setup > Basic Setup > Wireless in the camera's internal web pages.
This list is the result of a network scan. The network the AXIS M1011-W/M1031-W is currently linked to is shown in blue. A network using unsupported security is shown in grey. The following information is provided:
- SSID - The name of a wireless network (or ad-hoc device).
- Mode - An Access Point (Master) or Ad-Hoc device.
- Security – Shows which type of security the network uses. See below for the supported security types.
- Channel - Shows the wireless channel currently in use.
- Signal strength – Shows the signal strength.
- Bit rate - The current bit rate in Mbit/s. This is only shown for the access point currently in use.
Note:
Access points with a disabled SSID Broadcast will not appear unless the SSID is manually entered.
Wireless Settings
- Select an access point or ad-hoc device under Status of Wireless Networks, some of the required information will automatically be entered under Wireless Settings.
- SSID is the name of the selected wireless network. Leave this field blank if AXIS M1011-W/M1031-W is to access the nearest unsecured network.
-
Network type – select Master to access the network via an access point or Ad-hoc to access any other wireless device and create a local network (see note below).
-
Security - select one of the following methods:
-
WPA-/WPA2-PSK
- WPA-/WPA2-Enterprise - see instructions below
- WEP - see instructions below
- No security (not recommended)
Keys, passphrases and certificates that are used for security must be entered manually. To retrieve the necessary details, contact the Network Administrator for the selected access point or ad-hoc device.
5. Click Save.
Note:
Ad hoc mode allows users to form a wireless LAN without connection via an access point. The camera can, for example, connect point-to-point to a laptop with wireless network support. Ad-hoc connection may be useful in certain installations but is not the recommended method.
WPA-/WPA2-PSK - Enter the required Pre-shared Key for the access point, which can be a hexadecimal number (Manual hex) or a passphrase
WPA-/WPA2-Enterprise - Choose the type of client/server authentication being used by the access point; EAP-TLS.
EAP-TLS
- Identity – Enter the user identity to present to the network
- Private key password - Enter the password for your user identity
- EAPOL version - Select the version used (1 or 2) in your access point
- Certificates - Upload a CA certificate to present to the access point for authentication

text_image
Wireless Settings SSID: ****_point_1 Network type: Master Ad-Hoc Security: WPA-/WPA2-Enterprise WPA-Enterprise type: EAP-TLS Identity: axis Private key passwords: ****** EAPOL version: 1 Certificates Certificate management: Upload/Remove... Warning! Passphrases and keys saved here will be sent to the AXIS M1031-W in plain text. Save ResetWEP
Authentication - Select Open or Shared Key, depending on the method used by your access point. Not all access points have this option, in which case they probably use Open System, which is sometimes known as SSID Authentication.
Key length - This sets the length of the key used for the wireless encryption, 64 or 128 bit. The encryption key length may also be shown as 40/64 and 104/128.
Key type - The available key types depend on the selected access point. The following options are available in the camera:
- Manual – Allows you to manually enter the hex key.
- ASCII - The string must be exactly 5 characters for 64-bit WEP and 13 characters for 128-bit WEP.
- Passphrase - In 64-bit WEP, the Passphrase generates 4 different keys. For 128-bit WEP, only 1 key is generated, which is then replicated for all 4 keys. Key generation is not standardized and can differ from brand to brand. Check that the generated keys are identical to those in your access point - if not, they must be entered manually.
Complete the wireless installation
- Check that the wireless settings in the camera correspond to the settings in the access point.
- Disconnect the network cable from the camera.
- Refresh the web page after 20-30 seconds to confirm the wireless connection. If the camera cannot be accessed, run AXIS IP Utility and select it from the list.
Note:
- To establish communication, the wireless settings must be exactly the same in the camera as in the access point or ad-hoc device.
- Keys, passphrases and certificates that are used for security must be entered manually. Contact your Network Administrator for the requirements for the selected access point or ad-hoc device.
- Wireless settings must always (during installation and at all other times) be configured or changed in the camera first, before changing the settings in the wireless access point. This ensures that the camera is always accessible when making changes.
- SSID (Service Set Identifier) is sometimes written as ESSID (Extended Service Set Identifier).
AXIS M1011-W/M1031-W: The installation is now complete.
Other methods of setting the IP address
The table below shows the other methods available for setting or discovering the IP address. All methods are enabled by default, and all can be disabled.
| Use in operating system | Notes | |
| UPnPTM | Windows (ME or XP) | When enabled on your computer, the camera is automatically detected and added to “My Network Places.” |
| Bonjour | MAC OSX (10.4 or later) | Applicable to browsers with support for Bonjour. Navigate to the Bonjour bookmark in your browser (e.g. Safari) and click on the link to access the camera’s web pages. |
| AXIS Dynamic DNS Service | All A free service from | Axis that allows you to quickly and simply install your camera. Requires an Internet connection with no HTTP proxy. See www.axiscam.net for more information. |
| ARP/Ping | All See below. The com | command must be issued within 2 minutes of connecting power to the camera. |
| View DHCP server admin pages | All To view the admin | pages for the network DHCP server, see the server’s own documentation. |
Set the IP address with ARP/Ping
- Acquire an IP address on the same network segment your computer is connected to.
- Locate the serial number (S/N) on the AXIS M1011/M1011-W/M1031-W label.
- Open a command prompt on your computer and enter the following commands:
| Windows syntax: Windows example: | |
| arp -s <IP Address> <Serial Number> ping -l 408 -t <IP Address> | arp -s 192.168.0.125 00-40-8c-18-10-00 ping -l 408 -t 192.168.0.125 |
| UNIX/Linux/Mac syntax: UNIX/Linux/Mac example: | |
| arp -s <IP Address> <Serial Number> temp ping -s 408 <IP Address> | arp -s 192.168.0.125 00:40:8c:18:10:00 temp ping -s 408 192.168.0.125 |
- Check that the network cable is connected to the camera and then start/restart the camera, by disconnecting and reconnecting power.
- Close the command prompt when you see 'Reply from 192.168.0.125: ...' or similar.
- In your browser, type in http://
in the Location/Address field and press Enter on your keyboard.
Notes:
- To open a command prompt in Windows: from the Start menu, select Run... and type cmd. Click OK.
- To use the ARP command on a Mac OS X, use the Terminal utility in Application > Utilities.
Unit connectors
Network connector - RJ-45 Ethernet connector. Shielded cables recommended.
Power connector - Mini DC connector 5.0-5.1V DC, Max 1.5A. Center pin +.
LED indicators
| LED Color | Indication | |
| Network | Green | Steady for connection to a 100 Mbit/s network. Flashes for network activity. |
| Amber | Steady for connection to 10 Mbit/s network. Flashes for network activity. | |
| Unlit No network connection. | ||
| Status Green Steady green for normal operation. | ||
AXIS M1031-W only
AXIS M1031-W is equipped with the following:
PIR sensor - a passive infrared sensor that measures infrared light from passing objects in its field of view. If configured to do so, the camera can automatically switch on the light when triggered by the PIR sensor. Sensitivity range up to 5m (16ft).
Light - the white illumination LED can be configured to be triggered by the PIR sensor or via the web pages under Setup > Live View Config > Light buttons. Note that the light is designed for temporary use and should not be permanently lit.
Microphone/ speaker for half duplex audio.
For more information, see the AXIS M1011/M1011-W/M1031-W User's Manual located on the Axis web site at www.axis.com or on the Axis Network Video Product CD.
Resetting to the Factory Default Settings
This will reset all parameters, including the IP address, to the Factory Default settings:
- Disconnect power from the camera.
- Press and hold the Control button and reconnect power.
- Keep the Control button pressed until the Power indicator flashes amber (this may take up to 15 seconds).
- Release the Control button. When the Power indicator displays green (which can take up to 1 minute) the process is complete and the camera has been reset.
- Re-assign the IP address, using one of the methods described in this document.
It is also possible to reset parameters to the original factory default settings via the web interface. For more information, please see the online help or the user's manual.
Accessing the camera from the Internet
Once installed, your AXIS M1011/M1011-W/M1031-W is accessible on your local network (LAN). To access the camera from the Internet, network routers must be configured to allow incoming traffic, which is usually done on a specific port
- HTTP port (default port 80) for viewing and configuration
- RTSP port (default port 554) for viewing H.264 video streams
Please refer to the documentation for your router for further instructions. For more information on this and other topics, visit the Axis Support Web at www.axis.com/techsup
Further information
The user's manual is available from the Axis Web site at www.axis.com or from the Axis Network Video Product CD supplied with this product.
Tip! Visit www.axis.com/techsup to check if there is updated firmware available for the AXIS M1011/M1011-W/M1031-W. To see the currently installed firmware version, see Setup > About in the camera's web pages.
AXIS M1011/-W & AXIS M1031-W Guide d'installation
text_image
AXIS Camera Management File Edit View Tools Help Search Assign IP Upgrade Add/Edit User Configure Template Color Apply Template Names Page Refresh Status Group Add Group Name AVIS 2094FD - 00408C3015EB AVIS 07401 - 00408C1022AF AVIS M10314V-00408C18250D AVIS M10311 - 00408C16349F AVIS P3001 - 00408C97474Z AVIS P3001 - 00408C955268 AVIS M2014 - 00408C16313C AVIS 07401 - 00408C904831 AVIS 2234 - 00408C95A76F AVIS P3001 - 00408C97474B AVIS P3001 - 00408C18550D AVIS M3011 - 00408C16361T AVIS M3011 - 00408C98749S AVIS Z11 - 00408D4403A AVIS Z11A - 00408C1887C Status Address Serial Number Model Firmware OK OK OK OK OK OK OK OK OK OK OK OK OK OK OK OK OK OK OK OK OK OK OK OK OK OK OK OK OK OK OK OK OK OK OK OK OK OK OK OK OK OK OK OK OK OK OK OK OK OK OK OK OK OK OK OK OK OK OK OK OK OK OK OK OK OK OK OK OK OK OK OK OK OK OK OK OK OK OK OK OK OK OK OK OK OK OK OK OK OK OK OK OK OK OK OK OK OK OK OK OK OR OK OK OK OK OK OK OK OK OR OK OK OK OK OR OK OK OK OR OK OK OR OK OR OK OR OK OR OK OR OK OR OK OR OK OR OK OR OK OR OK OR OK OR OK OR OK OR OK OR OK OR OK OR OK OR OK OR OK OR OK OR OK OR OK OR OK OR OK OR OK OR OK OR OK OR OK OR OK OR OK OR OK OR OK OR OK OR OK Or OK OR OK OR OK OR OK OR OK OR OK OR OK OR OK OR OK OR OK OR OK OR OK OR OK OR OK OR OK OR OK OR OK OR OK OR OK OR OK OR OK OR OK OR OK OR OK OR OK OR OK OR OK OR OK OR OK OR OK OR OK OR OK OR OK ORtext_image
Edit IP Address Obtain an IP address automatically (DHCP) Assign the following IP address: IP address: 10 . 91 . 127 . 62 Subnet mask: 255 . 255 . 0 . 0 Default router: 10 . 91 . 0 . 1 Advanced OK Cancel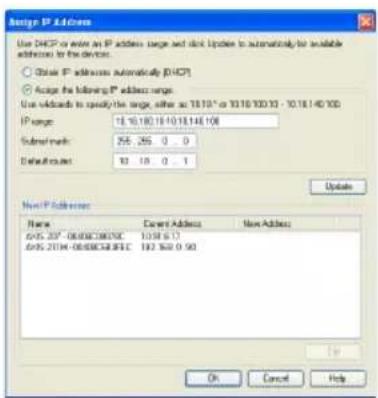
text_image
Assign IP Address Use DHCP or even an IP address range and disk Updates to automatically be available addresses by the devices. Obtain IP addresses automatically DHCP Obtain the following IP address range: Use invalids to specify the single, either as 10.10" or 10.10 X00 X3 - 10.10.140 X00 IP range: 18.10.180.19-10.18.148.106 Submit mesh: 56.256 0 0 Defaultset: 12 18 0 1 Update New IP Address Name Current Address New Address JNVS 207-00E0EC0B07EC 1038 613 JNVS 207H-00E0EC0B07EC 182 368 0 98 OK Cancel Helptext_image
Create Certificate Secure configuration of the root password via HTTPS requires a self-signed certificate. Create self-signed certificate... Configure Root Password User name: root Password: Confirm passwords: The password for the pre-configured admin before the product can be used. If the password for root is lost, the product settings, by pressing the button located i user documentation for more information. Pour configurer directement le mot de passe via une connexion cryptée, saisissez ici le mot de passe. Pour créer une connexion HTTPS, cliquez sur ce bouton. Create Self-Signed Certificate Common name: 10.92.25.211 Validity: 365 days *The name of the entity to be certified, i.e. product: OK Once the certificate is created, this page ni configure the root password via HTTPS. Configure Root Password using HTTPS User name: root Password: Confirm password: OK The password for the pre-configured administrator root must be changed before the product can be used. If the password for root is lost, the product must be reset to the factory default settings, by pressing the button located in the product's casing. Please see the user documentation for more information.text_image
Wireless Settings SSID: ****_point_1 Network type: Master Ad-Hoc Security: WPA-/WPA2-Enterprise WPA-Enterprise type: EAP-TLS Identity: axis Private key passwords: ****** EAPOL version: 1 Certificates Certificate management: Upload/Remove... Warning! Passphrases and keys saved here will be sent to the AXIS M1031-W in plain text. Save ResetWEP
AXIS M1031-W Wandmontage
text_image
Edit IP Address Obtain an IP address automatically (DHCP) Assign the following IP address: IP address: 10 . 91 . 127 . 62 Subnet mask: 255 255 . 0 . 0 Default router: 10 . 91 . 0 . 1 Advanced OK Canceltext_image
Assign IP Address Use DHCP or even on IP address issue and disk Update to automatics for available addresses to the device. ○ Delete IP addresses automatically DHCP ● Design the following IP address range Use keywords to operate the single, either as 19.10" or 10.16" 100 - 10.18.140 100 IP range: 18.18.180.18.18.148.108 Substrains: 255.255.0 Defaulters: 10.19.0.1 Update New IP Address: Name Current Address New Address A/HS 20F-0840EC38E7E.E 1025.6.17 A/HS 21H-0840EC38E7E.C 192.765.0.30 OK Cancel Helptext_image
AXIS Create Certificate Secure configuration of the root password via HTTPS requires a self-signed certificate. Create self-signed certificate... Configure Root Password User name: root Password: Confirm password: The password for the pre-configured adm before the product can be used. If the password for root is lost, the product settings, by pressing the button located i user documentation for more information. Create Self-Signed Certificate Common name: 10.92.25.211 Validity: 365 days *The name of the entity to be certified, i.e. product: OK Once the certificate is created, this page ai configure the root password via HTTPS. Configure Root Password using HTTPS User name: root Password: Confirm password: OK Um das Kennwort direkt über eine unverschlüsselte Verbindung zu konfigurieren, geben Sie es hier ein. Klicken Sie zum Herstellen einer HTTPS- Verbindung zunächst auf diese Schaltfläche. AXIS Configure Root Password using HTTPS The password for the pre-configured administrator root must be changed before the product can be used. If the password for root is lost, the product must be reset to the factory default settings, by pressing the button located in the product's casing. Please see the user documentation for more information.text_image
Wireless Settings SSID: ****_point_1 Network type: Master Ad-Hoc Security: WPA-/WPA2-Enterprise WPA-Enterprise type: EAP-TLS Identity: axis Private key passwords: ****** EAPOL version: 1 Certificates Certificate management: Upload/Remove... Warning! Passphrases and keys saved here will be sent to the AXIS M1031-W in plain text. Save ResetWEP
text_image
Edit IP Address Obtain an IP address automatically (DHCP) Assign the following IP address: IP address: 10.91.127.62 Subnet mask: 255.255.0.0 Default router: 10.91.0.1 Advanced OK Cancel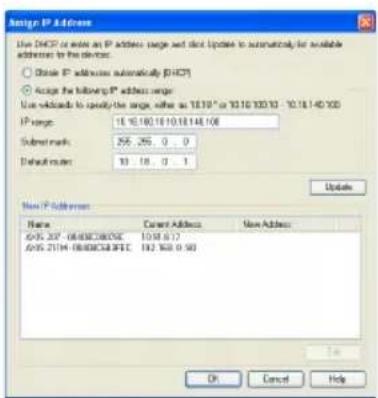
text_image
Assign IP Address Use DHCP or write an IP address range and disk update to automatically for available addresses to the devices. ○ Obtain IP addresses automatically DHCP ● Assign the following IP address range: Use defaults to qualify the range, either as 18.10" or 19.10.100.10 - 10.18.140.100 IP range: 15.10.100.10.10.148.100 Submit mask: 256.256.0.0 Default mail: 10.10.0.1 Update New IP Address Name Current Address New Address AOS 207-08/08/207/08 10/18/07 AOS 211M-08/08/207/08 192.368.9.90 OK Cancel Help
text_image
Per creare una connessione HTTPS, iniziare facendo clic su questo pulsante. Configure Root Password User name: root Password: 1 Confirm password: The password for the pre-configured adm before the product can be used. If the password for root is lost, the produ settings, by pressing the button located I user documentation for more information. Create Self-Signed Certificate Common name: 10.92.25.211 Validity: 365 days *The name of the entity to be certified, i.e. product: OK Once the certificate is created, this page xi configure the root password via HTTPS. Per configurare la password direttamente tramite una connessione non crittografata, inserire la password qui. Per create una connessione HTTPS, iniziare facendo clic su questo pulsante. Configure Root Password using HTTPS User name: root Password: Confirm password: OK The password for the pre-configured administrator root must be changed before the product can be used. If the password for root is lost, the product must be reset to the factory default settings, by pressing the button located in the product's casing. Please see the user documentation for more information.text_image
Wireless Settings SSID: ****_point_1 Network type: Master Ad-Hoc Security: WPA-/WPA2-Enterprise WPA-Enterprise type: EAP-TLS Identity: axis Private key passwords: ****** EAPOL version: 1 Certificates Certificate management: Upload/Remove... Warning! Passphrases and keys saved here will be sent to the AXIS M1031-W in plain text. Save ResetWEP
text_image
Edit IP Address Obtain an IP address automatically (DHCP) Assign the following IP address: IP address: 10.91.127.62 Subnet mask: 255.255.0.0 Default router: 10.91.0.1 Advanced OK Canceltext_image
Design IP Address Use DHCP or insert an IP address size and stick Update in automatically to be available addresses to the device. ○ Create IP addresses automatically (DHCP) ● Assign the following IP address range: Use defaults to modify the single, either as 10.10" or 10.10" to 10.14" to 10.14" IP range: 10.10/10.16/10.14/10.16 Submit mode: 55.25.0.0 Default mode: 10.16.0.1 Update New IP Address Name Cancel Address New Address AOS-2XP-0808C0803C 1018.0.17 AOS-2JTH-0808C0813C 192.50.0.50 OK Cancel Helptext_image
Create Certificate Secure configuration of the root password via HTTPS requires a self-signed certificate. Create self-signed certificate... Configure Root Password User name: root Password: Confirm passwords: The password for the pre-configured admin before the product can be used. If the password for root is lost, the product settings, by pressing the button located in user documentation for more information. Para configurar directamente la contraseña a través de una conexión sin cifrar, escriba aquí la contraseña. Para crear una conexión HTTPS, empiece haciendo clic en este botón. Create Self-Signed Certificate Common name: 10.92.25.211 Validity: 365 days *The name of the entity to be certified, i.e. product: OK Once the certificate is created, this page is configure the root password via HTTPS. Configure Root Password using HTTPS User name: root Password: Confirm password: OK The password for the pre-configured administrator root must be changed before the product can be used. If the password for root is lost, the product must be reset to the factory default settings, by pressing the button located in the product's casing. Please see the user documentation for more information.text_image
Wireless Settings SSID: ****_point_1 Network type: Master Ad-Hoc Security: WPA-/WPA2-Enterprise WPA-Enterprise type: EAP-TLS Identity: axis Private key passwords: ****** EAPOL version: 1 Certificates Certificate management: Upload/Remove... Warning! Passphrases and keys saved here will be sent to the AXIS M1031-W in plain text. Save ResetWEP
Radio Transmission Regulatory Information & EMC
This equipment generates and radiates radio frequency energy, and must be installed and operated while maintaining a minimum body-to-camera distance of 3 feet (1 meter).
If this equipment causes harmful interference to radio or television reception, which can be determined by turning the equipment off and on, the user is encouraged to try to correct the interference by one or more of the following measures: Re-orient or relocate the receiving antenna. Increase the separation between the equipment and receiver. Connect the equipment to an outlet on a different circuit to the receiver. Consult your dealer or an experienced radio/TV technician for help. Shielded (STP) network cables must be used with this unit to ensure compliance with EMC standards.
Tested to comply with FCC Standards FOR HOME OR OFFICE USE. This product must be installed and used in strict accordance with the instructions given in the user documentation. This Axis product complies with the following radio frequency and safety standards:
AXIS M1011
USA – This equipment has been tested and found to comply with the limits for a Class B computing device pursuant to Subpart B of Part 15 of FCC rules, which are designed to provide reasonable protection against such interference when operated in a commercial environment. Operation of this equipment in a residential area is likely to cause interference, in which case the user at his/her own expense will be required to take whatever measures may be required to correct the interference.
Canada - This Class B digital apparatus complies with Canadian ICES-003.
Europe - C€ This digital equipment fulfills the requirements for radiated emission according to limit B of EN55022, and the requirements for immunity according to EN55024 residential and commercial industry.
Japan – This is a class B product based on the standard of the Voluntary Control Council for Interference from Information Technology Equipment (VCCI). If this is used near a radio or television receiver in a domestic environment, it may cause radio interference. Install and use the equipment according to the instruction manual.
Australia – This electronic device meets the requirements of the Radio communications (Electromagnetic Compatibility) Standard AS/NZS CISPR22:2002
AXIS M1011-W/M1031-W (Wireless)
USA - Federal Communications Commission FCC
This device complies with Part 15 of FCC Rules. Operation of the device is subject to the following two conditions:
(1) This device may not cause harmful interference
(2) This device must accept any interference that may cause undesired operation.
Canada – This device complies with RSS-210 of Industry Canada. Operation is subject to the following conditions:
(1) This device may not cause interference, and
(2) this device must accept any interference, including interference that may cause undesired operation of the device.
Europe – EU Declaration of Conformity. This device complies with the requirements of the R&TTE Directive 1999/5/EC with essential test suites as per standards:
EN 301 489 General EMC requirements for radio equipment,
ETS 300 328 Technical requirements for radio equipment.
Japan – This product complies with Technical Regulations Conformity Certification of Specified Radio equipment.
Australia - This electronic device meets the requirements of the Radio communications (Electromagnetic Compatibility) Standard AS/NZS 4771.
Installation Guide Ver.1.10
AXIS M1011/-W/M1031-W Printed: February 2009
© Axis Communications AB, 2008-2009 Part No. 34807