
CTV 2205 - Television AEG - Free user manual and instructions
Find the device manual for free CTV 2205 AEG in PDF.


| Product Type | 22-inch LCD TV |
| Screen Diagonal | 22" (56 cm) |
| Resolution | 1920 x 1080 pixels (Full HD) |
| Panel Type | 16:9 TFT LCD |
| Contrast Ratio | 8000:1 |
| Response Time | 5 ms |
| Viewing Angle | 170° horizontal / 160° vertical |
| Power Supply | DC 12V, 3A; AC 100-240V~ 50/60 Hz (external adapter) |
| Power Consumption (Operating) | 35 W |
| Power Consumption (Standby) | < 1 W |
| Protection Class | II (power supply) |
| Tuner | DVB-T (digital terrestrial) and analogue (ATV) |
| Connections | ANT (75 ohm), VGA, SCART (via adapter), PC AUDIO, USB, HDMI1, HDMI2, Y Pb Pr, AV (RCA), L/R audio |
| PVR Recording | Yes (via USB, .ts format, requires formatting) |
| Time Shift Function | Yes (pause and resume live TV) |
| Teletext | Yes |
| EPG (Electronic Programme Guide) | Yes (DVB-T only) |
| Hotel Mode | Yes (limit volume, lock settings) |
| Parental Lock | Yes (channel blocking, password changeable) |
| Remote Control Batteries | 2 x AAA (1.5V) |
| VESA Mount | 100 x 100 mm, M4 screws (max 10 mm length) |
| Cleaning | Use a soft, dry cloth; avoid solvents and sharp objects |
| Safety | Do not expose to rain or moisture; keep ventilation clear; disconnect during storms |
Frequently Asked Questions - CTV 2205 AEG
User questions about CTV 2205 AEG
0 question about this device. Answer the ones you know or ask your own.
Ask a new question about this device
Download the instructions for your Television in PDF format for free! Find your manual CTV 2205 - AEG and take your electronic device back in hand. On this page are published all the documents necessary for the use of your device. CTV 2205 by AEG.
USER MANUAL CTV 2205 AEG
natural_image
Black AEG monitor with blank screen, no visible text or symbols on the device itself2 Deutsch
14.2 PVR File System
7.3 Ricerca manuale ATV
12.3 Timer Sleep
| HOTEL MENU | |
| Max Volume | 100 |
| Contrast Lock | On |
| ColorTemp Lock | On |
| Channel Delete | Yes |
Before using this device, carefully read this user manual and keep it together with the Warranty Certificate, cashier receipt and if possible, the original package inclusive its interior packing. If you hand on the device to any third person, include the user manual as well.
- To avoid the risk of ire or electric shock, do not expose the device to rain or humidity. Do not operate near water (e.g. in bathrooms, swimming pools and wet basements). The device is not intended to be operated in rooms with high humidity.
- Moving the device from cold to warm surroundings may cause condensation inside the device. Leave the device for several hours turned off.
- Ensure that no foreign objects enter the device.
- Only use the device for the private intended use. This device is not intended for commercial use.
- Do not use the appliance outdoors. Protect from heat, direct sunlight, moisture and sharp edges.
- When installing the device, do not cover any of the ventilation openings. Keep on all sides at least 8 cm distance for proper ventilation.
- Never open the enclosure of the device. Improper repairs may cause significant hazards to the user. In the event that the device is damaged, in particular the power supply and its cable, do not use the device but have it repaired by a specialist. Regularly check the mains cable for damage.
- Disconnect the power supply from the mains and remove the batteries from the remote control if the device is not used for long periods of time.
- Always take hold of the plug when disconnecting from mains power supply; do not pull the cable.
- Select a suitable location for the device, such as a dry, level and slip-proof surface when you can easily operate the device.
- Protect the screen from solvents to avoid damage.
- Do not touch the display unnecessarily, do not put pressure on its surface and do not touch it with pointed or sharp objects.
- Stop using the device if it does not work as usual. Immediately disconnect from mains power supply and contact the authorised service centre if you notice odours or smoke.
- During storms disconnect from mains power supply.
- The power supply is a protection class II device and must be connected to a properly installed, easily accessible Schuko socket. Ensure that your mains power matches the specifications on the type label.
- Ensure that during installation mains cord and other cables are not squeezed or pinched.
- Route the mains cord in such way that it does not become a trip hazard.
- Do not use a cable longer than 70 cm for USB connection. This may cause malfunctions.
These symbols may be found on the device and are intended as warnings:

The lightning flash is intended to alert the user to the presence of dangerous voltage within the device.
The exclamation mark is intended to alert the user to the presence of important operating and maintenance instruction accompanying this device.
Children and disabled persons
- For the safety of your children, keep any packing parts (plastic bags, cartilage, Styrofoam etc.) out of their reach.
WARNING! Don't let small children play with foils for danger of suffocation!
- This device is not intended for use by persons (including children) with reduced physical, sensory or mental capabilities, or lack of experience and/or knowledge unless they have been given supervision or instructions concerning the use of the device by a person responsible for their safety.
- Supervise children to ensure they do not play with the device.
Symbols in this user manual
Important notes for your safety are marked distinctively. Pay absolute attention to them to avoid accidents and damage to the device:
WARNING:
Warns of dangers for your health and indicates potential risks of injury.
△ CAUTION:
Indicates potential dangers for the device or other objects.
NOTE: Highlights tips and information for you.
Contents
- Important Safety Precautions....50
- Device Overview .... 53
2.1 Location of Controls and Connections....53
2.2 Rear View (Connection)....53 - Remote control....54
3.1 Button Functions....54
3.2 Insert Batteries ....54 - Before Installation....55
4.1 Scope of Delivery 55
4.2 Assemble Device 55
4.3 Connect Antenna Cable 56
4.4 Power Connection ....56
4.5 Initial Installation....56
4.6 Select Source 56 - Connect External Devices.... 57
- Basic Operation 57
6.1 Turn TV Set On/Off 57
6.2 Select Channel....58
6.3 Adjust Volume....58
6.4 Shortcuts....58
6.5 OSD Menu Structure 58 - Search and Edit Channel....59
7.1 Channel Search....59
7.2 DTV Manual Scan....59
7.3 ATV Manual Scan....59
7.4 Edit Channels....59
7.5 Display Information....60 - Programme Info (EPG - only for DVB-T)....61
- PVR Recording and Time Shift Function (Only in DTV Mode) (optional)....61
9.1 PVR Settings....62
9.2 Direct PVR Recording (Manual)....62
9.3 Programmed Recording with EPG (Electronic Pro-gramme Guide) 63
9.4 PVR Playback....63
9.5 Time Shift Function....63 - USB Mode 64
- Set Picture and Sound 64
11.1 Change Picture Settings....64
11.2 Change Aspect Ratio 65
11.3 Noise Reduction 65
11.4 PC Picture Settings....65
11.5 Change Sound Settings....66
11.6 Further Sound Settings 66
52
ENGLISH
- Current Time and Timer 66
12.1 Current Time....66
12.2 On Time and Off Time 66
12.3 Sleep Timer....67
12.4 Auto Sleep (Auto Sleep)....67
12.5 Time Zone 67 - Teletext....67
- Special Functions 68
14.1 Language Settings....68
14.2 PVR File System....69
14.3 Default....69 - Lock Functions 69
15.1 Lock....69
15.2 Hotel Mode....70 - Troubleshooting....70
- Technical Specifications....71
- Meaning of the "Wheelie Bin" Symbol....71
2. Device Overview
2.1 Location of Controls and Connections
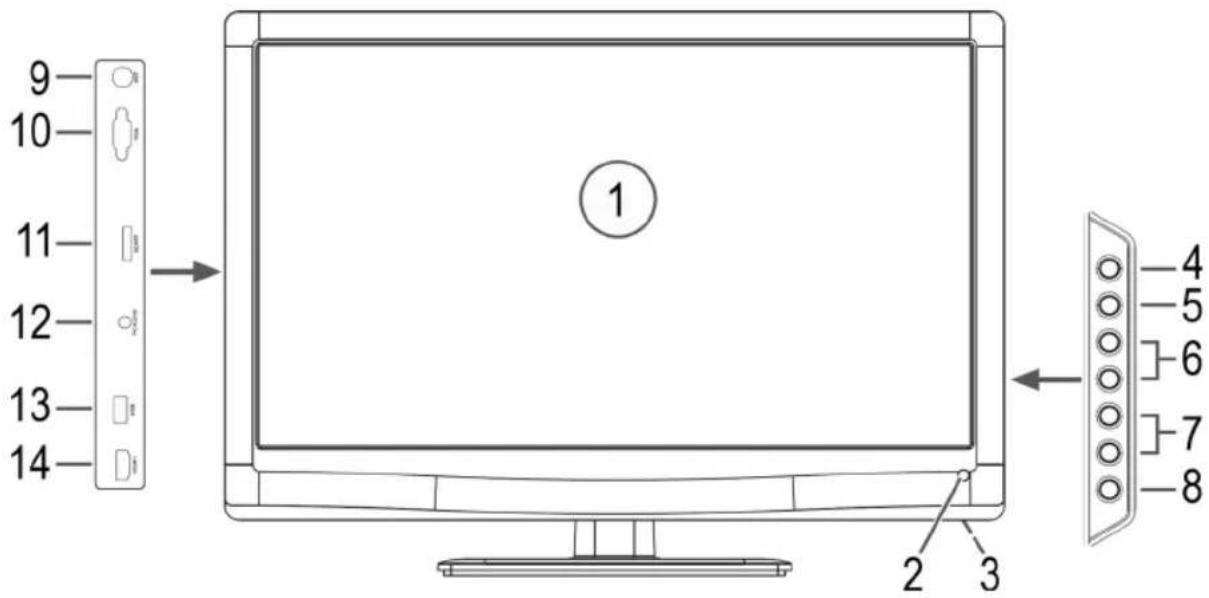
1 LCD Display
2 Sensor for the remote control
3 Status indicator (operation = blue, standby = red)
4 Select signal source
5 MENU Open/close OSD menu
6 CH+/CH- Select channel (next/previous channel number). In menu navigate one position up/down.
7 VOL+/VOL- Adjust volume. In menu navigate one position right/left/confirm selection.
8 ⏻ Switch device to standby mode
9 ANT 75 Ohm antenna input
10 VGA PC Input
11 SCART Adapter connection
12 PC AUDIO Audio input
13 USB USB port
14 HDMI1 Input
2.2 Rear View (Connection)

2 R/L -Audio inputs (right/left)
3 DC 12V/3A Power supply connection
4 Y / Pb / Pr Component Video input
5 HDMI2 input
3. Remote control
3.1 Button Functions

28 VOL+/-: Increase or decrease volume.
29 CH.LIST: Display channel list.
30 Arrow buttons (▲):▼▶◀ Navigate OSD menu.
31 TV MENU: Access OSD menu.
32 Numeric buttons: Enter channel number.
33 POWER ⏻Turn device on/off.
1 MUTE: Mute sound.
2 AUDIO: In ATV mode cycle through audio channels Stereo/ Mono/Dual Mono (if broadcast). Select audio language in DVB-T mode (if broadcast).
3 RECALL: Toggle between current and previous channel.
4 SOURCE: Access signal source menu.
5 OK: Confirm input.
6 EXIT: Exit OSD menu or return to previous menu.
7 SOUND: Select sound mode: Standard, Music, Movie, Sports, and User.
8 CH+/-: Select next/previous channel.
9 ASPECT: Select aspect ratio.
10 TV/RADIO: Toggle between TV and Radio in DTV mode (if radio channels are available in your area).
11 TEXT: Activate Teletext / superimpose Teletext on TV picture / deactivate Teletext.
12 INFO: Display current channel information.
13 SUBTITLE: Select subtitle language (if broadcast in DVB-T mode).
14 ▶: Skip to next file (in USB mode).
15←Skip to previous file (in USB mode).
16 REC/REP: Start PVR recording (DTV only) / Repeat file(s) in USB mode.
17 ■ Stop playback (in USB mode).
18 II Pause playback (in USB mode).
19▶Start playback (in USB mode).
20▶Fast forward in USB playback.
21 ◀Rewind in USB playback.
22 Red/Green/Yellow/Blue: Access colour-coded pages in Teletext mode. In menu mode channel edit.
REVEAL: Display hidden Teletext information.
HOLD: Hold Teletext page.
LIST: Set four Teletext favourites.
INDEX: Display Teletext time. Display Index page (100) in Teletext mode.
SUBPAGE: Select sub page in Teletext
SIZE: Enlarge current Teletext page.
MIX: Superimpose Teletext on TV image.
23 FAV: Display favourite list.
24 EPG: Display Electronic Programme Guide in DTV mode.
25 FREEZE: "Freeze" current image.
26 SLEEP: Activate interval for auto off.
27 PIC: Select picture mode: Standard, Mild, User, Dynamic.
3.2 Insert Batteries
- Open the battery compartment at the rear.
- Inser 2 x 1.5V batteries type R03/AAA ein. Observe correct polarity (see battery compartment)!
- Close the battery compartment again.
During longer periods of non-use remove the batteries to avoid battery leakage.
WARNING:
- Protect batteries from heat and direct sunlight. Do not dispose of batteries by burning, danger of explosion!
- Keep batteries away from children. They are no toys.
- Do not force batteries open.
- Avoid contact with metal objects (rings, mails, screws, etc.), risk of short circuit!
- Short-circuited batteries can heat up and even ignite, risk of burns.
- For your own safety cover battery terminals with sticky tape during transport.
- In case of battery leakage avoid contact with eyes and mucous membranes. After contact wash your hands, rinse eyes with clear water and contact physician with persistent troubles.
△ CAUTION:
- Do not use odd battery types or fresh and exhausted batteries.
- Do not dispose of batteries with the household trash. Return exhausted batteries to collection points or your dealer.
i NOTE:
- If the remote control range shortens the batteries are exhausted and must be replaced.
- Do not use rechargeable batteries.
- Protect batteries from heat and direct sunlight. Do not dispose of batteries by burning, danger of explosion!
- Remove exhausted batteries from the device. Remove the batteries during longer periods of non-use to avoid battery leakage.
- Wash thoroughly after coming into contact with battery acid.
4. Before Installation
4.1 Scope of Delivery
After unpacking ensure that the following parts were included:
• TV set
- Stand base plate and three Phillips screws
• Power supply (DC 12V)
- Remote control (incl. 2 x 1.5 V batteries type LR03 AAA)
- User manual
- Scart adapter cable
4.2 Assemble Device

- Mount the base plate onto the stand. Manually secure the screw to the base.
- Attach the stand with the three Phillips screws.
- Remove the protective film from remote control and TV set, if attached.
- Place the TV set on a stable, level surface. Ensure that the surface can carry the TV's weight.
- Protect the device from extreme heat and humidity.
- Ensure sufficient ventilation on all sides. When placed in a wall unit leave at least 20 cm on top and 10 cm distance at the sides for ventilation.
i NOTE: Wall mounting
- You can alternatively mount the device with the help of a suitable VESA standard wall bracket (available from dealers) to a suitable wall.
- Gap between holes in millimeters: 100 x 100.
- Thread: M4. The pitch length of the screws may not exceed 10 mm.
- The stand is not fitted when mounting to a wall.
- Maintain a clearance of at least 8 cm for ventilation around the device.
- Check the reach of the cable! When mounting the device, make sure that an easily accessible outlet is available within reach of the power cable.
4.3 Connect Antenna Cable
The TV set features a tuner to receive TV signals via antenna/cable and DVB-T signals.

CAUTION:
- Connect the antenna cable before connecting to mains power supply.
• DVB-T reception: The device is intended for reception via passive DVB-T antenna. - Connect the DVB-T antenna to ANT input.
- In the source menu (press SOURCE button) select DTV.
Other Antenna Connections
For optimum trouble-free picture quality use a dual shielded 75 ohm antenna cable.
- Connect a 75 ohm antenna cable to the antenna wall outlet.
- Connect the other end to antenna input ANT at the rear of the device.
- In the source menu (press SOURCE button) select ATV.

NOTE:
To be able to watch TV you first have to search for channels ( see "4.5 Initial Installation" on page 56).
4.4 Power Connection
The power supply is designed for AC 100-240 V\~ 50/60 Hz.
- Connect the power supply to the DC 12 V/3 A jack on the TV set. Then plug the power supply into a properly installed wall socket.

CAUTION:
Connect all devices before connecting the TV set to mains power supply. The wall outlet must be freely accessible at all times.
4.5 Initial Installation
When turning the TV set on for the first time a window is displayed to select the menu language and to start Channel Search.
- When the indicator light turns red, press the POWER ⏻ button on the remote control. The "Select OSD Language" window is displayed.
-
Press OK to confirm German as OSD language or press the arrow buttons ▶/◀/▲/▼ on the remote control and OK to select your language.
-
Press the arrow buttons ▶/▲ to select the country of your location.
-
Press OK to start Channel search. This process will take a few minutes. Progress is displayed on screen.
| Bitte OSD Sprache wählen | ||||
| Česky | English | Français | Magyar | Polski |
| Dansk | Español | Hrvatski | Nederlands | Português |
| Deutsch | «Mlyvki» | Italiano | Norsk | русский |
4.6 Select Source
| Input Source |
| DTV |
| ATV |
| SCART |
| YPbPr |
| PC |
| HDMI1 |
| HDMI2 |
| AV |
- In on mode press the SOURCE button. The source menu (connected devices) is displayed.
- Press the arrow buttons ▲/▼ on the remote control or CH +/- on the device to select the desired source.
- Press OK or VOL +/- on the device to confirm.
i NOTE:
Press the EXIT button to exit the menu without changes.
5. Connect External Devices
Your TV set features a variety of connectors for different devices (e.g. DVD recorder, PC, camera and set top box).
IMPORTANT! Ensure that your TV set and all devices to be connected are turned off before connection. Observe the user manuals of devices to be connected.
SCART Connector
Good quality analogue image and sound signals are transmitted via the SCART connector on the left hand side of the device. Connect here devices such as VCR, satellite receiver, game console or Pay-TV decoder.
- Connect the Scart adapter cable to the SCART connector on the TV set.
- Connect the device via the full-featured SCART cable with the Scart adapter cable jack.
- In the source menu (press SOURCE button) select SCART.
VIDEO Connectors
You can connect e.g. a video camera via the RCA jacks L and R and the AV jack on the back of the unit.
- Connect the device via RCA cable to AV, L and R.
IMPORTANT! Observe the colour coding of the cables when using AV cable (video = yellow, audio L = white and audio R = red).
- Select signal input AV in the source menu (press SOURCE button).
PC Connector
- Use a VGA cable to connect the monitor connector of the PC with the VGA connector on the TV set.
- Use an audio cable to connect the audio connector of the PC with PC AUDIO on the TV set.
- In the source menu (press SOURCE button) select PC.
Component Connector
The component connector Y Pb Pr transmits analogue image signals of external devices, e.g. AV receiver or DVD recorder in very good quality.
- Use a component cable (purchase separately at your dealer) with 3 RCA connectors to connect component output of the external device with the inputs Y Pb Pr on the TV set.
- Use an audio cable to connect the audio output of the external device with the audio connectors AUDIO L and R on the TV set.
- In the source menu (press SOURCE button) select YPbPr.
HDMI- Input
Digital video and audio signals from an external device are transmitted in high quality via the HDMI ports.
- Use an HDMI cable (not supplied) to connect the HDMI output of the external device with the HDMI input on the TV set.
- Select signal input HDMI1 resp. HDMI2 in the source menu (press SOURCE button).
6. Basic Operation
All settings can be performed comfortably with the remote control and the OSD menu. The basic functions can also be performed with the buttons on the TV set. In this user manual we generally describe operation with remote control.
6.1 Turn TV Set On/Off
- In standby mode (status indicator red) press the POWER ⏻ button on the remote control. The indicator light turns blue and the device is switched on.
- Press the POWER button on the remote control to turn the device off again (standby mode).
i NOTE:
Disconnect from mains power supply if not used, as the device uses a small amount of power in standby mode.
6.2 Select Channel
- Press the CH +/- buttons or numeric buttons 0-9 to select the desired channel.
- Press the RECALL button on the remote control to return to the previous channel.
- Press CH.LIST to display the channel list. Press the arrow buttons (▲▼▶◀) to highlight a channel and press OK to display the channel on screen.
6.3 Adjust Volume
- Press the VOL +/-, buttons to adjust the volume.
- Press the MUTE button to temporarily mute the sound. Press MUTE or VOL + to unmute the sound again.
6.4 Shortcuts
AUDIO Select audio language (only if supported by broadcaster)
SOURCE Select external device
PIC Select picture mode
SOUND Select sound mode
SLEEP Set sleep timer
ASPECT Select aspect ratio
TEXT Access Teletext
INFO Display channel information
SUBTITLE Select subtitle language (only if supported by broadcaster)
6.5 OSD Menu Structure
The OSD (On Screen Display) menu serves to select and set the different functions.

- Press the TV MENU button to display the OSD menu. See main menu items below.
- First press ◀▶ select the desired main menu item. The submenus are displayed next to them.
- Press ▲/▼ to select a submenu and press OK to confirm.
- Press the TV MENU button to return to the main menu.
Submenus
- Press the arrow buttons ▲ to select a submenu item. Here you can:
- either perform settings with the arrow buttons /◀◀
- or press OK to open a further setting window and perform settings here with the arrow buttons ◀.
Return to Main Menu
To select a different item from the main menu first exit the active submenu.
- Repeatedly press TV MENU until the main menu header (e.g. CHANNEL) is highlighted.
Exit Menus
- Press the TV MENU button to exit the menus step by step or press the EXIT button to exit the menu. Your changes are saved.
NOTE: After a few seconds idling the menu disappears automatically.
7. Search and Edit Channel
Your TV set can receive DVB-T signals as well as conventional analogue signals (e.g. via cable). The stations which can be received depend on the selection of the input signal: your DVB-T antenna for DVB-T reception or analogue cable tuner. Both methods can be saved in the channel list – but generally you will only use one kind of reception.
• DVB-T channels are displayed as DTV in the OSD menu.
- Analogue channels are displayed as ATV in the OSD menu.
7.1 Channel Search

- Press the TV MENU button to display the OSD main menu.
- Press ▼ in CHANNEL menu to select Auto Tuning.
- Press OK. Press ◀/▶ to select one of three tuning methods (DTV+ATV, DTV, ATV). Now press ▼
- Then press ▲ to select the country as your location.
- Press OK to start Channel Search. This will take a few minutes. The progress is shown on screen.
- After auto scan channel 1 is displayed.
- The window closes automatically after a few seconds or press EXIT to close it.
7.2 DTV Manual Scan
- Press the TV MENU button to display the OSD main menu.
- Press the arrow button ▼ to select item DTV Manual Tuning and press OK.
- Press the arrow buttons to select a channel. The signal strength of the selected channel is displayed. If no signal is received on the selected channel NO SIGNAL is displayed. In this case select a different channel.
- Press OK to start the manual scan.
- After finishing the manual scan the number of found channels is displayed. Press EXIT to close the window.

7.3 ATV Manual Scan
To receive analogue channels an analogue antenna signal (e.g. cable tuner) must be connected. Analogue channels are displayed as ATV (TV) in the OSD menu. If previously DVB-T channels were saved the new analogue channel is added to this list. The digital channels are not overwritten.
- Press the TV MENU button to display the OSD main menu.
- Press ▼ in CHANNEL menu to select ATV Manual Tuning and press OK.
- Under Storage To press ◀▶ to select the position in the channel list for the new analogue channel.
- Press ▲ to highlight Search.
- Press 🖼️ to start the manual scan. The changing frequency is displayed during the scan. After a channel is found the sound is activated again.
- Press the red button to save the channel.
- To scan for additional channels first select a position in the channel list for the new analogue channel with Storage To and then restart the scan.

In this menu you can also perform the following settings: System: is generally not changed. Current CH: shows which channel is active in the background. Press ◀/▶ to change. Fine-Tune: Press ◀/▶ to change the frequency in small steps. Frequency: Shows the current frequency.
7.4 Edit Channels
After auto scan all channels are saved in found sequence. You can add channels in the favourite list (FAV) or change the sequence by moving/swap or skipping channels.
ENGLISH
Move Channel/swap
- Press the TV MENU button to display the OSD main menu.
- Press ▼ in CHANNEL menu to select Programme Edit and press OK.
- Press ▲/▼to highlight the channel to be moved/swapped.
- Press the yellow button. The channel is marked yellow.
- Press the numeric buttons to enter the programme.
- Press OK twice to save the channel in the desired position.
- Repeat steps 5-6 to move/swap further channels.
- Press EXIT to exit the menu and save the changes.
| Programme Edit | |
| 1 Das Erste | BTV |
| 2 ZDF | BTV |
| 3 WDR Düsseldorf | BTV |
| 4 SAT.1 | BTV |
| 5 RTL NRW | BTV |
| 6 RTL2 | BTV |
| 7 VOX | BTV |
| 8 Kabel eins | BTV |
| 9 N24 | BTV |
| 10 ProSieben | BTV |
Skip Channel
The highlighted channels can only be accessed with the numeric buttons 0-9. Channel selection with CH +/- is no longer possible.
- Press the TV MENU button to display the OSD main menu.
- Press ▼ in CHANNEL menu to select Programme Edit and press OK.
- Press /▲t▼ highlight the channel to be skipped.
-
Press the blue button. Ⓞ is displayed behind the channel name.
-
Press EXIT to exit the menu and save the changes.
To unlock the channel select the highlighted channel and press the blue button again.
Save Channel to Favourite List
Save your favourite channels in the favourite list. Access the list with FAV.
- Press the TV MENU button to display the OSD main menu.
- Press ▼ in CHANNEL menu to select Programme Edit and press OK.
- Press /▲ to highlight the channel to be saved in the favourite list.
- Press the FAV button. A heart icon is displayed behind the channel name.
- Press EXIT to exit the menu and save the changes.
To delete the channel from the favourite list select the highlighted channel and press the FAV button again.
Rename Channel (only in ATV mode)
- Press the TV MENU button to display the OSD main menu.
- Press ▼ in CHANNEL menu to select Programme Edit and press OK.
- Press /▲ to highlight the channel to be renamed.
- Press the green button.
- Change the name with the arrow buttons.
- Press OK and press EXIT to exit the menu and save the changes.
Delete Channel
Use the delete function after compiling your channel list by moving/swap the channels. Delete unwanted channels at the end of the list (with channel number).
- Press the TV MENU button to display the OSD main menu.
- Press ▼ in CHANNEL menu to select Programme Edit and press OK.
- Press ▲to highlight the channel to be deleted.
- Press the red button to delete the channel.
- Press EXIT to exit the menu.
7.5 Display Information
You can display additional information for the current channel (channel number, network, modulation, quality and signal strength).
- Press TV MENU to enter the OSD main menu.
- In the CHANNEL menu press ▼ to select Signal Information and press OK.
8. Programme Info (EPG - only for DVB-T)
The Electronic Program Guide (EPG) is broadcast by many, but not all, programme providers. The contents can also greatly vary.
The EPG shows a daily overview of current or upcoming programmes with their respective broadcasting times.
- Press the EPG button to open the programme info.
- Use the following buttons for changes:
◀/▶ Toggle between channel/time overview (1) and change the date (2) or channel.
▲/▼ Select channel.
OK: Access selected channel.
INDEX: Go to channel/time overview (1). Press
◀/▶ to toggle
between channel and time overviews.
CHANNEL: The date (2) changes to CHANNEL. Press ◀/▶ to select the channel with the programmes to be viewed.
Time: CHANNEL changes to date (2). The window again displays the individual channels (3) and their current programmes (4).
INFO: Display detail information about selected programmes.
yellow button: Display schedule.
red button: Open recording window ( see "9.3 Programmed Recording with EPG" on page 63).
blue button: Open remind window ( see "Save Programmes").
EXIT: Exit EPG.

EPG allows you to save the programme start. The programmes are displayed in the schedule list. In on mode 10 seconds before programme start a prompt is shown asking you to switch channels. If no button is pressed or if you press◀ to confirm the channel is switched. Press▶to stay with the current channel.
- Press the EPG button to open the EPG window.
- Press INDEX and then press ◀ to select CHANNEL (1).
- In CHANNEL (2) press ↕ to select the channel.
- Press ▲ to select the desired programme.
- Press the blue button.
- In the next window confirm the values with OK or change the values. The recorder schedule list with all saved programmes is displayed.
- Press EXIT to close the window.
9. PVR Recording and Time Shift Function (Only in DTV Mode) (optional)
Important! Before recording the media must be formatted. Existing files are deleted. Check to make sure that no important information is saved on the media. Format the media according to "9.1 PVR Settings" (see page 62).
i NOTE:
PVR recordings are saved in .ts format to the USB device and can only be played back on this TV set. Playback on computer, DVD player, etc. which do not support .ts format is not possible.
9.1 PVR Settings
- Press the TV MENU button to display the OSD main menu.
- In the main menu select OPTION, press ▼ to select PVR File System and press OK.
- Select Disk
Not applicable for this device.
- Check PVR File System
Check the connected USB device. Press OK to check the PVR file system.
| Select Disk | C: |
| Check PVR File System | Start |
| USB Disk | |
| Format | |
| Time Shift Size | |
| Speed | |
| Free Record Limit | 6 Hr. |
| MENU | |
i NOTE:
Depending on the USB media's storage capacity, the check can take a little while. Do not press any buttons during the check.
- USB Disk
Here the file system check status is displayed. - Format
Press OK to format the disk.
△ CAUTION Existing files are deleted!
Connected PVR media must be formatted! The device writes specific files to the disk.
The window on the right is displayed. Select between "FAT 32" and "Hi Speed" formatting.
- Press ◀ to select the desired formatting mode.
- Press OK to confirm. A security prompt is displayed.
- Press → start formatting. The USB device is now formatted and the PVR files are created.
| File System Size | |
| PVR File System Type | FAT 32 |
| PVR File System Size | All |
| SD 104 Min | |
| HD 29 Min | |
| MENU | |
NOTE: This can take several minutes according to disk capacity.
If you have selected "Hi Speed" formatting, a window for setting the time shift size appears.
- Press ◀/▶ to select the desired Time Shift Size (size between 512MB....All).
i NOTE:
Selecting ALL for the time shift function uses the maximum disk capacity, and for further recordings is no capacity left.
• Free Record Limit
Press the arrow button▶ to select the recording time between 1 and 6 hours.
9.2 Direct PVR Recording (Manual)
- In DTV mode select the programme to be recorded.
- Press the REC/REP button. The info bar is displayed.
The recording time is displayed at the bottom right. Below this you can see the remaining recording time in blue.
The info bar at the bottom on the left displays the channel number together with the name of the station.
i NOTE:
Press REC/REP again to hide the info bar. The REC button remains top left on screen.
- Press the ■ button to finish recording.
i NOTE:
- Press the II button to pause the current recording ( see "9.5 Time Shift Function" on page 63).
Record a programme and watch another at the same time
During PVR recording you can switch to another programme of the same channel. In doing so, you will not interrupt the recording.
If the programme is broadcast on a different channel, a warning message appears on the screen.
The programmes which are broadcast on a channel depend on the coverage area. Information on channels that are broadcast in your coverage area can be found at www.überallfernsehen.de or at your specialist dealer.
9.3 Programmed Recording with EPG (Electronic Pro-gramme Guide)
- Press the EPG button to access the electronic programme guide.
- Press INDEX and press ◀/▶ to select CHANNEL (1).
- In CHANNEL (2) press /◄► to select the channel.
- Press ▲to select the desired programme.
- Press the red button. The recorder window is displayed.
- Press OK to confirm the entered times.
- Programming is finished and the dates are shown in the Overview.
- Press EXIT to close the window.


NOTE:
- During recording the info bar is displayed. Press REC/REP to hide the info bar. The REC button top left on screen remains.
- Important: The device does not automatically turn off after the recording is finished.
Different Programme Modes
To change the recording mode of the programming via EPG, select the bottom line in the Timer window. Here, select between the following modes:
Auto: The preset times of the station are saved.
Once: If necessary, you can change the preset start and end times.
Daily: The programme is recorded daily.
Weekly: The programme is recorded again on the same day of the week.
9.4 PVR Playback
- Press the INDEX button to display your recordings.
- Repeatedly press the INDEX button to sort the recordings by Programme, Channel, Time.
- Press ▲/▼to select the desired recording.
- Press ▶(19) to start playback.
- Press ■ to end playback.

NOTE:
- During playback the info bar is displayed. Press ▼o hide the info bar. The PLAY button top left on screen remains.
- Press the II button to pause playback (→ see "9.5 Time Shift Function" on page 63).
9.5 Time Shift Function
The time shift function allows you to interrupt a programme and to continue viewing it later. A USB device with sufficient capacity must be connected. Time shift size list set after formatting ( → see "9.1 PVR Settings" on page 62).
- Press the II button. The image is "frozen". On the bottom of the screen the elapsed time is displayed.
- Press ▶(19) to activate time shift playback.
i NOTE:
Press ▼ to hide the info bar. The time shift logo appears top left on screen.
- Press ▶/◀◀ to skip forward and back in the time window.
- Press ↗ to activate the search.
- Press Ito pause playback again.
Press ■ to exit the function.
A-B Repeat
In time shift mode you can define a section to be automatically repeated. This is indicated with the letters A and B below the playback icon.
- Mark the starting point of the section to be repeated. Press ▶ (19) once during time shift playback.
- Press ▶ again to mark the end point of the section to be repeated. The marked section is now repeated.
Press the ■ button to stop repeat mode.
10. USB Mode
This device has been developed in accordance with the latest technical developments in the USB field. Unfortunately the large number of different types of USB storage media on offer today makes it impossible to guarantee full compatibility with all USB storage media. For this reason there may be problems in rare cases with playing back from USB storage media. This is not a malfunction of the device.

NOTE: MPEG4
It is not possible to guarantee full compatibility with all of the compression methods used worldwide, particularly when more than one soundtrack or subtitles are involved. Also MPEG 4 files with integrated special functions such as a menu, subtitles etc. are not always supported. This is no malfunction of the player.
- Connect your USB device directly at the USB port at the rear of the unit.
- Press TV MENU to display the OSD main menu.
- Press ▶ repeatedly until the OPTION menu is highlighted.
- Press OK. The USB menu is displayed.
- Press ◀/▶ to select the playback mode and press OK to confirm. Only the selected file types are displayed.
- Press ◀ to select drive C and press OK.


NOTE:
- Press EXIT to return to playback selection mode.
-
For further operation observe the instructions at the bottom of the screen.
-
Press ▲▼▶◀ to select the file to be played/displayed. The info window with additional information is displayed and playback starts.
- Press ▶ (19). If required, press INFO to display the control menu.
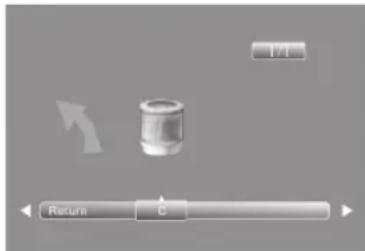

- Press ◀ to navigate the control menu. Press OK to execute the selected function.

NOTE:
- The control menu functions differ depending on the playback mode.
- Press ▼ to hide the control menu. Press INFO to display the control menu again.
Remote Control Operation
- Press ▶▶/◀◀ to skip to the next/previous file.
- Music files: Press >>/« to search within the file forward or back. Press ▶ to return to normal playback mode.
- Press the button to stop playback.
11. Set Picture and Sound
11.1 Change Picture Settings
Your TV set comes with 3 preset and one manually adjustable picture settings (Standard, Mild, User and Dynamic). Press the PIC button to cycle through the options. Select User to access your user-defined picture settings.

Define Picture Mode
- Press the TV MENU button to display the OSD main menu.
- Press the arrow button until the menu PICTURE is activated.
- Press ▼ to highlight the item Picture Mode. Press OK to display the menu.
- Press /▶ select item User. The following items are activated and can be changed.
Contrast / Brightness / Color / Sharpness and Tint
(only activated for NTSC signals)
- Press ▼ to access the desired item and set the value with the arrow buttons ◀
- Press the TV MENU button to access the complete picture menu for further changes.
- Press EXIT to exit the menu and save the changes.
Set Colour Temperature
Your TV set comes with 3 preset and one manually adjustable colour temperature settings (Cold, Medium, Warm and User).
- Press the TV MENU button to display the OSD main menu.
- Press the arrow button ▶ until the menu PICTURE is activated.
- Press ▼ to highlight the item Colour Temperature. Press OK to display the menu.
- Press ◀/▶ to select the item User. The following items are activated and can be changed: Red / Green / Blue.
- Press ▼o access the desired item and set the value with the arrow buttons / ◀▶
- Press the TV MENU button to access the complete picture menu for further changes.
- Press EXIT to exit the menu and save the changes.
11.2 Change Aspect Ratio
Your TV set comes with 5 aspect ratios: Choose the suitable option by pressing the ASPECTn.
- Press ASPECT once to display the current setting.
- Press ASPECT again to change the setting.
11.3 Noise Reduction
This function reduces the noise and increases the image quality with weak signals.
- Press the TV MENU button to display the OSD main menu.
- Press the arrow button ▶ until the menu PICTURE is activated.
- Press the arrow button ▼ to highlight Noise Reduction. Press OK to display the menu.
- Select between the settings: Off, Low, Medium, High and Auto. Press ▼ to display the desired item and press OK to confirm.
- Press EXIT to exit the menu and save the changes.
11.4 PC Picture Settings
If a PC is connected to your TV set and PC is selected as signal source in the PICTURE menu, the item Screen can be selected. Set position and synchronisation for desktop here.
- Press the TV MENU button to display the OSD main menu.
- Select the PICTURE menu.
- Press the arrow button ▼ to highlight Screen and press OK.
-
Press the arrow button ▼ to select the picture setting to be changed:
-
Horizontal Pos. (horizontal desktop position)
- Vertical Pos. (vertical desktop position)
- Size
-
Phase (synchronisation)
-
Set the value with the arrow buttons ◀▶
- Press EXIT to exit the menu and save the changes.

11.5 Change Sound Settings
Your TV set comes with 4 preset and one manually adjustable sound settings (Standard, Music, Movie, Sports and User). Press the SOUND button to cycle through the options. Select User to access your user-defined sound settings.

Set Audio Mode
- Press the TV MENU button to display the OSD main menu.
- Press the arrow button ▶ until the menu SOUND is activated.
- Press ▼ to highlight the item Sound Mode. Press OK to display the menu.
-
Press ◀ to select User. The following items are activated and can be changed:
Treble / Bass -
Press ▼ to access the desired item and set the value with the arrow buttons ◀▶
-
Press EXIT to exit the menu and save the changes.
11.6 Further Sound Settings
- Use Balance to set the sound balance between left and right speaker.
-
Select Auto Volume to adjust different volume, e.g. when changing the channel.
-
Press the TV MENU button to display the OSD main menu.
- Press the arrow button ▶ until the menu SOUND is activated.
- Press the arrow button ▼ to highlight Balance or Auto Volume.
- Balance: Press OK to display the menu. Press ↕ to set the desired value.
Auto Volume: Press OK to activate/deactivate the function.
- Press EXIT to exit the menu and save the changes.
12. Current Time and Timer
12.1 Current Time
In DVB-T mode the TV set automatically detects the current time. In ATV mode the current time can be set manually.

- Press the TV MENU button to display the OSD main menu.
- Press the arrow button ▶ until the menu TIME is activated.
- Press the arrow button ▼o highlight Clock.
- Press OK to access the function.
- Enter the values such as date with the arrow buttons /
- Press EXIT to exit the menu and save the settings.
12.2 On Time and Off Time
On Time and Off Time define the time when the TV set turns on and off. You can define different periods.
i NOTE:
These functions turn your TV set on from standby mode or into standby mode. If your TV set is turned off with the main switch this functions is invalid.
- Press the TV MENU button to display the OSD main menu.
- Press the arrow button ▶ until the menu TIME is activated.
- Press the arrow button ▼ to highlight Off Time or On Time.
- Press OK to access the function.
- Press the arrow buttons to highlight and change the displayed functions.
- Off Time: Define if the setting is to be performed once or regularly. Select between: (Off, Once, Daily, Mon-Fri, Mon-Sat, Sat-Sun or Sun).
- Hour / Minute: Set the off time.
Off Time:

On Time:
- On Time: Define if the setting is to be performed once or regularly. Select between: (Off, Once, Daily, Mon-Fri, Mon-Sat, Sat-Sun or Sun).
- Hour / Minute: Set the on time.
- Mode: DTV - if DVBT antenna is connected / ATV - if external antenna or cable tuner is connected.
- Channel: Set the channel number that the TV set turns on with.
-
Volume: Set the volume that the TV set turns on with.
-
Press TV MENU to exit the menu and save the settings.
| On Time | Off |
| Hour 00 | |
| Minute 00 | |
| DTV | |
| Channel 2 | |
| Volume 30 | |
| MENU | |
12.3 Sleep Timer
You can set your TV set to automatically turn off after a preset period of time. The sleep timer is deleted and must be set again if you turn the TV set off during sleep timer setting. Set the sleep timer interval between Off and 240 Min.
- Repeatedly press the SLEEP button on the remote control until the desired time is displayed. The menu disappears after a few seconds and the TV set turns off after the preset interval.

NOTE: You can also perform this setting in the TIME menu.
12.4 Auto Sleep (Auto Sleep)
With auto sleep activated the TV set automatically turns into standby mode after not receiving a signal for 10 minutes.
- Press the TV MENU button to display the OSD main menu.
- Press the arrow button ▶ until the menu TIME is activated.
- Press the arrow button ▼o highlight Auto Sleep.
- Press OK to on or off the function.
- Press EXIT to exit the menu and save the changes.
12.5 Time Zone
- Press the TV MENU button to display the OSD main menu.
- Press the arrow button ▶ until the menu TIME is activated.
- Press the arrow button ▼ to highlight Time Zone.
- Press OK. Press the arrow buttons▶/◀/▲/▼ to select the desired time zone.
- Press EXIT to exit the menu and save the changes.
13. Teletext
Teletext is a free information service of the broadcaster. It is transmitted with the TV signal and needs no further equipment. Not all stations offer Teletext. Teletext information is generally divided into areas, themes and pages. Some themes cover several pages (2/3 page two of three), others contain hidden information (quiz answers, VPS times, etc.).
Teletext On / Off
Press the TEXT button on the remote control to cycle through the Teletext functions
- turn on,
- turn off.
Mix Mode
Press MIX to activate the mix mode. The Teletext is superimposed on the TV image. Press again to deactivate the function.
Colour Buttons
Nearly all Teletext pages feature coloured text fields at the bottom of the screen (red, green, yellow, blue). Press the colour buttons on the remote control to access the themes/pages directly, which are displayed in the coloured fields.
Access Pages with Numeric Buttons
The current 3-digit page number is displayed in the rop left corner on screen. The page numbers are always entered with 3 digits with the numeric buttons. It takes a few seconds until the page is displayed.
Access Subpages
- Select the desired Teletext page (with subpages).
- Press the arrow buttons ◀/▶ to select the subpage. The number of subpages for the current Teletext page is displayed at the bottom of the screen.
Select Sub Page
- Select the desired Teletext page (with sub pages).
- Press SUBPAGE. Enter the desired sub-page with 4 digits (e.g. 0003 for the third sub-page). The page is displayed as soon as it is retrieved.
Hold Function
Press the HOLD button to pause and continue the automatic access of subpages.
Display Size
- Press the SIZE button to change the Teletext font size and to toggle in large font mode between top and bottom half of the page.
Hidden Information
Teletext pages with games or riddles often contain the hidden answers.
- Press the REVEAL button to display the answer. Not all broadcasters support this function.
Access Index Page
- Press the INDEX button to display the index page (generally page 100).
Set Favourite Pages
You can set favourite Teletext pages through the four colour buttons.
- In Teletext mode press LIST.
- Now press the colour button under which to save the Teletext page. The number in the respective colour box starts flashing.
- Enter the desired Teletext page.
- In Teletext mode, press LIST to display your preset Teletext pages in the colour boxes; recall the pages by pressing the respective colour button.
- Press LIST to deactivate the function.
14. Special Functions
14.1 Language Settings

- Press the TV MENU button to display the OSD main menu.
- Press the arrow button ▶ until OPTION is activated.
-
Press the arrow button ▼ to highlight the item:
-
OSD Language: Press OK and use the arrow buttons to select the OSD language.
- Audio Language: Press OK and press the arrow buttons to select the audio language.
-
Subtitle Language: Press OK and press the arrow buttons to select the subtitle language.
-
Press EXIT to exit the menu and save the changes.
i NOTE:
- The functions Audio Language and Subtitle Language are only valid if the broadcaster transmits subtitles or a second soundtrack (with a different language).
- The Option Country is set when setting Auto Tuning and cannot be changed here.
14.2 PVR File System
See page 62 "9.1 PVR Settings".
14.3 Default
With reset to default settings all user-defined settings are deleted. Your personal password is not deleted.
- Press the TV MENU button to display the OSD main menu.
- Press the arrow button ▶ until OPTION is activated.
- Press the arrow button ▼ to highlight Restore Factory Default Setting and press OK A security prompt is displayed.
- Press for "Yes" or for "No".
15. Lock Functions
15.1 Lock
This menu allows you to set different locks and to change the Password. Enter the preset password 6666 to open the menu.

- Press the TV MENU button to display the OSD main menu.
- Press the arrow button ▶ until the menu LOCK is activated.
- Press OK to open the function.
- Enter the password (preset 6666).
- This procedure must be repeated every time the menu is accessed.
Change Password
- Highlight the item Set Password and press OK.
- Enter the old password once and the new password twice. It is valid after second input.
- Perform further changes or press EXIT to exit the menu.
i NOTE:
If you forget your password enter the master password 9527 to select a new password.
Block Programme
You can block individual programmes. These programmes can only be accessed after entering the password. The programme block is valid until unlocked or resetting the TV set with Restore Factory Default.
i NOTE:
The function Block Programme is only available with the function Lock Channel activated (On).
- Highlight the item Block Program and press OK.
- Press ▲ or ▼ to select the programme to be blocked.
- Press the green button to block the programme. A lock icon is displayed behind the channel name.
- Block further programmes or press EXIT to exit the menu. The programmes are blocked.
To unlock access the menu Block Programme and mark the channel to be unlocked; press the green button again. The lock icon disappears.
Parental Guidance
The menu item Parental Guidance is invalid, as DVB-T broadcasters do not transmit the necessary signal.
15.2 Hotel Mode
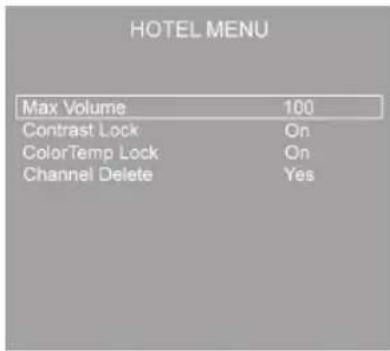
- Press SOURCE and enter 3690 with the numeric buttons.
- The HOTEL MENU is displayed.
-
Perform the settings with the arrow buttons
-
Max Volume: Set the maximum volume for the device.
- Contrast Lock: Activate/deactivate the contrast lock. With activated function the contrast in the PICTURE menu cannot be changed.
- ColorTemp Lock: Activate/deactivate the colour temperature lock.
-
Channel Delete: When this function is switched on (No), the programs in the menu "Programme Edit" cannot be deleted.
-
Press EXIT to exit the menu.
16. Troubleshooting
Before contacting customer support try to solve the problem with the tips from the following table:
| Problem Possible cause and proposal for solution | |
| No image, status LED not on | Check if the mains plug sits properly in the wall outlet.Check mains power on the wall outlet with a different device or connect TV set to different wall outlet. |
| Check if the signal cables from source devices are properly connected.Check if the source device is turned on. | |
| Image flickers | Check if the input signal of the source device matches the specifications of the TV set. |
| Check if the PC menu settings match the video output settings of the PC.Set the values again. | |
| TV set cannot be turned on. Check if the mains plug sits properly in the wall outlet. | |
| No sound. | Check if the audio cables are properly connected.Check the volume. |
| Volume too low. | Check the volume.Set the volume.Check if the volume is limited in the hotel mode menu. |
| Snowy image. Check if antenna or antenna cable are damaged. | |
| Remote control does not work. | Check if the batteries are exhausted.Check if the batteries make proper contact and are inserted with the correct polarity.Ensure that no obstacles are between remote control and sensor.Check if strong light sources shine onto the sensor. |
| Device is not operational. | Disconnect from mains power supply for approx. 5 seconds. Then switch the device on again. |
Defective Pixels
Defective pixels are no TFT panel malfunction. Production-related defective pixels cannot be avoided. Just like convergence defects for cathode ray tubes are defective pixels only a tolerance value.
Our TFT panels offer best value for price and quality.
Defective pixels can be caused by pressure on the panel.
Complex testing procedures during and after manufacture ensure that all defective pixels of our TFT panels are below the respective tolerance level.
The number of defective pixels depends on the kind of pixel and/or sub pixel defect, resolution and panel size.
17. Technical Specifications
| LCD panel | Diagonal 22" (56 cm) | |
| Panel type 16:9 TFT LCD | ||
| Resolution 1920 x 1080 | ||
| Contrast ratio 8000:1 | ||
| Response time 5 ms | ||
| Angle 170° (H) / 160° (V) | ||
| Power supply | Device DC 12V, 3A | |
| Power supply AC 100-240V~ 50/60 Hz | ||
| Protection class Power supply II | ||
| Power consumption <1 W (standby), 35 W | ||
Specifications are subject to change!
This device has been tested according to all relevant current CE guidelines, such as electromagnetic compatibility and low voltage directives, and has been constructed in accordance with the latest safety regulations.
18. Meaning of the "Wheelie Bin" Symbol

Take care of our environment, do not dispose of electrical appliances via the household waste.
Dispose of obsolete or defective electrical appliances via municipal collection points.
Please help to avoid potential environmental and health impacts through improper waste disposal.
You contribute to recycling and other forms of utilization of old electric and electronic appliances.
Your municipality provides you with information about collecting points.




- Deutsch
- PVR File System
- Ricerca manuale ATV
- Timer Sleep
- Children and disabled persons
- Symbols in this user manual
- WARNING:
- △ CAUTION:
- Contents
- ENGLISH
- Device Overview
- Location of Controls and Connections
- Rear View (Connection)
- Remote control
- Button Functions
- Insert Batteries
- i NOTE:
- Before Installation
- Scope of Delivery
- Assemble Device
- i NOTE: Wall mounting
- Connect Antenna Cable
- CAUTION:
- Other Antenna Connections
- NOTE:
- Power Connection
- Initial Installation
- Select Source
- Connect External Devices
- SCART Connector
- VIDEO Connectors
- PC Connector
- Component Connector
- HDMI- Input
- Basic Operation
- Turn TV Set On/Off
- Select Channel
- Adjust Volume
- Shortcuts
- OSD Menu Structure
- Submenus
- Return to Main Menu
- Exit Menus
- Search and Edit Channel
- Channel Search
- DTV Manual Scan
- ATV Manual Scan
- Edit Channels
- Move Channel/swap
- Skip Channel
- Save Channel to Favourite List
- Rename Channel (only in ATV mode)
- Delete Channel
- Display Information
- Programme Info (EPG - only for DVB-T)
- PVR Recording and Time Shift Function (Only in DTV Mode) (optional)
- PVR Settings
- △ CAUTION Existing files are deleted!
- Direct PVR Recording (Manual)
- Record a programme and watch another at the same time
- Programmed Recording with EPG (Electronic Pro-gramme Guide)
- Different Programme Modes
- PVR Playback
- Time Shift Function
- A-B Repeat
- USB Mode
- NOTE: MPEG4
- Remote Control Operation
- Set Picture and Sound
- Change Picture Settings
- Define Picture Mode
- Set Colour Temperature
- Change Aspect Ratio
- Noise Reduction
- PC Picture Settings
- Change Sound Settings
- Set Audio Mode
- Further Sound Settings
- Current Time and Timer
- Current Time
- On Time and Off Time
- Off Time:
- On Time:
- Sleep Timer
- Auto Sleep (Auto Sleep)
- Time Zone
- Teletext
- Teletext On / Off
- Mix Mode
- Colour Buttons
- Access Pages with Numeric Buttons
- Access Subpages
- Select Sub Page
- Hold Function
- Display Size
- Hidden Information
- Access Index Page
- Set Favourite Pages
- Special Functions
- Language Settings
- Default
- Lock Functions
- Lock
- Change Password
- Block Programme
- Parental Guidance
- Hotel Mode
- Troubleshooting
- Defective Pixels
- Technical Specifications
- Meaning of the "Wheelie Bin" Symbol
Brand : AEG
Model : CTV 2205
Category : Television