
CTV 4950 - Television AEG - Free user manual and instructions
Find the device manual for free CTV 4950 AEG in PDF.
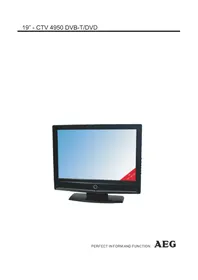


| Product Type | CRT Television |
| Brand | AEG |
| Model | CTV 4950 |
| Screen Size (diagonal) | 20 inches (51 cm) |
| Display Technology | Cathode Ray Tube (CRT) |
| Dimensions (with stand) | Approx. 480 x 400 x 450 mm (W x H x D) |
| Weight | Approx. 15 kg |
| Power Supply | AC 220-240 V, 50 Hz |
| Power Consumption | Approx. 70 W (typical) |
| Remote Control | Included (infrared) |
| Teletext | Yes, with memory |
| Channel Presets | Up to 99 |
| Input Connectors | SCART, RF antenna input, RCA audio/video |
| Audio Output | 2 x 8 W (built-in speakers) |
| Safety Features | Automatic degaussing, child lock |
| Cleaning Instructions | Wipe with dry soft cloth; do not use solvents |
| Accessories Included | Remote control, user manual, power cord |
| Repairability Index | 7/10 (common spare parts available) |
Frequently Asked Questions - CTV 4950 AEG
User questions about CTV 4950 AEG
0 question about this device. Answer the ones you know or ask your own.
Ask a new question about this device
Download the instructions for your Television in PDF format for free! Find your manual CTV 4950 - AEG and take your electronic device back in hand. On this page are published all the documents necessary for the use of your device. CTV 4950 by AEG.
USER MANUAL CTV 4950 AEG
Table of Contents
- DEVICE OVERVIEW 3
1.1 THANK YOU FOR YOUR TRUST!......5
CLASS 1 LASER PRODUCT
CAUTION
USB
DVD Video Multi-angle


Subtitle selection

Language selection


5.1 TURN TV SET ON AND OFF 36
5.2 SELECT TV PROGRAM 36
5.3 SET VOLUME LEVEL 36
5.4 QUICK ACCESS....36
5.5 OSD MENU STRUCTURE 36
- SEARCH AND EDIT CHANNELS 36
6.1 STORE CHANNELS AUTOMATICALLY....37
6.2 STORE DVB-T STATIONS MANUALLY.... 37
6.3 MANUAL SEARCH FOR ANALOG RECEPTION 37
6.4 EDIT CHANNELS 38
- PROGRAM INFO (EPG - ONLY FOR DVB-T) 38
- IMAGE AND SOUND SETTINGS 39
8.1 CHANGE IMAGE SETTINGS.... 39
8.2 NOISE REDUCTION 39
8.3 CHANGE ASPECT RATIO 39
8.4 PC IMAGE SETTINGS 40
8.5 CHANGE SOUND SETTINGS.... 40
8.6 OTHER SETTINGS....40
- CURRENT TIME AND TIMER......40
9.1 CURRENT TIME....40
9.2 SLEEP TIMER 40
9.3 ON TIME AND OFF TIME 41
- TELETEXT 41
- SPECIAL FUNCTIONS 42
11.1 LOCK FUNCTIONS 42
11.2 DEFAULT....42
11.3 LANGUAGE SETTINGS.... 42
11.4 TIME ZONE 42 11.5 AUTO OFF 42 12. General Settings in Setup Menu 44 13. Setup Options 44 13.1 SYSTEM SETUP 44 13.2 LANGUAGE SETUP 45 13.3 VIDEO SETUP 45 13.4 SPEAKER SETUP 46 13.5 DOWNMIX 46 14: UP/DOWN/LEFT/RIGHT 46 15: DVD MENU 46 16. DVD PAUSE 46 17. REPEAT 46 18. PLAY/PAUSE 46 19. STOP 46 20. DVD/USB 47 21. TITEL 47 22. RETURN 47 23. DISPLAY....47 24. OPEN/CLOSE 47 25. OK 47 26. ANGLE 47 27. PBC 47 28. NEXT 47 29. PREVIOUS 47 30. SUBTITLE 47 31. AUDIO 48 32. CLEANING 50 33. DISPOSAL....50 34. DECLARATION OF CONFORMITY 50 35. TROUBLESHOOTING 50 36. TECHNICAL DATA 51
1. OVERVIEW
Location of Controls
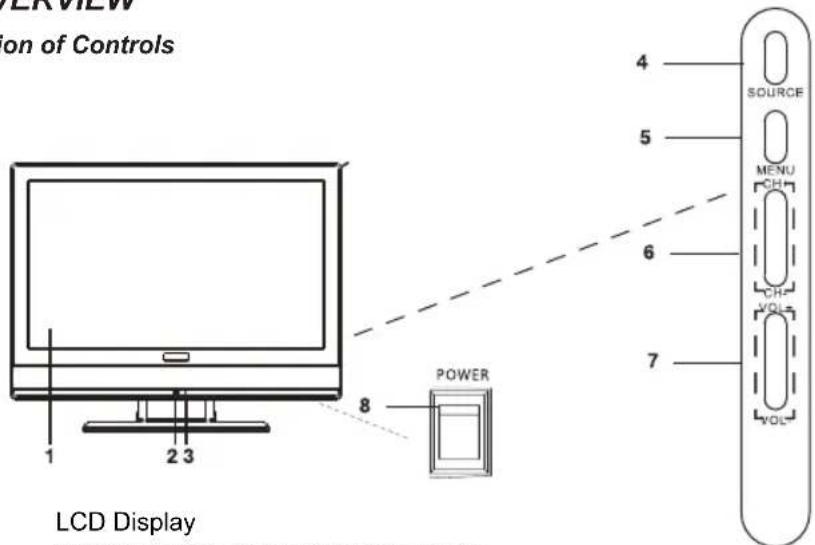
- LCD display
- IR sensor
- LED Off: when the TV is turned off; green: during operation; red: in standby mode
- SOURCE Select source
- MENU Access/exit OSD menu
- CH + / - Select channel (next/previous channel number); in menu mode one position up/down
- V +/- Volume control; in menu mode one position right/left / confirm selection
- Main switch
Connections Rear
- 100-240V 50/60Hz
Mains power supply
- HDMI Input DVD recorder, DVD player or set top box
- VGA INPUT Input PC
- Y Pb Pr Input DVD recorder, DVD player or set top box (video)
- L / R Input DVD recorder, DVD player or set top box (audio)
- SPDIF Output digital audio
- VGA AUDIO Input PC (audio) INPUT
- ANT Input 75 Ω coax antenna
- SCART Input DVD recorder, DVD player or set top box
- S-Video Input camcorder, PC or VCR (Video)
- AV Video input, e.g. camcorder
Remote Control

- MUTE Mute the sound
- FAV Access favorite list
- EPG Display program information
- INFO In DTV mode display information for current program, broadcaster and channel number
- 0-9 Enter programs, chapters, page or title numbers directly
- TV AUDIO Access and select audio language (if available)
- RECALL/ Recall previous channel GOTO
- SOURCE Select source
- ▲▼ ◀▶ Navigate in menu / change menu settings
- OK Confirm change menu settings
- EXIT Exit menu
- SOUND Access and change sound settings
- CH + / - Select channel (next/previous channel number)
- INDEX Teletext: display page 100
- LIST Teletext: set favorite pages
- SUBTITLE In DTV mode change subtitle language (if available)
- MIX Teletext: mix TV and Teletext display
- Color buttons Teletext: access the color-coded pages Menu: edit channel: move, delete
- SIZE Teletext: enlarge image
- SUBPAGE Teletext: access sub pages
- HOLD Teletext: hold page
- REVEAL Teletext: display hidden information
- PIC Access and change image settings
- VOL + / - Set volume level
- DVD MENU Display channel list
- TV MENU Display/exit OSD menu (TV)
- TEXT Teletext: Teletext on/off
- ASPECT Select aspect ratio
- SLEEP Set sleep timer
- TV/RADIO In DTV mode: toggle between TV and radio (if radio stations are available).
- FREEZE Freeze image
- POWER Turn TV on and off (standby mode)
- RETURN Returning to the previous menu.
- DISPLAY To display the play status on screen
- DVD AUDIO To change the Audio settings
- Fast forward.
- Fast reverse.
- To jump to the next chapter or song.
- To return to the previous chapter or song.
1.1 THANK YOU FOR YOUR TRUST!
Congratulations on your new AEG LCD TV with DVB-T tuner. We are confident that you will be satisfied with this modern appliance.
For best performance and your personal safety, please:
Read this user manual carefully before first use and follow all instructions, especially the safety precautions!
Only use this device as described in the user manual.
Keep the manual for future reference. Include this manual if you pass the appliance on to someone else. Enjoy your new LCD TV.
2. SAFETY PRECAUTIONS
Intended Use
The appliance is intended to receive (via DVB-T) and play back TV programs.
The appliance is designed for private use and is not suitable for commercial use.
General
- Read all safety precautions and the user manual carefully before connecting the appliance. This way, you can make the best use of all its features.
- Packaging materials are not toys. Do not allow children to play with plastic bags; there is a danger of suffocation!
- This appliance is not intended for use by persons (including children) with reduced physical, sensory, or mental capabilities, or lack of experience and knowledge, unless they have been given supervision or instruction concerning the use of the appliance by a person responsible for their safety.
- Children should be supervised to ensure that they do not play with the appliance.
- Ensure that children do not insert foreign objects into ventilation slots or openings in the casing; there is a danger of electric shock.
Ambient Conditions
- To avoid the danger of fire and the risk of electric shock, do not expose the receiver to rain or other types of moisture. Do not place water filled containers, such as vases, on top of the appliance.
- Do not use the appliance in areas with high humidity (e.g. bathroom). Observe the technical specifications for operating and storing temperatures.
- Do not insert foreign objects or liquids.
- Moving the appliance from a cold to a warm environment may cause condensation. Leave the appliance turned off for several hours.
- Place your TV set on a stable, flat and sturdy surface.
- Do not place heavy objects on top of the appliance.
- Protect the appliance from heat: danger of fire. Do not cover ventilation slots. Keep 20cm minimum distance at back and 10cm to the sides when placed in a bookcase.
- Do not place open flames, such as a burning candle, on top or right close to the appliance.
- Do not place the appliance close to equipment, which is sensitive to magnetic fields, such as tape decks.
- Protect the appliance from direct sunlight.
- Do not touch the screen unnecessarily, do not touch with pointed or sharp objects.
Mains Power
- Only connect to a properly installed, easily accessible wall outlet (100-240V~50/60Hz). The wall outlet must be freely accessible at all times.
- The appliance is not completely disconnected from mains power after being turned off with the main switch. Remove the plug from the wall outlet to completely disconnect from mains power.
- To disconnect, always take hold of the plug; do not pull the cable.
- Ensure that cables are not pinched or kinked.
- Power supply cords should be routed so that they are not likely to become a trip hazard.
- Disconnect from mains power during a storm.
Antenna
- Only use a double-shielded antenna cable, otherwise interference with low image quality may occur.
- To avoid damage caused by overvoltage, disconnect from mains power and antenna during a storm or when not in use for a longer period of time.
Damages
- Disconnect from mains power if the appliance or power cord are damaged.
- Do not use the appliance if damage to the casing or power cord is visible. Repairs to the casing or power cord should only be carried out by an authorized service center. To avoid hazards, a damaged power cord must be replaced by the service center.
- Caution! Immediately disconnect from mains power if liquids or foreign objects have entered the appliance. Have the appliance checked before using it again.
Cleaning and Maintenance
- Only use a soft and dry cloth for cleaning.
Batteries
- Batteries may contain toxins. Batteries must not fall into the hands of children. Children may place batteries in their mouths and swallow them. Immediately contact a physician if batteries were swallowed.
- Danger of explosion! Do not mix different battery types or brands. Do not mix fresh and exhausted batteries or batteries with different capacity.
- Do not charge the supplied batteries. Do not dismantle, short-circuit or burn batteries.
- Remove exhausted batteries from the remote control to prevent leakage and resulting damages. • Always replace both batteries and dispose of exhausted batteries environmentally responsible.
- Clean battery and appliance contacts before inserting the batteries.
- Remove the batteries from the remote control before longer periods of non-use.
- Do not expose batteries to extreme conditions, such as placing the remote control on a radiator; risk of leakage.
- Avoid skin, eye and mucous membrane contact with leaked battery acid. Wash thoroughly and contact a physician if you came into contact.
3. PREPARATION
3.1 SCOPE OF DELIVERY
Check the box content to ensure that all parts were included:
- TV set with foot
- Mains power cable
- Remote control (incl. 2 batteries type LR03/AAA 1.5V)
- User manual and warranty card
3.2 INSERT BATTERIES
You need to insert two batteries type LR03/AAA, 1.5V.
- Open the battery compartment at the rear of the remote control.
- Insert the supplied batteries. IMPORTANT! Observe correct polarity (+/-).
- Close the battery compartment again.
3.3 INSTALLATION
- Remove the protective foil from the remote control.
- Place the TV set on a stable, flat and sturdy surface.
- Do not expose the appliance to extreme heat or humidity.
- Ensure adequate ventilation on all sides. If placed in a bookshelf leave minimum distance of 20cm at top and 10cm on all sides.
3.4 CONNECT ANTENNA
The TV set is equipped with a built-in tuner to receive TV signals via aerial/cable connection and DVB-T signals.
IMPORTANT! Connect the antenna before connecting to mains power.
DVB-T Reception
CAUTION: The appliance is designed for passive DVB-T antenna.
- Connect a DVB-T antenna to antenna connector ANT.
Other Antenna Connections
For optimal, interference-free image quality use a double shielded 75Ω antenna cable.
- Connect a 75Ω antenna cable to your aerial.
- Connect the other end to antenna connector ANT. at the rear of the TV set.
- Select TV in the SOURCE menu.
PLEASE NOTE: To receive programs first execute channel search (see "Initial Installation" on page 5).
3.5 MAINS POWER CONNECTION
The TV set is designed for AC 100-240V \~ 50/60 Hz.
- Connect the power cord to AC-INPUT and a wall outlet.
CAUTION: First connect all other devices before connecting to mains power. The wall outlet must be freely accessible at all times.
3.6 INITIAL INSTALLATION
A window is displayed after turning the TV set on; here you select the menu language and start automatic search.
- Press On/Off on the right side to turn the TV set on. The Installation Guide menu is displayed.
- Press OK to confirm English as menu language (press ◀/▶ and OK on the remote control to select a different language). The item Auto Search is marked.
- Press OK. Press ◀/▶ to select the country of your location.
- Press OK twice to start automatic search. This process will take a few minutes. The progress is displayed on screen.
- After finishing the search, channel number 1 is automatically displayed.
- The menu closes after a few seconds or press EXIT.
3.7 SELECT SOURCE
- Turn the TV set on and press SOURCE. The source menu (devices for the corresponding inputs) is displayed.
- Press SOURCE or ▲/▼ on the remote control or CH +/- on the TV set to select the desired source.
- Press OK or VOL +/- on the TV set to confirm. PLEASE NOTE: Press EXIT to exit without changes.
4. CONNECT EXTERNAL DEVICES
The TV set comes with a set of inputs for external devices (e.g. DVD recorder, PC, camera and set top box).
IMPORTANT! Ensure that TV set and external devices are turned off before connecting. Please also read details in the manuals of the external devices.
SCART Connection
The SCART connector at the rear transmits analog video and audio signals in good quality. Connect VCR, satellite receiver, game console or PayTV decoder.
- Connect the device via SCART cable to SCART.
- Select SCART in the SOURCE menu.
5. BASIC OPERATION
All settings can comfortably be changed on screen with remote control and OSD menu.
VIDEO Connection
Connect a video camera via the RCA inputs L and R and AV or S-VIDEO.
- Connect the device via AV cable or RCA and S-Video cable to AV, L and R or S-VIDEO, L and R.
IMPORTANT! Observe the color-coding of the AV cable (video = yellow, audio L = white and audio R = red).
- Select AV or SVIDEO in the SOURCE menu.
PC Connection
- Connect PC via VGA cable to VGA INPUT on the TV set.
- Connect an audio cable to PC audio out and VGA AUDIO INPUT on the TV set.
- Select PC in the SOURCE menu.
Component Connection
The component input Y Pb Pr transmits analog video signals of a connected device, such as AV receiver or DVD recorder in very good quality.
- Connect via component cable (purchase separately) (3 x RCA) to component output of external device and inputs Y Pb Pr on the TV set.
- Connect the audio cable to the audio output of the external device and to audio inputs L and R on the TV set.
- Select YPBPR in the SOURCE menu.
HDMI Connection
The HDMI connector transmits digital video and audio signals of a connected device in very good quality.
- Connect via HDMI cable (purchase separately) to HDMI output of the external device and to HDMI input on the TV set.
- Select HDMI in the SOURCE menu.
The basic functions can also be accessed with the buttons on the TV set. The user manual generally refers to operating the TV set via remote control.
5.1 TURN TV SET ON AND OFF
- Press the main switch POWER on the right to turn the TV set on. It starts in the previous mode/source.
Press STANDBY on the remote control in standby mode (status LED bottom center is red). The status LED turns green and the TV set is turned on.
- Press STANDBY on the remote control to turn the TV set off into standby mode again.
- Press the main switch on the right to turn the TV set completely off.
IMPORTANT! Turn the TV set completely off if you are not using it, as it consumes power even in standby mode.
After being turned off with the main switch the TV set is still not disconnected from mains power. Disconnect from wall outlet to disconnect from mains power.
5.2 SELECT TV PROGRAM
- Press CH +/- or the numeric buttons 0-9 to select the desired channel.
- Press RECALL on the remote control to return to the previous channel.
- Press CH.LIST for an overview of your channels. Press the arrow buttons and OK to highlight and select a channel.
5.3 SET VOLUME LEVEL
- Press VOL +/- to set the volume level.
- Press MUTE to temporarily mute the sound. Press MUTE or VOL+/- to unmute the sound.
5.4 QUICK ACCESS
AUDIO Select audio language (only if supported by broadcaster)
SOURCE Select external device
SOUND Set audio
PIC Select color mode
SLEEP Set sleep timer
ASPECT Select aspect ratio
FREEZE Pause playback and display freeze frame
TEXT Access Teletext
INFO Display program information
SUBTITLE Select subtitle language (only if supported by broadcaster)
5.5 OSD MENU STRUCTURE
The OSD (On Screen Display) menu helps you to select the different functions and change settings.

- Press TV MENU to display the OSD menu. The main menu items are displayed above. The CHANNEL menu is displayed.
- First press ◀/▶ to select the main menu item. The submenus are displayed underneath.
- Press ▼ to select a submenu. The first row of the submenu is highlighted.
- Press OK or ▶ to access the submenu.
- Press TV MENU to return to the main menu.
Submenus
- Press ▲/▼ to select a submenu item. Here you can
- press ◀/▶ to change settings or
- press OK to access a further setting window and then press ◀/▶ to change the settings.
Return to Main Menu
You must exit the active submenu to select a further item from the main menu.
- Press TV MENU to return until the headline in the main menu is highlighted (e.g. CHANNEL).
- In the submenu press ▲ until the headline in the main menu is highlighted (e.g. CHANNEL).
Exit Menu
• Repeatedly press TV MENU to return step by step or press EXIT. Your new settings are saved.
PLEASE NOTE: The menu fades out if no setting is changed within a few seconds.
6. SEARCH AND EDIT CHANNELS
Your TV set can receive DVB-T signals and traditional analog signals (e.g. via cable). Your reception after automatic search depends on your antenna connection: the supplied DVB-T antenna for DVB-T reception or analog cable connection. Both types can be stored in the channel list – but generally you will only use one reception type. For both types you have the automatic and manual search functions.
• DVB-T stations are displayed with DTV. - Analog stations are displayed with ATV (TV).
6.1 STORE CHANNELS AUTOMATICALLY
• DVB-T stations are displayed with DTV. - Analog stations are displayed with ATV (TV).

- Press TV MENU to display the OSD menu.
- Press ▼ to select Auto Search.
- Press OK. Press ◀/▶ to select the country of your location.
- Press OK twice to start automatic search. This process will take a few minutes. The progress is displayed on screen.
- After finishing the search channel number 1 is automatically displayed.
- The menu closes after a few seconds or press EXIT.
6.2 STORE DVB-T STATIONS MANUALLY
- Select a channel number under which to store the new channel.
- Press TV MENU to display the OSD main menu.
- Press ▼ to select DTV Search manually and press OK.

- Press ◀/▶ to select a channel. The reception quality of the selected channel is displayed. If no program is received on the selected channel then NO SIGNAL is displayed. Press again to select the next channel.
- Press OK to start the search.
- Press OK to save a channel.
- After finishing the search the received program is displayed. Press EXIT to close the menu.
6.3 MANUAL SEARCH FOR ANALOG RECEPTION
To search analog channels individually the antenna connector must be connected to analog antenna signal (e.g. external antenna or cable). Analog channels are displayed as ATV (TV).
If a DVB-T channel was stored previously then the new analog channel is added to this list. The digital channels are not overwritten.

- Press TV MENU to display the OSD menu.
- Press ▼ to select ATV Search auto and press OK.
- Under Save under, select the channel number for the new analog channel by pressing ◀/▶.
- Press ▲/▼ to highlight the item Search.
- Press ◀/▶ to start the search. You see the frequency changing during search. After finding a program, the sound is activated again.
- Press the red button to save.
- For further channels, first select a channel number under Save under again, and then start the search again.
In this menu you can change the following settings:
System: is generally not changed.
Current channel: displays the channel number that is active in the background. Press ◀/▶ and OK to change.
Fine-tuning: press ◀/▶ to change the frequency in small steps.
Skip: the channel is skipped when changing the channel with CH -/+ when selecting YES.
Frequency: displays the current frequency.
6.4 EDIT CHANNELS
After searching, the channels are stored in the sequence they were found. You can add channels to your favorite list (FAV) or change the sequence by swapping or deleting channels.
Move Channel
- Press TV MENU to display the OSD main menu.
- Press ▼ to select Edit program and press OK.
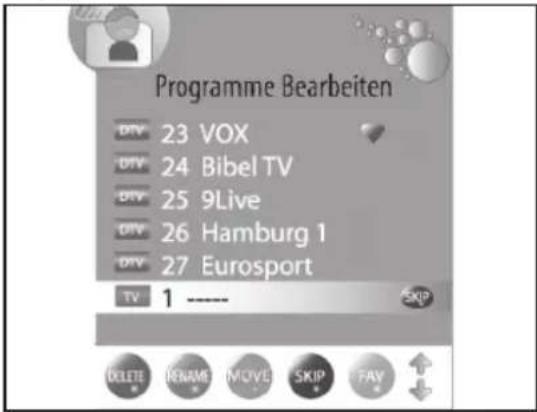
- Press ▲/▼ to highlight the channel to be moved.
- Press the yellow button to highlight the channel number in yellow.
- Press ▲/▼ to move the channel to the desired position.
- Press the yellow button again to save the channel at the desired position.
- To move further channels repeat step 5.
- Press EXIT to save the settings and exit the menu.
Skip Channel
Highlighted channels can only be accessed via the numeric buttons 0-9. Access via CH + / - is not possible.
- Press TV MENU to display the OSD menu.
- Press ▼ to select Edit program and press OK.
- Press ▲/▼/▼▼ to highlight the channel to be skipped.
- Press the blue button. SKIP is displayed behind the channel name.
- Press EXIT to save the settings and exit the menu.
To enable the channels again, select the highlighted channel and press the blue button again.
Store DVB-T Channels to Favorite List
Store your favorite channels (DTV only) in the favorite list. Press FAV to access the list.
- Press TV MENU to display the OSD menu.
- Press ▼ to select Edit program and press OK.
- Press ▲/▼/▼▼ to highlight the channel to be stored in the favorite list.
- Press FAV. A heart icon is displayed behind the channel name.
- Press EXIT to save the settings and exit the menu.
To delete channels from the favorite list, select and highlight, then press FAV again.
7. PROGRAM INFO (EPG - ONLY FOR DVB-T)
The Electronic Program Guide (EPG) is supported by many, but not all broadcasters.
The size also depends on the broadcaster. EPG displays a daily overview of current and future programs with corresponding times of broadcast.
Overview
- Press EPG to access the program overview.
- Make changes with the following buttons:
◀/▶: select previous/next programs on this channel.
▲/▼: select channel.
OK: switch to selected channel.
INFO: display detail information for selected program.
Green button: access schedule.
Yellow button: activate dateline. The date is highlighted. Press ◀/▶ to access program overview for other dates.
Blue button: store program start.
EXIT: exit detail information or EPG.
Save Programs
You can store program start via EPG. The programs are displayed in the Schedule. With the TV set turned on you are prompted 15 seconds before program start if you want to change the program. The program is changed if you do not respond or you press OK to confirm. If you want to stay with the current program select NO and press OK to confirm.
- Press EPG to display the electronic program guide.
- Press ▲/▼/◄/► to select desired channel and program.
- Press the blue button (reminder).
- In the next window confirm the values by pressing OK or change beforehand. The schedule with overview of all stored programs is displayed.
- Press EXIT to close the menu.
8. IMAGE AND SOUND SETTINGS
8.1 CHANGE IMAGE SETTINGS
Your TV set comes with 3 preset image settings (Standard, Soft and Dynamic). Press PIC to select your preferred setting. When selecting User your personal image settings are accessed.
Define Picture Mode
- Press TV MENU to display the OSD menu. You are currently in the CHANNEL menu.
- Press ▶ once. The IMAGE menu is activated.
- Press ▼ to mark item Picture mode and press ◀/▶/▶▶ to select item User.
- The following items are always enabled and can be changed. Tint (only enabled with NTSC signals)
- Press ▼ to access the desired item and press ◀/▶/▶▶ to set the desired value.
- Press TV MENU to access the complete image menu for further changes.
- Press EXIT to save the settings and exit the menu.
Contrast Brightness Hue Sharpness
Set Color Temperature
Your TV set comes with 3 preset color temperature settings (Warm, Medium and Cold).
- Press TV MENU to display the OSD menu. You are currently in the CHANNEL menu.
- Press ▶ once. The IMAGE menu is activated.
- Press ▼ to mark item Color temperature and press ◀/▶/▶▶ to select item User.
- The following items are enabled and can be changed: Red / Green / Blue
- Press ▼ to access the desired item and press ◀/▶/▶▶ to set the desired value.
- Press TV MENU to access the complete image menu for further changes.
- Press EXIT to save the settings and exit the menu.
8.2 NOISE REDUCTION
This function reduces noise and enhances image quality for weak signals.
- Press TV MENU to display the OSD menu. You are currently in the CHANNEL menu.
- Press ▶ once. The IMAGE menu is activated.
- Press ▼ to highlight the Noise reduction item.
- Press ◀/▶/▶▶ to enable or disable the function.
- Press EXIT to save the settings and exit the menu.
8.3 CHANGE ASPECT RATIO
Your TV set is equipped with 5 aspect ratios: 16:9, 4:3, AUTO, and ZOOM 1 + 2. Press ASPECT to select.
- Press ASPECT once to display the current setting.
- Press again to cycle through the settings.
PLEASE NOTE: With AUTO, the correct format is automatically selected. You can also change this setting in the IMAGE menu.
8.4 PC IMAGE SETTINGS
When selecting PC as the source, the IMAGE menu additionally displays the item MONITOR. Here you can set the position and synchronization of the PC desktop.
- Press TV MENU to display the OSD menu.
- Press ▶ once. The IMAGE menu is activated.

- Press ▼ until Monitor is highlighted and press OK.
- Press ▼ to select the image setting to be changed:
Horizontal Pos. (horizontal position of desktop)
Vertical Pos. (vertical position of desktop) Size
Phase (synchronization)
- Press ◀/▶/▶▶ to set the desired value.
- Press EXIT to save the settings and exit the menu.
8.5 CHANGE SOUND SETTINGS
Your TV set comes with 4 preset sound settings (Standard, Music, Movie and Sports). Press SOUND to select.
When selecting User your personal sound settings are accessed.
Set Audio Mode
- Press TV MENU to display the OSD menu. You are currently in the CHANNEL menu.
- Press ▶ until AUDIO is enabled.
- Press ▼ to highlight item Audio mode and press ◀/▶/▶▶ to select item User.
- The following items are enabled and can be changed.
Treble
Bass
Balance (can also be changed for presets)
- Press ▼ to access the desired item and press ◀/▶ to set the desired value.
- Press EXIT to save the settings and exit the menu.
8.6 OTHER SETTINGS
- Press Auto volume to balance the different volumes after changing the channel.
- Surround Sound stands for the sound being played in a virtual 3D sound.
- SPDIF determines if SPDIF signals are output.
- Press TV MENU to display the OSD menu. You are currently in the CHANNEL menu.
- Press ▶ until AUDIO is enabled.
- Press ▼ to highlight item Auto volume, Surround Sound or SPDIF.
- Press ◀/▶ to enable/disable the function.
- Press EXIT to save the settings and exit the menu.
9. CURRENT TIME AND TIMER
9.1 CURRENT TIME
During DVB-T reception the current time is automatically set. You can set the current time manually during analog reception.
- Press TV MENU to display the OSD menu. You are currently in the CHANNEL menu.
- Press ▶ until TIME is enabled.
- Press ▼ to highlight item Clock.
- Press OK to access the function.
- Insert the individual values, such as the date by pressing ◀/▶/▶▶.
- After setting the values press ▼ to highlight Close.
- Press OK to save the values.
9.2 SLEEP TIMER
Set your TV set so that it automatically turns off after a preset time. The sleep timer setting is deleted after turning the TV set off. Set the automatic off time between 0 (= off) and 240 min.
- Press SLEEP on the remote control until the desired off time is displayed. After a few seconds the display fades out and the TV set automatically turns off after the preset time period.
PLEASE NOTE: You can also access this setting via the TIME menu.
9.3 ON TIME AND OFF TIME
On time and off time determine the point in time when the TV set automatically turns on or off. You can make the settings for different time periods.
PLEASE NOTE: These functions turn the TV set on from standby mode and switch off into standby mode. This function is invalid if your TV set is switched on with the main switch.

- Press TV MENU to display the OSD menu. You are currently in the CHANNEL menu.
- Press ▶ until TIME is enabled.
- Press ▼ to highlight item On timer or Off timer.
- Press OK to access the function.
- Press the arrow buttons to highlight and change the displayed functions.
- Activate: Determine if the setting is to be executed once or regularly. Select between: (Off, Once, Daily, Mon-Fri, Mon-Sat, Sat-Sun or Sun).
- Hour / Minute: Set on time and off time.
- Volume: Set the volume the TV set turns on with.
- Mode: DTV – if connected to DVB-T antenna / TV – if connected to external antenna or cable box.
- Press EXIT to exit the menu or press TV MENU to return to the main menu. The settings are saved.
10. TELETEXT
Teletext is a free service of the broadcasters. It is transmitted with the TV signal and needs good reception. Not all broadcasters offer Teletext.
Teletext information is usually classified into areas, topics and pages. Some topics spread over several pages (2/3 = page 2 of 3) and others contain hidden information (quiz answers, VPS times, etc.).
Teletext On/Off
- Press TEXT on the remote control to enable/disable the Teletext functions.
Color Buttons
Nearly all Teletext pages offer colored fields at the bottom of the screen (red, green, yellow, blue). Press the color buttons on the remote control to skip directly to these topics/pages of the colored fields.
Access Pages with Numeric Buttons
The current 4-digit page number is displayed at the top right corner of your screen.
All page numbers must be entered 3-digit with the numeric buttons. It takes a moment until the page is displayed.
Access Subpages
- Access the desired Teletext page (with subpages).
- Press SUBPAGE and enter the subpage number with the numeric buttons, e.g. 0001 for subpage 1. (Alternative: At the bottom center of your screen a row with subpage numbers is displayed. Press ◀/▶ to select the subpages. The selected subpage is displayed.)
Hold Function
Press HOLD to stop/start the automatic access of subpages.
Mixed Display
- Press MIX to fade in the TV image behind Teletext. Press again to return to Teletext display only.
Size
- Press SIZE to change the Teletext display size on screen.
Hidden Information
Teletext pages with games or quizzes can contain hidden answers.
- Press REVEAL to display the answers. This function is not supported by all broadcasters.
Access Index Page
- Press INDEX to display the index page (generally page 100).
Program Color Buttons
Program the color buttons with your preferred pages.
- Press LIST. Instead of color markings page numbers are displayed, in the beginning the pages 100, 200, 300 and 400.
- Press the color button to be programmed and immediately enter the page number with the numeric buttons. The page is displayed and stored under the color button.
- Press LIST to return to standard color button layout.
- Press LIST to access the stored page and then the corresponding color button.
11. SPECIAL FUNCTIONS
11.1 LOCK FUNCTIONS
This menu allows you to lock and to change the password. Enter the preset password 6666 to access the menu.

- Press TV MENU to display the OSD menu. You are currently in the CHANNEL menu.
- Press ◀ until LOCK is enabled.
- Press OK to enable the function.
- Enter the password (preset to 6666).
- You must repeat this process every time you access this menu.
System Lock
With enabled function (On) before every channel search and channel editing the password must be entered.
Change Password
- Highlight the item Set password and press OK.
- Enter the new password twice. It is valid after being entered the second time.
- Execute your settings and press EXIT to exit the menu.
Channel Lock
You can lock individual channels. These channels can only be accessed after entering the password. The channel lock is valid until disabled or the TV set is reset to default settings in menu item default.
- Highlight the item Channel lock and press OK.
- Press ▲ or ▼ to highlight the channel to be locked.
- Press the green button to lock the channel. A lock icon is displayed behind the channel name.
- Lock further channels or press EXIT to exit the menu. The channels are locked.
To unlock access the Channel lock menu, highlight the channel number to be unlocked and press the green button again. The lock icon disappears.
Parental
The menu item Parental is invalid, as the signal is not transmitted by DVB-T broadcasters.
11.2 DEFAULT
When resetting to default settings all stored channels and user settings are deleted. The password is reset to 6666.
- Press TV MENU to display the OSD menu. You are currently in the CHANNEL menu.
- Press ▶ until OPTION is enabled.
- Press ▼ to highlight item DEFAULT and press OK.
- Press ◀ to highlight YES and press OK. After reset the menu for automatic search is displayed (see "Initial Installation" on page 5).
11.3 LANGUAGE SETTINGS
- Press TV MENU to display the OSD menu. You are currently in the CHANNEL menu.
- Press ▶ until OPTION is enabled.
- Press ▼ to highlight item
- Language: press ◀▶ to select the OSD language.
- Audio language: press OK and the arrow buttons to select the audio language.
- Subtitle language: press OK and the arrow buttons to select the subtitle language.
- Press EXIT to save the settings and exit the menu.
PLEASE NOTE: The functions Audio language and Subtitle language are only valid if the selected broadcaster supports subtitles or a second soundtrack (with another language).
11.4 TIME ZONE
- Press TV MENU to display the OSD menu. You are currently in the CHANNEL menu.
- Press ▶ until TIME is enabled.
- Press ▼ to highlight item Time zone.
- Press ▶ to set the desired time zone.
- Press EXIT to save the settings and exit the menu.
11.5 AUTO OFF
Enabled auto off turns the TV set automatically to standby mode if no signal as received for 15 minutes.
- Press TV MENU to display the OSD menu. You are currently in the CHANNEL menu.
- Press ▶ until TIME is enabled.
- Press ▼ to highlight item Auto off.
- Press ▶▶ to enable/disable the function.
- Press EXIT to save the settings and exit the menu.

CAUTION
This DVD player is a class A laser product. Only use the recommended controls, settings and features, otherwise hazardous radiation is possible. The laser beam in this DVD player is hazardous for your eyes. Do not dismantle the casing. Repairs only by qualified service personnel.
DVD SIDE PANEL
USB
In DVD mode press the DVD/USB button on the remote control to connect USB stick or MP3 player and to playback MP3 or JPEG files.
CAUTION:
Connect the USB device properly to prevent damage.
Following CD formats are supported:

DVD Video Multi-angle Subtitle selection


This product incorporates copyright protection technology that is protected by method claims of certain U.S. Patents and other intellectual property rights owned by Macrovision Corporation and other rights owners.
Use of this copyright protection technology must be authorized by Macrovision Corporation and is intended for home and other limited viewing uses only, unless otherwise authorized by Macrovision Corporation. Reverse engineering or disassembly is prohibited. This product incorporates KODAK image format and displays KODAK PICTURE CDs. The "KODAK PICTURE CD compatible" logo is a trademark of Eastman Kodak Company and only to be used after authorization. Manufactured under license of Dolby Laboratories.
"Dolby" and the double D symbol are trademarks of Dolby Laboratories. Confidential Unpublished Works. ©1992-1997 Dolby Laboratories, all rights reserved.
12. General Settings in Setup Menu
A) Press the Setup button to access the main menu.

B) Press the left and right arrow buttons to mark the desired item. Press the down or right arrow buttons to select the page. Example: press the right arrow button until the video icon is marked to access the video page. The page Video Setup is displayed.

C) Press the down arrow button to mark the desired function. Press Enter or the right arrow button to select the function. The options are displayed on the right. Example: Press the down arrow button to set the brightness. Press Enter to select the function; the brightness is displayed on the right.

13. Setup Options
13.1 SYSTEM SETUP
The system setting options are displayed as follows:
13.1.1 TV SYSTEM
Select the TV system according to the color system of your TV set.

13.1.2 VIDEO
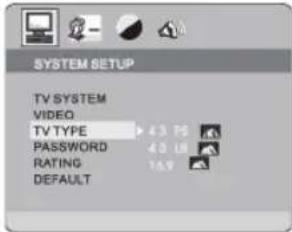
13.1.3 TV TYPE
Select TV-Type between 16:9, 4:3LB and 4:3PS.
13.1.4 PASSWORD
Originally the password option is set and you cannot change rating or password. To set the rating you have to change the password. Enter the preset password 6666 to change the settings. Press Enter to confirm. You are prompted to enter your old password and then your new password to change the password. Enter a 4-digit number (this is your password).
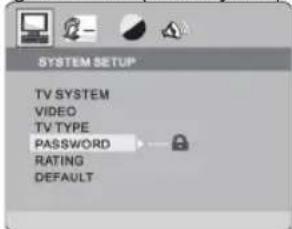
13.1.5 RATING
The rating is limited like the broadcast limitation. Enter the limitation for DVDs to determine what kind of movies your family can watch.

13.1.6 DEFAULT
The default option resets the DVD player to factory settings for best playback.

13.2 LANGUAGE SETUP
The language setting options are displayed as follows:
13.2.1 OSD LANGUAGE
Mark the option OSD language and select your language with the arrow buttons. Press Enter to confirm.
CAUTION: The OSD language is marked in the language of the country where the DVD player is sold.

13.2.2 AUDIO LANGUAGE
Mark this option and press the arrow buttons to select the desired language. Press Enter to confirm. This language is played if your inserted DVD supports this language.
CAUTION: The audio language is marked in the language of the country where the DVD player is sold.

13.2.3 SUBTITLE LANGUAGE
Mark the option subtitle language and select your language with the arrow buttons. Press Enter to confirm. This language is displayed if your inserted DVD supports this language. CAUTION: The subtitle language is marked in the language of the country where the DVD player is sold.

13.2.4 MENU LANGUAGE
Mark the option menu language and select your language with the arrow buttons. Press Enter to confirm. This language is displayed if your inserted DVD supports this language.
CAUTION: The menu language is marked in the language of the country where the DVD player is sold.

13.3 VIDEO SETUP
The video setting options are displayed as follows:

13.3.1 BRIGHTNESS
Press the up and down buttons to set brightness.

13.3.2 CONTRAST
Press the up and down buttons to set contrast.

13.3.3 HUE
Press the up and down buttons to set hue.

13.3.4 SATURATION
Press the up and down buttons to set saturation.

13.3.5 SHARPNESS
Press the up and down buttons to set sharpness.

13.4 SPEAKER SETUP
The speaker setting options are displayed as follows:
13.5 DOWNMIX
A. LT/RT Select this setting if your DVD player is connected to 2CH analog audio input.
B. STEREO Select this setting if your DVD player is connected to a TV set.

2:0-9 NUMERIC BUTTONS
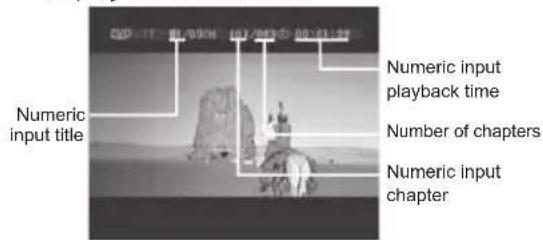
- Enter time, title, chapter or track number with these buttons.
- Press 0-9 to enter a number and confirm with Enter.
- Press GOTO to expand if the number is higher than 9.
- Press the MENU during DVD playback to access the DVD menu. CAUTION: This function depends on the DVD.
16. DVD PAUSE
- Press the PAUSE button during DVD playback to pause. Repeatedly press to move forward frame by frame. Press PLAY to return to normal playback.
17. REPEAT
- Press the REPEAT button during DVD playback to toggle between Repeat Title, Repeat Chapter and Repeat Off. Press the REPEAT button to toggle between Repeat 1, Repeat All and Repeat Off (CD or other media).
18. PLAY/PAUSE
- Press the PLAY/PAUSE button to start playback.
- Press the PLAY/PAUSE button during playback to pause.
- Press the PLAY/PAUSE button to continue playback.
19. STOP
- Press the STOP button once during playback to end playback.
- Press the PLAY button to continue playback.
- Press the STOP button twice during playback to finally stop playback.
20. DVD/USB
- Toggle between DVD and USB option.
21. TITLE
Press the TITLE button during DVD playback to access the DVD title menu or to play the first title.
CAUTION: This function depends on the DVD.

- Press and hold this button during playback to rewind. The player rewinds with 2x, 4x, 8x and 20x speed:

Press the PLAY button to continue normal playback.

- Press and hold this button during playback to fast forward. The player runs with 2x, 4x, 8x and 20x speed:

Press the PLAY button to continue normal playback.
22. RETURN
- Press this button during playback to access the DVD title menu or to play the first title. CAUTION: This function depends on the DVD.
23. DISPLAY
- Press the DISPLAY button during playback to display the playing time.
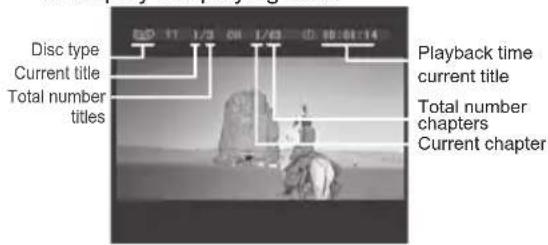
Press the DISPLAY button to access the audio and subtitle menus.

24. OPEN/CLOSE

- Press the OPEN/CLOSE button to open and close the disc drive.
GOTO
- Press the GOTO button during playback to display the current time.
25. OK
- Press the OK button to confirm your entry.
26. ANGLE
During DVD playback
- Press the ANGLE button to display scenes recorded from different camera angles. • Repeatedly press the ANGLE button to cycle through the different camera angles.
CAUTION: This function depends on the DVD.
27. PBC
Press the PBC button during VCD2.0 playback to display the disc menu.
28. NEXT
- Press the NEXT button to skip to the next chapter or track.
29. PREVIOUS
- Press the PREV button to skip to the previous chapter or track.
30. SUBTITLE
During DVD playback
- Repeatedly press the SUBTITLE button to select between up to 32 subtitle languages. CAUTION: This function depends on the DVD.
31. AUDIO
• Repeatedly press the AUDIO button during playback to select between up to 8 audio languages.
CAUTION: This function depends on the DVD.
MP3 PLAYBACK
The following menu is displayed after inserting MPEG or MP3 disc:

Press to select a folder with the cursor showing in the file window.
Press SELECT to open the selected folder or to start the selected track.
Press < to toggle between folders and tracks.
CAUTION
During MP3 playback you have no rewind/fast forward function.
CAUTION
Under the following conditions the player cannot playback MP3 CDs: The recording format is not supported (ensure your files are in MP3 format), the disc is badly scratched, damaged or dirty or the disc was not finalized.
DVD Troubleshooting
If you encounter problems with your DVD player, please first read the following instructions:
NO IMAGE OR NO SOUND
◇ Ensure the player is switched on. ◇ Ensure your wall outlet is ok. Ensure the power cord is ok. ◇ Ensure the power cord is connected properly.
IMAGE BUT NO SOUND
◇ Ensure that the sound is not muted. ◇ Ensure that the audio cable is connected properly.
WEAK IMAGE OR SOUND
◇ Ensure that the audio cable is connected properly. ◇ Ensure that your disc is not scratched or damaged.
BAD DISC IS DISPLAYED
◇ Ensure that your disc is not bent, damaged or scratched. ◇ Ensure that your disc is not scratched or dirty. ◇ Ensure that the player supports the disc format. ◇ Check if you are trying to play a software CD. If this is the case, please restart the player.
REMOTE CONTROL DOES NOT WORK
◇ Ensure the player is switched on. ◇ Ensure that the batteries are not exhausted. Go with the remote control right in front of the IR sensor of the player. ◇ Remove obstacles between remote control and IR sensor.
NO FUNCTION AT ALL
◇ Turn the player off and on again.
NO DISC IS DISPLAYED
◇ Ensure that a disc is inserted the correct way. ◇ Ensure that the disc is inserted properly. Ensure that your disc is not bent, damaged or scratched.
Troubleshooting
| Problem | Inspection | |||
| Image Sound | ||||
 | Snow Noise |  | Check antenna, connected directly or via other devices. | |
 | Ghost image |  | Normal sound | Check antenna, connected directly or via other devices. |
 | Interference Noi |  | Electronic accessories, car/ motorbike, light fitting. | |
 | Normal image M |  | Volume (check if muted or audio cables are connected properly). | |
 | No image Mute |  | Not connected to mains power. No power on wall outlet. Contrast and brightness/ volume settings. Press the Standby button and check remote control. | |
 | No color |  | Normal sound | Check color setting |
 | Diagonal stripes |  | Normal or soft sound | Change channel |
 | No color Noise |  | ||
32. CLEANING
Clean all parts with a dry cloth. Do not use solvents, as this will damage the finish.
33. DISPOSAL
Keep the packaging within the warranty period and dispose of it afterwards environmentally responsible.
Do not dispose of the appliance in the normal domestic waste under any circumstances. Contact your town or parish administration for information on proper and environmentally compatible disposal of the device.
Dispose of used batteries at a collection point.

34. DECLARATION OF CONFORMITY
This product complies with the basic requirements of EMV directive 2004/108/EG and low voltage directive 2006/95/EG.
35. TROUBLESHOOTING
Should the unit not function properly, please check the system according to this table to find out the possible problem.
Important! Do not try to repair the appliance yourself; always contact the authorized service center.
| Problem Possible cause/solution | |
| No image, no sound. | Check if the TV set is connected to mains power? |
| Check if the TV set is switched on at the main switch? | |
| Check if the antenna cable is damaged and connected properly? | |
| Check if the broadcaster is inactive? | |
| Check if the devices are turned on in case external devices are connected? | |
| Check if the correct SOURCE is selected? | |
| Distorted image. | Check antenna direction. |
| Check if the antenna cable is damaged and connected properly; check connecting cables. | |
| Interference by other electric devices. | |
| Disconnect one of the connected external devices. | |
| Check settings in IMAGE menu. | |
| Distorted image for individual channels or good image and distorted sound. | Check fine-tuning of the channel. |
| Remote control does not work. | Check the batteries. |
| Point the remote control at the sensor at the bottom center of the TV set. | |
| Only one sound channel. | Check balance settings in VIDEO menu. |
| Good image, but no sound. | Check if the sound is muted?Press MUTE.Check if the sound is set very low?Press VOL+. |
| TV set turns off. | Check if the off timer is activated if no channel is received? |
| No response to buttons; Teletext rolls. | Turn the TV set off at the main switch and turn on again after a moment. |
- TECHNICAL DATA
| Electrical data | |
| Power supply: Input: 100 - 240 V ~ 50/60 Hz | |
| Power consumption max.: | 60 W |
| Power consumption in standby mode: < 1 W | |
| Screen | |
| Screen diagonal: | 19" /48 cm |
| Aspect ratio: | 16:10 (4:3 selectable) + Zoom 1+2 |
| Resolution: | 1440x900 |
| Audio | |
| Audio output: 2 x 3 W | |
| Reception | |
| Channel options: 100 | |
| Channels: | VHF band I channel2 - 4VHF band III channel 5 - 12UHF channel 21 - 69 |
| TV system: PAL B/G, D/K, I / SECAM B/G, D/K, L, LL | |
| Inputs | |
| Euro-AV: SCART | |
| AV: | 1 x RCA / 1 x S-Video |
| PC: 1 x VGA D-SUB / 1 x PC audio stereo jack | |
| Component: Y Pb Pr | |
| SPDIF out (digital audio); SPDIF out | |
| HDMI: HDMI | |
| Antenna: 75 Ohm | |
| Remote Control | |
| Batteries: 2 x type LR03/AAA | |
| LED class: 1 | |
| General | |
| Dimensions (W x D x H): | 464 x 140 x 390 mm (incl. foot) |
| Weight: | approx. 4.7kg |
| Operating temperature: | 10°C - 35°C |
| Manual ID: | E41456/PE/2009 ----please check---- |
Subject to changes without prior notice.
- TABLE OF CONTENTS
- CLASS 1 LASER PRODUCT
- CAUTION
- USB
- OVERVIEW
- REMOTE CONTROL
- THANK YOU FOR YOUR TRUST
- READ THIS USER MANUAL CAREFULLY BEFORE FIRST USE AND FOLLOW ALL INSTRUCTIONS, ESPECIALLY THE SAFETY PRECAUTIONS
- SAFETY PRECAUTIONS
- INTENDED USE
- GENERAL
- AMBIENT CONDITIONS
- MAINS POWER
- ANTENNA
- DAMAGES
- CLEANING AND MAINTENANCE
- BATTERIES
- PREPARATION
- SCOPE OF DELIVERY
- INSERT BATTERIES
- INSTALLATION
- CONNECT ANTENNA
- DVB-T RECEPTION
- OTHER ANTENNA CONNECTIONS
- MAINS POWER CONNECTION
- INITIAL INSTALLATION
- CONNECT EXTERNAL DEVICES
- SCART CONNECTION
- BASIC OPERATION
- VIDEO CONNECTION
- PC CONNECTION
- COMPONENT CONNECTION
- HDMI CONNECTION
- TURN TV SET ON AND OFF
- SELECT TV PROGRAM
- SET VOLUME LEVEL
- QUICK ACCESS
- OSD MENU STRUCTURE
- SUBMENUS
- RETURN TO MAIN MENU
- EXIT MENU
- SEARCH AND EDIT CHANNELS
- STORE CHANNELS AUTOMATICALLY
- STORE DVB-T STATIONS MANUALLY
- MANUAL SEARCH FOR ANALOG RECEPTION
- EDIT CHANNELS
- MOVE CHANNEL
- SKIP CHANNEL
- STORE DVB-T CHANNELS TO FAVORITE LIST
- PROGRAM INFO (EPG - ONLY FOR DVB-T)
- IMAGE AND SOUND SETTINGS
- CHANGE IMAGE SETTINGS
- CONTRAST BRIGHTNESS HUE SHARPNESS
- SET COLOR TEMPERATURE
- NOISE REDUCTION
- CHANGE ASPECT RATIO
- PC IMAGE SETTINGS
- CHANGE SOUND SETTINGS
- OTHER SETTINGS
- CURRENT TIME AND TIMER
- CURRENT TIME
- SLEEP TIMER
- ON TIME AND OFF TIME
- TELETEXT
- TELETEXT ON/OFF
- COLOR BUTTONS
- ACCESS PAGES WITH NUMERIC BUTTONS
- ACCESS SUBPAGES
- HOLD FUNCTION
- MIXED DISPLAY
- SIZE
- HIDDEN INFORMATION
- ACCESS INDEX PAGE
- PROGRAM COLOR BUTTONS
- SPECIAL FUNCTIONS
- LOCK FUNCTIONS
- SYSTEM LOCK
- CHANGE PASSWORD
- CHANNEL LOCK
- PARENTAL
- DEFAULT
- LANGUAGE SETTINGS
- TIME ZONE
- AUTO OFF
- GENERAL SETTINGS IN SETUP MENU
- SETUP OPTIONS
- SYSTEM SETUP
- TV SYSTEM
- TV TYPE
- PASSWORD
- RATING
- LANGUAGE SETUP
- OSD LANGUAGE
- AUDIO LANGUAGE
- SUBTITLE LANGUAGE
- MENU LANGUAGE
- VIDEO SETUP
- BRIGHTNESS
- CONTRAST
- HUE
- SATURATION
- SHARPNESS
- SPEAKER SETUP
- DOWNMIX
- NUMERIC BUTTONS
- DVD PAUSE
- REPEAT
- PLAY/PAUSE
- STOP
- DVD/USB
- TITLE
- RETURN
- DISPLAY
- OPEN/CLOSE
- GOTO
- OK
- ANGLE
- PBC
- NEXT
- PREVIOUS
- SUBTITLE
- AUDIO
- MP3 PLAYBACK
- DVD TROUBLESHOOTING
- NO IMAGE OR NO SOUND
- IMAGE BUT NO SOUND
- WEAK IMAGE OR SOUND
- BAD DISC IS DISPLAYED
- REMOTE CONTROL DOES NOT WORK
- NO FUNCTION AT ALL
- NO DISC IS DISPLAYED
- CLEANING
- DISPOSAL
- DECLARATION OF CONFORMITY
- TROUBLESHOOTING
Brand : AEG
Model : CTV 4950
Category : Television