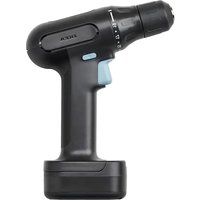
FIXA - Drill IKEA - Free user manual and instructions
Find the device manual for free FIXA IKEA in PDF.

User questions about FIXA IKEA
0 question about this device. Answer the ones you know or ask your own.
Ask a new question about this device
Download the instructions for your Drill in PDF format for free! Find your manual FIXA - IKEA and take your electronic device back in hand. On this page are published all the documents necessary for the use of your device. FIXA by IKEA.
USER MANUAL FIXA IKEA
natural_image
Line drawing of a handheld electric shaver with handle and control knob (no text or symbols)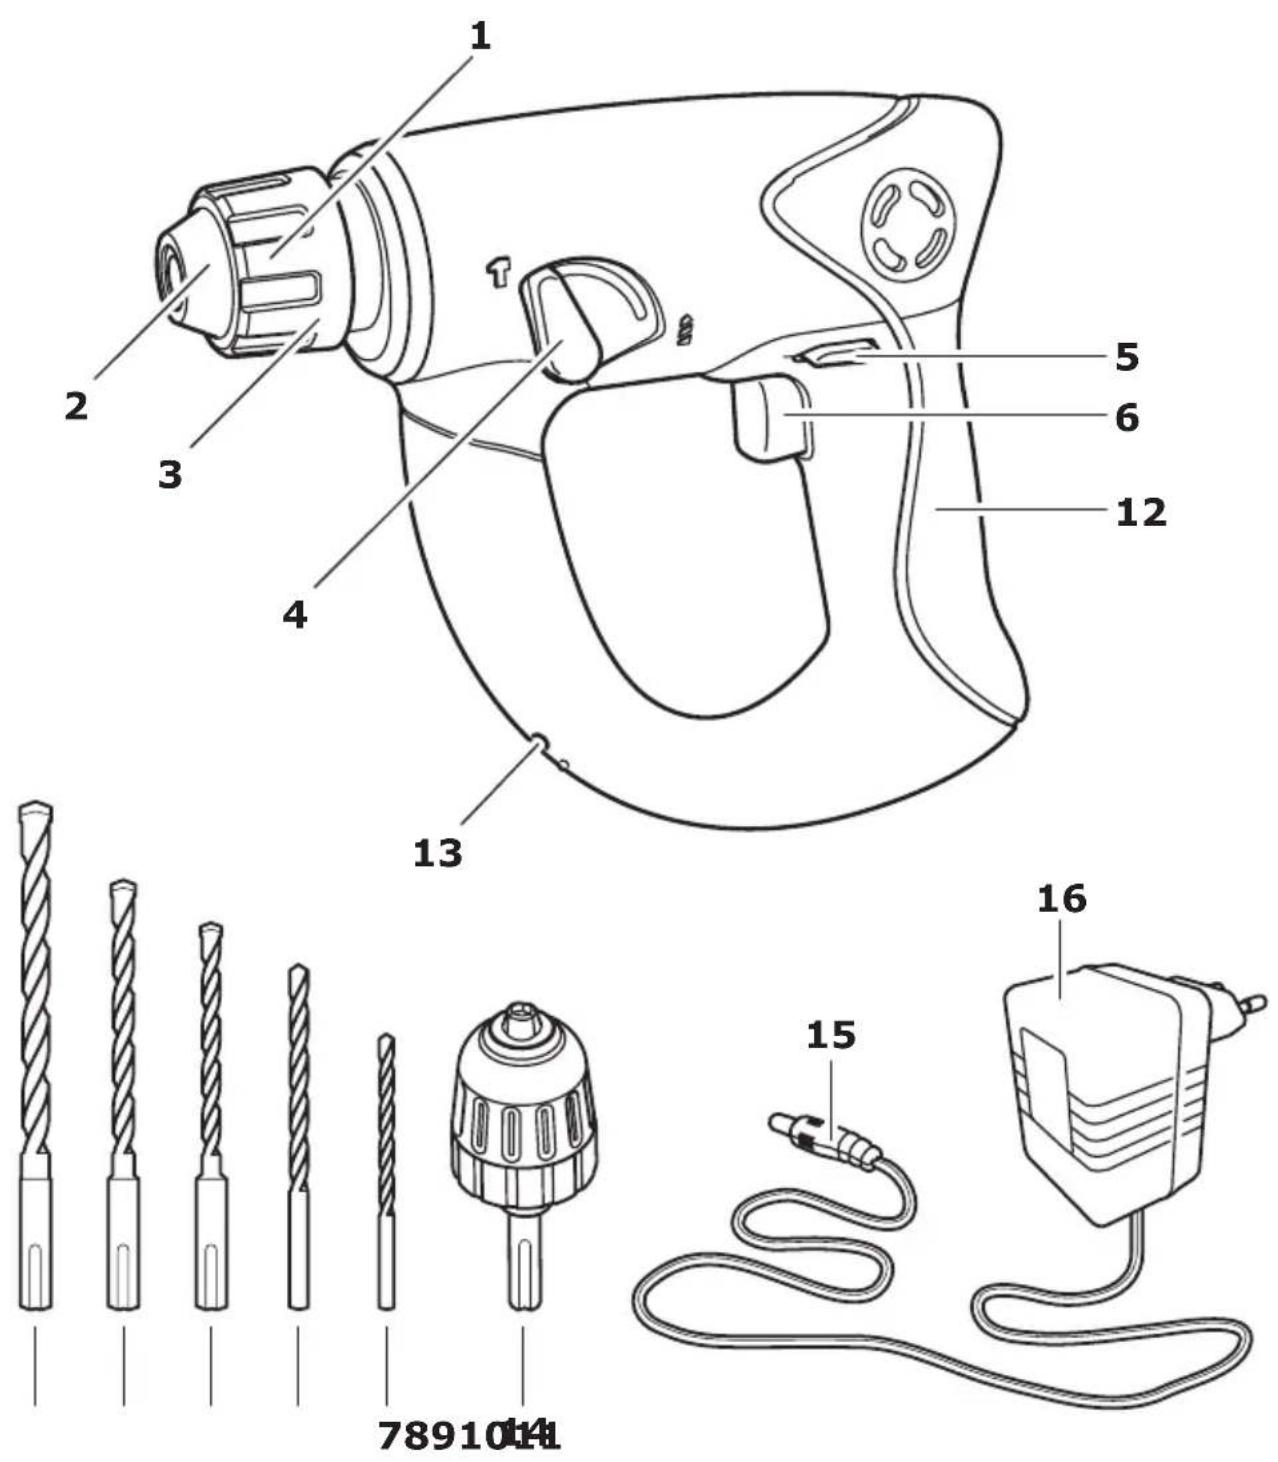
A

natural_image
Illustration of a hand using a drill bit to adjust the drill bit (no text or symbols present)B
text_image
Diagram illustrating battery recycling process with labeled components and recycling symbolENGLISH 4
Original instructions
DEUTSCH 13
Rated speed: 0-900 rpm
Impact rate: 0-4800 bpm
Impact energy per stroke: 1.0 J
Tool holder: SDS plus
Max drilling dia.:
-concrete (with twist drill) 10 mm (3/8")
-steel 8 mm (5/16")
-wood 10 mm (3/8")
Battery: Lithium-ion battery
Capacity: 1.5 Ah
Number of battery cells: 4
Charging time: 5-7 h
Charger: Local mains voltage
Separate chuck: 10 mm (3/8"), keyless,
quick-fit, quick-release chuck
Weight: 1.3 kg (2.86 lbs)
Vibration (according to EN 60745-1,
EN 60745-2-6)
$$ < a _ {h}. D = 5. 9 \mathrm{m} / \mathrm{s} ^ {2}, K = 1. 5 \mathrm{m} / \mathrm{s} ^ {2} $$
$$ a _ {h} = 4. 7 \mathrm{m} / \mathrm{s} ^ {2}, K = 1. 5 \mathrm{m} / \mathrm{s} ^ {2} $$
Noise (according to EN 60745-1)
Noise pressure level Lpa = 86 dB (A),
Kpa = 3 dB (A)
Noise power level Lwa = 97 dB (A),
Kwa = 3 dB (A)
LIST OF FEATURES
The numbering of the product features shown refers to the illustration of the hammer drill on the graphic page.
- SDS plus tool holder
- Dust protection cap
- Locking sleeve
- Selector switch for hammer drilling/drilling
- Rotational direction switch
- On/Off switch
- ∅ 3mm (1/8") wood bit
-
∅ 5mm (3/16") wood bit
-
∅ 5mm (3/16") SDS bit
-
∅ 6mm (1/4") SDS bit
-
∅ 8mm (5/16") SDS bit
-
Handle (insulated gripping surface)
-
Socket for charge connector and light diode
-
Exchange chuck
-
Charge connector
-
Transformer for charger
AREAS OF USE
This hammer drill is intended for hammer drilling in concrete, brick and stone, and is also suitable for drilling without impact in wood, metal, ceramic and plastic with the separate chuck that is included. Machines with electronic control and right/left rotation are also suitable for screwdriving.
Use the battery charger only when you fully understand and can perform all functions without limitation, or have received appropriate instructions.
GENERAL SAFETY INSTRUCTIONS
General safety instructions for power tools

Warning!

Read all safety warnings and
all instructions. Failure to follow all the warnings and instructions may result in electric shock, fire and/or serious injury.
Save all warnings and instructions for future reference.
The term "power tool" in all of the warnings listed below refers to your mains operated (corded) power tool or battery operated (cordless) power tool.
Work area safety
a. Keep work area clean and well lit.
Cluttered and dark areas invite accidents.
b. Do not operate power tools in explosive atmospheres, such as in the presence of flammable liquids, gases or dust. Power tools create sparks which may ignite the dust of fumes.
c. Keep children and bystanders away while operating a power tool.
Distractions can cause you to lose control.
Electrical safety
a. Power tool plugs must match the outlet. Never modify the plug in any way. Do not use any adapter plugs with earthed (grounded) power tools. Unmodified plugs and matching outlets will reduce risk of electric shock.
b. Avoid body contact with earthed or grounded surfaces such as pipes, radiators, ranges and refrigerators. There is an increased risk of electric shock if your body is earthed or grounded.
c. Do not expose power tools to rain or wet conditions. Water entering a power tool will increase the risk of electric shock.
d. Do not abuse the cord. Never use the cord for carrying, pulling or unplugging the power tool. Keep the cord away from heat, oil, sharp edges or moving parts. Damaged or entangled cords increase the risk of electric shock.
e. When operating a power tool outdoors, use an extension cord suitable for outdoor use. Use of a cord suitable for outdoor use reduces the risk of electric shock.
f. If operating a power tool in a damp location is unavoidable, use a residual current device (RCD) protected supply. Use of an RCD reduces the risk of electric shock.
Personal safety
a. Stay alert, watch what you are doing and use common sense when operating a power tool. Do not use a power tool while you are tired or under the influence of drugs, alcohol or medication. A moment of inattention while operating power tools may result in serious personal injury.
b. Use personal protective equipment. Always wear eye protection. Protective equipment such as dust mask, non-skid safety shoes, hard hat, or hearing protection used for appropriate conditions will reduce personal injuries.
c. Prevent unintentional starting: Ensure that the switch is in the off-position before connecting to power source and/or battery pack, picking up or carrying the tool. Carrying power tools with your finger on the switch or plugging in power tools that have the switch on invites accidents.
d. Remove any adjusting key or wrench before turning the power tool on. A wrench or a key left attached to a rotating part of the power tool may result in personal injury.
e. Do not overreach. Keep proper footing and balance at all times. This enables better control of the power tool in unexpected situations.
f. Dress properly. Do not wear loose clothing or jewellery. Keep your hair, clothing and gloves away from moving parts. Loose clothes, jewellery or long hair can be caught in moving parts.
g. If devices are provided for the connection of dust extraction and collection facilities, ensure these are connected and properly used. Use of these devices can reduce dust related hazards.
Power tool use and care
a. Do not force the power tool. Use the correct power tool for your application. The correct power tool will do the job better and safer at the rate for which it was designed.
b. Do not use the power tool if the switch does not turn it on and off.
Any power tool that cannot be controlled with the switch is dangerous and must be repaired.
c. Disconnect the plug from the power source and/or the battery pack before making any adjustments, changing accessories, or storing power tools. Such preventive safety measures reduce the risk of starting the power tool accidentally.
d. Store idle power tools out of the reach of children and do not allow persons unfamiliar with the power tool or these instructions to operate the power tool. Power tools are dangerous in the hands of untrained users.
e. Maintain power tools. Check for misalignment or binding of moving parts, breakage of parts and any other condition that may affect the power
tools operation. If damaged, have the power tool repaired before use. Many accidents are caused by poorly maintained power tools.
f. Keep cutting tools sharp and clean. Properly maintained cutting tools with sharp cutting edges are less likely to bind and are easier to control.
g. Use the power tool, accessories and tool bits, etc. in accordance with these instructions and in the manner intended for the particular type of power tool, taking into account the working conditions and the work to be performed. Use of the power tool for operations different from those intended could result in a hazardous situation.
h) Hold the power tool by insulated gripping surfaces, when performing an operation where the fastener may contact with hidden wiring or its own cord. Fasteners contacting a "live" wire may make exposed metal parts of the power tool "live" and could give the operator an electric shock.
Battery tool use and care
a. Recharge only with the charger specified by the manufacturer. A charger that is suitable for one type of battery pack may create a risk of fire when used with another battery pack.
b. Use power tools only with specifically designated battery packs. Use of any other battery packs may create a risk of injury and fire.
c. When battery pack is not in use, keep it away from other metal objects, like paperclips, coins, keys, nails, screws or other small metal objects
that can make a connection from one terminal to another. Shorting the battery terminals together may cause burns or a fire.
d. Under abusive conditions, liquid may be ejected from the battery; avoid contact. If contact accidentally occurs, flush with water. If liquid contacts eyes, additionally seek medical help.
Liquid ejected from the battery may cause irritation or burns.
Service
a. Have your power tool serviced by a qualified repair person using only identical replacements parts. This will ensure that the safety of the power tool is maintained.
MACHINE-SPECIFIC SAFETY INSTRUCTIONS
Drill safety warnings
Wear ear protectors when using the hammer drill. Exposure to noise can cause hearing loss.
Use appropriate detectors to determine if utility lines are hidden in the work area or call your local utility company for assistance. Contact with electric lines can lead to fire and electric shock. Damaging a gas line can lead to explosion. Penetrating a water line causes property damage or may cause an electric shock.
Switch off the power tool immediately when the tool insert jams. Be prepared for high reaction torque that can cause kickback. The tool insert jams when:
- the power tool is subject to overload or
- it becomes wedged in the workpiece.
When working with the power tool, always hold it firmly with both hands and provide for a secure stance. The power tool is guided more secure with both hands.
Secure the workpiece. A workpiece clamped with clamping devices or in a vice is held more secure than by hand.
Keep your workplace clean. Blends of materials are particularly dangerous. Dust from light alloys can burn or explode.
Always wait until the machine has come to a complete stop before placing it down. The tool insert can jam and lead to loss of control over the power tool.
Before any work on the machine (e. g., maintenance, tool change, etc.) as well as during transport and storage, set the rotational direction switch to the centre position.
Unintentional actuation of the On/Off switch can lead to injuries.
Protect the power tool against heat, e. g., against continuous intense sunlight, fire, water, and moisture. Danger of explosion.
In case of damage and improper use of the battery, vapours may be emitted. Provide for fresh air and seek medical help in case of complaints. The vapours can irritate the respiratory system.
Safety Warnings for battery chargers

For indoor use only.

uble insulated.
Keep the battery charger away from rain or moisture. Penetration of water in the battery charger increases the risk of an electric shock.
Do not charge other batteries. The battery charger is suitable only for charging the batteries that were supplied with your power tool. Otherwise there is danger of fire and explosion.
Keep the battery charger clean.
Contamination can lead to danger of an electric shock.
Before each use, check the battery charger, cable and plug. If damage is detected, do not use the battery charger. Never open the battery charger yourself. Have repairs performed only by a qualified technician. Damaged battery chargers, cables and plugs increase the risk of an electric shock.
Do not operate the battery charger on easily inflammable surfaces (e. g., paper, textiles, etc.) or surroundings. The heating of the battery charger during the charging process can pose a fire hazard.
Children should be supervised to ensure that they do not play with the battery charger.
Products sold in GB only: Your product is fitted with an BS 1363/A approved electric plug with internal fuse (ASTA approved to BS 1362). If the plug is not suitable for your socket outlets, it should be cut off and an appropriate plug fitted in its place by an authorised customer service agent. The replacement plug should have the same fuse rating as the original plug. The severed plug must be disposed of to avoid a possible shock hazard and should never be inserted into a mains socket elsewhere. Products sold in AUS only: Use a residual current device (RCD) with a rated residual current of 30 mA or less.
VIBRATION INFORMATION
Vibration level
The vibration emission level stated in this instruction manual has been measured in accordance with a standardised test given in EN 60745. It may be used to compare one tool with another and as a preliminary assessment of exposure to vibration when using the tool for the applications mentioned in this manual. However, using the tool for different applications, or with different or poorly maintained accessories, may significantly increase the exposure level.
An estimation of the level of exposure to vibration should also take into account the times when the tool is switched off or when it is running but not actually doing the job, as this may significantly reduce the exposure level over the total working period.
Protect yourself against the effects of vibration by maintaining the tool and its accessories, keeping your hands warm, and organizing your work patterns.
DECLARATION OF CONFORMITY
CE
We declare under our sole responsibility that this product, FIXA Hammer drill Li-Ion 14.4 V, is in conformity with the following standards or standardized documents: EN 60745-1, EN 60745-2-6, EN 55014-1, EN 55014-2, EN 61000-3-2, EN 61000-3-3, EN 60335-1, EN 60335-2-29, EN 62233 in accordance with the provisions of the directives 2006/42/EC, 2004/108/EC, 2006/95/EC, 2002/96/EC, 2002/95/EC.
Technical documentation at: IKEA of Sweden AB, Box 702, Tulpanvägen 8, SE-343 81 Älmhult, SWEDEN.
The undersigned is responsible for compilation of the technical documentation and makes this declaration on behalf of IKEA of Sweden AB.
Cunotini Nomel-Som
Christina Niemelä Ström Business Area Manager IKEA of Sweden AB
ASSEMBLY
Before any work on the machine (e.g., maintenance, tool change, etc.) as well as during transport and storage, set the rota tional direction switch to the centre position. Unintentional actuation of the On/Off switch can lead to injuries.
Battery charging
Charging your hammer drill/driver
When the charger is connected to the electricity supply, the red diode on the hammer drill lights up. The diode lights up while the battery is being charged (13).
Under normal conditions of use the hammer drill can be recharged several hundred times.
ATTENTION! The recharging process generates heat in the battery.
Note: The battery that is supplied with the hammer drill has been charged for test purposes only and must be fully recharged before use.
First read the safety instructions and then follow the loading instructions. Insert the charge connector into the socket (13) in the hammer drill. Then connect the charger's transformer (16) to the electricity supply.
Make sure that there are no knots or sharp bends in the cable.
The charger's transformer and the battery have been designed to be used together.
NEVER use this charger to recharge cordless tools or batteries from other manufacturers. The battery will gradually lose its charge over a period of time, even if the tool is not used.
The lithium-ion battery is protected against deep discharging by the "Electronic Cell Protection (ECP)". When the battery is empty, the machine is switched off by means of a protective circuit: The inserted tool no longer rotates.
WARNING! Do not continue to press the On/Off switch after the machine has been automatically switched off. The battery can be damaged.
WARNING! Recharge the battery on a non-flammable surface. Do not recharge the battery for more than eight hours. The red diode will turn green when the battery has been fully loaded.
Disconnect the cable and store the transformer in a suitable place when it is not in use.
It is not advisable to recharge the battery in temperatures below freezing.
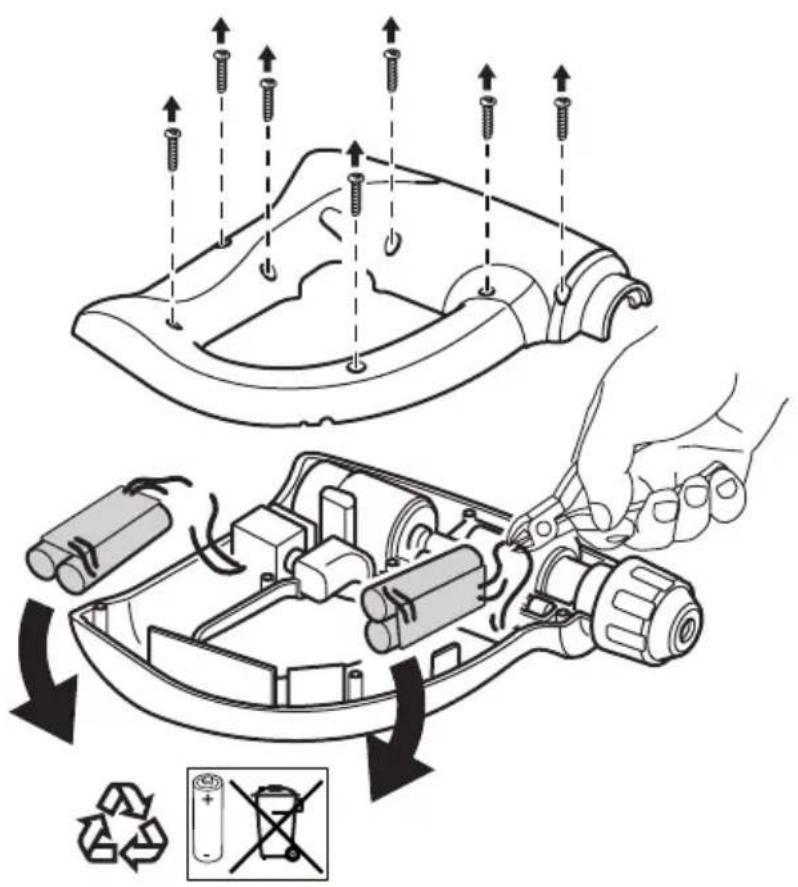
When removing the battery from the machine, actuate the On/Off switch (6) until the battery is completely discharged. Unscrew the screws in the casing and take off the casing shell. Disconnect the connections on the battery and remove the battery (see figure B).
INSTRUCTIONS FOR USE
Changing the tool
The SDS plus tool holder allows for simple and convenient changing of drilling tools without the use of additional tools. Due to their working principle, SDS plus drilling tools move freely. This results in radial runout at no-load. However, this has no effect on the accuracy of the drill hole, as the drill bit centres itself during drilling. The SDS tool holder can also accommodate different drill-bit types with hexagon shank. The dust protection cap (2) largely prevents the entry of drilling dust into the tool holder during operation. When inserting the tool, take care that the dust protection cap (2) is not damaged.
Inserting SDS plus Drilling Tools (see figure A)
Clean and lightly grease the shank end of the tool.
Insert the tool in a twisting manner into the tool holder until it latches itself.
Check the latching by pulling the tool.
Removing SDS plus Drilling Tools (See figure A)
WARNING! Accessories may be hot after use. Avoid contact with skin and use proper protective gloves or cloth to remove.
Push back the locking sleeve (3) and remove the tool. All accessories should be wiped clean after removing.
Dust/Chip Extraction
Dusts from materials such as lead-containing coatings, some wood types, minerals and metal can be harmful to one's health. Touch ing or breathing-in the dusts can cause aller gic reactions and/or lead to respiratory infec tions of the user or bystanders.
Certain dusts, such as oak or beech dust, are considered as carcinogenic, especially in connection with wood-treatment additives (chromate, wood preservative). Materials containing asbestos may only be worked by specialists.
Provide for good ventilation of the working place.
It is recommended to wear a P2 filter class respirator.
Observe the relevant regulations in your country for the materials to be worked.
Starting operation
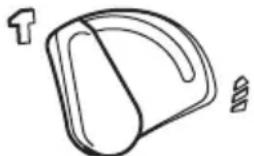
Setting the operating mode
With the selector switch for hammer drilling/ drilling (4), the operating mode of the machine is selected.
Note: Change the operating mode only when the machine is switched off! Otherwise, the machine can be damaged. To change the operating mode, turn the selector switch for "hammer drilling/drilling" (4) to the requested position.
natural_image
Simple line drawing of a mechanical component with a hammer and screw (no text or symbols)Position for hammer drilling in concrete or stone
natural_image
Simple line drawing of a stylized object resembling a helmet or capsule (no text or symbols)Position for drilling without impact in wood, metal, ceramic and plastic as well as for screwdriving
Reversing the Rotational Direction
Actuate the rotational direction switch (5) only when the machine is at a standstill.
The rotational direction switch (5) is used to re verse the rotational direction of the machine. However, this is not possible with the On/Off switch (6) actuated.
Right Rotation: For drilling and driving in screws, push the rotational direction switch (5) left to the stop.
Left Rotation: For loosening and unscrewing screws and nuts, press the rotational direction switch (5) through to the right stop.
Switching On and Off
To start the machine, press the On/Off switch (6) and keep it pressed.
To switch off the machine, release the On/Off switch (6).
For low temperatures, the power tool reaches the full hammer/impact capacity only after a certain time.
Setting the Speed/Impact Rate
The speed/impact rate of the switched on power tool can be variably adjusted, depending on how far the On/Off switch (6) is pressed.
Light pressure on the On/Off switch (6) results in low speed/impact rate. Further pressure on the switch increases the speed/impact rate.
Temperature Dependent Overload Protection
When using as intended, the power tool cannot be subject to overload. When the load is too high or the allowable battery temperature of 70 °C is exceeded, the electronic control switches off the power tool until the temperature is in the optimum temperature range again.
Working Advice
Apply the power tool to the screw/nut only when it is switched off. Rotating tool inserts can slip off.
MAINTENANCE AND CLEANING
Before any work on the machine (e.g. maintenance, tool change, etc) as well as during transport and storage, set the selector for rotation switch to the centre position. Unintentional actuation of the trigger can lead to injuries.
For safe and proper working, always keep the machine and ventilation slots clean.
ENVIRONMENTAL DISPOSAL INSTRUCTIONS
Help to protect the environment
Information (for private households) about the environmentally sound disposal of electrical and electronic equipment in accordance with the WEEE directive (Waste Electrical and Electronic Equipment).

This symbol on electrical and electronic products and the documentation that accompanies them indicates that these products may not be discarded together with ordinary household waste. Instead the products must be taken to a designated collection point where they will be received free of charge for disposal, treatment, reuse and recycling as appropriate. In certain countries products may also be returned to the point of sale when purchasing an equivalent new product. By disposing of this product in the proper manner you are helping to save valuable natural resources and to eliminate the negative effects that the irresponsible disposal and management of waste can have on health and the environment. Please contact the relevant authorities where you live for information about your nearest WEEE collection point. Disposing of this type of waste in an unapproved manner may render you liable to fine or other penalty according to the law.
Disposing of damaged or exhausted batteries
Do not dispose of discarded batteries together into ordinary household waste, fire or water. In accordance with the law, damaged or exhausted batteries must be taken to the nearest collection point for batteries or a battery management company. Failure to comply with these regulations may render you liable to fine or other penalty.
Information about disposal for users in countries outside the European Union

This symbol applies only within the European Union. Please contact the relevant authorities or retailer in your country for information about the correct method of disposal for this product.
DEUTSCH 13
FIXA Bohrhammer Li-Ion 14,4 V
TECHNISCHE DATEN
Spannung: 14,4 V
Separates Bohrfutter: 10 mm (3/8"),
Christina Niemelä Ström Business Area Manager IKEA of Sweden AB
MONTAGE
natural_image
Simple line drawing of a curved object with two small icons, no text or symbols presentnatural_image
Simple line drawing of a stylized object resembling a hat or container with a handle, no text or symbols present.Lpa = 86 dB (A), Kpa = 3 dB (A)
Lwa = 97 dB (A), Kwa = 3 dB (A)
LISTE DES COMPOSANTS
DÉCLARATION DE CONFORMITÉ

Christina Niemelä Ström Business Area Manager IKEA of Sweden AB MONTAGE
natural_image
Simple line drawing of a stylized object resembling a hat or container with a handle, no text or symbols present.natural_image
Simple line drawing of a stylized object resembling a helmet or capsule (no text or symbols)Lpa = 86 dB (A), KPa = 3 dB (A),
Geluidsvermogensniveau
LWA = 97 dB (A), Kwa = 3 dB (A)
ONDERDELEN
natural_image
Simple line drawing of a bag with a handle and side mark (no text or symbols)natural_image
Simple line drawing of a curved object with two small protrusions (no text or symbols)Lwa=97 dB (A), Kwa=3 dB (A).
COMPONENTES PRINCIPALES
Christina Niemelä Ström Business Area Manager IKEA of Sweden AB MONTAJE
natural_image
Simple line drawing of a curved object with a small mark and a number 1, no text or symbols present.natural_image
Simple line drawing of a rounded object with a handle and two small icons (no text or symbols)Lpa= 86 dB (A), Kpa= 3 dB (A),
Christina Niemelä Ström Business Area Manager IKEA of Sweden AB
MONTAGGIO
natural_image
Simple line drawing of a hat with a handle and spout (no text or symbols)natural_image
Simple line drawing of a curved object with two small symbols (no text or labels)Lpa= 86 dB (A), Kpa= 3 dB (A),
Lwa= 97 dB (A), Kwa= 3 dB (A)
CARACTERÍSTICAS
conforme as disposições das directivas 2006/42/EC, 2004/108/EC, 2006/95/EC, 2002/96/EC, 2002/95/EC.
Christina Niemelä Ström Business Area Manager IKEA of Sweden AB
MONTAGEM
natural_image
Simple line drawing of a curved object resembling a stylized letter 'D' or container, with no text or symbols present.Bàpoç: 1.3 kg (2.86 lbs)
Christina Niemelä Ström Business Area Manager IKEA of Sweden AB
ΣΥΝΑΡΜΟΛΟΓΗΣΗ
natural_image
Simple line drawing of a hat with a handle and spout (no text or symbols)natural_image
Simple line drawing of a curved object with a handle and textured base (no text or symbols)Lpa = 86 dB (A), Kpa = 3 dB (A),
Ses gücü seviyesi
Lwa = 97 dB (A), Kwa = 3 dB (A)
ÖZELLİKLER LİSTESİ
Christina Niemelä Ström Business Area Manager IKEA of Sweden AB