GS 300 P - Lawn mower GUDE - Free user manual and instructions
Find the device manual for free GS 300 P GUDE in PDF.

User questions about GS 300 P GUDE
0 question about this device. Answer the ones you know or ask your own.
Ask a new question about this device
Download the instructions for your Lawn mower in PDF format for free! Find your manual GS 300 P - GUDE and take your electronic device back in hand. On this page are published all the documents necessary for the use of your device. GS 300 P by GUDE.
USER MANUAL GS 300 P GUDE
natural_image
Icon of an open book inside a black circle (no text or symbols)Deutsch DE 3
Original Operating Instructions
REEL MOWER
Français FR 12
natural_image
Line drawing of a manual lawn mower with open lid and wheels (no text or symbols)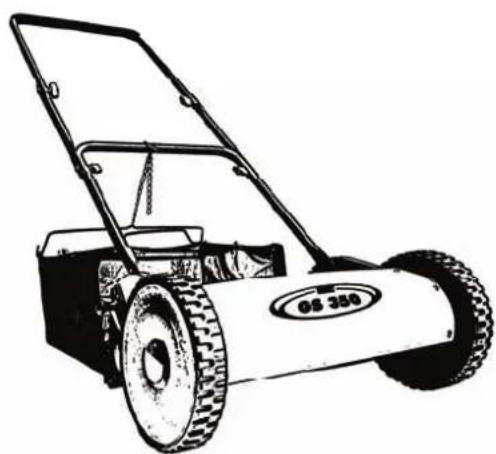
natural_image
Line drawing of a manual lawn mower with open lid and wheels (no text or symbols)1
text_image
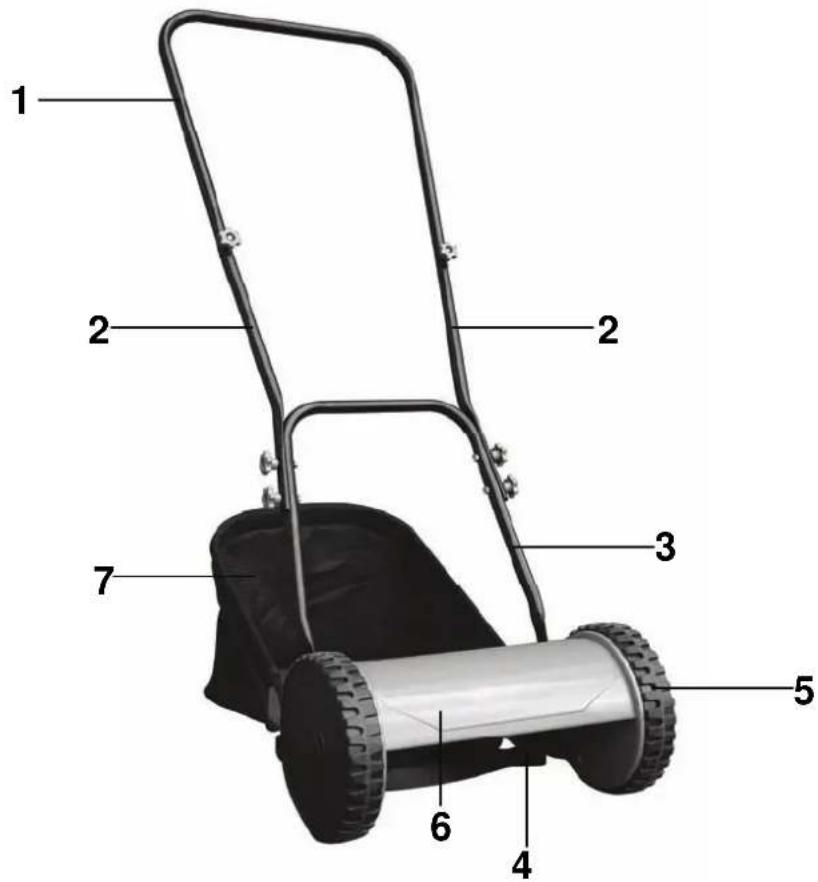
1 2 2 3 7 5 6 42
text_image
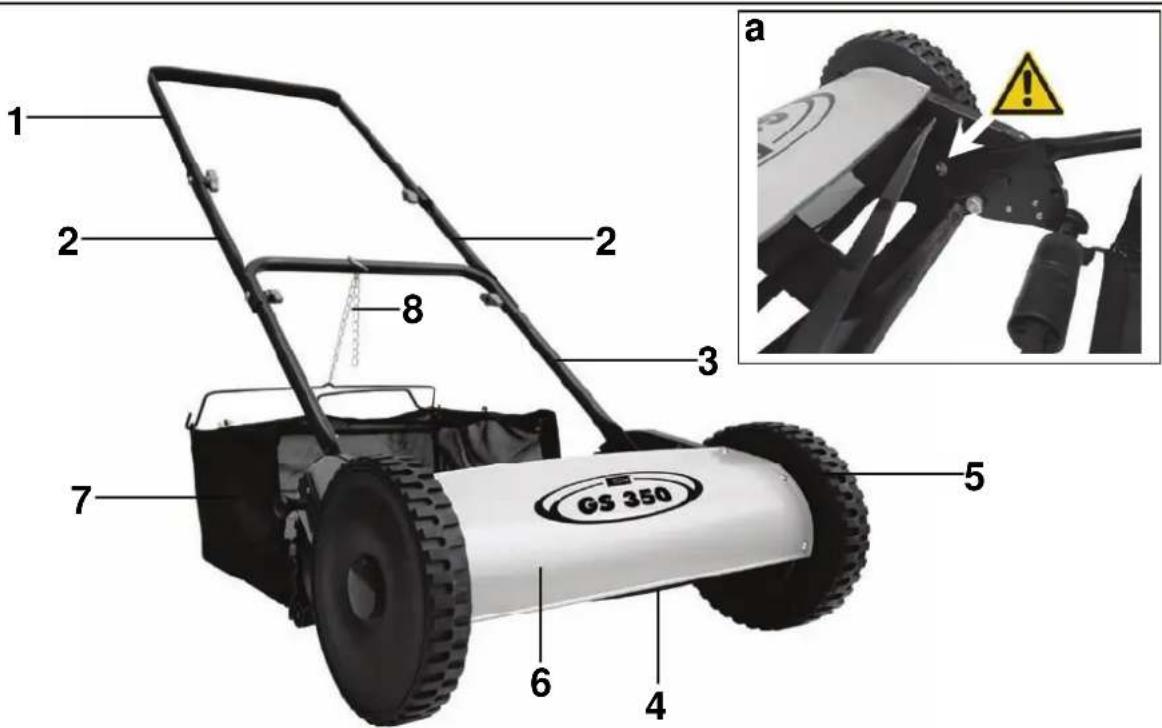
1 2 2 8 3 7 GS 350 5 6 4 aEinleitung
To enjoy your new reel mower as long as possible, please read carefully the Operating Instructions and the attached safety instructions before putting the appliance into operation. We also recommend keeping the Operating Instructions for future reference.
We reserve making technical changes to improve the appliance as part of the continuous product development.
This document represents the original Operating Instructions.
Supply includes
Take the appliance out of the transport container and check whether there are the following parts:
• GS 300 P or GS 350 REEL MOWER
• Upper part of the sliding handle
- Sliding handle extension (2 pcs)
- Bottom part of the sliding handle
- Small parts bag (bolts, fly nuts)
- Washer and nut (2 pcs) (#95116)
- Grass catcher (disassembled at #95116)
- Chain with hook (#95116)
• Allen wrench (#95116)
• Cotter (2 pcs) (#06000)
• Original Operating Instructions
- Warranty certificate
If any parts are missing or are damaged, please contact your dealer.
Appliance description (pic. 1 or pic. 2)
- Upper part of the sliding handle
- Sliding handle extension
- Bottom part of the sliding handle
- Cutting spindle
- Wheel
- Covering
- Grass catcher
- Chain with hook (#95116 only)
#06000 technical specifications
Cutting width 300 mm
Cutting spindle diameter 120 mm
Knives 5
Cutting height setting 15 mm - 40 mm
Grass catcher capacity 20
Weight 7 kg
Dimensions (L x W x H in mm) 440 x 310 x 1220
#95116 technical specifications
Cutting width 350 mm
Cutting spindle diameter 140 mm
Knives 4
Cutting height setting 30 mm - 52 mm
Grass catcher capacity 26
Weight 8.2 kg
Dimensions (L x W x H in mm) 530 x 390 x 1120
Safety instructions

Please read carefully these Operating Instructions. Familiarise with the control elements and appropriate use of the appliance. Keep the Operating Instructions for future reference.
Keep the place of your work clean!
Mess in the place of your work may result in injuries.
Consider the environment
Do not expose the appliance to rain.
Do not use the appliance in a wet or moist environment.
Provide adequate lighting.
Keep other persons in a safe distance!
Do not let other persons, especially children, touch the appliance and cable. Keep them in a sufficient distance from the place of your work.
Store the appliance properly!
An appliance that is not used should be kept in a dry, locked place inapproachable to children.
Do not overload your appliance!
Work within the specified output range.
Use the right appliance!
Do not use the appliance for purposes for which it has not been designed.
Look after your appliance!
Follow the servicing regulations and appropriate instructions.
If the appliance is damaged, have it replaced by an authorised expert. Keep the handles dry, with no sign of oil and grease.
Be careful!
Pay attention to what you are doing. Use common sense when working. Do not use the appliance when you are tired.
CAUTION!
Use any other accessory equipment may lead to a risk of injury.
Have your appliance repaired by an electrician only!
This appliance corresponds to appropriate safety regulations. Repairs may only be executed by an electrician, using original spare parts; otherwise, the user will face a risk of injury.
Appliance-specific safety instructions

Use the appliance only after you have carefully read the Operating Instructions.
- Follow all safety instructions specified in the Operating Instructions.
- Check the appliance every time it is to be put into operation to make sure the nuts, bolts and tools are not worn or damaged. Any worn or damaged cutting tools must be replaced.
- The area you wish to cut needs to be inspected before cutting. Any stones, pieces of wood, wires and other foreign items must be removed. Items caught by the cutting tool may be thrown away uncontrollably.
- Risk of injury! Never touch the cutting area and never put your feet above or under the rotating parts.
-
Wearing appropriate working clothes is necessary: safety shoes, working gloves and protective glasses.
-
Never leave the appliance unattended.
- Do not use the reel mower if there are other persons, especially children and animals, around. The user is liable for damages.
- Be particularly careful when cutting on hills or slopes:
• Make sure your posture is safe at all times
- Wear shoes with a non-slip rough sole.
- Cut across slopes at all times.
- Be particularly careful when reversing and pulling the reel mower. Risk of trip!
- If the cutting mechanism hits an obstacle or a foreign item, the reel mower must be inspected by a professional.
- Work under good visibility or adequate lighting only.
- Behave responsibly towards other persons.
- The appliance has exclusively been designed to be operated by one person; operating the appliance by two or more persons is strictly prohibited.
Marking
Product safety:
 | |
| Product corresponds to appropriate EU standards |
Prohibitions:
 |  |
| No touching inside | Must not be accessed by children |
Warning:
 |  |
| Warning/caution | Warning: cutting mechanism may injure your feet |
Commands:
 |  | |
| Please read carefully the Operating Instructions. Before using the appliance, familiarise carefully with the appliance operational elements. | Use safety shoes | |
Environment protection:
 |  | ||||
| Dispose waste professionally so as not to harm the environment. | Packing cardboard material may be delivered to collection centres for recycling. | ||||
Package:
 |  | |
| Protect against moisture This side up | ||
 | ||
| Interseroh-Recycling | ||
Technical specifications:
 | 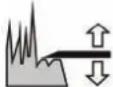 |
| Cutting width Cutting height setting | |
 |  |
| Grass catcher capacity Weight | |
Training
Please read carefully the Operating Instructions and the servicing instructions. Familiarise thoroughly with the controls and proper using of the appliance. You must know how the appliance works.
Never let children work with the appliance. Never let an adult person work with the appliance without proper training.
Do not let any persons, especially small children and pets, to the place of your work.
Be careful to prevent slipping of falling.
Use as designated
The reel mower has exclusively been designed to cut grass plots and lawns around the house and in the garden in private spaces. Following the attached Operating Instructions is the basis for proper using of the reel mower. Works other than those for which the appliance has been designed and that are specified in the Operating Instructions cannot be performed with this appliance.
Any other use is in conflict with the designation. The manufacturer will not be liable for any consequential damage and injuries. Please be sure to know that our appliances have not been designed to be used for industrial purposes.
Never use the reel mower to cut creepers or roof grass.
Assembly
When supplying the reel mower, some parts have been disassembled for transport purposes. Bolts, nuts, etc. can be found in the separate plastic bag. The assembly procedure is simple if these instructions are followed.
GS 300 P #06000 REEL MOWER
- Press slightly the bottom part of the rod towards yourself and let it snap in the pins on the reel mower.
-
Secure the bottom part of the rod with cotters on pins.
-
Mount the sliding handle extension to the bottom part of the rod using wing bolts.
- Slip the upper part of the rod on the sliding handle extension and fasten it using wing bolts.
- Fold up the grass catcher and hook it on the guide pulley.
GS 350 #95116 REEL MOWER
- Press slightly the bottom part of the rod towards yourself and let it snap in the pins on the reel mower. See picture 2a.
- Insert washers and fasten the rod to the reel mower using nuts.
- Fasten the sliding handle extension to the bottom part of the rod using wing bolts.
- Slip the upper part of the rod on the sliding handle extension and fasten it using wing bolts.
- Fold up the grass catcher, fasten the middle brace using wing nuts, slip chain on the rear brace and hang it to loops on the grass catcher.
- Hang the grass catcher on the guide pulley. Hang the chain to the bottom part of the rod in the required height using a snap ring.
Operation
Right cutting
To have a well-kept lawn, we recommend cutting grass at regular weekly intervals if possible. Grass thickens by frequent cutting. If the grass has not been cut for a long time, cutting should first take place in one direction with the highest cutting height and then across with the required cutting height. The maximum length of blades is 12 cm to be able to be cut by the reel mower. Cut only dry grass if possible as wet grass does not provide fine cutting.
Cutting height setting
GS 300 P #06000 REEL MOWER
- Release the side adjusting screws and set the required cutting height and then fix the screws again.
GS 350 #95116 REEL MOWER
- Pull the height setting lever, read the cutting height on the scale and release the lever.
- Repeat the procedure on the other side.
EU DECLARATION OF CONFOMITY
We,
Güde GmbH & Co. KG
Birkichstrasse 6
D-74549 Wolpertshausen
Germany
herewith declare that the following appliance complies with the appropriate basic safety and healthy requirements of the EU Directives based on its design and type, as brought into circulation by us. In case of alternation of the machine, not adreed upon by us, this declaration will lose its validity.
Machine description:
GS 300 P #06000 REEL MOWER
GS 350 #95116 REEL MOWER
Article No.
06000
95116
Applicable EU Directives:
2006/42 EG
Date/authorised signature: 8 Dec, 2010

Title of signatory: Managing Director
Mr
Technical documentation: J. Bürkle FBL; QS
Warranty
The warranty applies exclusively to material defects or manufacturing defects. Original purchase voucher with the purchase date must be provided for lodging a claim in the warranty period. The warranty does not cover any unauthorised use such as appliance overload, violent use, damage by a foreign person or foreign item. Failure to follow the Operating Instructions or assembly instructions and ordinary wear and tear are also excluded from the warranty.
Residual risks and protective measures
Other risks
| Risk Description Protective measure(s) | ||
| Thrown-away items | Thrown-away foreign items may cause injuries. | Wear appropriate working clothes: safety shoes, working gloves and protective glasses |
Ergonomic principles neglecting
| Risk Description Protective measure(s) | ||
| Inadequate local lighting | Inadequate lighting/poor visibility represents a high safety risk. | Provide adequate lighting or good visibility whenever working with the appliance. |
Behaviour in case of emergency
Provide necessary first aid treatment corresponding to the injury nature and seek qualified medical help as soon as possible.
Protect the injured person from other injuries and calm him/her down.
First aid kit must always be available in the place of your work in case of accident in accordance with DIN 13164. Material taken out of the first aid kit needs to be supplemented right away.
If help is needed, please provide the following details:
- Place of accident
- Accident nature
- Number of injured persons
- Injury type
Disposal
The disposal instructions are based on icons placed on the appliance or its package. The description of the meanings can be found in the "Marking" chapter.
Transport container disposal
The container protects the appliance against damage during transport. Container materials are usually selected depending on their environment friendliness and disposal method and can therefore be recycled.
Returning the container back in the circulation saves raw materials and reduces waste disposal costs.
Parts of the container (e.g. foils, styropore) can be dangerous to children. Risk of suffocation! Keep parts of the container out of reach of children and dispose them as quickly as possible.
Operator requirements
The operator must carefully read the Operating Instructions before using the appliance.
Qualification
No special qualification is necessary for using the appliance apart from derailed instruction by an expert.
Minimum age
The may only be operated by persons over 18 years of age. An exception includes youngsters operating the appliance within their professional education to achieve necessary skills under trainer's supervision.
Training
Using the appliance requires only appropriate instruction by a professional or reading the Operating Instructions. No special training necessary.
Maintenance
Do you have any technical questions? A claim? Do you need spare parts or the Operating Instructions? You will be helped quickly and without needless bureaucracy at our webpage www.guede.com in the Services part. Please help us be able to assist you. To be able to identify your appliance when claimed, we need to know details can be found on the type label. Enter the details below for future reference.
Serial No.
Order No.
Year of production:
Tel.: +49 (0) 79 04 / 700-360
Fax: +49 (0) 79 04 / 700-51999
E-Mail: support@tr.guede.com
Servicing and storing
Caution! Wear appropriate working gloves as there is a risk of injury by the cutting tool.
Caution! Never clean the reel mower under running water, in particular, not under high pressure.
Servicing works not explicitly specified in these Operating Instructions must only be provided by an authorised staff as there may be dangerous situations that the operator is unable to handle. Scheduled servicing or replacement of spare parts may only be performed by an authorised staff.
Actions to be performed immediately after cutting and before storing, e.g. after the season is over
- Clean the appliance. Remove any deposited grass by a brush or cloth. To clean the appliance, use a soft cloth and fine soap water solution. Prevent any direct contact of the appliance with aggressive cleaners. Aggressive, volatile and caustic cleaners must not be used.
- To provide protection against corrosion, wipe all metal parts with an oil-impregnated cloth or spray them with spray oil.
- Keep the appliance covered in a dry, clean and safe place inapproachable to children.
Troubleshooting
The table shows possible failures, their possible causes and removal options. However, if you are unable to remove the problem, contact a professional to assist you.
| Symptom | Possible cause | Measure |
| Abnormal sound | Loosened bolts/parts | Tighten the bolts |
| Foreign item in knife | Remove the foreign item | |
| Knife irregularity | Remove the irregularity using a sharpening stone | |
| Knives touching too much | Adjust the cutting mechanism | |
| Mower not cutting finely | Inappropriate knives setting | Adjust the cutting mechanism |
| Blunt knife | Sharpen or replace the knife | |
| Grass is too high (e.g. grass has not been cut for a long time) | Shorten the grass using a sickle |
Cutting mechanism setting
The cutting mechanism of the reel mower has been factory-set to optimum values. If the mower does not cut finely after being used for a long time, please adjust the bottom knife setting.
GS 300 P #06000 REEL MOWER
- Pull out the cotters and remove the sliding handle from the reel mower.
- The distance of the bottom knife and the knife roller may be changed using adjusting screws on both sides.
- If the knife roller and the bottom knife hardly audibly touch each other, the cutting mechanism is adjusted properly.
- Now proceed to the test cutting as described below.
GS 350 #95116 REEL MOWER
- Unscrew the nuts and remove the sliding handle from the reel mower.
- Incline the reel mower to side.
- The distance of the bottom knife and the knife roller may be changed using hex screws on both sides in the bottom.
- If the knife roller and the bottom knife hardly audibly touch each other, the cutting mechanism is adjusted properly.
- Now proceed to the test cutting as described below.
Test cutting
Put a slip of paper on the bottom knife so as it points to the knife roller axis.
Turn carefully the knife roller. If the bottom knife is adjusted properly, the paper will be cut off as if scissors are used.
Repeat the test cutting for various knives.
Introduction
DÉCLARATION DE CONFORMITÉ CE
Nous,
Güde GmbH & Co. KG
Birkichstrasse 6
D-74549 Wolpertshausen
Allemagne