Q61 - MIDI Keyboard ALESIS - Free user manual and instructions
Find the device manual for free Q61 ALESIS in PDF.

User questions about Q61 ALESIS
0 question about this device. Answer the ones you know or ask your own.
Ask a new question about this device
Download the instructions for your MIDI Keyboard in PDF format for free! Find your manual Q61 - ALESIS and take your electronic device back in hand. On this page are published all the documents necessary for the use of your device. Q61 by ALESIS.
USER MANUAL Q61 ALESIS
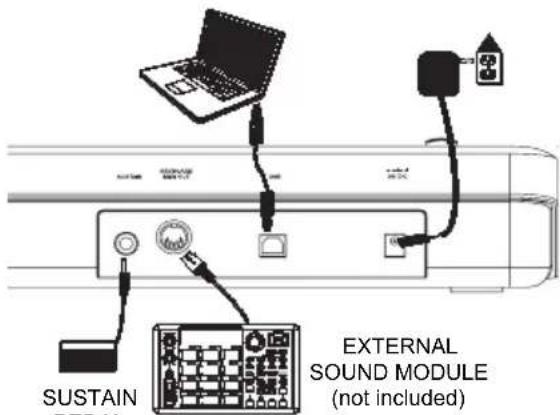
Please refer to the following scenario for connecting the Q61
· COMPUTER (not included)
POWER ADAPTER (not included)
- Connect a USB cable from your computer to the Q61. The unit will be powered through the USB connection. Alternatively, if you do not wish to use a computer in your setup or if you wish to power the Q61 externally, please plug in a 9V DC, 500mA power adapter, center-positive, 5.46mm barrel diameter.
- If you would like to use an external sound module, connect a 5-pin MIDI cable from the KEYBOARD MIDI OUT of the Q61 to the MIDI IN of the external device.
text_image
SUSTAIN REPAIR EXTERNAL SOUND MODULE (not included)PEDAL (not included)
REAR PANEL OVERVIEW
- DC POWER ADAPTER INPUT – Plug in a 9V DC, 500mA power adapter, center-positive, 5.46mm barrel diameter (sold separately) if you do not wish to power the Q61 through the USB connection.
- USB CONNECTION – Plug a standard USB cable into this outlet and into the
USB port of your computer. The computer's USB port will provide power to the Q61. This connection is used to send and receive MIDI data to and from your computer and may also be used to send MIDI data from your computer to a device attached to the MIDI OUT port of the Q61.
- MIDI OUT - Use a five-pin MIDI cable (sold separately) to connect this jack to the MIDI IN of an external device. This jack sends the MIDI data output from the keyboard.
- SUSTAIN PEDAL INPUT – Connect a 1/4" TS sustain pedal (sold separately) to this input.

text_image
SUPPORT EVEIANS BEET OUT USB HV DC 4 3 2 1TOP PANEL OVERVIEW

text_image
ALESIS Q61 1 2 3 4 5 6 7 8 9 10 11 12 13 14 15 16 17 18 19 20 21 22 23 24 25 26 27 28 29 30 31 32 33 34 35 36 37 38 39 40 41 42 43 44 45 46 47 48 49 50 51 52 53 54 55 56 57 58 59 60 61 62 63 64 65 66 67 68 69 70 71 72 73 74 75 76 77 78 79 80 ALESIS Q61- KEYBOARD – The KEYBOARD functions as a normal electronic piano keyboard during performance but can also be used to adjust MIDI settings and send MIDI messages. The labels above the keys indicate their functions. The numbered keys allow you to enter values for settings. Press the Cancel or Enter key to cancel or confirm your selection, respectively. See SELECTING & EDITING MIDI COMMANDS for more information.
- PITCH BEND WHEEL – Transmits MIDI Pitch Bend information to raise or lower the pitch of a note temporarily.
- MODULATION WHEEL – This wheel can be used to transmit continuous controller data (CC #1 – Modulation).
- DATA ENTRY SLIDER - This slider lets you send MIDI messages for the currently selected parameter from the KEYBOARD (e.g., REVERB DEPTH, VOLUME, etc.). You can select a parameter by pressing MIDI / SELECT then the corresponding key on the KEYBOARD.
- MIDI / SELECT - Pressing this button allows you to adjust MIDI settings and send MIDI messages by pressing labeled keys on the KEYBOARD. See SELECTING & EDITING MIDI COMMANDS for more information.
- OCTAVE UP / DOWN – These buttons can be used to shift the keyboard's range up and down.
SELECTING & EDITING MIDI COMMANDS
The MIDI / SELECT button and the keys on the KEYBOARD allow you to adjust MIDI parameters and send precise MIDI messages and information quickly and easily:
- Press MIDI / SELECT.
- Press the key on the KEYBOARD whose MIDI setting (printed above the key) you want to adjust or send.
- Enter a value with the numbered keys on the KEYBOARD.
- Press the Enter or Cancel key on the KEYBOARD to confirm or cancel your choice, respectively.
MIDI CHANNELS – Selects the MIDI channel (1-16) over which the Q61 will transmit MIDI messages. The default is Channel 1.
ASSIGNMENT DATA ENTRY GROUP
These parameters change the MIDI command sent by the Data Entry Slider. To change the Values, press the MIDI/SELECT button, then press the corresponding Key. Press the MIDI/Select Button to exit.
VELOCITY – Press this key to set the DATA ENTRY SLIDER to adjust the note velocity. Increasing this value increases the MIDI velocity value generated by a light key press.
REVERB DEPTH – Press this key to set the DATA ENTRY SLIDER to CC #91 (Reverb Send Level). The default value for this setting is 64.
CHORUS DEPTH – Press this key to set the DATA ENTRY SLIDER to CC #93 (Chorus Send Level). The default value for this setting is 64.
PAN POT – Press this key to set the DATA ENTRY SLIDER to CC #10 (Pan). The default value is 64 (center).
VOLUME – Press this key to set the DATA ENTRY SLIDER to CC #7 (Channel Volume).
CC DATA – Press this key to set the DATA ENTRY SLIDER to the CC# designated by the CC NO. control.
OCTAVE GROUP -
These parameters change the octave range of the keyboard.
-1 – Lowers the octave range of the keyboard by one octave.
STANDARD- Sets the octave range to the default value with the first key being C0.
+1 - Raises the octave range of the keyboard by one octave.
TRANSPOSE GROUP
These parameters transpose the keyboard by one semitone at a time. You can press these buttons multiple times to transpose multiple semitones to find your desired key.
b – Lowers the pitch of the entire KEYBOARD one semitone.
§ – Sets the KEYBOARD back to the standard piano range.
– Raises the pitch of the entire KEYBOARD one semitone.
OTHER SETTINGS AND COMMANDS
These set various parameters and send MIDI messages.
RESET – Press this key followed by the Enter key to send a reset message to all controllers and return the Q61 to its original settings.
Note: This button does not reset the current octave range or transposition of the KEYBOARD.
CC DATA (Control Change Data) – Sends a CC message over the CC number designated by the CC NO. function. Pressing the Enter key will send a MIDI message.
CC NO. (Control Change Number) – Sets the MIDI CC# to be sent by either the DATA ENTRY SLIDER or the CC DATA function. (A message will not be sent until the Enter key is pressed when selecting CC Data.)
BANK MSB and BANK LSB – Sets the LSB (Least Significant Byte) and MSB (Most Significant Byte):
Note: This is used when sending Program Change messages.
PROGRAM - Sets the MIDI Program Change number.
CANCEL - Deletes a numeric value entered into a parameter in MIDI / SELECT mode.
ENTER - Confirms a numeric value entered into a parameter in MIDI/SELECT mode.
Note: After you enter a CC#, the number will be remembered by the Q61. However, if you want to send a CC or Program Change message, you must enter the value using the numbered keys on the KEYBOARD each time before pressing Enter.
TROUBLESHOOTING
| PROBLEM CAUSE SOLUTION | ||
| No sound from target device. Q61 not properly connected. | Check your computer's USB connection to confirm that the Q61 is recognized. If necessary, replug the connection and restart your computer. | |
| If controlling an external hardware module, make sure that the MIDI cable is connected from the Q61 to the device's MIDI IN port. | ||
| Notes sustain continuously. | Q61 connected after software application has started.Problem is caused by use of a USB hub. | Restart the software application with the controller plugged in. |
| Unplug the Q61 from the USB hub and connect directly to the computer. | ||
| Software application not set to receive MIDI data from the Q61. | Ensure that the Q61 or USB MIDI device is listed as an active MIDI source in your application. Usually, the MIDI settings can be accessed through the application's Preferences menu. | |
| Q61's MIDI channel not the same as application's incoming MIDI chanel. | Make sure that the Q61 is sending MIDI information on the channel that the target device expects. | |
| Sustain pedal was plugged in after the Q61 was powered on. | Turn the unit's power off, wait a moment and then turn it on again. | |
| Stuck notes due to incomplete MIDI data. | Turn the unit's power off, wait a moment and then turn it on again. | |
| Sustain pedal works in reverse. | Sustain pedal was plugged in after power was turned on. | With the pedal plugged in, turn the unit's power off, wait a moment, and turn it on again. |
SPECIFICATIONS
POWER: USB, 9V DC, 500mA, center-positive, 5.46mm barrel diameter (sold separately)
KEYBOARD: 61 keys
ACCESSORIES: Quickstart Guide, USB cable
MIDI OUTPUTS: 1 5-pin jack
USB: 1 slave connector (MIDI over USB)
http://www.alesis.com/Q61