QX61 - MIDI Keyboard ALESIS - Free user manual and instructions
Find the device manual for free QX61 ALESIS in PDF.

User questions about QX61 ALESIS
0 question about this device. Answer the ones you know or ask your own.
Ask a new question about this device
Download the instructions for your MIDI Keyboard in PDF format for free! Find your manual QX61 - ALESIS and take your electronic device back in hand. On this page are published all the documents necessary for the use of your device. QX61 by ALESIS.
USER MANUAL QX61 ALESIS
Please refer to the following scenario for connecting the QX61.
- Connect a USB cable from your computer to the QX61. The unit will be powered through the USB connection. The first time you connect QX61 to your computer, it will automatically install the necessary drivers. (If you use a PC, a dialog box will appear telling you the "new hardware" is ready to use.)
Alternatively, if you do not wish to use a computer in your setup or if you wish to power the QX61 externally, please plug in a 9V DC, 500mA power adapter, center-positive, 5.5mm barrel diameter.
- If you would like to use an external sound module, connect a 5-pin MIDI cable from the KEYBOARD MIDI OUT of the QX61 to the MIDI IN of the external device.

text_image
COMPUTER (not included) POWER ADAPTER (not included) SUSTAIN PEDAL (not included) EXTERNAL SOUND MODULE (not included)REAR PANEL OVERVIEW
- DC POWER ADAPTER INPUT – Plug in a 9V DC, 500mA power adapter, center-positive, 5.5mm barrel diameter (sold separately) if you do not wish to power the QX61 through the USB connection.
- POWER SWITCH – Turns the power on/off. If you are using a power adapter (sold separately), set the switch to "POWER"
when turning it on. If you are powering it via its USB CONNECTION, set the switch to "USB" when turning it on.

text_image
SUSTAIN KEYBOARD MIDI OUT COMPUTER MIDI OUT USB USB | OFF | POWER 9V DC 6 5 4 3 2 1- USB PORT – Plug a standard USB cable into this outlet and into the USB port of your computer. The computer's USB port will provide power to the QX61. This connection is used to send and receive MIDI data to and from your computer and may also be used to send MIDI data from your computer to a device attached to the MIDI OUT port of the QX61.
- KEYBOARD MIDI OUT – Use a five-pin MIDI cable (sold separately) to connect this jack to the MIDI IN of an external device.
- COMPUTER MIDI OUT - Use a five-pin MIDI cable (sold separately) to connect this jack to the MIDI IN of an external sound module. An external sound module connected to this output can be controlled by your computer (connected to the USB PORT).
- SUSTAIN PEDAL INPUT – Connect a 1/4" TS sustain pedal (sold separately) to this input.
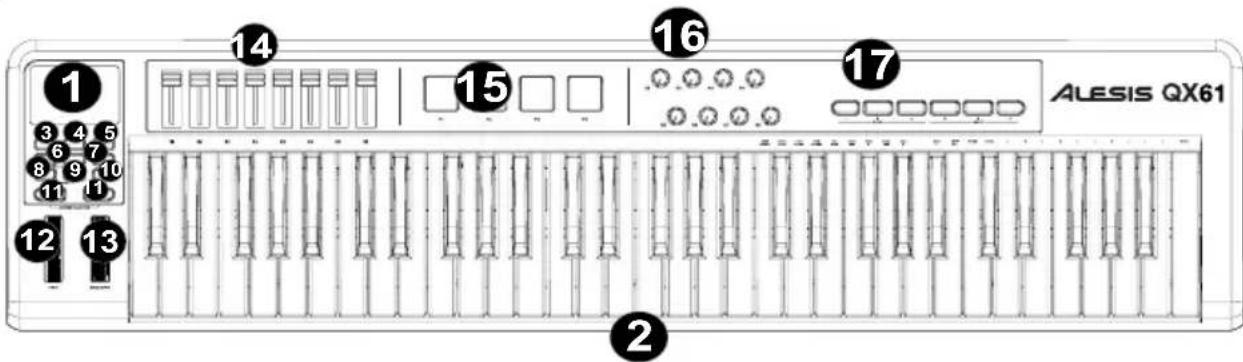
TOP PANEL OVERVIEW
text_image
1 3 4 5 6 7 8 9 10 11 12 13 14 15 16 17 ALESIS QX61 2- LCD – Displays the data, values, settings, etc. of QX61 and its functions.
- KEYBOARD – The KEYBOARD functions as a normal electronic piano keyboard during performance but can also be used to adjust MIDI settings and send MIDI messages. The labels above the keys indicate their functions. The numbered keys allow you to enter values for settings. Press the Enter key to confirm your selections.
- ADVANCED – Press this key to access QX61's advanced or secondary functions, allowing you to assign MIDI channels, set controls, adjust velocity curves, etc. when the ADVANCED button is engaged (i.e., when it is lit). See the ADVANCED FEATURES section for information on selecting and entering these assignments and values.
- ZONE RNG – Press this button to assign the MIDI note range of a Zone using the KEYBOARD.
- ZONE GRP – Press this button then use the TRANSPORT CONTROL buttons to activate/deactivate Zones on Groups.
- -/+ - Decreases/increases the value shown in the LCD by one. You can use these buttons to change the preset number when storing or recalling presets. Press both buttons simultaneously to activate the Snapshot function, sending out the current values of the DATA SLIDERS, MODULATION WHEEL, PITCH BEND WHEEL, KNOBS, and expression pedal (if one is attached).
- MUTE – Press this button to disable all of QX61's controls except for the KEYBOARD, pads and transport controls. "MUTE" will be shown on the LCD. Press MUTE and NULL simultaneously to send a MIDI panic message, which resets all controls and sends an All Notes Off message.
- RECALL – Press this button to recall one of QX61's 20 available presets (01-20). When "RECALL" is flashing on the LCD, use the -/+ buttons to select a preset. (See ADVANCED FEATURES for more information on storing presets.) You can press RECALL and PROGRAM simultaneously to set the QX61's global MIDI channel.
- PROGRAM – Press this button to change the current program (0-127). When the button is lit, you can use the -/+ buttons or the KEYBOARD's numeric keys to change the program number. You can press RECALL and PROGRAM simultaneously to set the QX61's global MIDI channel.
- NULL – Press this button to activate/deactivate Null Mode. ("NULL" will appear on the display when active.) In Null Mode, when you switch to another preset, QX61's controls will not send out any MIDI data until they reach the position in which you left them when you last used that preset. Essentially, this feature prevents parameter values from "jumping" when switching between presets. Press MUTE and NULL simultaneously to send a MIDI panic message, which resets all controls and sends an All Notes Off message.
- OCTAVE/TRANSPOSE UP/DOWN – Press one of these buttons to shift the KEYBOARD's octave range up or down. Press both buttons simultaneously then press either one of them to shift the KEYBOARD's notes up to 12 semitones in either direction.
- PITCH BEND WHEEL – Transmits MIDI Pitch Bend information to raise or lower the pitch of a note temporarily.
- MODULATION WHEEL – This wheel can be used to transmit continuous controller data (CC #1 or Modulation Depth).
- DATA SLIDERS – These sliders let you send MIDI data to adjust their currently selected parameters in your software.
- TRIGGER PADS – These velocity-sensitive pads will send MIDI note messages when pressed. You can use these pads to trigger drum hits or other samples in your software.
- KNOBS - These encoders let you send MIDI data to adjust their currently selected parameters in your software.
- TRANSPORT CONTROLS – You can use these buttons to operate transport controls (play, stop, record, etc.) in your software. These buttons are also used to select the keyboard's Zones and Groups.
ADVANCED FEATURES
FACTORY RESET: To restore QX61's factory settings, which will erase any presets or other saved values, press and hold the leftmost and rightmost TRANSPORT CONTROL buttons ("loop" and "record") while switching QX61's power on.
GLOBAL MIDI CHANNEL: Assigns QX61's global MIDI channel by following these steps:
- Press RECALL and PROGRAM simultaneously. "GLOB CHAN" will appear on the LCD and the current global channel number will be shown.
- Use the KEYBOARD's numeric keys to enter the desired channel (1-16).
- Press the KEYBOARD's ENTER key to confirm your choice.
RECALL: Recalls a stored preset:
- Press RECALL. "RECALL" will flash on the LCD along with the current preset.
- Use the -/+ buttons to select the number of the desired preset.
- Wait a couple seconds until "RECALL" disappears from the LCD.
Note: When you recall a preset, only Groups that are currently selected will be affected by the new preset's settings. Groups that are not selected will be unaffected.
TRANSPOSE: Instead of simply changing the register (octave range) of the KEYBOARD, you can transpose the KEYBOARD, shifting it up or down in semitone intervals.
- Press both OCTAVE / TRANSPOSE buttons simultaneously. "TRANS" will appear on the LCD.
- Use the OCTAVE/TRANSPOSE UP/DOWN buttons to increase or decrease the KEYBOARD's transposition. You can transpose it up or down up to 12 semitones. "00" is the default (no transposition).
- Do not touch the OCTAVE/TRANSPOSE UP/DOWN buttons for a couple seconds. You can play the KEYBOARD with the new transposition once "TRANS" stops flashing on the LCD.
For the functions listed below:
Press ADVANCED to enter Edit Mode.
When you are finished making all your changes, press ADVANCED to exit Edit Mode.
CONTROL ASSIGN: Assigns the MIDI message sent for any of the DATA SLIDERS, TRIGGER PADS, or KNOBS:
- Press the KEYBOARD's CTRL ASSIGN key. "CC" will flash on the LCD.
- Move the DATA SLIDER or KNOB or press the TRIGGER PAD whose MIDI message you want to assign. Its current MIDI message will appear on the LCD.
- Use the KEYBOARD's numeric keys to enter the desired MIDI message.
- Press the KEYBOARD's ENTER key to confirm your choice.
Note: See the MIDI MESSAGE CHARTS for a list of parameters and their numbers.
ZONE CHANNEL: Assigns the MIDI channel over which QX61's Zone controllers will send MIDI messages.
- Press the KEYBOARD's ZONE CHAN key. "ZONE CHAN" will flash on the LCD.
- Use the KEYBOARD's numeric keys to enter the desired channel. You can enter 1-16 or 0, which is the global MIDI channel.
- Press the KEYBOARD's ENTER key to confirm your choice.
CHANNEL ASSIGN: Assigns the MIDI channel over which the DATA SLIDERS, TRIGGER PADS, or KNOBS will send MIDI messages:
- Press the KEYBOARD's CHAN ASSIGN key. "CHAN" will flash on the LCD.
- Move the DATA SLIDER or KNOB or press the TRIGGER PAD whose channel you want to assign. Its current MIDI channel will appear on the LCD.
- Use the KEYBOARD's numeric keys to enter the desired channel number. You can enter 1-16 or 0, which is the global channel.
- Press the KEYBOARD's ENTER key to confirm your choice.
CONTROL SELECT: Allows you to change what control is selected.
- Press the KEYBOARD's CTRL SELECT key. The name of the last used controller will appear on the LCD.
- You can select the desired control using 1 of the 3 following methods:
A. Select the desired control by moving it
B. Use the -/+ buttons to cycle through the controls.
C. Use the KEYBOARD's numeric keys to select the control (1-4 Pads, 5-10 Transport, 11-18 Sliders, 19-26 Knobs, 27 Pitch Wheel, 28 Mod Wheel) until its name appears in the LCD. Once the desired control is selected, press the KEYBOARD's ENTER key to confirm your choice.
VELOCITY LOCK: Locks the velocity of QX61's TRIGGER PADS so they send out a constant velocity:
- Press the desired TRIGGER PAD at the desired velocity. (The velocity will appear in the LCD.)
- Press the KEYBOARD's VEL LOCK key. "LOC" will appear on the LCD, indicating the TRIGGER PADS' velocity is locked. (To unlock it, repeat Step 2 so "OFF" appears on the LCD.)
BANK LSB/MSB: Sets the LSB (Least Significant Byte) and MSB (Most Significant Byte):
- Press the KEYBOARD's MSB or LSB key.
- Use the KEYBOARD's numeric keys to enter the MSB or LSB (0-127).
- Press the KEYBOARD's ENTER key to confirm your choice.
Note: This is used when sending Program Change messages from the left panel parameter buttons.
DATA 1-3: Stores parameter values, all of which will be sent when a MIDI message is assigned to a pad, transport button, slider, etc. For descriptions of these messages and their parameters, see the included MIDI MESSAGE CHARTS:
- Press the KEYBOARD's DATA 1, DATA 2, or DATA 3 key.
- Move the control whose parameter values you want to edit. These controls include the DATA SLIDERS, KNOBS, TRIGGER PADS, PITCH BEND WHEEL, MODULATION WHEEL, TRANSPORT CONTROLS, and SUSTAIN PEDAL (sold separately), if one is connected.
- Use the KEYBOARD's numeric keys to enter the value for that parameter. See the MIDI MESSAGE CHARTS for a list of parameters and their numbers.
- Press the KEYBOARD's ENTER key to confirm your choice.
MIDI OUT: QX61 has two 5-pin MIDI OUT ports – COMPUTER MIDI OUT and KEYBOARD MIDI OUT. You can set QX61 to send MIDI data out either, both, or neither of these ports.
-
Press the KEYBOARD's MIDI OUT key to toggle through the available options.
-
When "USB" is shown in the LCD, MIDI data sent from a computer (connected to QX61's USB port) will be sent out the COMPUTER MIDI OUT.
- When "KEYBOARD" is shown in the LCD, QX61 will send MIDI data out its KEYBOARD MIDI OUT.
- When both "USB" and "KEYBOARD" are shown in the LCD, MIDI data will be sent out both 5-pin MIDI ports. The COMPUTER MIDI OUT will send out any MIDI messages sent to QX61 from a computer (connected to QX61's USB port), and any performance on QX61 will send its own MIDI messages out the KEYBOARD MIDI OUT.
-
When neither "USB" nor "KEYBOARD" is shown in the LCD, both COMPUTER MIDI OUT and KEYBOARD MIDI OUT ports are disabled.
-
Press ADVANCED when finished.
STORE: Stores QX61's controls in a preset:
-
Press the KEYBOARD's STORE key. "STORE" will flash on the LCD along with the current preset.
-
Use the KEYBOARD's numeric keys to enter a preset (01-20).
-
Press the KEYBOARD's ENTER key to confirm your choice.
CURVE: Allows you to adjust the velocity curves of the TRIGGER PADS and KEYBOARD. (PA- PAD, Bd- KEYBOARD, 1-8 different curves)
- Press the KEYBOARD's CURVE key. The LCD will flash the current velocity curve.
- Use the KEYBOARD's numeric keys to enter the new velocity curve number.
- Press the KEYBOARD's ENTER key to confirm your choice.
ZONES
QX61's note range can be divided into three Zones, which you can assign. These Zones can be mutually exclusive or overlap (or even be identical). Aside from the keyboard, the Pitch wheel and Mod wheel can be assigned per zone.
Zones allow you to play different or overlapping parts of the KEYBOARD over different MIDI channels simultaneously. For instance, you could send the lower register of the KEYBOARD over Channel 1, the upper register over Channel 2, and the entire KEYBOARD over the global channel.
To assign the channel of a Zone, see ZONE CHANNEL above.
To assign which keys are in a Zone:
- Press ZONE RNG. "ZONE RANGE" will flash on the LCD. The LCD will also display the lowest and highest MIDI notes that define that Zone.
- Use the left three TRANSPORT CONTROL buttons (labeled ZONE 1-3) to select which Zone (or Zones) you will be defining. The selected Zones will flash in the LCD.
- Press the KEYBOARD key corresponding to the lowest note that will be in that Zone.
- Press the KEYBOARD key corresponding to the highest note that will be in that Zone.
- Press ZONE RNG to turn off ZONE RANGE mode. The range of the new Zone (or Zones) is now between (and including) the keys you pressed in Steps 3-4. Note: Any Zone can be assigned to any range of keys regardless of the other Zones. You may assign Zones that overlap on the KEYBOARD. Also, it is not necessary for Zone 1 to be the leftmost Zone and Zone 3 to be the rightmost.
GROUPS
When storing presets on QX61, you can save the settings of different combinations of controls. QX61's controls are divided into Groups, as shown here:
| Group A | Group B | Group C | |||
| KEYBOARD | TRIGGER | PADS | PITCH | ||
| PROGRAM | TRANSPORT | CONTROLS | MODULATION | ||
| BANK LSB | DATA SLIDERS | Sustain pedal (sold separately) | |||
| BANK MSB | KNOBS | Zone settings | |||
When you store a preset, you can select any combination of these three Groups. The settings for the controls in those Groups will be stored with the preset.
To select which Groups will be saved with your preset:
- Press ZONE GRP.
- Use the TRANSPORT CONTROL buttons (labeled GROUP A-C) to select the Group (or Groups) to be stored. The selected Groups will be displayed on the LCD. (A minimum of one Group must be selected.)
- When you are finished, press ZONE GRP.
To store or recall a preset, see STORE and RECALL above.
Note: When you recall a preset, only Groups that are currently selected will be affected by the new preset's settings. Groups that are not selected will be unaffected.
TROUBLESHOOTING
| PROBLEM CAUSE SOLUTION | ||
| The display does not light up. | No power. | Please make sure that the QX61 is connected to your computer and that the computer is powered on. |
| If using a power adapter, please make sure that the adapter is plugged into a live power outlet. | ||
| No sound from target device. | QX61 not properly connected. | Check your computer's USB connection to confirm that the QX61 is recognized. If necessary, replug the connection and restart your computer. |
| If controlling an external hardware module, make sure that the MIDI cable is connected from the QX61 to the device's MIDI IN port. | ||
| QX61 connected after software application has started. | Restart the software application with the controller plugged in. | |
| Problem is caused by use of a USB hub. | Unplug the QX61 from the USB hub and connect directly to the computer. | |
| Software application not set to receive MIDI data from the QX61. | Ensure that the QX61 or USB MIDI device is listed as an active MIDI source in your application. Usually, the MIDI settings can be accessed through the application's Preferences menu. | |
| QX61's MIDI channel not the same as application's incoming MIDI chanel. | Make sure that the QX61 is sending MIDI information on the channel that the target device expects. | |
| Notes sustain continuously. | Sustain pedal was plugged or unplugged after the QX61 was powered on. | Press MUTE and NULL simultaneously to send a MIDI panic message, which resets all controls and sends an All Notes Off message. If that does not work, turn the unit's power off, wait a moment and then turn it on again. |
| Stuck notes due to incomplete MIDI data. | ||
SPECIFICATIONS
POWER: USB, 9V DC, 500mA, center-positive, 5.5mm barrel diameter (sold separately)
KEYBOARD: 61 keys
PADS, KNOBS, SLIDERS: 4 velocity-sensitive pads, 8 knobs, 8 sliders
ACCESSORIES: Quickstart Guide, USB cable
MIDI OUTPUTS: 2 5-pin jacks
USB: 1 slave connector (MIDI over USB)
http://www.alesis.com/qx61

THIS DEVICE COMPLIES WITH PART 15 OF THE FCC RULES. OPERATION IS SUBJECT TO THE FOLLOWING TWO CONDITIONS: (1) THIS DEVICE MAY NOT CAUSE HARMFUL INTERFERENCE, AND (2) THIS DEVICE MUST ACCEPT ANY INTERFERENCE RECEIVED, INCLUDING INTERFERENCE THAT MAY CAUSE UNDESIRED OPERATION.
In an environment with radio frequency interference, the unit may malfunction and resume normal operation after removal of the interference.
CONTENIDO DE LA CAJA
| Transmit/Export | Recognize/Import | Remarks | |
| 1. Basic Information | |||
| MIDI channels 1-16 No Default = 1 | |||
| Note numbers 1-128 No With Octave +/- buttons | |||
| Program change 1-128 No | |||
| Bank Select response Yes No 0-127 | |||
| Modes supported: Mode 1: Omni-On, PolyMode 2: Omni-On, MonoMode 3: Omni-Off, PolyMode 4: Omni-Off, MonoMulti Mode | NoNoYesNoNo | NoNoNoNoNo | |
| Note-On Velocity Yes No | |||
| Note-Off Velocity No No | |||
| Channel Aftertouch | Yes No | Via CC controls, when assigned | |
| Poly (Key) Aftertouch | No No | ||
| Pitch Bend | Yes No | ||
| Active Sensing No No | |||
| System Reset | Yes No | ||
| Tune Request | No No | ||
| Universal System Exclusive | No No | ||
| Manufacturer or Non-Commercial SystemExclusive | No | No | |
| NRPNs | Yes | No | Assignable to Pads and Transport controls |
| RPNs | Yes | No | Assignable to Pads and Transport controls |
| 2. MIDI Timing and Synchronization | |||
| MIDI Clock | No No | ||
| Song Position Pointer | No No | ||
| Song Select | No No | ||
| StartContinueStopRecordFast-forwardRewind | YesNoYesYesYesYes | NoNoNoNoNoNoNo | Start = CC 115Stop = CC 114Record = CC 116Fast-forward = CC 117Rewind = CC 118 |
| MIDI Time Code | No No | ||
| MIDI Machine Control | No No | ||
| MIDI Show Control | No No |
www.alesis.com