
Family Pro Fryer FR4016 - Deep fryer TEFAL - Free user manual and instructions
Find the device manual for free Family Pro Fryer FR4016 TEFAL in PDF.


| Product Type | Electric deep fryer with removable pot |
| Brand | Tefal |
| Model | Family Pro Fryer FR4016 |
| Pot Capacity | 4 liters (3.5 L min / 4 L max) |
| Power Supply | 220-240 V ~ 50/60 Hz, 2000 W |
| Weight | Approximately 5 kg |
| Dimensions (L x W x H) | Approximately 400 x 300 x 350 mm |
| Materials | Plastic body, stainless steel pot, chrome-plated metal basket |
| Control Panel | LCD screen, MENU, MODE, +/-, CANCEL, CONFIRM buttons |
| Preset Menus | Fries, Chicken, Onion Rings, Fish |
| Temperature Range | 60 °C to 195 °C (adjustable in 1 °C increments) |
| Timer | 0 to 99 minutes (in 30-second steps) |
| Sleep Mode | Automatic shutdown after 30 minutes of inactivity |
| Filter | Permanent metal filter in the lid, dishwasher safe |
| Cleaning | Removable pot and basket dishwasher safe; control unit and heating element clean with a damp cloth |
| Safety | Automatic shutoff, cool-touch handles, basket lock, non-slip feet, lid with viewing window |
| Spare Parts | Removable pot, basket, control unit, heating element, filter, lid (available at authorized service centers) |
| Repairability | Repair exclusively by authorized service center; do not disassemble yourself |
Frequently Asked Questions - Family Pro Fryer FR4016 TEFAL
User questions about Family Pro Fryer FR4016 TEFAL
0 question about this device. Answer the ones you know or ask your own.
Ask a new question about this device
Download the instructions for your Deep fryer in PDF format for free! Find your manual Family Pro Fryer FR4016 - TEFAL and take your electronic device back in hand. On this page are published all the documents necessary for the use of your device. Family Pro Fryer FR4016 by TEFAL.
USER MANUAL Family Pro Fryer FR4016 TEFAL
F
GB
D
NL
I
E
P
DK
S
N
FIN



This appliance complies with the safety regulations and directives in effect at the time of manufacture.
Check that the power supply voltage corresponds to that shown on the appliance (alternating current).
Given the diverse standards in effect, if the appliance is used in a country other than that in which it is purchased, have it checked by an approved Service Centre.
This appliance is designed for domestic use only. In case of professional use, inappropriate use or failure to comply with the instructions, the manufacturer accepts no responsibility and the guarantee does not apply.
Read and follow the instructions for use. Keep them safe.
GB
Connecting to the power supply
- Do not use the appliance if the appliance or the cord is damaged, if the appliance has fallen or shows visible damage or does not work properly.
In the event of the above, the appliance must be sent to an approved Service Centre. Do not take the appliance apart yourself.
• Always plug the appliance into an earthed socket.
- Do not use an extension lead. If you accept liability for doing so, only use an extension lead which is in good condition, has an earthed connection and is suited to the power of the appliance.
- If the power supply cord is damaged, it must be replaced by the manufacturer, an authorised service centre or a similarly qualified person in order to avoid any danger.
- Do not leave the cord hanging.
- Do not unplug the appliance by pulling on the cord.
• Always unplug the appliance: immediately after use, when moving it, prior to any cleaning or maintenance.
Using
- Use a flat, stable, heat-resistant surface, away from any water splashes.
- This appliance is not designed to be used by people (including children) with a physical, sensory or mental impairment, or people without knowledge or experience, unless they are supervised or given prior instructions concerning the use of the appliance by someone responsible for their safety.
- Children must be supervised to ensure that they do not play with the appliance.
- This electrical equipment operates at high temperatures which may cause burns. Do not touch the apparent metal parts, filter or window....
- Do not switch on the appliance near to flammable materials (blinds, curtains....) or close to an external heat source (gas stove, hot plate etc.).
• In the event of fire, never try to extinguish the flames with water. Close the lid. Smother the flames with a damp cloth. - Do not move the appliance when it is full of liquids or hot food.
- If you have a removable bowl, never take it out when the fryer is switched on.
- Never immerse the appliance or the electrical control unit in water!
- Before throwing away your appliance, the timer battery must be removed and disposed of separately by an approved Service Centre (depending on model).
Cooking
- Never plug in the deep fryer without oil or fat inside. The oil level must always be between the min and max markers.
- If you use solid vegetable fat, cut it into pieces and melt it over a slow heat in a separate pan beforehand, then slowly pour it into the deep fryer bowl. Never put solid fat directly into the deep fryer bowl or fryer basket as this will lead to incorrect operation of the appliance.
- Do not mix different types of oil.
- Do not overfill the basket, never exceed the maximum capacity.
Recommendations
- Limit the cooking temperature to 190°C , especially for potatoes.
- Use the basket for chips.
• Control the cooking: Do not eat burnt food. - Clean your oil after every use to avoid burnt crumbs and change it after every 8 to 12 uses.
- Eat a balanced and varied diet which includes plenty of fruits and vegetables.
- Store your fresh potatoes in a room above 8°C.
- For best results and fast cooking, we recommend that you limit the quantity of chips to 1/2 basket per frying.
- For a larger quantity of food or potatoes, the temperature drops very fast just after having lowered the basket. This lowers the oil temperature considerably and it is normal for the temperature to take a long time to return to 190° C.
Component description
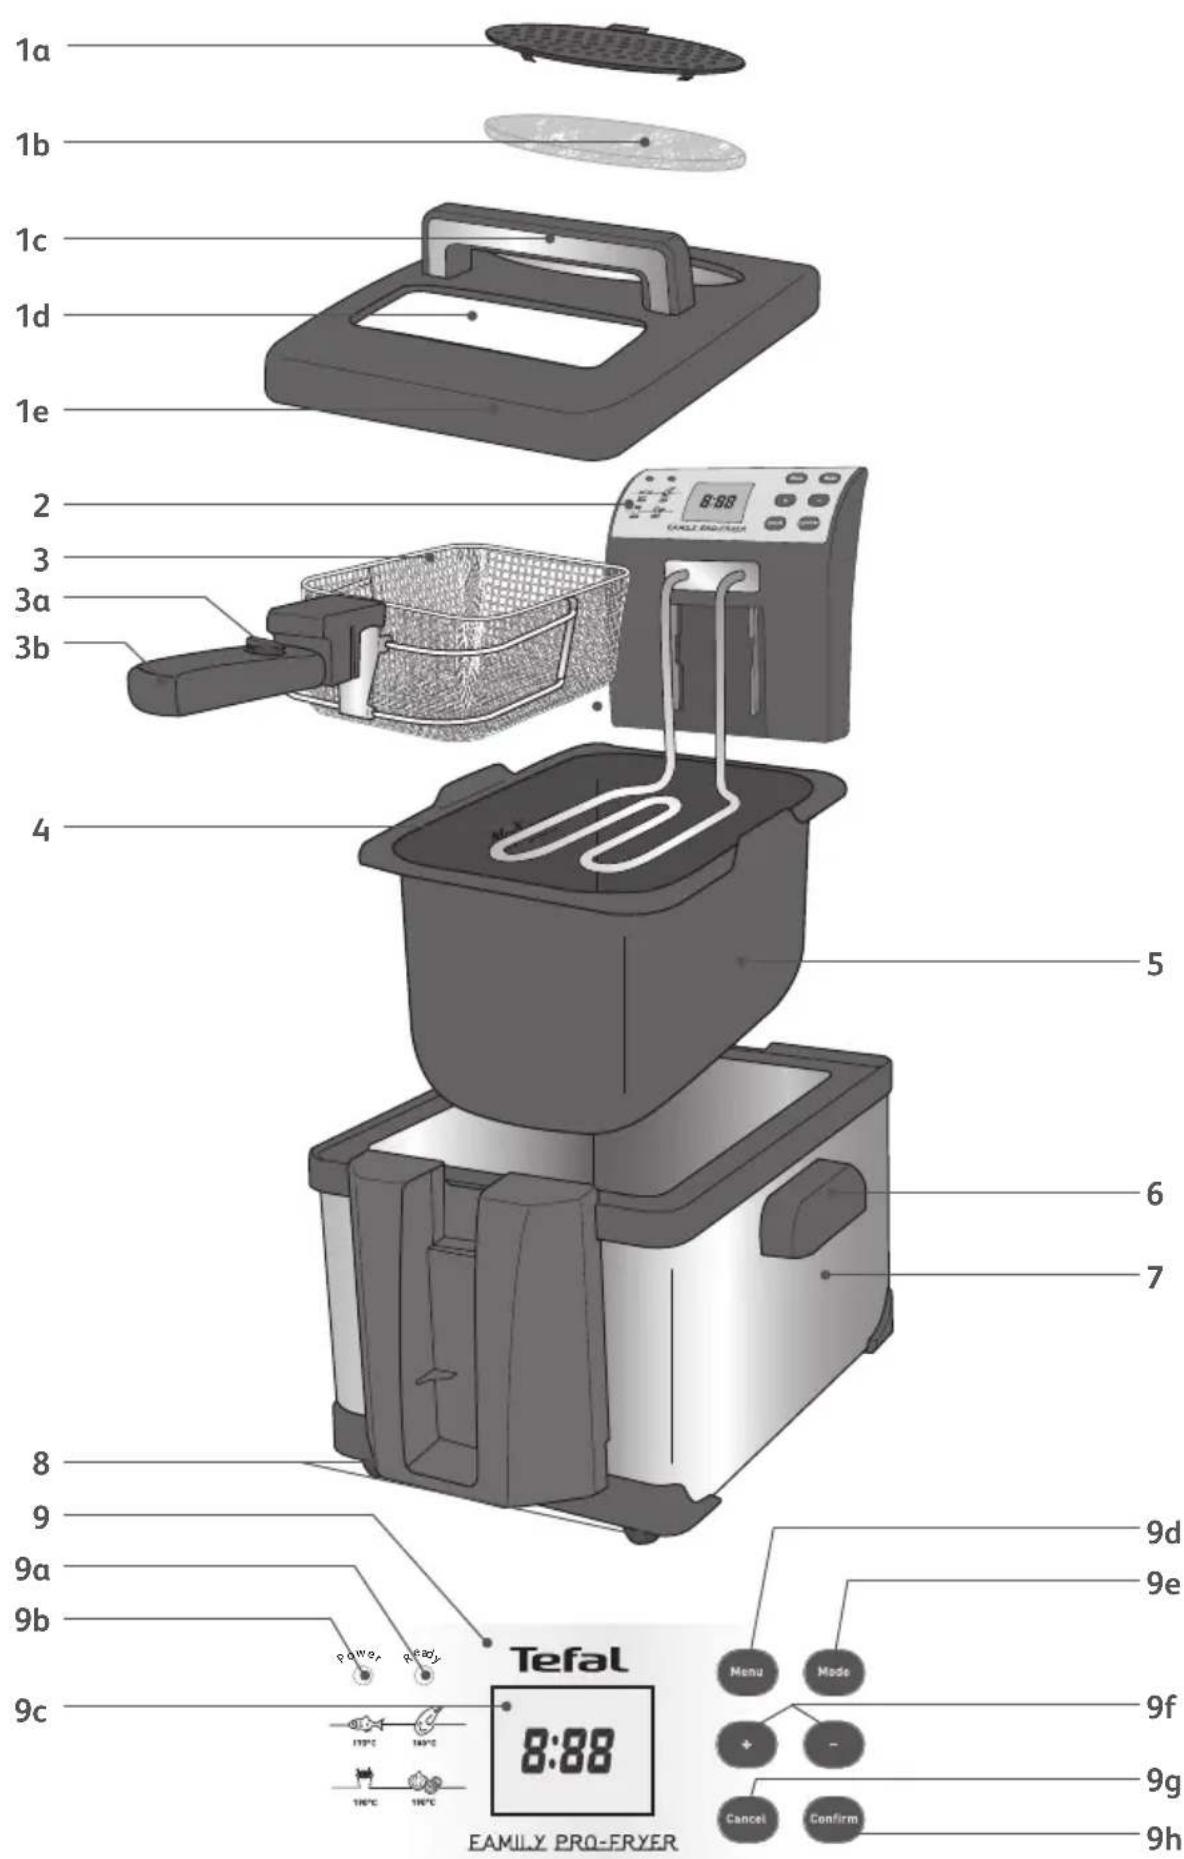
1. Lid
a. Filter cover
b. Permanent filter
c. Handle
d. Viewing window
e. Lid
-
Removable control unit with heating element
-
Frying basket
a. Handle unlocking button
b. Basket handle with raising & lowering positions
-
Min. and Max. oil level markings
-
Removable bowl
-
Safety carrying handles
- Housing
- Feet
- Electronic panel
a. Temperature ready light
b. Power light
c. LCD screen
d. Menu button
e. Mode button
f. + and - buttons
g. Cancel button
h. Confirm button
Preparation
Before using for the first time
- The fryer can be completely dismantled.
- Remove the lid and clean it with a damp cloth. Dry thoroughly.
- Lift the basket handle horizontally until you hear a “click” as it locks.
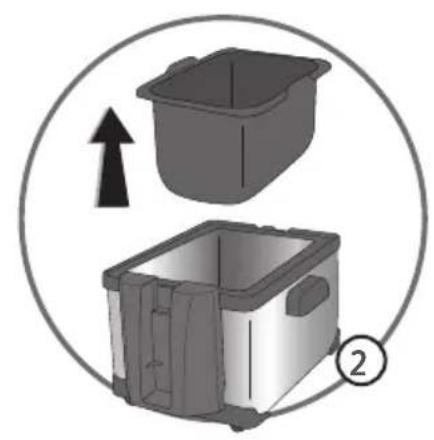
- Remove the basket, the control unit - fig.1 and the bowl - fig.2.
- Clean the frying basket and the bowl with a sponge and soapy water or put them in the dishwasher - fig.3.
- Clean the control unit and the heating element with a damp cloth.
• Dry all components thoroughly. - Place the bowl - fig.4 and the heating element in position - fig.5.
Do not immerse the control unit with the heating element in water. Never wash the lid in the dishwasher.
Make sure that the control unit is correctly positioned otherwise the fryer cannot function.
Filling the bowl
Never use different types of oil at the same time as this may cause the oil to overflow.
The oil level must always be kept between the min/max markers. Check the level each time before frying, and add some of the same type of oil if necessary.
- Fill the bowl with oil.
- The oil level should always be between the MIN and MAX level of the bowl. Do not exceed the maximum fill line as boiling oil may overflow during frying and can cause severe burns - fig.6.
- For best results we recommend a good quality blended vegetable oil. If using sunflower oil ensure the oil is changed every 5 uses. Oils which should not be used under any circumstances and may cause overflowing/smoking/risk of fire are: ground nut oil, soya oil, olive oil, lard or dripping.
- If you use solid vegetable oil, cut it into small pieces and melt it in a separate pan. Pour the melted oil into the fryer bowl.
- Never melt solid fat on the heating element or in the frying basket.
Model Oil Solid vegetable oil
| 3 Litres | Min. 2.5 | 2250g |
| Max. 3 | 2700 g | |
| 4 Litres | Min. 3.5 | 3150 g |
| Max. 4 | 3600 g |
Preheating
- After the bowl has been filled with oil, put the lid on the fryer and plug in the appliance without the frying basket. The control unit beeps and the power indicator light begins to flash. The control unit is in standby; it does not heat.
The LCD screen shows the default setting, which is Chips, with a temperature of 190° C and a cooking time of 8 minutes.
- Select the menu:
Press the MENU button - fig.7 on the control unit to select the corresponding MENU setting according to the food you want to fry.
There are four pre-set menu settings as shown in the table below.
Place the fryer:
- on a steady surface
- out of the reach of children
- away from water or heat sources.
GB
| COOKING MENUS | ||
| Fresh or Frozen food Cooking Time Temperature | ||
| Chips (fresh) 8 minutes 190°C | ||
| Chicken (fresh) 15 minutes 180°C | ||
| Onion Rings (frozen) 4 minutes 190°C | ||
| Fish (fresh) 7 minutes 170°C | ||
You can move from one menu setting to another by pressing the MENU button repeatedly.
After having chosen the appropriate MENU setting, you can confirm both the pre-set temperature and time by pressing the CONFIRM button - fig.8. The power light will switch on and the fryer will begin to heat.
- You can also change the default setting as follows:
- Change the default setting:
- Press the MODE button. The thermometer icon and the temperature will flash. Press the + or - button to set the desired temperature. The temperature is adjustable from 60°C to 195°C in 1°C increments. If you press the + or - button continuously, the scrolling will be faster.
- Press the MODE button again, the clock icon and the time will flash. Set the desired time by pressing the + or – button. The time is adjustable from 0 to 99 minutes in 30 seconds increments. If you press the + or – button continuously, the scrolling will be faster.
After the desired temperature and time have been set, press the CONFIRM button.
The power light will switch on and the fryer will begin to heat.
- You can fry other types of food than the ones which are pre-programmed by modifying the temperature and the time of any of the menus.
• Temperature and time follow-up:
At the beginning of the preheating, the LCD screen shows the current (before heating) temperature of the oil. It then will increase until it reaches the set temperature. In this way, you can monitor the oil as it reaches the desired temperature.
Never operate your fryer without any oil or fat in the bowl.
You can fry other types of food than the ones which are pre-programmed by modifying the temperature and time of one of the menus.
If you set the time to 0 and confirm this setting, the heating element will begin to heat and continue heating during 30 minutes or until you turn it off by pressing the CANCEL button.
After having pressed the CONFIRM button, only the + and - buttons will still work. In case of mistake and to start the selection again, press the CANCEL button.
Filling the basket
Cut food into similar-sized pieces so that they cook evenly. Avoid using pieces that are too thick.
- Remove excess water, ice or frost from food.
- Fill the basket before placing it in the deep fryer. Do not overfill the basket. Reduce the quantities for frozen foods - fig.9.
- Remove the lid.
Shake frozen food to remove excess pieces of ice away from the deep fryer.
For crispier frozen chips, wash them in cold water and dry them carefully.
- Place the frying basket on the edge of the bowl and leave the handle in the horizontal position.
- Put the lid back on the fryer.
Cooking
Lowering the basket
- When the oil has reached the correct temperature, the ready light (green) comes on and the control unit beeps.
- Press the handle unlocking button and fold the handle very slowly into its housing to lower the basket into the oil - fig.10. Plunging the basket too rapidly in the oil may cause it to overflow.
- Press the CONFIRM button. The timer will start to count down.
- You can modify the cooking time during the cooking by pressing the + or - buttons.
- During cooking, it is normal for the temperature light to go on and off.
For your security, if no food is put into the oil after the ready light has come on, the control unit will turn off the appliance after 30 minutes. Regardless of the recipe, food must be dried thoroughly before frying. This will prevent the oil from splattering and/or overflowing and will extend the life of the oil.
At the end of cooking time
When the fryer is in use, some parts will be extremely hot and can cause severe burns. Steam coming from the filter is also extremely hot - fig.11. Only touch the knobs and handles of the fryer for your safety.
For crispy fried food, remove the lid as soon as you have finished cooking to prevent steam.
Frying is complete when:
- The timer sounds, indicating the cooking time has elapsed and the food is the desired colour and texture.
- If you wish to continue cooking after the time has elapsed, add some cooking time by pressing the + button. The timer starts to count down.
- At the end of cooking time, switch off the fryer by pressing the CANCEL button.
- Lift the handle horizontally to raise the basket until you hear a "click" as it locks. Allow excess oil to drain by letting the basket remain on the hook for a moment.
- Remove the lid.
- Remove the basket.
- Serve the food.
- Put the lid on the fryer when it is not in use.
- To use a second time, correct the oil level if necessary, then follow the instructions from the beginning.
Switching off the deep fryer
- When you have finished frying, unplug the fryer.
- Allow the oil to cool completely in the fryer (approx. 3 hours).
- Move the fryer using the carrying handles.
Never move the fryer while the oil or fat is still hot.
Table of cooking times
GB
For best results and to prevent overflowing, use the traditional French method of frying chips cut from potatoes:
- first frying at 160°C*
- let them rest until they are slightly cooled
-
second frying at 190°C.
-
The cooking times are a guide only. They may vary depending on the size of the food, the amount of food, individual preferences, and the voltage.
- Cooking tip: To prevent food from sticking together, do not use the basket when cooking battered foods or doughnuts.
* time wil be based on size
| FRESH FOOD | Quantity | ||
| Chips * (maximum capacity 3 L model) | 800 g | 160°C* 190°C | +/- 7 - 9 min. +/- 5 - 7 min. |
| Chips * (maximum capacity 4 L model) | 1 kg | 160°C* 190°C | +/- 7 - 9 min. +/- 5 - 7 min. |
| Chips (optimal quantity 3 L model) | 400 g | 190°C | +/- 6 - 8 min. |
| Chips (optimal quantity 4 L model) | 500 g | 190°C | +/- 8 - 10 min. |
| Fried mushrooms 300 g 150°C +/- 6 - 8 min. | |||
| Onions rings 300 g 170°C +/- 4 - 5 min. | |||
| Breaded fish fillets 2 pieces 170°C +/- 6 - 8 min. | |||
| Fried squid 500 g 170°C +/- 5 - 6 min. | |||
| Fried prawns 500 g 170°C +/- 5 - 6 min. | |||
| Apple fritters 4 pieces 170°C +/- 5 - 6 min. | |||
* in 2 fryings
| FROZEN FOOD | Quantity |  |  |
| Chips (maximum capacity 3 L model) | 600 g | 190°C | +/- 8 - 10 min. |
| Chips (maximum capacity 4 L model) | 750 g | 190°C | +/- 8 - 11 min. |
| Chips (optimal quantity 3 Lmodel) | 300 g | 190°C | +/- 5 - 7 min. |
| Chips (optimal quantity 4 L model) | 375 g | 190°C | +/- 5 - 7 min. |
| Chicken nuggets (maximum capacity 3 L model ) | 1 kg | 190°C | +/- 6 - 9 min. |
| Chicken nuggets (maximum capacity 4 L model ) | 1,2 kg | 190°C | +/- 7 - 10 min. |
| Fried mushrooms | 300 g | 190°C | +/- 5 - 6 min. |
| Onions rings | 300 g | 190°C | +/- 3 - 5 min. |
| Battered cod fillets | 2 pieces | 190°C | +/- 6 - 7 min. |
| Fish fingers | 5 pieces | 190°C | +/- 5 - 7 min. |
| Fried squid | 500 g | 190°C | +/- 4 - 5 min. |
| Fried prawns | 500 g | 190°C | +/- 4 - 5 min. |
Cleaning
Filtering the oil
- Remove the basket and the lid.
• Empty the fat gently into a pan. - Place a filter paper in the bottom of the basket.
- Clean inside the bowl.
- Place the basket and filter paper into the bowl (handle in the upper position).
- Pour the oil carefully through the filter paper back into the bowl.
-
Throw the filter paper away and clean the basket.
-
You may store the oil or fat in the fryer, or in a separate airtight container.
- Do not pour used oil into the sink. Leave it to cool, and throw it away with the household waste – according to the local community regulations.
- Crumbs that break away from food tend to burn and alter the quality of the oil more rapidly. Over time, this increases the risk of catching fire. For this reason, filter the oil regularly.
We recommend changing the oil after a maximum of 8 to 10 uses. Some oils should be changed more frequently such as sunflower oil.
Cleaning the fryer
Never immerse the control unit with the heating element in water and never wash it under running water.
Never wash the lid in the dishwasher.
Do not store your deep fryer outside.
- Remove the control unit and heating element and clean both parts with a damp cloth or sponge.
- Clean the lid using a sponge and soapy water. Rinse and dry carefully - fig.12.
- The filter in the lid can be cleaned. Remove the filter cover, then the filter.
- The bowl, the frying basket, the housing and the filter are dishwasher safe or can be immersed in soapy water.
- Ensure all components are dry before placing them back inside the fryer.
- The lid is fitted with a permanent metallic filter. This filter does not need to be replaced.
Environment protection first!
Your appliance contains valuable materials which can be recovered or recycled.
Leave it at a local civic waste collection point.

Any batteries should be removed and disposed of separately by an approved Service Centre (depending on model).
If your fryer does not work properly
| PROBLEMS AND POSSIBLE CAUSES SOLUTIONS | |
| The LCD screen of the fryer is not lit up. | |
| The appliance is not plugged in. Plug-in the appliance. | |
| The fryer is not heating | |
| The CONFIRM button on control panel has not been pressed. | Press the CONFIRM button after having chosen the cooking menu. |
| The control unit returned to standby mode after 30 minutes as the unit was not operated or as no food was put in the oil after the READY light was on. | Press the CONFIRM button after having chosen the cooking menu for the second time. |
| Timer does not count down after the ready light turns on | |
| The CONFIRM button has not been pressed on control panel to start the timer. | Press the CONFIRM button when lowering the basket into the oil. |
| Oil overflows | |
| The basket was lowered too quickly. | Lower the basket slowly and keep a close eye on the oil level. |
| Cooking freshly made chips at 160/190°C for the first fry. | It is important to double-fry freshly made chips and to respect the recommended cooking temperature (see p.15) |
| The Max. marker for filling the bowl has been exceeded. | Check the oil level (Max.), and remove the excess. |
| The frying basket has been overfilled with food. Check that the basket is not too full. | |
| Food is wet or contains too much water (frozen food). | Remove any ice and dry the food thoroughly. Lower the basket slowly. |
| Different types of oil/fat have been mixed. Empty and clean the bowl. Refill the bowl with one type of oil. | |
| The fat/oil is unsuitable. Use a good quality blended vegetable oil (see p.12 for advice on oil to use). | |
| Emits unpleasant smells | |
| The fat/oil has deteriorated. | Replace the frying oil (after 12 uses max.), more frequently depending on the oil. |
| The fat/oil is unsuitable. Use a good quality blended vegetable oil (see p.12 for advice on oil to use). | |
| Vision through the viewing window is not clear | |
| The window is not cleaned often enough or is not cleaned the right way. | To ensure good visibility, clean the viewing window by wiping it with soap and water. Allow the window to dry at room temperature or dry with a clean cotton cloth. Clean as often as necessary. |
| Food does not become golden, and remains soft | |
| Food is moist and contains too much water (frozen food). | Remove as much ice from the frozen food as possible before frying. Dry freshly made chips well. |
| Pieces are too thick and contain water. | Experiment by lengthening the cooking time or by slicing food smaller and thinner. |
| Too much food is being cooked at the same time and the cooking oil is not at the right temperature. | Fry food in small quantities (especially when frozen). |
| The temperature of the frying oil may not be high enough: the temperature is set incorrectly. | Set the thermostat control to the recommended temperature. |
| Chips stick together | |
| Unwashed food immersed in hot oil. | Wash and cut potatoes well to remove excess starch, and dry them thoroughly. |
If you have any product problem or queries, please consult our website - www.tefal.co.uk
Sicherheitshinweise
- CONNECTING TO THE POWER SUPPLY
- USING
- COOKING
- RECOMMENDATIONS
- COMPONENT DESCRIPTION
- LID
- PREPARATION
- BEFORE USING FOR THE FIRST TIME
- FILLING THE BOWL
- PREHEATING
- FILLING THE BASKET
- LOWERING THE BASKET
- AT THE END OF COOKING TIME
- SWITCHING OFF THE DEEP FRYER
- TABLE OF COOKING TIMES
- CLEANING
- FILTERING THE OIL
- CLEANING THE FRYER
- ENVIRONMENT PROTECTION FIRST
- SICHERHEITSHINWEISE
Brand : TEFAL
Model : Family Pro Fryer FR4016
Category : Deep fryer