WP-110 - Interdental brush Waterpik - Free user manual and instructions
Find the device manual for free WP-110 Waterpik in PDF.

User questions about WP-110 Waterpik
0 question about this device. Answer the ones you know or ask your own.
Ask a new question about this device
Download the instructions for your Interdental brush in PDF format for free! Find your manual WP-110 - Waterpik and take your electronic device back in hand. On this page are published all the documents necessary for the use of your device. WP-110 by Waterpik.
USER MANUAL WP-110 Waterpik
natural_image
Line drawing of a hairdryer with digital earplifier and control panel (no text or symbols)Hydropropulseur
Waterpik®
Modèle WP-100/110
Irrigador bucal
Waterpik®
Modelo WP-100/110
WELCOME
Congratulations! By selecting the Waterpik® Water Flosser you are now on your way to better gum health, and a healthier smile!
With a clinically proven combination of water pressure and pulsations, the Waterpik ^® Water Flosser removes harmful bacteria deep between teeth and below the gumline – where brushing alone won't reach.
We are so convinced that you will be happy with your new Waterpik® Water Flosser, that we back it up with a 14-day guarantee. If you aren't satisfied that your gums are healthier after using the Waterpik® Water Flosser for 14 consecutive days, feel free to return it to us for a full refund.
Thank you for choosing the Waterpik ® Water Flosser.
Traditional Oral Care
natural_image
Line drawing of a hand holding a bandaged object over a seated figure (no text or symbols)Traditional brushing can't easily reach hidden food debris and harmful bacteria.
natural_image
Simple line drawing of a human head and neck with no text or symbolsFlossing has limited access below the gumline.
Oral Care With The Waterpik® Water Flosser
natural_image
Illustration of a dental procedure showing tooth being injected with forceps (no text or symbols)The Waterpik ^® Water Flosser removes trapped food debris and harmful bacteria.
TABLE OF CONTENTS
Important Safeguards 4
Product Description 6
Getting Started 8
Care of Your Waterpik Water Flosser 13
Troubleshooting Guide 14
Limited Three-Year Warranty 15
IMPORTANT SAFEGUARDS
When using electrical products, especially when children are present, the basic safety precautions below should always be followed.
READ ALL INSTRUCTIONS BEFORE USING.
DANGER:
To reduce the risk of electrocution:
• Always unplug product after using.
- Do not handle plug with wet hands.
- Do not immerse in water or other liquid.
- Do not use while bathing.
- Do not place or store product where it can fall or be pulled into a tub, shower stall or sink.
- Do not reach for a product that has fallen into any liquid. Unplug immediately.
- Check the power supply cord for damage before the first use and during the life of the product.
WARNING:
To reduce the risk of burns, electric shock, fire, serious injury or damage to tissue:
- Do not plug this device into a voltage system that is different from the voltage system specified on the device or charger.
- Do not use this product if it has a damaged cord or plug, if it is not working properly, if it has been dropped or damaged, or dropped into any liquid. Contact Water Pik, Inc. or your local distributor which can be found at www.waterpik.com.
- Do not direct water under the tongue, into the ear, nose or other delicate areas. This product is capable of producing pressures that may cause serious damage in these areas. See operating instructions for correct usage.
- Use this product only as indicated in these instructions or as recommended by your dental professional.
- Only use tips and accessories recommended by Water Pik, Inc.
- Do not drop or insert any foreign object into any opening or hose.
-
Keep electrical cord away from heated surfaces.
-
Do not operate where oxygen or aerosol sprays are being used.
- Do not use iodine, bleach, or water insoluble concentrated essential oils in this product. Use of these can reduce product performance and will shorten the life of the product.
- Fill reservoir with water or other dental professional recommended solution only.
- Do not use while wearing any oral jewelry. Remove prior to use.
- Do not use if you have an open wound on your tongue or in your mouth.
- If your physician or cardiologist has advised you to receive antibiotic premedication before dental procedures, you should consult your dentist before using this instrument or any other oral hygiene aid.
- For household use only. Do not use outdoors.
-
Closely instruct and supervise children and individuals with special needs in the proper use of this product.
-
Do not remove the Pik Pocket ^TM flexible tip from the clear shaft. If it separates for any reason, discard both the tip and shaft and replace with a new Pik Pocket ^TM Tip. Pik Pocket ^TM Tip not included in all models.
- Do not use this product for more than 5 minutes in each two-hour period. Longer usage can overheat the motor and cause product failure as well as voiding the warranty.
- Children should be supervised to ensure that they do not play with the appliance.
- This appliance has a polarized plug (one blade is wider than the other). As a safety feature, this plug is intended to fit into a polarized outlet only one way. If the plug does not fit fully into the outlet, reverse the plug. If it still does not fit, contact a qualified electrician. Do not attempt to modify the plug in any way.
SAVE THESE INSTRUCTIONS

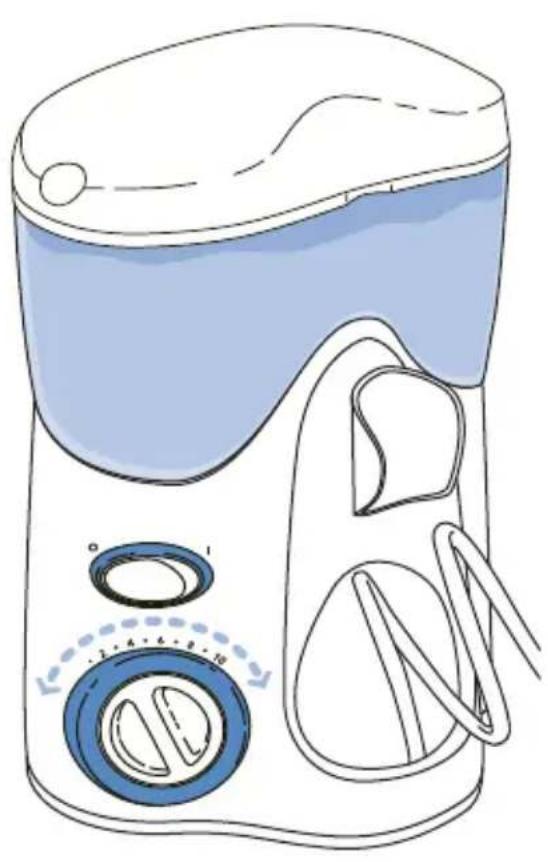
text_image
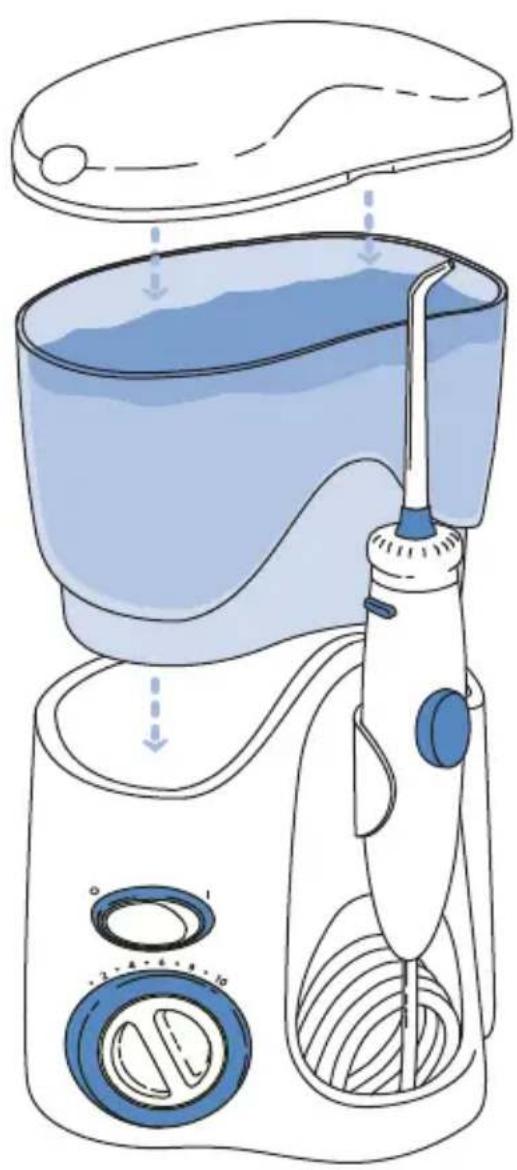
Reservoir cover w/ tip storage Tip Reservoir Tip eject button Handle Pause button Reservoir valve Base On/Off Pressure control dial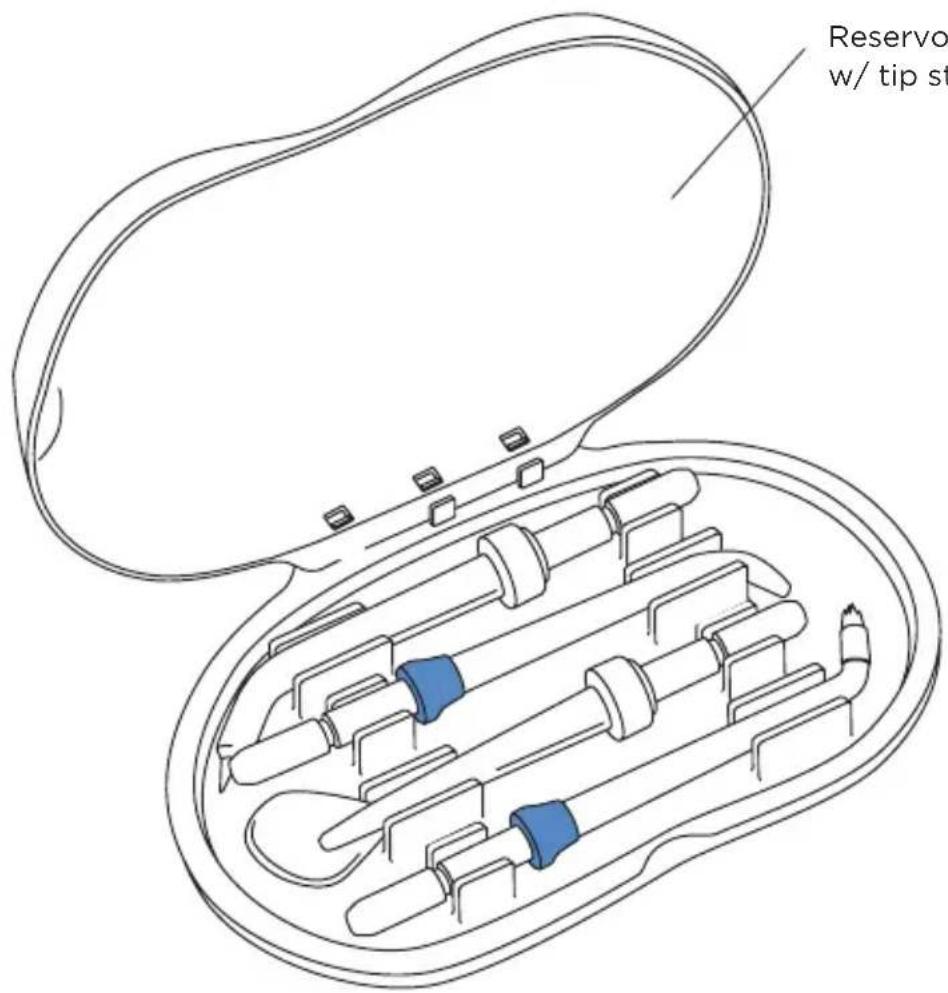
text_image
Reservoir w/ tip stReservoir cover w/ tip storage

NOTE: all tips not included in all models
GETTING STARTED
Plug the cord into an electrical outlet. If the outlet is controlled by a wall switch, be sure it is turned on.
Preparing the Reservoir
Remove reservoir and cover from base. Fill the reservoir with lukewarm water. Replace the reservoir over the base and press down firmly.
Inserting and Removing Tips
Insert tip into the center of the knob at the top of the Water Flosser handle. The colored ring will be flush with the end of the knob if the tip is correctly locked into place. To remove tip from the handle, press the tip eject button and pull tip from handle.
text_image
Diagram of a hand-oil water dispenser with labeled components and directional arrows indicating flow or movement.
natural_image
Illustration of three hand-drawn steps showing a medical procedure involving a pipette and a vial with blue liquid (no text or symbols)Adjusting the Pressure Setting
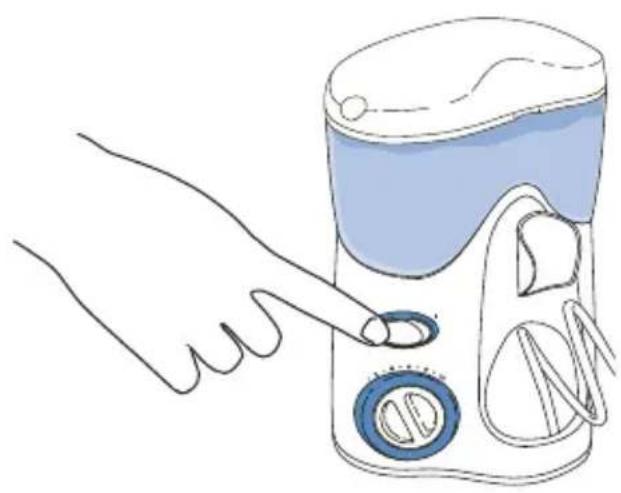
Turn the pressure control dial on the base of the unit to the lowest setting (pressure setting No. 1) for first-time use. Gradually increase pressure over time to the setting you prefer – or as instructed by your dental professional.
natural_image
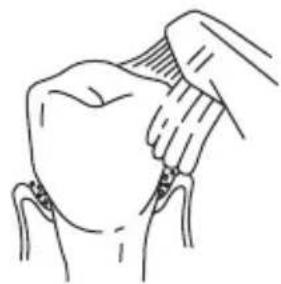
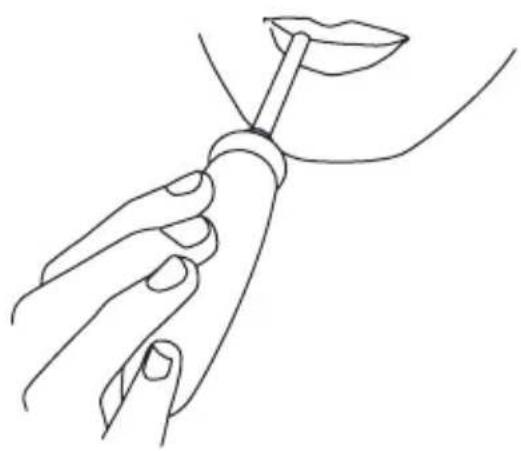
Line drawing of a washing machine with blue liquid and control buttons (no text or symbols)Placement in Mouth
Lean low over sink and place the tip in mouth.
Aim the tip toward teeth.
With your free hand, turn the unit on. Set pressure at desired setting.
natural_image
Illustration of a hand pointing at a cleaning or cleaning device with a blue lid and circular buttons (no text or symbols)Direct the stream by turning the knob at the top of the handle.

natural_image
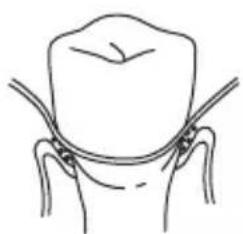
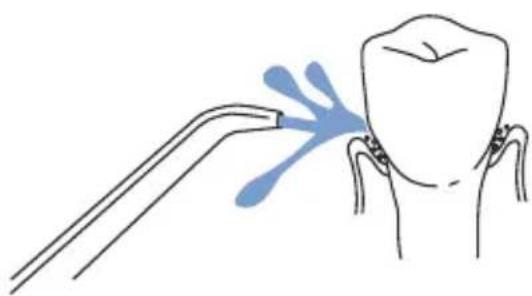
Illustration of a hand holding a dental tool with a blue cap and needle, no text or symbols presentRecommended Technique
Direct the stream at a 90-degree angle to your gumline. Slightly close lips to avoid splashing but allow water to flow freely from mouth into the sink. For best results, start in the molar area (back teeth) working toward the front teeth. Glide tip along gumline and pause briefly between teeth. Continue process until you have cleaned the inside and outside of both the upper and lower teeth.

text_image
Diagram illustrating dental procedure steps with labeled tool tips and tooth positioningPause Control
You can temporarily stop the flow any time by pressing the pause button on the handle.
When Finished
Turn the unit off. Empty any liquid left in the reservoir. Unplug the unit.
natural_image
Line drawing of a hand holding a lipstick with a stick, no text or symbols present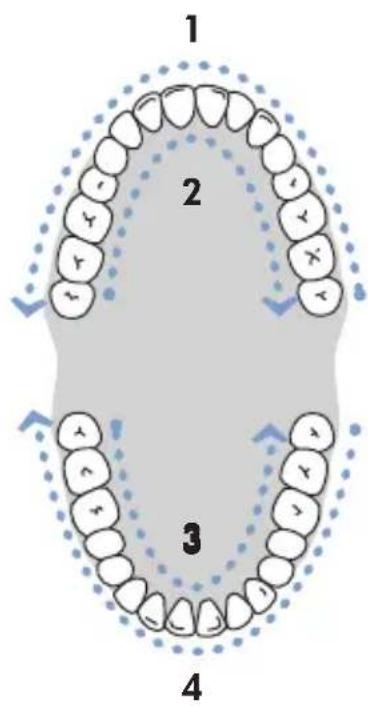
text_image
1 2 3 4
natural_image
Line drawing of a hand holding a dental power tool, no text or symbols presentTIP USAGE
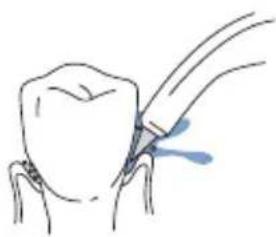
Pik Pocket™ Tip
The Pik Pocket™ Tip is specifically designed to deliver water or antibacterial solutions deep into periodontal pockets. It is not intended for general use.
To use the Pik
natural_image
Simple line drawing of a dental procedure with a tool and tooth (no text or symbols)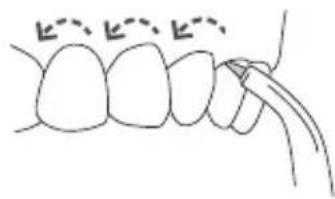
natural_image
Simple line drawing of dental arches with no text or symbolsPocket™ Tip, set the unit to the lowest pressure setting. Lean low over your sink and place the soft tip against a tooth at a 45-degree angle and gently place the tip under the gum line, into the pocket. Turn the unit on and continue tracing along the gum line until all periodontal pockets are treated.
NOTE: This tip must be used only with the Pressure Control set to 1. Use on a higher setting will shorten life of tip and power handle.
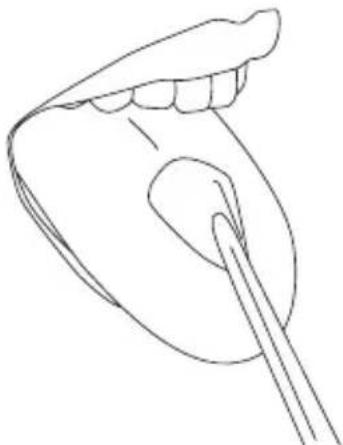
Tongue Cleaner Tip
Place the tongue cleaner on your tongue and
start the Water
Flosser – use the lowest pressure setting, increase as comfortable. Gently place the tongue cleaner in the center/ midline of your tongue about half way back and with light pressure pull forward.
natural_image
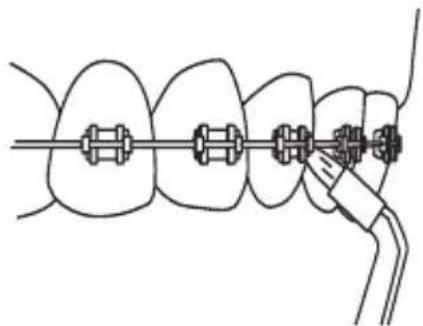
Line drawing of a human mouth with a brush applying makeup (no text or symbols)Orthodontic Tip
The special Orthodontic Tip is uniquely designed to simultaneously brush and rinse hard-to-reach areas around braces and other dental work.
Start on the last molar (back tooth). Aim tip at 90 degree angle to the tooth at the gumline. Gently glide tip along gumline, pausing briefly to lightly brush area between teeth and all around orthodontic bracket, before proceeding to the next tooth.
Continue process until you have cleaned the inside and outside of both the upper and lower teeth.
natural_image
Diagram of dental braces with a tool, showing alignment and bonding (no text or labels)Toothbrush Tip
Place the toothbrush tip in mouth with the brush head on the tooth at the gum line. The toothbrush tip can be used with or without toothpaste. Turn the Water Flosser on so water flows through the tip. Using a light pressure (bristles should not bend) massage the brush back and forth with very short strokes – much like you would with a manual toothbrush. Repeat on adjacent teeth. Water will flow through the brush, to help simultaneously clean and rinse the tooth surface.

text_image
Diagram showing dental tool application on upper teeth with Chinese annotationPlaque Seeker™ Tip
Direct the jet stream at a 90-degree angle to your gumline. Close lips slightly to avoid splashing but allow water to flow freely from mouth into sink. Start in the molar (back teeth) area working toward the front teeth. Place the tip close to the teeth so that the bristles are gently touching the teeth.
Gently glide tip along gumline, pausing briefly between teeth to gently brush and allow the water to flow between the teeth. Continue until all areas around and between the teeth both inside and outside, top and bottom have been cleaned.

text_image
Diagram showing dental procedure with labeled tooth positions and a blue tool tip pointing to a specific tooth area.Using Mouthwash and Other Solutions
Your Waterpik ^® Water Flosser can be used to deliver mouthwash and antibacterial solutions. Ask your dental professional to recommend the appropriate solution for you. Note: use of some antibacterial solutions could shorten the life of your Waterpik ^® Water Flosser.
After using any special solution in the reservoir, take a moment after every use to rinse the unit. Partially fill the reservoir with warm tap water. Aim the jet tip into your sink. Turn on the unit and let it run until empty. This will help keep the tip from clogging and help your unit to last longer.
Clean the product when necessary by using a soft cloth and mild non-abrasive cleanser.
CARE OF YOUR WATERPIK ^® WATER FLOSSER
Before cleaning, unplug from the electrical outlet.
Before exposing the Water Flosser to freezing temperatures, remove the reservoir and run the unit until completely empty.
Service Maintenance
Waterpik ^® Water Flossers have no consumer-serviceable electrical items and do not require routine service maintenance. For all parts and accessories go to www.waterpik.com. You may also call our toll-free customer service number at 1-800-525-2774 (USA) or 1-888-226-3042 (Canada).
Refer to the serial and model numbers in all correspondence. These numbers are located on the bottom of your unit.
Replacement tips/attachments may be purchased directly from Water Pik, Inc.
Call 1-800-525-2774 (USA) or
1-888-226-3042 (Canada) or visit our web site at www.waterpik.com.
RECOMMENDED TIP REPLACEMENT INTERVALS

text_image
Orthodontic Tip PikPocket™ Tip Toothbrush Tip Plaque Seeker™ Tip Replace Every 3 Months Classic Jet Tip Tongue Cleaner Tip Replace Every 6 Months 036TROUBLESHOOTING GUIDE
| PROBLEM | CAUSE | CORRECTIVE ACTION |
| Tips and Tongue CleanerLeakage between the tip and handle knob. | 1) Tip not fully engaged. | 1) Remove tip and reinstall. |
| Pik PocketTM TipTear in soft tip. | 1) Tip is worn.2) Tip is split. | 1) Replace with new tip.2) Replace with new tip and use ONLY on lowest pressure. |
| Water Flosser BaseHose to the handle leaks. | 1) Damage to the hose. | 1) Visit www.waterpik.com or contact Water Pik, Inc. customer service for a self service repair kit. |
| Reservoir leaks. | 1) Missing black reservoir valve.2) Black reservoir valve is upside down. | 1) Replace reservoir valve. Contact Water Pik, Inc. customer service for a replacement valve.2) Ensure valve is right side up (see image to right). 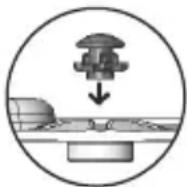 |
| Inadequate pressure. | 1) Reservoir not positioned properly.2) Tip is clogged with debris.3) Black reservoir valve is clogged. | 1) Re-position reservoir. Press down firmly on the reservoir.2) Flush tip under faucet or replace tip.3) Remove reservoir valve and clean by massaging the valve under warm running water and place back into reservoir. Ensure the valve is right-side up (see above image). |
| Unit doesn't start. | 1) Motor not running. | 1) Be sure outlet is functioning; test with another appliance (check electrical reset button and/or wall switch). |
LIMITED THREE-YEAR WARRANTY
Water Pik, Inc. warrants to the original purchaser/owner of this new product that it is free from defects in materials and workmanship for three years from date of purchase. Save your receipt as your proof of purchase date. We will replace any part of the product, which in our opinion is defective, provided the product has not been abused, misused, altered or damaged after purchase and was used according to these instructions. This limited warranty excludes accessories or consumable parts such as tips, etc.
This warranty gives you specific legal rights. You may also have other rights that vary depending on the law in your place or residence.
BIENVENUE
natural_image
Line drawing of a hand holding a small object above a seated figure (no text or symbols)natural_image
Simple line drawing of a human head and neck with no text or symbolsnatural_image
Illustration of a hand washing machine with digital earbuds and a digital brush (no text or symbols)natural_image
Illustration of three hand-drawn steps showing a medical procedure involving a pipette and a vial, with no visible text or symbols.natural_image
Line drawing of a portable water heater with control knobs and buttons (no text or symbols)natural_image
Illustration of a hand pressing down on a device with a blue lid and control buttons (no text or symbols)text_image
Diagram illustrating dental procedure steps with labeled tool tips and tooth positioningPause
natural_image
Line drawing of a hand holding a lipstick with a stick, no text or symbols present
text_image
1 2 3 4
natural_image
Line drawing of a hand holding a dental power tool, with no text or symbols presentUTILISATION DE LA CANULE Canule Pik Pocket™
natural_image
Simple line drawing of a medical procedure with a tool and blue arrow indicating a point (no text or symbols)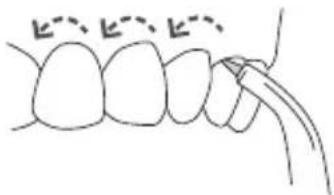
natural_image
Simple line drawing of a dental procedure with teeth and jaw (no text or symbols)
natural_image
Line drawing of a human mouth with a brush applying product to the lower lip (no text or symbols)natural_image
Illustration of a dental tool interacting with teeth (no text or symbols)Canule Plaque Seeker™
text_image
Diagram showing dental procedure with labeled tooth positions and a blue tool tip near the rootSuivez
natural_image
Diagram of dental braces with a finger insertion, showing alignment and bonding (no text or labels)natural_image
Line drawing of a hand holding a tool over a seated object (no text or symbols)natural_image
Simple line drawing of a pelvic bone structure (no text or labels)natural_image
Illustration of a dental procedure showing a tooth being injected with a tool (no text or symbols present)natural_image
Illustration of a hairdryer with digital display and control knobs (no text or symbols)natural_image
Illustration of three hand-drawn steps showing a medical procedure involving a pipette and a vial, with no visible text or symbols.natural_image
Line drawing of a portable water heater with control knobs and a dial indicator (no text or symbols)natural_image
Illustration of a hand pointing at a device with a blue lid and circular button (no text or symbols)text_image
Diagram illustrating dental procedure steps with labeled tool tips and tooth positioningControl de pausa
natural_image
Line drawing of a hand holding a lipstick with a stick, no text or symbols present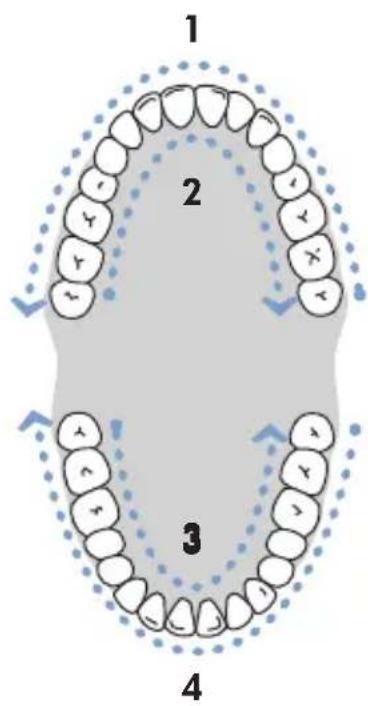
text_image
1 2 3 4
natural_image
Line drawing of a hand holding a dental power tool, with no text or symbols presentUSO DE LAS CABEZALES Cabezal Pik Pocket™
El cabezal Pik
natural_image
Simple line drawing of a dental procedure with a tool inserted into a tooth (no text or symbols)
natural_image
Simple line drawing of a tooth with a pointed tool inserted, no text or symbols present
natural_image
Line drawing of a human mouth with a toothbrush touching the chin area (no text or symbols)natural_image
Illustration of a dental tool interacting with teeth, showing tooth structure and color gradient (no text or symbols)text_image
Diagram showing dental procedure with labeled tooth and toothbrush, including a blue tool tip and dashed line indicating alignment or dislocation.natural_image
Diagram of dental braces with a finger insertion, showing alignment and bonding (no text or labels)1730 East Prospect Road
Fort Collins, CO 80553-0001 USA
www.waterpik.com
Waterpik ^® is a trademark of Water Pik, Inc. registered in Argentina, Australia, Canada, Chile, China,
Czech Republic, Hungary, India, Mexico, New Zealand, Pakistan, Poland, Russian Federation, Singapore, South Africa,
Switzerland, Taiwan, Ukraine, United Kingdom, and the United States.
Waterpik ^® (stylized) is a trademark of Water Pik, Inc. registered in Canada, EU, Japan, Mexico, Switzerland and the United States.
Treat yourself better ^TM , Pik Pocket ^TM and Plaque Seeker ^TM are trademarks of Water Pik, Inc.
Form No. 20013959-F AA
©2010 Water Pik, Inc.
Designed in USA.
Conçu aux É.-U.
Diseñado en EE.UU.
Made in CHINA.
Fabriqué en CHINE.
Hecho en CHINA.