BCF900 - Baby monitor SWITEL - Free user manual and instructions
Find the device manual for free BCF900 SWITEL in PDF.

User questions about BCF900 SWITEL
0 question about this device. Answer the ones you know or ask your own.
Ask a new question about this device
Download the instructions for your Baby monitor in PDF format for free! Find your manual BCF900 - SWITEL and take your electronic device back in hand. On this page are published all the documents necessary for the use of your device. BCF900 by SWITEL.
USER MANUAL BCF900 SWITEL
natural_image
Two white Switel BCF 900 digital camera devices, one displaying a baby photo and the other showing a circular device with sound waves (no text or symbols on device body)Bedienungsanleitung Moded'emploi Istruzioniperl'uso OperatingInstructions
D
F
|
GB
SWITEL
text_image
Technical diagram of a device with numbered components, showing internal structure and external view.
text_image
27 28 31 32 29
natural_image
Technical line drawing of a mechanical component with no visible text or symbols1LEDPower/LEDniveaudechargedespiles
12 Supportescamotable
13 Cachecompartimentpile
14 SortieAV
15 Prised'alimentation6V
16 Stationd'accueil
17 Contactsdechargement
18 DELCharge
19 LEDPower
text_image
Technical diagram of a device with numbered components, showing internal structure and external view.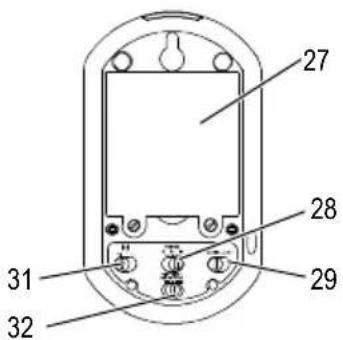
text_image
27 28 29 31 32
text_image
328 Interruttore LCD OFF/LCD OFF/ON (ON/LCD OFF/OFF)
9ALLARMEON/OFF
10 Tasto CANALE
11 Altoparlante
4Registering/Connectingthereceiver andtransmitterwitheachother54. . . .
5OperatingtheTransmitter55
6OperatingtheReceiver 57
7InCaseofProblems 59
8TechnicalProperties 60
9Maintenance/Guarantee 61
1 Safety Information
Pleasereadthisoperatinginstructionmanualthoroughly.
Intendeduse
TheA/Vmonitoringsetwasdevelopedformonitoringrooms. Thetransmittersendsaudioandvideo signalsfromitspointofinstallationtotherceiver.Anyotheruseisconsideredunintendeduse.

The useofthisequipmentdoesnotsubstitutepersonalsupervision,e.g.ofachild.Usersare notrelievedoftheirpersonalliability.
Unauthorisedmodificationorreconstructionisnotpermitted. Undernocircumstancesopen thedeviceorcompleteanyrepairworkyourself.
Installationlocationandsafetyinformation
-
Neverlaythetransmitterinababy's/child'sbedorplaypen.
-
Ensure that the transmitter and power adapter plug are always out of reach of babies/children.
- Pay attention that all the components are sufficiently well-ventilated when in operation. Do not lay a cushion, towelorsuchoverthedevices.
- The devices are not intended for medical purposes. Warning and signal tones from respiratory or heartbeat monitoring equipment are not transmitted.
- The installation location plays a decisive role in ensuring proper operation. Maintain a minimum distance of onemetertootherelectronicequipment, such as microwaveovensorhi-fisystems, since they could cause mutual disturbance.
- Prevent excessive exposure to smoke, dust, vibration, chemicals, moisture, heat and direct sunlight.
- Donotusetheequipmentinpotentiallyexplosiveareas.
Poweradapterplug

Attention: Only us the power adapter plugs contained in them materials supplied since other power adapter plugs could damage the A/V monitoring set.
Ensureaccesstothepoweradapterplugsisnotobstructedbyfurnitureorsuch.
When using the equipment with a power adapter plug, pay attention that the plug and cable are imperfect condition. Kinkedor worncablere present stherisk of afatal accident.
Batteries

Attention: Neverthrowbatteriesintoafire. Onlyusebatteriesofthesametype! Payattention tocorrectpolarity.
Powerfailure
Intheeventofapowerfailure, the devices only operate through battery power. Disconnect the power adapter plugs from the devices in this case.
Medicalequipment

Attention: Neverusethedevicesinthevicinityofmedicalequipment.Effectsonsuchequipmentcannotbefullyruledout.
Disposal
Inordertodisposeofyourdevice, takeittoacollectionpointprovidedbyyourlocalpublicwaste authorities(e.g.recyclingcentre). According to lawsonthedisposalofelectronicandelectrical devices, owners are obliged to dispose of old electronic and electrical devices in a separate wastecontainer. The adjacent symbol indicates that the device must not be disposed of fin normal domestic waste!
Riskstohealthandtheenvironmentfrombatteries!
Neveropen,damageorswallowbatteriesorallowthemtopollutetheenvironment.They couldcontaintoxicandecologicallyharmfulheavymetals.Youarelegallyobligedtodisposeofbatteriesatthepoint-of-saleorauthorisedcollectionpointstwherethecorrespondingcontainersareprovided.
Disposalisfreeofcharge. The abovesymbols indicate that the batteries must not be disposed of domestic waste and that they must be disposed of at an authorised collection point.
Packagingmaterialsmustbedisposedofaccordingtolocalregulations.


2OperatingElementsandIndicators

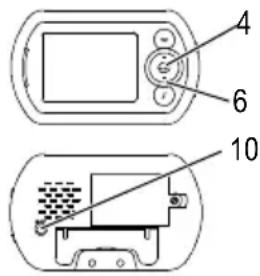
1 Power LED / Battery charge status LED
2LC display
3Melody button
4Mode button
5Talk button
6(+/-) button
7Microphone
8 LCD switch: OFF / LCD OFF / ON (device OFF / device on but LCD off / device ON)
9 ALARM ON/OFF
10 CHANNEL button
11 Loudspeaker
12 Fold out stand
13 Battery compartment
14 AV output
15 6 V power supply socket
16 Charging station
17 Charge contacts
18 Charging LED
19 Power LED
20 Lens rotating ring
21 Infrared LEDs for night-time monitoring
22 Lens
23 Loudspeaker
24 Microphone
25 6 V power supply socket
26 Night light
27 Battery compartment
28 VOLUME Hi/ Mid/ Lo (high/medium/low)
29 CAMERA/AUTO camera activation switch
30 NIGHTLIGHT AUTO/ON/OFF
31 ECO mode switch: Hi/Lo (high/low)
32 Power button
3 S t a r t i n g U p
Safetyinformation

Attention: It is essential to read the Safety Information in Chapter 1 before starting up.

Thedatatransmitted(imageand/orsound)canbereceivedpubliclyinthereceptionrange!
Checkingthepackagecontents
Thepackagecontains:
| atransmitterareceiveralithium-ionbattery | 3.7V,1200mA |
| twopoweradapterplugsachargingstationanoperatingmanual |
Connectingthetransmitter

Attention: Position the transmitter with a minimum distance of 1 mtootherelectronic devices, other-wise there is a risk of mutual disturbance.
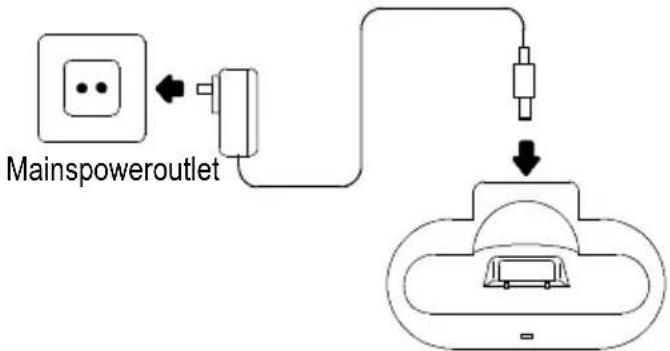
Operatingwithapoweradapterplug

Attention: Only us the power adapter plugs supplied. Ensure access to the power adapter plug is not obstructed by furniture or such.
Connectthetransmitterasillustratedinthediagram.

text_image
MainspoweroutletOperatingwithbatteries
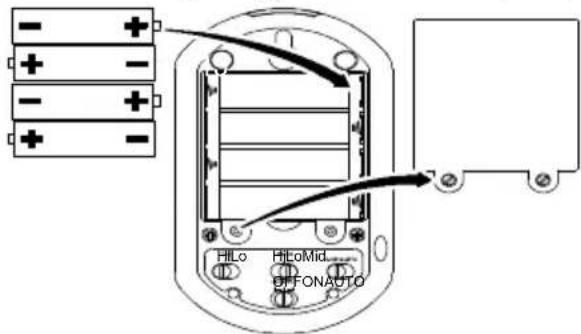
Removethescrewsontherearsideofthetransmitterandthenremovethebatterycompartment cover.InsertfouralkalineAA1.5Vbatteries(notincludedwiththematerialsupplied)inthebattery compartment,payingattentiontocorrectpolarity,andclosethebatterycompartment.
text_image
- + - + - + - + HLo HLoMid OFFONAUTOConnectingthereceiver

Attention: Position the receiver with a minimum distance of 1 m to other electronic devices, otherwisethereisariskofmutualdisturbance.
Operatingwithapoweradapterplug
Connectthechargingstationofthereceiverasillustratedinthediagram.Forsafetyreasons,onlyuse thepoweradapterplugsupplied.
text_image
Mainspoweroutlet
Attention: Onlyusethepoweradapterplugsupplied. Ensureaccesstothepoweradapter plugisnotobstructedbyfurnitureorsuch.
Operatingwithrechargeablebattery
Removethescrewsontherearsideofthereceiverandthenremovethebatterycompartmentcover. Insertthebatteryinthebatterycompartment,payingattentiontocorrectpolarity,andclosethebattery compartment.

Thereceiverissuppliedwithalithium-ionbattery(3.7V, 1200mA).
Registering/Connectingthereceiverandtransmitterwitheach
40 Registering/Connectingthereceiverandtransmitterwitheachother
Thereceiverandtransmitterarealreadyregisteredwhensupplied. Ifnecessary,registrationcanalsobecompletedmanually:
- PressandholdtheChannel button(10) on therearside of the receiver and Modebutton(4) simultaneously.
4.AmenuappearsontheLCdisplay inwhichyoucannavigatevertically usingtheChannelbutton(10)and horizontallywiththe(+/-) buttons(6).UsetheChannel button(10)toselectachannel,e.g. CH1,andthe(+/-)buttons(6)to select"Pair".
Receiver
text_image
4 6 10Transmitter, rearside (open)
text_image
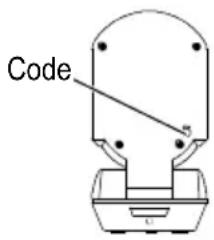
Code- Confirm your selection by pressing the Mode button(4). "Pairing" appears in the LC display.
6.PresstheCodebuttonontherearsideofthetransmitter.ThePowerLEDonthetransmitter flashes. - Pairing succeed and the selected channel appear in the display.
- Confirm bypassing the Channel button (10). The camera imagere appears.

If you have several transmitters available, you must use them to select the different channels (CH1-CH4) individually and press the Code button foreach transmitter. There receiver supports up to four transmitters.
5OperatingtheTransmitter

Check the transmitter and receiver are working properly each time before the equipment is put into operation.
Switchingthetransmitteron/off
- Press the Power button (32) briefly. The Power LED (19) lights up green. The transmitter is ready to operate.
- Toswitchthetransmitteroff, pressthePowerbutton(32) for approx. 2 seconds.
Voiceoperatedexchange(VOX)
Whenthecameraactivationswitch(29)issetto“CAMERA”, imageandsoundaretransmittedcontinuously. Whentheswitchissetto“AUTO”, imageandsoundaretransmittedfromavolumeofapprox.50dB.

Thereisaslightdelayinthetransmissionbeforethereceivercanreproducethevoice/sound andpicture.

Ifnovoiceorsoundisdetectedformorethan30seconds,transmissionisautomaticallyinterrupted.
Nightvisionfunction
The integrated infrared technology enables image transmission from areas which are not illuminated. Then night vision function is activated automatically when the light conditions make it necessary.

When then night vision function is activated, the image on the LC display turnst oblack and white. The image recording area is approx. 2m.
OperatingtheTransmitter
Nightlight
Thenightlightcanbeactivatedeithercontinuouslyorautomaticallyondetectingsoundsfromapprox. 50dB.
- SettheNIGHTLIGHTswitch(30)to"ON".Thenightlightisswitchedoncontinuously.
- Set the NIGHTLIGHT switch (30) to "OFF". The night light is switched off.
- Set the NIGHTLIGHT switch (30) to "AUTO". The night light is automatically switched on after detectinganoiselevelinexcessofapprox.50dB.
Turningthecameraimagehorizontal
Youcanturntheimagetransmittedbythecameratoahorizontalpositionbyturningthelensrotating ring(20)clockwiseorcounterclockwise.
ECOmodus
The transmitter is equipped with an ECO mode which can be very useful when operating using batteries. It reduces the transmission power, thereby increasing the service life of the batteries. Activate ECO mode by setting the ECO modes switch (31) to "LO".

Attention: The operating range of the transmitter and receiver is reduced when ECO mode is active. This can lead to interference in the transmission. In such cases, select anew location for the devices or deactivate ECO mode.
Changingtheloudspeakervolume
You can adjust the volume of the transmitter to one of three settings using the volume control (28).
6OperatingtheReceiver

Check the transmitter and receiver are working properly each time before the equipment is put into operation.
Switchingthereceiveron/off
TheLCDswitch(8)onthesideofthereceiverhasthreesettings:
- "OFF"-The device is completely deactivated.
- "LCD OFF"- The device only plays the sounds received from the transmitter. The display is switched off.
- "ON"-The device display the images and sounds received from the transmitter.
Settingthevolume
• Pressthe(+)button(6)toraisethevolume.
- Pressthe(-)button(6)tolowerthevolume.
Settingthebrightness
- PresstheModebuttononce.
- Pressthe(+)button(6)toincreasethebrightness.
- Pressthe(-)button(6)toreducethebrightness.
Settherequiredbrightness.
Settingthecontrast
- PresstheModebuttontwice.
- Pressthe(+)button(6)toincreasethecontrast.
- Pressthe(-)button(6)toreducethecontrast.
Settherequiredcontrast.
Settingthecoloursaturation
- PresstheModebuttonthreetimes.
- Pressthe(+)button(6),toincreasethecoloursaturation.
- Pressthe(-)button(6),toreducethecoloursaturation.
Settherequiredcoloursaturation.
Startingvoicetransmission
Youcanstartavoicetransmissiontothetransmitterfromthereceiver. Yourvoiceisthenplayedvia theloudspeakerinthetransmitter.
PressandholdtheTalkbutton(5)andspeakintothemicrophone(7)inthereceiver.Transmissionis endedwhenyoureleasetheTalkbutton(5).

When the Talkbutton(5) is pressed, any sound transmission from the transmitter to there receiver is interrupted.
Melodies
Youcansendmelodiesviathereceivertobeplayedonthetransmitter.Thereare3differentmelodies forselection.
PresstheMelodybutton(3).Thefirstmelodyisplayed.PresstheMelodybutton(3)againtoplaythe nextmelody.
Selectingachannel
Thechannelselectionispresettochannel1atthefactory.ThereceiverintheBCF900iscapableof supporting4transmittersat4differentlocations.ThisisdonebyusingtheCHANNELbutton(10). (RefertoPage9forinformationonusingseveraltransmitters.)
PowerLED/BatterychargestatusLED
ThePowerLED(1)(green)alsoservesasthebatterychargestatusLED.Itflashesorangewhenthe batteryneedstobecharged.
7InCaseofProblems
Servicehotline
ShouldproblemsarisewiththeBCF900A/Vmonitoringset,pleaserefertothefollowinginformation first.Inthecaseoftechnicalproblems,pleasecontactourhotlinewithinSwitzerlandundertel. 0900001675(costwithSwisscomattimeofgoingtoprint:CHF2.60/min).Inthecaseofclaimsunder thetermsofguarantee,contactyoursalesoutlet.Thereisa2yearperiodofguarantee.
Problemsandsolutions
| ProblemsSolutions | |
| Equipmentdoesnot function | -Transmitterand/orreceiverarenotswitchedon.-Thebatteryisemptyordefective.-Poweradapterplugsarenotconnectedproperly. |
| Noreception-Transmitterandreceiverarenotregistered.-Transmitteristoofarfromobjectbeingmonitored,e.g.baby.Observetheminimumdistanceofonemeter.-Thereceiverandtransmitteraretoofarapart. | |
| Receptioninterference-Thereceiverandtransmitteraretoofarapart.-Thebatterypoweristoolow.-Otherelectronicdevicesarecausinginterferenceinthefieldof transmission. | |
| Beepingnoise(acoustic feedback) | -Increasethedistancebetweenreceiverandtransmitter.-Reducethevolumeonthereceiver. |
| Noise-Thebatterypoweristoolow. | |
| Picturebutnosound transmission | -Volumesettingistoolow. |
| Pictureisinblackandwhite-Thenightvisionfunctionisactive. | |
| Thebatteryinthereceiver isnotbeingcharged. | -Thepoweradapterplugisnotconnectedproperly. |
8TechnicalProperties
Technicaldata
| FeatureValue | ||
| TransmitterButton:POWER:OFF/ON | Switches:CAMERA/AUTO | NIGHTLIGHT:OFF/AUTO/ONALARM:OFF/ONVOLUME:(Hi/Mid/Lo)ECOmode:(Hi/Lo) |
| Socket:6VSensor:1nightlightsensorLED:Connection/Power | DC | |
| ReceiverLCdisplay:3.5"TFTLCcolourdisplay | Switch: | LCD:OFF/LCDOFF/ON |
| Socket:6V | DC | |
| Buttons: | Talk,Melody,Mode,Volume(+/-) | |
| LED: | Power | |
| ReceiverPoweradapterplug | Input: | 100-240V_AC ,50-60Hz,150mA |
| Output: | 6VDC,800mA | |
| Battery: | Lithium-ion3.7V1200mA | |
| TransmitterPoweradapterplug | Input: | 100-240V_AC ,50-60Hz,150mA |
| Output: | 6VDC,800mA | |
| Range | Upto300metersunderoptimalconditions.Rangeisreducedinbuildingsthroughwalls,doorsetc. | |
| Frequencyrange | 2400MHz | |
| Permissibleambienttemperature | 0°Cto40°C | |
| Permissiblerelativehumidity | 20%to75% | |
| Transmissionpower(TXPApower) | 13±1dBm | |
DeclarationofConformity
This device fulfil the requirements stipulated in the EU directive:
1999/5/EU directiveonradioequipment and telecommunicationsterminalequipment and themutual recognition of their conformity. Conformity with the abovementioned directive is confirmed by the CE symbolonthed device.
ToviewthecompleteDeclarationofConformity,pleaseusethedownloadfacilityon ourwebsitewww.switel.com freeofcharge.
9Maintenance/Guarantee
Maintenance
- Cleanthehousing surfaces with asoft, fluff-freecloth.
- Neverusecleaningagentsorsolvents.
Guarantee
SWITELequipmentisproducedandtestedaccordingtothelatestproductionmethods.Carefullyselectedmaterialsandhighlydevelopedtechnologyensureperfectfunctioningandalongservicelife. Thetermsofguaranteedonotapplytothebatteriesorpowerpacksusedintheproducts.Theperiod ofguaranteeis24monthsfromthedateofpurchase.
Alldeficienciesrelatedtomaterialormanufacturingerrorswithintheperiodofguaranteewillbere-dressedfreeofcharge.Rightstocaimsunderthetermsofguaranteeareannulledfollowingtamperingbythepurchaserorthirdparties.Damagecausedastheresulttofimproperhandlingoroperation,normalwearandtear,incorrectpositioningorstorage,improperconnectionorinstallationorActsofGodandotherexternalinfluencesareexcludedfromthetermsofguarantee.Inthecaseofcom-plaints,wereservetherighttorepairorreplacedefectpartsorprovideareplacementdevice.Re-placedpartsordevicesbecomeourproperty.Rightstocompensationinthecaseofdamageareex- cludedwherethereisnoevidenceofintentorgrossnegligencebythemanufacturer.
If your device does show sign of a defect within the period of guarantee, please contact the sales outlet where you purchase the SWITEL device, producing the purchase receipt ease. All claims under the terms of guarantee in accordance with this agreement can only be asserted at the sales outlet. N claims under the terms of guarantee can be asserted after a period of two years from the date of purchase and hand-over of the product.
Importantinformation
The device is equipped with an energy-saveswitching powersupply (input voltage 240V voltage 6V, 800mA).
The power consumption of the adapter (receiver) with no load disapprox. 0.3W. The average level of efficiency is approx. 72.02%. The current consumption during operation is approx. 2.9 W, during the charging process approx. 2.1 Wand in Stand by mode approx. 0.149W.
The power consumption of the adapter (transmitter) with no load as approx. 0.3W. The average level of efficiency is approx. 72.02%. The current consumption during operation is approx. 2.9W and in Standby mode approx. 0.143W.
10Index
C
Changingtheloudspeakervolume,56
Connectingthereceiver,53
Connectingthetransmitter,52
D
DeclarationofConformity,61
E
ECOmode,56
Establishingaconnection,54
G
Guarantee,62
L
Lullabies,58
M
Maintenance,62
N
Nightlight,56
Nightvisionfunction,55
0
Operatingelements,51
Operatingwithapoweradapterplug,52,53
Operatingwithbattery,53
Operation,55,57
P
Packagecontents,52
PowerLED/BatterychargestatusLED,58
Problems,60
Problemsandsolutions,60
R
Registering,54
S
Safetyinformation,49
Selectingachannel,58
Servicehotline,60
Settingthebrightness,57
Settingthecoloursaturation,57
Settingthecontrast,57
Settingthevolume,57
Startingup,52
Startingvoicetransmission,58
Switchingthereceiveron/off,57
Switchingthetransmitteron/off,55
T
Technicaldata,61
Troubleshooting,60
Turningthecameraimagehorizontal,56
V
Voiceoperatedexchange,55
Notes
SWITEL DeclarationofConformity
ThisequipmentcomplieswiththeEuropeanR&TTEdirective.
ToviewthecompleteDeclarationofConformity, pleaserefertothefreedownloadavailableatourweb site:www.switel.com.