NVX-HC1 - Browser SONY - Free user manual and instructions
Find the device manual for free NVX-HC1 SONY in PDF.

User questions about NVX-HC1 SONY
0 question about this device. Answer the ones you know or ask your own.
Ask a new question about this device
Download the instructions for your Browser in PDF format for free! Find your manual NVX-HC1 - SONY and take your electronic device back in hand. On this page are published all the documents necessary for the use of your device. NVX-HC1 by SONY.
USER MANUAL NVX-HC1 SONY
DVD Navigation System
Operating Instructions GB
For installation and connections, see the supplied Installation/Connections manual.
CAUTION :CLASS 1M VISIBLE/INVISIBLE LASER RADIATION WHEN OPEN AND INTERLOCKS DEFEATED. DO NOT VIEW DIRECTLY WITH OPTICAL INSTRUMENTS.
These labels are located on the bottom of the chassis.
About this manual
- "Main unit" and "Card remote commander" in this manual represent CDX-NC9950 and its supplied remote control RM-X150 respectively.
- Instructions in this manual describe how to use the functions by mainly using the card remote commander.
- Illustrations in this manual may differ from the actual device.
- Countries/regions are indicated by national flag icons. The horizontal to vertical ratio of the icons is 2:1.
Table of contents
Welcome!....4
Important notice ....5
Location of controls .....7
Getting started
Resetting the unit .....9
Starting up the navigation .....9
Receiving GPS signals.....10
Registering your home. 10
Setting the clock automatically .....10
Basic operations
Switching the navigation mode/audio mode ....11
Menu operations....11
Route searching
Setting the destination and starting guidance....12
Setting the destination in other ways .....13
Adding waypoints on the route .....13
Guidance displays 14
Route editing
Changing the route search conditions .....15
Setting the route priority .....16
Editing waypoints....16
Checking route details by the list.....16
Searching for the route again .....17
Deleting a waypoint/destination.....17
Simulating the route....17
RDS-TMC information
Displaying traffic event information ..... 17
Avoiding traffic event on the route ..... 18
Cancelling the RDS-TMC voice guidance....18
Receiving RDS-TMC stations manually....18
System settings
Editing memory points 19
Setting up the system. 19
Additional information
Precautions 20
Notes on discs 20
Maintenance 20
Specifications 20
Troubleshooting....21
Menu items 22
Index 24
Welcome!
Thank you for purchasing this Sony DVD Navigation System. Before operating this system, read this manual thoroughly and retain it for future reference.
Features
This hideaway unit is designed to make up the navigation system with Sony FM/MW/LW Compact Disc Player CDX-NC9950. The system is controlled by CDX-NC9950, and the following features are available.
• DVD-ROM covering 21 European countries included
- 8 languages selectable for the voice guidance and on-screen display
- RDS-TMC (Traffic Message Channel) compatible
• 3 route simultaneous searching
• Maximum 2 waypoints can be set on the way to the destination
• Maximum 200 memory points storable
• Total 44 kinds of POI (point of interest) in 8 categories available
- Setting the destination by postal code
• Audio and navigation hybrid display
Display examples on CDX-NC9950
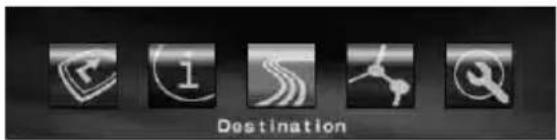
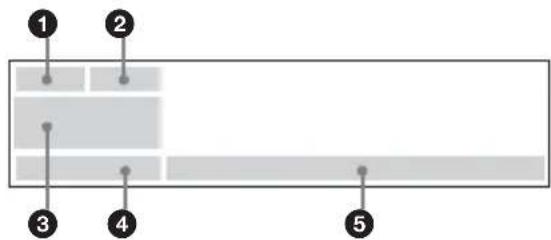
Navigation menu
You can make various settings in the navigation menu.
Settings and functions are categorised into the menus as follows:
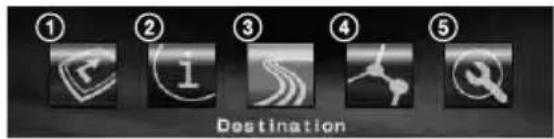
text_image
① ② ③ ④ ⑤ Destination① Suspending/resuming route guidance
② Setting for the RDS-TMC information
③ Searching for the destination
④ Editing the route to the destination
⑤ Setting for the system of the unit
For your safety, the menu setting operation is performable only after you park the car and set the parking brake.
4 guidance patterns
Road map (standard) with arrow guidance
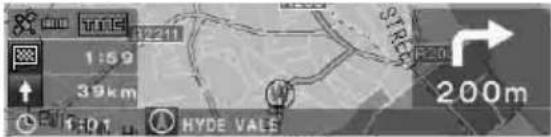
text_image
1:59 39km 1:01 m HYDE VALE 200mRoad map (zoom) with arrow guidance

text_image
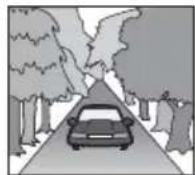
1:57 38km 1:02 DEPTFORD BRIDGE. 700m CAEFKSINEArrow guidance

text_image
TIME 10:55 18km 10:29 2.5km GÉNÉRAL LECLERC(AVE.)Turn list

text_image
D306 0.6km GENERAL PATTON(AV. ... 2.6km) CHAMBLAIN(BLVD.)/N6 12km 11:03 28km 10:28 N6Colourful intersection close-up view including rivers as landmarks
text_image
80m 2:03 39km ROYAL HILLMotorway view and interchange close-up view
text_image
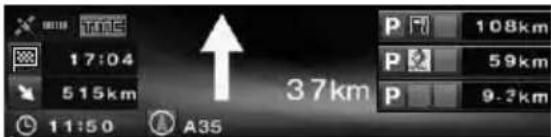
TIME 17:04 515km 37km 11:50 A35 P 108km P 59km P 9.7km
text_image
60m 15:57 164km TUNNEL SOUS LA MANCHEDynamic route guidance based on the RDS-TMC information
text_image
- 3.0km RDS-TMC Information TMC reroute? OK CancelImportant notice
To avoid the risk of injury or accident, read the following warning before installing and operating the unit.
On safety
- Comply with your local traffic laws and regulations.
- Observe actual traffic regulations, such as one-way streets, while driving with the route guidance.
- For your safety, do not operate the system or watch the display window while driving. It is dangerous and may cause an accident.
- Do not allow any liquid or foreign objects to enter the unit.
- Do not disassemble or modify the unit.
- This unit is designed for 12 V DC negative earth operation only.
Preventing an accident
The menu setting operation is performable only after you park the car and set the parking brake. When you attempt the menu operation while the parking break is released, the following caution appears.

text_image
Menu inoperable while driving.On installation
- Before installing the unit, check your local traffic laws and regulations.
• Make sure you install the unit properly following the Installation/Connections manual. - Improper installation may result in fire or electric shock.
On GPS
GPS (Global Positioning System) satellites continuously emit signals for positioning anywhere on the earth. As a GPS aerial receives these signals, users can be informed of their location (latitude, longitude and altitude). Information must be received from 3 satellites in order to obtain two-dimensional fixes (altitude and longitude), and 4 satellites are required for three-dimensional positioning (latitude, longitude and altitude). As GPS satellites are controlled by the U.S. Department of Defense, a deliberate margin of error between a few metres (a few feet) and 10 metres (32.8 feet) exists. As a result, the GPS navigation system may include an error of between 10 metres (32.8 feet) and about 200 metres (656.2 feet), depending on the circumstances.
As GPS information is obtained using signal from satellites, it may be impossible or difficult to obtain the information in the following locations:
- Tunnel or underground

• Under a highway
- Between high buildings
- Between tall trees with dense foliage
Note
When the reverse signal and the speed sensor cords are connected, the system calculates the current car position with detecting the direction and the travel distance of the car by the gyroscope and speed pulse respectively even in locations where the GPS signal cannot be received.
continue to next page →
On the supplied map disc
Read the following conditions carefully before opening the disc package.
- Roads and names on the map may differ from actual roads and names.
- The warranty on the disc does not extend to an exchange or refund due to some typographical errors and omissions, or any other discrepancy in layout found in the disc.
- In no way may the map data be copied and used, in whole or in part, without permission of the copyright holder.
- Contents are subject to change without notice.
- In no event shall Sony be liable to you or any third party for any damages resulting from the use of this product.
By opening the disc package, you are agreeing to be bound by the above.
On trademarks


V-Trafic Information in France is provided by Mediamobile company.

Traffic Information in the UK is provided by ITIS Holdings Plc.
Austria
Based upon Ordnance Survey electronic data and used with the permission of the Controller of Her Majesty's Stationary Office © Crown Copyright, 1995.
Italy
Copyright © 2000; Norwegian Mapping Authority
Portugal
Source: IgeoE - Portugal
Spain
Based upon electronic data © National Land Survey Sweden
Switzerland
Location of controls
NVX-HC1 (When the front panel is opened):
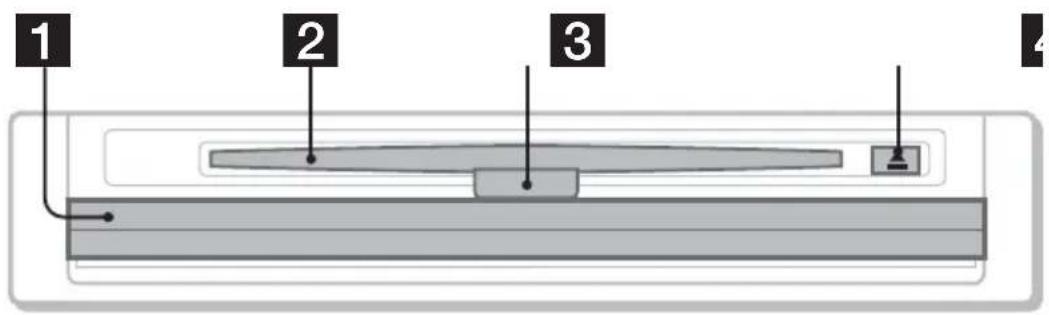
text_image
1 2 3 4Main unit CDX-NC9950 (In navigation mode):

text_image
5 6 7 8 SOURCE OFF VOL CUSTOM 9 10 11 ENTER MENU 12 13 141 Front panel
2 Disc slot
3 LED
Lights up in blue when the power is supplied to the unit.
4 ≧ (Eject) button
5 SOURCE (Power on/Radio/CD/MD/AUX) button
To select the audio source in the background.
6 OFF button
To turn off the unit.
7 Display window
8 ENTER button
During menu operation: To decide an item/apply a setting.
Except menu operation: To store point information (press)/display traffic event information (press and hold).
9 L (Left) dial
During voice guidance: To adjust the guidance volume level.
When no voice guidance is provided: To adjust the volume level of the audio source in the background.
10 CUSTOM button
During menu operation: To return to a previous display.
Except menu operation: To select the route guidance mode or audio mode (press)/provide the voice guidance (press and hold).
11 Receptor
To receive signals from the card remote commander or wireless rotary commander.
12 Reset button
To reset the unit.
13 MENU button
To display the navigation menu.
14R (Right) dial
During menu operation: To select an item. During route guidance: To change the guidance display pattern (4 patterns are selectable).
Note on using the L/R dials
Before using the L/R dials, push in and release them first. Push in again after use.
Card remote commander RM-X150 (supplied with CDX-NC9950) (In navigation mode):

text_image
OFF REP SHUF 1 2 3 BEE MP PAUSE 4 5 6 7 8 9 0 MENU SOURCE ENTER BACK MODE PTY ATTIAF VOICE TMC MARK MAPC -VOL- - + - 1 2 3 4 5 6 7 8 9 10 11 12 13 14 15The buttons on the card remote commander share the same functions as those on CDX-NC9950.
1 Number buttons
To input numbers for an address, phone number, or postal code.
2 MENU button
To display the navigation menu.
3 ←/↑/→/↓ buttons
To move the cursor to select a desired item.
4 BACK button
To return to a previous display.
5 VOICE button
To provide the voice guidance.
6 TMC button
To display traffic event information.
7 NAVI button
To select the route guidance mode/audio mode.
8 SCREEN button
To display the audio source information in the background.
9 ENTER button
To decide an item/apply a setting.
10 SOURCE button
To select the audio source in the background.
11 MODE button
To change the radio band or playback unit in the background.
12 ATT button
To attenuate the sound. To cancel, press again.
13 MAP button
To change the guidance display pattern (4 patterns are selectable).
14MARK button
To store point information in memory.
15 VOL (+/-) buttons
To adjust the volume level (the same function as L dial on the main unit).
Note
If the display disappears by pressing OFF, the main unit cannot be operated with the card remote commander unless SOURCE on the main unit is pressed, or a disc is inserted to activate the main unit first.
Getting started
Resetting the unit
Before operating the unit for the first time, or after replacing the car battery or changing the connections, you must reset the unit.
Press the reset button with a pointed object, such as a ballpoint pen.
After pressing the reset button, the start-up image appears and the demonstration starts automatically.

text_image
CDX-NC9950 Reset buttonNote
Pressing the reset button will initialise all the setting values excluding the stored memory point information on NVX-HC1, and some stored contents such as the clock/calendar settings in the memory of CDX-NC9950 likewise.
Tip
For details on the start-up images and the demonstration, see the instruction manual supplied with CDX-NC9950.
Starting up the navigation
The following settings are required before you operate the unit for the first time, after replacing the car battery, or changing the connection.
1 After resetting the main unit, press NAVI to switch to the navigation mode.
2 Open the front panel, then insert the supplied DVD-ROM (label side up).

text_image
NVX-HC1Verifying starts automatically, then the language selection display appears.
3 Select the desired language by pressing ↑ or ↓, then press ENTER.
The warning display appears.
4 Press ENTER.
The road map appears.
To eject the disc, press ▲.
With the main unit
Rotate the R dial instead of pressing or in step 3.
Notes
- Only the supplied disc can be used on this unit.
- You cannot insert or eject the disc when the power is not supplied to the unit.
- When "English" is selected in step 3, the unit selection display appears. Select "km" or "mile" by pressing ↑ or ↓, then press ENTER.
Receiving GPS signals
When using the navigation system for the first time after installing, drive your car on the roads without high buildings around for 30 minutes at a regular speed. The system requires signals from minimum 3 GPS satellites to calculate the current car position properly.
GPS reception sensitivity shows the number of GPS satellites currently identified. Make sure at least 3 increments are indicated.
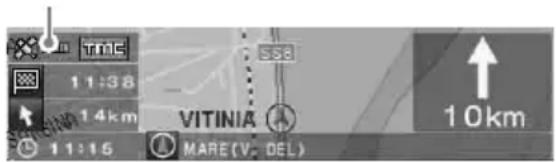
text_image
11:38 14km 11:16 S58 VITINIA 10km MARE(V. DEL)Notes on current car position
- Before operating the system for the first time, or after replacing the car battery, your current car position on the road map will be the default (Greenwich, London, UK) until GPS signal becomes receivable.
- The current car position on the map may be widely off the road until the speed pulse from your car is properly checked.
Registering your home
It is highly recommended to register your home in memory for easy recall next time.
1 Park your car at the point where you want to register as home.
2 Press MARK.
The confirmation display appears.
3 Select "Yes" by pressing or , then press ENTER. The address of the current car position is stored in memory.
4 Press MENU.
5 Select "Navigation Setup" by pressing or , then press ENTER.
6 Select "Memory Points" by pressing ↑ or ↓, then press ENTER. The address list appears.
7 Select the address stored in step 2 by pressing ↑ or ↓, then press ENTER.
8 Select "Register as Home" by pressing ↑ or ↓, then press ENTER. The conformation display appears.
9 Select "Yes" by pressing or , then press ENTER. The current car position is registered as home.
Setting the clock automatically
You can adjust the clock based on the GPS information.
1 Press NAVI to select the audio mode.
2 Press MENU.
3 Select "Setup" by pressing or , then press ENTER.
4 Select "GPS" by pressing or , then press ENTER.
5 Press ENTER to select the desired item.
Items:
“AUTO” sets the local time of the current position.
“HOME” sets the local time of stored home position.
“OFF” cancels setting time automatically.
6 Press MENU.
The display returns to the audio display.
Note
There might be a difference between the time set by the GPS information and the actual time.
Tip
The system supports the summer time.
Basic operations
Common procedures to operate the system are explained.
Switching the navigation mode/audio mode
You can switch to the navigation mode with a simple operation.
1 In audio mode, press NAVI.
To return to the audio source on the main unit, press NAVI.
To listen to the radio, CD, etc.
Press SOURCE repeatedly to select the desired audio source.
To display the audio source information Press SCREEN.
Menu operations
You can set all items in the navigation menus by following procedures below.
Operation by the card remote commander:
text_image
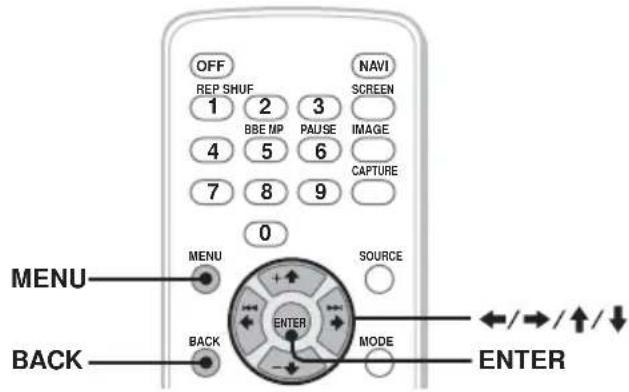
OFF REP SHUF 1 2 3 BBE MP PAUSE IMAGE 4 5 6 7 8 9 NAV SCREEN CAPTURE 0 MENU SOURCE ENTER BACK MODE ENTER ←/→/↑/↓1 In navigation mode, press MENU. The navigation menu appears.
text_image
Destination2 Press ← or → to select the desired menu, then press ENTER.

text_image
Navigation Setup Memory Points System Setup3 Press ↑ or ↓ to select the desired setting item, then press ENTER.
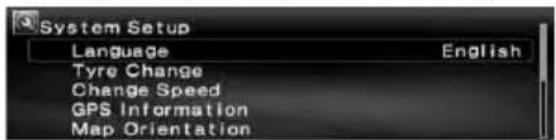
text_image
System Setup Language English Tyre Change Change Speed GPS Information Map Orientation4 Make the desired setting.
Press ← or → (↑ or ↓) to select the desired setting or input characters/numbers, then press ENTER.
5 Press MENU.
The display returns to the normal display.
During the menu operation:
To return to the previous display, press BACK.
To cancel the menu selection, press ⓂMENU.
Tips
- The items on the menu, and the setting operations differ depending on the selected menu item.
• The selectable items on the menu are highlighted.
Operation by the main unit:
Rotate the R dial on the main unit instead of pressing , , or on the card remote commander.

text_image
ENTER R dial MENUCUSTOM1 In navigation mode, press MENU. The navigation menu appears.
2 Rotate the R dial to select the desired menu, then press ENTER.
3 Rotate the R dial to select the desired setting item, then press ENTER.
4 Rotate the R dial to select the desired setting, then press ENTER.
5 Press MENU.
The display returns to the normal display.
During the menu operation:
To return to the previous display, press CUSTOM.
To cancel the menu selection, press ⓂMENU.
Route searching
The system searches for routes automatically after setting the destination.
The following contents are featured.
- Setting the destination easily by city/street names, postal codes, etc.
- Storing the desired point in memory
- Setting up to 2 waypoints on the route to go through
Setting the destination and starting guidance
The procedure for searching for the route and starting the route guidance is explained. Setting the destination by the address is introduced as an example here. For details on setting the destination in other ways, see “Setting the destination in other ways” on page 13.
1 Press MENU.
2 Select "Destination" → "Country" by ←, →, ↑, ↓ and ENTER.
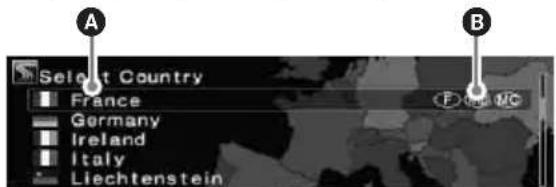
text_image
A Select Country France Germany Ireland Italy Liechtenstein BA Country/Region
B Country/Region code
3 Select the desired country by , and ENTER.
4 Select "Address" → "City Name Input" by ↑, ↓ and ENTER.
The name input display appears.
Select "Search All Cities" to search for the route by selecting the street name from all the cities. Go to step 6.
5 Input the city name.
① Select the character by , , , and (ENTER).
Repeat step 1 to input characters and narrow down the candidates.
The number of candidates
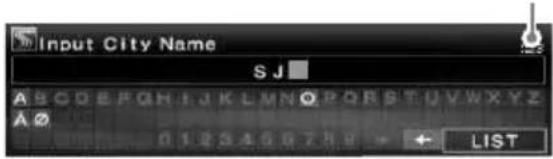
text_image
Input City Name SJ A B C D E F G H I J K L M N O P Q R S T U V W X Y Z A 0 0 1 2 3 4 5 6 7 8 9 LISTTo insert a space, select “→” then press ENTER.
To delete an input character, select “←” then press ENTER.
② Select "LIST" by ←, →, ↑, ↓ and ENTER.
In the list display, up to 200 candidates on the list after narrowed down can be scrolled cyclically.
③ Select the desired city name by ↑, ↓ and ENTER.
6 Input the street name.
Follow steps 5-① to ③ to select the street name.
7 Select "Set" by ↑, ↓ and ENTER.
Other items:
"House Number"
To set the house number, then select "OK."
"2nd Street"
To set the street crossing on the route as the destination. If the place you want to go is near an intersection, you can set the intersection as your destination.
8 Select "Start Guidance" by ↑, ↓ and ENTER.
The route search starts, then the route list appears.

text_image
Route search Route1 75km 12h10m 13:45 Route2 786km 12h11m 13:36 Route3 754km 12h27m 13:52A Travel distance ^**2
B Travel time*3
© Arrival time*
*1 The shortest and the fastest routes are marked with “●.”
*2 Travel distance is displayed up to "9999km" (When "km" is selected as the distance unit).
*3 Travel time is displayed up to "99h59m."
Other items:
"Register to Memory Points"
To store the point information in memory. The stored point can be called up with a simple operation.
"Add Way Point"
To set the waypoints on the route. For details, see “Adding waypoints on the route” on page 13.
"Detailed Information"
To display the information on the point.
9 Select the desired route by ↑, ↓ and ENTER.
The route guidance starts.
To suspend the route guidance
Press Ⓜ MENU, then select “Suspend Guidance” by ←, → and Ⓑ ENTER.
To resume the guidance, press Ⓜ, then select “Resume Guidance” by ←, → and ENTER.
Tip
You can also input numbers directly by pressing the number buttons on the card remote commander during character input.
Setting the destination in other ways
You can also set the destination and search for the routes by the following methods.
After pressing Ⓜ, select the items in the following order by ←, →, ↑, ↓ and ⒷTER.
Postal Code
Searches for routes by the postal code.
“Destination” → “Postal Code” → Postal code input → the desired postal code → Street name input → the desired street name → “Set” → “Start Guidance” → the desired route
POI Categories
Searches for routes to the POI such as restaurants, theatre, hotels, etc., selected from the category list.
(Ex. Searching for airports) “Destination” →
“POI Categories” → “Travel” → “Airport” →
"City Name Input" (or "Search All Cities") →
City name input → the desired city name →
POI name input → the desired POI name → “Start Guidance” → the desired route
Local POI\*
Searches for routes to the POI such as restaurants, theatre, hotels, etc., within approx. 30 km (20 mile) radius of the current car position.
(Ex. Searching for Chinese restaurants)
“Destination” → “Local POI” → “Restaurant” →
“Chinese” → the desired restaurant → “Start Guidance” → the desired route
* All the 2nd POI categories are displayed when "All Categories" in "Local POI" is selected.
Home/Previous Destination/Memory Points
Searches for routes by stored points.
“Destination” → “Home,” “Previous Destination” or “Memory Points” → the desired point* →
"Start Guidance" → the desired route
* Not required when "Home" is selected.
Tip
You can also input numbers directly by pressing the number buttons on the card remote commander during character input.
Adding waypoints on the route
You can set maximum 2 points on the route as the waypoint.
1 Before setting, search for the waypoint by the address, POIs, etc.
For details, see “Setting the destination and starting guidance” on page 12 and “Setting the destination in other ways” on page 13.
2 Select "Add Way Point" in
"Destination" menu by ↑, ↓ and ENTER.
The display for adding waypoints appears.
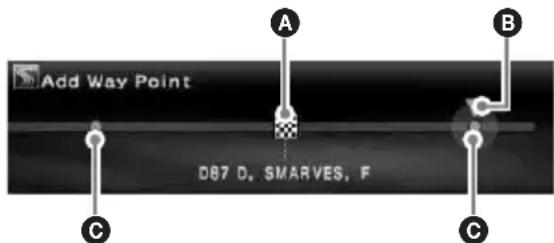
text_image
Add Way Point D87 D, SMARVES, FA Destination
B Selected position to add
© Selectable position
3 Select the desired position to add the waypoint by , and ENTER.
The route searching starts, then the route guidance starts.
Tip
When you want to rearrange the sequence of the waypoints, see "Editing waypoints" on page 16.
Guidance displays
The following displays appear while driving.
Each time you press MAP ^1 during navigation, the display pattern changes as follows: Road map (zoom) with arrow guidance → Road map (standard) with arrow guidance → Turn list ^2 → Arrow guidance ^*2 → Road map (zoom) with arrow guidance → ...
*1 Not operable while you are on the motorway. *2 Available only when the destination is set.
Basic information on the display
text_image
1 2 3 4 5① GPS reception condition
② TMC information
③ When the destination is not set: Compass direction, Current latitude and longitude
When the destination is set:
Travel time, travel distance and direction to the waypoint/destination
When audio display is selected by pressing SCREEN :
Audio source information
4 Current time
5 (Current car mark)/current road name,
(Arrow guidance)/current street name or next area name
Road map with arrow guidance display
The road map combined with arrow directions and major information is displayed.
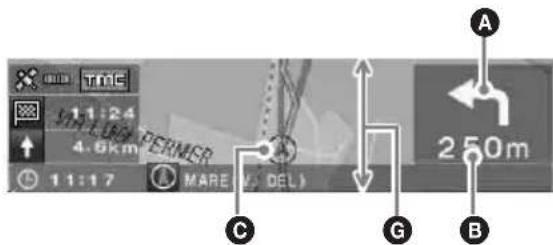
text_image
TMC 1:1:24 4.6km 11:17 MARE (M DEL) A 250m C G BTip
“”appearing on the road map when the priority of “Restricted Road” is set to “High” shows that the road has been blocked due to the traffic control.
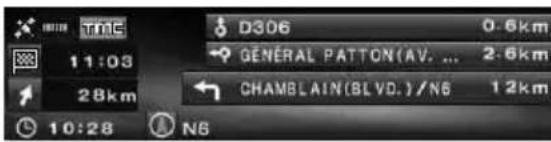
Turn list display
Only the directions to turn, area names, and distance to turn are displayed.
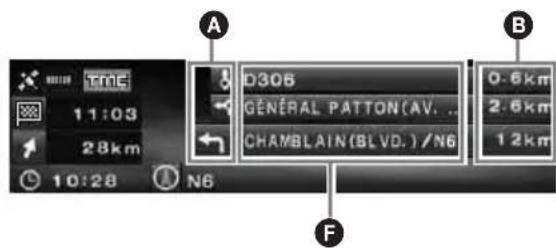
text_image
A D306 GENERAL PATTON(AV.... CHAMBLAIN(BLVD.)/N6 0.6km 2.6km 12km FTip
" Ferry route" appears at the transfer point when using ferries, and trains as well.
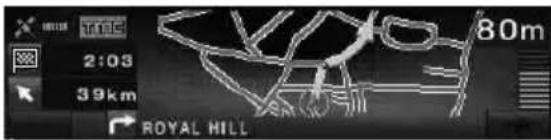
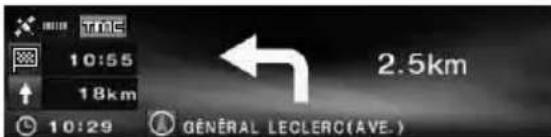
Arrow guidance display
When approaching an intersection or interchange point, the map becomes close-up automatically to display more detail.
General road:

text_image
A 10:55 18km 10:29 GÉNÉRAL LECLERC(AVE.) 2.5km BWhen approaching an intersection
text_image
A B 2:03 39km ROYAL HILL 89m C DMotorway*:
* Only the following guidance displays are provided, and cannot be changed while you are on the motorway.

text_image
A 17:04 515km 11:50 A35 37km B E P 108km P 59km P 9.2kmWhen approaching an interchange point
text_image
TUNNEL SOUS LA MANCHE 15:57 164km 60m A B DTips
• or lights up in close-up view when approaching the point to turn right or left.
- To cancel the close-up view, press BACK on the card remote commander or CUSTOM on the main unit.
A Arrow guidance/Route line
B Distance to turn
© Current car position
D Visualised distance to turn
E Facility information such as service area/petrol station/parking area, Distance to the next facility Upper: The nearest facility except parking area Middle: The 2nd nearest facility Lower: The nearest facility
F Area name
G The vertical width of the window indicates the approximate distance as follows: Standard scale map: 600 m (0.4 mile)/Zoom scale map: 300 m (0.2 mile)
Notes
- Four cardinal points are shown only in English when displaying the location and address information by latitude and longitude.
- After the current car position is off the route, the arrow guidance on the display disappears during rerouting.
- Arrow guidance “↑” continues to appear when the distance to the next turning point is over 5 km (3 miles) for general roads and 10 km (6 miles) for motorways.
Tips
- "Unknown" appears when the road/street name is unknown.
- “” appears at the transfer point when using ferries, and trains as well.
- If the characters are too many to display, the end of a line is abbreviated as “...” and skip the rest.
- Travel time is displayed up to "99h59m."
- Travel distance is displayed up to "9999km" (When "km" is selected as the distance unit).
Route editing
The settings for searching for routes or waypoints on a route can be configured in various ways.
The following contents are featured.
- Changing the route search condition to find other routes
- Setting route priority
- Editing waypoints
- Checking route information
- Searching for a route again
- Deleting the destination when malfunction occurs
- Route simulation
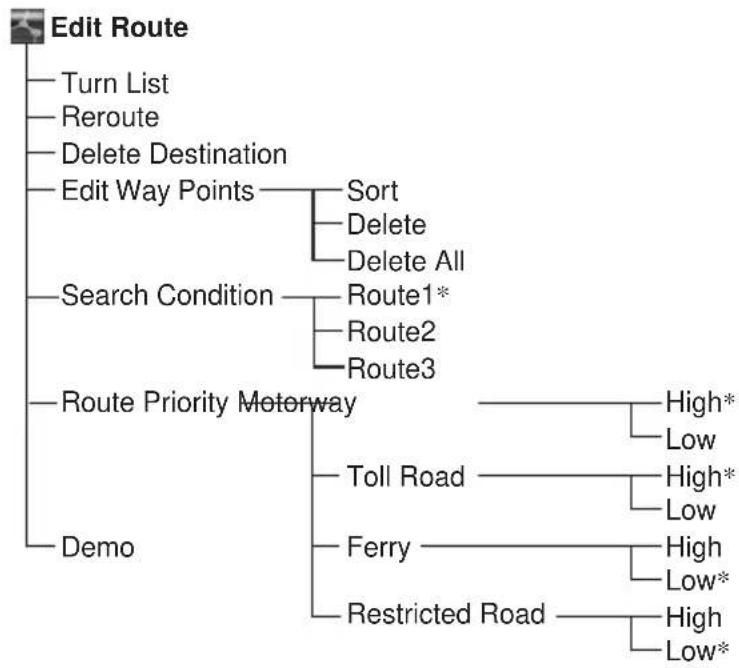
Changing the route search conditions
When you want to change the route while driving, change the search condition and search for the route again.
1 Press MENU.
2 Select "Edit Route" by , and ENTER.
3 Select "Search Condition" by pressing ↑ or ↓, then press ENTER.
text_image
Search Condition Route1 A B CA Route1: Time-priority route
Route2: Time-priority route (Alternative)
© Route3: Distance-priority route
4 Select the desired route by , and ENTER.
The route search starts, then the route guidance starts.
Note
Use the search result as a rough guide, it may be different in practice.
Setting the route priority
You can set the route priority for taking the motorway, toll road, ferry and restricted road. Search for the route again when you change the priorities.
1 Press MENU.
2 Select "Edit Route" → "Route Priority" by ←, →, ↑, ↓ and ENTER.
3 Set the priority.
① Select the desired route way by ↑, ↓ and ENTER.
② Select "Low" or "High" by ↑, ↓ and ENTER.
The route search starts, then the route guidance starts.
Tips
- Setting "Motorway" to "High" is recommended when searching for a long distance route.
- The route ways set to "Low" priority may still be taken on the route.
Editing waypoints
You can rearrange the order or make the deletion of waypoints set on the route.
1 Press MENU.
2 Select "Edit Route" → "Edit Way Points" by ←, →, ↑, ↓ and ENTER.
3 Select "Sort" by ↑, ↓ and ENTER. The display to sort waypoints appears.
text_image
Sort Way Points 1 B C TOWER BRIDGE MILLENNIUM DOME LONDON EYEA 1st waypoint
B 2nd waypoint
© Destination
Other items:
"Delete"
To delete the unwanted waypoint.
"Delete All"
To delete all the waypoints and destination set on the route.
4 Select the desired waypoint to shift by , and ENTER.
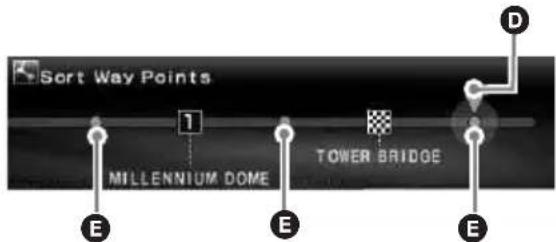
text_image
Sort Way Points 1 MILLENNIUM DOME TOWER BRIDGE D E E ED Selected position to shift
E Selectable position
5 Select the desired position to set by , and ENTER.
The route search starts, then the route guidance starts.
Checking route details by the list
You can check the area names and the distance between the points on the route.
1 Press MENU.
2 Select "Edit Route" → "Turn List" by ←, →, ↑, ↓ and ENTER.
The turn list appears.
Press or to scroll the list.

text_image
Turn List KING WILLIAM WALK COLLEGE APRCH. GREENWICH CHURCH ST. GREENWICH HIGH ROAD 0.1km 0.0km 0.3kmA Turn direction
B Area name
© Distance between points
To exit the turn list, press ⓂMENU.
Searching for the route again
When the car position on the map does not match the current road, you can search for the route again manually before the system updates the current car position.
1 Press MENU.
2 Select "Edit Route" by , and ENTER.
3 Select "Reroute" by ↑, ↓ and ENTER. The route search starts, then the route guidance starts.
Deleting a waypoint/destination
The next waypoint or the destination (when no waypoint is on the route) is deleted.
1 Press MENU.
2 Select "Edit Route" → "Delete Destination" by ←, →, ↑, ↓ and (ENTER).
The conformation display appears.
3 Select "Yes" by , and ENTER.
Simulating the route
You can simulate the route to the destination.
1 After searching for the route, press MENU.
2 Select "Edit Route" by ←, → and ENTER.
3 Select "Demo" by ↑, ↓ and ENTER. The route simulation starts.
To exit the route simulation, press MENU.
RDS-TMC information
The Traffic Message Channel (TMC) is an RDS broadcasting service that allows FM stations to send traffic information along with the regular radio signal.
The following contents are featured.
- Receiving and storing the traffic information
- Searching for the alternative route to avoid a traffic event
• Providing voice guidance
Note
Depending on the country or region, not all of the RDS-TMC features are available.
Displaying traffic event information
The system receives and stores RDS-TMC information automatically. You can check the traffic event on the route based on the RDS-TMC information. "TM lights up depending on the status as follows:
| Indication | Colour Status | |
| TMC | Background: Orange | Traffic information is stored. |
| TMC | Background: Grey | No traffic information |
| TMC | Text: White Within TMC service area | |
| TMC | Text: Grey Out of TMC service area | |
1 Press TMC on the card remote commander, or press and hold ENTER on the main unit.
The information display appears if there is any traffic event information.
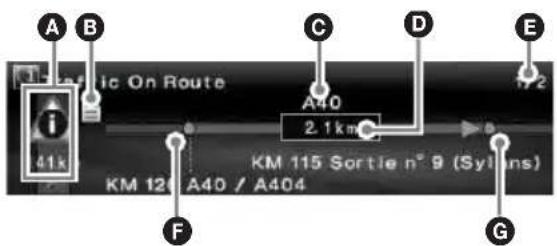
text_image
A B 41k Music On Route A40 2.1km KM 115 Sortie n° 9 (Syllans) KM 121 A40 / A404 F G Econtinue to next page →
A Traffic events and distance
B Detailed information*
© Road name
D Distance influenced by the traffic event
E Page count on the information*
F Starting point of the traffic event
G Closing point of the traffic event
* Appears when available. You can check the detailed information by rotating the R dial on the main unit or pressing ← or → (↑ or ↓) on the remote commander to display the next or previous page.
Traffic event
 | Stationary traffic |  | Road conditions |
 | Traffic jam We |  | |
 | Accidents Dela |  | |
 | Closed road Pa |  | |
 | Road works O |  | order |
 | Danger | ||
To display all traffic information currently available (including the information on other routes), press Ⓜ, then select “RDS-TMC Information” → “All Traffic Conditions” → the desired road.
Tip
You can also display traffic information by pressing MENU, then select "RDS-TMC Information"→ "Traffic On Route" by ←, →, ↑, ↓ and ENTER.
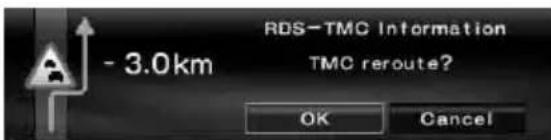
Avoiding traffic event on the route
The system offers dynamic route guidance for calculating an alternative route to avoid traffic event.
When traffic event occurs, the confirmation display appears.

text_image
A B - 3.9 km RDS-TMC Information TMC reroute? OK CancelA Traffic event
B Additional distance caused by detour*
* May be shortened depending on the calculated alternative route. Displayed with a minus sign in this case.
1 Select "OK" when avoiding the traffic event by , and ENTER.
To cancel avoiding the traffic event, press MENU, then select "RDS-TMC Information" → "Dynamic Navigation" → "Off" by ←, →, ↑, ↓ and ENTER.
Cancelling the RDS-TMC voice guidance
You can cancel providing the voice guidance so as not to interrupt the radio, CD, etc.
1 Press MENU.
2 Select "RDS-TMC Information" → "Guide" by ←, →, ↑, ↓ and ENTER.
3 Select "Off" by ↑, ↓ and ENTER.
Receiving RDS-TMC stations manually
The system receives TMC stations in the area automatically even after crossing the border. If the RDS-TMC reception is poor, you can specify the country and receive TMC stations manually.
1 Press MENU.
2 Select "RDS-TMC Information" → "RDS-TMC Setup" → "Station" → "Manual" by ←, →, ↑, ↓ and ENTER.
The RDS-TMC station list appears.
3 Select the desired station by ↑, ↓ and ENTER.
To specify your area, select "Country" instead of "Station" in step 2, then select the desired area.
Note
It may take a few minutes to receive the RDS-TMC station list.
System settings
The various settings related to the system and the memory are configurable.
For the structure of menus, see “Menu items” on page 22.
Editing memory points
You can edit the memory point information stored.
After pressing Ⓑ MENU, select “Navigation Setup” → “Memory Points” → the desired memory point → the desired item below to make setting by ←, →, ↑, ↓ and Ⓒ ENTER.
"Edit Memory Point"
To edit the name and the phone number of the memory point.
"Register as Home"
To set the memory point as home.
"Delete"
To delete the registered memory point.
"Current Position"
To update the current car position.
Setting up the system
You can set up the system related items.
After pressing ⒷENU, select “Navigation Setup” → “System Setup” → the desired item below to make setting by ←, →, ↑, ↓ and ⒷENTER.
"Language"
To select the desired language for the on-screen display and the voice guidance.
"Tyre Change"*1
To reset the calibration after changing tyres.
"Change Speed"*2
To set the average speed on the motorway, country road, and urban road.
- “Auto” adjusts the average speed based on the actual travelling speed automatically.
"GPS Information"*3
To display the GPS reception conditions and the latitude, longitude, altitude, and speed of your car.
"Map Orientation"
To select the heading up map or the north up map.
- “Heading Up” rotates the road map to point the travelling direction upwards.
- “North Up” displays the road map with the north side upwards.
"Est.Time to Destination"
To select the estimated arrival time or remaining time to display.
"Route Information"
To select the displaying time and distance to the next waypoint or destination.
"Voice Guidance"
To turn on or off the guidance, and adjust the balance and select the volume level setting.
"Voice" turns on or off the voice guidance.
“Balance” adjusts the balance of the voice guidance.
“Volume” selects the way of setting the volume levels.
- “Independ” allows you to adjust the volume level of the voice guidance and audio source individually.
- “Mixed” allows you to adjust the volume level of the voice guidance and audio source together.
*1 This operation is only required when taking speed pulse with speed sensor.
*2 When the speed sensor is not connected, set the average speed for "Motorway," "Country Road" and "Urban Road" manually.
*3 The speed is always measured in "m/sec"(metre per second) despite the language setting. The latitude, longitude, altitude and speed information may include a substantial margin of error due to the characteristics of GPS. For details, see "On GPS" on page 5.
Additional information
Precautions
- If your car has been parked in direct sunlight, allow the unit to cool off before operating it.
- Power aerial will extend automatically while the unit is operating.
Moisture condensation
On a rainy day or in a very damp area, moisture condensation may occur inside the lenses and display of the unit. Should this occur, the unit will not operate properly. In such a case, remove the disc and wait for about an hour until the moisture has evaporated.
To maintain the performance
Be careful not to splash juice or other soft drinks onto the unit or disc.
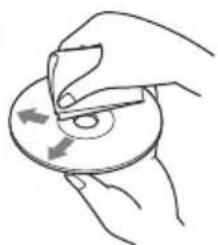
Notes on discs
- Any discs other than the disc supplied cannot be used on this unit. Use only the supplied disc.
• To keep a disc clean, do not touch its surface. Handle the disc by its edge. - Do not subject discs to heat/high temperature. Avoid leaving them in a parked car or on a dashboard/rear tray.
- Do not attach labels, or use discs with sticky ink/residue. Such discs may stop spinning when used, causing a malfunction, or may ruin the disc.


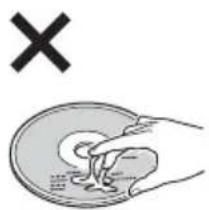
text_image
X- Before playing, clean the disc with a commercially available cleaning cloth. Wipe each disc from the centre out. Do not use solvents such as benzine, thinner, commercially available cleaners, or antistatic spray intended for analogue discs.
natural_image
Illustration of hands holding a CD or DVD disc with arrows indicating rotation (no text or symbols)If you have any questions or problems concerning your unit that are not covered in this manual, consult your nearest Sony dealer.
Maintenance
Fuse replacement
When replacing the fuse, be sure to use one matching the amperage rating stated on the original fuse. If the fuse blows, check the power connection and replace the fuse. If the fuse blows again after replacement, there may be an internal malfunction. In such a case, consult your nearest Sony dealer.
Fuse (5 A) on the power cord
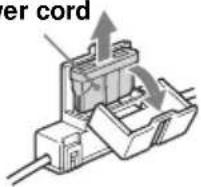
Fuse (0.1 A) on the FM aerial divider
Warning
Never use a fuse with an amperage rating exceeding the one supplied with the unit as this could damage the unit.
Specifications
General
Connection terminal:
FM aerial terminal (FM ANT. IN)
GPS aerial terminal (GPS ANT. IN)
Navigation control terminal (NV-BUS)
Speed sensor terminal (SPEED)
Reverse signal terminal (REVERSE)
Power requirement: 12 V DC car battery (negative earth)
Consumption current: Max. 3A
Dimension: Approx. 196 × 37.5 × 189 mm (7^3/4 × 1^1/2 × 7^1/2 in) (w × h × d)
Mass: Approx. 1.3 kg (2 lb 14 oz)
Supplied accessories:
Parts for installation and connections (1 set) Map disc
Design and specifications are subject to change without notice.

- Lead-free solder is used for soldering certain parts. (more than 80 %)
- Halogenated flame retardants are not used in the certain printed wiring boards.
- Halogenated flame retardants are not used in cabinets.
- Packaging cushions do not use polystyrene foam.
Troubleshooting
The following checklist will help you remedy problems you may encounter with your unit. Before going through the checklist below, check the connection and operating procedures.
General
The operation buttons do not function.
• TA (traffic announcement) is interrupting.
→ Wait until the TA interruption finishes.
→ Cancel the TA function by pressing MODE, or TA on the card remote commander.
- Press the reset button (page 9).
GPS signal cannot be received.
- The system cannot receive GPS signals due to an obstruction.
→ Move your car somewhere clear.
• GPS signal reception is low.
→ Check the GPS signal values. - The GPS aerial is incorrectly installed.
→ Install the GPS aerial where the signal is not interrupted by the body of the car, etc. and install the aerial horizontally. For details, see the Installation/Connections manual. - The GPS aerial is not properly connected to the unit.
→ Insert the connector of the aerial until it clicks into the GPS ANT. IN port of the unit. For details, see the Installation/Connections manual.
The car position on the map does not match the current road.
The error margin of the signal from the GPS satellites is too large. A maximum error margin of a few hundred metres can exist.
→ Search for the route again and update your current car position. For details, see “Searching for the route again” on page 17.
The guidance patterns cannot be changed by pressing MAP.
- The patterns cannot be changed when you are on the motorway.
- The current car position does not appear on the route right after guidance started.
→ Wait unit the current car position appears on the road map.
The voice guidance cannot be heard.
• The volume is too low.
→Press (+) (VOL) on the card remote commander or rotate the L dial clockwise to adjust the volume.
- The ATT function of the main unit is activated.
Cancel the ATT function of the main unit.
“□” appears on the display.
The characters on the route guidance display complies with ISO 8859-1 character set, incompatible characters are shown as “☐.”
Arrow guidance “↑” appears for a while.
- The system still calculates the direction on the route right after guidance started.
- There is no way to make a right or left turn for a while.
- The distance to the next turning point is over 5 km (3 miles) for general roads and 10 km (6 miles) for motorways.
Estimated travel distance, travel time or arrival time is not displayed.
The current car position does not appear on the route right after guidance started, and the system still calculates the route information.
Error message
When “Please Set Original Disc in NAVI Unit” keeps appearing after inserting the supplied DVD-ROM, consult your nearest Sony dealer.
Menu items
You can make various settings in the navigation menu by pressing Ⓜ MENU. Menu items and settings are as follows:
* Default setting

RDS-TMC Information
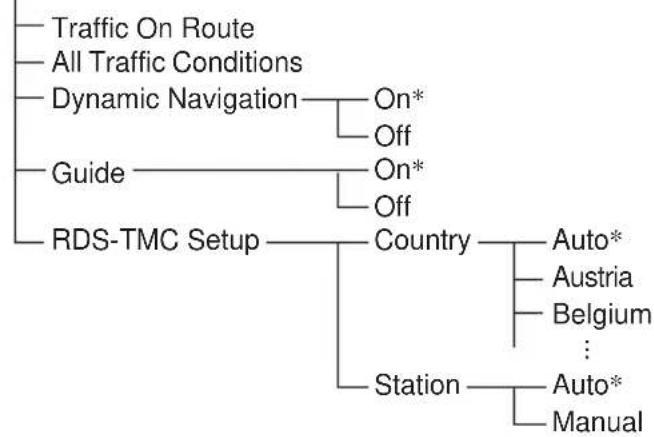
flowchart
graph TD
    A["Traffic On Route"] --> B["All Traffic Conditions"]
    B --> C["Dynamic Navigation"]
    C --> D["On* Off"]
    E["Guide"] --> F["On* Off"]
    G["RDS-TMC Setup"] --> H["Country"]
    H --> I["Auto* Austria Belgium"]
    H --> J["Station"]
    J --> K["Auto* Manual"]

Destination
flowchart
graph TD
    A["Country"] --> B["Andorra"]
    A --> C["Austria"]
    A --> D["United Kingdom*"]
    A --> E["Vatican City"]
    F["Address"] --> G["City Name Input Set"]
    F --> H["Search All Cities"]
    H --> I["House Number"]
    H --> J["2nd Street"]
    K["POI Categories"] --> L["City Name Input"]
    K --> M["Search All Cities"]
    N["Memory Points"] --> O["Postal Code"]
    O --> P["City Name Input"]
    O --> Q["Search All Cities"]
    Q --> R["House Number"]
    Q --> S["2nd Street"]
    T["Previous Destination"] --> U["Local POI"]
    T --> V["Home"]
    W["Start Guidance"] --> X["Add Way Point"]
    W --> Y["Detailed Information"]
    W --> Z["Register to Memory Points"]
    AA["Route1"] --> AB["Route2"]
    AA --> AC["Route3"]
flowchart
graph TD
    A["Edit Route"] --> B["Turn List"]
    A --> C["Reroute"]
    A --> D["Delete Destination"]
    A --> E["Edit Way Points"]
    E --> F["Sort"]
    E --> G["Delete"]
    E --> H["Delete All"]
    A --> I["Search Condition"]
    I --> J["Route1*"]
    I --> K["Route2"]
    I --> L["Route3"]
    A --> M["Route Priority Motorway"]
    M --> N["Toll Road"]
    M --> O["Ferry"]
    M --> P["Restricted Road"]
    N --> Q["High*"]
    N --> R["Low"]
    O --> S["High*"]
    O --> T["Low"]
    P --> U["High"]
    P --> V["Low*"]
    Q --> W["High"]
    Q --> X["Low*"]

flowchart
graph TD
    A["Navigation Setup"] --> B["Memory Points"]
    A --> C["System Setup"]
    B --> D["Edit Memory Point"]
    B --> E["Register as Home"]
    B --> F["Delete"]
    B --> G["Current Position"]
    C --> H["Language"]
    H --> I["English* mile"]
    H --> J["Espanol km*"]
    H --> K["..."]
    C --> L["Tyre Change"]
    C --> M["Change Speed"]
    M --> N["Motorway"]
    M --> O["Country Road"]
    M --> P["Urban Road"]
    M --> Q["Auto*"]
    C --> R["GPS Information"]
    C --> S["Map Orientation"]
    S --> T["Heading Up*"]
    S --> U["North Up"]
    C --> V["Est. Time to Destination"]
    V --> W["Arrival*"]
    V --> X["Remaining"]
    C --> Y["Route Information"]
    Y --> Z["Next Way Point*"]
    Y --> AA["Destination"]
    C --> AB["Voice Guidance"]
    AB --> AC["Voice On* Off"]
    AB --> AD["Balance Left Center* Right"]
    AB --> AE["Volume Independ* Mixed"]
Index
Numerics
2nd Street 12
A
Add Way Point 13
Address 12
All Traffic Conditions 18
Altitude 19
B
Balance 19
C
Cancel
RDS-TMC
voice guidance 18
Voice guidance 19
Card remote commander 8
Change Speed 19
City Name Input 12
Country 12, 18
Country Road 19
Current Position 19
D
Delete
All 16
Destination 17
Memory point 19
Waypoint 16
Delete Destination 17
Demo 17
Destination
Delete 17
Previous 13
Detailed Information 13
Dynamic Navigation 18
Dynamic route guidance 18
E
Edit
Memory point 19
Route 15, 16, 17
Waypoint 16
Edit Memory Point 19
Edit Way Points 16
Est.Time to Destination 19
F
Ferry 16
Fuse 20
G
GPS 5, 10
GPS Information 19
Guidance displays 14
Guide 18
H
Heading Up 19
Home 13
House Number 12
|
Independ 19
L
Language 19
Latitude 19
LIST 12
Local POI 13
Longitude 19
M
Main unit 7
Manual 18
Map Orientation 19
Memory Points 10, 13, 19
Menu 11, 22
Mixed 19
Motorway 16, 19
N
Navigation Setup 10, 19
North Up 19
Notes on discs 20
P
POI Categories 13
Postal Code 13
Previous Destination 13
R
RDS-TMC Information 17, 18
RDS-TMC Setup 18
Receive
GPS signal 10
RDS-TMC 18
Register as Home 10, 19
Register to Memory Points 13
Reroute 17
TMC 18
Reset 9
Restricted Road 14
Route
Edit 15, 16, 17
Simulate 17
Route Information 19
Route Priority 16
S
Search All Cities 12
Search Condition 15
Speed
Change 19
Speed pulse 19
Speed sensor 19
Start Guidance 12
Station 18
System Setup 19
T
TA (traffic announcement) 21
TMC 17
Toll Road 16
Traffic event 18
Traffic Message Channel 17
Traffic On Route 18
Turn List 16
Tyre Change 19
U
Urban Road 19
V
Voice 19
Voice Guidance 19
Provide 8
Volume 19
W
Waypoint
Add 13
Delete 16
Sort 16
CLASS 1
LASER PRODUCT
CAUTION :CLASS 1M VISIBLE/INVISIBLE LASER RADIATION WHEN OPEN AND INTERLOCKS DEFEATED. DO NOT VIEW DIRECTLY WITH OPTICAL INSTRUMENTS.
text_image
1:57 38km 1:02 DEPTFORD BRIDGE. 700m CREEK SIDEPfeilführung

text_image
TIME 10:55 18km 10:29 2.5km GÉNÉRAL LECLERC(AVE.)Based upon Ordnance Survey electronic data and used with the permission of the Controller of Her Majesty's Stationary Office © Crown Copyright, 1995.
Italien
Copyright © 2000; Norwegian Mapping Authority
Portugal
source: IgeoE - Portugal
Spanien
Based upon electronic data © National Land Survey Sweden
Schweiz
text_image
Diagram showing three stages of a medical procedure: cross, cross, and cross with corresponding icons.natural_image
Hand holding a CD or DVD disc with an arrow indicating rotation (no text or symbols)TMC (Traffic Message Channel)
19
U
Unabhängig 21
V
CAUTION :CLASS 1M VISIBLE/INVISIBLE LASER RADIATION WHEN OPEN AND INTERLOCKS DEFEATED. DO NOT VIEW DIRECTLY WITH OPTICAL INSTRUMENTS.
Avis important ....5
Commutation mode navigation/mode audio ....11
Informations RDS-TMC
text_image
1:57 38km 1:02 DEPTFORD BRIDGE. 700m CREEKSING• Tunnel ou parking souterrain
Based upon Ordnance Survey electronic data and used with the permission of the Controller of Her Majesty's Stationary Office © Crown Copyright, 1995.
Italie
Copyright © 2000; Norwegian Mapping Authority
Portugal
Source : IgeoE - Portugal
Espagne
Based upon electronic data © National Land Survey Sweden
Suisse
Commutation mode navigation/mode audio
text_image
Destinationnatural_image
Illustration of a hand holding a CD or DVD disc with arrows indicating direction (no text or symbols)Appareil principal 7
Autoroute 17, 21
B
Balance 21
C
Information RDS-TMC 19, 20
modification 16, 17, 18
simulation 18
L
Langage 21
Latitude 21
Liste 13
Longitude 21
M
Manuelle 20
CAUTION :CLASS 1M VISIBLE/INVISIBLE LASER RADIATION WHEN OPEN AND INTERLOCKS DEFEATED. DO NOT VIEW DIRECTLY WITH OPTICAL INSTRUMENTS.
text_image
1:57 38km 1:02 DEPTFORD BRIDGE. 700m CREEK SIDEGuida con frecce

text_image
10:55 18km 10:29 2.5km GÉNÉRAL LECLERC(AVE.)Elenco delle svolte
text_image
TIME 11:03 28km 10:28 N6 D306 0.6km GENERAL PATTON(AV. ... 2.6km CHAMBLAIN(BLVD.)/N6 12kmBased upon Ordnance Survey electronic data and used with the permission of the Controller of Her Majesty's Stationary Office © Crown Copyright, 1995.
Italia
Copyright © 2000; Norwegian Mapping Authority
Portogallo
Source: IgeoE - Portugal
Spagna
Based upon electronic data © National Land Survey Sweden
Svizzera
text_image
Diagram showing three stages of a medical procedure: cross, cross, and cross with corresponding illustrations.natural_image
Hand holding a CD or DVD disc with an arrow indicating rotation (no text or symbols)Mete in Memoria 10, 14, 20
Mix 21
Modifica
meta in memoria 20
percorso 16, 17, 18
tappa 17
Modifica Meta in Memoria 20
Modifica tappe 17
CAUTION :CLASS 1M VISIBLE/INVISIBLE LASER RADIATION WHEN OPEN AND INTERLOCKS DEFEATED. DO NOT VIEW DIRECTLY WITH OPTICAL INSTRUMENTS.
text_image
1:57 38km 1:02 DEPTFORD BRIDGE. 700m CREEK SINGPijlbegeleiding
text_image
TIME 10:55 18km 10:29 2.5km GÉNÉRAL LECLERC(AVE.)Routeplan

text_image
D306 0.6km GENERAL PATTON(AV. ... 2.6km CHAMBLAIN(BLVD.)/N6 12km 11:03 28km 10:28 N6Based upon Ordnance Survey electronic data and used with the permission of the Controller of Her Majesty's Stationary Office © Crown Copyright, 1995.
Italië
Copyright © 2000; Norwegian Mapping Authority
Portugal
source: lgeoE - Portugal
Spanje
Based upon electronic data © National Land Survey Sweden
Zwitserland
De routebegeleiding begint.
natural_image
Hand holding a CD or DVD disc with arrows indicating rotation (no text or symbols)natural_image
Technical line drawing of a mechanical component with no visible text or symbolsZekering (0,1 A) van de FM-antennesplitter
Waarschuwing
Traffic Message Channel 18
Tussenpunt
Sorteren 17
Toevoegen 14
Wissen 17