Big Wheeler 560 Mega B&S - Lawn mower GUDE - Free user manual and instructions
Find the device manual for free Big Wheeler 560 Mega B&S GUDE in PDF.

User questions about Big Wheeler 560 Mega B&S GUDE
0 question about this device. Answer the ones you know or ask your own.
Ask a new question about this device
Download the instructions for your Lawn mower in PDF format for free! Find your manual Big Wheeler 560 Mega B&S - GUDE and take your electronic device back in hand. On this page are published all the documents necessary for the use of your device. Big Wheeler 560 Mega B&S by GUDE.
USER MANUAL Big Wheeler 560 Mega B&S GUDE
natural_image
Icon of an open book inside a black circle (no text or symbols)Deutsch 4
Magyar10
Čeština 16
Slovenčina 21
Nederlands 27
English 33
Français 39
Italiano 45
natural_image
Line drawing of a lawn mower with visible blades and wheels (no text or symbols)CE
95125

text_image
1 11 2 9 14 5 8 7 6 10 3 4 13 MEGA BS WHEELER
natural_image
Two types of household items: a black-and-white book case and a white box with a handle, placed on a plain surface (no text or symbols visible)
natural_image
Black fabric bag with metal frame and circular label '3' (no text or symbols on bag itself)
natural_image
Top-down view of a black and silver car hood with visible internal compartments (no text or symbols)

natural_image
Two-step diagram showing a mechanical component being adjusted from 5a to 5b, with no visible text or symbols.
text_image
5c 5d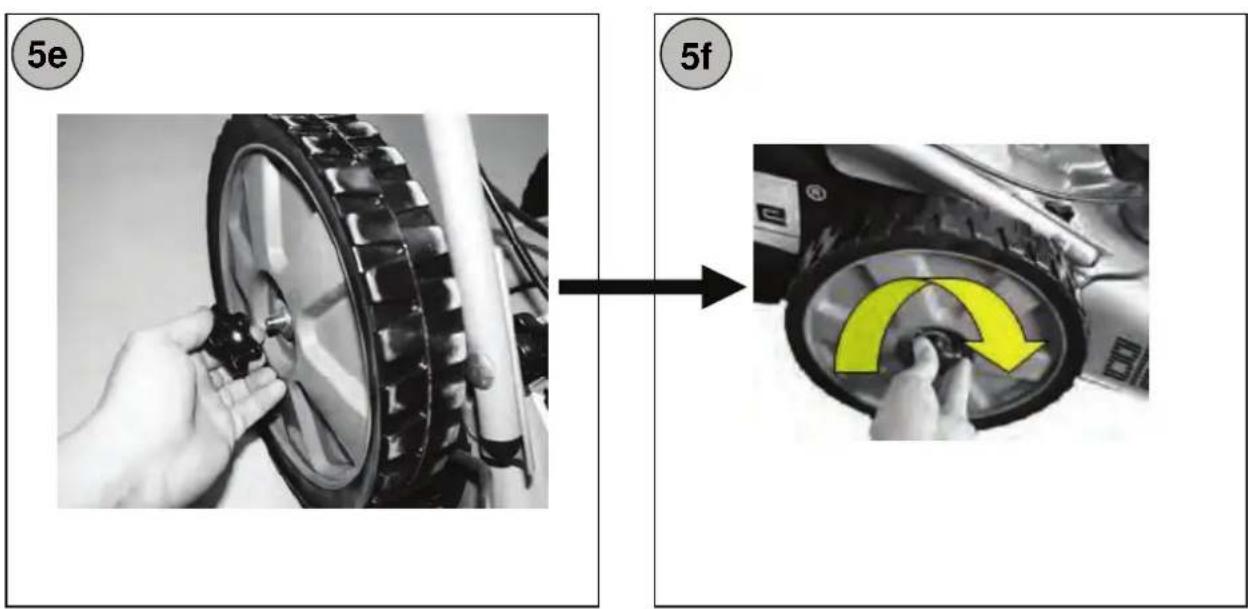
text_image
5e 5fDE

natural_image
Illustration of a lawn mower with motion arrows indicating cycle (no text or symbols)Betrieb
text_image
Diagram showing a mechanical or electrical component with numbered parts and directional arrows indicating motion or force.
natural_image
Hand inserting a component into a car compartment (no text or symbols visible)Achtung!!!
text_image
Technical diagram of a mechanical assembly with labeled parts and a hand symbol indicating support or hazard.natural_image
Illustration of a lawn mower with a handle and blade, showing motion arrows (no text or symbols)Müködés
natural_image
Hand inserting a component into a device (no text or symbols visible)Vigyázz!!!
text_image
Technical diagram of a mechanical assembly with labeled components and a hand symbol indicating safety or hazard.natural_image
Illustration of a lawn mower with a handle and blade, showing motion arrows (no text or symbols)Provoz
natural_image
Hand holding a small object inside a vehicle's door panel (no text or symbols visible)Pozor!!!
text_image
Technical diagram of a mechanical assembly with labeled components and a hand icon indicating safety.natural_image
Illustration of a lawn mower with a handle and blade, showing motion arrows (no text or symbols)Prevádzka
natural_image
Hand inserting a component into a door handle (no text or symbols visible)Pozor!!!
text_image
Technical diagram of a mechanical assembly with labeled parts and a hand gesture icon- WAARSCHUWING: Benzine is licht ontvlambaar:
text_image
Diagram showing a mechanical or structural component with numbered parts and directional arrows indicating motion or force.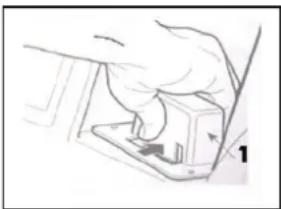
natural_image
Hand inserting a component into a device (no text or symbols visible)Let op!!!
natural_image
Technical line drawing of a mechanical assembly with no visible text or symbols| GB | Please read carefully these operating instructions before putting the machine into operation. |
| A.V. 2 |
| Reprints, even partial, are subject to approval. Technical changes reserved. |
| GB | Do you have any technical questions? Any claim? Do you need any spare parts or operating instructions? We will quickly help you and without needles bureaucracy at our web pages atwww.guede.comin the Servicing part. Please help us be able to help you. In order to identify your device in case of claim we need the serial No., product No. and year of production. All this data can be found on the type label. Please enter it here for future reference: | ||
| Serial No: Product No: Year of production: | |||
| Tel.: +49 (0) 79 04 / 700-360 | Fax: +49 (0) 79 04 / 700-51999 | E-Mail: support@ts.guede.com | |
Marking:

B1: Before any use read carefully and follow the user manual and safety precautions.
B2: Risk of any objects to be thrown by the machine if engine is running - Keep away yourself from danger area.
B3: Keep safe distance from blade of Lawnmower when engine is running.
B4: Explosion hazard – Fill fuel tank only when engine is stop.
B5: Emission of toxic gas – Do not use equipment in a close area.
B6: Use ear protection and safety glasses.
B7: Stop the engine and pull spark plug out before carrying out any repairs, maintenance and cleaning.
B8: CAUTION - hot surface - risk of scorching
Please note the separate

text_image
BRIGGS&STRATTON engine manual!!!Product safety:
 | |
| Product corresponds to appropriate norms of the European Community. |
Environment protection:
 | |
| Do not throw waste to environment but dispose it properly. | Packing cardboard material may be delivered to collecting centres designed thereto. |
 | |
| Any damaged or liquidated electric or electronic devices must be delivered to appropriate collection centre. |
Package:
 |  | ||
| Protect against humidity This side up | |||
Technical data:
 |  | ||
| Engine | Speed | ||
 |  | ||
| Cutting width Weight | |||
| Technical Specifications of Lawnmower BIG WHEELER 560 Mega B&S #95125: | |
| Engine: 4,8 kW/6,5 PS (max. | 3600 rr/ min ^1 ) |
| Capacity: 161 ccm | |
| Max. number of rotation of idled engine: | 2950 r/min |
| Cut: 550 mm | |
| Grass catcher volume: 60 l | |
| 6 options of cutting high levels: | 25-75 mm |
| Sound LWA: 98 dB | |
| Weight: 39 kg | |
| Proportions: 1150 x 580 x 1000 mm | |
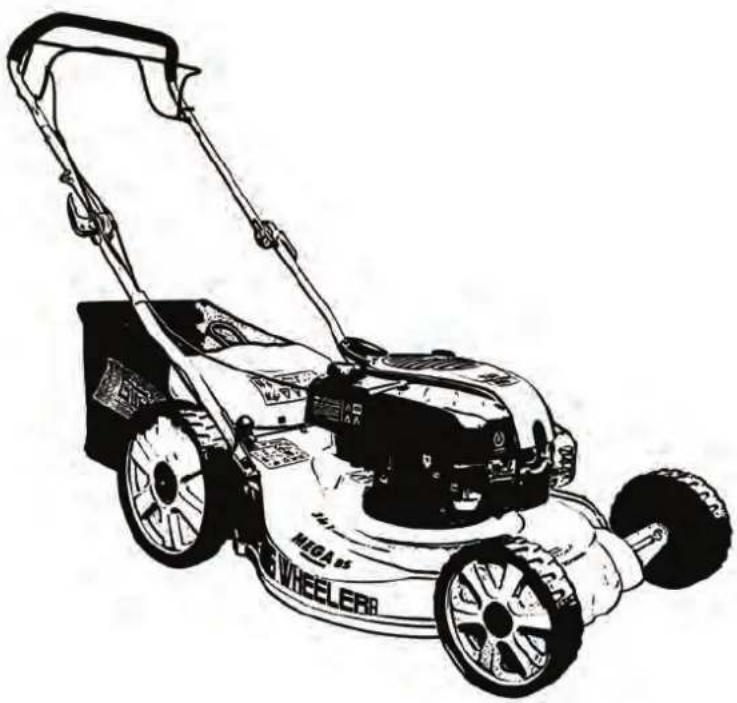
Delivery and device description
- Extension handle
- Quick-clamping lever
- Air filter
- Spark plug
- Outlet/noise silencer
- Throat for oil adding
- Height adjustment lever
- Grass catcher
- Reverse starter
- Type label
- Operation lever (lever for automatic stopping)
- Drive lever
- Throttle
- Water connector
GB EC Declaration of Conformity
Wolpertshausen, Germany, hereby declare the conception and construction of the below-mentioned devices correspond - at the type of construction being launched - to appropriate basic safety and hygienic requirements of EC Directives. In case of any change to devices not discussed with us the Declaration expires.
Marking of devices: BIG WHEELER 560 Mega B&S
product No.: 95125
Date/producer signature: 18.03.2009
Data on Signatory:

Mr Arnold, executive officer
Appropriate EC Directives:
98/37/EG
2000/14/EG 2005/88/EG
97/68/EG 2002/88/EG
2004/108/EG
Harmonised standards used:
EN 836:1997+A1+A2+A3+AC
EN 14982:1998
Type Approval no.:
e11*97/68SA*2004/26*0385*02
Certification body:
TÜV Rheinland Product Safety GmbH, Am Grauen Stein,
D-51105 Köln
Reference No.:
15029420 001
Guarantee
Guarantee claims as per guarantee card attached.
General Safety Instructions
Caution
IMPORTANT: The lawn mower may amputate toes and fingers and throw away items. Failing to observe
the below-mentioned rules may lead to serious injuries.
WARNING: Always disconnect the spark plug cable to prevent unintentional device starting at adjustment, transportation or maintenance
WARNING: Exhaust gases and their various components contain or, more precisely, emit chemicals functioning as carcinogenic agents may damage the foetus or bring infertility.
WARNING: The silencer and other engine parts may become very hot in the working condition and remain hot even after engine turning off. Do not touch these parts to prevent from getting burnt.
WARNING! The knife still rotates for a few seconds after the engine is switched off. If you want to leave the mower laying unattended then disconnect the spark plug cap.
- Read these instructions thoroughly. Familiarise with its operating elements and correct using.
- Keep your hands and legs in safe distance from rotating parts. Keep safe distance from the machine exhaust. Caution: do not touch the rotary parts of the machine.
- The device should only be operated by responsible persons that have familiarised themselves with the operating instructions.
- Carefully search the area on which the device is to be used. Remove all items the mower could throw away while working.
- Do not use the mower if any persons (especially children) or animals, are around.
- Wear stable boots and long trousers when cutting. Never operate the device bootless or in sandals.
- If it is not necessary, do not pull the mower backwards. Look down and backwards while moving backwards.
- Do not operate the mower with any damaged safety equipment, e.g. ejection flap or grass catcher.
- Use accessories allowed by the producer only.
- When passing any gravel road or non-solidified road cut off the knife.
-
Switch the engine off and disconnect the spark plug,
- before releasing any blocked parts or cleaning the clogged ejection channel
-
before check, cleaning and various works on the mower
o after any foreign body has been caught by the mower. Check whether the mower is not damaged and remove any damage before restarting the device. -
if there are any extra strong vibrations of the mower (immediate checking)
-
Switch off the engine before taking the grass catcher out and wait until the knife fully stops.
- Cut in daylight or with suitable lighting only.
- Do not operate the device when impaired or intoxicated.
- Never operate the device in wet grass. Pay attention to where you put your legs and hold the guide handle firmly. Guide the mower step by step.
- Release the clutch for wheel drive before starting the engine.
- Replace any faulty absorbers.
- Always wear protective glasses when operating the mower.
- Remove all obstacles, e.g. stones and branches.
- Check the terrain for unevenness, there may be obstructions hidden in high grass.
- Do not cut near ditches and slopes. You may lose your stability and balance.
- Do not use the device on a very steep terrain.
- Realise the operator, or, more precisely, the user is responsible for any injuries or threat of persons and things.
- Be watchful and switch the device immediately off if there are children around.
- Be watchful and switch the device immediately off if there are children around.
- Never let persons not familiarised with these instructions work with the mower. The operator's age can be limited by local regulations.
• WARNING — petrol is highly flammable.
- Store the fuel in containers designed for that purpose.
- Add fuel outdoor only, do not smoke when adding fuel.
- Add fuel before device starting. Never take the cover out and do not add fuel when the engine is running or hot.
- If you spill the petrol do not try to start the device. Take the device away and prevent generation of a flammable source around the spilled petrol.
- Secure the petrol tank is closed safely.
- Always check whether the knife, knife bolts and cutting equipment are not damaged or worn before using the mower. Always replace any damaged and worn knives and bolts in the entire set to prevent device unbalance. Do not make any alterations to the safety device. Regularly check their proper functioning.
- Keep the device clean, with no grass, leaves or other impurities. Always wipe any oil or petrol run out. Let the mower cool down before storing to closed spaces.
- Be especially careful when changing direction on a slope.
- Never adjust the height of wheels when the engine is running.
- The grass catching device may lose its functioning any throw away items due to wear or damage. Regularly check the mower parts and, if necessary, replace them with spare parts recommended by the manufacturer.
- The mower knife is very sharp. Risk of injury! Be especially careful at knife maintaining, wear protective gloves or cover the knife-edges.
- Do not change the basic engine adjustment and avoid its overloading.
- Be especially watchful when turning the mower or pulling it towards your body.
- If it is necessary to incline or lift the mower to pass a surface other than grass or when carrying the mower to or from the area to be cut then cut off the knife.
- Release the knives and engine clutches before switching on.
- Start the engine in accordance with the operating instructions and make sure your legs are in safe distance from the knife.
- Do not incline the mower at starting except for cases when it is necessary. Do not incline the mower more than necessary in such a case and always lift the part reversed from you.
- Do not start the engine when standing in front of the ejection outlet.
- Never lift and transfer the mower with engine running.
- Lower the brake adjustment when the engine is off. If the engine is equipped with a stop valve then close the petrol supply after cutting.
- Move slowly if using an auxiliary trail seat.
ASSEMBLY / PREPARATION
All assembly and/or maintenance works may be performed only when the motor is turned off!
Please read the entire operating instructions before assembling or starting your new mower.
IMPORTANT: The mower is supplied without oil and petrol.
UNPACK THE MOWER
Take the mower out of the board and check whether there are any free parts left there.
Wheel assembly (Fig. 5 a-f)
Install wheel at the lawn mower according to figures 5 a-f.
⚠️Pay attention to proper order of spacer disc at both sides (fig. 5d)
⚠️Pay attention to that star-shaped screws are tightened firmly enough (self-locking.
Assembly of collecting bag (Fig. 2) (Fig. 3) (Fig. 4)
- Take the collecting bag, corresponding frame and plastic insert out of the package. (Fig. 2)
- Put the frame into the collecting bag while paying attention to that the coupling at the frame is outside the collecting bag. (Fig. 3)
- Now fix the collecting bag at the frame. (Fig. 4)
Assembly - Handle
IMPORTANT: Disassemble the handle with care to prevent clamping or damage of the cables.
- Lift the handle until it snaps in the working position.
- Remove the protection sleeve, lift the upper parts of the handle and assemble it with the bottom part. Tighten the safety bolts on both sides of the handle.
- Remove the protection sleeve of the operation grab handle in the upper part.

natural_image
Illustration of a lawn mower with motion arrows indicating cycle (no text or symbols)Operation
Operation lever (for automatic stopping) (12) – press the lever towards the handle when starting. If you want to switch the engine off release the lever.
Drive lever (13) - used when you want the mower to be moving forward.

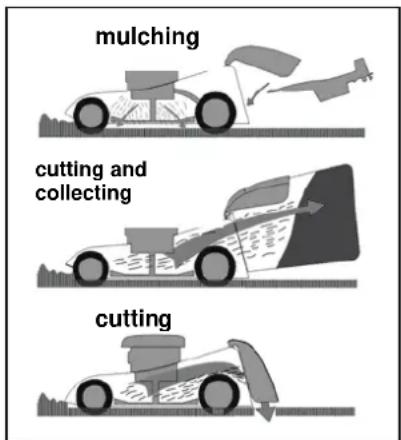
- Cutting (without grass catcher)
The cut grass is laid in strips.
- Cutting and collecting
The grass is collected to the grass catcher (if the grass is damp or wet it reduces the catcher capacity). If you want to mount the catcher to the mower lift the cover plate and hang the grass catcher.
3. Mulching
When the mulching wedge is inserted (see the picture and "Changeover to mulching" article) the grass is not thrown up but ground by the cutting knives and the grass will remain as surface fertilisation on the lawn
text_image
mulching cutting and collecting cuttingChangeover to mulching
- Assembly and disassembly of accessories must always take place when the engine is switched off.
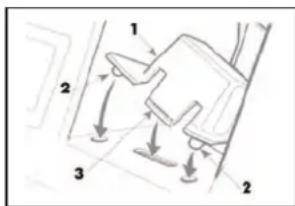
- Remove the grass catcher, insert the mulching wedge to the ejection channel and lock the mulching wedge (1) point it against two outlets (2) in the bottom part and ensure it with a self-securing hook (3).
- Please make sure the mulching wedge is mounted firmly after the changeover.
- Attention!!! Use original equipment from the producer only.
5. Disassembly
Press with thumb in the middle (3) then release and deflect the mulching wedge downwards.
text_image
Diagram showing a mechanical or structural component with numbered parts and directional arrows indicating motion or force.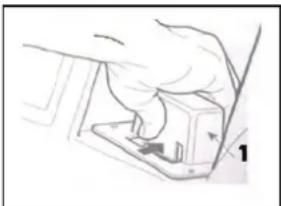
natural_image
Hand inserting a component into a device (no text or symbols visible)Attention!!!
If the mower is blocked during mulching reduce the travelling speed so that the knife could continue in grinding the grass and spread it on the lawn. Never remove the gathered grass with your hands.
DRIVE CONTROL
The self-propelling travel is controlled as follows: Press the operation lever (lever for automatic stopping) (12) towards the handle and simultaneously press the drive lever towards the handle (13).
The forward movement is stopped by releasing the drive lever (13).
CUTTING HEIGHT ADJUSTMENT
Depending on the cutting height required it is necessary to adjust the height of wheels. Adjust the height with the lever (8) as you wish. The middle position is most suitable at most mowers.
Important tips and advice for grass cutting!!!
- Under certain conditions, e.g. when the grass is very high, it may be necessary to adjust bigger cutting height so that effort at pushing the mower was reduced, engine overloading removed and blocking of grass in the mower prevented. It is possible you will also have to reduce the mower travel speed and/or cut the area again.
- If cutting is very difficult it may be suitable to reduce the travel speed and mower gear.
- Vent ports in the grass catcher may get blocked if the catcher is not cleaned regularly. Clean the grass catcher regularly with water and let it dry before use.
- Keep the upper part of the engine in the starter place clean. Air flow will be improved and engine life increased by doing so.
- Cut in dry weather only.
• Always keep the knives sharp.
MAINTENANCE
IMPORTANT – Regular maintenance is unavoidable for constant operational reliability and keeping the original device output.
1) Keep all screws and nuts tightened so that you were sure the device is in an operation-reliable condition. Regular maintenance is necessary for safety and trouble-free operation.
2) Never store the device with fuel in closed rooms as the evaporating fuel may ignite.
3) It is necessary to let the device cool down and empty fuel from it before storing in closed rooms.
4) In order to minimise the risk of fire keep the engine and muffler and the fuel tank clean and with no grass, leaves and fats. Do not store the grass cut with the mower.
5) For safety reasons, avoid using a device with a worn or damaged parts. Replace any faulty parts with new ones, do not repair them. Use original spare parts and original spare knives only.
Parts with quality different from the one prescribed may damage the device and threaten your safety.
6) If it is necessary to empty the fuel tank do it outside and with cold engine.
7) Wear solid protective gloves at assembly and adjustment of knives.
8) Check correct direction of rotating and balance of knives after sharpening.
9) Regularly check wear and pollution of the self-closing cover and grass catcher.
10) When you must transport the device, carry it in hands or incline it always wear safety gloves.
Always hold the device at places guaranteeing safe holding. Take into account the weight of the device and its distribution.
ČLEANING
Clean the device with water, remove the grass and mud from inside before each use – it will prevent from impurities getting dry and problems at next starting.
The painting inside the housing may wear down in the course of time. In order to prevent later corrosion of the device use anti-corrosive paint for the worn-down spots.
Equipment is provided by water quick acting coupling, compatible with Gardena system enables easier cleaning. To easy and thoroughly equipment cleaning join water supply and according the level of deposits let lawnmower run about 30 seconds.
Remove the gearbox cover and clean the space around belt pulleys and drive belts with a brush or compressed air once or twice a year.
You should clean the inside of the drive wheels once per season. Disassemble both wheels. Clean the cog wheels and their edges off the grass and other impurities with compressed air or a brush.
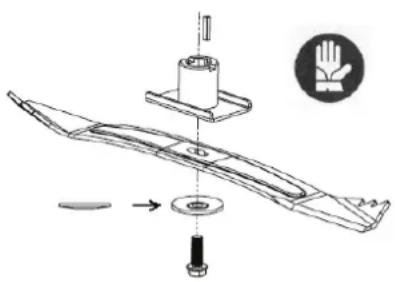
KNIFE DISASSEMBLY
For purpose of cleaning / sharpening / replacement
Attention!!! It is necessary to first disconnect the spark plug before disassembly.
Release the screw at disassembly of the knives.
natural_image
Technical diagram of a mechanical assembly with labeled parts and a hand symbol (no text or labels present)Re-assemble according to the picture. Tighten the screws. Torsion moment of 40 Nm. You should also replace the screw at replacement of knives.
STORAGE
The petrol must not remain in the fuel tank for more than 1 month. Regularly clean the mower and store it to a dry, closed room.
ENVIRONMENT
You should pay special attention to the following points for environment protection:
• Always use clean unleaded petrol.
• Always use a funnel and/or can with level regulation to prevent fuel spilling while refuelling.
- Do not fill the fuel tank up to the edge.
- Do not let the engine oil overflow.
- At changing the oil, make sure the oil used will be disposed in accordance with the regulations. Prevent oil spilling.
- Do not throw the oil filters to the municipal waste but deliver them to appropriate collection centre.
- Replace the absorber if faulty. Use original spare parts at repairs.
• Always have the carburettor adjusted by a specialist.
• Always clean the filter according to appropriate instructions.
- We recommend returning the mower after mower life expiry to the seller to ensure its disposal in accordance with regulations. Regularly check the level of wear and technical state of the mower.
MAINTENANCE
Original spare parts will be supplied by your seller or our service department. We recommend annual maintenance and check of safety elements being executed at an authorised shop. Please contact your seller for issues of maintenance and acquisition of spare parts.
FAILURE DIAGNOSTICS
| ENGINE DOES NOT START | Possible reason Correction | |
| 1.Fuel check Lack of fuel Fuel | to be added | |
| Wrong fuel, machine storing without petrol tank emptying, wrong type of petrol. | Fuel tank and carburettor to be emptied. Fresh petrol to be added. | |
| 2. Spark plug check | Wrong, dirty or poorly adjusted spark plug | Spark plug to be replaced (P-8). |
| Spark plug is wet from petrol (blocked engine). | Spark plug to be dried and re-fitted. | |
| 3. Have the engine repaired at the seller or use the operating instructions for reference. | Blocked fuel filter, wrong carburettor or sparking adjustment, sticky valves, etc. | Replace or (if necessary) repair the faulty parts. |
| 4. Faulty forward movement | Stroke too long | Stroke setting to be changed |
| 5. Grass is not collected Blocked channel, full grass catcher, grass is too wet | Ejection to be cleaned, grass catcher to be emptied, cutting in dry weather. | |
FR
Directives CE applicables :
98/37/EG
2000/14/EG 2005/88/EG
97/68/EG 2002/88/EG
2004/108/EG
Type Approval No.
e11*97/68SA*2004/26*0385*02
natural_image
Illustration of a lawn mower with motion arrows indicating cycle (no text or symbols)Fonctionnement
natural_image
Hand turning a car door panel with a tool, no visible text or symbolsAttention !!!