
MSM1033 - Saw Ferm - Free user manual and instructions
Find the device manual for free MSM1033 Ferm in PDF.

| Product type | Bench circular saw / compound miter saw |
| Brand | Ferm |
| Model | MSM1033 |
| Supply voltage | 230 V~ |
| Rated power | 1300 W |
| Protection class | II (double insulation) |
| No-load speed | 5000 rpm |
| Blade dimensions | 210 x 30 x 2.6 mm |
| Miter cutting angle | 45° (left and right) |
| Bevel angle | 45° (left only) |
| Sawing capacity (bench saw) | 30 mm |
| Cross-cutting capacity (miter 0°, bevel 0°) | 120 x 60 mm |
| Weight | 11.2 kg |
| Sound pressure level | 94.2 ± 3 dB(A) |
| Sound power level | 107.2 ± 3 dB(A) |
| Vibration level | < 2.5 m/s² |
| Package contents | Saw, dust bag, parallel guide, flange wrench, socket wrench, Allen key, push stick, manual, safety instructions, warranty card |
| Main functions | Bench sawing (rip cuts) and cross-cutting (cross cuts, miters, bevels) |
| Safety | Upper and lower blade guard, riving knife, emergency stop, safety switch, overload protection (fuse) |
| Maintenance and cleaning | Clean with a damp cloth, do not use solvents, lubrication not required |
| Spare parts and repairability | Exploded view on the back of the manual, contact Ferm dealer for parts |
| General information | Stationary machine, to be installed on workbench or stand, dust extraction recommended |
Frequently Asked Questions - MSM1033 Ferm
User questions about MSM1033 Ferm
0 question about this device. Answer the ones you know or ask your own.
Ask a new question about this device
Download the instructions for your Saw in PDF format for free! Find your manual MSM1033 - Ferm and take your electronic device back in hand. On this page are published all the documents necessary for the use of your device. MSM1033 by Ferm.
USER MANUAL MSM1033 Ferm
natural_image
Mechanical device with a metallic frame and orange clamping mechanism against a textured wall (no visible text or symbols)EN Original instructions 05
DE Übersetzung der Originalbetriebsanleitung 12
NL Vertaling van de oorspronkelijke gebruiksaanwijzing 21
FR Traduction de la notice originale 29
ES Traducción del manual original 37
HU Eredeti használati utasítás fordítása 45


natural_image
Technical line drawing of a mechanical component with no visible text or symbols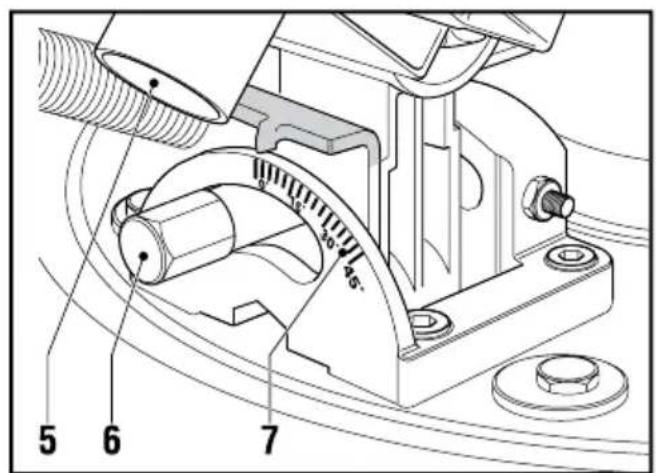
Fig. 1


natural_image
Technical diagram of a mechanical assembly with chains and bolts, labeled as Fig. 6 (no text or symbols on the diagram itself)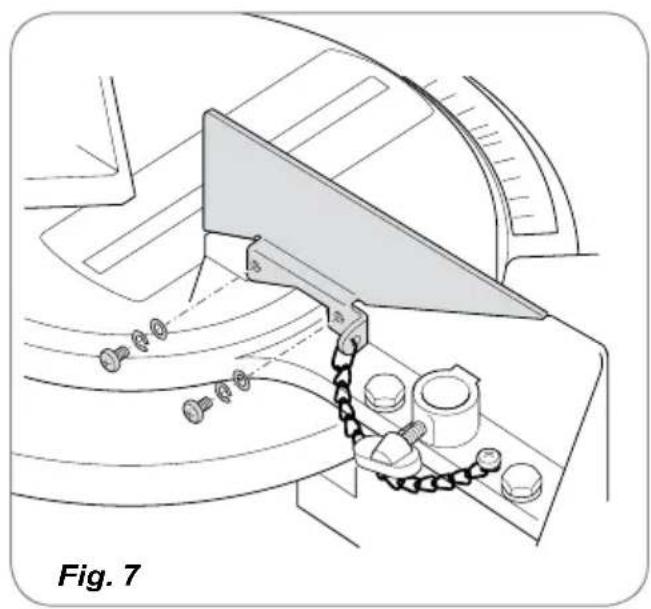
natural_image
Technical diagram of a mechanical device with chains and bolts, labeled Fig. 7 (no text or symbols on the diagram itself)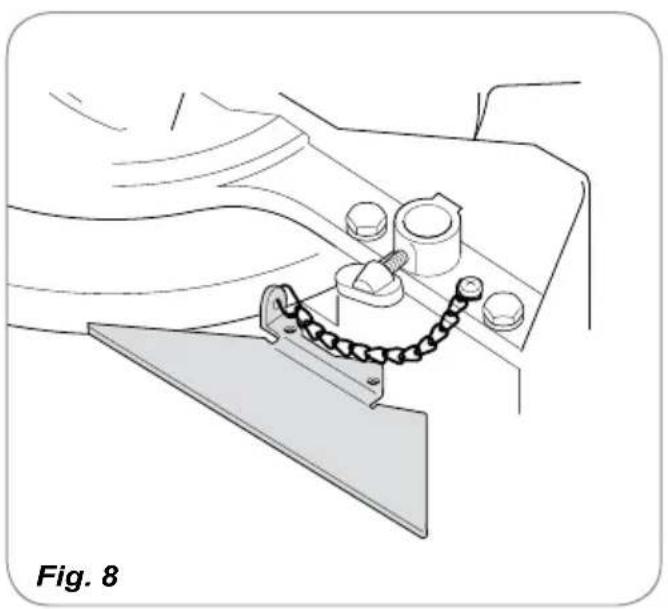
natural_image
Technical line drawing of a mechanical assembly with a chain and nut, labeled Fig. 8 (no text or symbols on the diagram itself)TABLE SAW / MITRE SAW
The numbers in the following text correspond with the pictures at page 2 - 4

Before using the machine, thoroughly read these instructions for use. Make sure that you know how the machine works and how to operate it. Maintain the machine according to the instructions and make sure that it works properly. Keep these instructions for use and the other documentation with the machine.
Contents
- Machine information
- Safety
- Mounting accessories
- Operating
- Service and Maintenance
1. Machine information
Introduction
The bench saw – mitre saw is for sawing wood and woody pieces of work.
Specifications
| Voltage 230 V ~ | |
| Capacity 1300 W | |
| Machine class II (double insulated) | |
| Revolutions, not under load 5000 rpm | |
| Saw blade measurement 210 x 30 x 2.6mm | |
| Angle for mitring 45° (left and right) | |
| Angle for bevelling 45° (only left) | |
| Table saw maximum | |
| sawing capacity 30 mm | |
| Mitre saw maximum | |
| sawing capacity:| | |
| - Mitre 0°, Bevel 0° 120 x 60mm | |
| - Mitre 45°, Bevel 45° 90 x 40mm | |
| - Mitre 45°, Bevel 0° 90 x 60mm | |
| - Mitre 0°, Bevel 45° 120 x 40mm | |
| Weight 11.2 kg | |
| Lpa (sound pressure) 94.2+3 dB(A) | |
| Lwa (acoustic capacity) | 107.2+3 dB(A) |
| Vibration level | <2.5 m/s ^2 |
Vibration level
The vibration emission level stated in this instruction manual has been measured in accordance with a standardised test given in EN 61029; it may be used to compare one tool with another and as a preliminary assessment of exposure to vibration when using the tool for the
applications mentioned
• using the tool for different applications, or with different or poorly maintained accessories, may significantly increase the exposure level
- the times when the tool is switched off or when it is running but not actually doing the job, may significantly reduce the exposure level
Protect yourself against the effects of vibration by maintaining the tool and its accessories, keeping your hands warm, and organizing your work patterns.
Contents of the packaging
1 Table saw / mitre saw
1 Dust bag
1 Parallel guide
1 Flange key for changing the saw blade
1 Socket spanner
1 Allen key
1 Stick for pushing the work
1 Instructions for use
1 Safety instructions
1 Guarantee card
Part names
Figs. 1 to 4
- On/off switch (cross-cut saw)
- Operating handgrip
- Unlocking button
- Upper bench surface locking screw
- Dust bag connection
- Rotary knob for bevelling
- Scale for bevelling
- Locking knob
- Locking knob for setting the mitre angle
- Scale for bevelling angle
- Mounting hole
- Mitre saw surface
- Guide stop
- Saw blade protector
- On/off switch (bench saw)
- Lower protective hood
- Guide
- Upper bench surface
- Upper saw blade protector
- Riving knife
- Flange
- Saw blade
- Saw blade bolt
- Bench inlay
- Degree arc
- Clamp screws
-
Flange key
-
Box spanner
- Allen key
- Dust bag
- Fuse box
Check the machine, loose parts and accessories for any transport damage.
2. Safety
Symbols and meanings
The following symbols are used in these instructions for use and on the machine:

Class II machine – Double insulation – You don't need any earthed plug.

Denotes risk of personal injury, loss of life or damage to the tool in case of non-observance of the instructions in this manual.

Indicates electrical shock hazard.

Immediately unplug the plug from the mains electricity in the case that the cord gets damaged and during maintenance
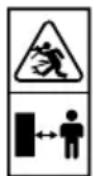
Keep bystanders away

Wear ear and eye protection

Faulty and/or discarded electrical or electronic apparatus have to be collected at the appropriate recycling locations.
Specific safety rules for table saws / mitre saws
- The user of the machine must be instructed in the use, adjustment and operation of the machine,
• Make sure of a well-lit and clean and tidy
working area.
- Never use saw blades that are bent, distorted or in any other way damaged.
• Never use saw blades of HSS steel. - Never use saw blades that do not meet the specifications stated in these instructions for use.
- Never use adapters to mount saw blades with to large an axle hole.
- Never saw any material other than wood, woody material, aluminium and plastics.
- Never remove the protective hood. Make sure that the saw blade is correctly protected by the protective hood.
- Check that all movable protective parts do not stick.
- Never saw work pieces in which there are nails or other metal objects.
- Never switch the machine on when the piece of work is touching the saw blade.
- Do not start sawing until the machine is running at full revolutions.
- Make sure that the piece of work is clamped down. Never try to saw pieces of work that are too small.
- Never try to slow down the saw blade by applying counter pressure to the side of the blade.
- Never leave the machine unattended before you have switched it off and the saw blade has stopped rotating.
- Never try to saw round pieces of work with the bench circular saw.
- Never remove the riving knife from the table saw. The distance between the saw blade and the riving knife must not be more than 5 mm maximum.
• Make sure that dust vacuuming works properly while working, in connection with the danger to health caused by breathing in the dust being produced. - With the table saw always use a wooden stick to move the work piece along the saw blade.
- When using the mitre saw, always make sure that the saw blade is fully protected by the protective hood.
- When using the table saw, always make sure that the upper bench surface is fixed properly.
• Take the plug out of the socket when you are carrying out maintenance of the machine. The same goes for assembly or setting up. - Do not use the machine before you have assembled and installed it completely as described in these instructions for use.
- When you have finished using the machine, take the plug out of the socket and clean the bench.
Additional safety instructions
- When using the saw blades with hard metal teeth (Carbon tipped) it is advisable to use blades with a negative or slightly positive cutting angle. Do not use any saw blades with deeply cut teeth. They can grip the protective cap.
- Attention: First carefully assemble all the parts before starting work. Follow the procedure as indicated.
- If you are not familiar with using such a machine, you would be better to be informed first by a professional, an instructor or by a technician.
- Always clamp or press the workpiece firmly against the saw guide, before you carry out the process. The use of all possible clamping set-ups is preferable to using your hands.
- Important: If you are holding the workpiece by hand for the process to be carried out, keep a minimum distance of 100 mm from the saw blade.
- Always press the workpiece against the bench.
- Keep the saw blade sharp and check regularly whether it rotates freely without abnormal vibrations. Replace the saw blade if necessary.
- Allow the machine to rotate freely until it reaches the maximum number of revolutions, before you start the process.
- Maintain the air inlets at the back and the bottom of the bench saw machine and electric engine for a longer machine life. Dust piles must be removed.
- Always lock the different degree set-ups before you start processing.
- Only buy suitable saw blades with a number of revolutions of at least 4500 revolutions per minute.
- Only use the correct saw blade. Too small or too big saw blades are extremely dangerous.
- Regularly inspect the saw blade for any faults. Replace the saw blade if necessary.
- Grease the new saw blade and clean the flanges before you assemble the new blade. Then assemble the blade in the correct direction and pull the flanges firmly using the central bolt.
- Only use original flanges. All other types are
not suitable.
- Never work without the protective cap of the saw blade.
- The moving part of the protective cap must also remain assembled.
- Never grease the saw blade while it is rotating.
- Always keep your hands removed from the track of the saw blades.
- Never pick up the workpiece by grasping with your hands along or behind the saw blade.
- Ensure that the workpiece never touches the saw blade before the machine has been switched on.
- Never process metal or stone sorts with this machine.
- Use support aids in order to support long workpieces.
- Never use the machine in a dangerous environment, where inflammable gases or fluids are present.
- Never leave the machine unattended without first disconnecting it from the mains voltage.
- If you hear abnormal noises, try to trace them or take the machine to a recognized fitter, or repair company.
- If a part is broken or damaged, replace it or repair it immediately.
- Never stand in the track of the saw blade but stand to the left or the right of the saw bench.
- Your hands must likewise be placed next to the track of the saw blade.
- Always use the feedstick to push the wood through the saw.
- Always place the wood at the front of the saw bench and then push it further back.
- For mitring only the adjustable guide must be used and the fence must be removed.
- Never use the fence as a linear measure for cutting off beams.
- If the saw blade is locked: first switch off the machine before you attend to the fault.
- Avoid workpieces hitting back in your direction by taking the following measures:
• Always use sharp saw blades.
• Do not saw too small workpieces. - Never release the workpiece before it has been completely pushed through the saw.
- Always adjust the guide parallel to the saw blade.
• Never remove the saw protection. - Before you continue sawing, ensure that you are standing firmly and that your hands are in the required position.
- Never use thinners to clean the machine. Only
use a damp cloth for cleaning.
-
Do not use saw blades which are damaged or deformed.
-
Replace table insert when worn.
-
Use only saw blades recommended by the manufacturer.
-
Take care that the selection of the saw blade depends on the material to be cut.
-
Connect circular saws to a dust-collecting device when sawing.
-
Use and correct adjustment of the riving knife
-
Use and correct adjustment of the upper saw blade guard.
45 The dust that is emitted when sawing certain types of wood can be toxic, i.s. oak, birch, ash, beech and fibreboard. Certain dust, from tropical wood types such as rosewood, coco bolo and afzelia, cause cancer when breathed in regularly. Ensure therefore that you have good dust suction installed with a device that fulfils the following requirements:
- Tube must fit perfectly on the connection element
- Suction volume must be larger than 550 m3 per hour
• Vacuum at connection more than 740 Pa
• Air speed at connection more than 20 meters/second
Ensure that the least possible wood dust is released in the atmosphere. WIPE wood dust away (do not blow away with pressured air), repair leaks in the tubes and ensure appropriate ventilation.
Do not use saw blades which are damaged or deformed.
Always clamp or press the workpiece firmly against the saw guide, before you carry out the process.
Do not modify the machine; unauthorised parts have not been tested and approved.
Mainly use:
• No unauthorised saw blades
• No unauthorised safety systems 7
• Always use the supplied safety systems!
• Always use a cavity blade for scalloping.
46 Wear ear protectors. The following facors can be of influence in producing noise
• The kind of material to be cut
- The sawblade
• The force of which the workpiece is fed

Loud noise can lead to hearing damage. Ensure that you wear ear protectors. Ensure that the cavity blade is not bent,
this can also cause noise.
47 Residual risks
The following risks are inherent to the use of these machines:
• Injuries caused by touching the rotating parts
• Injuries caused by disruption of the cutting blade
• These risks are most evident:
• Within the range of operation
- Within the range of the rotating machine parts In spite of the application of the relevant safety regulations and the implementation of safety devices, certain residual risks cannot be avoided. These are:
• Impairment of hearing.
- Risk of accidents caused by the uncovered parts of the rotating cutting blade.
• Risk of injury when changing the blade.
- Risk of squeezing fingers when opening the guards.
3. Assembly and accessories
Installation of the mitre saw
- Place one extension piece on the right-hand side of the machine and the other extension piece on the left-hand side of the machine.
- Loosen the locking bolts and slide the guide rods in the openings.
• Tighten the locking bolts again. - Place the work piece clamp on the left or right side of the machine.
- Hold the handgrip and move the saw slightly downwards and then pull the pin out slightly so that the machine comes free.
Note: Never use the mitre saw without the extension pieces supplied. Make sure that they are correctly mounted.
Mounting the support bracket.
- Mount the support bracket into the slot in the rear of the base.
- Tighten the screw to secure the support bracket.
Installation of the machine on a workbench or on the subframe.
This machine is a stationary machine and for safety reasons must always be firmly installed and not used for mobile applications.
You can install the machine in two ways:
a. As a stationary machine on a workbench. In this case the machine must be secured to the workbench with 4 bolts.
b. As a stationary machine on the subframe. In this case the machine must be secured to the subframe with 4 bolts and the subframe anchored to the floor or to a floor plate with dimensions of at least 1 square meter.
Figs. 1 to 4

Make sure that the plug is not in the socket when assembling and mounting accessories.
Placement of the machine

Use screws to fix the machine to a sturdy workbench.
- Place the machine on the workbench and draw the positions of the holes on the workbench.
- Drill holes in the marked places of the correct diameter for the screws to be used.
- Put the machine on the workbench, place the screws in the mounting holes (11) and screw the screws tight.
Guide fence insert
For safety reasons, this machine is equipped with a guide fence insert to be used when using the machine for sawing straight cross-cuts.
- For sawing straight cross-cuts, the guide fence insert must remain mounted on the machine (fig. 6).
- For sawing mitre cuts, the guide fence insert must be removed from the machine as shown (fig. 6).
- For sawing bevel cuts, the guide fence insert must be removed from the machine as shown (fig. 7+8).
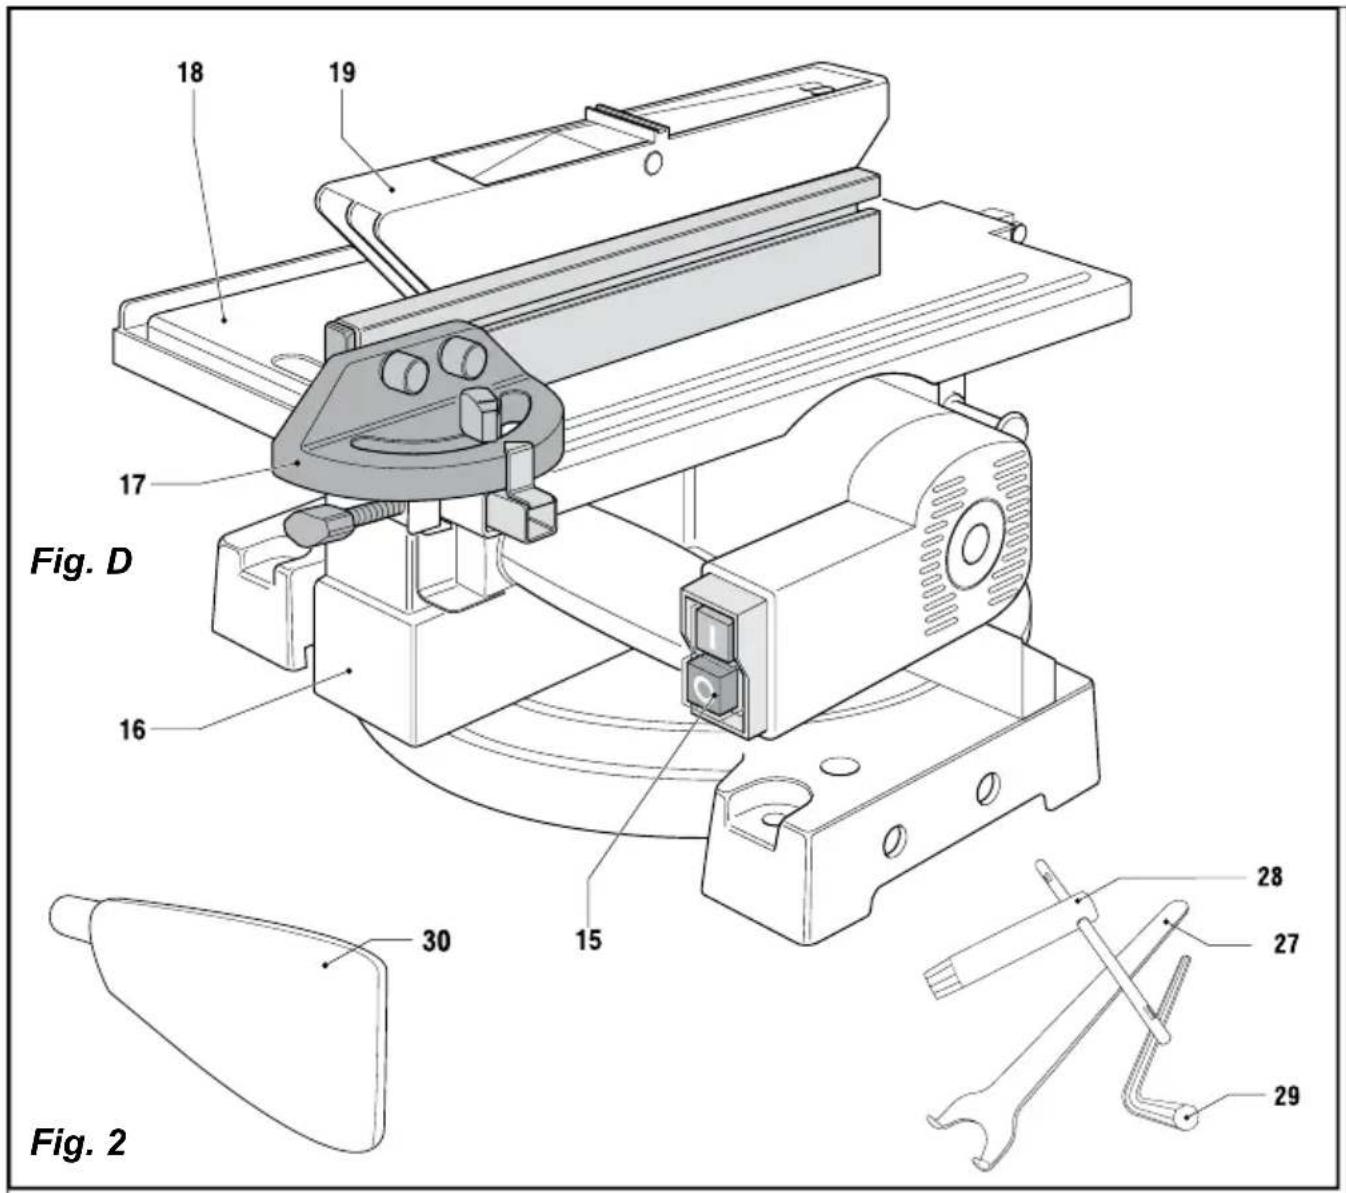
Mounting the dust bag
In connection with the danger to health by breathing in any dust released, you must mount the dust bag (30) on the dust bag connection (5). This also keeps the workplace cleaner longer.
- Press the clamp of the dust bag and slide it over the outlet at the rear of the machine. Let go of the clamp and the dust bag is then fixed
in place.
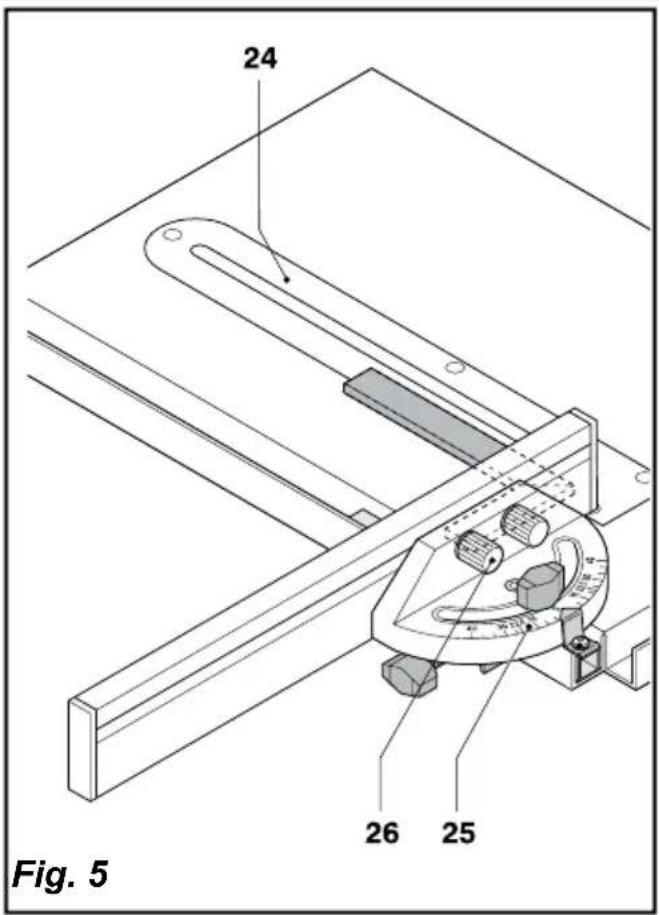
Parallel and mitre guide (table saw)
Fig. 5
The guide is used to guide the piece of work along the saw blade. The guide can be mounted to the left and to the front of the saw blade.
- Slide the guide (17) with the holder into the guide rail of the bench surface.
- Unscrew the setting screw on the degree arc (25).
- Move the guide in the rail to the required place.
- Set the desired angle with the aid of the degree arc (25):
• parallel sawing: adjusting the guide parallel to the saw blade - mitring: setting the guide to the desired angle in relation to the saw blade
- Screw the setting screw tight again.
- With the aid of the clamp screws (26) the guide can be moved lengthwise.
Use of the machine:
Mitre saw or table saw
This combined machine can be used in two ways: mitre saw or table saw. After use the machine must always be left set up as the table saw.
Set-up for use as a mitre saw
- Unscrew the screw (4) that locks the upper bench surface.
- Keep the saw head pushed downwards against the handgrip (2), while you bring the upper bench surface (18) upwards.
- Screw the screw (4) tight again.
- Hold the saw head down with your left hand and pull the lock (8) out with your right hand.
- Gently let the saw head come upwards.
- Remove the lower protective hood (16).
- Put the plug into the socket and test the saw by pressing the switch (1).
Set-up as a table saw
- Place the lower protective hood (16) on the lower bench surface (12) of the cross-cut saw.
- Hold the operating handgrip (2) firmly with your right hand. Press the locking knob (3) with your thumb and bring the saw head downwards. The saw blade is then completely protected by the lower protective hood.
- Lock the lock (8) in place.
- Unscrew the screw (4) two turns.
- Push the upper bench surface gently
downwards and screw the screw (4) tight again.
- Put the plug into the socket and test the saw by pressing the green switch (15).
- Turn off the machine by pressing the red switch (0).
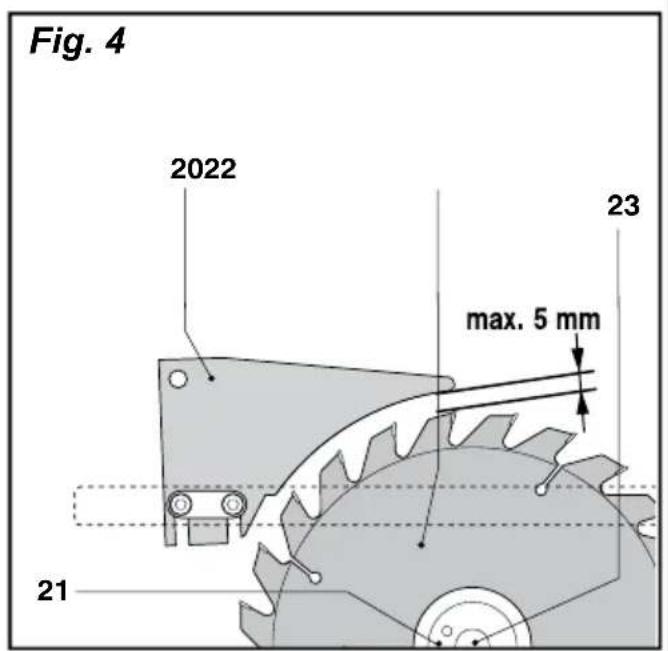
Adjusting the riving knife
Figs. 3 and 4

Make sure that the riving knife is always correctly adjusted. For safety reasons the distance between the riving knife (20) and the teeth of the saw blade must never be more than 5 mm.
- Lift the head of the machine
- Use the Allen key to loosen the two riving knife bolts by unscrewing them two turns.
- Set the riving knife to the correct position.
- Screw the bolts tight again.
Changing the saw blade

Make sure that the plug is not in the socket when changing the saw blade.
- Set the machine to the table saw position.
- Remove the upper protective hood (19) by unscrewing the bolt holding it in place.
- Then remove the riving knife (20) and the bench inlay (24).
- Unscrew the bolt (23) (note: clockwise) with the socket spanner (28). At the same time lock the flange (21) using the flange key (27).
- Remove the bolt and the outer flange.
- Remove the saw blade from the machine via the opening at the top.
- Clean the inner and outer flanges and the axle.
- Mount the inner flange, the new saw blade and the outer flange onto the axle.
Note: the arrow on the saw blade, which shows the direction of turn, must point in the same direction as the arrow marked on the machine.

Make sure that both flanges correctly enclose the saw blade, so that the saw blade turns in a straight line without any sideways movement.
-
Tighten the bolt (23) again (anticlockwise!).
-
Mount the bench inlay, the riving knife (see Adjusting the riving knife), and the upper protective cover.
- Check that the saw blade turns freely (turn it carefully with you hand).
- Put the plug into the socket.
- Before making a saw cut, switch the machine on and draw it downwards to check that all is well.
4. Operating
Using the mitre saw
When cutting the piece of work is placed against the stop and sawed across its breadth.
- Hold the piece of work against the bench and pressed against the guide stop.
- Switch the machine on using the switch (1) in the handgrip.
- Bring the saw head gently downwards, so that the saw blade cuts into the piece of work and goes into the groove in the bench.
- Switch the machine off when the sawing has been done by releasing the switch (1).
- When the saw has come to a standstill, bring the saw head up again.
Using the table saw
Set the guide to the required cut. See Parallel and mitre guide (bench saw)
- Place the piece of work against the guide.
- Switch the machine on using the green switch (15) in the handgrip.
- Hold the piece of work firmly with both hands and pressed against the guide. Feed the piece of work gradually towards the saw blade.

Avoid any injuries. Keep your hands a good distance from the saw blade! Use the stick for pushing small pieces of work.
- Switch the machine off when the sawing has been done with the red switch (15).
Mitring
When mitring the piece of work is sawn at an angle to the furthermost guide.
a. Table saw
The mitring angle is a maximum of 45^ , both left and right.
- Unscrew the two screws (9) for setting up the mitring angle.
- Hold the handgrip (2) firmly and move the turntable to the left or right. The entire saw moves in the direction required.
• Then screw the two screws tight again. - The turntable clicks into place at the following angles: 0^ , 15^ , 22,5^ , 30^ , and 45^ (both left and right).
b. Table Saw
See: Parallel and mitre guide (table saw)
Set the guide for mitre sawing and follow the procedure under 'Using the table saw'.
Bevelling
(Mitre saw/table saw)
When bevelling the piece of work is sawn at an angle to the vertical.
The bevel angle is a maximum of 45^ .
• Unscrew the knob (6).
- Set the required bevel angle using the scale (7).
- Screw the knob tight again.
When double mitring the piece of work is placed against the stop and sawed across its breadth in both mitring and bevelling cutting directions.
- Set the mitring angle.
- Set the bevelling angle.
- Follow the procedure under ‘Using the mitre saw’.

Note: With double mitring the saw blade is more exposed because of the large angle. So there is a greater chance of injury. Keep your hands a good distance from the saw blade!
Problems
The motor does not start
• The plug is not in the socket
• The power cord is broken
- The switch is defective. Take the machine to your Ferm dealer for repair.
The fuse is burnt out:
- Remove the plug from the socket.
- Remove the cap (nr. 31 on Fig.1) from the fuse box with help of a screwdriver
- Check the fuse and replace when necessary. Always replace the fuse by a new one with the same specification.
- Mount the cap on the fuse box again.
The saw cut is not even (jagged)
• The saw blade must be sharpened
• The saw blade is mounted back to front
The saw blade is clogged with resin or sawdust
- The saw blade is not suitable for the piece of work being used
The motor has difficulty in reaching full speed
• The extension cable is too thin and/or too long
• The mains voltage is less than 230 V.
The machine vibrates excessively
• The saw blade is damaged
• The machine is not fixed to the workbench
The machine becomes excessively hot
- The ventilation slots are blocked. Clean them out with a dry cloth.
5. Service and maintenance
Maintenance

Always make sure that the machine is not connected to the mains electricity when you carry out any maintenance of the mechanism.
Ferm machines are designed to function for a long time without any problems with a minimum of maintenance. By cleaning the machine regularly and using it in the correct way you can contribute to a long life of your machine.
Transport
- Check that all locks and tensioning devices are secure.
- Carry the machine with both hands under the lower bench surface when the machine must be moved.
Cleaning
Clean the machine housing regularly with a soft cloth, preferably after each time you use the machine. Make sure that the ventilation slots are free of dust and dirt. For stubborn dirt use a soft cloth dampened with soapy water. Never use solvents such as benzene, alcohol, ammonia, etc. These types of solvents can damage the plastic parts.
Lubrication
The machine does not need any extra lubrication.
Repairs and dealers
If a failure occurs as a result of wear and tear of a part, for example, contact your local Ferm dealer. You can find an exploded view of the parts that can be ordered at the back of these instructions for use.
Environment
To prevent damage during transport the machine is delivered in sturdy packaging. The packaging is made of recyclable material wherever possible. So make use of the possibility of recycling the packaging. When you replace a machine, take the old one to your local Ferm dealer. Here it will be dealt with in an environmentally friendly way.

Faulty and/or discarded electrical or electronic apparatus have to be collected at the appropriate recycling locations.
Guarantee
For the guarantee conditions read the guarantee card at the back of these instructions for use.
La machine surchauffe
No. Description Position
| 105317 Extension piece (x2) 8 | |
| 105318 Table insert set 14 + 90 | |
| 105319 Bottom guard 15 | |
| 105320 Fence 21 | |
| 105321 Saw blade nut 31 | |
| 105322 Flange set 27 + 30 | |
| 105323 Dustbag complete 75 TILL 77 | |
| 105324 Guard 78 TILL 81 | |
| 105326 Guide 94 + 95 | |
| 105327 Angle guide 98 TILL 103 | |
| 105328 Rotor 128 | |
| 105329 Carbon brush set 129 | |
| 105330 Stator 135 | |
| 105331 Carbon brush holder | 139 |
| 105332 Carbon brush cap | 140 |
| 105333 Switch | 149 |

CE
DECLARATION OF CONFORMITY FCMS-210, MITRE-/TABLE SAW
(EN) We declare under our sole responsibility that this product is in conformity and accordance with the following standards and regulations:
(DE) Der Hersteller erklärt eigenverantwortlich, dass dieses Produkt den folgenden Standards und Vorschriften entspricht:
(NL) Wij verklaren onder onze volledige verantwoordelijkheid dat dit product voldoet aan, en in overeenstem ming is met, de volgende standaarden en reguleringen:
(FR) Nous déclarons sous notre seule responsabilité que ce produit est conforme aux standards et directives suivants:
(ES) Declaramos bajo nuestra exclusiva responsabilidad que este producto cumple con las siguientes normas y estándares de funcionamiento:
(PT) Declaramos por nossa total responsabilidade de que este produto está em conformidade e cumpre as normas e regulamentações que se seguem:
(IT) Dichiariamo, sotto la nostra responsabilità, che questo prodotto è conforme alle normative e ai regolamenti seguenti:
(SV) Vi garanterar på eget ansvar att denna produkt uppfyller och följer följande standarder och bestämmelser:
(FI) Vakuutamme yksinomaan omalla vastuullamme, että tämä tuote täyttää seuraavat standardit ja säädökset:
(NO) Vi erklærer under vårt eget ansvar at dette produktet er i samsvar med følgende standarder og regler:
(DA) Vi erklærer under eget ansvar, at dette produkt er i overensstemmelse med følgende standarder og bestemmelser:
(HU) Felelősségünk teljes tudatában kijelentjük, hogy ez a termék teljes mértékben megfelel az alábbi szabványoknak és előírásoknak:
(CS) Na naši vlastní zodpovědnost prohlašujeme, že je tento výrobek v souladu s následujícími standardy a normami:
(SK) Vyhlasujeme na našu výhradnú zodpovednosť, že tento výrobok je v zhode a súlade s nasledujúcimi normami a predpismi:
(SL) S polno odgovornostjo izjavljamo, da je ta izdelek v skladu in da odgovarja naslednjim standardom terpredpisom:
(PL) Deklarujemy na własną odpowiedzialność, że ten produkt spełnia wymogi zawarte w następujących normach i przepisach:
(LT) Prisiimdami visą atsakomybę deklaruojame, kad šis gaminys atitinka žemiau paminėtus standartus arba nuostatus:
(LV) Apgalvojam ar visu atbildību, ka šis produkts ir saskaņā un atbilst sekojošiem standartiem un nolikumiem:
(ET) Deklareerime meie ainuvastutusel, et see toode on vastavuses ja kooskõlas järgmiste standardite ja määrustega:
(RO) Declarăm prin aceasta cu răspunderea deplină că produsul acesta este în conformitate cu următoarele standarde sau directive:
(HR) Izjavljujemo pod vlastitom odgovornoL,šu da je strojem ukladan sa slijedešim standardima ili standardiziranim dokumentima i u skladu sa odredbama:
(SR) Pod punom odgovornošću izjavljujemo da je usaglašen sa sledećim standardima ili normama:
(RU) Под свою ответственность заявляем, что данное изделие соответствует следующим стандартам и нормам:
(UK) На свою власну відповідальність заявляємо, що дане обладнання відповідає наступним стандартам і нормативам:
(EL) Δηλώνουμε υπεύθυνα ότι το προϊόν αυτό συμφωνεί και τηρεί τους παρακάτω κανονισμούς και πρότυπα:
EN55014-1, EN55014-2, EN61000-3-2, EN61000-3-11, EN61029-1, EN61029-2-11 2006/42/EC, 2002/95/EC, 2002/96/EC, 2004/108/EC, 2006/95/EC
Zwolle, 01-07-2010

I.Mönnink CEO Ferm BV
It is our policy to continuously improve our products and we therefore reserve the right to change the product specification without prior notice.
Ferm BV • Lingenstraat 6 • 8028 PM • Zwolle The Netherlands


- TABLE SAW / MITRE SAW
- The numbers in the following text correspond with the pictures at page 2 - 4
- Contents
- Machine information
- Introduction
- Specifications
- Vibration level
- Protect yourself against the effects of vibration by maintaining the tool and its accessories, keeping your hands warm, and organizing your work patterns.
- Contents of the packaging
- Part names
- Figs. 1 to 4
- Safety
- Symbols and meanings
- Specific safety rules for table saws / mitre saws
- Additional safety instructions
- Residual risks
- Assembly and accessories
- Installation of the mitre saw
- Mounting the support bracket.
- Installation of the machine on a workbench or on the subframe.
- You can install the machine in two ways:
- Placement of the machine
- Guide fence insert
- Mounting the dust bag
- Parallel and mitre guide (table saw)
- Fig. 5
- Use of the machine:
- Mitre saw or table saw
- Set-up for use as a mitre saw
- Set-up as a table saw
- Adjusting the riving knife
- Figs. 3 and 4
- Changing the saw blade
- Operating
- Using the mitre saw
- Using the table saw
- Mitring
- a. Table saw
- b. Table Saw
- Bevelling
- (Mitre saw/table saw)
- Problems
- The motor does not start
- The fuse is burnt out:
- The saw cut is not even (jagged)
- The saw blade is clogged with resin or sawdust
- The motor has difficulty in reaching full speed
- The machine vibrates excessively
- The machine becomes excessively hot
- Service and maintenance
- Maintenance
- Transport
- Cleaning
- Lubrication
- Repairs and dealers
- Environment
- Guarantee
- La machine surchauffe
- CE
- DECLARATION OF CONFORMITY FCMS-210, MITRE-/TABLE SAW
Brand : Ferm
Model : MSM1033
Category : Saw