
Xonar D-KARA - Soundcard ASUS - Free user manual and instructions
Find the device manual for free Xonar D-KARA ASUS in PDF.


| Product type | Internal PCI sound card |
| Brand | ASUS |
| Model | Xonar D-KARA |
| Interface | PCI 2.2 or higher |
| Audio channels | 5.1 (with Karaoke function) |
| Input connectors | 1x microphone input (3.5 mm), 1x audio input (3.5 mm) |
| Output connectors | 1x headphone/front output (3.5 mm), 1x side surround output (3.5 mm), 1x center/subwoofer output (3.5 mm), 1x optical S/PDIF output (TOSLINK) |
| Internal connectors | 1x front panel header (9-pin), 1x auxiliary input header (4-pin), 1x S/PDIF output header |
| Signal-to-noise ratio (DAC) | 118 dB |
| Supported operating systems | Windows 7 (32/64-bit), Vista (32/64-bit), XP (32/64-bit), MCE2005 |
| Minimum system requirements | Intel Pentium 1.4 GHz or AMD Athlon 1400, 256 MB RAM, 60 MB hard disk space, CD/DVD-ROM drive |
| Features | High-quality microphone preamp, 118 dB DAC converter, Karaoke support, 5.1 surround sound, optical digital output |
| Included accessories | Support CD (driver and manual), quick start guide, low-profile bracket |
| Power | Powered by PCI slot |
| Care and cleaning | Use a soft, dry cloth to clean the casing. Avoid liquids. See manual for details. |
| Safety | Turn off the computer and unplug the power cable before installing or removing the sound card. |
Frequently Asked Questions - Xonar D-KARA ASUS
User questions about Xonar D-KARA ASUS
0 question about this device. Answer the ones you know or ask your own.
Ask a new question about this device
Download the instructions for your Soundcard in PDF format for free! Find your manual Xonar D-KARA - ASUS and take your electronic device back in hand. On this page are published all the documents necessary for the use of your device. Xonar D-KARA by ASUS.
USER MANUAL Xonar D-KARA ASUS
• One PCI v2.2 compatible slot for the audio card
- Microsoft * Windows* 7 (32/64bit) / Vista (32/64bit) / XP (32/64bit) / MCE2005
- Intel "Pentium" 4 1.4 GHz or AMD" Athlon 1400 CPU or faster CPU
• 256 MB (or above) DRAM system memory
- 60 MB available HDD space for driver installation package
- CD-ROM drive (or DVD-ROM drive) for software installation
- High-quality headphones or powered analog speakers to enjoy the ultra-high fidelity sound of the card
Xonar D-KARA card layout
English

Audio ports
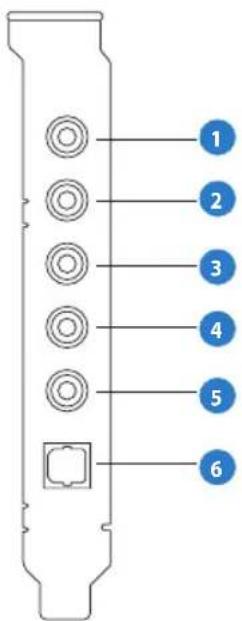
4 ASUS Xonar D-KARA
| No Item Description | ||
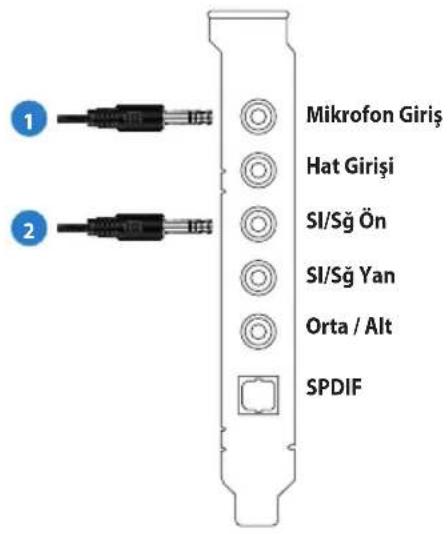
| 1 Microphone In port | Connect your external PC microphone to this 3.5mm port for voice input. Built-in high-quality Microphone pre-amplifier. | |
| 2 Line In port | Connect analog devices like MP3 players, CD players, music synthesizers and other line-level sound sources to this 3.5mm port for audio recording or processing. | |
| 3 | Headphone/Front Out port | Connect your headphones or 2 channel speakers to this 3.5mm port. For multi-channel speaker systems, connects to the front left/right input on the powered speakers. |
| 4 Side Surround Out port | Connects to the surround channel input on 4/5.1 powered analog speakers. | |
| 5 | Center/Subwoofer Out port | Connects to the center/subwoofer input on 5.1 powered analog speakers. |
| 6 S/PDIF Out port | Optical TOSLINK digital output port. Connects to external digital decoder or digital speaker systems, Home Theater systems, AV receivers for outputting digital audio including PCM, DTS Digital, DTS, WMA-Pro, etc. | |
| 7 | Front panel audio header | 9-pin Intel AC'97 / HDA front-panel which supports audio jack-detection and audio FP Headphone selection for Analog Out on the Audio Center. |
| 8 Aux Input Header | 4-pin header. Usually connects to the Analog Audio output of TV tuner card or other sound source inside your PC system. (To monitor your TV tuner card's audio from this Aux-In, you must enable the "monitor" function for Aux-In in the Xonar D-KARA Audio Center's recording mixer.) | |
| 9 S/PDIF Out header | Connects to the supported graphics card with HDMI. | |
Installing the hardware
Installing the audio card

Before you proceed with the following installation steps, it's recommended that you disable your onboard audio device in your BIOS settings, or uninstall any other audio cards on your PC. (For BIOS setting or uninstallation of other sound cards, refer to the user manuals of your motherboard and audio card.)
Installing the Xonar D-KARA card
- Power OFF the computer, the monitor, and all other peripheral devices connected to your computer.
- Unplug the computer power cord from your computer and power outlet.
- Touch the metal back or side panel of the computer to avoid static electricity.
- Remove the chassis cover.
- Remove the metal bracket from an available PCI slot for the Xonar D-KARA audio card.
- Carefully insert the audio card into the PCI slot. Ensure the audio card sits properly in place.
- Secure the audio card with screws and the metal bracket.
- Put back the chassis cover.
- Reconnect all cables.
- Plug the power cord to the computer and to a power outlet.
- Power ON the computer.

natural_image
Technical line drawing of a computer motherboard with connectors and components (no text or symbols)6 ASUS Xonar D-KARA
Connecting to a TV tuner card
- If you have a traditional PCI TV tuner card on your PC, you may need to connect it to the Xonar D-KARA card to send the tuner card's sound to your PC speakers.
- Secure the PCI TV tuner card and screw it into the back-panel.
- Connect the audio output header from the TV tuner card to the Aux-In header of the Xonar D-KARA card.

For optimum TV audio quality, Xonar D-KARA uses ADC recording to digitize the signal and loops it back to DAC playback. Select Aux-In as the recording source in the Xonar D-KARA Center's recording mixer and enable the monitoring button to pass this signal to the audio output. Using this setup, you can even turn on sound effects such as Dolby Headphone to expand the stereo TV audio to 5.1 channel surround sound in any set of headphones. TV audio on your PC will become even better than on your TV set.
Installing software
Installing the card driver

Ensure that you have installed the audio card before installing the Xonar D-KARA driver. Otherwise, driver installation error may occur.
- After you have installed the Xonar D-KARA card, turn on your computer. Windows automatically detects the audio card and searches for device drivers. When prompted for the drivers, click Cancel.
- Insert the support CD into the optical drive. If Autorun is enabled in your system, the setup starts automatically. If not, run setup.exe from your support CD.
- Follow the onscreen instructions to finish the installation.

The version and content of the support CD are subject to change without notice.
Connecting speakers and peripherals
Connecting digital speaker systems (Home Theater)
The Xonar D-KARA makes playback through your home theater system possible, creating an impressive surround sound experience. A single digital cable connection can carry high-quality digital audio from any of your PC audio sources to any digital speakers or AV Receivers.
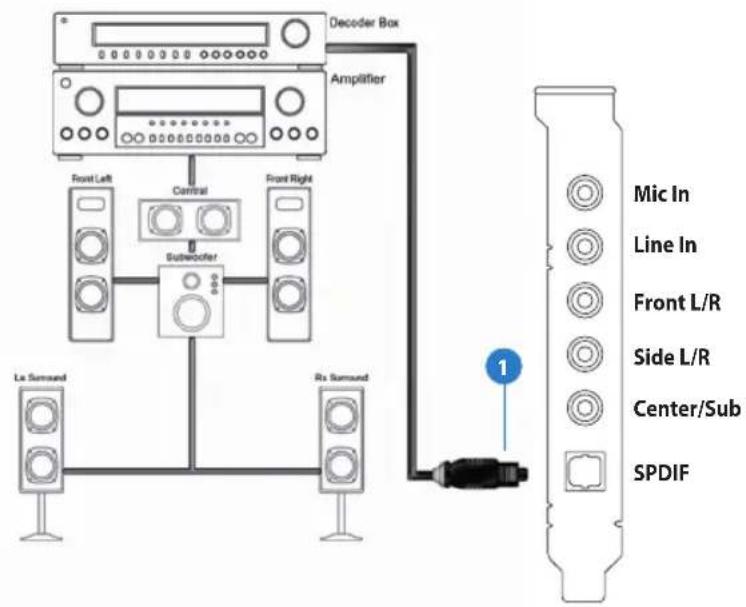
No Item Description
1 Optical cable
Plug your decoder's TOSLINK optical cable into the S/PDIF-Out connector.
Connecting stereo headphones
Connecting Stereo Headphones
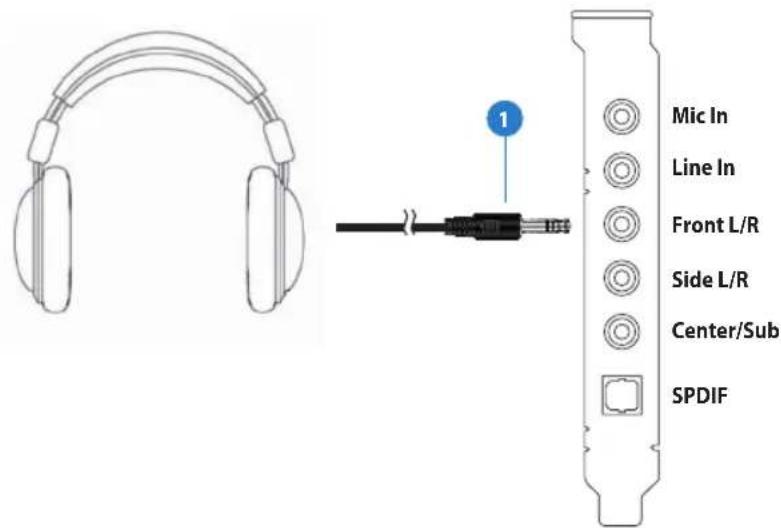

No Item Description
1 Front Out/Headphone Jack
The Front Out/Headphone jack has a built-in high-quality amplifier to drive headphones. Connect your stereo headphones directly to this jack.
Connecting 5.1 channel Headphones


| No Item Description | |
| 1 Front Out | Connect the front-channel 3.5mm plug of your 5.1 headphone into this jack. |
| 2 Side Surround Out | Connect the surround-channel 3.5mm plug of your 5.1 headphone into this jack. |
| 3 Center/Subwoofer Out | Connect the Center/Bass-channel 3.5mm plug of your 5.1 headphone into this jack. |
10 ASUS Xonar D-KARA
Connecting Analog Speaker Systems
Connecting Analog Power Amplifier


| No Item Description | |
| 1 Front Out | Connects to the “left front” and “right front” input ports of the analog amplifier with the mini-jack to RCA cable. |
| 2 Side Surround Out | Connects to the “left surround” and “right surround” input ports of the analog amplifier with the mini-jack to RCA cable. |
| 3 Center/Subwoofer | Connects to the “Center” and “subwoofer” input ports of the analog amplifier with the mini-jack to RCA cable. |
11ASUS Xonar
Connecting 2 channel speakers
2 Speakers
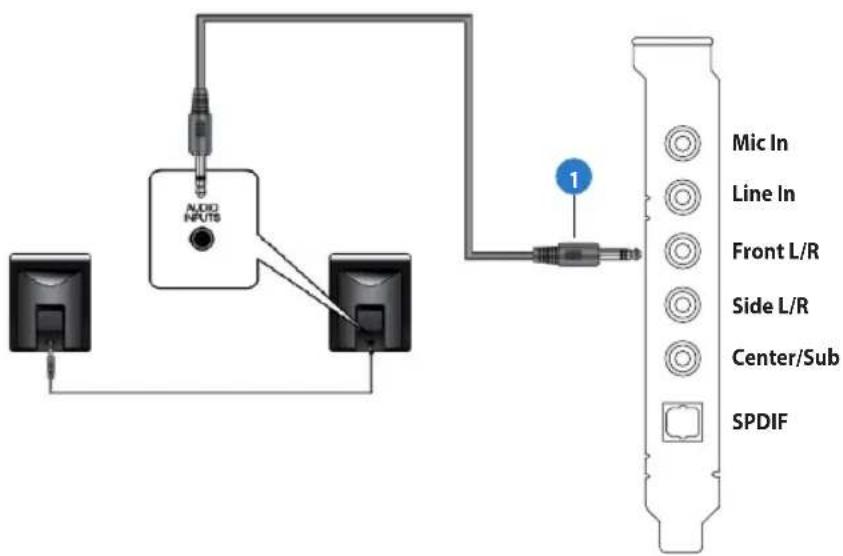

| No Item Description | |
| 1 Front Out/Headphone Jack | Connect the 2 channel speaker set's 3.5mm plug into this Front Out jack. |

12 ASUS Xonar D-KARA
Connecting 4 Channel Speakers
4 Speakers

flowchart
graph TD
    A["Audio Inputs"] --> B["Micro Device"]
    C["Audio Inputs"] --> D["Front"]
    E["Micro Device"] --> F["Micro Device"]
    G["Micro Device"] --> H["Micro Device"]
    I["Micro Device"] --> J["Micro Device"]
    K["Micro Device"] --> L["Micro Device"]
    M["Micro Device"] --> N["Micro Device"]
    O["Micro Device"] --> P["Micro Device"]
    Q["Micro Device"] --> R["Micro Device"]
    S["Micro Device"] --> T["Micro Device"]
    U["Micro Device"] --> V["Micro Device"]
    W["Micro Device"] --> X["Micro Device"]
    Y["Micro Device"] --> Z["Micro Device"]
    AA["Micro Device"] --> AB["Micro Device"]
    AC["Micro Device"] --> AD["Micro Device"]
    AE["Micro Device"] --> AF["Micro Device"]
    AG["Micro Device"] --> AH["Micro Device"]
    AI["Micro Device"] --> AJ["Micro Device"]
    AK["Micro Device"] --> AL["Micro Device"]
    AM["Micro Device"] --> AN["Micro Device"]
    AO["Micro Device"] --> AP["Micro Device"]
    AQ["Micro Device"] --> AR["Micro Device"]
    AS["Micro Device"] --> AT["Micro Device"]
    AU["Micro Device"] --> AV["Micro Device"]
    AW["Micro Device"] --> AX["Micro Device"]
    AY["Audio Inputs"] --> Z
    AZ["Audio Inputs"] --> AA
    BA["Audio Inputs"] --> AB
    BB["Audio Inputs"] --> AC
    BC["Audio Inputs"] --> AD
    BD["Audio Inputs"] --> AE
    BE["Audio Inputs"] --> AF
    BF["Audio Inputs"] --> AG
    BG["Audio Inputs"] --> AH
    BH["Audio Inputs"] --> AI
    BI["Audio Inputs"] --> AJ
    BK["Audio Inputs"] --> AL
    BL["Audio Inputs"] --> AM
    BM["Audio Inputs"] --> AN
    BN["Audio Inputs"] --> AO
    BO["Audio Inputs"] --> AP
    BP["Audio Inputs"] --> AQ
    BQ["Audio Inputs"] --> AR
    BR["Audio Inputs"] --> AS
    BS["Audio Inputs"] --> AT
    BT["Audio Inputs"] --> AU
    BU["Audio Inputs"] --> AV
    BV["Audio Inputs"] --> AW
    BW["Audio Inputs"] --> AX
    BX["Audio Inputs"] --> AZ
    BY["Audio Inputs"] --> BA
    CA["Audio Inputs"] --> BB
    CB["Audio Inputs"] --> DA
    DB["Audio Inputs"] --> AE
    BF --> AF
    BG --> AG
    BH --> AH
    BI --> AI
    BJ --> AJ
    BK --> AK
    BL --> AL
    BM --> AM
    BN --> AN
    BO --> AO
    BP --> AP
    AU --> AQ
    AV --> AR
    AW --> AS
    AX --> AT
    AU --> AU
    AV --> AV
    AW --> AV
    AX --> AV
    AU --> AV
    AV --> AW
    AX --> AW
    AU --> AW
    AV --> AW
    AW --> AX
    AX --> AX

No Item Description
| 1 Front Out | Connects to the Front input port of the 4 channel speakers with the mini-jack cable. |
| 2 Side Surround Out | Connects to the Surround input port of the 4 channel speakers with the mini-jack cable. |
13ASUS Xonar
Connecting 5.1 Channel Speakers
5.1 Speakers


| No Item Description | |
| 1 Front Out | Connects to the Front input port of the 5.1 speakers with the mini-jack cable. |
| 2 Side Surround Out | Connects to the Surround input port of the 5.1 speakers with the mini-jack cable. |
| 3 Center/Subwoofer | Connects to the Center/Subwoofer input port of the 5.1 speakers with the mini-jack cable. |

14 ASUS Xonar D-KARA
Connecting microphone
| No Item Description | |
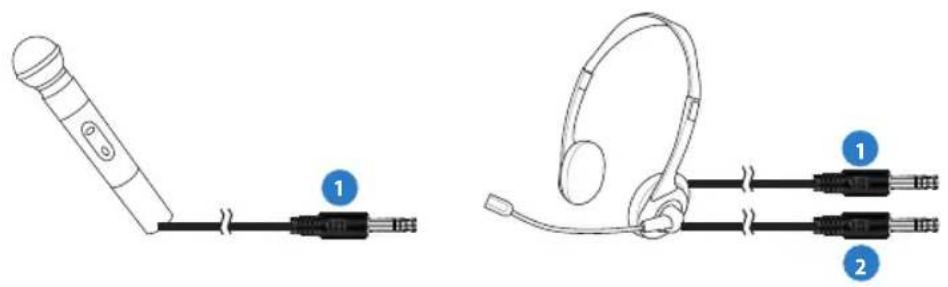
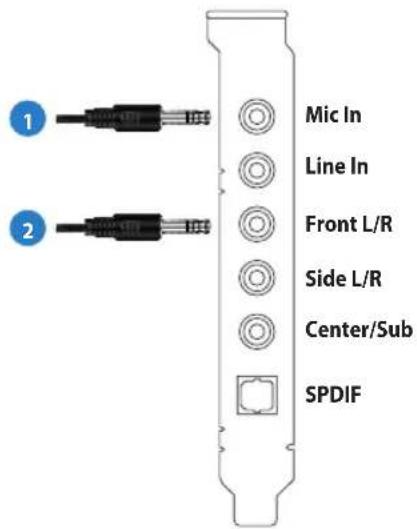
| 1 Microphone Input Jack | Connect the microphone's 3.5mm plug into this Mic-In jack for voice communication, recording, or karaoke. |
| 2 Headphone Jack | The Front Out jack has a built-in high-quality amplifier to drive headphones. Connect your stereo headphones directly to this jack. |
Connecting Line-In audio sources

No Item Description
1 Line Input Jack
Connect the 3.5mm plug of the CD/MP3 Player or any other Line level analog audio sources into this Line-In jack for sound recording.
16 ASUS Xonar D-KARA
ASUS
F7299
Xonar D-KARA
natural_image
Technical line drawing of a computer motherboard with connectors and ports (no text or symbols)21ASUS Xonar

natural_image
Two horizontal bar segments with grayscale shades and a central crosshair symbol (no text or labels)Xonar D-KARA Kartenlayout

Audio-Anschlüsse

natural_image
Technical line drawing of a computer motherboard with connectors and a separate component (no text or symbols)
natural_image
Technical line drawing of a computer motherboard with connectors and components (no text or symbols)51ASUS Xonar

Italiano

Italiano


natural_image
Technical line drawing of a computer motherboard with connectors and ports (no text or symbols)66 ASUS Xonar D-KARA
natural_image
Line drawing of a computer motherboard with a card and connectors (no text or symbols)natural_image
Illustration of a VR headset and its connector, showing a remote control with cable routing (no text or symbols)
natural_image
Technical line drawing of a computer motherboard with connectors and components (no text or symbols)
natural_image
Technical line drawing of a computer motherboard with connectors and ports (no text or symbols)111ASUS Xonar



- Installing the hardware
- Installing the audio card
- Installing the Xonar D-KARA card
- Connecting to a TV tuner card
- Installing software
- Installing the card driver
- Connecting speakers and peripherals
- Connecting digital speaker systems (Home Theater)
- No Item Description
- Optical cable
- Connecting stereo headphones
- Connecting Analog Speaker Systems
- Connecting Analog Power Amplifier
- Connecting 2 channel speakers
- Speakers
- Connecting 4 Channel Speakers
- Connecting 5.1 Channel Speakers
- Speakers
- Connecting Line-In audio sources
- Line Input Jack
- Xonar D-KARA
Brand : ASUS
Model : Xonar D-KARA
Category : Soundcard