
Xonar U7 - Soundcard ASUS - Free user manual and instructions
Find the device manual for free Xonar U7 ASUS in PDF.


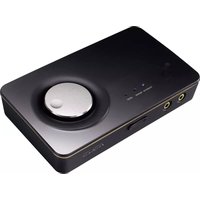
| Product Type | External USB Sound Card |
| Brand | Asus |
| Model | Xonar U7 |
| Dimensions (approx.) | 150 x 90 x 30 mm |
| Weight (approx.) | 200 g |
| Power Supply | USB bus-powered |
| Audio Channels | 7.1 surround sound |
| Sample Rate | Up to 192 kHz / 24-bit |
| Headphone Amplifier | Built-in, supports up to 300 Ω |
| Outputs | 3.5mm jacks (front, rear, center/sub, side), optical S/PDIF out |
| Inputs | 3.5mm microphone/line-in, optical S/PDIF in |
| Supported OS | Windows 10, 8.1, 7, macOS |
| Main Functions | High-definition audio playback, 7.1 surround, headphone amplification, audio recording |
| Maintenance & Cleaning | Use a soft dry cloth; avoid liquids and abrasive cleaners |
| Safety Instructions | Keep away from water and moisture; do not disassemble |
| Spare Parts & Repairability | No user-serviceable parts; contact support for issues |
| General Information | Asus Xonar U7 external sound card with USB connectivity, ideal for PC and Mac |
Frequently Asked Questions - Xonar U7 ASUS
User questions about Xonar U7 ASUS
0 question about this device. Answer the ones you know or ask your own.
Ask a new question about this device
Download the instructions for your Soundcard in PDF format for free! Find your manual Xonar U7 - ASUS and take your electronic device back in hand. On this page are published all the documents necessary for the use of your device. Xonar U7 by ASUS.
USER MANUAL Xonar U7 ASUS
7.1 USB Soundcard & Headphone Amplifier

User Manual
E11108
Revised Edition V2
November 2015
Copyright © 2015 ASUSTeK COMPUTER INC. All Rights Reserved.
No part of this manual, including the products and software described in it, may be reproduced, transmitted, transcribed, stored in a retrieval system, or translated into any language in any form or by any means, except documentation kept by the purchaser for backup purposes, without the express written permission of ASUSTeK COMPUTER INC. ("ASUS").
Product warranty or service will not be extended if: (1) the product is repaired, modified or altered, unless such repair, modification of alteration is authorized in writing by ASUS; or (2) the serial number of the product is defaced or missing.
ASUS PROVIDES THIS MANUAL "AS IS" WITHOUT WARRANTY OF ANY KIND, EITHER EXPRESS OR IMPLIED, INCLUDING BUT NOT LIMITED TO THE IMPLIED WARRANTIES OR CONDITIONS OF MERCHANTABILITY OR FITNESS FOR A PARTICULAR PURPOSE. IN NO EVENT SHALL ASUS, ITS DIRECTORS, OFFICERS, EMPLOYEES OR AGENTS BE LIABLE FOR ANY INDIRECT, SPECIAL, INCIDENTAL, OR CONSEQUENTIAL DAMAGES (INCLUDING DAMAGES FOR LOSS OF PROFITS, LOSS OF BUSINESS, LOSS OF USE OR DATA, INTERRUPTION OF BUSINESS AND THE LIKE), EVEN IF ASUS HAS BEEN ADVISED OF THE POSSIBILITY OF SUCH DAMAGES ARISING FROM ANY DEFECT OR ERROR IN THIS MANUAL OR PRODUCT.
SPECIFICATIONS AND INFORMATION CONTAINED IN THIS MANUAL ARE FURNISHED FOR INFORMATIONAL USE ONLY, AND ARE SUBJECT TO CHANGE AT ANY TIME WITHOUT NOTICE, AND SHOULD NOT BE CONSTRUED AS A COMMITMENT BY ASUS. ASUS ASSUMES NO RESPONSIBILITY OR LIABILITY FOR ANY ERRORS OR INACCURACIES THAT MAY APPEAR IN THIS MANUAL, INCLUDING THE PRODUCTS AND SOFTWARE DESCRIBED IN IT.
Products and corporate names appearing in this manual may or may not be registered trademarks or copyrights of their respective companies, and are used only for identification or explanation and to the owners' benefit, without intent to infringe.
Table of Contents
1. Introduction ...... 4
1.1 Package contents 4 1.2 System requirements.... 4 1.3 General Specification....5
2. Hardware....7
Xonar U7 Audio Card....7 Top view 7 Rear view 7 Bottom view....7
3. Driver Installation....9
3.1 Installing the Xonar U7 Card Driver 9 3.2 Uninstalling or Reinstalling the Xonar U7 Card Driver ..... 9
4. Connecting Speakers and Peripherals .... 10
4.1 Input connection ....10 4.2 Output connection.... 13
5. Xonar U7 Driver Guide.... 19
5.1 Introduction to the Xonar U7 Audio Center GUI.... 19 5.2 Input Device Function Introduction 21 5.3 Mic-In, Line In Device Function Introduction...... 37 5.4 Information Page Introduction.... 40 5.5 Tray Icon Function Introduction 40
6. Troubleshooting.... 42
1. Introduction
1.1 Package contents
Check your ASUS Xonar™ U7 audio card package for the following items:
• ASUS Xonar™ U7 7.1-Channel USB Audio Card - Driver CD • S/PDIF TOSLINK optical adapter x 1 - Quick Start Guide - USB Cable x 1
1.2 System requirements
To ensure a successful installation of the Xonar U7 audio card, make sure that your computer meets the following requirements:
- USB port 2.0 and above
- Microsoft® Windows® 10 / 8.1 / 8 / 7 / XP (32/64-bit)
- Intel® Pentium® 4 1.4 GHz or AMD Athlon 1400 CPU or faster CPU • More than 256 MB system memory
- More than 60 MB available storage space for driver installation
- CD-ROM drive (or DVD-ROM drive) for software installation
- High-quality headphones, powered analog speakers, or a Dolby Digital decoder, to enjoy the audio card's high fidelity
1.3 General Specification
Items Description
| Audio Performance | |
| Output Signal-to-Noise Ratio (A-Weighted) | up to 114dB |
| Input Signal-to-Noise Ratio (A-Weighted): | 110dB |
| Output Total Harmonic Distortion + Noise at 1kHz (A-Weighted) : | up to 0.0006% (104dB) |
| Input Total Harmonic Distortion + Noise at 1kHz (A-Weighted) : | up to 0.0001% (-100dB) |
| Frequency Response (-3dB, 24-bit/96kHz format): | < 10Hz to 46KHz |
| Output / Input Full-Scale Voltage 1 Vrms (2.828 Vp-p) for line out1.3 Vrms (3.677 Vp-p) for headphone out1 Vrms (3.677 Vp-p) for line in | |
| Bus Compatibility | |
| USB audio class - USB audio class 2.0 for all functions- USB audio class 1.0 for playback | |
| Main Chipset | |
| Audio Processor Cmedia 6632A High-Performance Sound Processor(Max. 192KHz / 24bit) | |
| D-A Converter of Digital Sources Cirrus CS4398* 1 (120dB SNR, Max. 192kHz/24bit)Cirrus CS4362* 1 (114dB SNR, Max. 192kHz/24bit) | |
| A-D Converter for Analog Inputs Cirrus CS5361* 1 (114dB SNR, Max. 192kHz/24bit) | |
| Sample Rate and Resolution | |
| Analog Playback Sample Rate and Resolution | 44.1K/48K/88.2K//96K/172.4K/192KHz @ 16/24bit |
| Analog Recording Sample Rate and Resolution | 44.1K/48K/88.2K//96K/172.4K/192KHz @ 16/24bit |
| S/PDIF Digital Output 44.1K/48K/88.2K//96K/172.4K/192KHz @ 16/24bit | |
| ASIO 2.0 Driver Support 44.1K/48K/88.2K//96K/172.4K/192KHz @ 16/24bit | |
Items Description
| I/O Ports |
| Analog Output Jack RCA (phone) jack * 2 (Front left / Front right)3.50mm mini jack * 3 for surround(Side/Center-Subwoofer/Rear-out)3.50mm mini jack * 1 (Headphone out) |
| Analog Input Jack 3.50mm mini jack * 1 (Shared by Line-In / Mic-In) |
| Button Output volume knob/Output selection / MicrophoneVolume) |
| Digital S/PDIF Output High-bandwidth coaxial port supports 192HKz/24bitwith one S/PDIF TOSLINK optical adapter |
| Driver Features |
| Operating System Windows® 10 / 8.1 / 8 / 7 / XP (32/64bit) |
2. Hardware
Xonar U7 Audio Card
Top view

Rear view

Bottom view

| No. Items Description | ||
| 1. Headphone Out port | Connect your headphone to this port. | |
| 2. | Microphone In port | Connect your external PC microphone to this 3.5mm port for voice input. |
| Line In port | Connect analog devices like MP3 players, CD players, music synthesizers, and other line-level sound sources to this 3.5mm port for audio recording or processing. | |
| 3. | Microphone Volume Control | Press to increase or decrease microphone volume. |
| 4. | Output Selection Indicator | LED indicator indicates different output selection (Headphone/Speaker/S/PDIF). |
| 5. | Output Selection/Volume Control | Rotate to adjust the playback volume. Press to select an output source. |
| 6. | Front (R) Out port | For 2/4/5.1/7.1 channel speaker systems, connects to the front right input on the powered speakers. |
| 7. | Front (L) Out port | For 2/4/5.1/7.1 channel speaker systems, connects to the front left input on the powered speakers. |
| 8. | Side Surround Out port | Connects to the surround channel input on 7.1 powered analog speakers. |
| 9. | Center/Subwoofer Out port | Connects to the center/subwoofer input on 5.1/7.1 powered analog speakers. |
| 10. | Rear Out port | Connects to the back surround input on 4/5.1/7.1 powered analog speakers. |
| 11. | S/PDIF Out port | Coaxial digital output port. Connects to an external digital decoder or digital speaker systems, Home Theater systems, AV receivers for outputting digital audio including PCM, Dolby Digital, DTS, etc. Connects to the surround channel input on 4/5.1/7.1 powered analog speakers. Through S/PDIF-Out it will deliver stereo PCM and use DDL for 5.1 channel. |
| 12. | USB Port | Connects to your computer using a USB Type B-A lead. |
| 13. | USB Audio 1.0/2.0 switch | Move this switch to toggle between USB Audio 2.0 and USB Audio 1.0 connection. Use USB Audio 1.0 for plug and play. Use USB Audio 2.0 on a mac (Apple computer). |

USB Audio 1.0/2.0 switch is located at the bottom side of the audio card. USB Audio 1.0 connection has the following limitations:
- Only supports playback features.
- 7.1 speakers, Headphone, Mic In / Line-In, and SPDIF Out can only support sample rates of 44.1KHz/48KHz @16-bit.
3. Driver Installation
3.1 Installing the Xonar U7 Card Driver
After installing the Xonar U7 audio card on your computer, you need to install the device driver that enables the Xonar U7 audio card to work with Windows® operating system.

- The driver is required only when you connect the Xonar U7 to a PC or notebook.
- The version and content of the support CD are subject to change without notice.
To install the device driver:
- Insert the ASUS Xonar U7 support CD into your optical drive. If Autorun is enabled, the ASUS Xonar Card Driver screen appears automatically. Go to step 4. If Autorun is not enabled in your computer, perform step 2.
- Click My Computer on your desktop and double-click the optical drive icon.
- Double-click setup.exe located on the optical drive.
- Follow the on-screen instructions to complete the installation. Read, understand, and accept the END USER LICENSE AGREEMENT before continuing the installation.
- When the installation finishes, you may be prompted to restart your computer. You can choose to restart the computer at a later time.
3.2 Uninstalling or Reinstalling the Xonar U7 Card Driver
3.2.1 Uninstalling the Xonar U7 Card Driver
To uninstall the Xonar U7 card driver:
- Click Start > Settings > Control Panel.
- Double-click the Add/Remove Programs icon.
- Click the Change or Remove Programs button.
- Select the program you want to remove, then click the Add/Remove (or Change/Remove) button.
- In the InstallShield Wizard dialog box, select Remove.
- Restart your computer when prompted.
3.2.2 Reinstalling the Xonar U7 Card Driver
To reinstall the Xonar U7 card driver:
- Uninstall the existing software or driver.
- Follow the installation process to reinstall the driver.
4. Connecting Speakers and Peripherals
4.1 Input connection
4.1.1 Connecting to a USB 2.0 port on your computer
![graph TD A["PC"] -->|OR| B["USB"] C["NB"] -->|OR| B["USB"] D["PC"] -->|OR| B["USB"] style A fill:#f9f,stroke:#333 style C fill:#f9f,stroke:#333 style D fill:#ccf,stroke:#333](/content/2026/06/1341938/images/c9a02a18dc2f8e4d22c7208528abb8fc0fde139496d3e4d25244aa615d0138ce.jpg)
| No. Items Description | |
| 1. USB Port | Connects to your computer using a USB Type B-A lead. |
4.1.2 Connecting digital audio systems

No. Items Description
- S/PDIF Output port
Connect an AVR to this S/PDIF output port.
4.1.3 Connecting microphone / Line-In

| No. Items Description | |
| 1. Microphone In / Line In port | Connect the microphone's 3.5mm plug into this Mic-In port for voice communication, recording, or karaoke. Connect the 3.5mm plug of the CD/MP3 Player or any other Line level analog audio sources into this Line-In port for sound recording. |
4.2 Output connection
4.2.1 Connecting Stereo Headphones

No. Items Description
- Headphone Out Port
The Headphone Out port has a built-in high-quality amplifier to drive headphones. Connect your stereo headphones directly to this port.
4.2.2 Connecting 5.1 channel headphones

| No. Items Description | |
| 1. Front (R) Out port | Connects to the front right input port of 5.1 channel headphones using the RCA cable. |
| 2. Front (L) Out port | Connects to the front left input port of 5.1 channel headphones using the RCA cable. |
| 3. Center/Subwoofer Out port | Connect the Center/Bass-channel 3.5mm plug of your 5.1 channel headphone into this jack. |
| 4. Rear Surround Out port | Connects to the rear surround input port of your 5.1 channel headphone. |
4.2.3 Connecting analog speaker systems Connecting 2 channel speakers

| No. Items Description | |
| 1. Front (R) Out port | Connects to the front right input port of 2 channel speakers using the RCA cable. |
| 2. Front (L) Out port | Connects to the front left input port of 2 channel speakers using the RCA cable. |
Connecting 4 channel speakers / power amplifier

| No. Items Description | |
| 1. Front (R) Out port | Connects to the front right input port of 4 channel speakers. |
| 2. Front (L) Out port | Connects to the front left input port of 4 channel speakers. |
| 3. Rear Surround Out port | Connects to the rear surround input port of 4 channel speakers. |
Connecting 5.1 channel speakers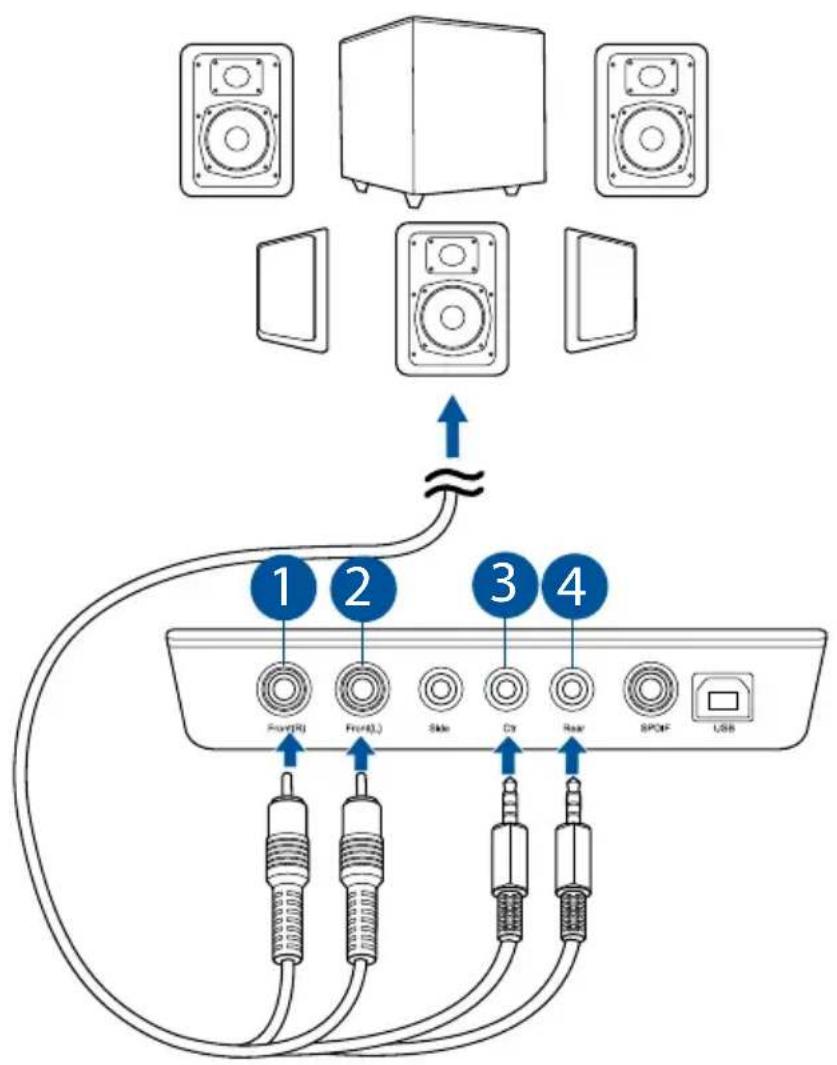
| No. Items Description | |
| 1. Front (R) Out port | Connects to the front right input port of 5.1 channel speakers. |
| 2. Front (L) Out port | Connects to the front left input port of 5.1 channel speakers. |
| 3. Center/Subwoofer Out port | Connects to the Center and Subwoofer input ports of 5.1 channel speakers. |
| 4. Rear Surround Out port | Connects to the rear surround input port of 5.1 channel speakers. |
Connecting 7.1 channel speakers
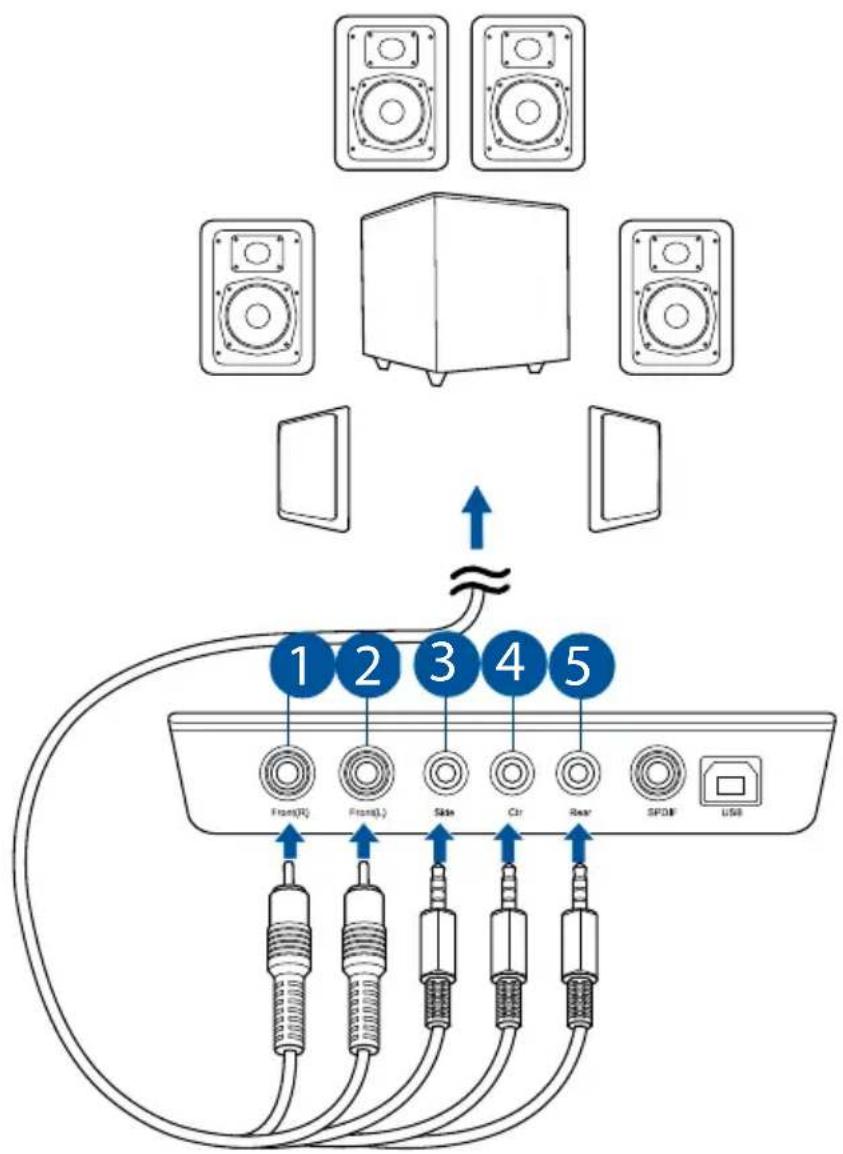
| No. Items Description | |
| 1. Front (R) Out port | Connects to the front right input port of 7.1 channel speakers. |
| 2. Front (L) Out port | Connects to the front left input port of 7.1 channel speakers. |
| 3. Side Surround Out port | Connects to the Left surround and Right surround input ports of 7.1 channel speakers. |
| 4. Center/Subwoofer Out port | Connects to the Center/Subwoofer input port of 7.1 channel speakers using the mini-jack cable. |
| 5. Rear Surround Out port | Connects to the rear surround input port of 7.1 channel speakers. |
5. Xonar U7 Driver Guide
5.1 Introduction to the Xonar U7 Audio Center GUI
After finishing the driver installation and rebooting your computer, you will find the Xonar U7 Audio Center's icon in the system tray on the bottom right-hand corner of the screen. Double click this icon to open the Xonar Audio Center utility.


If the icon could not be found in the system tray, go to the Windows® Control Panel and double click the Xonar U7 Audio Center icon.
5.1.1 Function Pop-up Menu
Xear Audio Center provides several sound effects. There is a pop menu for each output / input device and you can enter the sound effect page to enjoy music, movie and gaming.
To open the pop-up menu:
- Double-click the left button of the mouse on the Device icon.
- Left-click the mouse on the Device icon.

5.1.2 Audio Status Panel

| No. Items Description | ||
| 1. | Playback (Speaker Out) | Indicates the output default device. |
| 2. Capture (Mic In) | Indicates the input default device. | |
| 3. Speaker Numbers | Indicates the speaker numbers for Speaker device only. | |
| 4. Sample Rate | Indicates the sample rate of playback sources. | |
| 5. | Audio Output effect indicator | Indicates the playback sound effect status.Abbreviation of Sound effect:EQ: EqualizerEM: Environment EffectsVSS: 7.1 Virtual Speaker ShifterFB: Flex Bass IIKS: Xear SingFX for key shiftingVF: Xear SingFX for vocal fadingAB: Xear Audio BrilliantDB: Xear Dynamic BassSVN: Xear Smart VolumeVC: Xear Voice ClaritySMX: Xear Surround Max |
| 6. | In effect indicator | Indicates the playback sound effect status.Abbreviation of Sound effect:SF: Xear SingFX for microphone echoSF: Xear SingFX for Magic Voice |
| 7. | Switch to Profile Panel button | Click to switch the status bar to the Profile panel. |
| 8. | Volume Adjustment bar | Click to increase or decrease volume. |
| 9. Mute / Unmute | Click to mute or unmute a device. | |
| 10. ASIO | Click to launch the ASIO control panel. | |
5.1.3 Profile Panel
This profile panel for sound effect contains a preset mode and a user-defined mode.

| No. Items Description | |
| 1. Profile Mode | Click to select the presets in profile mode. |
| 2. Add Profile | Adjust specific sound effects (EQ, EM etc...) settings and click “+” to create a user-defined mode. |
| 3. Delete Profile | Click to delete a user-defined mode. |
| 4. Switch Button | Click to switch between the Profile panel and Audio Status Panel. |
5.2 Input Device Function Introduction


Click the device icon on the left side to open the pop-up menu.
5.2.1 Dolby® Home Theater (Windows® 7 and above Only)
Function Introduction


- The following items will be replaced by Dolby® Home Theater V4 under Windows® 7 and above Operating System.
- 7.1 Virtual Speaker Shifter
- 10-Band Equalizer
- Refer to Dolby's official manual for Dolby® Home Theater V4 functions.
5.2.2 Volume Control
Function Introduction
This function allows you to control the volume of the speaker.
| No. Items Description | |
| 1. Volume Control bar | Master – Adjust the volume level for all channels.Front - Adjust the volume level for the front channel. |
| 2. Left/ Right Channel Lock | Click to lock the left / right channel to sync L/R channel. |
| 3. Mute / Un-mute | Click to mute or ummute all channels. |
| 4. dB Input Area | Key in a dB value in this field to set the volume level. |
5.2.3 Speaker Settings
Function Introduction

This function allows you to set the speaker configuration (stereo, quadraphonic, 5.1 surround, 7.1 surround).
| No. Items Description | ||
| 1. Setting items | Select an item to set. | |
| 2. Speaker Test | Click to test the speaker that you select. | |
| 3. | LFE / Center Channel Swap | When enabled, the function can swap the audio stream between Center/LFE (Available for 5.1 and above). |
5.2.4 Headphone Settings
Function Introduction

This function allows you to configure gain settings based on your headphone's impedance.
| No. Items Description | ||
| 1. | Low Gain | 0dB for < 32 ohms |
| Medium Gain | 6dB for 32 ~ 64 ohms | |
| High Gain | 12dB for > 64 hms | |
5.2.5 Sample Rate
Function Introduction
This function allows you to set the sample rate for the speaker.
| No. Items Description | |
| 1. Sample Rate button | 44.1 KHz - set the playback sample rate to 44.1K48 KHz - set the playback sample rate to 48K88.2 KHz - set the playback sample rate to 88.2K96 KHz - set the playback sample rate to 96K176.4 KHz - set the playback sample rate to 176K192 KHz - set the playback sample rate to 192K |
| 2. Bit Depth button | 16bit - set the playback bit depth to 16bit24bit - set the playback bit depth to 24bit |
5.2.6 Equalizer (Windows XP only)
Function Introduction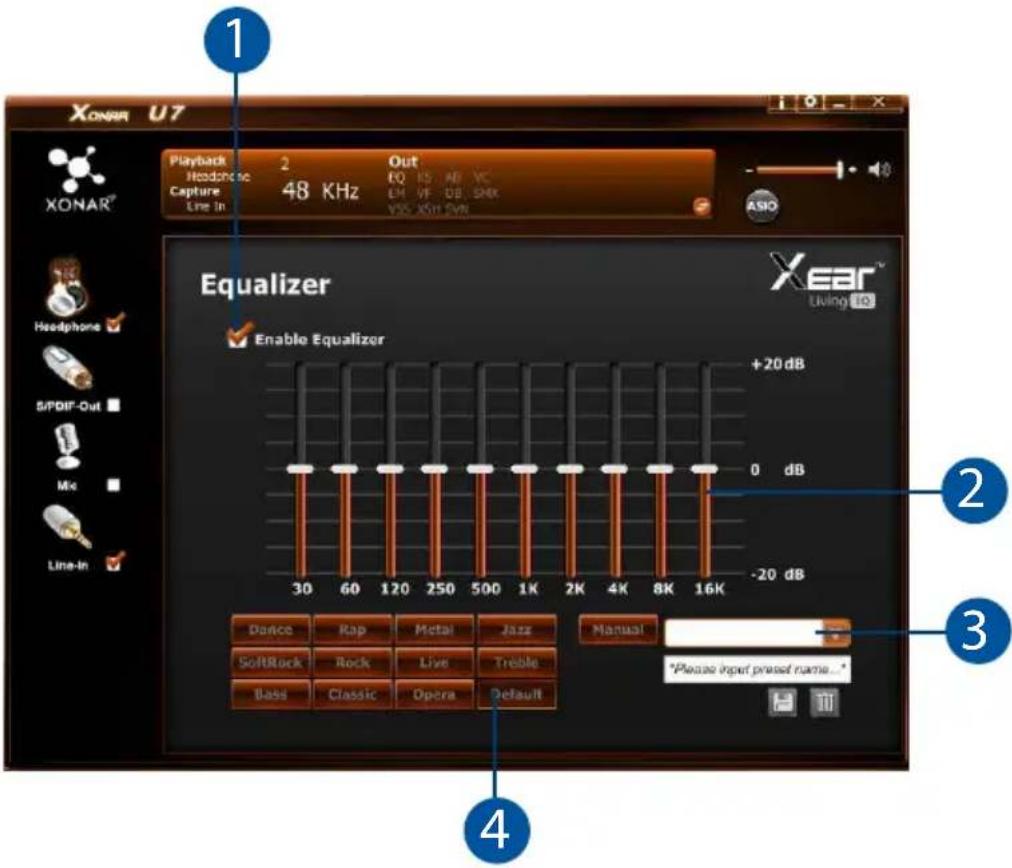
This 10-band EQ function allows you to adjust the EQ band manually and create customized preset items or click to select a preset EQ mode.
| No. Items Description | |
| 1 EQ enable / disable switch | Click to enable / disable EQ. |
| 2 EQ band controller | Change the gain setting for each band (30/ 60/ 120/ 250/ 500/ 1K/ 2K/ 4K/ 8K/ 16K). |
| 3 Manual mode | Change the gain setting for each band, key in a name in the input field and then clicksaveto add your new setting. New setting will appear in the Manual Mode List. Clicktrashto delete settings. |
| 4 Preset mode | Select a preset mode for equalizer that is designed accordingly. There are 12 preset modes such as Bass, Treble, Live, Rock, Jazz, etc. |
5.2.7 Environment Effect
Function Introduction
This function provides 28 special environment emulations for different sound reflections and reverberation.
| No. Items Description | |
| 1. Environment Effect enable/disable switch | Click on the check box to enable / disable Environment Effect. |
| 2. Environment Effect mode | Click on an Environment Effect button or drop the dropdown list to choose an Environment Effect. |
| 3. Room Size | Change the Room Size icon to simulate a larger or smaller space. |
5.2.8 7.1 Virtual Speaker Shifter (Windows XP only)
Function Introduction
| No. Items Description | |
| 1. 7.1 Virtual speaker shifter enable/ disable switch | Click on the check box to enable / disable 7.1 Virtual Speaker to simulate the speaker direction and distance. |
| 2. Virtual Speaker (L/R/Ls/Rs/Lb/ Rb/C/W) | Each virtual speaker virtualizes one channel of the 7.1 channel speakers in the real world. |
| 3. Volume Control | Each virtual speaker virtualizes one channel of the 7.1 channel speakers in the real world. |
| 4. Volume indicator | Indicate the volume of each channel. |
| 5. Reset | Reset the location of virtual speakers / virtual listener to default. |
| 6. Manual Shifting (Free Moving Mode) | Use the pointer to click and drag to move the location of individual virtual speakers. |
| 7. Manually Rotation Mode | Use mouse to rotate the virtual speakers on the screen manually. |
| 8. Auto Rotation Mode | The virtual speakers rotate clockwise or counterclockwise slowly. |
5.2.9 Flex Bass II
Function Introduction
This function allows you to increase / decrease the LFE strength. This function would cut the low frequency band (50~250Hz) of stereo music content (eg. Mp3, WMA, CD Audio) and transfer to subwoofer or each speaker.
| No. Items Description | |
| 1. Flex Bass II enable/ disable switch | Click on this check box to enable / disable Flex Bass II. |
| 2. Bass Level | The bass level range is from -12 to 12dB. |
| 3. Speaker Size | Small Speaker w/o bassWhen the speaker size is set to small, you can hear the sound resonance more obvious and reverberation from subwoofer.Larger Speaker w/o bassWhen the speaker size is set to small, you can hear the sound resonance more obvious and reverberation from subwoofer. |
| 4. Speaker Diagram | You can also check the speaker size from this home theater diagram. |
| 5 Cut Off Frequency | The cut off range of low frequency is from 50Hz to 250Hz. |
5.2.10 Xear SingFX
Function Introduction
Xear SingFX function provides two features for karaoke applications.
| No. Items Description | |
| 1. Key Shifting switch | It provides the key change function. There are four steps to shift up or down. Use the slide bar to change the key level. |
| 2. Vocal Fading | It provides the vocal removing function for any stereo music content (eg. Mp3, WMA and CD). Use the slide bar to change the vocal fading level. |
5.2.11 Xear Audio Brilliant (Windows XP only)
Function Introduction
Xear Audio Brilliant function restores the clarity and details of compressed audio to music, movies and games (mp3, wma, aac, ac3, etc.)
| No. Items Description | |
| 1. Xear Audio Brilliant enable/disable option | Tick to enable or disable the Xear Audio Brilliant function. |
| 2. Brilliant Level | Drag to increase or decrease the Brilliant Level. |
| 3. Reset button | Click to reset to the factory default settings. |
5.2.12 Xear Dynamic Base (Windows XP only)
Function Introduction
Xear Dynamic Base function increases the bass reproduction effect for small speaker drivers by using psychoacoustic techniques.
| No. Items Description | |
| 1. Xear Dynamic Base enable/disable option | Tick to enable or disable the Xear Dynamic Base function. |
| 2. Base Level | Drag to increase or decrease the Brilliant Level. |
| 3. Cut-off Frequency | Drag to adjust the Cut-off Frequency. |
| 4. Reset button | Click to reset to the factory default settings. |
5.2.13 Xear Smart Volume (Windows XP only)
Function Introduction
Xear Smart Volume function normalizes the music's sound volume automatically.
| No. Items Description | |
| 1. Xear Smart Volume enable/disable option | Tick to enable or disable the Xear Smart Volume function. |
| 2. Volume Level | Drag to increase or decrease the Volumet Level. |
| 3. Mode | Select Music mode or Speech mode. |
5.2.14 Xear Voice Clarity (Windows XP only)
Function Introduction
Xear Voice Clarity function increases the clarity, intelligibility and prominence of the voice received from VoIP, games, music or movies without suppressing or changing other audio stream.
| No. Items Description | |
| 1. Xear Voice Clarity enable/disable option | Tick to enable or disable the Xear Voice Clarity function. |
| 2. Voice Clarity Level | Drag to increase or decrease the Voice Clarity Level. |
| 3. Noise Suppression for communication | Click to select the level of background noise elimination. |
| 4. Reset button | Click to reset to the factory default settings. |
5.2.15 Xear Surround Max
Function Introduction
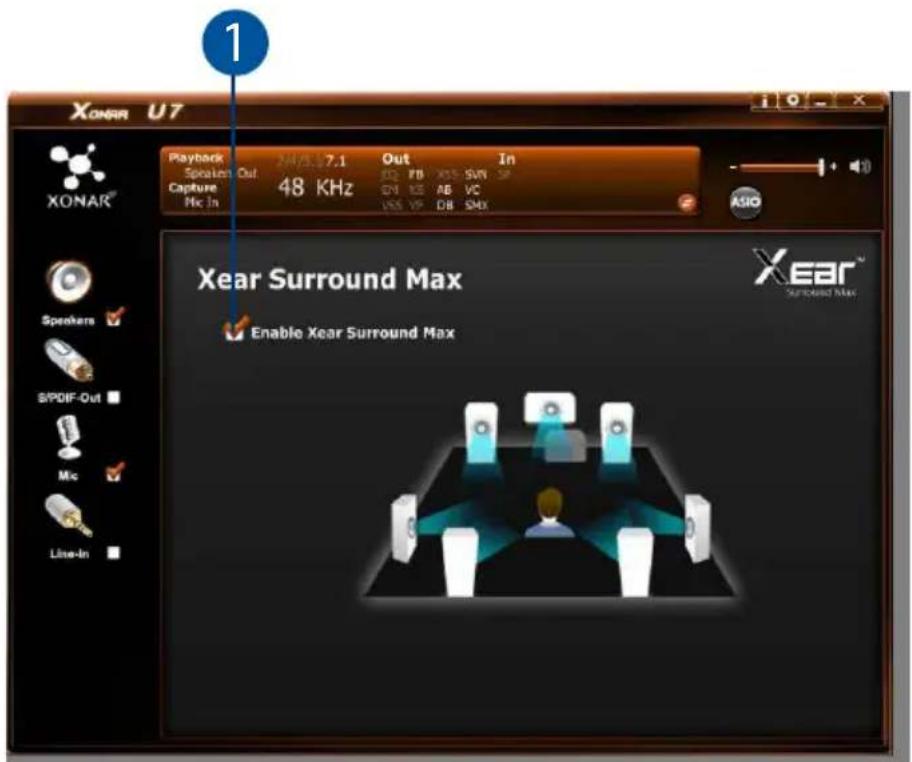
No. Items Description
- Xear Surround Max enable/disable option
Tick to enable or disable the Xear Surround Max function.
5.3 Mic-In, Line In Device Function Introduction
Function Introduction

Click the device icon on the left side to open the pop-up menu.
5.3.1 Sample Rate
Function Introduction
This function page allows you to set the sample rate.
| No. Items Description | |
| 1. Sample Rate button | 44.1 KHz - set the playback sample rate to 44.1K48 KHz - set the playback sample rate to 48K96 KHz - set the playback sample rate to 96K192 KHz - set the playback sample rate to 192K |
| 2. Bit Depth button | 16bit - set the playback bit depth to 16bit24bit - set the playback bit depth to 24bit |
5.3.2 Xear SingFX (Mic In only)
Function Introduction
| No. Items Description | |
| 1. Microphone Echo enable / disable option | Tick to enable or disable the Microphone Echo function.Drag the slide bar below to adjust the echo level. |
| 2. Magic Voice mode enable / disable option | Tick to enable or disable the Magic Voice mode. Select an icon below to apply the magic voice mode (monster, carton, male and female). |
| 3. Reset button | Click to reset to the factory default settings. |
5.4 Information Page Introduction
This page lists the driver information and the technologies' trademark logo. You can get both hardware/software details and legal information references here.


Click the Information button on the upper right corner of the user interface to display the detailed information of the device.
5.5 Tray Icon Function Introduction
Open the CPL Tray Icon Function List by right-clicking the tray icon in the system tray area.
- Open: Click the Open item to restore the USB Audio Software CPL.
- Volume Control: Click the Volume Control item to launch the Windows OS Volume Mixer, which allows you to control the volume of speakers and other audio devices separately.
- Windows Media Player: Click the Windows Media Player item to launch Microsoft Windows Media Player.
- Sound Recorder: Click the Sound Recorder item to open the Windows Sound Recorder.
- Multimedia Properties: Launch the Windows OS Multimedia Properties page to select the working sample rate and bit rate. (1) Select the Speakers device and then click the Properties button.
(2) Click the Advanced tab and click the dropdown list to open the default format support list as shown in the diagram below.
(3) Follow the same step to change the sample rate and bit rate for the Microphone device.
- Settings: Click Settings to launch the Advanced Settings page as shown below.

(1) Show System Tray Icon: Check the Show System Tray Icon box to show the Xear Audio Center icon in the system tray.
(2) UI Transparent: Adjust the UI transparency.
(3) Language Select: Change the UI language.
(4) Don't show start up message: Check the box to hide or show the startup message.
- Exit: Click Exit to remove the tray icon from the system tray.
6. Troubleshooting
1. I cannot install the audio card driver in my PC.
(1) Ensure that you have switched the USB sound card to USB Audio 2.0 and plugged it into the USB port. (2) Make sure that the LEDs light up. (3) Ensure that you have the latest driver version. (4) Check that the Windows hardware Device Manager has detected the device. (5) Restart your computer. (6) Try to plug the device into another USB port.
2. I cannot find the Xonar U7 Audio Center.
(1). Make sure you have installed the driver. (2). Find the Xonar U7 Audio Center icon in the system tray on the right bottom of the screen. Double click the icon to launch the Xonar U7 Audio Center utility.

(3). If you cannot find the icon in the system tray, go to the Windows Control Panel and double click the Xonar U7 Audio Center icon to make it visible in the system tray again. (4). After the driver installation is complete, it's recommended that you reboot your computer to complete the setup. If the icon still doesn't appear, please try installing the driver package again.
3. I can't hear any sound from my analog speakers
(1). Ensure that you have connected speakers properly and have powered on your speakers. (2). Ensure that the device master volume or the software player has NOT been muted in the Xonar U7 Audio Center. (3). Ensure that the output LED indicator matches the output source configured in the device.
(4). If you are using Dolby Digital Live encoder through the S/PDIF output, the analog output will be muted to get rid of the interference between your digital speaker system and analog speakers or headphones. Please check if this is the case. (5). Please go to the sound and audio device of Windows® Control Panel to check whether the playback default device is set to Xonar U7 Audio Device, instead of other onboard AC97 or HDA codec device. If it's not, please set it to Xonar U7 Audio Device and restart your applications. (6). Restart your computer.
4. I can't hear any sound from the S/PDIF output
(1). Ensure that you have enabled S/PDIF output in the Audio Center GUI (Main page). (2). Ensure that you have connected the correct S/PDIF output jack in the card to the decoder's (AV receiver) S/PDIF input jack. (3). You may need to select the correct input and mode of your decoder or AV receiver. For Dolby Digital or DTS output, double check that the AV receiver is in that decoding mode. (4). If you are using 192KHz PCM output, make sure that your decoder can support 192KHz decoding. Try changing it to 44.1K or 48KHz first.


- COPYRIGHT © 2015 ASUSTEK COMPUTER INC. ALL RIGHTS RESERVED
- TABLE OF CONTENTS
- INTRODUCTION
- HARDWARE
- DRIVER INSTALLATION
- CONNECTING SPEAKERS AND PERIPHERALS
- XONAR U7 DRIVER GUIDE
- TROUBLESHOOTING
- PACKAGE CONTENTS
- SYSTEM REQUIREMENTS
- GENERAL SPECIFICATION
- INSTALLING THE XONAR U7 CARD DRIVER
- UNINSTALLING OR REINSTALLING THE XONAR U7 CARD DRIVER
- UNINSTALLING THE XONAR U7 CARD DRIVER
- REINSTALLING THE XONAR U7 CARD DRIVER
- INPUT CONNECTION
- CONNECTING TO A USB 2.0 PORT ON YOUR COMPUTER
- CONNECTING DIGITAL AUDIO SYSTEMS
- NO. ITEMS DESCRIPTION
- CONNECTING MICROPHONE / LINE-IN
- OUTPUT CONNECTION
- CONNECTING STEREO HEADPHONES
- CONNECTING 5.1 CHANNEL HEADPHONES
- CONNECTING ANALOG SPEAKER SYSTEMS CONNECTING 2 CHANNEL SPEAKERS
- CONNECTING 4 CHANNEL SPEAKERS / POWER AMPLIFIER
- CONNECTING 7.1 CHANNEL SPEAKERS
- INTRODUCTION TO THE XONAR U7 AUDIO CENTER GUI
- FUNCTION POP-UP MENU
- TO OPEN THE POP-UP MENU
- AUDIO STATUS PANEL
- PROFILE PANEL
- INPUT DEVICE FUNCTION INTRODUCTION
- DOLBY® HOME THEATER (WINDOWS® 7 AND ABOVE ONLY)
- FUNCTION INTRODUCTION
- VOLUME CONTROL
- SPEAKER SETTINGS
- HEADPHONE SETTINGS
- SAMPLE RATE
- EQUALIZER (WINDOWS XP ONLY)
- ENVIRONMENT EFFECT
- VIRTUAL SPEAKER SHIFTER (WINDOWS XP ONLY)
- FLEX BASS II
- XEAR SINGFX
- XEAR AUDIO BRILLIANT (WINDOWS XP ONLY)
- XEAR DYNAMIC BASE (WINDOWS XP ONLY)
- XEAR SMART VOLUME (WINDOWS XP ONLY)
- XEAR VOICE CLARITY (WINDOWS XP ONLY)
- XEAR SURROUND MAX
- MIC-IN, LINE IN DEVICE FUNCTION INTRODUCTION
- XEAR SINGFX (MIC IN ONLY)
- INFORMATION PAGE INTRODUCTION
- TRAY ICON FUNCTION INTRODUCTION
- I CANNOT INSTALL THE AUDIO CARD DRIVER IN MY PC
- I CANNOT FIND THE XONAR U7 AUDIO CENTER
- I CAN'T HEAR ANY SOUND FROM MY ANALOG SPEAKERS
- I CAN'T HEAR ANY SOUND FROM THE S/PDIF OUTPUT
Brand : ASUS
Model : Xonar U7
Category : Soundcard