
KV-V8 - Monitor JVC - Free user manual and instructions
Find the device manual for free KV-V8 JVC in PDF.
| Product type | VHS Hi-Fi stereo 4-head VCR |
| Brand | JVC |
| Model | KV-V8 |
| Power supply | DC 12 V (11 to 16 volts tolerated), negative ground |
| Dimensions (W x H x D) | 259 mm x 94 mm x 270 mm |
| Weight | 3.2 kg |
| Operating temperature | 0 °C to +40 °C |
| Operating humidity | 35% to 80% |
| Storage temperature | -20 °C to +60 °C |
| Video system | PAL VHS, 4-head Hi-Fi helical scan |
| Audio system | Hi-Fi stereo VHS, 2 Hi-Fi channels + 1 normal channel |
| Playback functions | Normal playback, still frame, frame advance, slow motion, search, repeat |
| Recording functions | Automatic recording, automatic and manual tracking |
| Protection circuits | Condensation detector, high temperature, abnormal voltage, tape protection |
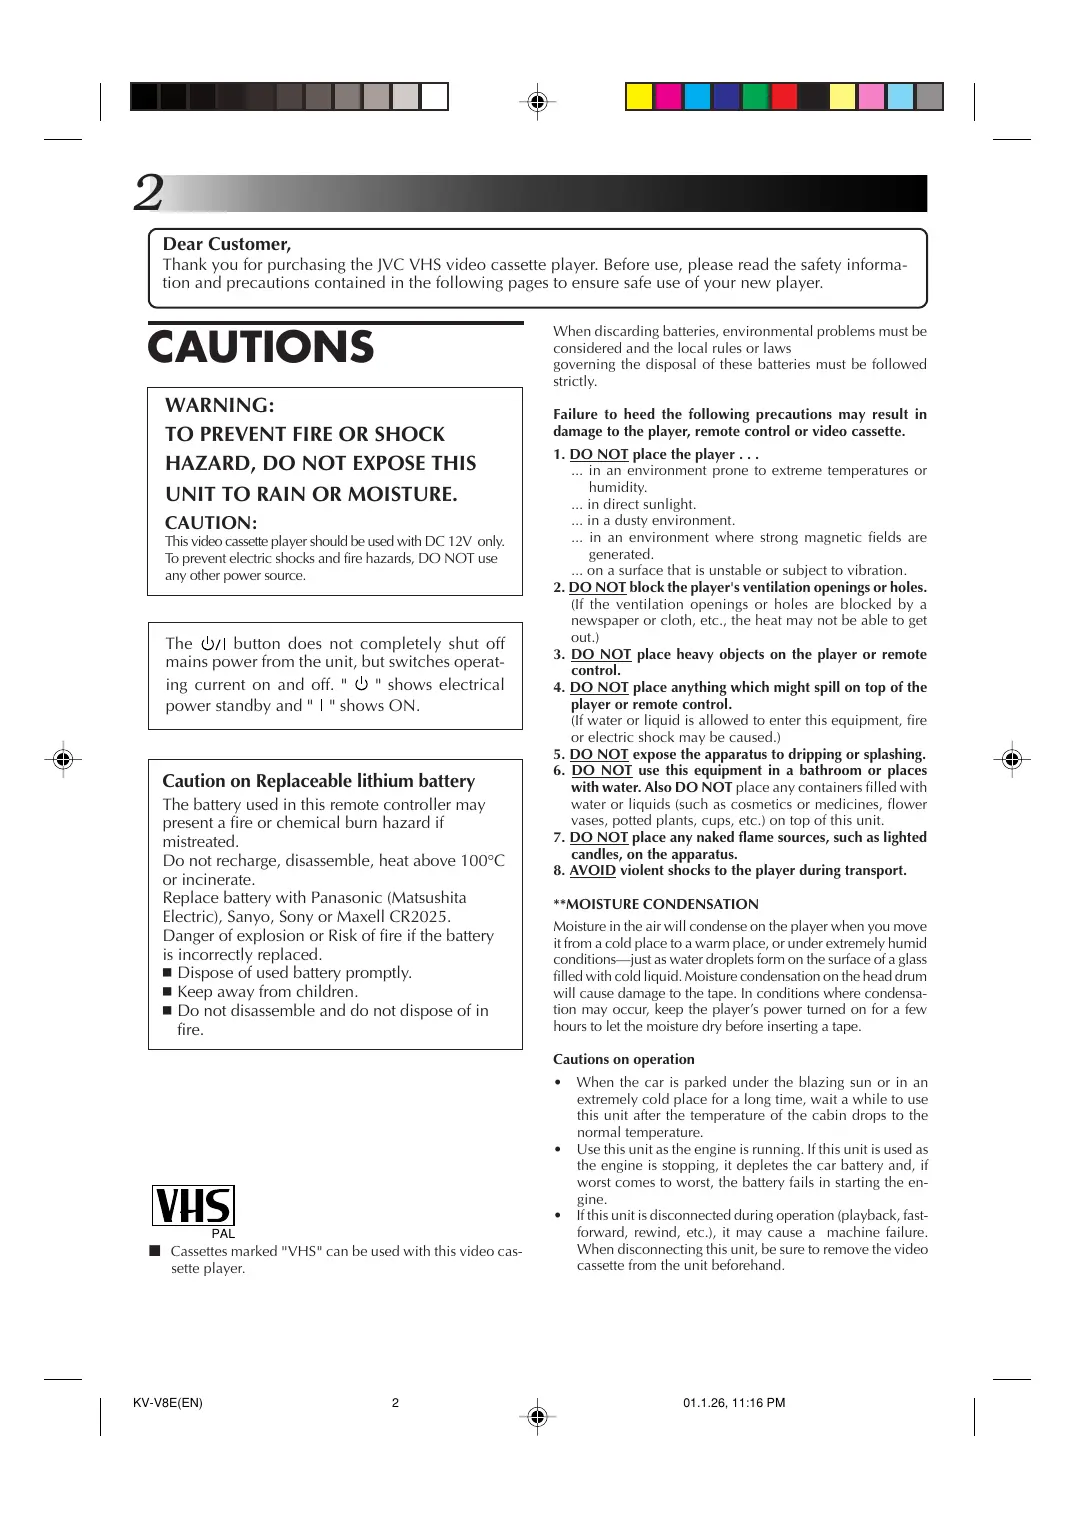
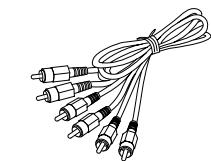
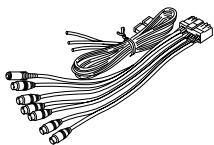
| Supplied accessories | Audio/video cable (5 m), power cord (5.5 m), remote control, CR2025 battery, sensor unit, mounting bracket, screws, Velcro tape |
| Maintenance and cleaning | Use a dry-type head cleaning cassette (TCL-2UX) |
| Safety | Do not expose to rain or moisture; use only on AC or DC 12V; do not block ventilation openings |
| Spare parts | Replacement battery CR2025 (Panasonic, Sanyo, Sony or Maxell) |
| Repairability | Contact the dealer or authorized distributor for any repairs |
Frequently Asked Questions - KV-V8 JVC
User questions about KV-V8 JVC
0 question about this device. Answer the ones you know or ask your own.
Ask a new question about this device
Download the instructions for your Monitor in PDF format for free! Find your manual KV-V8 - JVC and take your electronic device back in hand. On this page are published all the documents necessary for the use of your device. KV-V8 by JVC.
USER MANUAL KV-V8 JVC
For installation and connections, refer to the separate manual.
Thank you for purchasing the JVC VHS video cassette player. Before use, please read the safety information and precautions contained in the following pages to ensure safe use of your new player.
CAUTIONS
WARNING: TO PREVENT FIRE OR SHOCK HAZARD,DO NOT EXPOSE THIS UNIT TO RAIN OR MOISTURE.
CAUTION:
This video cassette player should be used with DC 12V only. To prevent electric shocks and fire hazards, DO NOT use any other power source.
The / button does not completely shut off mains power from the unit, but switches operating current on and off. " " shows electrical power standby and " I " shows ON.
Caution on Replaceable lithium battery
The battery used in this remote controller may present a fire or chemical burn hazard if mistreated.
Do not recharge, disassemble, heat above 100^ or incinerate.
Replace battery with Panasonic (Matsushita Electric), Sanyo, Sony or Maxell CR2025.
Danger of explosion or Risk of fire if the battery is incorrectly replaced.
- Dispose of used battery promptly.
- Keep away from children.
- Do not disassemble and do not dispose of in fire.
When discarding batteries, environmental problems must be considered and the local rules or laws governing the disposal of these batteries must be followed strictly.
Failure to heed the following precautions may result in damage to the player, remote control or video cassette.
- DO NOT place the player ...
... in an environment prone to extreme temperatures or humidity.
... in direct sunlight.
... in a dusty environment.
... in an environment where strong magnetic fields are generated.
... on a surface that is unstable or subject to vibration.
- DO NOT block the player's ventilation openings or holes. (If the ventilation openings or holes are blocked by a newspaper or cloth, etc., the heat may not be able to get out.)
- DO NOT place heavy objects on the player or remote control.
- DO NOT place anything which might spill on top of the player or remote control.
(If water or liquid is allowed to enter this equipment, fire or electric shock may be caused.)
- DO NOT expose the apparatus to dripping or splashing.
- DO NOT use this equipment in a bathroom or places with water. Also DO NOT place any containers filled with water or liquids (such as cosmetics or medicines, flower vases, potted plants, cups, etc.) on top of this unit.
- DO NOT place any naked flame sources, such as lighted candles, on the apparatus.
- AVOID violent shocks to the player during transport.
**MOISTURE CONDENSATION
Moisture in the air will condense on the player when you move it from a cold place to a warm place, or under extremely humid conditions—just as water droplets form on the surface of a glass filled with cold liquid. Moisture condensation on the head drum will cause damage to the tape. In conditions where condensation may occur, keep the player's power turned on for a few hours to let the moisture dry before inserting a tape.
Cautions on operation
- When the car is parked under the blazing sun or in an extremely cold place for a long time, wait a while to use this unit after the temperature of the cabin drops to the normal temperature.
- Use this unit as the engine is running. If this unit is used as the engine is stopping, it depletes the car battery and, if worst comes to worst, the battery fails in starting the engine.
- If this unit is disconnected during operation (playback, fast-forward, rewind, etc.), it may cause a machine failure. When disconnecting this unit, be sure to remove the video cassette from the unit beforehand.
VHS PAL
Cassettes marked "VHS" can be used with this video cassette player.
Table of contents
CAUTIONS 2
Features 4
Dew sensor circuit 4
High temperature sensor circuit 4
Abnormal voltage sensor circuit 4
Tape protection circuit 4
ACCESSIONS 4
Inserting/removing cassette 5
Inserting cassette into the cassette compartment 5
Removing cassette from player 5
For protection of important recording 5
How to playback VHS-C cassette tape recorded by Video Movie 5
For playing back pictures clearly all the time (Use of head cleaning cassette) 6
FRONT VIEW 7
REAR VIEW 8
REMOTE CONTROLLER 9
How to set battery in the battery compartment . 10
Indications on the screen 11
Playback 12
Playing back 12
Fast-forwarding/Rewinding 12
Fast-forwarding/Rewinding while looking at picture 12
Still playback/Frame-to-frame playback
/Slow playback 12
Repeated playback 12
Search playback 13
Playing back from the beginning of each program-Search playback 13
How to choose (specify) the address (index) of a program 13
NTSCPlayback 13
Connection to other apparatus
Connection to Mobile Color TV System 14
Connection to a video camera 15
Troubleshooting 16
Specifications 16
Some Do's And Don'ts On The Safe Use Of Equipment
This equipment has been designed and manufactured to meet international safety standards but, like any electrical equipment, care must be taken if you are to obtain the best results and safety is to be assured.
DO read the operating instructions before you attempt to use the equipment.
DO ensure that all electrical connections (including the POWER CONNECTOR, extension leads and interconnections between pieces of equipment) are properly made and in accordance with the manufacturer's instructions. Switch off and withdraw the POWER CONNECTOR when making or changing connections.
DO consult your dealer if you are ever in doubt about the installation, operation or safety of your equipment.
DO be careful with glass panels or doors on equipment.
DON'T continue to operate the equipment if you are in any doubt about it working normally, or if it is damaged in any way — switch off, withdraw the POWER CONNECTOR and consult your dealer.
DON'T remove any fixed cover as this may expose dangerous voltages.
DON'T leave equipment switched on when it is unattended unless it is specifically stated that it is designed for unattended operation or has a standby mode. Switch off using the switch on the equipment and make sure that your family knows how to do this. Special arrangements may need to be made for infirm or handicapped people.
DON'T use equipment such as personal stereos or radios so that you are distracted from the requirements of road safety. It is illegal to watch video whilst driving.
DON'T listen to headphones at high volume, as such use can permanently damage your hearing.
DONT obstruct the ventilation of the equipment, for example with curtains or soft furnishings. Overheating will cause damage and shorten the life of the equipment.
DON'T use makeshift stands and NEVER fix legs with wood screws — to ensure complete safety always fit the manufacturer's approved stand or legs with the fixings provided according to the instructions.
DON'T allow electrical equipment to be exposed to rain or moisture.
ABOVE ALL...
NEVER let anyone especially children push anything into holes, slots or any other opening in the case — this could result in a fatal electrical shock;
NEVER guess or take chances with electrical equipment of any kind — it is better to be safe than sorry!
Features
4-heads stereo Hi-Fi video cassette player
- Mountable in either vertical or horizontal posture thanks to the highly reliable vibration-resistant design
Protection circuits (self-diagnosing circuits)
This video cassette player incorporates some protection circuits inside.
If this video cassette player is used as it is dewed, it may damage the tape and video heads.
Dew sensor circuit
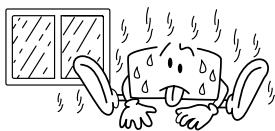
- When the cabin whose temperature is considerably low is rapidly heated or the humidity in the cabin is considerably high, insides of the wind-screen and cabin windows are sometimes fogged. At the same time, inside of the video cassette player mounted on the car is dewed.
In such the case (dewed condition), the dew sensor circuit functions to stop machine operation with indication of blinking indicator lamp in green, and "DEW PLEASE WAIT" appears on the screen. When the machine falls into such the status, wait for several hours until the indicator lamp stops blinking and lights continuously.
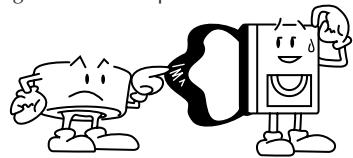
High temperature sensor circuit
- When the temperature of the machine becomes considerably high, the high temperature sensor circuit functions to stop machine operation with indication of blinking indicator lamp in red, and "HIGH TEMP PLEASE WAIT" appears on the screen. When the machine falls into such the status, turn off the machine and wait for a while until the indicator lamp stops blinking while leaving it in a cool place to lower the temperature. When turning on the machine again, make sure that the indicator lamp does not blink before starting operation.
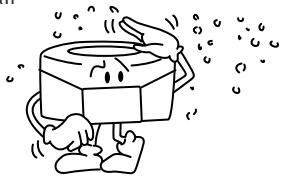
Abnormal voltage sensor circuit
- When the source loop circuit of the machine detects voltage out of the operation range, the abnormal voltage sensor circuit functions to turn off the machine with indication of blinking the /1 indicator lamp in orange, and "VOLTAGE PLEASE CHECK" appears on the screen.
In such a case, make sure that the machine is connected properly or battery voltage is sufficient.
Note: This video cassette player should be used with DC12V only.
Tape protection circuit
- When the machine remains in the still playback or slow playback mode for 5 minutes or longer, the tape protection circuit functions to stop mode the machine for protecting the tape.
ACCESSORIES
- Check to see if the following accessories are supplied with the video cassette player.
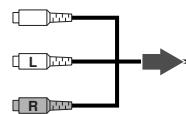
AV cord (5 m/16.7ft. long)
Power cord (5.5m/18.2ft. long)
Remote sensor unit

Remote control data cord (5m/16.7ft. long)
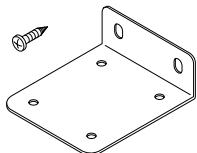
Mounting bracket x 2
Tapping screw ( 5 x 20 mm) x 4
Screw (M5 x 8 mm) x 4
Velcro tape x 2 sets

Remote controller
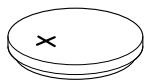
Round battery (CR2025)
Inserting/removing cassette
Inserting cassette into the cassette compartment
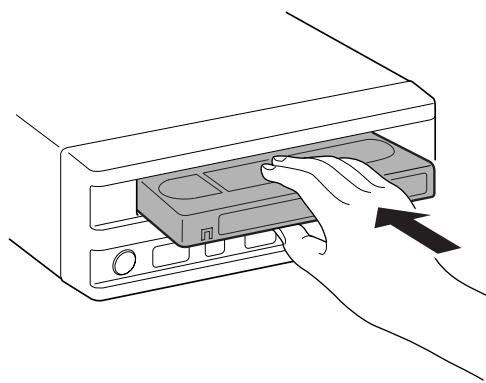
Insert a video cassette with the label side up into the cassette compartment by gently pressing the center part.
- With insertion of a video cassette into the cassette compartment, the player is automatically turned on. (Automatic power on function)
- The tape counter is reset to 0:00:00. (Automatic counter reset function)
- Inserting a cassette automatically starts playback. (Automatic playback function)
- When the car is shaking, it is hard to insert a cassette because the machine is apt to hold the cassette firmly to prevent the cassette from vibration. In such a case, insert the cassette strongly or pull the cassette out of the player once and again try to insert it.
Removing cassette from player
Press the EJECT button while in the stop mode.
- Don't insert fingers or foreign substances into the cassette compartment. When a little child is near the video cassette player, pay heed to him/her not to do so.
- If a video cassette is inserted in wrong posture, it is automatically ejected by the function of the protection mechanism. If it happens, wait for a few seconds and try to insert it correctly once again.
For protection of important recording
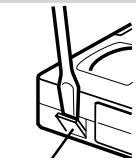
Protection tab
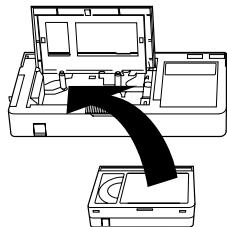
How to play back VHS-C cassette tape recorded by Video Movie
Break the recording protection tab of the cassette.
-
If you want to use the cassette whose recording protection tab was broken for recording, cover the broken part with adhesive tape double.
-
Use an optional VHS cassette adapter to play back VHS-C cassette tape.
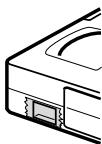
For playing back pictures clearly all the time (Use of head cleaning cassette)
If this video cassette player is used for a longtime, it makes playback pictures rough. In such a case, clean the video heads with an optional head cleaning cassette.
When the following symptom is observed:
- Playback picture is rough.
- Playback picture is unclear or no picture is reproduced on the screen.
- "USE CLEANING CASSETTE" appears on the screen.
What to do on such the occasions.
- Clean the video heads with a dry type head cleaning cassette (TCL-2UX).
Factors to soil heads - High temperature, high humidity (in the rainy season, etc.)
Damaged or soiled tape
If playback picture is still rough after the video heads are cleaned by the head cleaning cassette, consult the store that you got this player at or the nearest JVC dealer about the matter.
- Dust in air
- Long-time operation, etc.
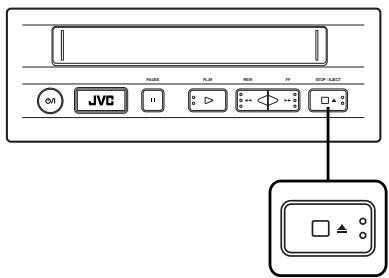
FRONT VIEW
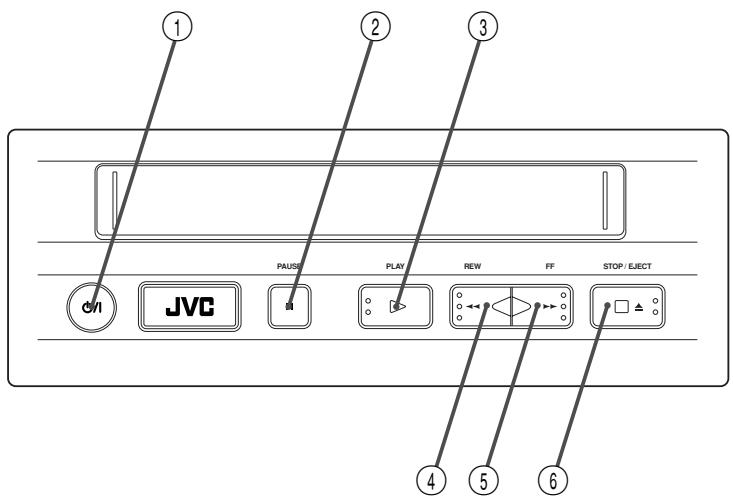
① button
Press this button to turn on or off this video cassette player.
② PAUSE button
Press this button to suspend playback temporarily.
③ PLAY button
Press this button to play back a video cassette.
④ REW (rewind) button
Press this button to rewind the tape.
⑤ FF (fast-forward) button
Press this button to fast-forward the tape.
⑥ STOP/EJECT button
- Press this button to stop playback operation.
- Press this button to eject a video cassette while in the stop mode.
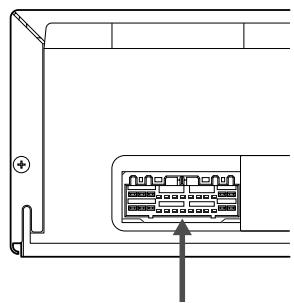
REAR VIEW
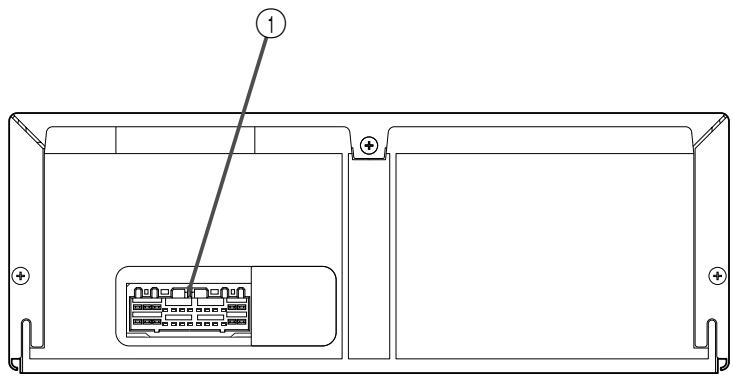
① POWER CORD CONNECTOR
REMOTE CONTROLLER

① button
Press this button to turn on/off the video cassette player.
② DISPLAY button
Press this button to turn the tape counter on and off.
③ REW (rewind) button
Press this button to rewind the tape.
④ PLAY button
Press this button to play back the tape.
⑤ STOP button
Press this button to stop playback.
⑥ AUTO (automatic tracking) button
Press this button to switch on/off automatic tracking on or off.
⑦ AUDIO selector button
Press this button to select a desired audio output. Selected audio output is shown on the screen.
HI-FI: Hi-Fi audio output
L: Audio output on left channel only
R: Audio output on right channel only
NORM: Normal audio output
MIX: Mixed audio output
AUX button
Press this button to select an external audio source.
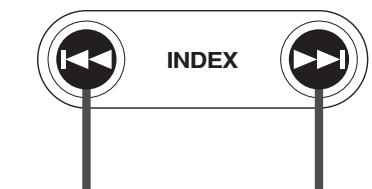
9 INDEX buttons
Press these buttons to search the beginning of a program.
FF (fast-forward) button
Press this button to fast-forward the tape.
1 PAUSE button
Press this button to suspend playback temporarily.
⑫ TRACKING +/- buttons
Press these buttons for manual tape tracking. Before pressing these buttons, be sure to switch off automatic tracking with the AUTO button.
How to set battery in the battery holder
- Set the round battery into place.
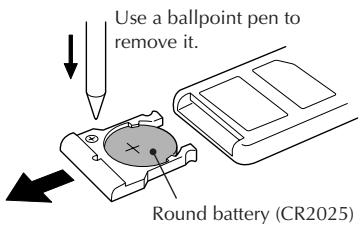
Pull out the battery holder.
Insert the battery in the holder, and be sure to have the "+" mark visible.
- Slide the holder back in until you hear a click.
Indications on the screen
Operation and status of the video cassette player can be checked by indications appearing on the screen. Each time an operation button is pressed, operation of the video cassette player is shown for about 5 seconds.
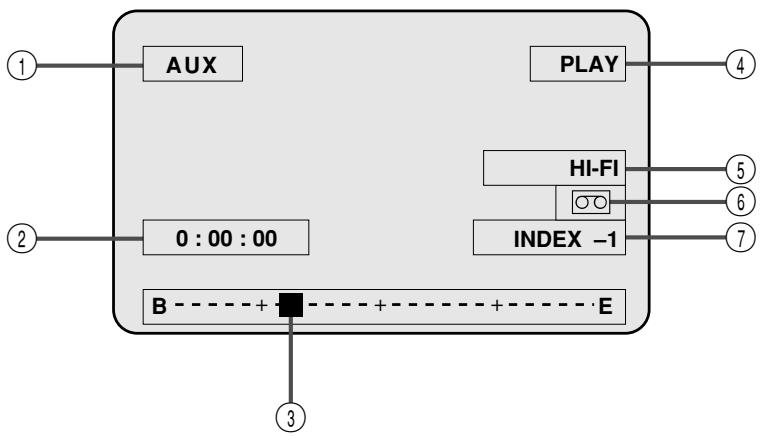
① External input indication
② Tape counter indication
③ Present tape position indication
④ Tape status indication (PLAY/FF/REW/STOP)
⑤ Audio output indication
HI-Fi: Hi-Fi audio output
L: Audio output on left channel only
R: Audio output on right channel only
NORM: Normal audio output
MIX: Mixed audio output
⑥ Cassette indication
⑦ Program index indication
Playback
Playing back
Preparation: Turn on a Monitor set or TV set connected with the video cassette player and set it to an external input mode (VIDEO 1,VIDEO 2,etc.).
1 Press the button of the video cassette player to turn it on.
2 Insert a video cassette into the video cassette player. When a video cassette is inserted, the video cassette player automatically starts playback.
3 Tape tracking is automatically adjusted.
Press the STOP button to discontinue playback.
The tape is rewound automatically when the tape comes to end in playing and fast-forwarding.
- When noise is generated in playback, press the AUTO button on the remote controller to switch off the automatic tracking mode and manually adjust tape tracking with the TRACKING + and - buttons.
Fast-forwarding/Rewinding
Press the FF button or REW button when the tape remains stopping.
- If the / button is pressed within 2 seconds after the REW button is pressed, the video cassette player is turned off after the tape is completely rewound to its beginning.
If the PLAY button is pressed within 2 seconds after the REW button is pressed, the video cassette player starts playback of the tape.
Fast-forwarding/Rewinding while looking at picture Momentarily press the FF button or REW button in playback.
- The video cassette player starts search playback.
- To playback the tape normally, press the PLAY button.
- For short searches, press and hold FF or REW for over 2 seconds during playback or still picture. When released, normal playback resumes.
ATTENTION
In the search, still, slow-motion or frame-by frame playback mode,
- the picture will be distorted.
- the noise bars will appear.
- there will be a loss of colour.
Still playback/Frame-to-frame playback/Slow playback
Press the PAUSE button in playback.
- The playback picture becomes still.
- When the still picture fluctuates up and down, adjust tracking with the TRACKING +/- button on the remote controller so that the picture becomes stable.
Press the PAUSE button in the still playback mode.
Each time the PAUSE button is pressed in the still playback mode, pictures are played back from frame to frame.
Continuously press the PAUSE button in playback for 2 seconds or longer.
- Playback speed goes down to 1/6 of the normal speed (slow playback).
- When noise is generated in this operation, adjust tracking with the TRACKING +/- button on the remote controller so that noise is minimized.
- If the same operation is performed in the reverse search, slow playback is operated in the reverse direction.
To return to the normal playback from the slow playback, press the PLAY button. - In playback at a speed different from the normal (in fast/slow playback), no sound is output from the video cassette player.
- If noise is generated in the fast playback, or slow search, it does not come from machine trouble.
- If still playback or slow playback is continuously operated for 5 minutes or longer, the video cassette player automatically stops playback for protecting the tape.
- If a badly recorded video tape or tape on which recording was performed by a different machine is played back, tracking adjustment occasionally results in failure.
Automatic tracking is automatically activated the moment the video cassette player is turned on or a cassette is inserted.
Repeated playback
Press the PLAY button in playback for 5 seconds or more.
(The PLAY indication blinks.)
- The tape is repeatedly played back from the beginning to the end 20 times, and the 20th playback ends at the end of the tape.
To discontinue repeated playback halfway, press the STOP button.
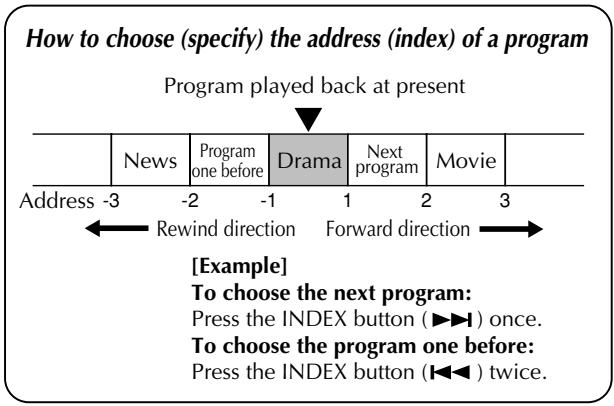
Search playback
Playing back from the beginning of each program - Search playback
To start playback from the beginning of a program, search the index recorded at the beginning point of each program. Video cassette tapes recorded by JVC machine have automatically recorded the index marks.
1 Choose a desired address (index) with the INDEX button on the remote control unit.
Rewind direction
Forward direction
TV screen
INDEX -2
Choose an address (index) two before the present program.
- Search a desired address (index) for automatic playback of the program.
Each time the right button is pressed, the number of index increases. On the other hand, each time the left button is pressed, the number of index decreases.
Maximum nine programs can be chosen at a time.
To discontinue search playback halfway, press the STOP button.
NTSCPlayback
You can play back NTSC tapes.
- Some TVs shrink the picture vertically and place black bars at the top or bottom of the screen. This is not a malfunction on the part of either the video player or the TV.
- The picture may roll up and down. This can be corrected using the V-HOLD control found on some TVs. (This cannot be corrected if the TV does not have a V-HOLD control.)
- The counter will be incorrect.
- During search, still, or frame-by-frame playback, the picture will be distorted, and there may be a loss of colour.
- Depending on the type of TV, the top and bottom portions of superimposed displays may be cut off during NTSC playback.
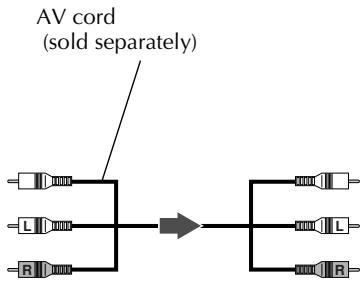
Connection to other apparatus
Connection to Mobile Color TV System
Connection to the commercially available Mobile Color TV System.
Connect the video cassette player to the tuner unit of a commercially available Mobile Color TV System.
- Connect the output connector on the video cassette player to video input connector 1 on the Mobile Color TV System.
Example of connection

Signal flow
Mobile Color TV System
Tuner unit
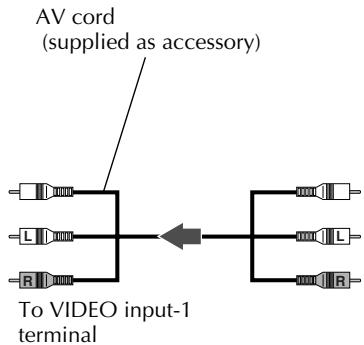
To the powercord connector
Power cord (supplied as accessory)
VCP output
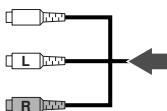
Connection to a video camera
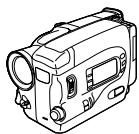
Connecting to a video camera allows you to enjoy pictures and sound recorded with the video camera on the mobile color TV set connected to this video cassette player. Some video cameras, however, cannot be connected to the video cassette player. Refer to the instruction manual that comes with the video camera for more information.
- Connect the output connector of the video camera to the input connector on the video cassette player.
Example of connection
Signal flow

ToVIDEO-AUDIO output terminals
AUX input
Troubleshooting
When you doubt if there is something wrong in the machine, check the symptom and cause referring to the following table.
| ■No power supply ▲Power cord is disconnected. ○Tightly plug the power cord into the jack. |
| ■Machine does not work though power is normally supplied. (◆ indicator lamp is blinking.) ▲Machine is dewed inside, or high temperature sensor circuit is in operation. ○When the machine is dewed, wait for several hours until the inside becomes dry. ○When the high temperature sensor circuit is functioning, cool the cabin to lower the machine temperature. |
| ■Indications don't disappear from the screen. ○Press the DISPLAY button on the remote controller. |
| ■Noise appears in a part (or some parts) of playback picture. ▲Abnormal tracking. ▲If noise appears in the same part of playback picture all the time, the tape is damaged by the part. ○Press the AUTO button on the remote control unit to cancel automatic tracking and manually adjust tracking with the TRACKING + and - buttons. |
| ■Still picture fluctuates up and down. ▲Vertical hold is maladjusted. ○Adjust tracking with the TRACKING + and - buttons on the remote control unit. |
| ■Abnormal color ▲No video output ▲No audio output ○Carefully read the instructions of the TV set connected to the video cassette player. |
| ■Playback picture is rough or frosted. ▲Video heads are soiled. ○Clean the video heads with the head cleaning cassette. |
Specifications
General
Power supply : DC12 V (11V-16V allowable) Negative ground
- Dimensions : 259 mm x 94 mm x 270 mm (width x height x depth)
Mass : 3.2kg
- Allowable working temperature : 0^ to +40^
- Allowable relative humidity : 35% to 80%
- Allowable conservation temperature : -20°C to +60°C
Video
-Playback system :VHS format, Hi-Fi 4-heads helical scan
Video signal :VHS PAL standard
Audio
-Playback system :VHS stereo Hi-Fi audio
- Audio track : 2 Hi-Fi audio channels and 1 normal audio channel
- Remote control unit : A code
(A code and B code are switchable automatically in the main unit.)
Verehrter Kunde,
② Touche DISPLAY (affichage)
③ Touche REW (remboinage)
⑤ STOP-toest (stoptoets)
⑨ INDEX-toets (indextoets)