
PHOTO EASY 160 - Photo printer SAGEM - Free user manual and instructions
Find the device manual for free PHOTO EASY 160 SAGEM in PDF.
| Product type | Thermal dye sublimation photo printer |
| Brand | SAGEM |
| Model | PHOTO EASY 160 |
| Print resolution | 309.8 x 309.8 dpi |
| Colors | 16.7 million (continuous) |
| Print speed | Less than 60 seconds per photo (excluding processing) |
| Supported memory card formats | SmartMedia, Memory Stick, SD, MMC, xD, CompactFlash |
| Connectivity | USB (master and slave), infrared, Bluetooth (optional), PictBridge, DPOF |
| Paper size | 101 x 152.4 mm (detachable borders) |
| Paper tray capacity | 20 sheets |
| Consumables | Three-color ribbon + varnish, 40 prints per ribbon |
| Power supply | 230 V AC, 50/60 Hz |
| Power consumption | 10 W (standby), 80 W (printing) |
| Dimensions (without paper tray) | 201 x 174 x 94 mm |
| Weight (without power adapter) | 1.5 kg |
| Special features | Crystal Image optimization, red-eye correction |
| Minimum PC configuration | Pentium, Windows 98SE/2000/Me/XP, 128 MB RAM, 150 MB disk space, USB port |
| Maintenance | Cleaning the print head with denatured alcohol and a cotton swab |
| Operating temperature | 15 to 35 °C |
| Operating humidity | 30 to 75 % |
Frequently Asked Questions - PHOTO EASY 160 SAGEM
User questions about PHOTO EASY 160 SAGEM
0 question about this device. Answer the ones you know or ask your own.
Ask a new question about this device
Download the instructions for your Photo printer in PDF format for free! Find your manual PHOTO EASY 160 - SAGEM and take your electronic device back in hand. On this page are published all the documents necessary for the use of your device. PHOTO EASY 160 by SAGEM.
USER MANUAL PHOTO EASY 160 SAGEM
Connect the mains supply 6
First ribbon installation 7
To change the ribbon 8
Loading paper 10
5 PRINTING FROM A MEMORY CARD 12
Insert a memory card 12
Print your photographs 14
Rapid printing 14
Example of rapid printing from a memory card 15
Create a contact sheet (index) 17
Prepare a series of photographs for printing
print basket function) 18
Print in DPOF (Digital Print Order Format) mode 21
6 PRINTING FROM A DIGITAL CAMERA (PICTBRIDGE MODE) 22
Printing in PictBridge mode 23
7 PRINTING FROM A MOBILE PHONE OR
OTHER PERIPHERAL DEVICE 24
Infrared transfer 24
Bluetooth transfer (optional) 26
8 FUNCTION CRYSTAL IMAGE 28
Activation/deactivation 28
9 PRINTING FROM A PC 29
10 PROCESSING THE CONTENT OF THE MEMORY CARD
FROM YOUR PC 31
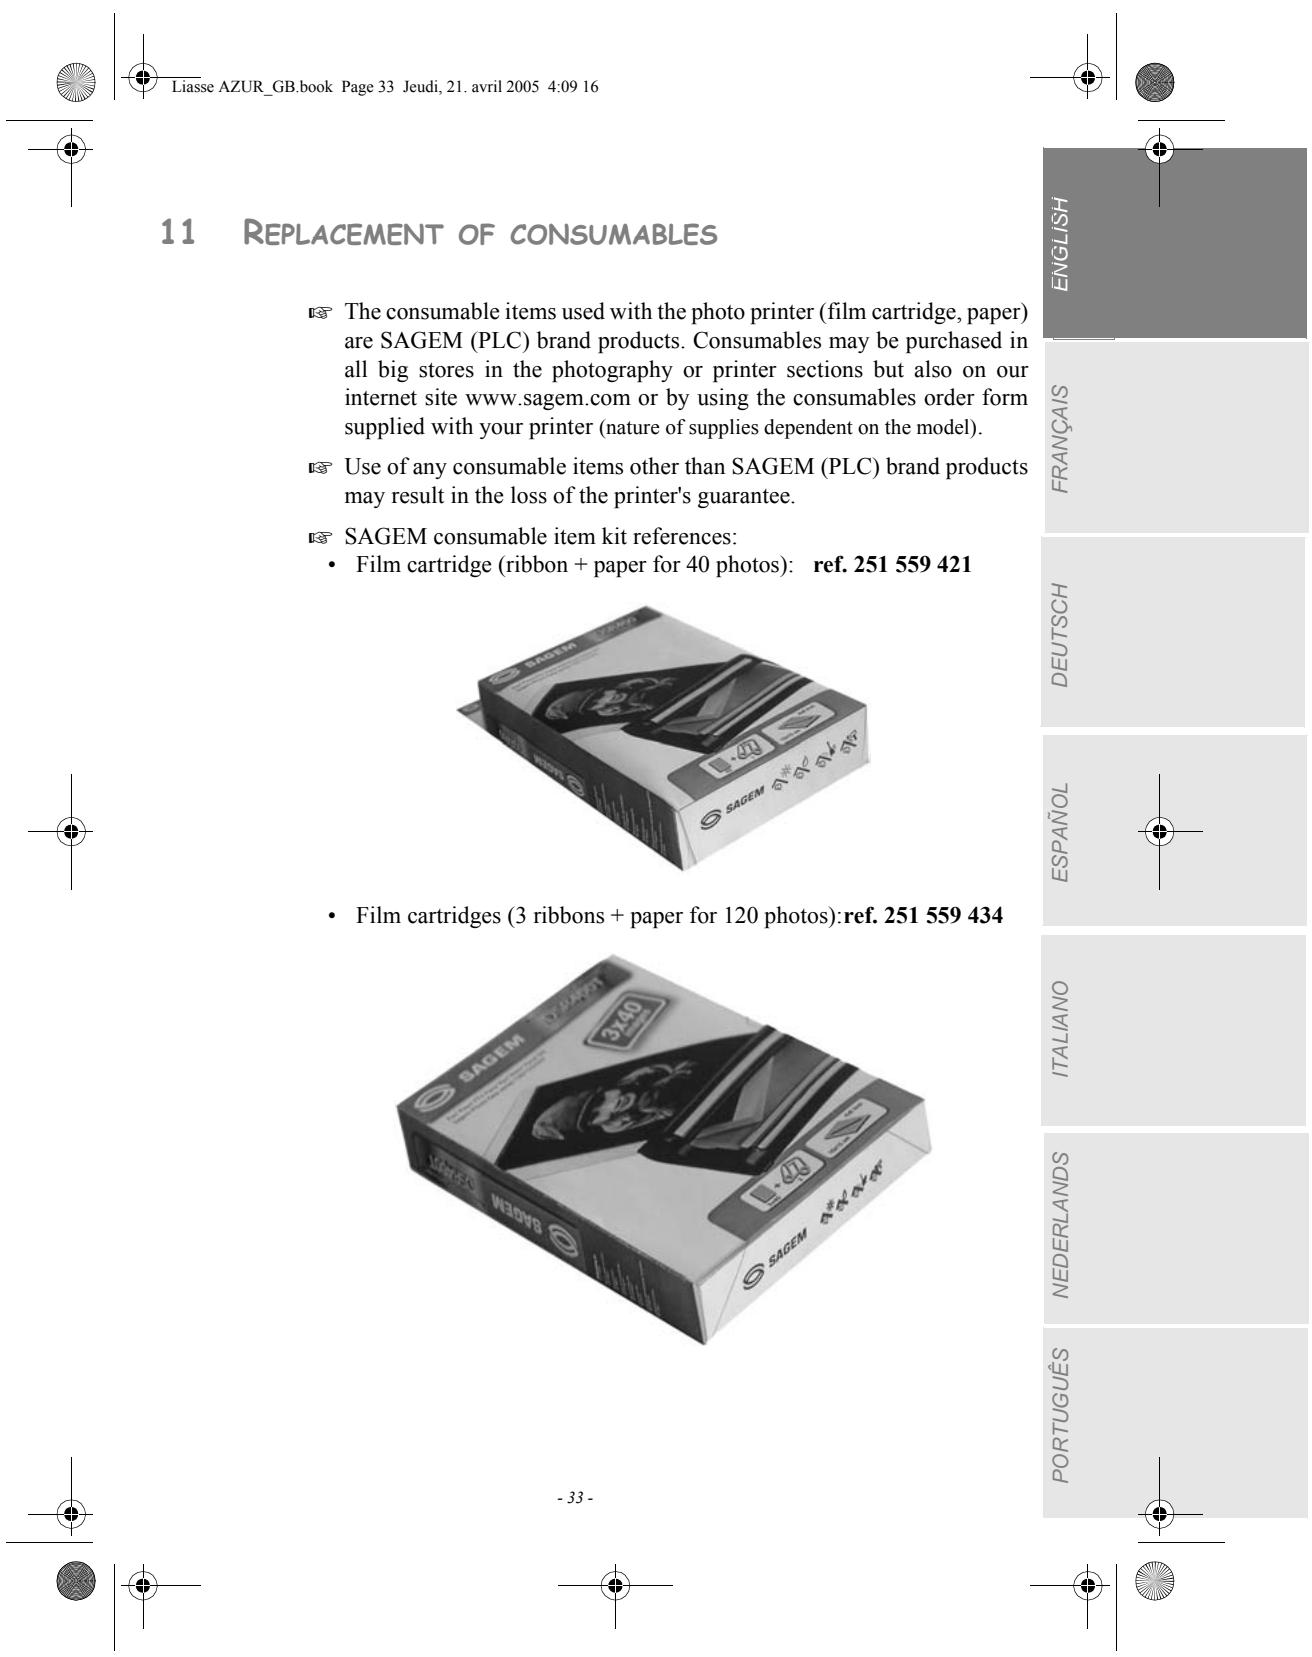
11 REPLACEMENT OF CONSUMABLES 33


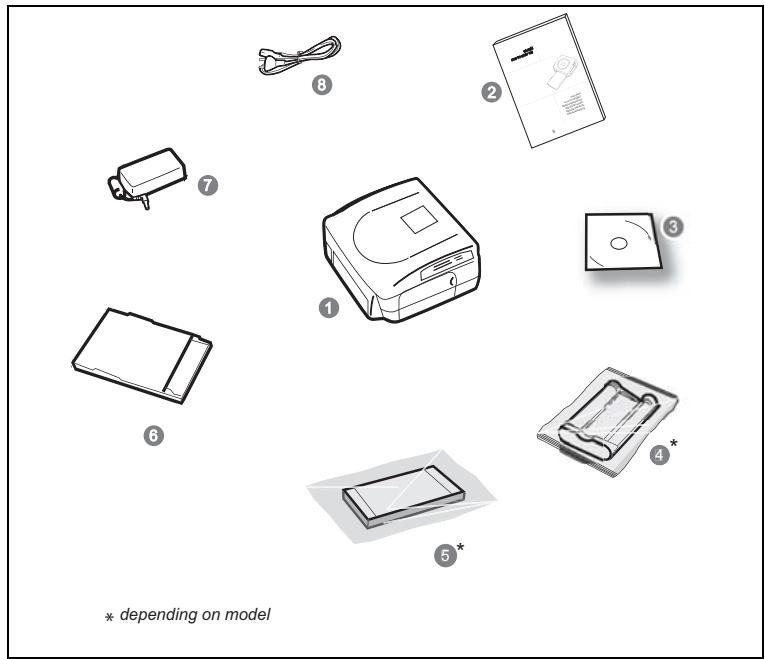
Place the box in front of you, open the packaging and check that you have received the items listed below:
- Photo printer.
- User manual.
- CD-ROM.
- Ink ribbon* (consumable).
- Photo paper* (consumable).
- Paper tray.
- Power supply unit.
- Mains cable.


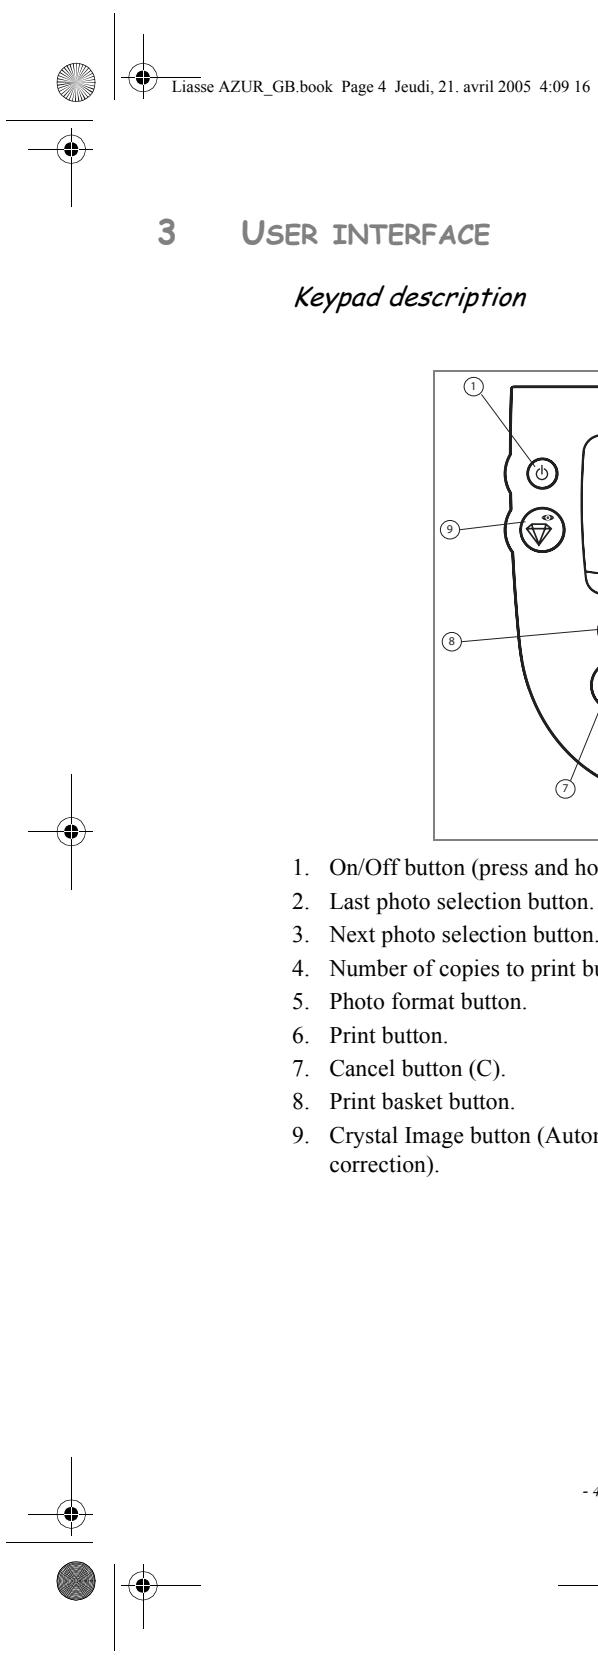

- On/Off button (press and hold).
- Last photo selection button.
- Next photo selection button.
- Number of copies to print button.
- Photo format button.
- Print button.
- Cancel button (C).
- Print basket button.
- Crystal Image button (Automatic print quality enhancement and red-eye correction).
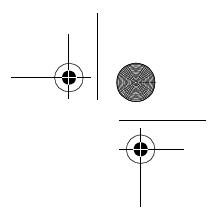
Display description
The following information is available on screen:
- Number of the selected photo.
- DPOF mode.
- Presence of the selected photo in the print basket.
- Number of copies to be printed.
- Crystal Image function icon.
- Print format.
- Red-eye correction function icon.
- Ribbon error.
-
Paper error.
-
Consumable card icon (smart card).
- Timer icon that flashes during printer activity.
- Print basket function.
- Number of the sheet to be printed.

-5-


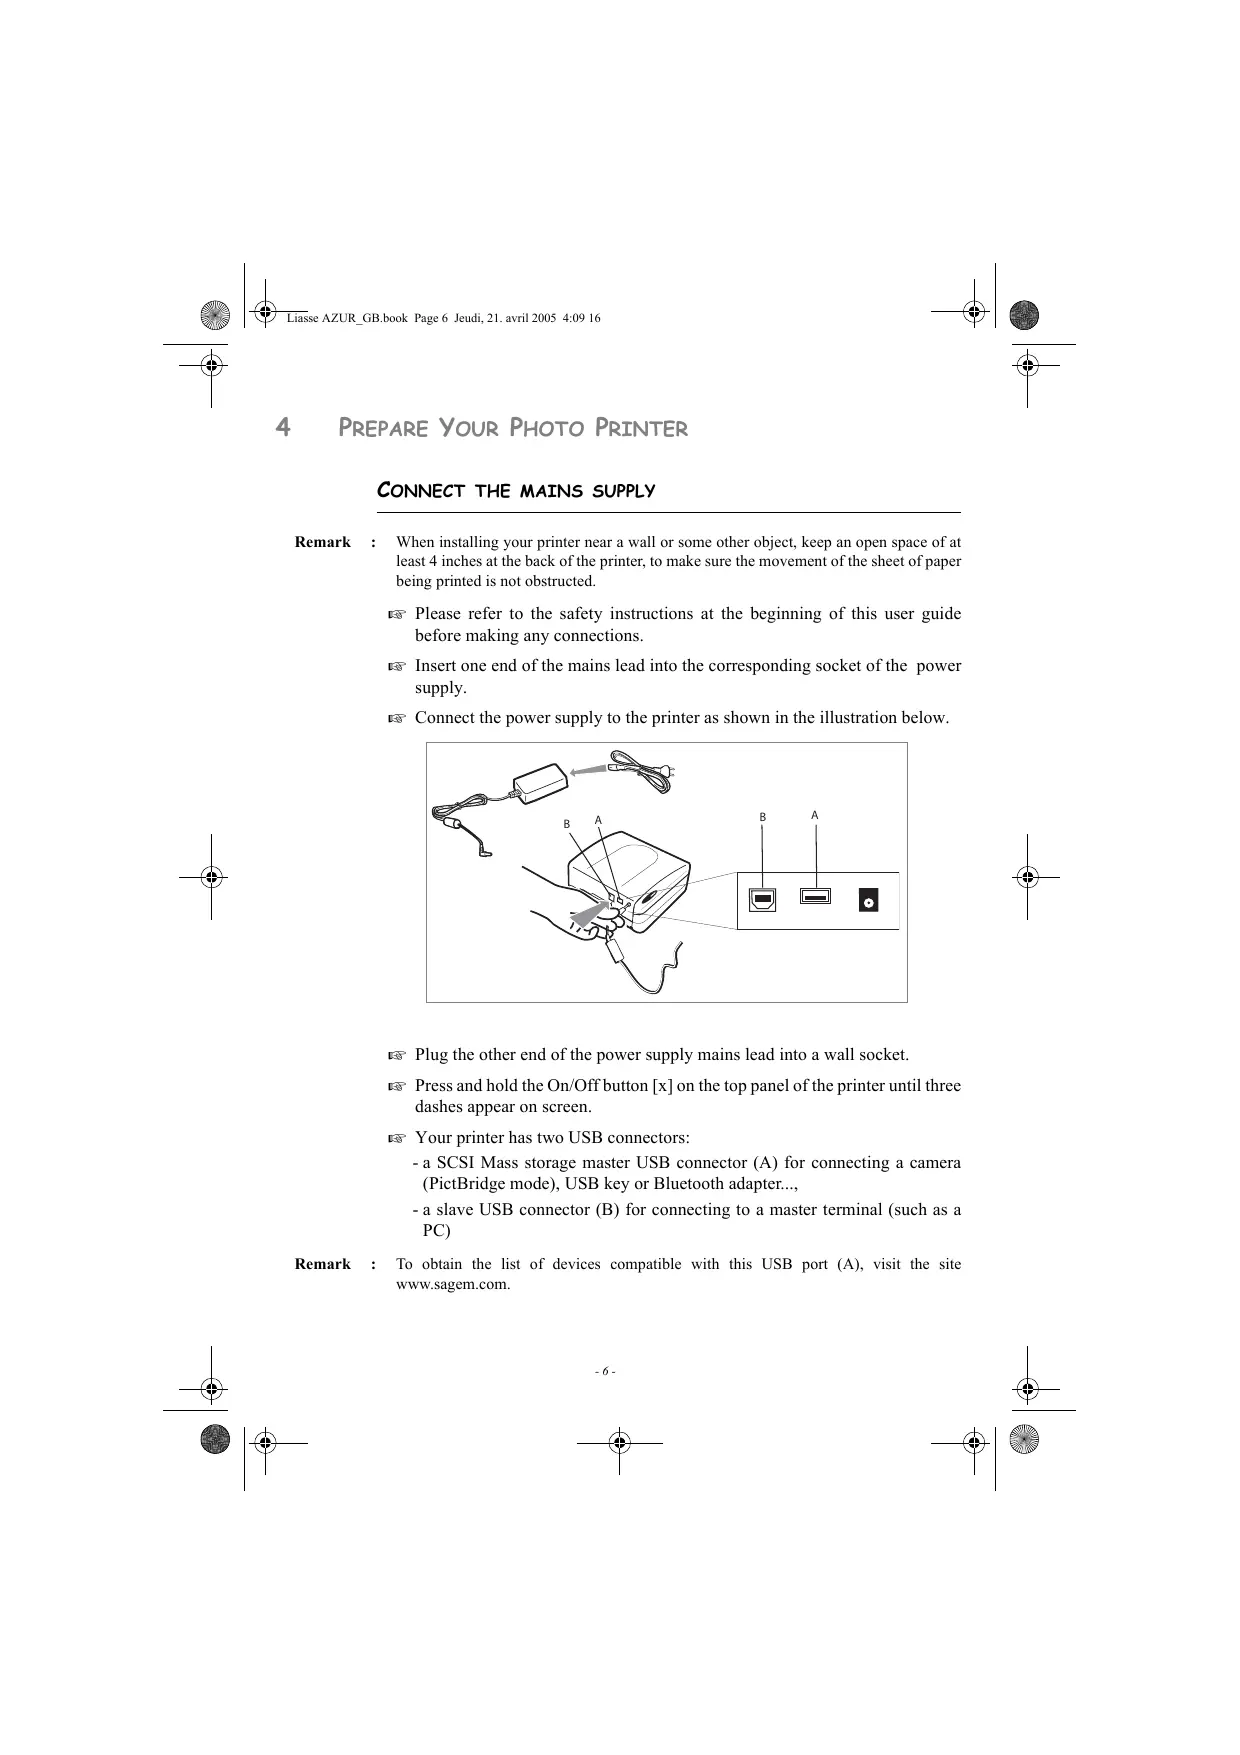
4 PREPARE YOUR PHOTO PRINTER
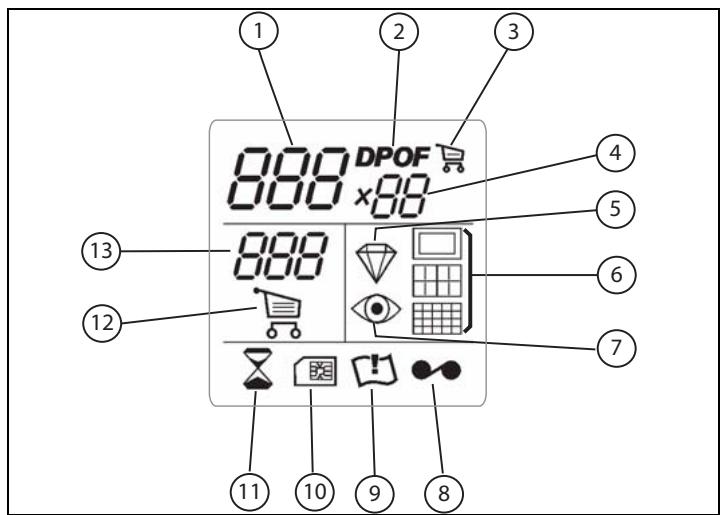
CONNECT THE MAINS SUPPLY
Remark : When installing your printer near a wall or some other object, keep an open space of at least 4 inches at the back of the printer, to make sure the movement of the sheet of paper being printed is not obstructed.
Please refer to the safety instructions at the beginning of this user guide before making any connections.
Insert one end of the mains lead into the corresponding socket of the power supply.
Connect the power supply to the printer as shown in the illustration below.


Plug the other end of the power supply mains lead into a wall socket.
Press and hold the On/Off button [x] on the top panel of the printer until three dashes appear on screen.
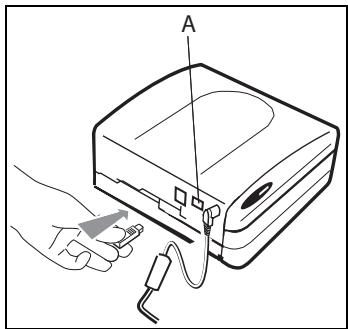
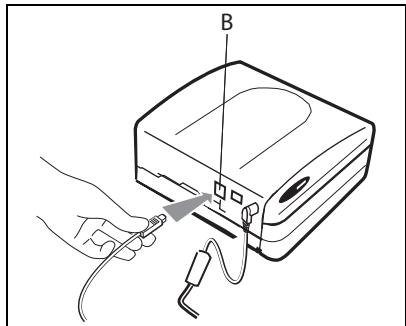
Your printer has two USB connectors:
- a SCSI Mass storage master USB connector (A) for connecting a camera (PictBridge mode), USB key or Bluetooth adapter...
- a slave USB connector (B) for connecting to a master terminal (such as a PC)
Remark : To obtain the list of devices compatible with this USB port (A), visit the site www.sagem.com.

-6-

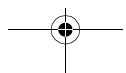
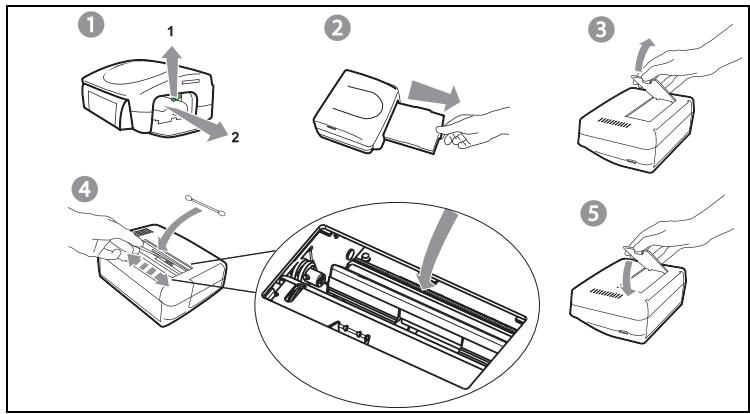
FIRST RIBBON INSTALLATION
Remark : Use manufacturer consumables only. These are specially designed to provide optimum print quality (see Chapter 10).
Remark : Smart card validation is not necessary for the use of consumables supplied with the printer (nature of supplies dependent on the model).
Switch on the printer. Wait 10 seconds for the printhead to lift, then:
- Open the external flap located on the right-hand side of the printer.
- Remove the protective foam.
- Take the new ribbon out of its packaging and make sure that the film is stretched after removing the card (A).
- Install the ribbon in the position shown in the illustration below.
- Insert the ribbon so that it is firmly seated in its housing. The locking catch must be closed after insertion.
- Close the external flap.
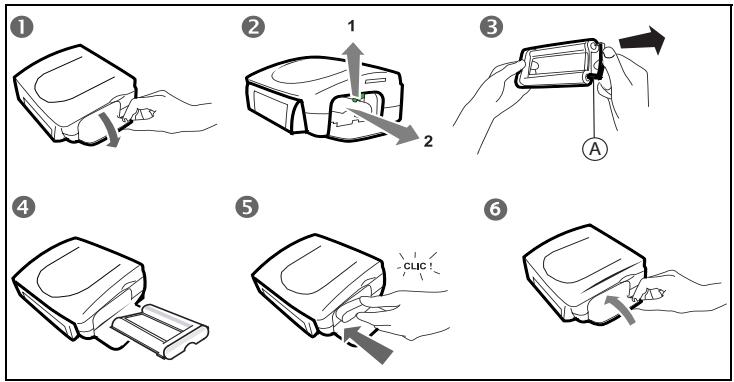
Warning : Never touch the film cartridge with your fingers. Make sure the cartridge is completely inserted into the printer. Check that the green locking lever is correctly lowered.
Remark : In the event of any difficulty, check that there are no foreign objects in the film cartridge compartment.

-7-


TO CHANGE THE RIBBON
Remark : Use manufacturer consumables only. These are specially designed to provide optimum print quality.
Switch on the printer. Wait 10 seconds for the printhead to lift, then:
- Take the smart card supplied with the ribbon and photo paper and insert it in the reader on the printer's left-hand side. The smart card is recognised and read by the printer, and once the procedure is complete the wording: "40 End" or "120 End" appears on screen.
- Remove the SIM card.
- Take the new ribbon out of its packaging and make sure that the film is stretched after removing the card (A).
- Open the external flap located on the right-hand side of the printer.
- Lift the locking lever and remove the used ink ribbon.
- Install the ribbon in the position shown in the illustration below.
- Lift the locking lever and push in the film cartridge until it touches the back of the compartment the locking lever must be locked after insertion.
- Close the external flap.
Remark : If the ribbon is replaced during a print job, you can resume printing where you left off
by pressing the button.


-8-

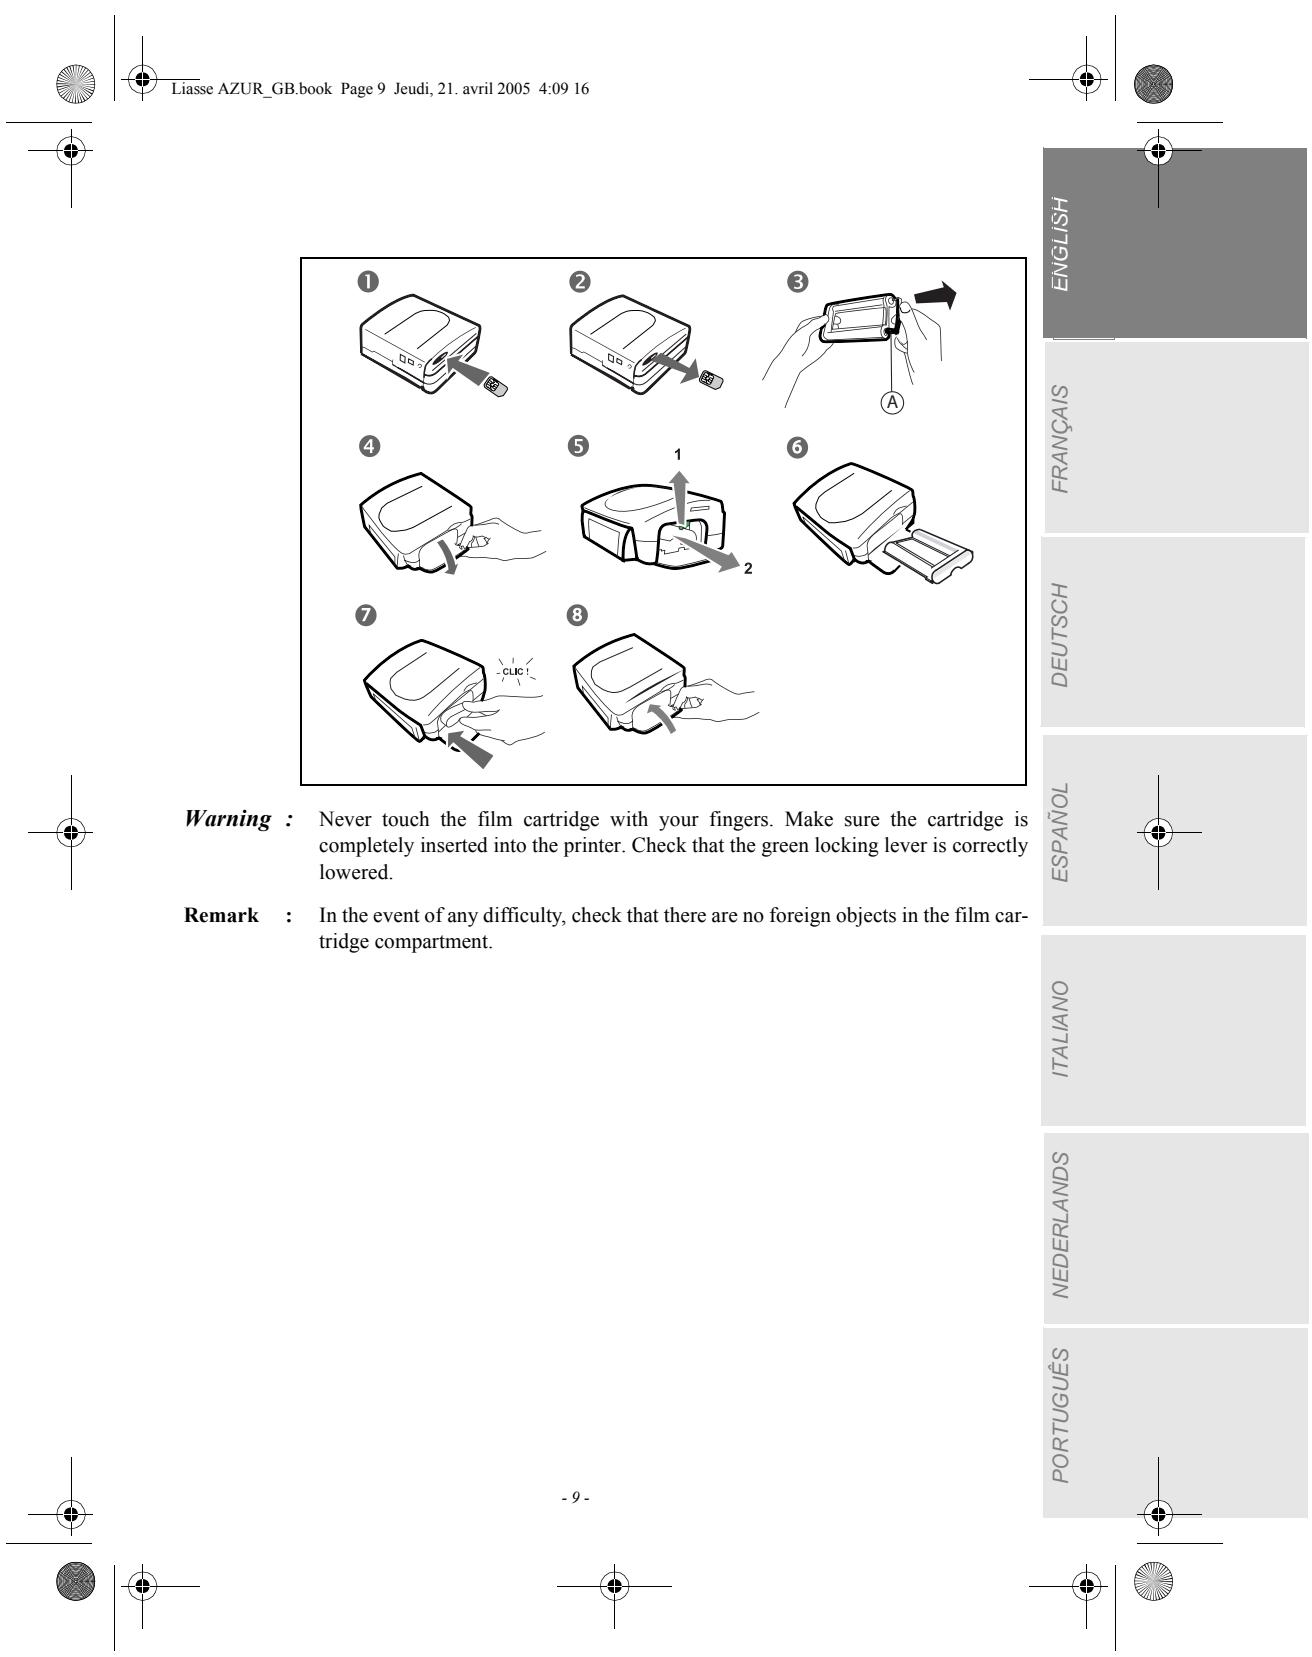
LOADING PAPER
- Pull the paper tray out of the printer.
- Open a pack of paper with the protection sheet on the top, insert it in the paper tray, making sure the rectangle reserved for postage stamps is on the outside of the tray, that is, towards you.
- Remove the protection sheet.
- Line up the tray with its compartment and push it in slowly until the locking system clicks.
Your photo printer is now ready to print your digital photographs.
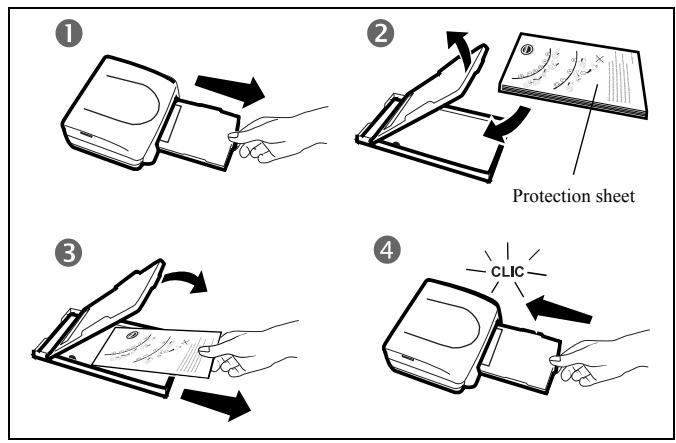
Warning : handle paper sheets by their pre-cut edges, never allow your fingers to come into contact with the shiny surface before printing.

-10-


5 PRINTING FROM A MEMORY CARD
INSERT A MEMORY CARD
Insert your memory card into the corresponding slot, as shown in the illustrations below.
Warning : SmartMedia, CONTACTS FACING DOWNWARD.
Warning : The memory cards do not enter fully in the reader slot. DO NOT USE FORCE UNDER ANY CIRCUMSTAN
If a card does not enter properly, remove it and check that you are introducing it in the correct slot and with the right orientation.
Warning : Printing of picture by ascending order relatively to the date of the pictures on the memory board will be achieved if parameters "dates and hour" have been set on your camera before the catch of pictures. Otherwise pictures will be read and printed in a random order.

-12-


Your printer is switched on, and you have inserted a memory card.
The timer icon flashes while the printer is loading data. After a few seconds, the number of photographs found on the memory card is displayed on the screen.
Your photos are printed in four stages. The printer first prints the three colours: yellow, magenta and cyan in that order, then deposits a protective film on the sheet of paper, and finally ejects the photo.
Remark : To enable you to handle your photographs under the right conditions, the size of the sheets of paper is greater than the printed surface and the two lateral edges are pre-cut.
After printing, do not tear these edges abruptly, fold along the dotted line several times and then gently tear off the edges.
Idea : The edges can be removed on a number of photos at a time by superimposing them on each other.

RAPID PRINTING
Select the number of the photograph required using the - or + keys.
Remark : If you press and hold the + button, you can advance the photo number in steps of ten, which can be useful when dealing with a large number of photos.
Press the key to set the number of copies.
Press the key to select print format.
You may select a predefined format to print the photographs:
- Print your photograph in format 10 × 15 ~cm full page, no border
- Print your photograph in format 10 × 15 cm with a white border
- Print your photograph in format 10 × 13 cm
- Print 2 photographs per page

-14-


- Print 4 photographs per page
Print 8 photos per page - Print 20 photographs per page (contact sheet or index)
Once the selection is made, press the key to start printing.
If printing is interrupted due to a lack of paper, paper jam or empty film cartridge, the printing operation may be restarted where it was interrupted by pressing the key after the necessary replacement or defect correction is performed.
Idea : Using the pre-printed reverse side postcard you can quickly send your photograph to friends, family, etc.
Idea : Hold the C key down for 3 seconds to reinitialise the printer and return to the default status, such as when inserting a card.
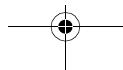
EXAMPLE OF RAPID PRINTING FROM A MEMORY CARD
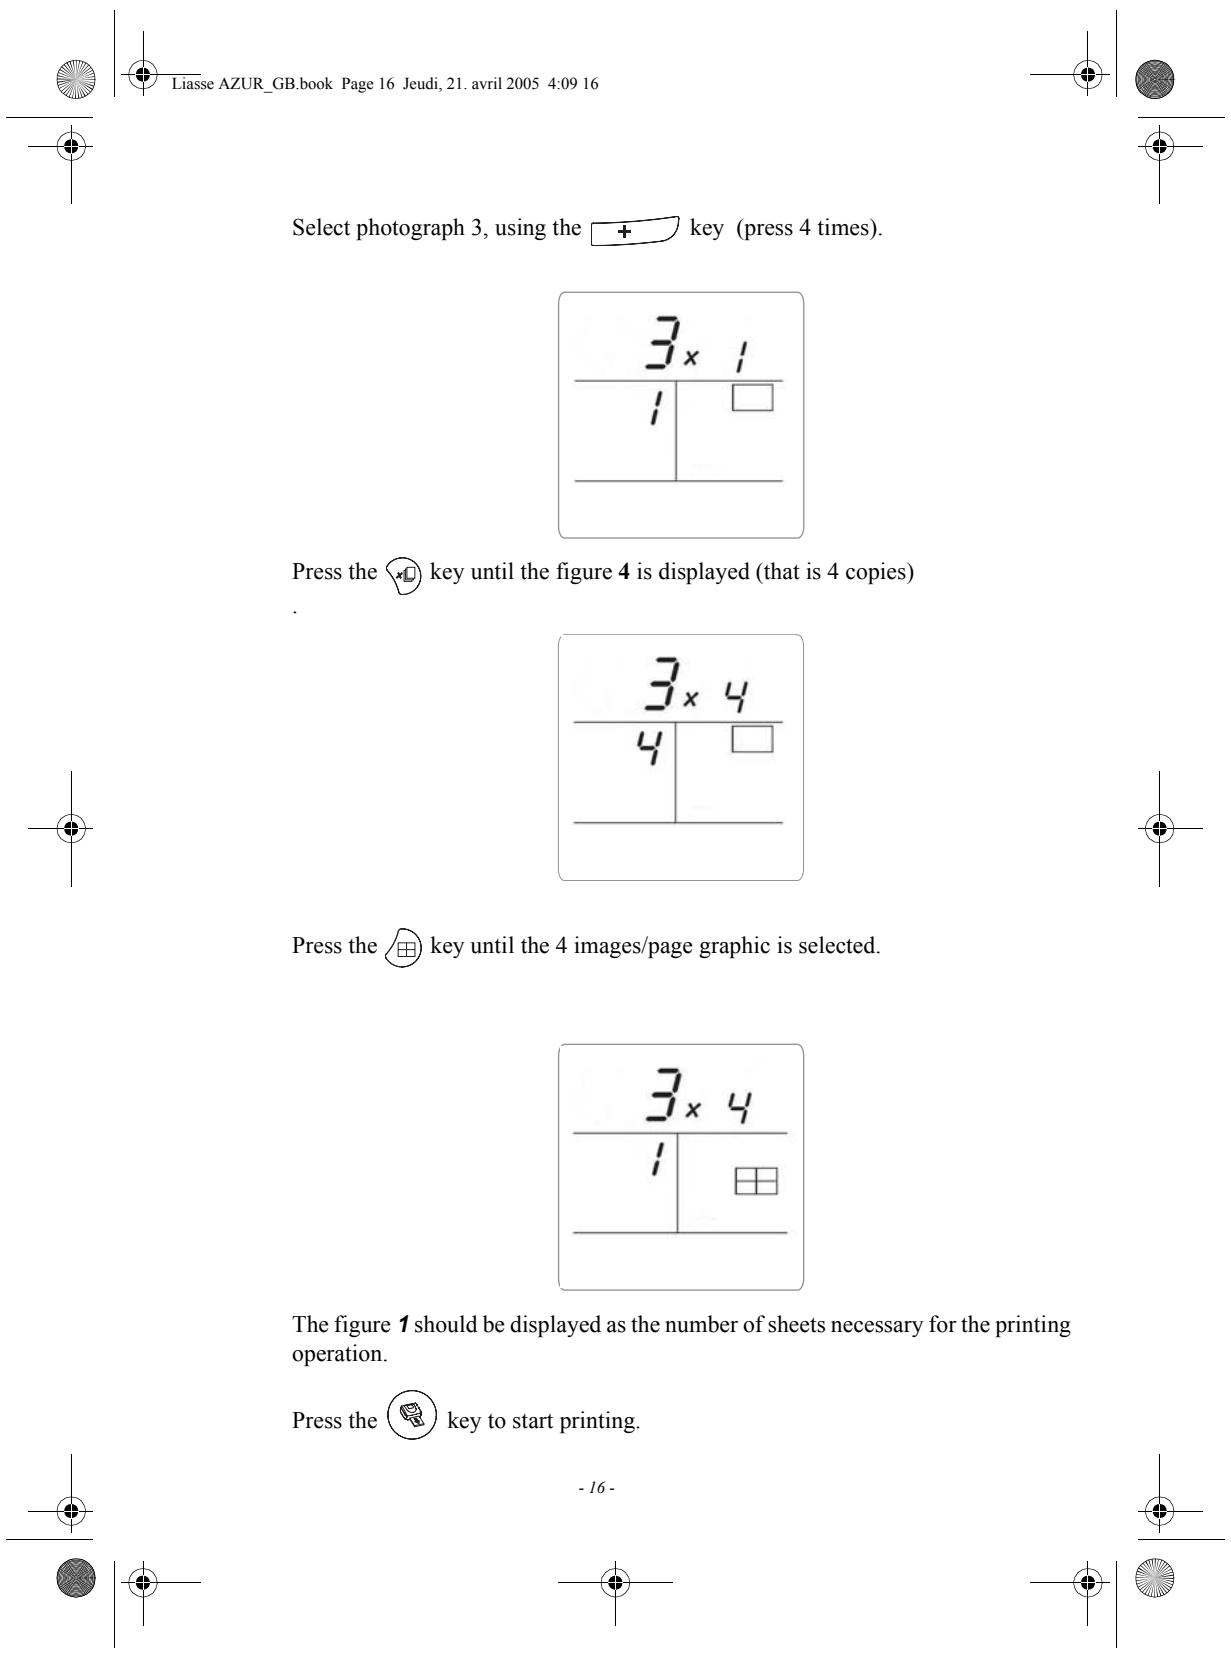
The memory card contains 5 photographs. We want to print photograph number 3, 4 times on the same sheet of paper.
Press and hold the On/Off button until three dashes appear on screen.
Insert the memory card into the correct printer slot.
After an analysis and recognition phase, the validated quantity of photos appears on screen.
-15-


CREATE A CONTACT SHEET (INDEX)
After inserting the memory card, the number of valid photos is displayed on the screen..

Press the + key until ALL is displayed on screen.
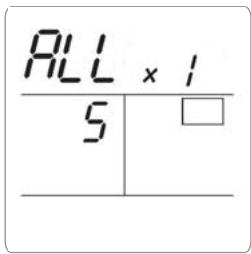

Select the format photographs per sheet format using the key.
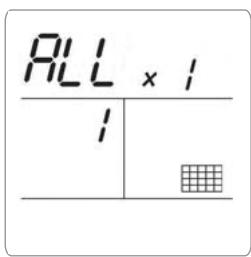
In the above example, you will be using 1 sheet for 5 printable photos.
Press the take out he key to initiate printing.
Idea
The contact plate is a simple way of displaying all the photographs on your memory card; choose those to be printed using the number assigned to each of them
-17-


PREPARE A SERIES OF PHOTOGRAPHS FOR PRINTING (PRINT BASKET FUNCTION)
After inserting the memory card, the number of valid photos is displayed on the screen..
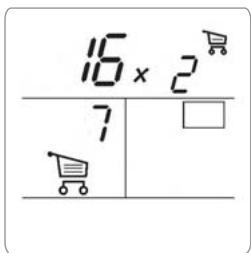
This example describes how to print 4 copies of photograph 3, 1 copy of photograph 8 and 2 copies of photograph 16.
Remark : Printing format remains fixed for series printing.

Select photograph 3, using the + , key; press the × key until the figure 4, corresponding to the quantity desired, is displayed.
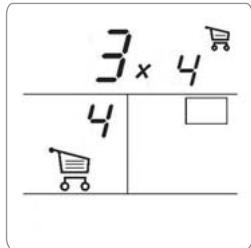
Press the key to add the photograph to the "shopping trolley" (the series).
The icon to the top right indicates that the active photo has been selected. The number displayed above the icon (bottom left) indicates the number of photos to be printed.

-18-
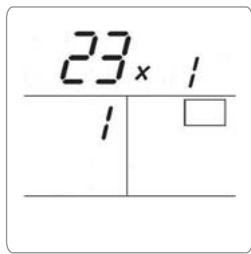
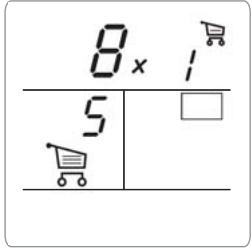
Select photograph 8, using the + key, press key to add this to the shopping trolley (the default number of copies is 1).
Select photograph 16, using the + key, press × key until the figure 2, corresponding to the desired number of copies, is displayed.
Press the key to add this to the shopping trolley.

The required number of sheets is displayed to the right of the print basket icon. Press the key to start printing.
Remark: If you notice that you have made an error after having validated the selection with the key, press the key again to cancel and redo the selection. This cancels only the most recent selection. It is also possible to deselect all photographs by selecting ALL using the + key and pressing the key twice.

-19-


PRINT IN DPOF
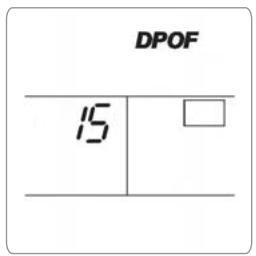
(DIGITAL PRINT ORDER FORMAT) MODE
This function allows you to select the photos that you want to print on your photo printer from your digital camera in PictBridge mode or from your memory card.
Select the required photographs on the camera (follow the instructions in the documentation of your camera).
Place the memory card in the appropriate slot to launch data transfer to your photo printer, the logo on the printer screen is activated and the number of printable photographs is displayed in the lower left-hand corner of the screen.
Warning : Example: memory card that contains 15 photographs selected for printing.
Start printing by pressing the key.
To exit DPOF mode, press the key.
To switch back to DPOF mode, press and hold the key down for 3 seconds.

-21-


6 PRINTING FROM A DIGITAL CAMERA (PICTBRIDGE MODE)
Warning : If a memory card is inserted in the printer, you cannot access PictBridge mode.
Your photo printer supports PictBridge standards, allowing you to print photos directly from cameras that are PictBridge-compatible.
Refer to your camera's accompanying documentation.
From your camera, you can:
Print a photo.
Select photos and printing them several times on the same paper.
Print from a DPOF-standard file.
Monitor printing and especially the beginning, progress and end of the printing process. Also, error messages likely to occur (no paper, paper jam, no ink, cover not closed, no cartridge, fatal error).
Your photo printer does not support the following functions:
Image cropping.
Choosing a type of paper.
Providing additional data (for example, date and time), in addition to the photo to be printed.

-22-
PRINTING IN PICTBRIDGE MODE
Check that camera is set up in PictBrigde mode.
Connect the USB cable to the USB port of your camera and the other end to the master USB port of the printer (reference A of the illustration on page 6).
After the analysis and recognition phase, the following screen appears
The printer is driven by the digital camera. No buttons need to be pressed on the printer.
To leave PictBridge mode withdraw USB cable.

-23-


7 PRINTING FROM A MOBILE PHONE OR OTHER PERIPHERAL DEVICE
Warning : If a memory card is inserted in the printer, you cannot access infrared or bluetooth transfer mode.
Your photo printer allows you to print photos stored in your mobile phone, PDA or PC. For this, you need to transfer them to the printer using the infrared or bluetooth link (for bluetooth, use the optional bluetooth adapter).
On the photo printer, press and hold the On/Off button until three dashes appear on screen.
Remark : For a list of compatible devices, go to www.sagem.com.
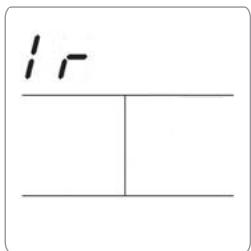
INFRARED TRANSFER
Warning : If you have started transfer by Bluetooth, you will not be able to transfer photos by infrared if you have not before hand erased be internal memory by holding the key ( c c ) down for 3 seconds
Place the infrared window of your device face-to-face with the corresponding window of the photo printer, at a distance not exceeding 30 centimetres.
Warning : In an environment exposed to intense light, a distance of no more than 10 centimetres between the two infrared windows is recommended.
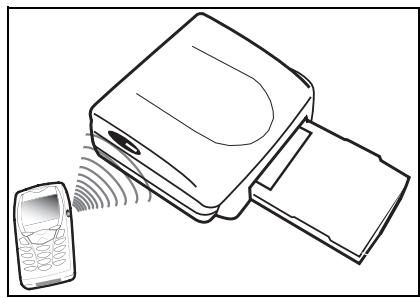
Select a photo on your device and launch its transfer via the infrared link.


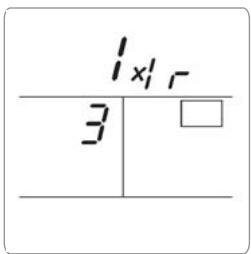
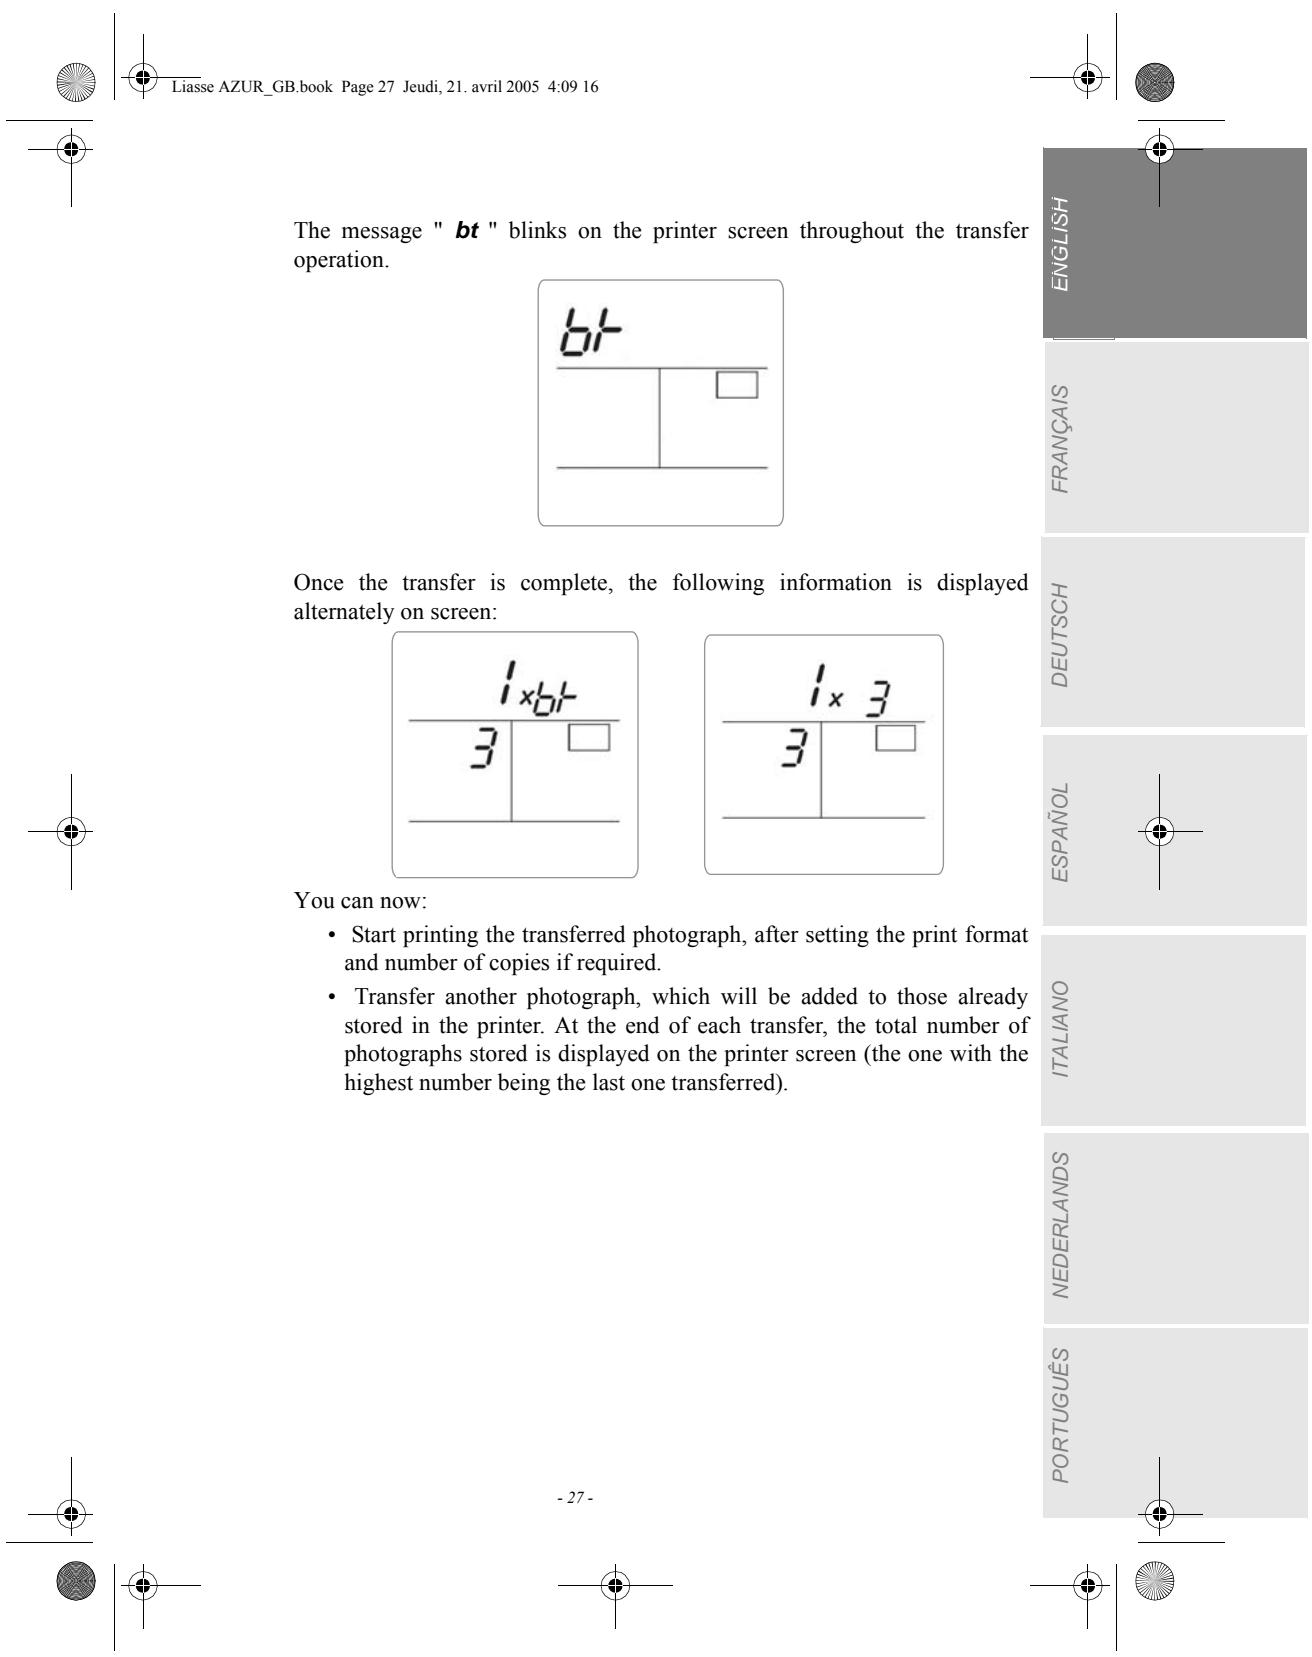
The message "I r" blinks on the printer screen throughout the transfer operation.
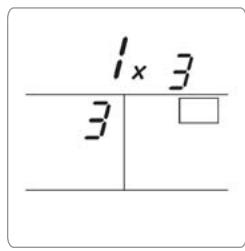
Once the transfer is complete, the following information is displayed alternately on screen:
You can now:
- Start printing the transferred photograph, after setting the print format and number of copies if required.
- Or, transfer another photo from your device, which is then added to the photo(s) already stored in the printer. At the end of each transfer, the total number of photographs stored is displayed on the printer screen (the one with the highest number being the last one transferred).
- The same operations as described in the previous chapters can now be performed before starting to print the photographs: (selecting the photographs to be printed, selecting the format, selecting the number of copies).
You can now:
- Start another print job, after selecting different parameters (photograph number, format, number of copies) if required.
- End the transferred photograph processing. To do this, hold the key down for 2 seconds.

-25-


BLUETOOTH TRANSFER (OPTIONAL)
Warning : If you have started transfer by infrared, you will not be able to transfer photos by Bluetooth if you have not before hand erased be internal memory by holding the key C down for 3 seconds
The adapter of Bluetooth (optional equipment) printer is a fast and effective solution to pass from a telegraphic connection to a connection without wire.
The adapter transforms the photo printer into a Bluetooth receiver, allowing you to print photos from devices equipped with Bluetooth technology, such as mobile phones, PDAs, PCs and the like.
Ensure that all hardware units are powered. Never force installation of connectors on hardware, as the cable and the connector could be damaged.
Remark : For a list of compatible devices, go to www.sagem.com.
Connect the Bluetooth adaptor (optional equipment) to the USB port (A) of your photo printer.
Identification among hardware units is automatic.
Attention : The size of the photo or photos to be transferred to the photo printer must be less than 600 Kbytes. The photo format required is the JPEG format. An error message "Err 75" will be displayed when the maximum storage capacity is reached.
To transfer new data to the photo printer, you must clear the memory. To do this, press and hold the key for some time C


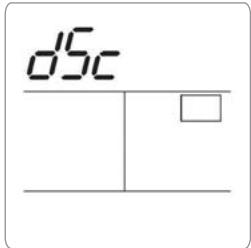
8 FUNCTION CRYSTAL IMAGE
Your printer comes equipped with the Crystal Image picture optimisation function offering enhanced print quality.
Remark : Crystal Image works independently of a PC.
Crystal Image consists of 2 components that can be utilised according to your needs:
image optimisation
- red-eye correction
Warning : red-eye correction is a complex process that may require extensive processing time.
Crystal Image automatically implements all the settings and corrections required with respect to the sharpness of the image as well as the colour and contrast management, in order to achieve the best possible print quality. What is more, exposure defects will also be corrected (e.g., under-exposed photos are made brighter, or parts of a photo presenting strong contrasts will be compensated). The red-eye correction function corrects the red-eye phenomenon associated with flash photography.
ACTIVATION/DEACTIVATION
Remark : By default, the "image optimisation" component of Crystal Image is activated and "red-eye correction" is deactivated.
The following table indicates how many times you need to press the button to activate or deactivate the Crystal Image function.
| Number of times button pressed | Crystal Image function status | |
| Image optimisation | Red-eye correction | |
| 0 (Default status) | Deactivated | Deactivated |
| 1 | Activated | Deactivated |
| 2 | Activated | Activated |
| 3 | Deactivated | Activated |
| 4 (return to default status) | Deactivated | Deactivated |


9 PRINTING FROM A PC
Your kit includes an installation CD-ROM containing a printer driver, image processing software.
Warning : To avoid any print problems associated with the picture format, you are advised to use the software supplied with the printer, or other image retouching software.
Make sure that your PC is compatible with the requirements as specified :
PC configuration required:
Pentium or equivalent,
OS:Windows98SE/2000/Me/XP,
128 MB DRAM or more,
150 MB available on hard disk,
USB port available.
Install the software
The photo software is installed in three phases: running the Install program, restarting the computer, and performing the final printer installation.
Do not connect the printer to the PC before installing the printer driver. After you have installed the software, a message will be displayed asking you to restart the PC. After restarting you can connect the printer to the PC.
Insert the CD-ROM in the drive to start installation. A command window appears. Follow the instructions displayed on the screen.
If the installation program does not start automatically, you can start it by double-clicking on the "setup.exe" file located in the CD-ROM root directory.
The CD-ROM contains an installation manual which includes detailed operating instructions for the printer driver. Refer to this manual for further information.
Remark : The B/W print option is not available in Windows 98.

-29-


Connect your printer
Make sure that both the PC and the printer are switched on. Never apply force when plugging in connectors into the equipment as this could damage both the cable and the connector.
Connect your photo printer (USB port (B)) to PC using an USB cable.
Recognition between the two devices is automatic.

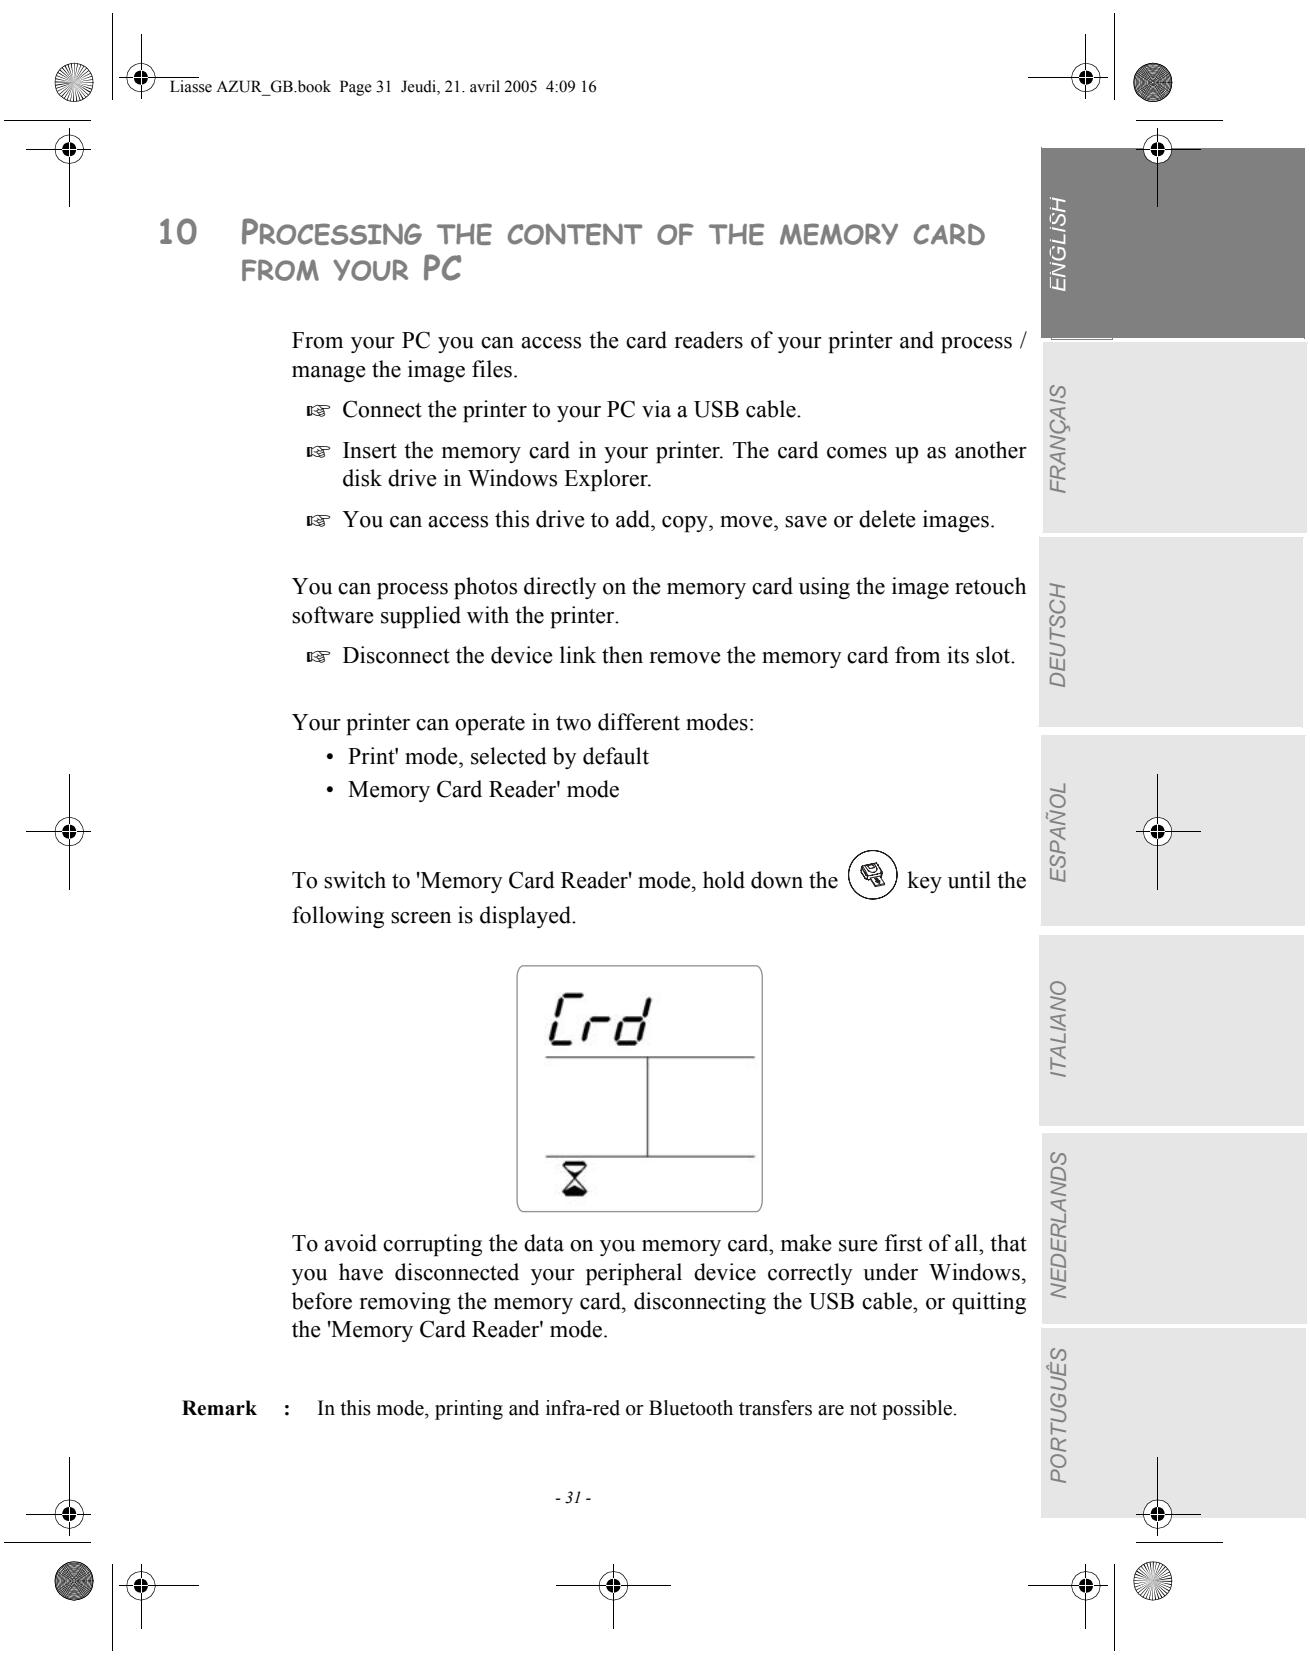
Using your printer
Your printer can operate in two different modes:
- 'Print' mode, selected by default
'Memory Card Reader' mode, see chapter 10.
In the latter mode, printing and infra-red or Bluetooth transfers are not possible.
To quit this mode, refer to chapter 10

-30-


Remark : When changing mode, Windows messages indicating the detection/disconnect of a USB peripheral may be displayed.
12 MAINTENANCE
CLEANING THE PRINT HEAD
Continuous lines across the length of your photographs may be caused by dirt particles stuck to the printhead.
You will need a methylated alcohol1 based cleaning product and some off-the-shelf cotton tips ("Q-tips").
Switch off your printer, disconnect the main cables and wait for five minutes; since the print head operates at a high temperature, there is a risk of burning if you touch it.
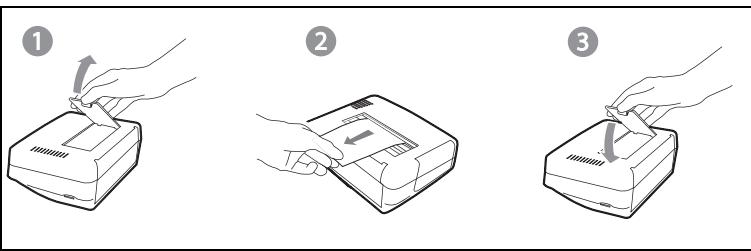
1 - Open the cartridge flap. Press on the locking lever and pull out the film cartridge.
2 - Pull out the paper tray.
3 - Turn the printer upside down to remove the lower hatch.
4 - Clean the heating line of the print head carefully using a cotton bud.
5 - Replace the lower hatch, turn the printer right side up, connect the mains cable and switch on the printer.
Warning : Never touch the print head with your fingers or any object that might scratch it.
Replace the film cartridge. Take care that the film is taut before inserting the cartridge into its compartment. Check that the locking lever is pushed down correctly and close the flap.
Push the paper tray back into place until the locking system clicks.


Follow this procedure if a sheet becomes stuck in the printer and cannot simply be pulled out:
Turn off the printer then turn it on again. Wait for 10 seconds until the print head is freed.
Switch off your printer by pressing button and disconnect the mains cable.
Turn the printer upside down.
1 - Remove the lower cover.
2 - Gently and carefully remove the sheet causing the jam. Under no circumstances touch the printhead.
3 - Replace the lower cover and turn the printer right side up.
Switch on the printer and reconnect the mains cable.
Warning : Never use objects that could damage the printer (scissors, screwdriver, paper cutter, etc.)


-35-

PROBLEMS
Remark : The printer is fitted with an automatic time-out to prevent overheating, this can be tripped when performing large print jobs. The printer automatically restarts the current print job as soon as the temperature drops back to normal.
| PROBLEMS | Solutions |
| No mains supply | ·Check that the power supply block is correctly plugged into the mains. ·Check that the power supply connector is correctly plugged into the printer. ·Check that the mains socket is live (check fuses and/or circuit breakers of your installation as necessary). |
| The printer was unplugged during a print job | ·Check that the printer is off and then reconnect the mains lead. ·Switch on the printer and wait for the initialisation phase to be completed. ·If a sheet of paper is jammed, carry out the procedure (Refer to paragraph Paper jam, page -35). ·Restart printing. |
| No photograph is printed on a sheet | ·Are you using sheets that meet the technical specifications (Refer to paragraph Technical data, page -40) ·Have the sheets been inserted shiny face up? |
| The photograph is marked with a continuous line or a lot of spots | ·Clean the printhead (Refer to paragraph Cleaning the print head, page -34). |
| No PC printing | ·Check that the USB cable is correctly connected. ·Is the printer driver installed? ·Make sure that you are in 'Print' mode, not 'Memory Card Reader' mode (see chapter 10) |
| Photo chronology not observed (the printed photo is not the one expected) | ·You must set the date and time on your camera beforehand, and activate them before photographing. |
| The timer icon is flashing and nothing seems to be happening | ·Wait: your printer is processing data, warming up or cooling down. |


| The photo of the inserted card are not visible | ·Images smaller than 80,000 pixels cannot be printed from memory cards (e.g., a 320 x 240 image (equivalent to 76,800 pixels)). However, these photos can be printed from a PC or via direct infrared link (or bluetooth link with the optional adapter). |
| The PC cannot read the memory card | ·Make sure that you are in 'Memory Card Reader' mode (see chapter 10) |


ERROR MESSAGES
After any intervention on your printer, do not forget to press the restart the current print job.

key to
| Error displayed | Icon displayed | Error Type | Description | Action |
| Err 01 | Paper | No paper | Check that the paper has been correctly inserted in the loading tray. | |
| Err 02 | Paper | Paper jam | Remove any paper jammed in printer (do not reuse this sheet of paper) | |
| Err 11 | Film cartridge | No film cartridge | Insert a new film cartridge or replace the current one. | |
| Err 12 | Film cartridge | End of film cartridge | Replace the film cartridge with a new one. | |
| Err 13 | Film cartridge | Film cartridge error | Check that the film cartridge is correctly inserted. If error persists: replace the cartridge. | |
| Err 14 | Film cartridge | Film cartridge missing or incorrectly inserted | Check that the cartridge is correctly inserted and that the locking lever is locked. | |
| Err 21 | None | Memory card | File damaged or incorrect | File illegible. Try to print others. If error persists: check the file source, or try with a different source. |
| Err 22 | None | Memory card | JPEG decompression error | The file cannot be read. Try printing the others. If the error persists, check the source of the file or try with another source. |
| Err 23 | None | Memory card | Unsupported JPEG feature | The JPEG file contains an unsupported feature. |
| Err 27 | None | Memory card | Read error | The card or file are illegible. Check the card source or try with another source |
| Err 72 | None | IR link | Transfer error | Error during transfer of photographs from GSM mobile phone camera. Restart transfer from the GSM phone. Check that both devices are facing each other. |
| Err 75 | None | IR link | Not enough space to store photograph | Photograph to be transferred too big or insufficient space to store photograph in printer. |


| Error displayed | Icon displayed | Error Type | Description | Action |
| Err 76 | None | IR link | File format not supported | Photograph to be transferred is not in JPEG format. |
| Err 80 | SIM card | SIM card no longer valid | The SIM card has already been used. Remove the inserted card and insert a valid SIM card. | |
| Err 81 | SIM card | Print quantity reached. Change the consumable. | The print quantity has been reached. Replace the consumable. | |
| Err 82 | SIM card | Card illegible | Insérer votre carte à puce dans l'autre sens. | |
| Err 83 to Err 88 | SIM card | Card illegible or incompatible | Use the smart card supplied with the consumable | |
| Err 89 | SIM card | Incorrect data transfer | Data transfer error. Remove the inserted card and insert a valid SIM card. | |
| Err 90 | SIM card and ribbon | Authorised print quantity reached | The selected number of photos is greater than the remaining ribbon capacity to print all photos. | |
| Other error number | None | Other | System error | Switch off printer, wait 30 seconds and restart. If error persists, contact your retailer. |

-39-
TECHNICAL DATA
PC configuration required:
Pentium or equivalent,
OS:Windows98SE/2000/Me/XP,
128 MB DRAM or more,
150 MB available on hard disk
USB port available.
Device name
:PHOTO EASY 160
Print method
Dye-diffusion thermal transfer
Resolution
309,8 x 309,8 dpi
Colours
16.7 million continuous
Print speed
Less than 60 seconds per photo (excluding image processing)
Interface
Memory cards, type Compact Flash (support type I & II), SM/MS/MMC/SD /xD,USB2.0compatibleport.
Storage of photographs
transferred from a device
Up to 1.6 MB
Image resolution supported
Up to 12 million pixels
Image size supported
Up to 6 MB (JPEG compressed image)
Consumable items
Photo-quality paper. Film cartridge with three colours (yellow, magenta, cyan) and protective coating, 40 print operations per cartridge.
Paper size
101 x 152,4 mm excluding detachable borders
Paper tray
: By automatic loader, capacity 20 sheets
Mains supply
230VAC 50 / 60Hz
Approval
:EC
Field of use for optimum print quality: 15^ to 35^, 30% to 75% humidity
Size
: 201× 174× 94 mm excluding paper tray
Weight
: 1.5kg (except power supply unit)
Power consumption
: in standby:10 W
in print mode:80 W
All data are provided for reference purposes only. SAGEM (PLC) reserves the right to make any changes without prior notice.


14 GUARANTEE
GUARANTEE (UK Terms and Conditions)
In order to apply the guarantee, you should contact your dealer. Proof of purchase will be required. Should malfunctioning arise, the dealer will advise you what to do.
If you bought your equipment from SAGEM directly, the following shall apply:
A SAGEM undertakes to remedy by repair, free of charge for labour and replacement parts, any defects in the equipment during a period of twelve (12) months from the date of original delivery of the Equipment, where those defects are a result of faulty workmanship.
During this twelve month guarantee period, the defective equipment will be repaired free of charge; the customer must however return the defective equipment at his/her own expense, to the address given by SAGEM After Sales Department, the phone number of which can be found on the delivery slip. Unless the customer has concluded with SAGEM a maintenance contract in respect of the equipment which specifically provides for repairs to be carried out at the customer's premises, the repairs will not be carried out on the equipment at the customer's premises.
The following sentence applies to purchases of equipment for the customer's trade, business or profession. Except as otherwise expressly provided in this Document and to the extent permitted by law, SAGEM makes no representations or warranties, express or implied, statutory or otherwise, and to such extent, all terms and conditions implied by law are hereby excluded.
This guarantee does not affect the Customer's statutory rights.
B Exclusions From Guarantee
SAGEM shall have no liability under the guarantee in respect of :
-
damage, defects breakdown or malfunction due to :
-
failure to properly follow the installation process and instructions for use; or
- an external cause to the equipment (including but not limited to, lightening, fire, shock or water damage of any nature); or
- modifications made without the written approval of SAGEM SA; or
- a failure or neglect to maintain the equipment or inappropriate maintenance; or

-42-


- unsuitable operating conditions, particularly of temperature and humidity; or
- repair or maintenance of the equipment by persons not authorised by SAGEM; or
- wear and tear from normal daily use of the equipment and its accessories
- damage due to insufficient or bad packaging of equipment when returned to SAGEM
- supply of new versions of software
- work on any equipment or software modified or added without the prior written consent of SAGEM
- malfunctions not resulting from the Equipment or from software installed in user workstations for the purpose of use of the equipment
- communication problems related to an unsuitable environment, including :
- problems related to access and/or connection to the Internet such as interruptions by access networks or malfunction of the line used by the subscriber or his correspondent
- transmission faults (for example poor geographical coverage by radio transmitters, interference or poor line quality)
- the local network fault (wiring, servers, workstations) or the failure of the transmission network
- the normal servicing (as defined in the user guide supplied with the equipment) as well as malfunctioning due to servicing not being carried out, servicing costs are in any event always borne by the customer.
C In the cases set forth in B) as well as after expiry of the twelve month guarantee period, the customer must ask SAGEM for an estimate, and he/she must accept the estimate and agree to pay the charges mentioned in it before returning the equipment to SAGEM. The repair and delivery costs will be invoiced to the customer.
The foregoing shall apply unless otherwise agreed in writing with the customer and only for the UK. If any provision of this guarantee shall be held to be in whole or in part invalid or illegal due to an obligatory rule applicable to consumers pursuant to their national legislation, such invalidity or illegality shall not impair or affect the remaining provisions or parts of this guarantee.

-43-


Attention: SmartMedia CONTACT VERS LE BAS.
Aucune impression,�除 the fact that it is a black and white device, from the fact that it is a black device.
Compact Flash Card (support type I &
II), SM / MS / MMC / SD / xD,
Port USB compatible 2.0
SAGEM SA - Customer relations department
SAGEM SA - Customer relations department
SAGEM SA - Customer relations department
6 STAMPA DALLA FOTOCAMERA DIGITALE (MODALITA PICTBRIDGE)
STAMPA IN MODALITA PICTBRIDGE
A Anything, e possible:
Compact Flash Card supporto
typ I & II), SM / MS/ MMC / SD / xD,
Porta USB compatible 2.0.
SAGEM SA - Customer relations department
8 CRYSTAL IMAGE FUNCITIE
Pentium of equivalent;
Besturingsystem: Windows 98 SE / 2000 / Me / XP;
128 MB DRAM ofmeer;
Pentium of equivalent;
Besturingsystem: Windows 98 SE / 2000 / Me / XP;
128 MB DRAM ofmeer;
Imprimir as suasOTOS
Impressão rápida
DIGITAL (MODO PICTBRIDGE)
Caracteristicas techniques 40
13 AMBIENTE 41
14 CONDIÇOES DE GARANTIA 42

-11
SAGEM SA - Customer relations department
User Guide - Data subject to change without notice
Datum: 21 April 2005
C:Documents and Settings\G097447\Bureau\LU AZUR 251 985 569A | PHOTO EASY 160 6 langues\Couvertures\4eme COUV.fm


- PREPARE YOUR PHOTO PRINTER
- CONNECT THE MAINS SUPPLY
- FIRST RIBBON INSTALLATION
- TO CHANGE THE RIBBON
- LOADING PAPER
- PRINTING FROM A MEMORY CARD
- INSERT A MEMORY CARD
- RAPID PRINTING
- EXAMPLE OF RAPID PRINTING FROM A MEMORY CARD
- CREATE A CONTACT SHEET (INDEX)
- PREPARE A SERIES OF PHOTOGRAPHS FOR PRINTING (PRINT BASKET FUNCTION)
- PRINT IN DPOF
- (DIGITAL PRINT ORDER FORMAT) MODE
- PRINTING FROM A DIGITAL CAMERA (PICTBRIDGE MODE)
- PRINTING IN PICTBRIDGE MODE
- PRINTING FROM A MOBILE PHONE OR OTHER PERIPHERAL DEVICE
- INFRARED TRANSFER
- You can now:
- BLUETOOTH TRANSFER (OPTIONAL)
- FUNCTION CRYSTAL IMAGE
- ACTIVATION/DEACTIVATION
- PRINTING FROM A PC
- Install the software
- Connect your printer
- Using your printer
- MAINTENANCE
- CLEANING THE PRINT HEAD
- PROBLEMS
- ERROR MESSAGES
- TECHNICAL DATA
- GUARANTEE
- GUARANTEE (UK Terms and Conditions)
- B Exclusions From Guarantee
- STAMPA DALLA FOTOCAMERA DIGITALE (MODALITA PICTBRIDGE)
- STAMPA IN MODALITA PICTBRIDGE
- A Anything, e possible:
- CRYSTAL IMAGE FUNCITIE
Brand : SAGEM
Model : PHOTO EASY 160
Category : Photo printer