
R-PLUG RADIO+ - Car stereo RENAULT - Free user manual and instructions
Find the device manual for free R-PLUG RADIO+ RENAULT in PDF.
| Product Type | Car Radio |
| Brand | RENAULT |
| Model | R-PLUG RADIO+ |
| Category | Car Radio |
| Power Supply | 12 V DC (vehicle) |
| Output Power | 4 × 50 W (max) |
| Dimensions (1 DIN) | 180 × 50 × 160 mm (approx.) |
| Weight | Approximately 1 kg |
| Main Functions | FM/AM Radio, CD player, USB port, iPod input, hands-free Bluetooth |
| Supported Audio Formats | CD audio, MP3, WMA, AAC, WAV |
| Connections | USB, 3.5 mm jack (aux input), radio antenna, ISO connector |
| Bluetooth | Yes, for hands-free calling and audio streaming |
| Audio Settings | Bass, treble, balance, fader |
| Display | Backlit LCD screen |
| Maintenance and Cleaning | Clean with a soft, dry cloth. Avoid solvents. |
| Safety | Protective fuse, installation should be done by a professional |
| Spare Parts and Repairability | Contact RENAULT after-sales service |
| General Information | Manual available in multiple languages. Repairability index not communicated. |
Frequently Asked Questions - R-PLUG RADIO+ RENAULT
User questions about R-PLUG RADIO+ RENAULT
0 question about this device. Answer the ones you know or ask your own.
Ask a new question about this device
Download the instructions for your Car stereo in PDF format for free! Find your manual R-PLUG RADIO+ - RENAULT and take your electronic device back in hand. On this page are published all the documents necessary for the use of your device. R-PLUG RADIO+ by RENAULT.
USER MANUAL R-PLUG RADIO+ RENAULT
Introduction to the controls GB.2
Precautions during use GB.6
General description. 7
Operation. GB.9
Operating principles. 10
Listening to the radio. GB.11
Listening to a CD/MP3 player . GB.13
Audio settings . GB.15
Auxiliary audio sources . GB.17
Pairing, unpairing a telephone. GB.20
Connecting, disconnecting a telephone GB.22
Managing the telephone directory. GB.24
Making and receiving a call. GB.25
System settings. 27
Operating faults. GB.29
Translated from French. Copying or translation, in part or in full, is forbidden unless prior written permission has been obtained from the vehicle manufacturer.
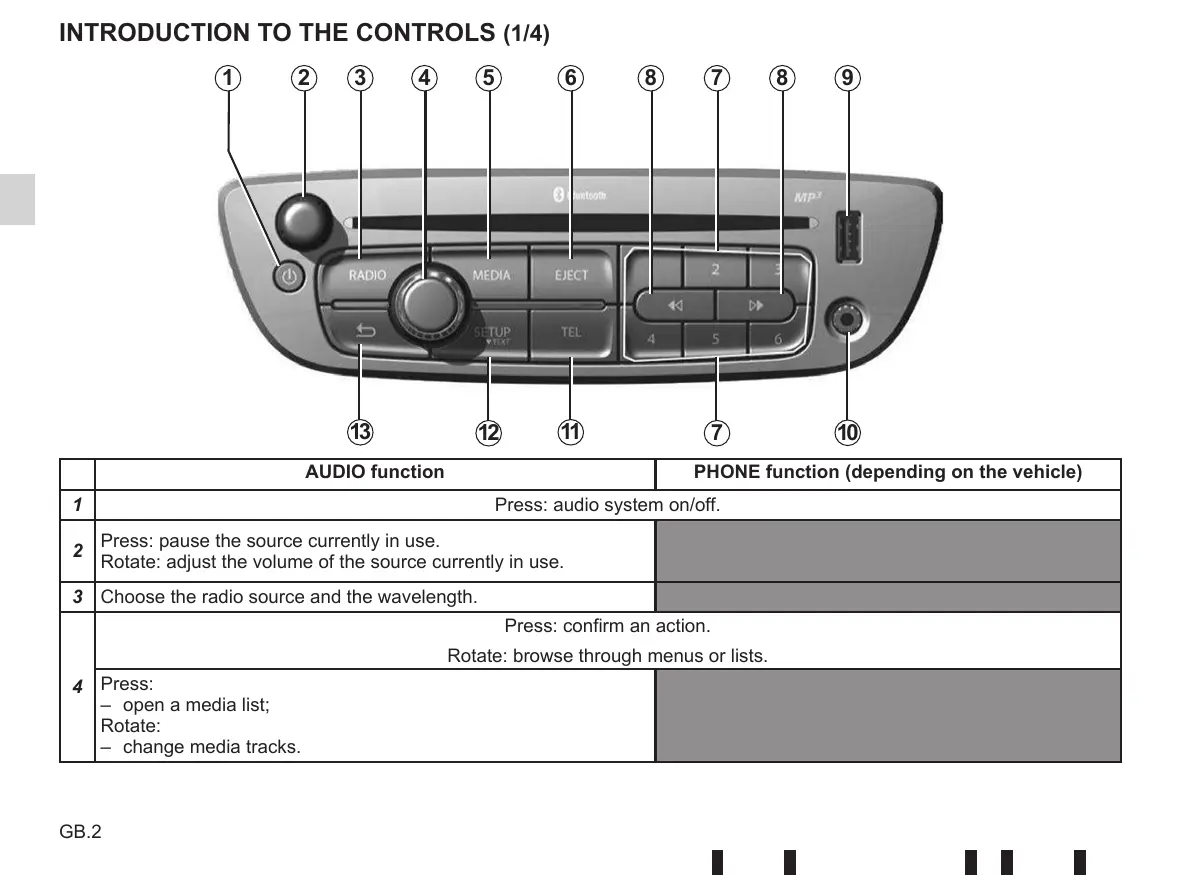
INTRODUCTION TO THE CONTROLS (1/4)
| AUDIO function | PHONE function (depending on the vehicle) | |
| 1 | Press: audio system on/off. | |
| 2 | Press: pause the source currently in use. Rotate: adjust the volume of the source currently in use. | |
| 3 | Choose the radio source and the wavelength. | |
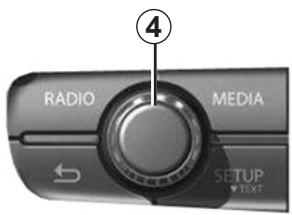
| 4 | Press: confirm an action. Rotate: browse through menus or lists. | |
| Press: - open a media list; Rotate: - change media tracks. | ||
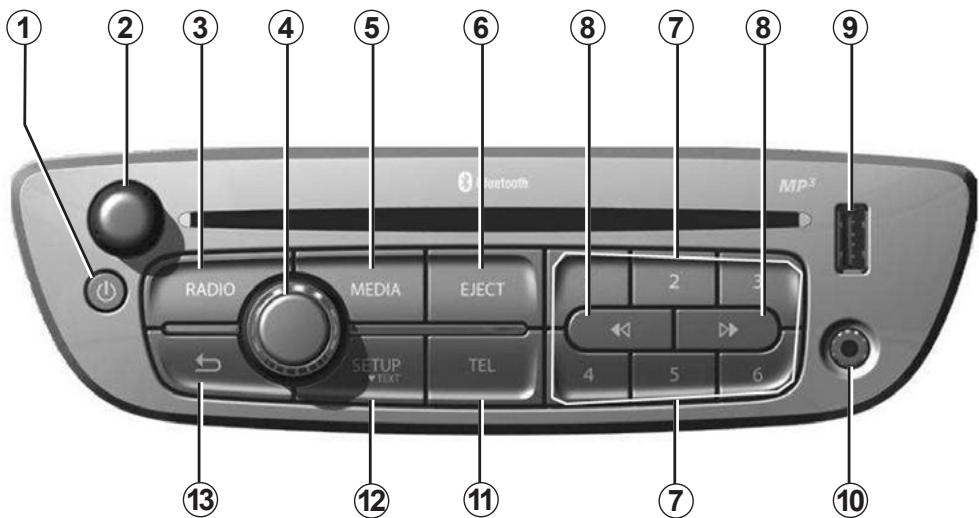
INTRODUCTION TO THE CONTROLS (2/4)
| AUDIO function | PHONE function (depending on the vehicle) | |
| 5 | Select the desired audio source (if connected): - Media: CD → USB → Bluetooth® → AUX (Jack socket). | |
| 6 | Eject a CD/CD MP3. | |
| 7 | Short press: recall a pre-programmed station. Press and hold: store a radio station. | |
| 8 | Short press: - following or previous track (CD/CD MP3, some portable audio players); - scroll through the radio frequencies (+/-0.5 Hz for each press). Press and hold: - fast forward on a CD/CD MP3 on some portable audio players; - continuous scrolling of the frequencies. After release, the search stops automatically on the following or previous station. | |
| 9 | USB socket for iPod® or auxiliary audio sources. | |
| 10 | Auxiliary input. | |
| 11 | - Accessing the Telephone menu; - Return to the current source. | |
| 12 | - Accessing the customised settings menu; - Return to the current source. | |
| 13 | - Return to previous screen/previous level when browsing through menus; - Cancel current action. |
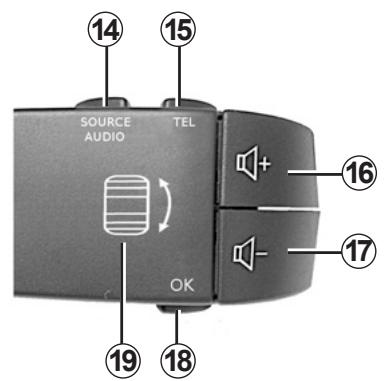
INTRODUCTION TO THE CONTROLS (3/4)
| AUDIO function | PHONE function (depending on the vehicle) | |
| 14 | Select the desired audio source (if connected): FM1 → FM2 → MW → LW → CD → USB → Bluetooth® → AUX (Jack socket). | |
| 15 | - Accessing the Telephone menu; - Short press: pick up the call; - Long press: reject an incoming call; - Short press during a call: put the call on hold; - Two successive presses: end the call. | |
| 16 | Increase the volume of the source currently in use. | |
| 17 | Decrease the volume of the source currently in use. | |
| 16+17 | Pause. | |
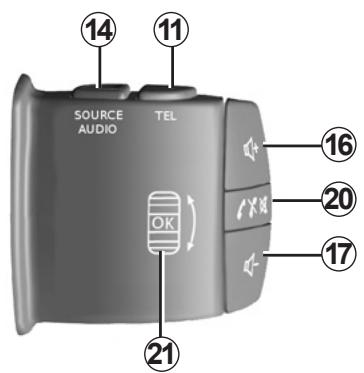
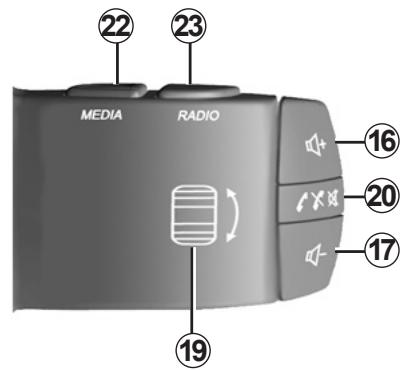
INTRODUCTION TO THE CONTROLS (4/4)
| AUDIO function | PHONE function (depending on the vehicle) | |
| 18 | Press: confirm an action. | |
| Short press:- Confirm an action/open a media list;Long press:- Return to previous screen/previous level when browsing through menus;- Cancel current action. | - Press: pick up the call; | |
| 19 | Rotate:- Radio: browse through the radio list;- Media: previous/next track;- browse through the menus. | |
| 20 | - Mute sound of source currently in use;- Mute sound and stop playback of CD, USB, iPod®, Bluetooth® portable audio player. | - Short press: pick up the call;- Long press: reject an incoming call;- Short press during a call: put the call on hold;- Two successive presses: end the call. |
| 21 | Rotate:- Radio: browse through the radio list;- Media: previous/next track.Press:- Short press: confirm an action/open a media list;- Long press: return to previous screen/previous level when browsing through menus;- Cancel current action. | - Press: pick up the call; |
| 22 | Choose the radio source and the wavelength. | |
| 23 | Select the desired audio source (if connected):- Media: CD → USB → Bluetooth® → AUX (Jack socket). | |
PRECAUTIONS DURING USE
It is essential to follow the precautions below when using the system, both in the interest of safety and to prevent material damage. You must always comply with the laws of the country in which you are travelling.

Precautions when operating the audio system
- Operate the controls (on the dash or near the steering wheel) and read the information on the screen only when road conditions allow.
- Set the volume to a reasonable level so that outside noise can be heard.
Precautions concerning the equipment
- Do not attempt to dismantle or modify the system, as there is a risk of damage to equipment and fire.
- Contact a representative of the manufacturer in the event of malfunction and for all operations involving disassembly.
- Do not insert foreign objects, or damaged or soiled CDCD MP3s into the player.
- Only use 12 cm diameter circular CDCD MP3s.
- When handling discs, hold them by the inner or outer edges, without touching the non-printed face of the CDCD MP3.
- Do not stick paper to the CDCD MP3.
- After prolonged use, remove the CD CD MP3 from the player with care as it may be hot.
- Never expose CDs/CD MP3s to heat or direct sunlight.
Precautions when using the phone
- There are laws which govern the use of phones in vehicles. They do not necessarily authorise the use of hands-free phone systems under all driving conditions: drivers must be in control of their vehicles at all times.
- Using a phone whilst driving is a significant distraction and risk factor during all stages of use (dialling, communicating, searching for a number in the handset memory, etc.).
Maintenance of the fascia
- Use a soft cloth and, if necessary, a small amount of soapy water. Rinse with a soft, slightly damp cloth, then dry with a soft, dry cloth.
- Do not press on the display on the front panel, and do not use any alcohol-based products.
The description of the models given in this manual is based on the specifications at the time of writing. This manual covers all existing functions for the models described. Whether or not they are fitted depends on the equipment model, options selected and the country where they are sold. This manual may also contain information about functions to be introduced later in the year.
Finally, when reference is made throughout this manual to the Manufacturer's Representative, this means the vehicle manufacturer.
GENERAL DESCRIPTION (1/2)
Introduction
The audio system has the following functions:
RDS radio;
- CD/CD MP3 reader;
management of auxiliary audio sources;
- Bluetooth® hands-free phone system.
Radio and CD/CD MP3 functions
The radio allows you to listen to radio stations, and play CD audio, MP3, WMA, AAC, WAV.
Radio stations are divided into wavebands: FM and AM.
The RDS system makes it possible to display the name of some stations or messages sent by FM stations to be displayed:
traffic bulletins (TA);
emergency messages.
Auxiliary audio function
You can listen to your personal stereo directly through your vehicle's speakers. There are several ways to connect your portable audio player, depending on the type of device and the vehicle:
- USB socket;
- Jack socket;
- Bluetooth® connection.
For more information on compatible devices, contact your approved manufacturer's dealer.
GENERAL DESCRIPTION (2/2)
Hands-free phone function
Depending on the vehicle, the hands-free Bluetooth® phone system provides the following functions without having to handle your phone:
- Pair up to 5 phones;
- send/receive/reject a call;
- transfer the list of contacts from the phone memory and the SIM card (depending on the phone);
- access the call logs for calls which have come through the system;
- dial voicemail.
Function Bluetooth®
(dependently on vehicle)
This function enables the audio system to recognise and operate your portable audio player or mobile phone by Bluetooth® pairing.
You can activate or deactivate the Bluetooth® function through the "Bluetooth activated" menu:
- press 12 to display the settings menu;
- select "Phone settings" by turning 4, 19 or 21 and pressing 4, 18 or 21;
- select "Bluetooth activated" or "Bluetooth deactivated".

Your hands-free phone system is only intended to facilitate communication by reducing the risk factors,
without removing them completely. You must always comply with the laws of the country in which you are travelling.
OPERATION
On and off
Press 1 to switch on your audio system.
The audio system can be used with the vehicle ignition off. It will be operational for a few minutes before cutting out automatically. Press 1 to make it operational for a few additional minutes.
Switch off the audio system by pressing 1.
CHOOSING THE SOURCE
Scroll through the various sources by pressing 5 or 14 repeatedly. When scrolling, the sources appear in the following order: CD/CD MP3 USB Bluetooth® Jack.
When a CD/CD MP3 is inserted when the radio is on, the source changes automatically and the CD begins to play.
You may also select the radio source by pressing buttons 3 or 14. Press 3 or 14 repeatedly to scroll through the wavelengths in the following order: FM1 FM2 MW LW, etc.
VOLUME
Adjust the volume by pressing 16 or 17 or turning 2.
The display shows "VOLUME" followed by the current setting value.
Mute
Press 20, or simultaneously press 16 and 17. The message "Pause" is displayed on the screen.
Press 20 again to continue listening to the current source.
You can also deactivate the mute function by pressing 16 or 17.
Moving within the screen displays
Browse through the menus or lists by turning 4, 19 or 21.
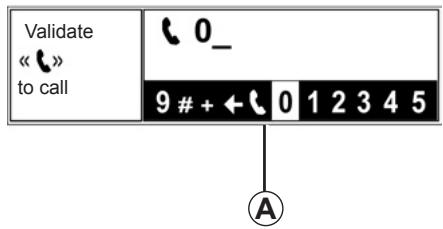
Using a numerical keypad
When entering an item using a numerical keypad, choose each digit in zone A by turning 4, 19 or 21, then pressing 4, 18 or 21.
LISTENING TO THE RADIO (1/2)
Selecting a wavelength
Press 3 or 14 repeatedly to select the desired wavelength: FM1, FM2, MW, LW, etc.
Selecting a radio station
There are different modes for choosing a radio station.
Automatic search
This mode performs an automatic scan to search for stations.
Press and hold 8, then release. The search will start automatically.
To halt the station search, press 8 or on one of the keys on the keypad 7.
Manual search
This mode allows you to search for stations manually, scrolling through the frequencies by pressing 8.
Note: the frequency increases by +0.5Hz by pressing 8.
When performing a manual search, press and hold 8, then release to automatically switch to the next radio station.
Selecting by name of station (FM only)
Open the radio list by turning 4, 19 or 21, then select a station from the list. This list contains up to 50 radio stations with the best reception at your current location. To make sure you have the most up-to-date list of stations, you can also activate the update manually. Please refer to the information on "Manually updating the radio list" in the section entitled "Audio settings".
Station memory
This operating mode allows you to listen to your pre-set radio stations.
Select a wavelength, then select a radio station using the methods described above.
To store a station, press one of the keys on keypad 7 until a beep sounds to confirm that the station has been stored.
Six stations can be stored per wavelength.
To recall stored stations, press one of the keys on keypad 7.
LISTENING TO THE RADIO (2/2)
RDS-AF automatic retuning
The frequency of an FM station changes depending on your location. Some stations use the RDS system, which allows automatic retuning. The radio system is able to follow the changes in frequency of these stations.
Poor reception can sometimes cause unwanted changes in frequency.
To activate or deactivate this function, please refer to the information on "Activating the RDS-AF function" in the section entitled "Audio settings".
Traffic information (i Traffic)
When this function is activated, your audio system makes it possible to automatically search for and listen to traffic information when they are broadcast from certain FM radio stations.
To activate the i Traffic function, please refer to the information on "Activating the i Traffic function" in the section entitled "Audio settings".
Once the function is activated, select the news station then choose if you require another playback source.
Traffic information is broadcast automatically and has priority over the source being listened to at the time. The automatic broadcasts will not operate when listening to radio stations on the LW and MW wavelength.
To stop listening to traffic information, press 4, 13, 18 or 21 at any time.
Text information (Radio-text)
Some FM radio stations issue text information relating to the broadcast program (e.g. song name).
To see this information, press and hold 12.
Note: To return to the original screen, press 4, or press and hold 18 or 21, or wait for 30 seconds without performing any action.
LISTENING TO A CD (1/2)
Specifications of readable formats
Only files with an MP3/WMA> extension can be played.
If a CD contains both normal CD audio files and compressed audio files, the compressed audio files will not be recognised.
Note: Some protected files (copyright) cannot be played.
NB: to ensure that folder and file names are easy to read, we recommend that you use names with fewer than 64 characters, and avoid the use of special characters.
Maintaining CD/CD MP3
To maintain a good playback quality, never expose a CD/CD MP3 to heat or direct sunlight.
To clean a CD/CD MP3, rub the CD from the centre outwards using a soft cloth.
As a general rule, refer to the CD manufacturer's advice concerning maintenance and storage.
Note: Some scratched or dirty CD will not be playable.
Inserting a CD
Refer to the Section entitled "Precautions during use".
Check that there is no CD in the player, then insert the CD.
Listening to a CD /CD MP3
When a CD/CD MP3 is inserted, the audio system automatically switches to the CD/CD MP3 source and starts playing the first track.
If the audio system is switched off and the ignition is switched on, inserting a CD/CD MP3 starts the audio system and the CD/CD MP3 will start playing.
If the ignition is not switched on, the audio system will not start playing.
If you are listening to the radio and a CD/CD MP3 is in the player, you can choose to listen to the CD/CD MP3 by pressing 5 or 14. Playback starts when the audio system switches to the CD/ CD MP3 source.
Searching for a track
Press and release 8 or turn 19 or 21 to move from one track to another.
Fast winding
Press and hold 8 to fast forward or rewind.
Normal playback resumes when the button is released.
LISTENING TO A CD (2/2)
Pause
Press 20 or 2 to mute the audio volume. This function is automatically deactivated when the volume is adjusted, the source is changed or automatic information messages are issued.
Displaying text information (if available) (CD -Text or ID3 tag)
To browse through the ID3 tag information (artist name, album or title), press and hold 12 while turning 4. To return to the original screen, press 4 or 13, or press and hold 18 or 21, or wait for 30 seconds without performing any action.
NB: after a few seconds of inaction, the previous screen is displayed automatically.
Ejecting a CD
Eject a CD from the player by pressing 6.
Note: if an ejected disc is not removed within 20 seconds, it will automatically be reinserted into the CD player
AUDIO SETTINGS (1/2)
Display the settings menu by pressing 12. Select "Audio settings".
To browse through the menu and select the various sections, please refer to the information on "Moving within the displays" in the "Operating principles" section.
Note: You can exit the settings by pressing 12, 13 or by pressing and holding 18 or 21, or by waiting for 30 seconds of inactivity.
Sound levels
(dependently on vehicle)
Musical atmosphere
Access the "Musical atmosphere" menu, then turn 4, 19 or 21 and press 4, 18 or 21 to select the required musical environment:
Bass/treble;
- Pop/Rock;
- Classical;
Jazz;
- Neutral.
Tone (Bass/Treble)
Access the "Musical atmosphere" menu, turn 4, 19 or 21 to browse through the "Bass / treble" menu, then press 4, 18 or 21 to select the bass or treble tone. Once the tone has been selected, adjust it by turning 4, 19 or 21.
Activating the automatic gain control function (AGC)
Access the "AGC activated" menu and press 4, 18 or 21 to activate this function.
Volume adjustment according to speed
When this function is activated, the volume of the audio system varies according to the vehicle speed.
Access the "Audio settings" menu, then confirm "Adaptation volume km/h" by pressing 4, 18 or 21.
Set the volume/speed ratio by turning and pressing 4, 18 or 21 to choose the desired setting.
Balance
Optimising the sound distribution (depending on the vehicle)
Display the settings menu by pressing 12, then select "Sound localization". Turn 4, 19 or 21 to select the heading "Vehicle" or "Driver" in order to optimise the sound distribution for all the vehicle occupants or for the driver alone. Confirm by pressing 4, 18 or 21.
Moderate volume in the front
(dependently on the vehicle)
Access the "Sound localization" menu. Turn 4, 19 or 21 to select the item "Rear Off". This setting is for the comfort of rear passengers (audio stopped in the rear and moderate volume at the front of the vehicle). Confirm by pressing 4, 18 or 21.
AUDIO SETTINGS (2/2)
Right/left and front/rear balance
Access the "Sound localization" menu, then turn 4, 19 or 21 to select the "Balances/Fader" item. Press 4, 18 or 21 to display the "Balances" setting, then turn 4, 19 or 21 to adjust the left/right balance.
Press 4, 18 or 21 to confirm and display the "Fader" setting. Turn 4, 19 or 21 to adjust the front/rear balance.
Manually updating the radio list
To update the list of stations and obtain the most recent ones, activate the update manually.
Access the "Radio functions" menu, then select "Update FM List" and validate.
Activating the RDS - AF function
Access the "Radio functions" menu, then select "RDS - AF" by pressing 4, 18 or 21. This setting is saved.
Activating the Random function
Access the "Audio settings" menu, then select "Random" by pressing 4, 18 or 21. This setting is saved. The "Random" indicator is displayed at the bottom of the screen when the function is activated.
NB: on an MP3/WMA CD, this function applies to the current directory, then switches to the following directory.
Activating the i Traffic function
Access the "Radio functions" menu, then select "i Traffic" by pressing 4, 18 or 21 to save the setting.
Default settings
Select "Default settings" by pressing 4, 18 or 21.
All the audio settings return to their default values.
Radio software version
Access the "Software version" menu, then press 4, 18 or 21 to display your software version. To update your software, please refer to the information on "Updating the radio using a USB stick" in the "System settings" section.
AUXILIARY AUDIO SOURCES (1/3)
Your audio system has an auxiliary input to connect an external audio source (USB key, MP3 player, iPod®, Bluetooth® portable audio player, etc).
There are several ways to connect your portable audio player:
- USB socket;
- Jack socket;
- Bluetooth® connection.
NB: the auxiliary audio source formats include MP3, WMA and AAC.
Auxiliary input: USB socket
Connection
Connect the iPod® cable or USB key to the USB socket.
Once the device is plugged into the USB socket, the track will play automatically.
Note: if this is the first time that the device is connected to the system, audio playback will start at the first track in the first folder on the source. Otherwise, playback will start at the last track played.
Note: once connected, you can no longer directly control your portable digital audio player. You must use the buttons on the front panel of the audio system.
Use
-iPod®:
After connecting your iPod®, the menus are accessible from your audio system.
The system keeps the same playlists as on your iPod®.
- USB memory stick:
Playback of the first audio file from the first folder on your USB key begins automatically.
If you are in the menu tree structure, you can change the track or the folder by turning and pressing 4, 18 or 21.
Note: To access your USB stick's menu during an audio track playback, press 13 or press and hold 18 or 21. To open the menu on your iPod®, turn 4, 19 or 21, press 13 or press and hold 18 or 21.
AUXILIARY AUDIO SOURCES (2/3)
Auxiliary input: Jack socket
Connection
Using the appropriate cable (not supplied), connect the Jack socket of the auxiliary input 10 to the portable audio player headphones socket (usually a 3.5mm jack).
Note: you cannot select a track directly from your audio system. To select a track, you must do so directly via your portable audio player, when the vehicle is stationary.
Use
Just the text Jack is displayed on the system screen. No artist or track name is visible.
Auxiliary input: Bluetooth® audio playback
(depend on equipment model)
To use your Bluetooth® portable audio player, you must pair it to the vehicle the first time you use it.
Pairing allows the audio system to recognise and store a Bluetooth® portable audio player.
Note: if your Bluetooth® device has telephone and audio player functions. You can choose to connect either the telephone and the audio player, or just the audio player.

Only handle the personal stereo when traffic conditions permit.
Store the portable audio player safely while driving (risk of being thrown in the event of sudden braking or impact).
Connection
- Activate the portable audio player's Bluetooth® connection (refer to your portable audio player's manual).
- Pair your portable audio player to the vehicle (please see the information in the "Pairing, unpairing a telephone" section).
- Access the "Bluetooth devices" menu by pressing 5 or 14.
NB: if this is the first time that the device is connected to the system, audio playback will start at the first track in the first folder on the source. Otherwise, playback starts from the last track played (if you connect the same device twice).
Note: if there is no Bluetooth® device connected, press 11 or 15 to activate the Bluetooth® function; pressing 11 or 15 takes you directly to the list of Bluetooth® connections (if the radio's Bluetooth® function is activated).
AUXILIARY AUDIO SOURCES (3/3)
Use
Your portable audio player must be connected to the system to enable all its functions to be accessed.
Note: no portable audio player can be connected to the system unless it has previously been paired.
Once the Bluetooth® digital portable audio player is connected, you can control it from your audio system.
Depending on the device, press 8 to go to the previous/next tracks on the portable audio player.
Note: the number of accessible functions varies depending on the type of portable audio player and its compatibility with the audio system.
Note: in some cases, you will need to refer to your device's manual to finalise the connection procedure.
PAIRING AND UNPAIRING A TELEPHONE (1/2)
Pairing a phone
In order to use your hands-free phone system, you must pair your Bluetooth® mobile to your vehicle before using it for the first time.
Pairing will enable the hands-free phone system to recognise and store a phone.
Up to five phones can be stored by the hands-free phone system, but only one can be connected to the hands-free phone system at any time.
Pairing is carried out on the system and on your phone. Your audio system and phone must both be switched on.
Note: The existing pairing will be automatically disconnected once a new pairing is made.
To pair a phone, carry out the following operations:
- activate the phone's Bluetooth® connection (please refer to your phone manual);
| 20:5 | Phone settings |
| SET | Bluetooth connection |
| iTraffic | Language |
display the settings menu by pressing 12, then select the "Bluetooth connection" menu;
choose a free space, then press 4, 18 or 21 to display the following menu;
Note: You can also access the list of Bluetooth® phones by pressing 11 or 15 if there is no phone connected.
select "Pair a phone" by pressing 4, 18 or 21;
| 20:5 | 1 (Free) |
| B | 2 (Free) |
| iTran | 3 (Free) |
- enter the pairing code displayed on the system screen using the telephone keypad;
NB: some phones authorise the connection automatically and do not require a code.
- from your phone search for Bluetooth® equipment in the vicinity;
from the phone, select "My_Radio" (name of hands-free phone system) from the list.
For more information, refer to your phone's user guide.
PAIRING, UNPAIRING A TELEPHONE (2/2)
Once pairing is completed:
- a message with the name of the phone that has been paired is displayed;
- the phone is automatically connected to the vehicle.
If pairing has failed, the message "Pairing failed. Please restart pairing procedure." is displayed.
If the list of paired phones is full, a new phone can only be paired if an existing phone is unpaired.
Unpairing a phone
Unpairing deletes a phone from the hands-free phone system memory.
Display the settings menu by pressing 12, then select the "Bluetooth connection" menu. Select the phone to be unpaired from the list and press 4, 18 or 21, then select "Delete".
Note: unpairing a phone erases all the contacts from the mobile phonebook downloaded to the system, as well as the associated history.

Your hands-free phone system is only intended to facilitate communication by reducing the risk factors,
without removing them completely. You must always comply with the laws of the country in which you are travelling.
CONNECTING/DISCONNECTING A TELEPHONE (1/2)
Connecting a paired phone
Your phone must be connected to the hands-free phone system in order to use all its functions.
No phone can be connected to the hands-free phone system if it has not first been paired. Please refer to the information on "Pairing a telephone" in the "Pairing,unpairing a telephone" section.
NB: the Bluetooth® connection for your telephone must be activated.
Automatic connection
Once the ignition is switched on, the hands-free phone system searches for nearby paired telephones.
NB: the priority telephone is the last phone to have been connected.
Searching will continue until a paired phone is found (this may take up to five minutes).
A message will indicate that the phone is connected.
Note:
- you can use automatic telephone connection with the ignition switched on. You may need to activate the automatic Bluetooth® connection function on your hands-free phone system. To do this, please refer to your telephone user manual;
- when reconnecting, and when two paired phones are within range of the hands-free system, the last phone to have been connected will take priority, even if this phone is outside the vehicle but within range of the hands-free system.
NB: if a call is already in progress when your hands-free phone system is connected, the phone will automatically be connected and the conversation will switch to the vehicle speakers.
Manual connection (changing the phone connected)
Display the settings menu by pressing 12, then select the "Bluetooth connection" menu. You will find the list of phones already paired.
Select the telephone from the list and confirm "Connect" by pressing 4, 18 or 21. A message will indicate that the phone is connected.
Note: You can also select a telephone to be deleted by pressing 4, 18 or 21.
CONNECTING/DISCONNECTING A TELEPHONE (2/2)
Connection failure
If connection fails, check that:
- your phone is switched on;
- your phone battery is not flat;
- your phone has already been paired to the hands-free phone system;
- the Bluetooth® function on your phone and on the system are activated;
- the phone is configured to accept the system's connection request.
Note: using your hands-free phone system for prolonged periods will discharge your phone's battery more quickly.
Disconnect a phone
Display the settings menu by pressing 12, then select the "Bluetooth connection" menu.
Select the telephone to be disconnected from the list, then select "Disconnect" and press 4, 18 or 21 to confirm.
If the phone is switched off, the telephone will be disconnected.
A message is then displayed on your screen to confirm that the phone is disconnected.
NB: if a call is in progress when the phone is disconnected, the call will automatically be transferred to your phone.
To disconnect your telephone, you can also:
- switch off the Bluetooth® function of your radio system;
- deactivate your phone's Bluetooth® function;
- delete the paired phone via the telephone menu.
To cut Bluetooth® from your radio, please refer to the information on the "Bluetooth Function" in the "General Description" section.
To unpair a Bluetooth® telephone, please refer to the information on "Unpairing a telephone" in the "Pairing/ unpairing a telephone" section.
MANAGING THE TELEPHONE DIRECTORY
| 20:0 | Update |
| TEL | Phonebook |
| iTraffic | History |
Displaying the mobile phonebook
When a phone is paired, its phonebook is automatically downloaded to the system.
Display the "Phone" menu by pressing 11 or 15, then select the "Phonebook" menu to display the contacts list.
Selecting a contact in the mobile phonebook
(dependently on the vehicle)
Select the first letter of the name by turning 4, 19 or 21, then press 4, 18 or 21 to display the corresponding contact(s).
Select the required contact, then press 4, 18 or 21 to display the details for this contact. You can assign up to four numbers per contact (home, work, mobile, other).
Updating the phone memory
The mobile phonebook is updated automatically in the system each time it is connected.
You can also update the telephone directory manually:
display the "Phone" menu by pressing 11 or 15, then select "Phonebook";
- access the "Update" menu, then select the "Update" section.
The maximum memory capacity is 500 contacts. If the memory capacity is exceeded, the system will warn you and suggest that you clear one of the contacts.
Confidentiality
The list of contacts for each phone is stored in the memory by the hands-free phone system.
For reasons of confidentiality, each downloaded contacts list can only be viewed when the corresponding phone is connected.
MAKING AND RECEIVING CALLS (1/2)
Calling a contact from the telephone directory
When a phone is paired, its phonebook is automatically downloaded to the system.
Display the phone menu by pressing 11 or 15, then select "Phonebook" by turning 4, 19 or 21. To display the contacts list, press 4, 18 or 21.
Select a contact to call from the list, then confirm by pressing 4, 18 or 21 to make the call.
Note: To return to the previous screen, press 13, 19 or 21.

It is recommended that you stop your vehicle before entering a number or searching for a contact.
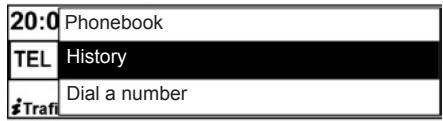
Call from a contact stored in the call history
Display the call history by pressing 11 or 15, then select the "History" item.
Select the "Dialled calls", "Missed calls" or "Received calls" menu. The call history is displayed on the screen. Select the contact or the number to call, then confirm by pressing 4, 18 or 21 to make the call.
Making a call by dialling a number
Display the "Phone" menu by pressing 11 or 15, then select the "Dial a number" menu.
Dial the desired number using the numerical keypad (please refer to the information on "Using the numerical keypad" in the section entitled "Operating principles"), then select ... and press 4, 18 or 21 to confirm your call.
The system does not support threeway calling when your telephone is connected. If you receive a call when you are on another call, this new call is automatically rejected.
MAKING AND RECEIVING CALLS (2/2)
Receiving a call
When receiving a call, the caller's number is displayed on the screen (this function depends on the options you have subscribed to with your service provider).
If the caller's number is in one of the memories, the name of the caller is displayed instead of the number.
If the caller's number cannot be displayed, the message "unknown" is displayed on the screen.
Note: the hands-free system ringtone depends on the phone model and its mode (silent, vibrate, etc.).
Rejecting a call
You can reject an incoming call by selecting "Refuse" or by pressing and holding 11, 15 or 20.
| Pause | (unknown)Y...ABCCall in progress |
| Keypad | |
| Handset |
During a call
You can:
- adjust the volume by pressing 16, 17 or turning 2;
- enter a number on the keypad (so that you can control a voice server such as your voicemail box).
To do this, select the heading "Keyboard" in the call management zone;
- place a call on hold: the person you are speaking to will then hear a voice message asking them to wait.
To do this, select the "Pause" item (once the "Pause" item is selected, it is replaced by "Resume"), or press 15 or 21. When a call is placed on hold your phone is considered to be receiving a call;
- picking up a call on hold: you may continue the communication at any moment.
To do this, select the "Resume" item in the call management zone; - hang up by pressing 15 or 20 or by selecting the item "Hang up" in the call management zone;
- switch the call to the phone by selecting the heading "Handset" in the call management zone.
Note: some phones disconnect from the system during the switch to "Handset" mode.
SYSTEM SETTINGS (1/2)
Audio settings
Display the settings menu by pressing 12. Select "Audio settings", then press 4, 18 or 21. Please refer to the "Audio settings" section in this handbook for more information.
Telephone settings
Press 12 to display the settings menu. Select "Phone settings".
Adding a contact to the mobile phonebook
Display the "Phone settings" menu, then select "Add contacts".
Vehicle/phone ringtone
You can select the type of ringtone activated for an incoming call: either the vehicle or phone ringtone. Access the "Ring tone" menu, then select "Vehicle" or "Phone".
Note: Your phone may not have the ringtone transfer function; please refer to the compatibility list.
Manual/automatic call waiting
Access the "Put on hold" menu, then select "Automatic" or "Manual".
In automatic mode, a beep will sound to indicate that a call is on hold.
You can exit the settings mode by pressing 12, 13 or by pressing and holding 18 or 21, or by waiting for 30 seconds of inactivity.
SYSTEM SETTINGS (2/2)
Choosing the language
Access the "Language" menu. Select one of the available languages.
Setting the time
Access the "Clock" menu.
Turn 4, 19 or 21 to adjust the "Hours" item, then press 4, 18 or 21 to confirm the hours. Turn 4, 19 or 21 to adjust the "Minutes" item, then press 4, 18 or 21 to confirm the setting.
Note: if you have a navigation system, refer to the instruction manual for this system to set the clock.
Software version
To display the software version, select "Software version" and turn 4, 19 or 21 and press 4, 18 or 21.
Updating the radio system using a USB stick
For the latest system software:
- download the necessary files from the RENAULT website;
- copy the files to your USB memory stick;
- insert the USB memory stick into the radio system;
- follow the instructions shown on the screen.
NB: the opening of a door interrupts the update of the system.
Default settings
Select "Default settings" by turning 4, 19 or 21 and pressing 4, 18 or 21. A message is displayed on the screen requesting confirmation of your selection. Choose "Confirm" to confirm.
All the system settings return to their default values.
OPERATING FAULTS (1/3)
| Description | Possible causes | Solutions |
| No sound can be heard. | The volume is set to minimum or pause. | Increase the volume or deactivate pause. |
| The audio system does not work and the display does not light up. | The audio system is not switched on. | Switch the audio system on. |
| The audio system fuse has blown. | Replace the fuse (see “fuses” in the vehicle's driver's handbook). | |
| The audio system does not work but the display lights up. | The volume is set to minimum. | Turn 2 or press 14. |
| Speaker short circuit. | Contact a representative from the manufacturer. | |
| No sound comes out of the left or right-hand speakers when using the radio or a CD/CD MP3. | The sound balance setting (left/right) is incorrect. | Correct the sound balance setting. |
| Speaker disconnected. | Contact a representative from the manufacturer. | |
| Poor radio reception or no reception. | The vehicle is too far from the transmitter to which the radio is tuned (background noise and interference). | Find another transmitter with better reception in your area or deactivate the “RDS-AF” function. |
| The reception is disrupted by interference from the engine. | Contact a representative from the manufacturer. | |
| The aerial is damaged or not connected. | Contact a representative from the manufacturer. |
OPERATING FAULTS (2/3)
| Description | Possible causes | Solutions |
| The initial read time of a CD CD MP3 seems long. | The CD is dirty. | Eject and clean the CD. |
| CD MP3. | Wait: the CD MP3 requires a long time to be read. | |
| “CD read error” is displayed or the CD CD MP3 is ejected by the audio system. | CD incorrectly inserted or dirty, damaged or incompatible. | Eject the CD/CD MP3. Correctly insert a clean, undamaged or compatible CD/CD MP3. |
| Some CD MP3 files cannot be read. | Audio and non-audio files have been saved on the same CD. | Save audio and non-audio files on different CDs. |
| The audio system cannot read the CD MP3. | The CD has been written at a speed of less than 8x or more than 16x. | Burn your CD at 8x speed. |
| The CD has been written in multi-session mode. | Write your CD in Disc at Once mode or write the CD in Track At Once mode, and finalise the CD after the last session. | |
| The CD MP3 playback quality is poor. | The CD is black or of a colour with a lower reflective capacity, which reduces the playback quality. | Copy your CD onto a white or light-coloured CD. |
OPERATING FAULTS (3/3)
| Description | Possible causes | Solutions |
| The phone does not connect to the system. | - Your phone is off. - Your phone's battery is flat. - Your phone has not previously been paired to a hands-free phone system. - Bluetooth® for your phone and the system have not been activated. - The phone is not configured to accept the system's connection request. | - Switch on your phone. - Recharge your phone's battery. - Pair your phone to the hands-free phone system. - Activate the Bluetooth® for your phone and the system. - Configure the phone to accept the system's connection request. |
| The Bluetooth® portable audio player does not connect to the system. | - Your audio player is off. - Your audio player's battery is flat. - Your audio player has not previously been paired to the audio system. - The Bluetooth® for your audio player and the audio system have not been activated. - The audio player is not configured to accept the system's connection request. - Music does not start to play from your audio player. | - Switch on your portable audio player. - Recharge your audio player's battery. - Pair your audio player to the audio system. - Activate Bluetooth® for your audio player and the audio system. - Configure the audio player to accept the system's connection request. - Depending on your phone's degree of compatibility, music may need to be played from your audio player. |
| The message “Battery low” is shown. | Using your hands-free phone system for prolonged periods of time will run down your phone’s battery more quickly. | Recharge your phone’s battery. |
ALPHABETICAL INDEX (1/2)
A
auxiliary source. GB.7, GB.17
B
background/on-hold music .GB.15
balance. GB.15
Balance. GB.16
bass. GB.15
Bluetooth GB.8
Bluetooth® portable audio player . GB.18
buttons. GB.2 GB.5
C
call GB.25
call history. GB.25
call volume. GB.26 - GB.27
call waiting. GB.26-GB.27
CD text. GB.14
CD/MP3 CD
eject. GB.14
fast winding. GB.13 - GB.14
insert .GB.13-GB.14
listen .GB.13-GB.14
MP3 CD specifications.. GB.13 - GB.14
choosing the source . GB.9
clock
setting . GB.28
communication . GB.26
connect a telephone . GB.22
connection
failure .GB.21, GB.23
contacts GB.24
contacts list. GB.24
controls. GB.2 GB.5
D
default settings .GB.28
dialled numbers. GB.25
dalling a number. GB.25
disconnect a telephone. GB.23
F
FM/LW/MW bandwidths. GB.7
H
hands-free telephone system. GB.8
1
i Traffic . GB.12, GB.16
ID3 tag. GB.14
J
Jack socket. GB.18
L
languages. GB.28
M
missed calls. GB.25
MP3 .GB.13-GB.14
mute. GB.9
0
operating faults. GB.29 GB.31
operation. GB.9
P
pairing a telephone. GB.20 - GB.21
precautions during use. GB.6
ALPHABETICAL INDEX (2/2)
R
radio automatic mode . GB.11
automatic station storage. GB.11
choosing a station. GB.11
manual mode. GB.11
station pretuning . GB.11
radio stations list update. GB.16
radio-text. GB.12
range of wavelengths. GB.11
RDS. GB.7
RDS-AF .GB.16
received calls. GB.25
receiving a call. GB.26
ringtone. GB.27
ringtone volume. GB.27
s
settings audio. GB.15, GB.27
balance .GB.16
fader. GB.16
software audio connection box. GB.16
telephone compatibility . GB.27
sound optimisation. GB.15
switching off. GB.9
T
telephone contacts list. GB.24 - GB.25
tone. GB.15
treble. GB.15
U
unpairing a telephone. GB.21
USB socket. .GB.17
V
volume. GB.9
volume: adapted to speed . GB.16
W
WMA. GB.13-GB.14
DESCRIPCION GENERAL (2/2)
ACOPLAR, DESACOPLAR UN TELEFONO (1/2)
Emparejar un téléphone
ACOPLAR, DESACOPLAR UN TELEFONO (2/2)
ÍNDICE ALFABÉTICO (1/2)
A
bandas FM / LW / MW. E.7
Bluetooth® E.8
botones. E.2→E.5
C
CD / CD MP3 characteristicas de los CD MP3 E.13 - E.14
escuchar E.13-E.14
expulsar E.14
insertar E.13-E.14
lectura accelerada E.13-E.14
CD text. E.14
comunicación. E.26
ÍNDICE ALFABÉTICO (2/2)
0
DESCRÊçÂO GERAL (1/2)
Introdução
DESCRÊçÂO GERAL (2/2)
FONTES ÁUDIO EXTERNAS (1/3)
FONTES ÁUDIO EXTERNAS (2/3)
Entrada auxiliar: tomada Jack
Ligação
REGISTAR, ELIMINAR UM TELEMÓVEL (2/2)
LIGAR, DESLIGAR UM TELEMÓVEL (2/2)
Ligação falhada
ÍNDICE ALFABÉTICO (1/2)
A
agudos. P.15
ÍNDICE ALFABÉTICO (2/2)
sintonia automática. P.11
sintonia manual. P.11
sintonizaruma estao.. P.11
radio-text. P.12
RDS P.7
RDS-AF P.16
KUMANDALARIN TANITILMASI (4/4)
HARICI SES KAYNAKLARI (1/3)
HARICI SES KAYNAKLARI (2/3)
Ilave girls: Jack girisi
Baglanti
HARICI SES KAYNAKLARI (3/3)
Kullanim
| 20:5 | 1 (bos) |
| B | 2 (bos) |
| iTran | 3 (bos) |
SISTEM AYARLARI (1/2)
Ses ayarlari
SISTEM AYARLARI (2/2)
Dilin seçilmesi
ÇALİŞMA ARIZALARI (2/3)
USTAWIENIA AUDIO (2/2)
ZEWNETRZNE ZRODLA AUDIO (1/3)
ZEWNETRZNE ZRODLA AUDIO (2/3)
USTAWIENIA SYSTEMU (2/2)
Wybór jejzyka
NIEPRAWIDŁOWOSCI W DZIAŁANIU (1/3)
NIEPRAWIDŁOWOSCI W DZIAŁANIU (2/3)
NIEPRAWIDŁOWOSCI W DZIAŁANIU (3/3)
- INTRODUCTION TO THE CONTROLS (1/4)
- INTRODUCTION TO THE CONTROLS (3/4)
- PRECAUTIONS DURING USE
- Precautions when operating the audio system
- Precautions concerning the equipment
- Precautions when using the phone
- Maintenance of the fascia
- GENERAL DESCRIPTION (1/2)
- Introduction
- Radio and CD/CD MP3 functions
- Auxiliary audio function
- GENERAL DESCRIPTION (2/2)
- Hands-free phone function
- Function Bluetooth®
- OPERATION
- On and off
- CHOOSING THE SOURCE
- VOLUME
- Mute
- Moving within the screen displays
- Using a numerical keypad
- LISTENING TO THE RADIO (1/2)
- Selecting a wavelength
- Selecting a radio station
- Automatic search
- Manual search
- Selecting by name of station (FM only)
- Station memory
- LISTENING TO THE RADIO (2/2)
- RDS-AF automatic retuning
- Traffic information (i Traffic)
- Text information (Radio-text)
- LISTENING TO A CD (1/2)
- Specifications of readable formats
- Maintaining CD/CD MP3
- Inserting a CD
- Listening to a CD /CD MP3
- Searching for a track
- Fast winding
- LISTENING TO A CD (2/2)
- Pause
- Displaying text information (if available) (CD -Text or ID3 tag)
- Ejecting a CD
- AUDIO SETTINGS (1/2)
- Sound levels
- Musical atmosphere
- Tone (Bass/Treble)
- Activating the automatic gain control function (AGC)
- Volume adjustment according to speed
- Balance
- Optimising the sound distribution (depending on the vehicle)
- Moderate volume in the front
- AUDIO SETTINGS (2/2)
- Right/left and front/rear balance
- Manually updating the radio list
- Activating the RDS - AF function
- Activating the Random function
- Activating the i Traffic function
- Default settings
- Radio software version
- AUXILIARY AUDIO SOURCES (1/3)
- Auxiliary input: USB socket
- Connection
- Use
- AUXILIARY AUDIO SOURCES (2/3)
- Auxiliary input: Jack socket
- Auxiliary input: Bluetooth® audio playback
- AUXILIARY AUDIO SOURCES (3/3)
- PAIRING AND UNPAIRING A TELEPHONE (1/2)
- Pairing a phone
- PAIRING, UNPAIRING A TELEPHONE (2/2)
- Unpairing a phone
- CONNECTING/DISCONNECTING A TELEPHONE (1/2)
- Connecting a paired phone
- Automatic connection
- Note:
- Manual connection (changing the phone connected)
- CONNECTING/DISCONNECTING A TELEPHONE (2/2)
- Connection failure
- Disconnect a phone
- MANAGING THE TELEPHONE DIRECTORY
- Displaying the mobile phonebook
- Selecting a contact in the mobile phonebook
- Updating the phone memory
- Confidentiality
- MAKING AND RECEIVING CALLS (1/2)
- Calling a contact from the telephone directory
- Call from a contact stored in the call history
- Making a call by dialling a number
- MAKING AND RECEIVING CALLS (2/2)
- Receiving a call
- Rejecting a call
- During a call
- SYSTEM SETTINGS (1/2)
- Audio settings
- Telephone settings
- Adding a contact to the mobile phonebook
- Vehicle/phone ringtone
- Manual/automatic call waiting
- SYSTEM SETTINGS (2/2)
- Choosing the language
- Setting the time
- Software version
- Updating the radio system using a USB stick
- ALPHABETICAL INDEX (1/2)
- A
- B
- C
- D
- F
- H
- 1
- J
- L
- M
- 0
- P
- ALPHABETICAL INDEX (2/2)
- R
- s
- T
- U
- V
- W
- DESCRIPCION GENERAL (2/2)
- ACOPLAR, DESACOPLAR UN TELEFONO (1/2)
- Emparejar un téléphone
- ACOPLAR, DESACOPLAR UN TELEFONO (2/2)
- ÍNDICE ALFABÉTICO (1/2)
- ÍNDICE ALFABÉTICO (2/2)
- DESCRÊçÂO GERAL (1/2)
- Introdução
- DESCRÊçÂO GERAL (2/2)
- FONTES ÁUDIO EXTERNAS (1/3)
- FONTES ÁUDIO EXTERNAS (2/3)
- Entrada auxiliar: tomada Jack
- Ligação
- REGISTAR, ELIMINAR UM TELEMÓVEL (2/2)
- LIGAR, DESLIGAR UM TELEMÓVEL (2/2)
- Ligação falhada
- HARICI SES KAYNAKLARI (1/3)
- HARICI SES KAYNAKLARI (2/3)
- Ilave girls: Jack girisi
- Baglanti
- HARICI SES KAYNAKLARI (3/3)
- Kullanim
- SISTEM AYARLARI (1/2)
- Ses ayarlari
- SISTEM AYARLARI (2/2)
- Dilin seçilmesi
- USTAWIENIA AUDIO (2/2)
- ZEWNETRZNE ZRODLA AUDIO (1/3)
- ZEWNETRZNE ZRODLA AUDIO (2/3)
- USTAWIENIA SYSTEMU (2/2)
- Wybór jejzyka
Brand : RENAULT
Model : R-PLUG RADIO+
Category : Car stereo