
X-HM81-S - Audio System PIONEER - Free user manual and instructions
Find the device manual for free X-HM81-S PIONEER in PDF.
| Brand | PIONEER |
| Model | X-HM81-S |
| Category | Audio system |
| Product type | Mini Hi-Fi system |
| Dimensions (W x H x D) | 250 x 100 x 300 mm |
| Weight | 3.5 kg |
| Power supply | AC 220-240 V ~ 50/60 Hz |
| Output power | 2 x 30 W RMS |
| Main functions | CD player, FM/AM tuner, Bluetooth, USB, auxiliary input |
| Maintenance and cleaning | Clean with a soft, dry cloth. Do not use abrasive products. |
| Safety | Unplug the device before cleaning. Do not expose to moisture. |
| Spare parts and repairability | Parts available from authorized Pioneer after-sales service. |
| General information | Compliant with directive 1999/5/EC. Manual downloadable in PDF format. |
Frequently Asked Questions - X-HM81-S PIONEER
User questions about X-HM81-S PIONEER
0 question about this device. Answer the ones you know or ask your own.
Ask a new question about this device
Download the instructions for your Audio System in PDF format for free! Find your manual X-HM81-S - PIONEER and take your electronic device back in hand. On this page are published all the documents necessary for the use of your device. X-HM81-S by PIONEER.
USER MANUAL X-HM81-S PIONEER
Discover the benefits of registering your product online at http://www.pioneer.co.uk (or http://www.pioneer.eu).
Operating Instructions
IMPORTANT

The lightning flash with arrowhead symbol, within an equilateral triangle, is intended to alert the user to the presence of uninsulated "dangerous voltage" within the product's enclosure that may be of sufficient magnitude to constitute a risk of electric shock to persons.
CAUTION
RISK OF ELECTRIC SHOCK DO NOT OPEN
CAUTION:
TO PREVENT THE RISK OF ELECTRIC SHOCK. DO NOT REMOVE COVER (OR BACK). NO USER-SERVICEABLE PARTS INSIDE. REFER SERVICING TO QUALIFIED SERVICE PERSONNEL.

The exclamation point within an equilateral triangle is intended to alert the user to the presence of important operating and maintenance (servicing) instructions in the literature accompanying the appliance.
D3-4-2-1-1_A1_En
WARNING
This equipment is not waterproof. To prevent a fire or shock hazard, do not place any container filled with liquid near this equipment (such as a vase or flower pot) or expose it to dripping, splashing, rain or moisture.
D3-4-2-1-3_A1_En
WARNING
Before plugging in for the first time, read the following section carefully.
The voltage of the available power supply differs according to country or region. Be sure that the power supply voltage of the area where this unit will be used meets the required voltage (e.g., 230V or 120V ) written on the rear panel.
D3-4-2-1-4*A1En
WARNING
To prevent a fire hazard, do not place any naked flame sources (such as a lighted candle) on the equipment.
D3-4-2-1-7a_A1_En
Operating Environment
Operating environment temperature and humidity: +5^ to +35^ (+41^ to +95^) less than 85% RH (cooling vents not blocked)
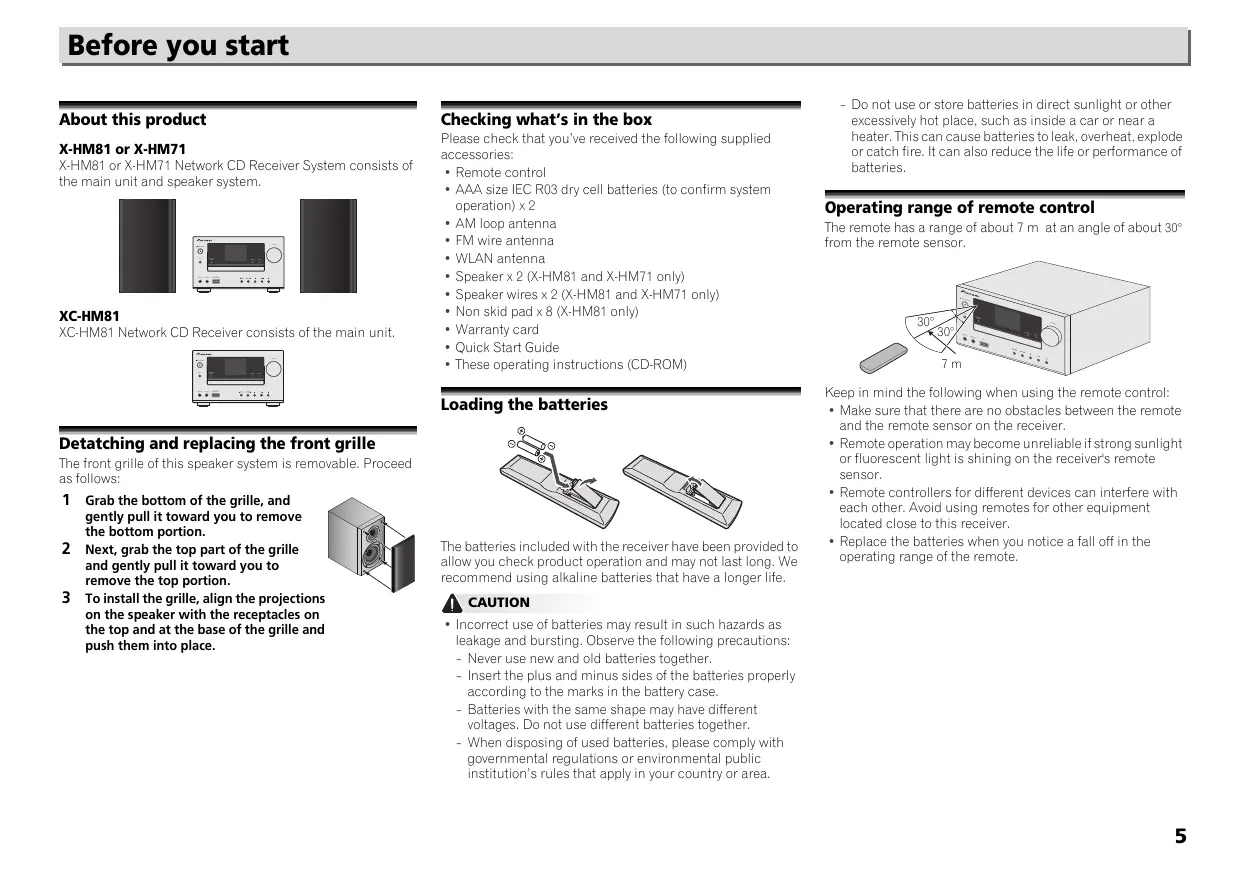
Do not install this unit in a poorly ventilated area, or in locations exposed to high humidity or direct sunlight (or strong artificial light)
This product is for general household purposes. Any failure due to use for other than household purposes (such as long-term use for business purposes in a restaurant or use in a car or ship) and which requires repair will be charged for even during the warranty period.
K041_A1_En
Radio wave caution
This unit uses a 2.4 GHz radio wave frequency, which is a band used by other wireless systems (Microwave ovens and Cordless phones, etc.). In this event noise appears in your television image, there is the possibility this unit (including products supported by this unit) is causing signal interference with the antenna input connector of your television, video, satellite tuner, etc. In this event, increase the distance between the antenna input connector and this unit (including products supported by this unit).
-
Pioneer is not responsible for any malfunction of the compatible Pioneer product due to communication error/malfunctions associated with your network connection and/or your connected equipment. Please contact your Internet service provider or network device manufacturer.
-
A separate contract with payment to an Internet service provider is required to use the Internet.
D3-4-2-1-7c*A1_EN
VENTILATION CAUTION
When installing this unit, make sure to leave space around the unit for ventilation to improve heat radiation (at least 10cm at top, 10cm at rear, and 10cm at each side).
WARNING
Slots and openings in the cabinet are provided for ventilation to ensure reliable operation of the product, and to protect it from overheating. To prevent fire hazard, the openings should never be blocked or covered with items (such as newspapers, table-cloths, curtains) or by operating the equipment on thick carpet or a bed.
D3-4-2-1-7b*A1_EN
For Wireless product European Union Notice
PIONEER hereby declares that this/these product(s) is/are in compliance with the essential requirements and other relevant provisions of Directive 1999/5/EC, 2004/108/EC, 2006/95/EC and 2009/125/EC.
Information for users on collection and disposal of old equipment and used batteries
(Symbol for equipment)

Symbol examples) for batteries


Pb
These symbols on the products, packaging, and/or accompanying documents mean that used electrical and electronic products and batteries should not be mixed with general household waste.
For proper treatment, recovery and recycling of old products and used batteries, please take them to applicable collection points in accordance with your national legislation.
By disposing of these products and batteries correctly, you will help to save valuable resources and prevent any potential negative effects on human health and the environment which could otherwise arise from inappropriate waste handling.
For more information about collection and recycling of old products and batteries, please contact your local municipality, your waste disposal service or the point of sale where you purchased the items.
These symbols are only valid in the European Union.
For countries outside the European Union:
If you wish to discard these items, please contact your local authorities or dealer and ask for the correct method of disposal.
K058a_A1_En
POWER-CORD CAUTION
Handle the power cord by the plug. Do not pull out the plug by tugging the cord and never touch the power cord when your hands are wet as this could cause a short circuit or electric shock. Do not place the unit, a piece of furniture, etc., on the power cord, or pinch the cord. Never make a knot in the cord or tie it with other cords. The power cords should be routed such that they are not likely to be stepped on. A damaged power cord can cause a fire or give you an electrical shock. Check the power cord once in a while. When you find it damaged, ask your nearest PIONEER authorized service center or your dealer for a replacement.
S002*A1En
If the AC plug of this unit does not match the AC outlet you want to use, the plug must be removed and appropriate one fitted. Replacement and mounting of an AC plug on the power supply cord of this unit should be performed only by qualified service personnel. If connected to an AC outlet, the cut-off plug can cause severe electrical shock. Make sure it is properly disposed of after removal. The equipment should be disconnected by removing the mains plug from the wall socket when left unused for a long period of time (for example, when on vacation).
D3-4-2-2-1a_A1_En
CAUTION
The 0STANDBY/ON switch on this unit will not completely shut off all power from the AC outlet. Since the power cord serves as the main disconnect device for the unit, you will need to unplug it from the AC outlet to shut down all power. Therefore, make sure the unit has been installed so that the power cord can be easily unplugged from the AC outlet in case of an accident. To avoid fire hazard, the power cord should also be unplugged from the AC outlet when left unused for a long period of time (for example, when on vacation).
D3-4-2-2-2a*A1_EN
CAUTION
This product is a class 1 laser product classified under the Safety of laser products, IEC 60825-1:2007.

D58-5-2-2a_A1_En
Condensation
If the player is moved suddenly from a cold place into a warm room (in winter, for example) or if the temperature in the room in which the player is installed rises suddenly due to a heater, etc., water droplets (condensation) may form inside (on operating parts and the lens). When condensation is present, the player will not operate properly and playback is not possible. Let the player stand at room temperature for 1 or 2 hours with the power turned on (the time depends on the extent of condensation). The water droplets will dissipate and playback will become possible. Condensation can also occur in the summer if the player is exposed to the direct wind from an air-conditioner. If this happens, move the player to a different place.
S005_A1_En
Thank you for buying this Pioneer product. Please read through these operating instructions so you will know how to operate your model properly.
About this product 5
Detatching and replacing the front grille 5
Checking what's in the box. 5
Loading the batteries 5
Operating range of remote control 5
01 Controls and displays
Front panel. 6
Remote control. 7
02 Connecting your equipment
Antenna connection. 8
WLAN antenna connection 9
Speaker connection 9
Using other subwoofer. 9
Connecting a TV, etc. 9
Connecting USB storage devices 10
Connecting to the network through the LAN interface or WLAN antenna. 10
Connecting to auxiliary component 10
Plugging in. 10
03 Getting started
Setting the receiver 11
Setting the clock 11
Setting the wake-up timer. 11
Sleep operation 12
General control. 12
Listening to auxiliary component 12
Headphones. 12
Sound Controls 13
04 iPod/iPhone/iPad playback
Confirming what iPod/Phone/iPad models are supported. 14
Connecting your iPod/iPhone/iPad. 14
Playing your iPod/iPhone/iPad 15
05 Music playback using Bluetooth® wireless technology
ConnectingBluetooth® wireless technology ADAPTER . 16
Setting the PIN code. 16
Pairing Bluetooth® wireless technology ADAPTER and
Bluetooth wireless technology device 16
Listening to music contents of Bluetooth wireless technology device 17
AIRJAM. 17
06 Disc playback
Playing discs 18
Advanced CD or MP3/WMA disc playback 18
MP3/WMA folder mode (only for MP3/WMA files) 20
07 USB playback
Playing files stored on USB storage devices 22
08 Internet radio
Listening to the Internet radio. 23
Advanced operations for the Internet radio. 23
Network setting 24
WPS connection setting 25
Connecting to a router without WPS-PBC function. 26
Connection settings using an iOS device 27
Friendly Name 27
Parental lock setup. 27
09 Music server
Introduction 28
Playing audio files stored on PCs or other components . . 28
10 Using the tuner
Listening to the radio broadcasts 30
Using the Radio Data System (RDS). 31
11 Additional information
Troubleshooting 32
Firmware Update 34
Resetting this receiver 35
Cautions on use 36
Handling discs 36
Caution for when the receiver is installed in a rack with a glass door 36
About network playback 36
Radio wave caution 38
Precautions regarding connections to products supported by this receiver 39
About playable music file formats. 39
About iPod/iPhone/iPad 39
About Wi-Fi® 40
Specifications 40
About this product
X-HM81 or X-HM71
X-HM81 or X-HM71 Network CD Receiver System consists of the main unit and speaker system.
XC-HM81
XC-HM81 Network CD Receiver consists of the main unit.
Detatching and replacing the front grille
The front grille of this speaker system is removable. Proceed as follows:
1 Grab the bottom of the grille, and gently pull it toward you to remove the bottom portion.
2 Next, grab the top part of the grille and gently pull it toward you to remove the top portion.
3 To install the grille, align the projections on the speaker with the receptacles on the top and at the base of the grille and push them into place.

Checking what's in the box
Please check that you've received the following supplied accessories:
Remote control
- AAA size IEC R03 dry cell batteries (to confirm system operation) × 2
AM loop antenna
FM wire antenna
- WLAN antenna
- Speaker x 2 (X-HM81 and X-HM71 only)
- Speaker wires x 2 (X-HM81 and X-HM71 only)
Non skid pad x 8 (X-HM81 only)
Warranty card
Quick Start Guide
These operating instructions (CD-ROM)
Loading the batteries
The batteries included with the receiver have been provided to allow you check product operation and may not last long. We recommend using alkaline batteries that have a longer life.
CAUTION
- Incorrect use of batteries may result in such hazards as leakage and bursting. Observe the following precautions:
- Never use new and old batteries together.
- Insert the plus and minus sides of the batteries properly according to the marks in the battery case.
- Batteries with the same shape may have different voltages. Do not use different batteries together.
-
When disposing of used batteries, please comply with governmental regulations or environmental public institution's rules that apply in your country or area.
-
Do not use or store batteries in direct sunlight or other excessively hot place, such as inside a car or near a heater. This can cause batteries to leak, overheat, explode or catch fire. It can also reduce the life or performance of batteries.
Operating range of remote control
The remote has a range of about 7m at an angle of about 30^ from the remote sensor.
Keep in mind the following when using the remote control:
- Make sure that there are no obstacles between the remote and the remote sensor on the receiver.
- Remote operation may become unreliable if strong sunlight or fluorescent light is shining on the receiver's remote sensor.
- Remote controllers for different devices can interfere with each other. Avoid using remotes for other equipment located close to this receiver.
- Replace the batteries when you notice a fall off in the operating range of the remote.
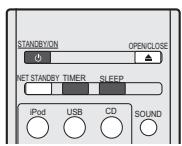
Front panel

1 Remote sensor
Receives the signals from the remote control (page 5).
2 Network Standby and power indicator
When turning on the receiver, this indicator flashes slowly for thirty seconds or more. After thirty seconds or more, this indicator lights. This indicator also lights in the Network Standby mode. In the Network Standby mode, during AirPlay or DMR, the receiver automatically turns on (page 7).
3 Display
See Display below.
4 iPod or iPhone docking station
Connect iPod/iPhone (page 14).
5 Charge indicator
Lights when iPod/iPhone connected to the docking station is charged (page 14).
6 Timer indicator
Lights when the timer is set (page 11).
7 Volume control
Use to adjust the listening volume (page 13).
8 STANDBY/ON button
Switches the receiver between standby and on (page 11).
9 INPUT button
Select the input source (page 12).
10 Headphone socket
Use to connect headphones. When the headphones are connected, there is no sound output from the speakers (page 12).
11 AUDIO IN jack
Use to connect an auxiliary component using a stereo mini-jack cable (page 12).
12 USB terminal
Use to connect your USB mass storage device or iPod/ iPhone/iPad as an audio source (page 10, 22).
13 Disc tray
Place the disc, label side up (page 18).
14Playback control buttons
Select the desired track or folder to be played back. Use to stop the playback. Use /to stop playback or resume playback from the pause point (page 18).
15 Disc Tray Open/Close button
Use to open or close the disc tray (page 18).
Display
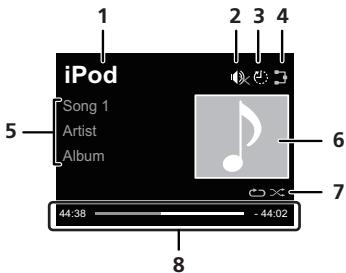
1 Input source
2 Mute
Displayed during the mute operation (page 13).
3 Sleep timer
When the sleep timer is set, the remaining time until power off is displayed (page 11).
4 Network connection status
3 When the receiver is connected to the wired network, this indicator lights (page 10).
When the receiver that is connected to the LAN cable is not connected to the network, this indicator lights. When the LAN cable is not connected to this receiver, this indicator does not light (page 10).
When the receiver is connected to the wireless network, this indicator lights. Depending on the strength of wireless signal, the icon changes in five steps (page 10).
When the receiver is not connected to the wireless network, this indicator lights (page 10).
5 Name of file/track/artist/album/station, etc.
6 Artwork
Displayed when the currently playing file includes an album jacket image, etc.
7 Repeat and Shuffle
Repeat all files.
Repeat a file.
Shuffle
8 Play status
Displays the play status. The play status differs depending on the input source.
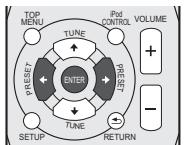
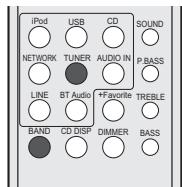
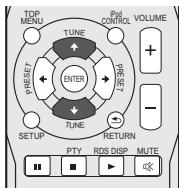
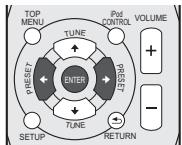
Remote control
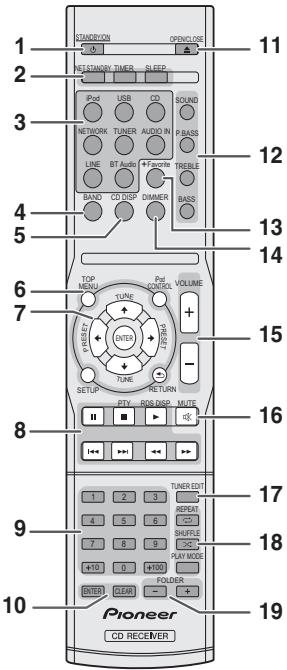
1 STANDBY/ON
Switches the receiver between standby and on (page 18).
2 CD Receiver control buttons
NET STANDBY - Switches the receiver to the Network Standby mode. During AirPlay or DMR, the receiver automatically turns on.
TIMER - Use for setting the clock, as well as for setting and checking the timers (page 11).
SLEEP - Press to change the amount of time before the receiver switches into standby (30 min. - 60 min. - 90 min. - Off). You can check the remaining sleep time at any time by pressing SLEEP once (page 12).
3 Input function buttons
Use to select the input source to this receiver.
BT Audio - Use to set up or play the audio file using the Bluetooth network (page 16). (X-HM81 and XC-HM81 only)
4 BAND
Switches between AM, FM STEREO and FM MONO radio bands (page 30).
5 CD DISP
Displays the disc information (page 20).
6 CD Receiver control buttons
TOP MENU - Displays the top menu of each input source. Displays the Noise Cut menu in Tuner. Displays BT menu in BT Audio.
iPod CONTROL - Switches between the iPod controls and the receiver controls (page 15).
SETUP - Press to access the receiver setup menu (page 11).
RETURN - Exit the current menu screen.
7 / / / (TUNE / , PRESET / ), ENTER
Use to select/switch system settings and modes, and to confirm actions.
TUNE / can be used to find radio frequencies and
PRESET / can be used to select preset radio stations (page 30).
8Playback control buttons
The main buttons ( , ,etc.) are used to control each function after you have selected it using the input function buttons (page 18).
PTY - Use to search for RDS program types (page 31).
RDS DISP - Use to display the RDS information (page 31).
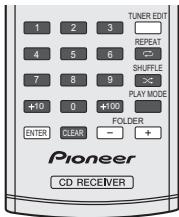
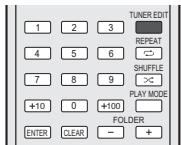
9 Numeric buttons
Use to enter the number.
10 ENTER, CLEAR
Use to select/switch system settings.
11 OPEN/CLOSE
Use to open or close the disc tray (page 18).
12 Sound control buttons
Adjust the sound quality (page 13).
13 +Favorite
Use to add an audio file or a station to Favorites function (page 23).
14 DIMMER
Dims or brightens the display. The brightness can be controlled in three steps (page 12).
15 Volume control buttons
Use to adjust the listening volume (page 13).
16 MUTE
Mutes/unmates the sound (page 13).
17 TUNER EDIT
Memorizes/names stations for recall (page 30).
18Playbackmodebuttons
REPEAT - Press to change repeat play setting from a CD, iPod, USB, Internet Radio, Music Server or Favorites.
SHUFFLE - Press to change shuffle play setting from a CD, iPod, USB, Internet Radio, Music Server or Favorites.
PLAY MODE - Press to change the playback mode between CD and MP3/WMA disc (page 19).
19 FOLDER +/-
Use to select the folder of the MP3/WMA disc (page 20).

CAUTION
- Be sure to turn off the power and unplug the power cord from the power outlet whenever making or changing connections.
- Connect the power cord after all the connections between devices have been completed.
- The Bluetooth® word mark and logos are registered trademarks owned by Bluetooth SIG, Inc. and any use of such marks by PIONEER CORPORATION is under license. Other trademarks and trade names are those of their respective owners.
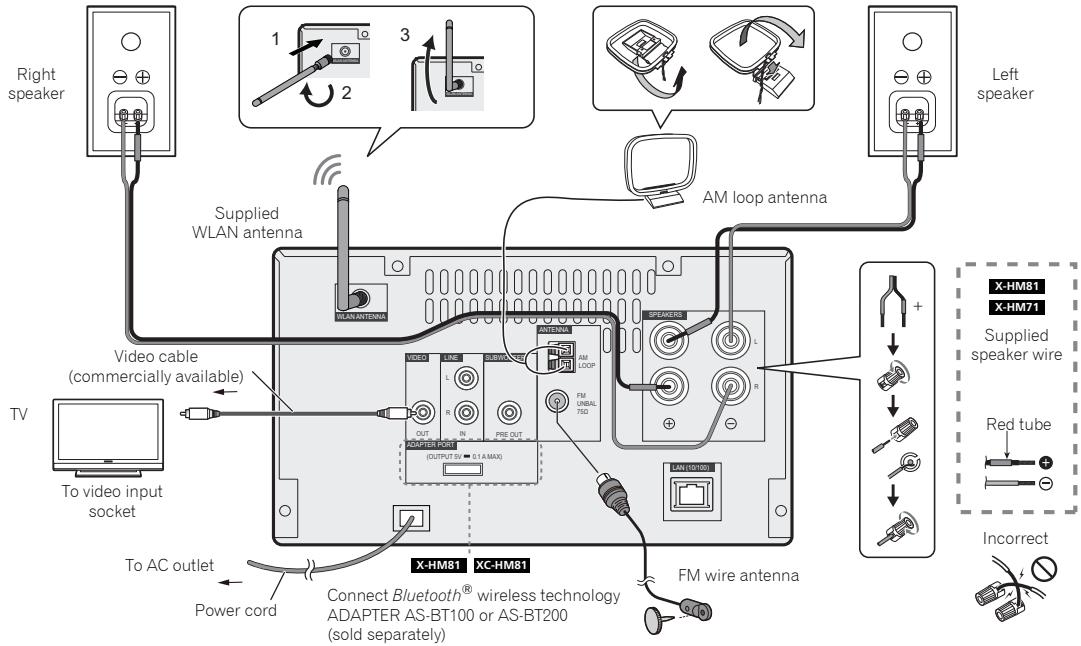
Antenna connection
Supplied FM wire antenna:
Connect the FM wire antenna to the FM 75 ohms socket and position the FM wire antenna in the direction where the strongest signal can be received.
External FM wire antenna:
Use an external FM wire antenna (75 ohms coaxial cable) for better reception. When an external FM wire antenna is used, disconnect the supplied FM wire antenna.
Supplied AM loop antenna:
Connect the AM loop antenna to the AM terminal. Position the AM loop antenna for optimum reception. Place the AM loop antenna on a shelf, etc., or attach it to a stand.
Note
- Placing the antenna on the receiver or near the AC power cord may cause noise pickup. Place the antenna away from the receiver for better reception.
CAUTION
- Do not connect the supplied speakers with any other receiver. This may result in malfunction or fire.
WLAN antenna connection
Connect the WLAN antenna to the WLAN ANTENNA terminal.
Please always use the supplied WLAN antenna.
Speaker connection
- The provided speaker wire with the red tube is for the plus (+) terminal. Connect the wire with red tube to the plus (+) terminal, and other wire to the minus (-) terminal.
- Use speakers with an impedance of 4 ohms as lower impedance speakers can damage the receiver.
- The receiver is not magnetically shielded and so should not be placed near a TV or monitor, as the interaction of magnetic materials can cause distortion of the colors on your TV screen. Magnetic storage media (such as floppy discs and tape or video cassettes) should also not be kept close to the receiver.

CAUTION
- These speaker terminals carry HAZARDOUS LIVE voltage To prevent the risk of electric shock when connecting or disconnecting the speaker cables, disconnect the power cord before touching any uninsulated parts.
- Do not mistake the right and the left channels. The right speaker is the one on the right side when you face the receiver.
- Do not let the bare speaker wires touch each other.
- Make sure that all the bare speaker wire is twisted together and inserted fully into the speaker terminal. If any of the bare speaker wire touches the back panel, it may cause the power to cut off as a safety measure.
Cleaning the glossy finish of the speaker (X-HM81 only)
- If you use a dusty or hard cloth or if you rub the screen hard, the finish of the product will be scratched.
- If you clean the surface of the speaker system with a wet cloth, water droplets on the surface may enter into the product, resulting in malfunction.
- When cleaning the finish of the speaker system, gently wipe it with a dry soft cloth.
Applying non skid pads (X-HM81 only)
The use of non skid pads is recommended depending on the installation location. Apply the pads to the four corners of the side of the speaker which will be on the bottom. Note that depending on the location, the pads may not provide fully sufficient traction to prevent slipping, so care should be taken not to install the speakers in conditions where they may be prone to side.
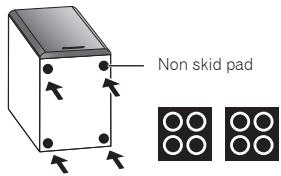

CAUTION
- When applying non skid pads, laid down the speaker on the soft cloth etc. to avoid working with unstable position.
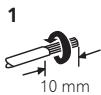
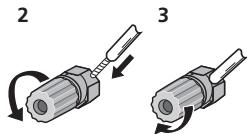
If not using the provided speaker wire
Twist exposed wire strands together.
2 Loosen terminal and insert exposed wire.
3 Tighten terminal.
X-HM81 and X-HM71 only:
- Do not install your speakers overhead on the ceiling or wall. The grill is designed to be detachable, and as such it may fall and cause damage or personal injury if installed overhead.
- Do not allow any objects to fall into or to be placed in the bass reflex ducts.
- Do not stand or sit on the speakers. You may be injured.
Using other subwoofer
You can connect a subwoofer with an amplifier to the SUBWOOFER PREOUT socket.
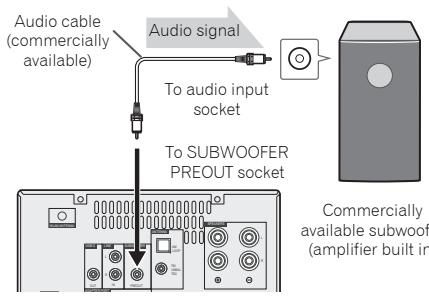
Note
- No sound is heard from the subwoofer without a built-in amplifier.
Connecting a TV, etc.
Connect to the TV using an audio cable.

To select Line function:
- On main unit: Press INPUT button repeatedly until Line is displayed.
- On remote control: Press LINE button.
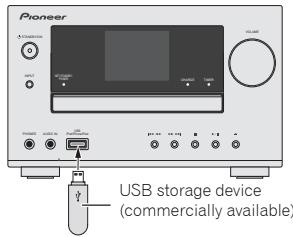
Connecting USB storage devices
It is possible to listen to two-channel audio using the USB/ iPod/iPhone/iPad terminal on the front of this receiver.
1 Connect your USB device to the USB/iPod/iPhone/iPad terminal on the front panel of this receiver.
- This receiver does not support a USB hub.
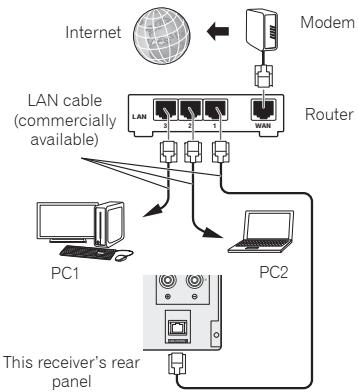
Connecting to the network through the LAN interface or WLAN antenna
By connecting this receiver to the network via the LAN interface, you can play back audio files stored on components on the network, including your PC, and listen to Internet radio stations.
Connect the LAN terminal on this receiver to the LAN terminal on your router (with or without the built-in DHCP server function) with a straight LAN cable (CAT 5 or higher). Also wireless connection to the network is possible.
Turn on the DHCP server function of your router. If your router does not have a built-in DHCP server function, you have to set up the network manually. For details, see page 24.
Note
- To use services such as Internet radio, you must conclude a contract with an Internet service provider.
-
Photo or video files cannot be played back.
-
With Windows Media Player 11 or 12, you can even play back copyrighted audio files on this receiver.
Connecting using LAN cable
Connecting using wireless LAN

Connecting to auxiliary component
Connect the front panel AUDIO IN mini-plug jack to your auxiliary playback component.
This method can be used to play music on this receiver from iPod/iPhone/iPad that do not support use of an iPhone dock.
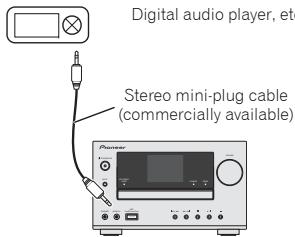
If the AUDIO IN mini Plug jack is connected to auxiliary phones jack, the volume of the receiver will be adjusted by the volume on the playback component. If the sound is distorted after you lower the volume of the receiver, try lowering the volume on the auxiliary playback component.
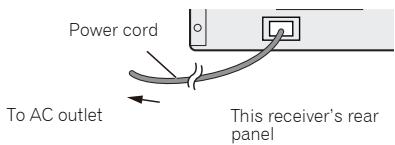
Plugging in
Before making or changing the connections, switch off the power and disconnect the power cord from the AC outlet. After you've finished making all connections, plug the receiver into an AC outlet.
Setting the receiver
When you use the receiver for the first time, the following screens will be displayed.
Set up the following items to customize the receiver.
1 Press STANDBY/ON.
The power indicator flashes slowly. About twenty seconds after turning on the power, the following screen appears.
About thirty seconds are required between turning the power on and completion of startup.
Pioneer
Auto power off setup
Set to automatically turn off the receiver after a specified time has passed (when the power has been on with no operation for several hours).
- Default setting: 6 H
1 Press NETWORK, then press SETUP on the remote control.
The Initial Setup menu is shown on the display.
2 Select 'Option Setting' from Initial Setup menu.
3 Select 'Auto Power Off' from Option Setting menu.
4 Use / to specify the amount of time to allow before the power is turned off (when there has been no operation), then press ENTER.
You can select 2, 4 or 6 hours, or OFF (if no automatic shutoff is desired).
5 When you're finished, press RETURN.
Setting the clock

Setting the clock allows you to use the timer.
1 Press TIMER button on the remote control.
The day of the week and time are displayed. The first time you use the clock, you are taken to the clock adjust mode.
Press ENTER button.
3 Use / to set the day of the week, then press ENTER.
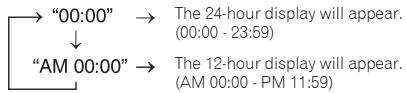
4 Use to select 24-hour or 12-hour display, then press ENTER.
5 Use / to set the hour, then press ENTER.
6 Use to set the minute, then press ENTER to confirm.
To confirm the time display:
Press TIMER button. The time display will appear for about 10 seconds.
Setting the wake-up timer
Timer playback:
The receiver turns on and plays the desired source (CD, AM, FM, USB, Internet Radio, AUDIO IN, LINE or iPod) at a preset time.
Before setting timer:
- Check that the clock is set to the correct time (Setting the clock on page 11). If it is not set, you cannot use the timer function.
- For timer playback: Plug in USB or load discs or iPod to be played.
1 Press STANDBY/ON button to turn the power on.
2 Press and hold TIMER button for more than two seconds.
3 Use / to select 'Timer Set' within ten seconds, then press ENTER.
4 Select the source you want to play. Use / to select CD, TUNER, USB, Internet Radio, AUDIO IN, LINE or iPod function.
5 Press ENTER.
6 Set the day(s) of the week.
Use to choose the day(s). The timer can be set as follows.
| EVERYDAY | SUNDAY | MONDAY |
| TUESDAY | WEDNESDAY | THURSDAY |
| FRIDAY | SATURDAY | MON-FRI |
| TUE-SAT | SAT-SUN |
7 Press ENTER.
8 Set the switch-on time. Use / to set the hour, then press ENTER. Set the minute in the same way, pressing ENTER when you're done.
9 Set the switch-off time.
Set as above, pressing ENTER when done.
10 Use to adjust the volume.
11 Press ENTER.
The TIMER indicator lights, and the settings are confirmed on the display.
12Press STANDBY/ON to enter the power standby mode.
Note
- If you select USB function for the wake-up timer, check there is the playable file in the root folder.
- Internet Radio function is not recommended for the wake-up timer because Internet Radio is not always connected by the wireless connection.
- If Internet Radio function is selected for the wake-up timer, the last tuned station is selected.
Turning the wake-up timer on/off
If you have already set the wake-up timer, you can switch it on/off.
1 When the power is on, press and hold TIMER button for two seconds.
Press to select 'Timer On' or 'Timer Off' within ten seconds, then press ENTER.
When 'Timer On' is selected, the timer indicator lights, and the settings are confirmed on the display.
3 When 'Timer On' is selected, press STANDBY/ON to set the standby mode.
Configuring the memorised timer setting
The timer setting is memorised once it is entered. To configure the setting, perform the following operations.
1 When the power is on, press and hold TIMER button for two seconds.
2 Press / to select 'Timer Call' within ten seconds, then press ENTER.
The TIMER indicator lights, and the settings are confirmed on the display.
Sleep operation
1 Press SLEEP to change the amount of time before the receiver switches into standby (30 min. - 60 min. - 90 min. - Off).
You can check the remaining sleep time at any time by pressing SLEEP once.
General control
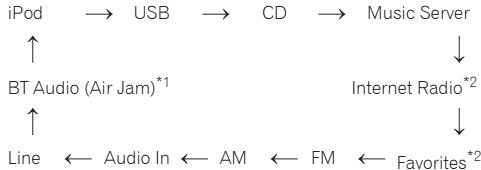
Input function
When pressing INPUT button on the receiver, the current function will change to different mode. Press INPUT button repeatedly to select desired function. The selected input is displayed on the front panel display.
1 This function is available for X-HM81 and XC-HM81.
2 This function is available when Parental Lock is OFF.
Note
- The backup function will protect the memorised function mode should there be a power failure or the AC power cord becomes disconnected.
Network function
When pressing NETWORK button on the remote control, the current network function will change to different network mode. Press the NETWORK button repeatedly to select desired network function. The selected function is displayed on the front panel display.

*1 This function is available when Parental Lock is OFF.
Listening to auxiliary component
1 Press AUDIO IN to select Audio In. Audio In is shown on the display.
Audio In
2 Start playback of the auxiliary component.
Headphones
- Do not turn the volume on to full at switch on and listen to music at moderate levels. Excessive sound pressure from earphones and headphones can cause hearing loss.
- Before plugging in or unplugging the headphone, reduce the volume.
- Be sure your headphone has a 3.5mm diameter plug and impedance between 16 and 50 ohms. The recommended impedance is 32 ohms.
- Plugging in the headphone disconnects the speakers automatically. Adjust the volume using the VOLUME control.
Display brightness control
Press DIMMER button to dims the display brightness. The brightness can be controlled in three steps.
Auto volume
If you turned off this receiver with the volume set to 41 or higher, the volume starts at 40 when the receiver turns on next time.
Volume control
Turn the volume (on this receiver) or press VOLUME +/- (on remote control) to increase or decrease the volume.

CAUTION
- The sound level at a given volume setting depends on speaker efficiency, location, and various other factors. It is advisable to avoid exposure to high volume levels. Do not turn the volume on to full at switch on. Listen to music at moderate levels. Excessive sound pressure from earphones and headphones can cause hearing loss.
Muting
The volume is muted temporarily when pressing the MUTE button on the remote control. Press again to restore the volume.
Sound Controls
P.bass control
When the P.BASS button on the remote is pressed, the P.Bass mode turns ON and powerful music emphasizing low bass can be enjoyed. To cancel the P.bass mode, press the P.BASS button.
Bass control
Press the BASS button, then press / to adjust the bass.
Treble control
Press the TREBLE button, then press / to adjust the treble.
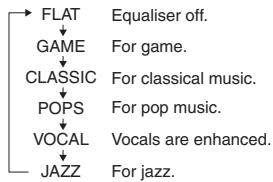
Equaliser
When the SOUND button is pressed, the current mode setting will be displayed. To change to a different mode, press the SOUND button repeatedly to select the desired sound.
Merely by connecting your iPod/iPhone/iPad to this receiver, you can enjoy high-quality sound from your iPod/iPhone/iPad. This receiver can also be connected to a television set, letting you view images from your iPod/iPhone.
Playback and volume level setting for iPod/Phone music and images can be performed from this receiver or the iPod/ iPhone itself.
Confirming what iPod/iPhone/iPad models are supported
The iPod/iPhone/iPad playable on this receiver are shown below.
| iPhone/iPad/iPod | Audio | Control |
| iPhone | ✓ | ✓ |
| iPhone 3G/Phone 3GS | ✓ | ✓ |
| iPhone 4/Phone 4S | ✓ | ✓ |
| iPhone 5 | ✓ | ✓ |
| iPad/iPad 2 | ✓ | ✓ |
| iPad (3/4G) | ✓ | ✓ |
| iPad mini | ✓ | ✓ |
| iPod nano (3/4/5/6/7G) | ✓ | ✓ |
| iPod touch (1/2/3/4/5G) | ✓ | ✓ |
Note
- This receiver is compatible with the audio of the iPod nano (audio only for the iPod nano 3/4/5/6/7G), iPod touch (1/2/3/4/5G), iPhone, iPhone 3G, iPhone 3GS, iPhone 4, iPhone 4S, iPhone 5, iPad, iPad 2, iPad 3, iPad 4 and iPad mini. However, some of the functions may be restricted for some models. The receiver is not compatible with the iPod shuffle.
-
This receiver has been developed and tested for the software version of iPod/iPhone/iPad indicated on the website of Pioneer (http://pioneer.jp/homeav/support/ios/eu/).
-
Installing software versions other than indicated on the website of Pioneer to your iPod/iPhone/iPad may result in incompatibility with this receiver.
- iPod, iPhone and iPad are licensed for reproduction of noncopyrighted materials or materials the user is legally permitted to reproduce.
- Features such as the equalizer of iPod/iPhone/iPad cannot be controlled using this receiver, and we recommend switching the equalizer off before connecting.
1 Select "Settings" from the top menu.
You can confirm your software version by operating your iPod/iPhone/iPad. When using iPod touch, iPhone or iPad, select "General" after selecting "Settings".
2 Select "About".
The software version will be displayed.

- When using an iPod/iPhone/iPad not supported by this receiver, use a commercially available cable to connect the iPod/iPhone/iPad to the AUDIO IN jack of this receiver.
Connecting your iPod/iPhone/iPad
CAUTION
- Do not use an adaptor that converts into a Lightning connector on the unit's iPod/iPhone connector to connect an iPod/iPhone/iPad. This may lead to malfunction/ damage to the connector.
Please connect these Lightning connector devices to the USB port on the front of the unit. iPhone 5, iPad (4th generation), iPad mini, iPod touch (5th generation), iPod nano (7th generation)
Connecting iPod/iPhone to the docking station
CAUTION
- If you have the Universal dock adapter provided with your iPod/iPhone or a commercially adapter designed to support iPod/iPhone, use it when you connect iPod/iPhone to this receiver.
-
Unplug all accessories from the iPod or iPhone before inserting it into the dock.
-
Connect iPad to the USB/iPod/iPhone/iPad terminal.
1 Open the dock cover by pulling up.
2 If you have the Universal dock adapter, attach it to iPod/ iPhone connector port on this receiver.
An iPod/iPhone universal dock adapter is not supplied with this receiver.
When attaching the Universal dock adapter, be sure to orient the front-back directions of the Universal dock adapter correctly. Insert the adapter into the iPod/iPhone dock, and press into position. When attaching the adapter, be careful not to strike the connectors.
3 Connect your iPod/iPhone.
When iPod/iPhone is connected to this receiver, iPod/ iPhone is charged.

To remove the Universal dock adapter
Insert the tip of a screwdriver (^n type, small) into the Universal dock adapter hole as shown and lift upward to remove.

Watching iPod/iPhone images on your TV
To watch iPod/iPhone images on a television, connect it using a composite video cable.
When an iPod/iPhone is connected to this receiver, the TV output setting of the iPod/iPhone is automatically set to 'ON'.
Note
- Some iPod allow the TV output setting to be changed while connected.
- When the iPod/iPhone is disconnected from this receiver, the iPod/iPhone's TV output setting returns to its original state.
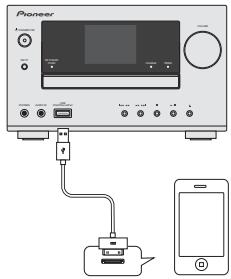
Connect iPod/iPhone/iPad to the USB/iPod/iPhone/ iPad terminal
Connect your iPod/iPhone/iPad to the USB/iPod/iPhone/iPad terminal on the receiver's front panel. Use the iPod cable supplied with your iPod/iPhone/iPad for the connection.
- For the cable connection, also refer to the operating instructions for your iPod/iPhone/iPad.
Note
- The videos and images on the iPod cannot be viewed using this connection.
Playing your iPod/iPhone/iPad

CAUTION
- When your iPod/iPhone/iPad is connected to this receiver and you wish to operate the iPod/iPhone/iPad directly, be sure to hold the iPod/iPhone/iPad steady with the other hand to prevent malfunctions due to faulty contacts.

Connect your iPod/iPhone/iPad.
To connect your iPod/iPhone/iPad, see Connecting your iPod/iPhone/iPad on page 14.

Press iPod to select iPod as the input source.
IPod is shown on the display and starts playback.
Note
- When the iPod/iPhone/iPad is connected to this receiver, the playback information for the songs are displayed on the iPod/iPhone/iPad display. Pressing iPod CTRL button on the remote will switch the display and display the information on the front panel of the receiver.
Watching images from iPod/Phone
- iPod/iPhone images can only be watched when the iPod/ iPhone is connected to this receiver by the iPod/iPhone connector.
- iPad images cannot be watched.
- iPod/iPhone images cannot be displayed on the front panel display of this receiver. Press iPod CTRL button on the remote to switch the display to the iPod/iPhone side.

Important
- If this receiver cannot play your iPod/iPhone/iPad, perform the following troubleshooting checks:
- Check whether the iPod/iPhone/iPad is supported by this receiver (page 14).
- Reconnect the iPod/iPhone/iPad to the receiver. If this doesn't seem to work, try resetting your iPod/iPhone/ iPad.
- Check the iPod/iPhone/iPad software is supported by this receiver.
-
If the iPod/iPhone/iPad cannot be operated, check the following items:
-
Is the iPod/iPhone/iPad connected correctly? Reconnect the iPod/iPhone/iPad to the receiver.
- Is the iPod/iPhone/iPad experiencing a hangup? Try resetting the iPod/iPhone/iPad, and reconnect it to the receiver.
- When connecting the iPad, use only an iPad dedicated cable.

Tip
- iPod/iPhone/iPad recharging occurs whenever an iPod/ iPhone/iPad is connected to this device. (This function is supported in standby mode as well.)
- When input is switched from iPod to another function, iPod/iPhone/iPad playback is temporarily stopped.
Music playback using Bluetooth® wireless technology
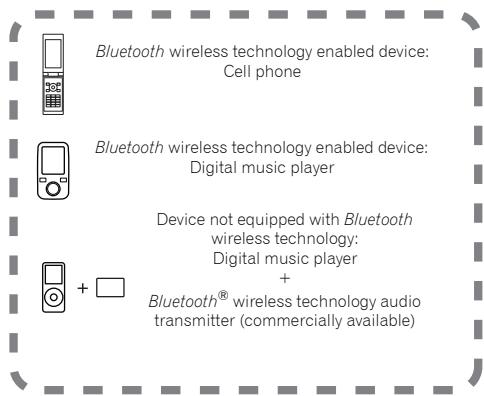
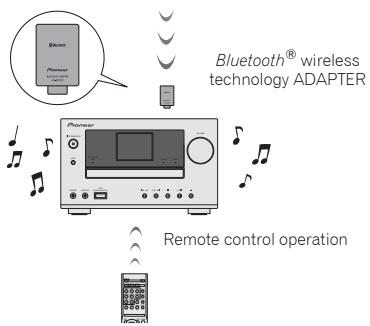
This function is available for X-HM81 and XC-HM81.
Wireless music play
When the Bluetooth ADAPTER (Pioneer Model No. AS-BT100 or AS-BT200) is connected to this receiver, a product equipped with Bluetooth wireless technology (portable cell phone, digital music player, etc.) can be used to listen to music wirelessly. Also, by using a commercially available transmitter supporting Bluetooth wireless technology, you
can listen to music on a device not equipped with Bluetooth wireless technology. The AS-BT100 and AS-BT200 model supports SCMS-T contents protection, so music can also be enjoyed on devices equipped with SCMS-T type Bluetooth wireless technology.
- With the AS-BT100, some functions may not be available on this receiver.
- It must be necessary that the Bluetooth wireless technology enabled device supports A2DP profiles.
Important
- Pioneer does not guarantee proper connection and operation of this receiver with all Bluetooth wireless technology enabled devices.
Remote control operation
The remote control supplied with this receiver allows you to play and stop media, and perform other operations.
- It must be necessary that the Bluetooth wireless technology enabled device supports AVRCP profiles.
- Remote control operations cannot be guaranteed for all Bluetooth wireless technology enabled devices.
Connecting Bluetooth® wireless technology ADAPTER
Be sure to turn off the power and unplug the power cord from the power outlet whenever making or changing connections.

Bluetooth® wireless technology ADAPTER
Setting the PIN code
Set this receiver's PIN code to the same setting as that for the Bluetooth wireless technology device used. Supported PIN code setting values include 0000, 1234 or 8888.
Default setting: 0000
1 Press BT Audio to select BT Audio as the input source. BT Audio is shown on the display.
2 Press TOP MENU.
3 Use ↑/↓ to select PIN after Bluetooth Setup, then press ENTER.
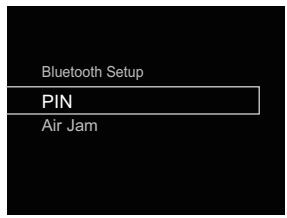
4 Use / to select the PIN code, then press ENTER. The PIN code is stored.
Pairing Bluetooth® wireless technology ADAPTER and Bluetooth wireless technology device
"Pairing" must be done before you start playback of Bluetooth wireless technology content using Bluetooth® wireless technology adapter. Make sure to pair devices the first time you operate the system or any time pairing data is cleared. "Pairing" is the step necessary to register Bluetooth wireless technology device to enable Bluetooth communications. For more details, see also the operating instructions of your Bluetooth wireless technology device.
Note
- Pairing is required when you first use Bluetooth wireless technology device and Bluetooth® wireless technology ADAPTER.
- To enable Bluetooth wireless technology communication, pairing should be done with both of your system and Bluetooth wireless technology device.
During pairing, the name of this receiver appears as AS-BT100 or AS-BT200.
1 Press BT Audio to select BT Audio as the input source. BT Audio is shown on the display.
2 Turn on the Bluetooth wireless technology device that you want to pair, place it near the system and set it into pairing mode. Pairing starts.
3 Check to see that the Bluetooth® wireless technology ADAPTER is detected by the Bluetooth wireless technology device. If the Bluetooth wireless technology device cannot be connected to the receiver, perform the connection operation from the Bluetooth wireless technology device
Listening to music contents of Bluetooth wireless technology device
1 Press BT Audio to select BT Audio as the input source. BT Audio is shown on the display.
2 Make connection between the Bluetooth wireless technology device and the receiver. See Pairing Bluetooth® wireless technology ADAPTER and Bluetooth wireless technology device above.
3 Press to start playback.
AIR JAM
Air Jam - a Pioneer-exclusive application and available for free.
Air Jam lets you connect multi compatible devices to this receiver using Bluetooth wireless technology. With it, you can make a group playlist directly on a supported device to play in your home theater through the receiver. You and your friends can add songs from your devices to the playlist. Also Air Jam lets you delete the song before anyone has to hear it.
Press BT Audio to select BT Audio as the input source. BT Audio is shown on the display.
2 Press TOP MENU.
3 Use / to select Air Jam after Bluetooth Setup, then press ENTER.
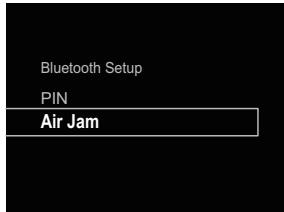
4 Use ↑/↓ to select the Air Jam ON or OFF, then press ENTER.
The Air Jam is stored.
For more details on using Air Jam, access our website.
http://pioneer.jp/product/soft/iapp_airjam/en.html
This receiver can play back a standard CD, CD-R/RW in the CD format and CD-R/RW with MP3 or WMA files, but cannot record on them. Some audio CD-R and CD-RW discs may not be playable due to the state of the disc or the device that was used for recording.
MP3:
MP3 is a form of compression. It is an acronym which stands for MPEG Audio Layer 3. MP3 is a type of audio code which is processed by significant compression from the original audio source with very little loss in sound quality.
- This system supports MPEG-1/2/2.5 Audio Layer 3 (Sampling rates: 8kHz to 48kHz ; Bit rates: 32 kbps to 320 kbps).
- During VBR file playback, time counter in the display may differ from its actual playback time.
WMA:
WMA files are Advanced System Format files that include audio files which are compressed with Windows Media Audio codec. WMA is developed by Microsoft as an audio format file for Windows Media Player.
- This receiver supports WMA (Sampling rates: 32 kHz/44.1 kHz/48 kHz; Bit rates: 5 kbps to 320 kbps).
Playing discs
1 Press the STANDBY/ON button to turn the power on.
2 Press CD on the remote control or INPUT button repeatedly on the receiver to select CD function.
3 Press to open the disc tray.
4 Place the disc on the disc tray, label side up.
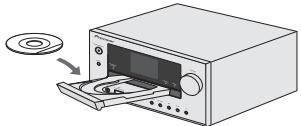
5 Press to close the disc tray.
6 Press / to start playback. After the last track is played, the receiver will stop automatically.
CAUTION
- Do not place two discs in one disc tray.
- Do not play discs of special shapes (heart, octagon, etc). It may cause malfunctions.
- Do not push the disc tray whilst it is moving.
- If the power fails whilst the tray is open, wait until the power is restored.
- Be sure to place 8cm disc in the middle of the disc tray.
Note
- Due to the structure of the disc information, it takes longer to read an MP3/WMA disc than a normal CD (approximately 20 to 90 seconds).
- Rewritable multi-session discs with unfinished writing, can still be played.
- If TV or radio interference occurs during CD operation, move the receiver away from the TV or radio.
Advanced CD or MP3/WMA disc playback
Direct track search
By using the numeric buttons, the desired tracks on the current disc can be played.
Use the numeric buttons on the remote control to select the desired track whilst playing the selected disc.
- The numeric buttons allow you to select up to number 9.
- When selecting number 100 or higher, use the "+" button.
- When selecting number 10 or higher, use the "+" button.
A.For example,to choose 13
1 Press the +10 button.
2 Press the "3" button.
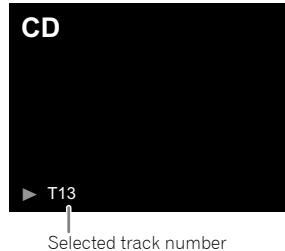
B. For example, to choose 130
1 Press the "+" button.
Press the ^ 一 + 1 0 ^ 一 button three times.
3 Press the "0" button.
Note
- A track number higher than the number of tracks on the disc cannot be selected.
- During shuffle play, direct track search is not possible.
To stop playback:
Press
Repeat play
Repeat play can play one track, all tracks or a programmed sequence continuously.
- During repeat play, "♂" appears.

To repeat one track:
Press REPEAT repeatedly until "Repeat One" appears. Press / (▶).
To repeat all tracks:
Press REPEAT repeatedly until "Repeat All" appears. Press /II (▶).
To repeat desired tracks:
Perform steps 1 - 5 in "Programmed play" section on this page and then press REPEAT repeatedly until "Repeat All" appears.
To cancel repeat play:
Press REPEAT repeatedly until "Repeat Off" appears and " 一 _ 0 ^ 一 disappears.
Shuffle play
The tracks on the disc can be played in shuffle order automatically.
- During shuffle play, "×" appears.

To shuffle play all tracks:
Press SHUFFLE on the remote control.
To cancel shuffle play:
Press SHUFFLE and "×" disappears.
Note
- If you press the button during shuffle play, you can move to the track selected next by the shuffle operation. On the other hand, the button does not allow you to move to the previous track. The beginning of the track being played will be located.
- In shuffle play, the receiver will select and play tracks automatically. (You cannot select the order of the tracks.)
After performing repeat play, be sure to press. Otherwise, the disc will play continuously.
Programmed play (CD)
You can choose up to 32 selections for playback in the order you like.
1 Whilst in the stop mode, press PLAY MODE on the remote control to enter the programming save mode.

2 Press the or button or numeric buttons on the remote control to select the desired track.
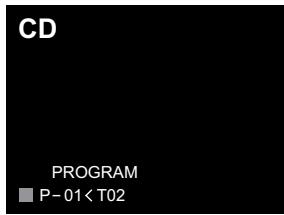
3 Press ENTER to save the track number.
4 Repeat steps 2-3 for other tracks. Up to 32 tracks can be programmed. If you make a mistake, the programmed tracks can be cleared by pressing CLEAR.
5 Press to start playback.
Adding tracks to the programme:
Stop the playing mode, then follow steps 2 - 3 to add tracks. The new tracks will be stored after the last track of the previous programme.
To cancel the programmed play mode:
During programmed stop mode, press button. Press PLAY MODE button to select the basic play mode, and all the programmed contents will be cleared.
Displaying disc information:
Press CD DISP repeatedly to change to the display of the elapsed playback time and the remaining playback time of the CD.
Note
- When a disc is ejected, the programme is automatically cancelled.
- If you press the STANDBY/ON button to enter the standby mode or change the function from CD to another, the programmed selections will be cleared.
- During the programme operation, shuffle play is not possible.
- The control buttons to change displays differ between the discs: for CD, CD DISP is used.
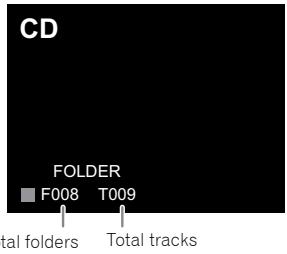
MP3/WMA folder mode (only for MP3/WMA files)
To play back MP3/WMA (Windows Media Audio) file
There are many music sites on the internet that you can download MP3/WMA (Windows Media Audio) music files. Follow the instructions from the website on how to download the music files. You can then play back these downloaded music files by burning them to a CD-R/RW disc.
- Your downloaded song/files are for personal use only. Any other usage of the song without owner's permission, is against the law.
About folder playback order
If MP3/WMA files are recorded in several folders, a folder number will be set to each folder automatically.
Press PLAY MODE to select the folder playback mode.
These folders can be selected by the FOLDER +/- button on the remote control. If there is no supported file formats inside the selected folder, the folder is skipped and the next folder will be selected.
Example: How to set folder number if MP3/WMA format files are recorded as below figure.
1 ROOT folder is set as folder 1.
2 Playback will be in the order of the diagram below.
3 For CD MP3/WMA, 255 numbers of folders and files inclusive of the folders which have non playable files can be read.
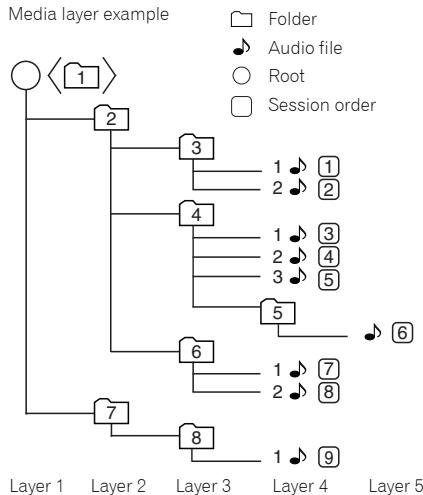
Procedure to playback MP3/WMA disc with folder mode on

To play back CD-R/RW.
1 Press CD, and load an MP3/WMA disc. Press PLAY MODE to select the folder playback mode.
Disc information will be displayed.
2 Press FOLDER +/- to select desired playback folder. (Folder mode on)
Playback will start.
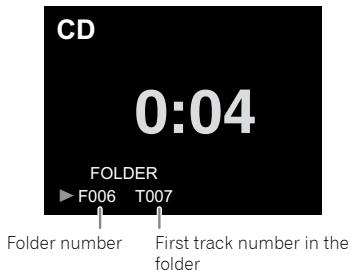
- In case of playback with the folder mode on, press FOLDER +/-, and the folder can be selected even though it is in playback/pause mode. It will continue playback/pause mode in the 1st track of the selected folder.
To cancel the folder playback mode, stop the playback, press the PLAY_MODE button, and select the normal playback mode.
Note
- If "Can't Play" is displayed, it means "Copyright protected WMA file" or "Not supported playback file" is selected.
Playing files stored on USB storage devices
This receiver may not recognize a USB storage device, play files or supply power to a USB storage device. For details, see Connecting USB storage devices on page 10.
Pioneer does not guarantee that any file recorded on a USB storage device will play or that power will be supplied to a USB storage device. Also note that Pioneer will accept no responsibility whatsoever for loss of files on USB storage devices caused by connection to this receiver.
1 Press USB to select USB as the input source.
USB is shown on the display.
2 Connect the USB storage device.
The folders/files stored on the connected USB storage device appear on the display automatically.
3 Use / to select the file, then press ENTER.
Playback starts.
To return to the previous screen, press RETURN
- When changing to a different input source, stop the USB memory playback first, before changing.
- Turn the power off before removing the USB storage device.
Note
- The following screen appears on the display when you play back audio files. Note that some file types may not be displayed.
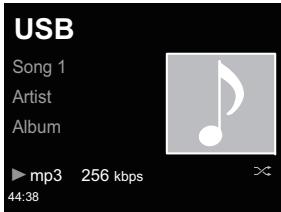
- The progress bar and the remaining playback time may not be displayed depending on the play back file.
Listening to the Internet radio
You can select and listen to your favorite Internet radio station from the list of Internet radio stations created, edited, and managed by the vTuner database service exclusively for use with the Pioneer products.
Connecting to a LAN network
Connect to the network using the LAN interface or WLAN antenna.
For details on the connections, see Connecting to the network through the LAN interface or WLAN antenna on page 10.
Listening to the Internet radio for the first time
When you listen to the Internet radio first time, follow the instructions below to tune into your desired station.
1 Press NETWORK repeatedly to select Internet Radio as the input source.
Internet Radio is shown on the display.
2 Use / to select the folder and press ENTER.
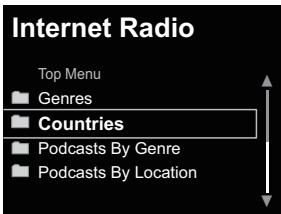
Favorite folder is displayed when you have added the stations via vTuner.
Tune into a station
1 Press NETWORK repeatedly to select Internet Radio as the input source.
The information of the station you last selected is displayed on the display.
2 Press TOP MENU to display Internet Radio menu screen.
3 Use / to select the folder and press ENTER. You can select Favorites function when you have already added your favorite station to Favorites.
To add stations, press ^+ Favorite on the remote control.
4 Use / to select the station, then press ENTER.
You can also select the available stations from the internet radio menu.
Playing back your favorite songs
Up to 64 favorite tracks on the media server and/or Internet Radio stations can be registered in Favorites function. Note that only the audio files stored on components on the network can be registered.
Registering and deleting audio files and Internet radio stations in and from Favorites
1 Press NETWORK on the remote control to select Internet Radio.
2 Select the track or Internet radio station you want to register, press ^+ Favorite on the remote control.
The selected song or Internet Radio station is registered in Favorites.
Note
To delete a registered song, select Favorites, select the song you want to delete from Favorites, and press CLEAR. The selected song is then deleted from Favorites.
Advanced operations for the Internet radio
Registering broadcast stations not on the vTuner list from the special Pioneer site
With this receiver, broadcast stations not included on the list of stations distributed by vtuner can be registered and played. Check the access code required for registration on this receiver, use this access code to access the special Pioneer Internet radio site and register the desired broadcast stations in your favorites. The address of the special Pioneer Internet radio site is: http://www-radio-pioneer.com
1 Display Internet Radio screen.
To display the Internet radio list screen, perform steps 1 to 2 at Listening to the Internet radio for the first time above.
2 Use / to select Help, then press ENTER.
3 Use / to select Get access code, then press ENTER.
The access code required for registration on the special Pioneer Internet radio site is displayed. Make a memo of this address.
The following can be checked on the Help screen:
- Get access code - The access code required for registration on the special Pioneer Internet radio site is displayed.
- Show Your WebID/PW - After registering on the special Pioneer Internet radio site, the registered ID and password are displayed.
- Reset Your WebID/PW - Resets all the information registered on the special Pioneer Internet radio site. When reset, all the registered broadcast stations are also cleared. If you want to listen to the same stations, re-register after resetting.
4 Access the special Pioneer Internet radio site from your computer and perform the registration process.
Access the above site and use the access code in step 3 to perform user registration, following the instructions on the screen.
5 Register the desired broadcast stations as your favorites, following the instructions on the computer's screen.
Both broadcast stations not on the vTuner list and stations on the vTuner list can be registered. In this case they are registered on the receiver as favorite broadcast stations and can be played.
Note
- Playback may stall when the PC is switched off or any media files stored on it are deleted while playing content.
- If there are problems within the network environment (heavy network traffic, etc.) content may not be displayed or played properly (playback may be interrupted or stalled). For best performance, a 100BASE-TX connection between player and PC is recommended.
Network setting
If a broadband router (with built-in DHCP server function) is connected to this receiver, you can simply turn on the DHCP server function without having to set up the network manually. A broadband router without a DHCP server function connected to this receiver must be set up as described below. Before you set up the network, consult with your ISP or the network manager for the required settings. It is advised that you also refer to the operation manual supplied with your network component.
Any changes made to a router without the DHCP server function must be reflected to receiver network settings.
1 Press NETWORK SETUP.
The Initial Setup screen is shown on the display.
2 Select Network Setting Network Configuration.
3 Use / to select Wired or Wireless, then press ENTER.
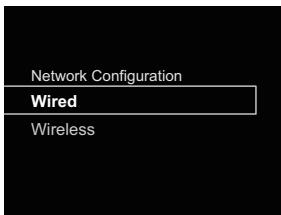
Next steps are described separately between Wired Setting and Wireless Setting. Follow the instructions of the appropriate network type.
Wired setting
Make sure that the LAN cable connections has completed (page 10).
1 Use / to select DHCP On, then press ENTER.
Select Use Proxy Server to setup Proxy Host Name and Proxy Port.

If your router does not have a built-in DHCP server function, you have to set up the network manually. Return to step 1 and select DHCP to be Off and press ENTER. When you select DHCP to be Off, go to step 2.
2 Use / / / or numeric buttons to adjust the numbers, then press ENTER.
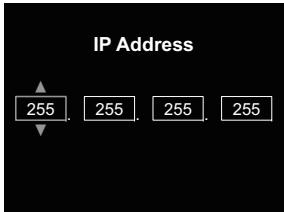
/ : Moves the adjusting digit.
↑/↓: Increases or decreases values.
IP Address
The IP address to be entered must be defined within the following ranges. If the IP address defined is beyond the following ranges, you cannot play back audio files stored on components on the network or listen to Internet radio stations.
Class A: 0.0,0.0,1 to 10,255,255.254 / Class B: 172,16.0,1 to 172,31,255,254 / Class C: 192,168.0,1 to 192,168,255.254
Subnet Mask
If an xDSL modem or a terminal adapter is directly connected to this receiver, enter the subnet mask listed in your ISP documentation. In most of the cases, enter 255.255.255.0.
Default Gateway
If a gateway (router) is connected to this receiver, enter the corresponding IP address.
Primary DNS Server/Secondary DNS Server
If there is only one DNS server address listed in your ISP documentation, enter Primary DNS Server. In case there are more than two DNS server addresses, enter
Secondary DNS Server in the other DNS server address field.
Proxy Setup
Select Use Proxy Server when you connect this receiver to the Internet via a proxy server. Enter Proxy Host Name and the port number of your proxy server in the Proxy Port field.
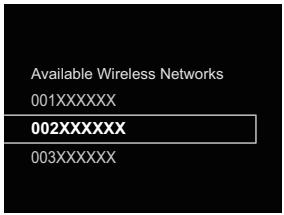
Wireless Setting
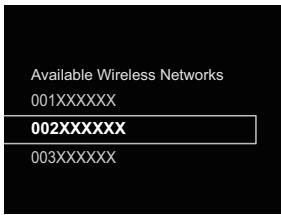
1 Use / to select Auto, then press ENTER.
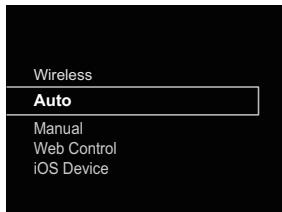
If you setup manually, select Manual.
2 Use / to select the available wireless network you want to connect to.
3 Use / / to enter the Pass Phrase or WEP Key.
/ : Moves the adjusting digit.
↑/↓: Changes displayed character.
REPEAT: Switches character types.
CLEAR: deletes one character at a time.
4 Use ↑/↓ to select DHCP On, then press ENTER. Select Use Proxy Server to setup Proxy Host Name and Proxy Port.

If your router does not have a built-in DHCP server function, you have to set up the network manually. Return to step 4 and select DHCP to be Off and press ENTER. When you select DHCP to be Off, go to step 2 of Wired setting on page 24.
WPS connection setting
WPS is abbreviation of Wi-Fi Protected Setup. A standard established by the Wi-Fi Alliance industry group for a function allowing settings related to interconnection of WPS compatible wireless LAN devices and encryption to be made with simple operations.
This receiver supports push-button configuration and PIN code configuration.
Network Type must be set to Wireless or Auto to use WPS connection. When using WPS connection, be sure the LAN cable is not connected to the receiver and turn this receiver on.
1 Press NETWORK SETUP on the remote control.
The Initial Setup screen is shown on the display.
2 Select Network Setting WPS.
3 Use / to select PBC (Push Button Configuration) or PIN Input, then press ENTER.
If your wireless device supports PBC, select PBC.
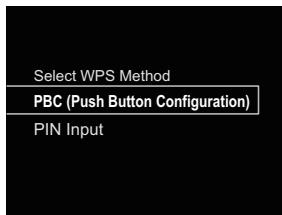
PBC (Push Button Configuration)
Connection settings are made automatically simply by pressing the WPS buttons on the WPS compatible wireless LAN device. Follow the instructions on the display. This is the simplest way of making the settings, and is possible when the WPS compatible wireless LAN device is equipped with WPS button.
PIN INPUT
Connection settings are made by inputting the 8-digit PIN code shown on the display to the access point to which you selected.
Follow the instructions shown in Connecting using PIN code configuration on the right.
Connecting using PIN Input
1 Press NETWORK SETUP. Select Network Setting WPS PIN Input, then press ENTER.
2 Use / to select the access point which you want to connect, then press ENTER.
3 Confirm the PIN code of this receiver, then press ENTER. The PIN code of this receiver is shown on the display. You must check this PIN code to connect to the network.
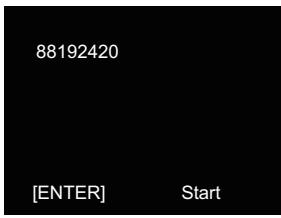
4 Within 2 minutes after closing the PIN Code message, input the PIN Code to the access point selected in step 2.
The connection success or failure is displayed on the display. The PIN Code input method differs depending on the LAN device used. For details, consult the operating instructions accompanying your LAN device.
Connecting to a router without WPS-PBC function
This section describes how to set the network connection using Safari browser on a Macintosh computer. Be sure your computer is equipped with wireless LAN function. Settings can be performed from the Web browser of the computer.
1 Be sure the LAN cable is not connected to the receiver.
2 Plug the power cord into an AC outlet. Press STANDBY/ON.
3 Press NETWORK SETUP on the remote control.
4 Select Network Setting Network Configuration Wireless Web Control.
5 Select Start OK.
The receiver restarts. Change settings on Web Control on your computer.
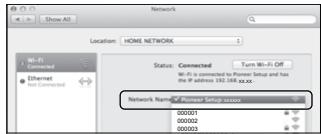
6 Select Pioneer Setup (this receiver) in the available wireless network connection of your computer.
SSID is displayed as Pioneer Setup:xxxxxx. "xxxxxxxx" is the lower three bytes of the MAC address.
You can change this receiver's network settings via Safari browser.
Note
- This setting for the network has been confirmed for Mac OS X 10.7 and Safari 5.1.
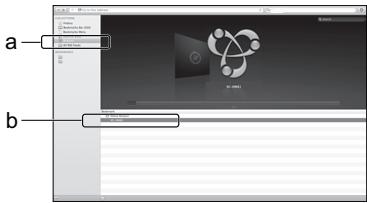
7 Launch Safari on your computer.
Press Bookmark icon. Click Bonjour list (a), and then select this receiver's name (Friendly Name) (b) in Bookmark.
If Bonjour list is not displayed, access the IP address http://192.168.1.1/from Safari.
If you use X-HM71 or X-HM81, XC-HM71 or XC-HM81 is displayed as the receiver's name.
9 Click Network Configuration. Select Auto and then press OK.
10Setup the network settings manually and then press Apply.
If SSID is not displayed, return to step 9 and select Manual.
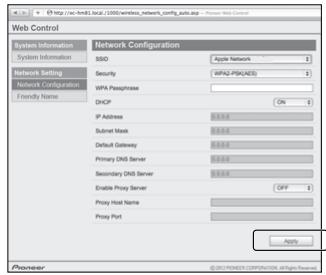
The receiver restarts and the new network settings are applied to the receiver.

Note
- You can set the network as in the above by connecting this unit's IP address via the Safari Browser even if Web Control isn't selected.
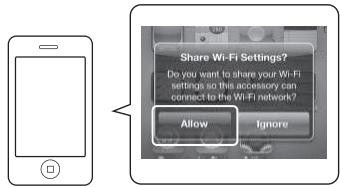
Connection settings using an iOS device
You can apply iPod/iPhone/iPad (iOS device with iOS ver 5.0 or later)'s Wi-Fi settings to this receiver.
1 Be sure the LAN cable is not connected to the receiver.
2 Unlock your iPod/iPhone/iPad that Wi-Fi connection is completed.
3 Plug the power cord into an AC outlet. Press STANDBY/ON.
4 Press iPod or USB on the remote control. If you press iPod, connect iPod/iPhone to the docking station. If you press USB, connect the iOS device to the USB/iPod/iPhone/iPad terminal.
5 Press SETUP.
6 Select Network Setting Network Configuration Wireless iOS Device and then press ENTER.
7 Tap Allow on iPod/iPhone/iPad. The Wi-Fi settings of your iPod/iPhone/iPad are applied to the receiver.
Friendly Name
1 Press NETWORK SETUP.
2 Select Network Setting Friendly Name.
3 Use / to enter Friendly Name, then press ENTER.
/ : Moves the adjusting digit.
↑/↓: Changes displayed character.
REPEAT: Switches character types.
CLEAR: Deletes one character at a time.
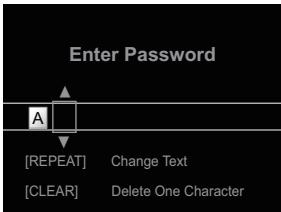
Parental lock setup
Restrict internet radio access for children. When Parental Lock is set to On, you cannot listen to Internet Radio and select Favorites without entering a password.
Turn on/off the parental lock
1 Press NETWORK SETUP. The Initial Setup screen is displayed on the display.
2 Select Network Setting Parental Lock.
3 Use / / / or numeric buttons to enter the password, then press ENTER.
←/→: Moves the adjusting digit.
↑/↓: Increases or decreases numbers. The factory default setting is "0000".
4 Select Parental Lock.
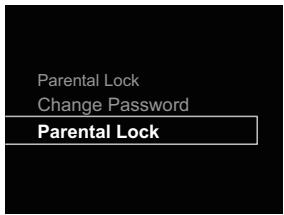
Use ↑/↓ to select On or Off, then press ENTER.
Changing the password
1 Press NETWORK SETUP. The Initial Setup screen is displayed on the display.
2 Select Network Setting Parental Lock.
3 Use / / / or numeric buttons to enter the current password, then press ENTER.
4 Select Change Password.
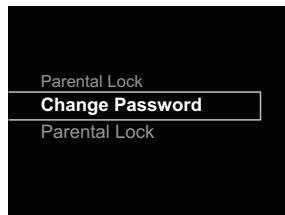
Use / / / or numeric buttons to enter the new password, then press ENTER.
If you press RETURN, the previous screen will be displayed.
This receiver can play audio files stored on PCs or other components on a Local Area Network (LAN).
Introduction
This receiver allows you to listen to audio files on a computer or other component connected to the receiver via LAN interface. This chapter describes the setup and playback procedures required to enjoy these features. It is advisory that you also refer to the operation manual supplied with your network component.
Note
- Photo or video files cannot be played back.
- With Windows Media Player 11 or Windows Media Player 12, you can even play back copyrighted audio files on this receiver.
About playable DLNA network devices
This receiver allows you to play music on media servers connected on an identical Local Area Network (LAN) as the receiver. This receiver allows you to play files stored on the following devices:
- PCs running Microsoft Windows Vista or XP with Windows Media Player 11 installed
- PCs running Microsoft Windows 7 with Windows Media Player 12 installed
- DLNA-compatible digital media servers (on PCs or other components)
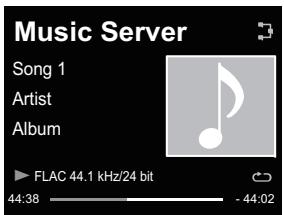
Files stored in a PC or DMS (Digital Media Server) as described above can be played via command from an external Digital Media Controller (DMC). Devices controlled by this DMC to play files are called DMRs (Digital Media Renderers). This receiver supports this DMR function.
When this receiver is selected as a DMR and DMS playback is begun, the receiver's input automatically switches to DMR. During DMR input, the currently playing track name, artist name, album name, and album art will appear on the receiver's display (some information may not be displayed, depending on the file being played).
When in the DMR mode, such operations as playing and stopping files can be performed from the external controller. Volume adjustment and the muting control are also possible.
Note
- Depending on the external controller being used, playback may be interrupted when the volume is adjusted from the controller. In this case, adjust the volume from the receiver or remote control.
Using AirPlay on iPod touch, iPhone, iPad and iTunes
AirPlay works with iPhone, iPad, and iPod touch with iOS 4.3.3 or later, Mac with OS X Mountain Lion, and Mac and PC with iTunes 10.2.2 or later.
To use AirPlay, select your receiver on your iPod touch, iPhone, iPad or in iTunes and start playback. For more information, see the Apple website (http://www.apple.com).
- Adjustment of the receiver's volume from iPod touch, iPhone, iPad or iTunes.
- Pause/resume, next/previous track, and shuffle/repeat from the remote control of the receiver. The display will not show the Play Status, Repeat, or Shuffle icons.
- Display of the currently playing track information on the receiver's display, including artist, song/album name and album artwork. It may not be displayed other than song name.
Tip
- A network environment is required to use AirPlay.
- The receiver's name that shows up in the AirPlay UI on iPod touch, iPhone, iPad and iTunes can be changed by Friendly Name from Network Setting.
- AirPlay provided on this receiver has been developed and tested based on the software versions for the iPod touch, iPhone, iPad and the software versions for iTunes that are indicated on the Pioneer website. AirPlay may not be compatible with iPod touch, iPhone, iPad or iTunes software versions other than those indicated on the Pioneer website.
About the DHCP server function
To play back audio files stored on components on the network, you must turn on the DHCP server function of your router.
In case your router does not have the built-in DHCP server function, it is necessary to set up the network manually. Otherwise, you cannot play back audio files stored on components on the network or listen to Internet radio stations. See Network setting on page 24 for more on this.
Authorizing this receiver
This receiver must be authorized to enable playback. The receiver is automatically authorized when it is connected to a PC over a network. If not, please authorize this receiver manually on the PC. The authorization (or permission) method for access varies depending on the type of server currently being connected. For more information on authorizing this receiver, refer to the instruction manual of your server.
Playing audio files stored on PCs or other components
Connecting to the LAN network
Be sure to connect PC or other components to the network using the LAN interface before you use this function. For details on the connections, see page 10.
Playback with Music Server

Important
- You cannot access a PC on a network while you are logged onto a domain that is configured in a Windows network environment. Instead of logging onto the domain, log onto the local machine.
- There are cases where the time elapsed may not be correctly displayed.
1 Press NETWORK repeatedly to select Music Server. All available servers are shown on the display. "Please wait" will be displayed until an available server is found.
2 Use / to select the server that the file you want to play is stored on, then press ENTER. The folders/files stored on the server are shown on the display.
3 Use / to select the file you want to play, then press ENTER.
Playback starts.
- When the file you want to play is in the folder, select the folder first.
- If you press RETURN during playback, the previous (Folders/files) screen will be displayed.
To add your favorite file to Favorites function, press +Favorite on the remote control. - Check your network environment if "Please wait" continues to be displayed.
Listening to the radio broadcasts
The following steps show you how to tune in to FM and AM radio broadcasts using the automatic (search) and manual (step) tuning functions. Once you are tuned to a station you can memorize the frequency for recall later. See Saving station presets below for more on how to do this.
1 Press TUNER to select the tuner.
2 Use BAND to change the band (FM or AM), if necessary.
Each press switches the band between FM (stereo or mono) and AM.
3 Tune to a station.
There are 2 ways to do this:
Automatic tuning
To search for stations in the currently selected band, press and hold TUNE / for about a second. The receiver will start searching for the next station, stopping when it has found one. Repeat to search for other stations.
Manual tuning
To change the frequency one step at a time, press
TUNE /
Tuned Mono -Lights when a monaural FM broadcast channel is being received.
Tuned Stereo -Lights when a stereo FM broadcast is being received.
Tuned - Lights when a stereo AM broadcast is being received.
Improving FM sound
If the Tuned Mono or Tuned Stereo indicators don't light when tuning to an FM station because the signal is weak, set the receiver to the mono reception mode.
Press BAND to select FM MONO.
This should improve the sound quality and allow you to enjoy the broadcast.
Saving station presets
If you often listen to a particular radio station, it's convenient to have the receiver store the frequency for easy recall whenever you want to listen to that station. This saves the effort of manually tuning in each time. This receiver can memorize up to 40 stations.
1 Tune to a station you want to memorize.
See Listening to the radio broadcasts above for more on this.
Press TUNER EDIT.
The preset number is blinking.
3 Press PRESET / to select the station preset you want.
You can also use the numeric buttons.
4 Press ENTER.
The preset number stop blinking and the receiver stores the station.
Note
If the receiver is left disconnected from the AC power outlet for over a month, the station memories will be lost and will have to be reprogrammed.
- Stations are stored in stereo. When the station is stored in the FM MONO mode, it shows as Tuned Stereo when recalled.
Listening to station presets
You will need to have some presets stored to do this. See Saving station presets above if you haven't done this already.
1 Press PRESET / to select the station preset you want.
You can also use the numeric buttons.
Naming preset stations
For easier identification, you can name all of your preset stations.
1 Choose the station preset you want to name.
See Listening to station presets above for how to do this.
Press TUNER EDIT twice.
The cursor at the first character position is blinking on the display.
3 Input the name you want.
Choose a name up to eight characters long.
- Use / to select character position.
- Use ↑/↓ to select characters.
- The name is stored when ENTER is pressed.
Changing the noise cut mode
If you find that the AM sound quality is bad even after trying the above, you may be able to improve it using a different noise cut mode. Just choose the one that sounds best.
Default setting: Mode1
Press TOP MENU button after tuning to an AM radio station.
Press / to choose the Noise cut mode (1, 2 or 3) then press ENTER.
Using the Radio Data System (RDS)
An introduction to RDS
Radio Data System (RDS) is a system used by most FM radio stations to provide listeners with various kinds of information—the name of the station and the kind of show they're broadcasting, for example.
One feature of RDS is that you can search by type of program. For example, you can search for a station that's broadcasting a show with the program type, Jazz.
You can search the following program types:
News - News
Affairs - Current Affairs
Info - General Information
Sport-Sport
Educate - Educational
Drama - Radio plays, etc.
Culture - National or regional culture, theater, etc.
Science - Science and technology
Varied - Usually talk-based material, such as quiz shows or interviews.
Pop M - Pop music
Rock M - Rock music
Easy M - Easy listening
Light M - 'Light' classical music
Classics - 'Serious' classical music
Other M - Music not fitting above categories
Weather - Weather reports
Finance - Stock market reports, commerce, trading, etc.
Children - Programs for children
Social-Social affairs
Religion - Programs concerning religion
Phone In – Public expressing their views by phone
Travel-Holiday-type travel rather than traffic announcements
Leisure - Leisure interests and hobbies
Jazz-Jazz
Country - Country music
Nation M - Popular music in a language other than English
Oldies - Popular music from the '50s and '60s
Folk M - Folk music
Document - Documentary
Note
- In addition, there are three other program types, ALARM, ALARMTST, and NO TYPE. ALARM and ALARMTST are used for emergency announcements. NO TYPE appears when a program type cannot be found.
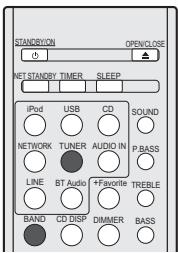

Searching for RDS programs
You can search for a program type listed above.
1 Press TUNER then press BAND to select the FM band. RDS is only possible in the FM band.
2 Press PTY. PTY SEARCH shows in the display.
Press PRESET / to select the program type you want to hear.
4 Press ENTER to search for the program type.
The system starts searching through the station presets for a match, stopping when it was found one. Repeat to search for other stations.
If NO PTY is displayed it means the tuner couldn't find that program type at the time of the search.
- RDS searches station presets only. If no stations have been preset, or if the program type could not be found among the station presets NO PTY is displayed. FINISH means the search is complete.
Displaying RDS information
Use the RDS DISP button to display the different types of RDS information available.
1 Press RDS DISP for RDS information.
Each press changes the display as follows:
-
Radio Text (RT) - Messages sent by the radio station. For example, a talk radio station may provide a phone number as RT.
-
Program Service Name (PS) - The name of the radio station.
- Program Type (PTY) - This indicates the kind of program currently being broadcast.
- Current tuner frequency (FREQ)
Note
- If any noise is picked up while displaying the RT scroll, some characters may be displayed incorrectly.
- If you see NO TEXT in the RT display, it means no RT data is sent from the broadcast station. The display will automatically switch to the PS data display (if no PS data, NO NAME is displayed).
- In the PTY display, NO PTY may be shown.
Troubleshooting
Incorrect operations are often mistaken for trouble and malfunctions. If you think that there is something wrong with this component, check the points below. Sometimes the trouble may lie in another component. Investigate the other components and electrical appliances being used. If the trouble cannot be rectified even after exercising the checks listed below, ask your nearest Pioneer authorized service center or your dealer to carry out repair work.
- If the receiver does not operate normally due to external effects such as static electricity disconnect the power plug from the outlet and insert again to return to normal operating conditions.
General
The clock is not set to the correct time.
Did a power failure occur?
Reset the clock (page 11).
When a button is pressed, the receiver does not respond.
Set the receiver to the power standby mode and then turn it back on.
If the receiver still malfunctions, reset it (page 11).
No sound is heard.
Is the volume level set to "Min"?
Are the headphones connected?
Are the speaker wires disconnected?
Settings you have made have been cleared.
- Was the power cord unplugged forcibly while this receiver's power was on? Be sure to press STANDBY/ON and wait for the POWER indicator on the front panel display to turn off before unplugging the power cord.
Difference in volume between CDs, MP3, WMA, iPod/ iPhone/iPad and Tuner.
This is not a problem with this receiver. The volume may sound differently depending on the input source and recording format.
This receiver cannot be operated with the remote control.
Are you operating from far away? Operate from within a distance of Operate within 7m 30^ of the remote sensor on the front panel (page 5).
Is the remote control sensor exposed to direct sunlight or strong artificial light from a fluorescent bulb, etc.? The remote control signals may not be received properly if the remote
control sensor is exposed to direct sunlight or strong artificial light from a fluorescent bulb, etc.
Are the batteries dead? Replace the batteries (page 5).
The receiver suddenly switches off.
When the Auto Power Off function is working, the power will automatically turn off if the receiver has not operated for several hours. Check the setting for the Auto Power Off function (page 11).
X-HM81/XC-HM81 only: The Bluetooth wireless technology device cannot be connected or operated. Sound from the Bluetooth wireless technology device is not emitted or the sound is interrupted.
- Check that no object that emits electromagnetic waves in the 2.4 GHz band (microwave oven, wireless LAN device or Bluetooth wireless technology apparatus) is near the receiver. If such an object is near the receiver, set the receiver far from it. Or, stop using the object emitting the electromagnetic waves.
- Check that the Bluetooth wireless technology device is not too far from the receiver and that obstructions are not set between the Bluetooth wireless technology device and the receiver. Set the Bluetooth wireless technology device and the receiver so that the distance between them is less than about 10m^* and no obstructions exist between them.
- The line-of-sight transmission distance is an estimate. Actual transmission distances supported may differ depending on surrounding conditions.
Check that the Bluetooth ADAPTER and the ADAPTER PORT terminal of the receiver are correctly connected.
→ The Bluetooth wireless technology device may not be set to the communication mode supporting the Bluetooth wireless technology. Check the setting of the Bluetooth wireless technology device.
Check that pairing is correct. The pairing setting was deleted from this receiver or the Bluetooth wireless technology device. Reset the pairing.
- Check that the profile is correct. Use a Bluetooth wireless technology device that supports A2DP profile and AVRCP profile.
Tuner
The radio makes unusual noises continuously.
Is the receiver placed near the TV or computer?
Is the FM antenna or AM loop antenna placed properly? Move the aerial away from the AC power cord if it is located nearby.
Disc playback
Playback does not start. Playback stops in the middle or is not performed properly.
Is the disc loaded upside down?
Does the disc satisfy the standards?
Is the disc distorted or scratched?
Playback sounds are skipped, or stopped in the middle of a track.
Is the receiver located near excessive vibrations?
Is the disc very dirty?
Has condensation formed inside the receiver?
Disc cannot be played or disc is ejected automatically.
Is the disc scratched? Scratched discs may not play.
Is the disc dirty? Wipe the dirt off the disc (page 36).
Is the disc properly placed? Place a disc with the label side facing front.
Is this receiver placed in a humid location? There could be condensation inside. Wait a while for the condensation to evaporate. Do not place this receiver near an air-conditioner, etc. (page 36).
Sound is intermittent during disc playback.
Sound volume may be too high. Sound and image may be unsteady if sound volume is set too high; in this case, lower the sound volume.
When a USB storage device is connected
USB storage device is not recognized.
Is the USB storage device properly connected? Connect the device securely (all the way in).
Is the USB storage device connected via a USB hub? This receiver does not support USB hubs. Connect the USB storage device directly.
This is not a problem with this receiver. Turn the power off then back on. Some USB storage devices may not be recognized properly. This receiver only supports USB mass storage class devices. Only the FAT16 and FAT32 file systems are supported. Other file systems (ex. FAT, NTFS, etc.) are not supported. This device does not support the use of external hard disc drives.
Much time is required to recognize the USB storage device.
What is the USB storage devices capacity? Some time may be required to load the data when large capacity USB storage devices are connected (this could take several minutes).
Audio playback is undesirably stopped or disturbed.
You may be using a USB 1.0 compatible device. We recommend you use a USB 2.0 compatible device.
File cannot be played.
Is the file copyright-protected (by DRM)? Copyright-protected files cannot be played.
→ This is not a problem with this receiver. Files stored on a computer cannot be played. It may not be possible to play some files.
When connecting the USB storage device, this receiver switches off.
Is Timer indicator flashing? The USB storage device does not work or power consumption is too large. Disconnect the USB storage device and turn this receiver on.
When an iPod/iPhone/iPad is connected
Can't operate the iPod/iPhone/iPad.
Make sure the iPod/iPhone/iPad is connected correctly (refer to Connecting iPod/iPhone to the docking station on page 14). Also, try disconnecting the iPod/iPhone/iPad then reconnecting it.
Confirm that the connected iPod/iPhone/iPad is supported by this receiver.
If the iPod/iPhone/iPad is experiencing a hangup, try resetting the iPod/iPhone/iPad, and reconnect it to the receiver.
Network
Cannot access to the network.
The LAN cable is not firmly connected. Firmly connect the LAN cable (page 10).
Confirm the network type (Network Setting Network Type). When Auto is selected in Network Type, the network type is automatically switched between Wired and Wireless.
Cannot access to the network using WPS.
Network Type is set to Wired. Network Type must be set to Wireless or Auto to use WPS connection. See page 25 to change the network type. When using WPS connection, be sure the LAN cable is not connected to the receiver and turn this receiver on.
Cannot access to the component or PC connected via network.
Internet security software is currently installed in the connected component. There are cases where a component
with Internet security software installed cannot be accessed.
The audio component on the network which has been switched off is switched on. Switch on the audio component on the network before switching on this receiver.
The component connected to the network is not properly set. If the client is automatically authorized, you need to enter the corresponding information again. Check whether the connection status is set to "Do not authorize".
There are no playable audio files on the component connected to the network. Check the audio files stored on the component connected to the network.
Playback does not start.
The component is currently disconnected from this receiver or the power supply. Check whether the component is properly connected to this receiver or the power supply.
The PC or Internet Radio is not properly operated.
The corresponding IP address is not properly set. Switch on the built-in DHCP server function of your router, or set up the network manually according to your network environment (page 10).
The IP address is being automatically configured.
→ The automatic configuration process takes time. Please wait.
The audio files stored on components on the network, such as a PC, cannot be played back.
→ Windows Media Player 11 or Windows Media Player 12 is not currently installed on your PC. Install Windows Media Player 11 or Windows Media Player 12 on your PC (page 28).
Audio files were recorded in formats other than MP3, WAV (LPCM only), MPEG-4 AAC, FLAC, and WMA. Play back audio files recorded in MP3, WAV (LPCM only), MPEG-4 AAC, FLAC, or WMA. Note that some audio files recorded in these formats may not be played back on this receiver.
Audio files recorded in MPEG-4 AAC or FLAC are being played back on Windows Media Player 11 or Windows Media Player 12. Audio files recorded in MPEG-4 AAC or FLAC cannot be played back on Windows Media Player 11 or Windows Media Player 12. Try using another server. Refer to the operation manual supplied with your server.
The component connected to the network is not properly operated. Check whether the component is affected by special circumstances or is in the sleep mode. Try rebooting the component if necessary.
The component connected to the network does not permit file sharing. Try changing the settings for the component connected to the network.
→ The folder stored on the component connected to the network has been deleted or damaged. Check the folder stored on the component connected to the network.
Network connections could be restricted due to the computer's network settings, security settings, etc. Check the computer's network settings, security settings, etc.
Cannot access Windows Media Player 11 or Windows Media Player 12.
In case of Windows Media Player 11: You are currently logged onto the domain through your PC with Windows XP or Windows Vista installed. In case of Windows Media Player 12: You are currently logged onto the domain through your PC with Windows 7 installed. Instead of logging onto the domain, log onto the local machine.
Audio playback is undesirably stopped or disturbed.
The audio file currently being played back was not recorded in a format playable on this receiver. Check whether the audio file was recorded in a format supported by this receiver. Check whether the folder has been damaged or corrupted. Even audio files listed as playable on this receiver may sometimes not be played back or displayed (page 39).
The LAN cable is currently disconnected. Connect the LAN cable properly (page 10).
There is heavy traffic on the network with the Internet being accessed on the same network. Use 100BASE-TX to access the components on the network.
When in the DMR mode, depending on the external controller being used, playback may be interrupted when a volume operation is performed from the controller. In this case, adjust the volume from the receiver or remote control.
There is a connection routed through a wireless LAN on the same network. There may be a shortage of bandwidth on the 2.4 GHz band used by the wireless LAN. Make wired LAN connections not routed through a wireless LAN. Install away from any devices emitting electromagnetic waves on the 2.4 GHz band (microwave ovens, game consoles, etc.). If this does not solve the problem, stop using other devices that emit electromagnetic waves.
Cannot listen to Internet Radio stations.
The firewall settings for components on the network are currently in operation. Check the firewall settings for components on the network.
→ You are currently disconnected from the Internet. Check the connection settings for components on the network, and consult with your network service provider if necessary (page 10).
The broadcasts from an Internet Radio station are stopped or interrupted. Some Internet radio stations on the list of Internet Radio stations for this receiver (page 30) may occasionally not be available for listening.
Cannot pause at Music Server/DMR.
For some DLNA server software/NAS, or file formats being played, you many not be able to pause. Please contact the DLNA server software manufacturer or NAS manufacturer that you are using.
Wireless LAN
Network cannot be accessed via wireless LAN.
Is Network Type set to Auto and the LAN cable connected to the receiver? Switch Network Type to Wireless or disconnect the LAN cable from the receiver, then restart the receiver. If Network Type is set to Auto and the LAN cable is connected to the receiver, the receiver recognizes the Network Type as Wired.
→ This receiver and base receiver (wireless LAN router, etc.) are too far apart or there is an obstacle between them. Improve the wireless LAN environment by moving the receiver and base receiver closer together, etc.
→ This receiver and base receiver (wireless LAN router, etc.) are too far apart or there is an obstacle between them. Improve the wireless LAN environment by moving the receiver and base receiver closer together, etc.
There is a microwave oven or other device generating electromagnetic waves near the wireless LAN environment. Use the system in a place away from microwave ovens or others device generating electromagnetic waves. Avoid using devices generating electromagnetic waves as much as possible when using the system with the wireless LAN.
Multiple wireless devices are connected to the wireless LAN router. When connecting multiple wireless devices, their IP addresses must be changed.
Wireless LAN connections cannot be established between the receiver and base receiver (wireless LAN router, etc.). The receiver must be set in order to establish wireless LAN connections. See Connecting using wireless LAN on page 10.
→ The IP address settings of the receiver does not match the settings of the wireless LAN router, etc. Check the IP address settings of the receiver (including the DHCP setting). If the receiver's DHCP setting is on, turn the receiver's power off, then turn the power back on. Check that the IP address of the receiver matches the settings of the wireless LAN router, etc. If
the receiver's DHCP setting is off, set an IP address matching the network of the base receiver (wireless LAN router, etc.). For example, if the wireless LAN router's IP address is "192.168.1.1", set the receiver's IP address to "192.168.1.XXX" (1), the subnet mask to "255.255.255.0", the gateway and DNS to "192.168.1.1". 1) Set the "XXX" in "192.168.1.XXX" to a number between 2 and 248 that is not assigned to other devices.
- The access point is set to conceal the SSID. In this case, the SSID may not be displayed on the access point list screen. If not, set the SSID, etc., by making the wireless LAN settings on the receiver manually.
- The access point's security settings use WEP 152-bit length code key or shared key authentication. The receiver does not support WEP 152-bit length code key or shared key authentication.
Firmware Update
Use this procedure to update the receiver's software. You can update the software via a USB storage device.
Updating via a USB storage device is performed by downloading the update file from a computer, reading this file onto a USB storage device then inserting the USB storage device into the USB port on the receiver's front panel.
If an update file is provided on the Pioneer website, download it onto your computer. When downloading an update file from the Pioneer website onto your computer, the file will be in ZIP format. Unzip the ZIP file before saving it on the USB storage device. If there are any old downloaded files or downloaded files for other models on the USB storage device, delete them.

Important
- DO NOT unplug the power cord during updating.
- When updating via a USB storage device, do not disconnect the USB storage device.
1 Press USB to select USB as the input source. USB is shown on the display.
Press SETUP.
The Initial Setup screen is displayed on the display.
3 Select Option Setting Firmware Update Start, then press ENTER.
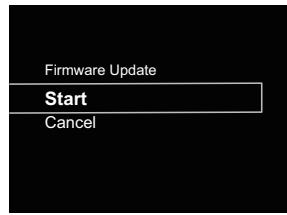
4 To update, select OK.
The updating screen appears and updating starts. The receiver will reboot when the update is completed, and the display will show the input function before the update.
Firmware Update messages
Status messages
Description
File Not Found.
No update file was found on the USB storage device. Store the file in the USB storage device's root directory.
Firmware Update using Safari browser
You can update this receiver's firmware via Apple Safari browser. Download the latest firmware at Pioneer website.
1 Be sure this receiver and your computer are connected to the same wired or wireless network.
2 Launch Safari on your computer.
3 Press Bookmark icon. Click Bonjour list (a), and then select this receiver's name (Friendly Name) (b) in Bookmark.
If Bonjour list is not displayed, access the IP address "http://(the receiver's IP address)" from Safari.
If you use X-HM71 or X-HM81, XC-HM71 or XC-HM81 is displayed as the receiver's name.
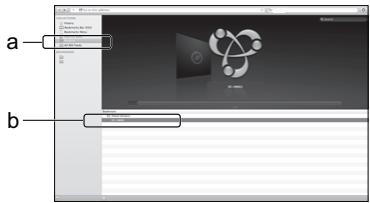
Note
-
Confirm the receiver's IP address as follows:
-
Press NETWORK SETUP.
- Select System Info.
- Confirm the IP field.

Click Firmware Update.
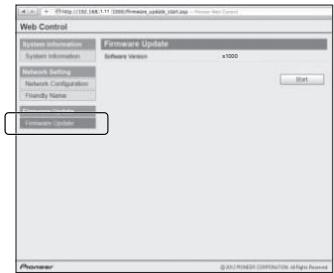
5 Press Start.
The firmware update prepare screen is displayed. If the screen does not switch automatically, click Click here.
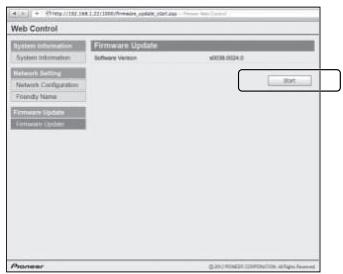
6 Browse the latest firmware on your computer (a) and then press Upload (b).
The confirmation screen is displayed. If you continue the firmware update, press Yes. Once the firmware update process starts, you can't stop it. Wait until the file is uploaded (about one minute may be required depending on your LAN connection environment).
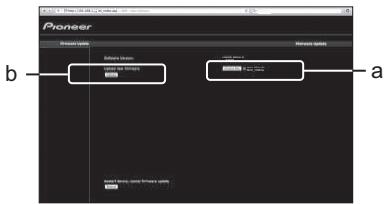
7 The firmware upload status screen is displayed. Press Ok.
"The upload process finished successfully." will be shown when the update is completed.
Unplug the power cord from the AC outlet after the update is completed.
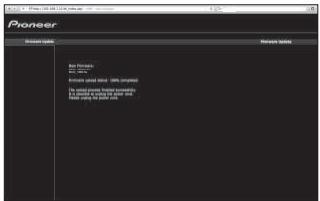
Note
- This setting for the network has been confirmed for Mac OS X 10.7 and Safari 5.1.
Resetting this receiver
Use this procedure to reset all receiver settings to the factory default.

Important
- Disconnect all components connected to this receiver before the operation.
1 Press NETWORK SETUP.
The Initial Setup screen is displayed on the display.
2 Use / to select Factory Reset.
3 Select Start.
"Reset?" screen appears. Press ENTER to reset the system.
All the settings will be reset to the factory default next time the receiver is turned on.
Cautions on use
When moving this receiver
When moving this receiver, be sure to first that there is no disc loaded and disconnect the iPod/iPhone/iPad, USB storage device, LAN cable or any other equipment connected to the receiver. Then press STANDBY/ON, wait for the power indicator on the front panel display to turn off, then unplug the power cord. Damage may occur if the receiver is transported or moved with a disc inserted, or when another device is connected to the iPod/iPhone connector port, USB, LAN (10/100) terminals, or AUDIO IN, PHONES mini-plug jacks.
Place of installation
Choose a stable place near the TV or stereo system being used with this receiver. Do not place this receiver on top of a TV or color monitor. Also install it away from cassette decks and other devices easily affected by magnetic forces.
Avoid the following locations:
- Places exposed to direct sunlight
- Humid or poorly ventilated places
- Extremely hot places
- Places exposed to vibrations
- Places in which there is much dust or cigarette smoke
- Places exposed to soot, steam or heat (kitchens, etc.)
Do not place objects on this receiver.
Do not place any objects on top of this receiver.
Do not obstruct the ventilation holes.
Do not use this receiver on shaggy rugs, beds, sofas, etc., or wrapped in cloth, etc. Doing so will prevent the heat from dispersing, leading to damage.
Do not expose to heat.
Do not place this receiver on top of an amplifier or other component that generates heat. When rack mounting it, to avoid the heat given off by the amplifier or other audio component, place it on a shelf below the amplifier.
Cleaning the product
- Unplug the power cord from the power outlet when cleaning this receiver.
- Clean this receiver using a soft cloth. For tough dirt, apply some neutral detergent diluted in 5 to 6 parts water to a soft cloth, wring out thoroughly, wipe off the dirt, then wipe again with a soft, dry cloth.
- Alcohol, thinner, benzene, insecticides, etc., could cause the print or paint to peel off. Also, leaving rubber or vinyl products in contact with this receiver for long periods of time could mar the cabinet.
- When using chemical-impregnated wipes, etc., read the cautions included with the wipes carefully.
About copyrights
This item incorporates copy protection technology that is protected by U.S. patents and other intellectual property rights of Rovi Corporation. Reverse engineering and disassembly are prohibited.
Handling discs
Storing
- Always place discs in their cases and store them vertically, avoiding hot, humid places, places exposed to direct sunlight and extremely cold places.
- Be sure to read the cautions included with the disc.
Cleaning discs
- Discs may not play if there are fingerprints or dust on them. In this case, use a cleaning cloth, etc., to gently wipe the disc from the inside towards the outside. Do not use dirty cleaning cloths.
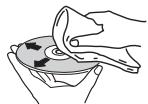
-
Do not use benzene, thinner or other volatile chemicals. Also do not use record spray or antistatic agents.
-
For tough dirt, apply some water to a soft cloth, wring out thoroughly, wipe off the dirt, then wipe off the moisture with a dry cloth.
- Do not use damaged (cracked or warped) discs.
- Do not let the signal surface of discs get scratched or dirty.
- Do not attach pieces of paper or stickers to discs. Doing so could warp discs, making it impossible to play them. Also note that rental discs often have labels attached to them, and the label's glue may have oozed out. Check that there is no glue around the edges of such labels before using rented discs.
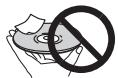

About specially shaped discs
Specially shaped discs (heart-shaped, hexagonal, etc.) cannot be played on this receiver. Do not attempt to play such discs, as they could damage this receiver.

Caution for when the receiver is installed in a rack with a glass door
Do not press the OPEN/CLOSE on the remote control to open the disc tray while the glass door is closed. The door will hamper the movement of the disc tray, and the receiver could be damaged.
About network playback
The network playback function such as Internet Radio or Music Server of this receiver uses the following technologies:
Windows Media Player
See Windows Media Player 11/Windows Media Player 12 on page 28 for more on this.
Windows Media DRM
Microsoft Windows Media Digital Rights Management (WMDRM) is a platform to protect and securely deliver content for playback on computers, portable devices and network devices. Music Server functions as a WMDRM 10 for networked devices. WMDRM protected content can only be played on media servers supporting WMDRM.
Content owners use WMDRM technology to protect their intellectual property, including copyrights. This device uses WMDRM software to access WMDRM protected content. If the WMDRM software fails to protect the content, content owners may ask Microsoft to revoke the software's ability to use WMDRM to play or copy protected content. Revocation does not affect unprotected content. When you download licenses for protected content, you agree that Microsoft may include a revocation list with the licenses. Content owners may require you to upgrade WMDRM to access their content. If you decline an upgrade, you will not be able to access content that requires the upgrade.
This product is protected by certain intellectual property rights of Microsoft. Use or distribution of such technology outside of this product is prohibited without a license from Microsoft.
DLNA

dlna
CERTIFIED
DLNA CERTIFIED® Audio Player
The Digital Living Network Alliance (DLNA) is a cross-industry organization of consumer electronics, computing industry and mobile device companies. Digital Living provides consumers with easy sharing of digital media through a wired or wireless network in the home.
The DLNA certification logo makes it easy to find products that comply with the DLNA Interoperability Guidelines. This receiver complies with DLNA Interoperability Guidelines v1.5.
When a PC running DLNA server software or other DLNA compatible device is connected to this player, some setting changes of software or other devices may be required. Please refer to the operating instructions for the software or device for more information.
DLNA®, the DLNA Logo and DLNA CERTIFIED® are trademarks, service marks, or certification marks of the Digital Living Network Alliance.
Content playable over a network
- Even when encoded in a compatible format, some files may not play correctly.
- Movie or Photo files cannot be played back.
- There are cases where you cannot listen to an Internet radio station even if the station can be selected from a list of radio stations.
- Some functions may not be supported depending on the server type or version used.
- Supported file formats vary by server. As such, files not supported by your server are not displayed on this receiver. For more information check with the manufacturer of your server.
Disclaimer for Third Party Content
Access to content provided by third parties requires a high speed internet connection and may also require account registration and a paid subscription.
Third party content services may be changed, suspended, interrupted, or discontinued at any time without notice, and Pioneer disclaims any liability in connection with such occurrences.
Pioneer does not represent or warrant that content services will continue to be provided or available for a particular period of time, and any such warranty, express or implied, is disclaimed.
About playback behavior over a network
- Playback may stall when the PC is switched off or any media files stored on it are deleted while playing content.
- If there are problems within the network environment (heavy network traffic, etc.) content may not be displayed or played properly (playback may be interrupted or stalled). For best performance, a 100BASE-TX connection between player and PC is recommended.
- If several clients are playing simultaneously, as the case may be, playback is interrupted or stalled.
Depending on the security software installed on a connected PC and the setting of such software, network connection may be blocked.
Pioneer is not responsible for any malfunction of the player and/or the Music Server features due to communication error/malfunctions associated with your network connection and/or your PC, or other connected equipment. Please contact your PC manufacturer or Internet service provider. Windows Media is either a registered trademark or trademark of Microsoft Corporation in the United States and/or other countries.
This product includes technology owned by Microsoft Corporation and cannot be used or distributed without a license from Microsoft Licensing, Inc.
Microsoft, Windows, Windows Vista, Windows XP, Windows 2000, Windows Millennium Edition, Windows 98, and Windows NT are either registered trademarks or trademarks of Microsoft Corporation in the United States and/or other countries.
Authorizing this receiver
In order to be able to play with Music Server, this receiver must be authorized. This happens automatically when the receiver makes a connection over the network to the PC. If not, please authorize this receiver manually on the PC.
The authorization (or permission) method for access varies depending on the type of server currently being connected. For more information on authorizing this receiver, refer to the instruction manual of your server.
aacPlus


The AAC decoder uses aesPlus developed by Coding
Technologies
(www.codingtechnologies.com).
FLAC
FLAC Decoder
Copyright c 2000, 2001, 2002, 2003, 2004, 2005, 2006, 2007 Josh Coalson
Redistribution and use in source and binary forms, with or without modification, are permitted provided that the following conditions are met:
- Redistributions of source code must retain the above copyright notice, this list of conditions and the following disclaimer.
- Redistributions in binary form must reproduce the above copyright notice, this list of conditions and the following disclaimer in the documentation and/or other materials provided with the distribution.
- Neither the name of the Xiph.org Foundation nor the names of its contributors may be used to endorse or promote products derived from this software without specific prior written permission.
THIS SOFTWARE IS PROVIDED BY THE COPYRIGHT HOLDERS AND EDITORS "AS IS" AND ANY EXPRESS OR IMPLIED WARRANTY, INCLUDING, BUT NOT LIMITED TO, THE IMPLIED WARRANTY OF MERCHANTABILITY AND FITNESS FOR A PARTICULAR PURPOSE ARE DISCLAIMED. IN NO EVENT SHALL THE FOUNDATION OR EDITORS BE LIABLE FOR ANY DIRECT, INDIRECT, INCIDENTAL, SPECIAL, EXEMPLARY, OR CONSEQUENTIAL DAMAGES (INCLUDING, BUT NOT LIMITED TO, PROCEDURE OF SUBSTITUTE GOODS OR SERVICES; LOSS OF USE, DATA, OR PROFITS; OR BUSINESS INTERMUsION) HOWEVER CAUSED AND ON ANY THEORY OF LIABILITY, WHETHER IN
CONTRACT, STRICT LIABILITY, OR TORT (INCLUDING NEGLIGENCE OR OTHERWISE) ASING IN ANY WAY OUT OF THE USE OF THIS SOFTWARE, EVEN IF ADVISED OF THE POSSIBILITY OF SUCH DAMAGE.
Radio wave caution
This receiver uses a 2.4 GHz radio wave frequency, which is a band used by other wireless systems (see list below). To prevent noise or interrupted communication, do not use this receiver nearby such devices, or make sure these devices are switched off during use.
- Cordless phones
- Cordless facsimiles
- Microwave ovens
Wireless LAN devices (IEEE802.11b/g) - Wireless AV equipment
- Wireless controllers for game systems
- Microwave-based health aids
Some baby monitors
Other, less common, equipment that may operate on the same frequency:
- Anti-theft systems
- Amateur radio stations (HAM)
- Warehouse logistic management systems
- Discrimination systems for train or emergency vehicles
Note
- In the event noise appears in your television image, there is the possibility that a Bluetooth wireless technology enabled device or this receiver (including products supported by this receiver) are causing signal interference with the antenna input connector of your television, video, satellite tuner, etc. In this event, increase the distance between the antenna input connector and the Bluetooth wireless technology enabled device or this receiver (including products supported by this receiver).
- If there is something obstructing the path between this receiver (including devices supported by this receiver) and the device equipped with Bluetooth wireless technology (such as a metal door, concrete wall, or insulation containing tinfoil), you may need to change the location of your system to prevent signal noise and interruptions.
Scope of operation
Use of this receiver is limited to home use. (Transmission distances may be reduced depending on communication environment).
In the following locations, poor condition or inability to receive radio waves may cause the audio to be interrupted or stopped:
- In reinforced concrete buildings or steel framed or iron-framed buildings.
Near large metallic furniture. - In a crowd of people or near a building or obstacle.
- In a location exposed to the magnetic field, static electricity or radio wave interference from radio communication equipment using the same frequency band (2.4 GHz) as this receiver, such as a 2.4 GHz wireless LAN device (IEEE802.11b/g) or microwave oven.
- If you live in a heavily populated residential area (apartment, townhouse, etc.) and if your neighbor's microwave is placed near your system, you may experience radio wave interference. If this occurs, move your receiver to a different place. When the microwave is not in use, there will be no radio wave interference.
Radio wave reflections
The radio waves received by this receiver include the radio wave coming directly from the device equipped with Bluetooth wireless technology (direct wave) and waves coming from various directions due to reflections by walls, furniture and building (reflected waves). The reflected waves (due to obstacles and reflecting objects) further produce a variety of reflected waves as well as variation in reception condition depending on locations. If the audio cannot be received properly due to this phenomenon, try moving the location of the device equipped with Bluetooth wireless technology a little. Also note that audio may be interrupted due to the reflected waves when a person crosses or approaches the space between this receiver and the device equipped with Bluetooth wireless technology.
Precautions regarding connections to products supported by this receiver
- Complete connections for all devices supported by this receiver, including all audio cords and power cord before connecting them to this receiver.
- After completing connections to this receiver, check the audio and power cords to confirm that they not twisted together.
- When disconnecting this receiver, confirm that you have sufficient working space in the surrounding area.
- When changing connections of audio or other cables for products supported by this receiver, confirm that you have sufficient working space in the surrounding area.
About playable music file formats
The USB and NETWORK function of this receiver supports the following music file formats.
- Note that some file formats are not available for playback although they are listed as playable file formats. Also, the compatibility of file formats varies depending on the type of server. Check with your server to ensure the compatibility of file formats supported by your server.
| Categ ory | Exten sion | Stream | ||
| MP3a | .mp3 | MPEG-1/2 Audio Layer-3 | Sampling frequency | 32 kHz, 44.1 kHz, 48 kHz |
| Quantization bitrate | 16 bit | |||
| Channel | 2 ch | |||
| Bitrate | 8 kbps to 320 kbps | |||
| VBR/CBR | Supported/ Supported |
| Category | Extension | Stream | ||
| WAV | .wav | LPCM | Sampling frequency | Music Server (Wired): 32 kHz, 44.1 kHz, 48 kHz, 88.2 kHz, 96 kHz, 176.4 kHz, 192 kHz |
| Music Server (Wireless): 32 kHz, 44.1 kHz, 48 kHz | ||||
| Quantization bitrate | 16 bit, 24 bit | |||
| Channel | 2 ch | |||
| WMA | .wma | WMA2/7/8/gb | Sampling frequency | 32 kHz, 44.1 kHz, 48 kHz |
| Quantization bitrate | 16 bit | |||
| Channel | 2 ch | |||
| Bitrate | 5 kbps to 320 kbps | |||
| VBR/CBR | Supported/Supported | |||
| AAC | .m4a c.aac | MPEG-4 AAC LC MPEG-4 HE AAC (aacPlus v1/2) | Sampling frequency | 32 kHz, 44.1 kHz, 48 kHz |
| Quantization bitrate | 16 bit | |||
| Channel | 2 ch | |||
| Bitrate | 16 kbps to 320 kbps | |||
| VBR/CBR | Supported/Supported |
| Categ ory | Exten sion | Stream | ||
| FLAc d | .flac | FLAC | Sampling frequency | Music Server (Wired): 32 kHz, 44.1 kHz, 48 kHz, 88.2 kHz, 96 kHz, 176.4 kHz, 192 kHz |
| Music Server (Wireless): 32 kHz, 44.1 kHz, 48 kHz | ||||
| Quantization bitrate | 16 bit, 24 bit | |||
| Channel | 2 ch | |||
| Bitrate | — |
a "MPEG Layer-3 audio decoding technology licensed from Fraunhofer IIS and Thomson multimedia."
b Files encoded using Windows Media Codec 9 may be playable but some parts of the specification are not supported; specifically, Pro, Lossless, Voice.
c Apple lossless encoding is not supported.
d Uncompressed FLAC files are not supported. Pioneer does not guarantee playback.
About iPod/iPhone/iPad
Made for

iPod

iPhone

iPad

AirPlay
"Made for iPod, "Made for iPhone" and "Made for iPad" mean that an electronic accessory has been designed to connect specifically to iPod, iPhone, or iPad, respectively, and has been certified by the developer to meet Apple performance standards. Apple is not responsible for the operation of this device or its compliance with safety and regulatory standards. Please note that the use of this accessory with iPod, iPhone, or iPad may affect wireless performance.
USB works with iPhone 5, iPhone 4S, iPhone 4, iPhone 3GS, iPhone 3G, iPhone, iPad (3rd and 4th generation), iPad 2, iPad, iPad mini, iPod touch (1st through 5th generation) and iPod nano (3rd through 7th generation).
The 30-pin connector works with iPhone 4S, iPhone 4, iPhone 3GS, iPhone 3G, iPhone, iPod touch (1st through 4th generation), and iPod nano (3rd through 6th generation).
X-HM81 only:
Bluetooth technology works with iPhone 5, iPhone 4S, iPhone 4, iPhone 3GS, iPhone 3G, iPhone, iPad (3rd and 4th generation), iPad 2, iPad, iPad mini, and iPod touch (2nd through 5th generation).
Apple, AirPlay, iPad, iPhone, iPod, iPod shuffle, iPod nano, iPod touch, iTunes, Safari, Bonjour and Mac are trademarks of Apple Inc., registered in the U.S. and other countries.
Lightning is a trademark of Apple Inc.
The AirPlay logo is a trademark of Apple Inc.
About Wi-Fi

CERTIFIED
The Wi-Fi CERTIFIED Logo is a certification mark of the Wi-Fi Alliance.

The Wi-Fi Protected Setup Mark is a mark of the Wi-Fi Alliance.
Specifications
Amplifier section
RMS Power Output. .50 W + 50 W (1 kHz, 10 % T.H.D., 4 ohms)
Guaranteed speaker impedance . 4 ohms to 16 ohms Headphones recommended: 32 ohms
Tuner section
Frequency Range (FM) 87.5 MHz to 108 MHz
Antenna Input (FM) 75 ohms unbalanced
Frequency Range (AM) 522 kHz to 1602 kHz
Antenna (AM). Loop antenna
Video section
Signal level (Composite) 1 Vp-p (75 ohms)
Network section
LAN terminal .Ethernet 10BASE-T/100BASE-TX
Other connectors
Power supply
USB connector . 5V,2.1 A
iPod connector . 5V,1.0 A
ADAPTER Port (X-HM81 and XC-HM81 only) .5 V, 0.1 A
Miscellaneous
Power source. AC 220 V to 240 V, 50 Hz
Power consumption
Power on .75 W
Power standby. 0.5 W or less
Network standby .17 W
Dimensions
Width 215 mm
Height (X-HM71) 131 mm
Height (X-HM81 and XC-HM81) 132.2 mm
Depth 353 mm
Weight (X-HM71) 5.0 kg
Weight (X-HM81 and XC-HM81). 5.5 kg
Speaker (X-HM81 only)
Type
2-way type speaker system
2.5 cm Dome-Tweeter
12 cm Woofer
Maximum input power .50 W
Impedance 4 ohms
Dimensions
Width. 156 mm
Height 266 mm
Depth. 258 mm
Weight. 4.3 kg/each
Speaker (X-HM71 only)
Type
2-way type speaker system
2 cm Dome-Tweeter
12 cm Woofer
Maximum input power 50 W
Impedance. 4 ohms
Dimensions
Width 148 mm
Height 263 mm
Depth 208 mm
Weight 2.7 kg/each
Accessories
Remote control 1
AAA size IEC R03 dry cell batteries. 2
AM loop antenna 1
FM wire antenna. 1
WLAN antenna 1
Speaker (X-HM81 and X-HM71 only). 2
Speaker wires (X-HM81 and X-HM71 only). 2
Non skid pad (X-HM81 only) 8
Warranty card 1
Quick Start Guide 1
These operating instructions (CD-ROM)
Note
The specifications are applicable when the power supply is 230 V.
- Specifications and the design are subject to possible modifications without notice, due to improvements.
Corporation and product names mentioned herein are trademarks or registered trademarks of the respective corporations.
- This product is not designed for use in Japan.
- This product includes FontAvenue® fonts licensed by NEC Corporation. FontAvenue® is a registered trademark of NEC Corporation.
- iOS is a trademark on which Cisco holds the trademark right in the US and certain other countries.
Ubiquitous WPS2.0
Copyright© 2007-2011 Ubiquitous Corp.
Declaration of Conformity with regard to the R&TTE Directive 1999/5/EC
Manufacturer:
EU Representative's:
PIONEER CORPORATION
Pioneer Europe NV
1-1, Shin-ogura, Saiwai-ku,
Haven 1087, Keetberglaan 1,
Kawasaki-shi, Kanagawa
9120 Melsele, Belgium
212-0031, Japan
http://www.pioneer.eu

[^*]X-HM81 - S / - K,X-HM71 - S / - K,XC-HM81 - S / - K
English:
Hereby, Pioneer, declares that this [^*] is in compliance with the essential requirements and other relevant provisions of Directive 1999/5/EC.
Suomi:
http://www.pioneer.co.uk
http://www.pioneer.eu
© 2012 PIONEER CORPORATION.
All rights reserved.
PIONEER CORPORATION
1-1, Shin-ogura, Saiwai-ku, Kawasaki-shi, Kanagawa 212-0031, Japan
PIONEER ELECTRONICS (USA) INC.
P.O. BOX 1540, Long Beach, California 90801-1540, U.S.A. TEL: (800) 421-1404
PIONEER ELECTRONICS OF CANADA, INC.
340 Ferrier Street, Unit 2, Markham, Ontario L3R 2Z5, Canada TEL: 1-877-283-5901, 905-479-4411
PIONEER EUROPE NV
Haven 1087, Keetberglaan 1, B-9120 Melsele, Belgium TEL: 03/570.05.11
PIONEER ELECTRONICS ASIACENTRE PTE. LTD.
253 Alexandra Road, #04-01, Singapore 159936 TEL: 65-6472-7555
PIONEER ELECTRONICS AUSTRALIA PTY. LTD.
5 Arco Lane, Heatherton, Victoria, 3202, Australia, TEL: (03) 9586-6300
PIONEER ELECTRONICS DE MEXICO S.A. DE C.V.
Blvd. Manuel Avila Camacho 138 10 piso Col.Lomas de Chapultepec, Mexico, D.F. 11000 TEL: 55-9178-4270
K002_B3_En
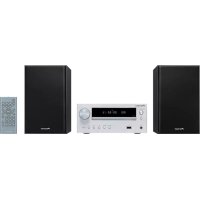

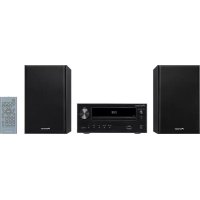
- IMPORTANT
- CAUTION
- CAUTION:
- WARNING
- Operating Environment
- Radio wave caution
- VENTILATION CAUTION
- For Wireless product European Union Notice
- Information for users on collection and disposal of old equipment and used batteries
- POWER-CORD CAUTION
- Condensation
- Controls and displays
- Connecting your equipment
- Getting started
- iPod/iPhone/iPad playback
- Music playback using Bluetooth® wireless technology
- Disc playback
- USB playback
- Internet radio
- Music server
- Using the tuner
- Additional information
- About this product
- X-HM81 or X-HM71
- XC-HM81
- Detatching and replacing the front grille
- Checking what's in the box
- Loading the batteries
- Operating range of remote control
- Front panel
- Remote sensor
- Network Standby and power indicator
- Display
- iPod or iPhone docking station
- Charge indicator
- Timer indicator
- Volume control
- STANDBY/ON button
- INPUT button
- Headphone socket
- AUDIO IN jack
- USB terminal
- Disc tray
- 14Playback control buttons
- Disc Tray Open/Close button
- Display
- Input source
- Mute
- Sleep timer
- Network connection status
- Name of file/track/artist/album/station, etc.
- Artwork
- Repeat and Shuffle
- Play status
- Remote control
- STANDBY/ON
- CD Receiver control buttons
- Input function buttons
- BAND
- CD DISP
- CD Receiver control buttons
- / / ← / (TUNE / , PRESET ← / ), ENTER
- 8Playback control buttons
- Numeric buttons
- ENTER, CLEAR
- OPEN/CLOSE
- Sound control buttons
- +Favorite
- DIMMER
- Volume control buttons
- MUTE
- TUNER EDIT
- 18Playbackmodebuttons
- FOLDER +/-
- Antenna connection
- Supplied FM wire antenna:
- External FM wire antenna:
- Supplied AM loop antenna:
- Note
- WLAN antenna connection
- Speaker connection
- Cleaning the glossy finish of the speaker (X-HM81 only)
- Applying non skid pads (X-HM81 only)
- If not using the provided speaker wire
- X-HM81 and X-HM71 only:
- Using other subwoofer
- Connecting a TV, etc.
- To select Line function:
- Connecting USB storage devices
- Connect your USB device to the USB/iPod/iPhone/iPad terminal on the front panel of this receiver.
- Connecting to the network through the LAN interface or WLAN antenna
- Connecting using LAN cable
- Connecting using wireless LAN
- Connecting to auxiliary component
- Plugging in
- Setting the receiver
- Press STANDBY/ON.
- Pioneer
- Auto power off setup
- Setting the clock
- To confirm the time display:
- Setting the wake-up timer
- Timer playback:
- Before setting timer:
- Turning the wake-up timer on/off
- Configuring the memorised timer setting
- Sleep operation
- General control
- Input function
- Network function
- Listening to auxiliary component
- Start playback of the auxiliary component.
- Headphones
- Display brightness control
- Auto volume
- Volume control
- Muting
- Sound Controls
- P.bass control
- Bass control
- Treble control
- Equaliser
- Confirming what iPod/iPhone/iPad models are supported
- Select "Settings" from the top menu.
- Select "About".
- Connecting your iPod/iPhone/iPad
- Connecting iPod/iPhone to the docking station
- Open the dock cover by pulling up.
- If you have the Universal dock adapter, attach it to iPod/ iPhone connector port on this receiver.
- Connect your iPod/iPhone.
- To remove the Universal dock adapter
- Watching iPod/iPhone images on your TV
- Connect iPod/iPhone/iPad to the USB/iPod/iPhone/ iPad terminal
- Playing your iPod/iPhone/iPad
- Watching images from iPod/Phone
- Tip
- Music playback using Bluetooth® wireless technology
- Wireless music play
- Remote control operation
- Connecting Bluetooth® wireless technology ADAPTER
- Setting the PIN code
- Default setting: 0000
- Pairing Bluetooth® wireless technology ADAPTER and Bluetooth wireless technology device
- Listening to music contents of Bluetooth wireless technology device
- AIR JAM
- Use ↑/↓ to select the Air Jam ON or OFF, then press ENTER.
- MP3:
- WMA:
- Playing discs
- Press to close the disc tray.
- Press / to start playback. After the last track is played, the receiver will stop automatically.
- Advanced CD or MP3/WMA disc playback
- Direct track search
- Use the numeric buttons on the remote control to select the desired track whilst playing the selected disc.
- A.For example,to choose 13
- For example, to choose 130
- To stop playback:
- Repeat play
- To repeat one track:
- To repeat all tracks:
- To repeat desired tracks:
- To cancel repeat play:
- Shuffle play
- To shuffle play all tracks:
- To cancel shuffle play:
- Programmed play (CD)
- Whilst in the stop mode, press PLAY MODE on the remote control to enter the programming save mode.
- Press the or button or numeric buttons on the remote control to select the desired track.
- Press ENTER to save the track number.
- Repeat steps 2-3 for other tracks. Up to 32 tracks can be programmed. If you make a mistake, the programmed tracks can be cleared by pressing CLEAR.
- Press to start playback.
- Adding tracks to the programme:
- To cancel the programmed play mode:
- Displaying disc information:
- MP3/WMA folder mode (only for MP3/WMA files)
- To play back MP3/WMA (Windows Media Audio) file
- About folder playback order
- Procedure to playback MP3/WMA disc with folder mode on
- Press CD, and load an MP3/WMA disc. Press PLAY MODE to select the folder playback mode.
- Press FOLDER +/- to select desired playback folder. (Folder mode on)
- Playing files stored on USB storage devices
- Listening to the Internet radio
- Connecting to a LAN network
- Listening to the Internet radio for the first time
- Tune into a station
- Playing back your favorite songs
- Registering and deleting audio files and Internet radio stations in and from Favorites
- Advanced operations for the Internet radio
- Registering broadcast stations not on the vTuner list from the special Pioneer site
- Network setting
- Wired setting
- IP Address
- Subnet Mask
- Default Gateway
- Primary DNS Server/Secondary DNS Server
- Proxy Setup
- Wireless Setting
- WPS connection setting
- PBC (Push Button Configuration)
- PIN INPUT
- Connecting using PIN Input
- Connecting to a router without WPS-PBC function
- Connection settings using an iOS device
- Friendly Name
- Parental lock setup
- Turn on/off the parental lock
- Select Parental Lock.
- Changing the password
- Select Change Password.
- Introduction
- About playable DLNA network devices
- Using AirPlay on iPod touch, iPhone, iPad and iTunes
- About the DHCP server function
- Authorizing this receiver
- Playing audio files stored on PCs or other components
- Connecting to the LAN network
- Playback with Music Server
- Use / to select the file you want to play, then press ENTER.
- Listening to the radio broadcasts
- Automatic tuning
- Manual tuning
- Improving FM sound
- Saving station presets
- Listening to station presets
- Naming preset stations
- Changing the noise cut mode
- Using the Radio Data System (RDS)
- An introduction to RDS
- Searching for RDS programs
- Displaying RDS information
- Press RDS DISP for RDS information.
- Troubleshooting
- General
- Tuner
- Disc playback
- When a USB storage device is connected
- When an iPod/iPhone/iPad is connected
- Network
- Wireless LAN
- Firmware Update
- To update, select OK.
- Firmware Update messages
- Status messages
- Description
- Firmware Update using Safari browser
- Press Bookmark icon. Click Bonjour list (a), and then select this receiver's name (Friendly Name) (b) in Bookmark.
- Click Firmware Update.
- Press Start.
- Browse the latest firmware on your computer (a) and then press Upload (b).
- The firmware upload status screen is displayed. Press Ok.
- Resetting this receiver
- Press NETWORK → SETUP.
- Use / to select Factory Reset.
- Select Start.
- Cautions on use
- When moving this receiver
- Place of installation
- Avoid the following locations:
- Do not place objects on this receiver.
- Do not obstruct the ventilation holes.
- Do not expose to heat.
- Cleaning the product
- About copyrights
- Handling discs
- Storing
- Cleaning discs
- About specially shaped discs
- Caution for when the receiver is installed in a rack with a glass door
- About network playback
- Windows Media Player
- Windows Media DRM
- DLNA
- Content playable over a network
- Disclaimer for Third Party Content
- About playback behavior over a network
- aacPlus
- FLAC
- Scope of operation
- Radio wave reflections
- Precautions regarding connections to products supported by this receiver
- About playable music file formats
- About iPod/iPhone/iPad
- X-HM81 only:
- About Wi-Fi
- Specifications
- Amplifier section
- Tuner section
- Video section
- Network section
- Other connectors
- Miscellaneous
- Speaker (X-HM81 only)
- Speaker (X-HM71 only)
- Accessories
- Declaration of Conformity with regard to the R&TTE Directive 1999/5/EC
- PIONEER CORPORATION
- English:
- Suomi:
Brand : PIONEER
Model : X-HM81-S
Category : Audio System