
X-HM21BT-K - Hi-Fi Micro System PIONEER - Free user manual and instructions
Find the device manual for free X-HM21BT-K PIONEER in PDF.
User questions about X-HM21BT-K PIONEER
0 question about this device. Answer the ones you know or ask your own.
Ask a new question about this device
Download the instructions for your Hi-Fi Micro System in PDF format for free! Find your manual X-HM21BT-K - PIONEER and take your electronic device back in hand. On this page are published all the documents necessary for the use of your device. X-HM21BT-K by PIONEER.
USER MANUAL X-HM21BT-K PIONEER
Discover the benefits of registering your product online at http://www.pioneer.co.uk (or http://www.pioneer.eu).
Operating Instructions
Mode d'emploi
Bedienungsanleitung
This equipment is not waterproof. To prevent a fire or shock hazard, do not place any container filled with liquid near this equipment (such as a vase or flower pot) or expose it to dripping, splashing, rain or moisture.
D3-4-2-1-3_A1_En
WARNING
To prevent a fire hazard, do not place any naked flame sources (such as a lighted candle) on the equipment.
D3-4-2-1-7a_A1_En
VENTILATION CAUTION
When installing this unit, make sure to leave space around the unit for ventilation to improve heat radiation (at least 25cm at top, 10cm at rear, and 5cm at each side).
WARNING
Slots and openings in the cabinet are provided for ventilation to ensure reliable operation of the product, and to protect it from overheating. To prevent fire hazard, the openings should never be blocked or covered with items (such as newspapers, table-cloths, curtains) or by operating the equipment on thick carpet or a bed.
D3-4-2-1-7b*A1_En
Operating Environment
Operating environment temperature and humidity: +5^ to +35^ (+41^ to +95^) less than 85% RH (cooling vents not blocked)
Do not install this unit in a poorly ventilated area, or in locations exposed to high humidity or direct sunlight (or strong artificial light).
D3-4-2-1-7c*A2_EN
WARNING
Store small parts out of the reach of children and infants. If accidentally swallowed, contact a doctor immediately.
D41-6-4_A1_En
This product is for general household purposes. Any failure due to use for other than household purposes (such as long-term use for business purposes in a restaurant or use in a car or ship) and which requires repair will be charged for even during the warranty period.
K041_A1_En
CAUTION
The oSTANDBY/ON switch on this unit will not completely shut off all power from the AC outlet. Since the power cord serves as the main disconnect device for the unit, you will need to unplug it from the AC outlet to shut down all power. Therefore, make sure the unit has been installed so that the power plug can be easily unplugged from the AC outlet in case of an accident. To avoid fire hazard, the power cord should also be unplugged from the AC outlet when left unused for a long period of time (for example, when on vacation).
D3-4-2-2-2a*A1_EN
CAUTION
This product is a class 1 laser product classified under the Safety of laser products, IEC 60825-1:2007.
CLASS 1 LASER PRODUCT
D58-5-2-2a_A1_En
POWER-CORD CAUTION
Handle the power cord by the plug. Do not pull out the plug by tugging the cord and never touch the power cord when your hands are wet as this could cause a short circuit or electric shock. Do not place the unit, a piece of furniture, etc., on the power cord, or pinch the cord. Never make a knot in the cord or tie it with other cords. The power cords should be routed such that they are not likely to be stepped on. A damaged power cord can cause a fire or give you an electrical shock. Check the power cord once in a while. When you find it damaged, ask your nearest PIONEER authorized service center or your dealer for a replacement.
S002*A1_EN
Do not install your speakers overhead on the ceiling or wall. The grill is designed to be detachable, and as such it may fall and cause damage or personal injury if installed overhead.
SGK004_A1_En
Information for users on collection and disposal of old equipment and used batteries
(Symbol for equipment)

Symbol examples for batteries


Pb
These symbols on the products, packaging, and/or accompanying documents mean that used electrical and electronic products and batteries should not be mixed with general household waste.
For proper treatment, recovery and recycling of old products and used batteries, please take them to applicable collection points in accordance with your national legislation.
By disposing of these products and batteries correctly, you will help to save valuable resources and prevent any potential negative effects on human health and the environment which could otherwise arise from inappropriate waste handling.
For more information about collection and recycling of old products and batteries, please contact your local municipality, your waste disposal service or the point of sale where you purchased the items.
These symbols are only valid in the European Union.
For countries outside the European Union:
If you wish to discard these items, please contact your local authorities or dealer and ask for the correct method of disposal.
K058a_A1_En
Radio wave caution
This unit uses a 2.4 GHz radio wave frequency, which is a band used by other wireless systems (Microwave ovens and Cordless phones, etc.). In this event noise appears in your television image, there is the possibility this unit (including products supported by this unit) is causing signal interference with the antenna input connector of your television, video, satellite tuner, etc. In this event, increase the distance between the antenna input connector and this unit (including products supported by this unit).
- Pioneer is not responsible for any malfunction of the compatible Pioneer product due to communication error/malfunctions associated with your network connection and/or your connected equipment. Please contact your Internet service provider or network device manufacturer.
- A separate contract with/payment to an Internet service provider is required to use the Internet.
Thank you for buying this Pioneer product.
Please read through these operating instructions so that you will know how to operate your model properly. After you have finished reading the instructions, put them in a safe place for future reference.
Contents
01 Before you start
What's in the box 5
Loading the batteries in the remote control 5
Using the remote control 5
02 Part names and functions
Remote control 6
Speaker system 7
Front panel 8
Display 9
03 Connections
Speaker connection 10
Connecting antennas 11
Using external antennas. 11
Plugging in 11
04 Getting started
To turn the power on 12
Setting the clock 12
General control 12
Input function. 12
Display brightness control 12
Volume auto setting. 12
Volume control. 12
Muting. 12
Sound controls 13
Equalizer 13
P.BASS control 13
Bass/treble control 13
Setting the wake-up timer 13
Calling the wake-up timer. 14
Cancelling the wake-up timer. 14
Using the wake-up timer. 14
Using the sleep timer 14
Using Headphones 14
05 iPod/iPhone/iPad playback
Confirming what iPod/iPhone/iPad models are
supported 15
Connecting your iPod/iPhone/iPad 15
Connecting iPod/iPhone/iPad using supplied
stand 15
Playing iPod/Phone/iPad 16
06 Disc playback
Playing discs or files 17
Advanced CD or MP3/WMA disc playback 18
Direct track search 18
Repeat play. 18
Random play 18
Programmed play (CD or MP3/WMA) 19
About downloading MP3/WMA 19
About folder playback order 19
Specify the folder to play. 20
Switch the display contents 20
07 USB playback
Playing USB storage devices 21
Repeat play. 21
Random play 21
Specify the folder to play. 22
Switch the display contents 22
Playing in the desired order (Programmed Play) 22
08 Using the tuner
Listening to the radio broadcasts 23
Tuning. 23
Saving station presets. 23
To recall a memorised station 24
To scan the preset stations. 24
To erase entire preset memory. 24
Using the Radio Data System (RDS) 24
An introduction to RDS. 24
Searching for RDS programs 24
Information provided by RDS 25
Using the Auto Station Program Memory (ASPM). 25
Notes for RDS operation. 25
09 Other connections
Connecting auxiliary components 26
10 Bluetooth® Audio playback
Music playback using Bluetooth wireless
technology 27
Pairing with the unit (Initial registration) 27
Listen to music on the unit from a Bluetooth capable
device 28
Radio wave caution 28
Scope of operation 28
Radio wave reflections 29
Precautions regarding connections to products
supported by this unit 29
11 Additional information
Troubleshooting 30
Playable discs and formats 33
Regarding copy protected CDs 33
Supported audio file formats 33
Cautions on use 33
When moving this unit 33
Place of installation. 33
Do not place objects on this unit. 34
About condensation 34
Cleaning the product. 34
Cleaning the lens. 34
Handling discs 34
Storing 34
Cleaning discs 34
About specially shaped discs 34
About iPod/Phone/iPad 35
Restoring all the settings to the defaults 35
Specifications 36
Chapter 1: Before you start
What's in the box
Please confirm that the following accessories are in the box when you open it.
Remote Control
Power cord
AM antenna cable
FM wire antenna
- AAA batteries (R03) x 2
- iPad stand
Warranty card
- Operating instructions (this document)
Loading the batteries in the remote control
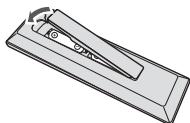
1 Open the rear lid and load the batteries as illustrated below.
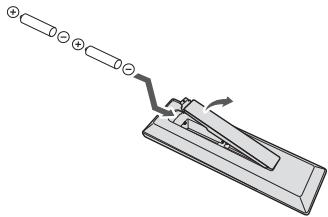
2 Close the rear lid.
CAUTION
- When inserting the batteries, make sure not to damage the springs on the battery's terminals. This can cause batteries to leak or over heat.
- Do not use any batteries other than the ones specified. Also, do not use a new battery together with an old one.
- When loading the batteries into the remote control, set them in the proper direction, as indicated by the polarity marks ( and ).
WARNING
- Do not heat batteries, disassemble them, or throw them into flames or water.
- Batteries may have different voltages, even if they are the same size and shape. Do not use different types of batteries together.
- To prevent leakage of battery fluid, remove the batteries if you do not plan to use the remote control for a long period of time (1 month or more). If the fluid should leak, wipe it carefully off the inside of the case, then insert new batteries. If a battery should leak and the fluid should get on your skin, flush it off with large quantities of water.
- When disposing of used batteries, please comply with governmental regulations or environmental public institution's rules that apply in your country/area.
Do not use or store batteries in direct sunlight or other excessively hot place, such as inside a car or near a heater. This can cause batteries to leak, overheat, explode or catch fire. It can also reduce the life or performance of batteries.
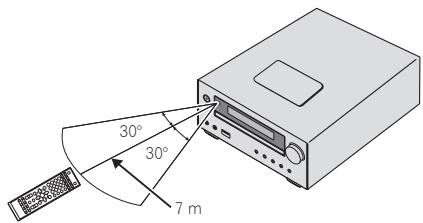
Using the remote control
The remote has a range of about 7m at an angle of about 30^ from the remote sensor.
Keep in mind the following when using the remote control:
- Make sure that there are no obstacles between the remote and the remote sensor on the unit.
- Remote operation may become unreliable if strong sunlight or fluorescent light is shining on the unit's remote sensor.
Remote controllers for different devices can interfere with each other. Avoid using remotes for other equipment located close to this unit. - Replace the batteries when you notice a fall off in the operating range of the remote.
Chapter 2:
Part names and functions
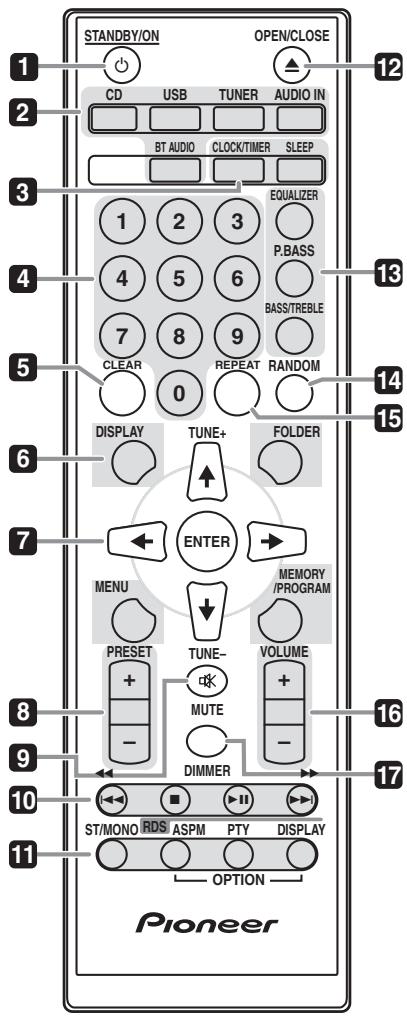
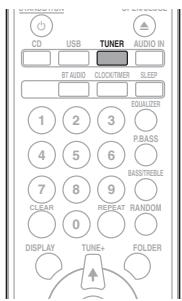
Remote control
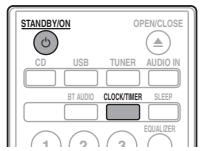
1 STANDBY/ON
Switches the receiver between standby and on (page 12).
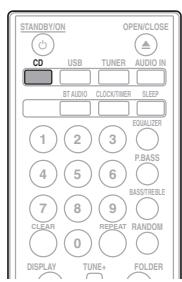
2 Input function buttons
Use to select the input source to this receiver (pages 16, 17, 21, 23, 26).
3 CD Receiver control buttons CLOCK/TIMER
Use for setting the clock, as well as for setting and checking the timers (page 12).
SLEEP
See Using the sleep timer on page 14.
4 Numeric buttons (0 to 9)
Use to enter the number (page 18).
5 CLEAR
Use to clear the programmed play (page 19).
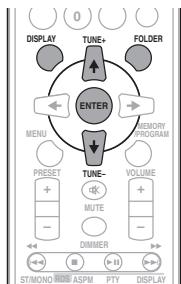
6 CD Receiver control buttons DISPLAY
Press to change the display for songs playing back from CD or USB (page 20).
FOLDER
Use to select the folder of the MP3/WMA disc or USB mass storage device (page 19).
MENU
Used when displaying iPod/iPhone menu screen.
MEMORY/PROGRAM
Use to memory or program the MP3/WMA disc (page 19).
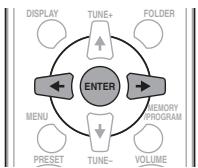
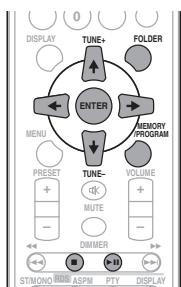
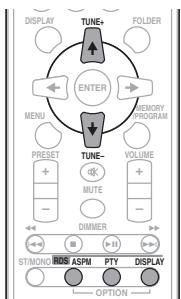
7 / / / (TUNE + / - ), ENTER
Use to select/switch system settings and modes, and to confirm actions.
Use TUNE + / - can be used to find radio frequencies (page 23).
8 PRESET +/-
Use to select preset radio stations (page 24).
9 MUTE
Mutes/unmates the sound (page 12).
10Playback control buttons
Use to control each function after you have selected it using the input function buttons (page 17).
11 Tuner control buttons ST/MONO
Use to switch the sound mode between stereo and monaural. (page 23)
RDS ASPM
Use to search for RDS Auto station program memory (page 24).
RDS PTY
Use to search for RDS program types (page 24).
RDS DISPLAY
Press to change the RDS display for information mode (page 24).
12 OPEN/CLOSE
Use to open or close the disc tray (page 17).
13 Sound control buttons
Adjust the sound quality (page 13).
14 RANDOM
Randomize order of track playback from a CD, iPod or USB (page 18).
15 REPEAT
Press to change the repeat play setting from a CD, iPod or USB (page 18).
16 Volume control buttons
Use to set the listening volume (page 12).
17 DIMMER
Dims or brightens the display. The brightness can be controlled in four steps (page 12).
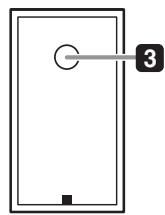
Speaker system
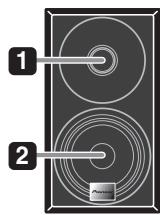
1 Tweeter
2 Woofer
3 Bass Reflex Duct
Important
- Make sure nothing comes into contact with the speaker diaphragms when you remove the speaker grilles.
Front panel
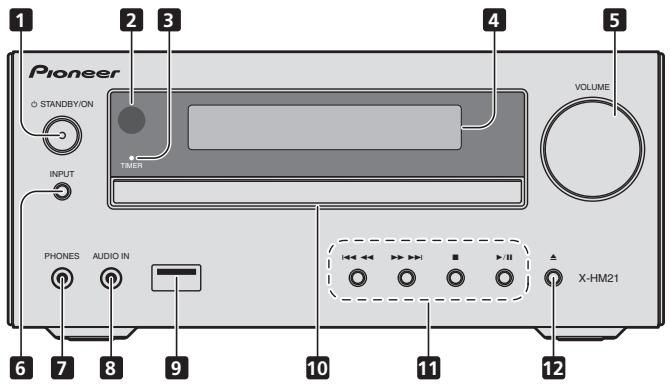
1 STANDBY/ON button
Switches the receiver between standby and on (page 12).
2 Remote sensor
Receives the signals from the remote control.
3 TIMER indicator
Lights when the unit power is off but when the timer setting is activated.
4 Character display
See Display on page 9.
5 Volume control
Use to set the listening volume (page 12).
6 INPUT button
Selects the input source.
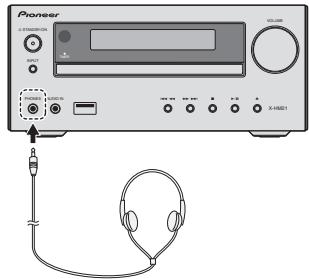
7 Headphone socket
Use to connect headphones. When the headphones are connected, there is no sound output from the speakers (page 14).
8 AUDIO IN socket
Use to connect an auxiliary component using a stereo minijack cable (page 26).
9 USB terminal
Use to connect your USB mass storage device or Apple iPod/ iPhone/iPad as an audio source (page 21).
10 Disc tray
Place the disc, label side up (page 17).
11Playback control buttons
Select the desired track or file to be played back. Stop current playback. Stop playback or resume playback from the point where it was paused.
12 Disc tray open/close button
Use to open or close the disc tray (page 17).
Display
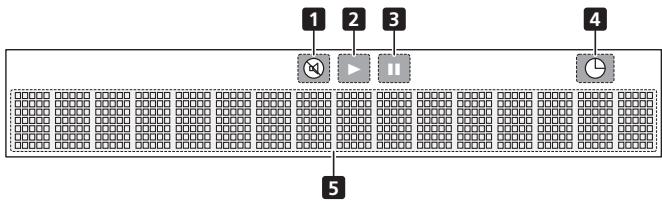
1 Lights when the sound is muted.

The mute icon will be displayed in red.
2 Start playback.
3 Pause playback.
4 ④
Timer function is set.
5 Character display
Displays various system information.
Chapter 3:
Connections

CAUTION
- Be sure to turn off the power and unplug the power cord from the power outlet whenever making or changing connections.
- Connect the power cord after all the connections between devices have been completed.
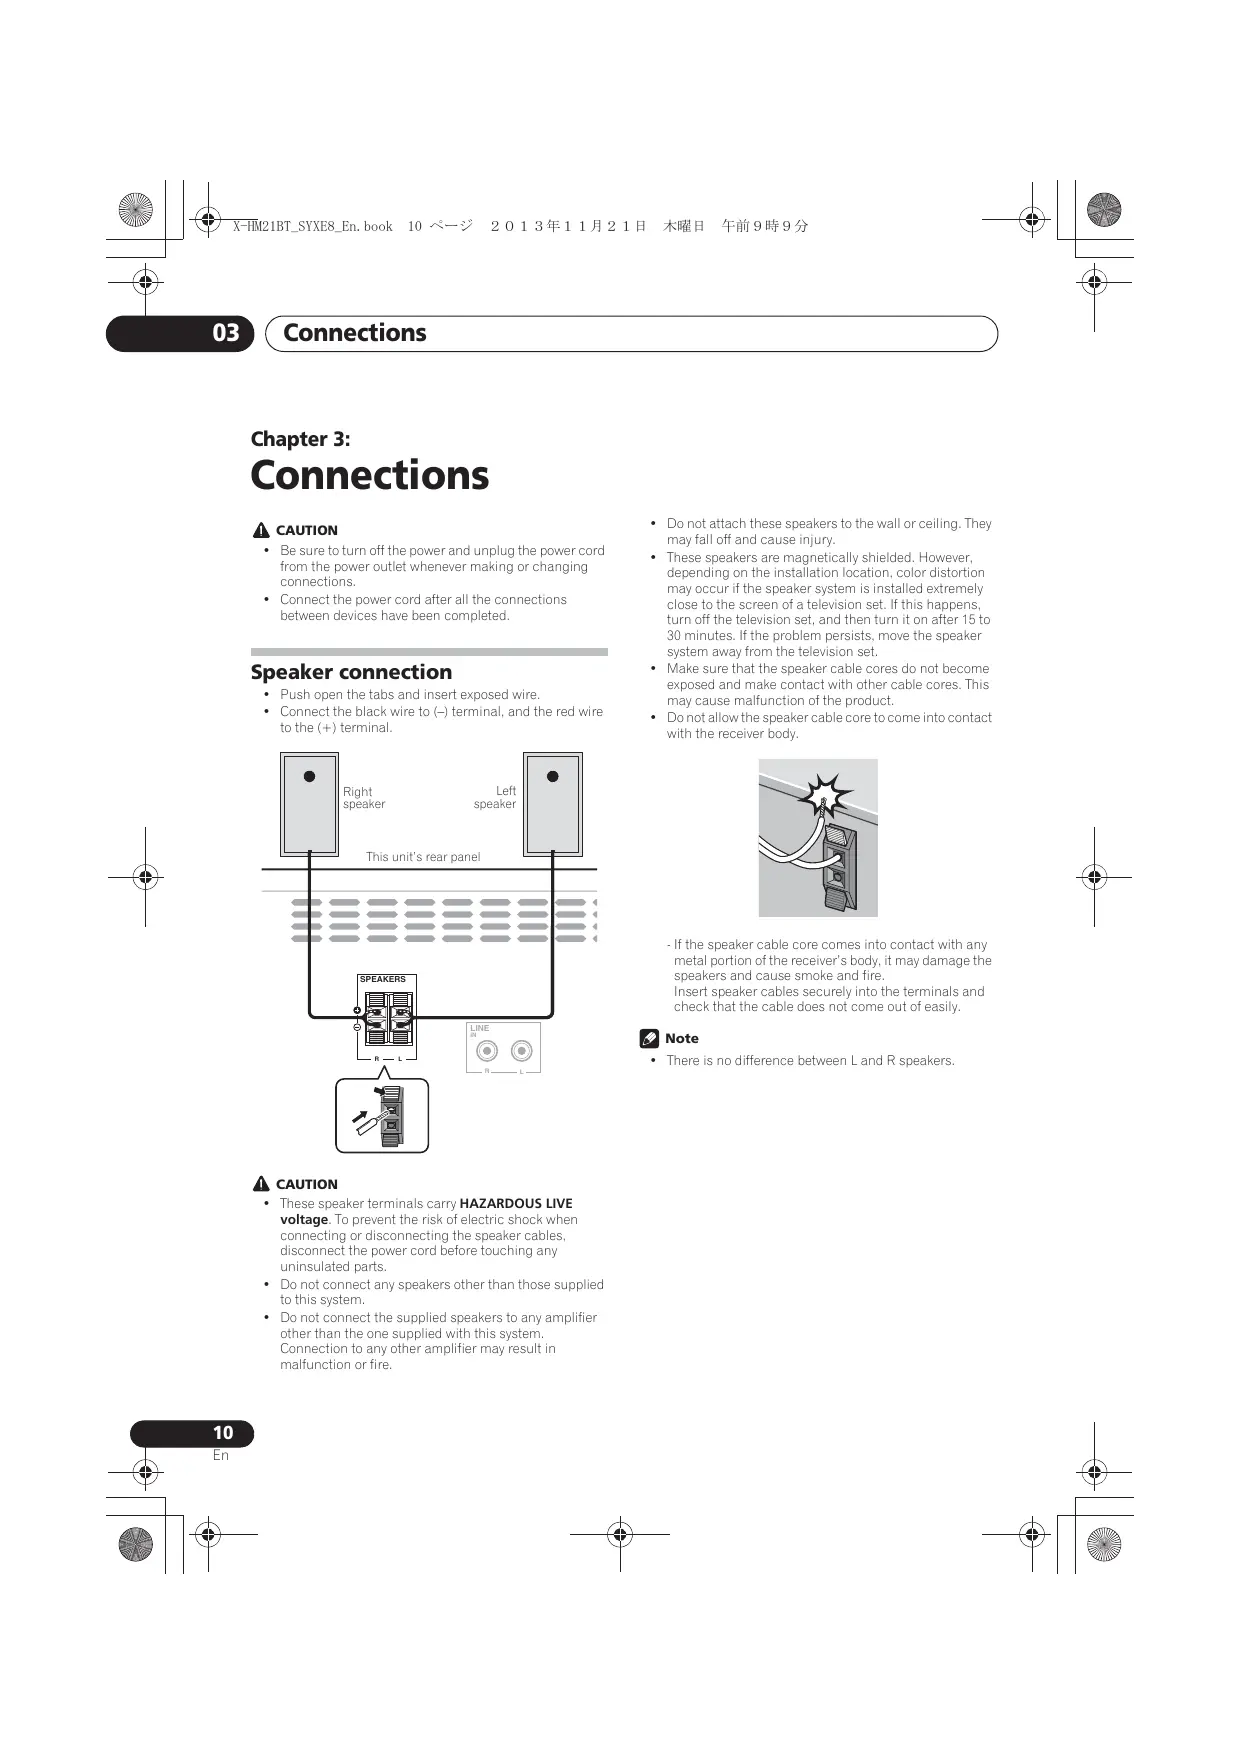
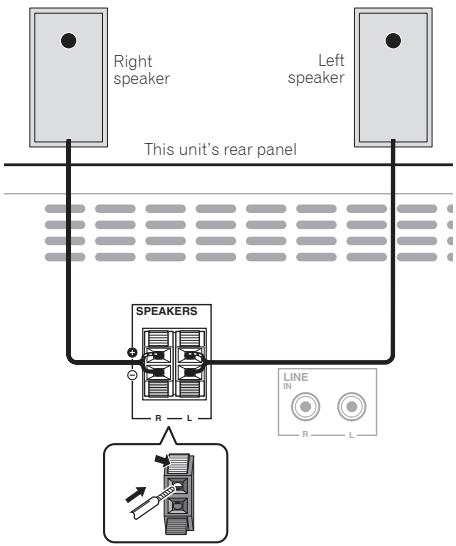
Speaker connection
- Push open the tabs and insert exposed wire.
- Connect the black wire to (-) terminal, and the red wire to the (+) terminal.

CAUTION
These speaker terminals carry HAZARDOUS LIVE voltage. To prevent the risk of electric shock when connecting or disconnecting the speaker cables, disconnect the power cord before touching any uninsulated parts.
- Do not connect any speakers other than those supplied to this system.
- Do not connect the supplied speakers to any amplifier other than the one supplied with this system. Connection to any other amplifier may result in malfunction or fire.
- Do not attach these speakers to the wall or ceiling. They may fall off and cause injury.
- These speakers are magnetically shielded. However, depending on the installation location, color distortion may occur if the speaker system is installed extremely close to the screen of a television set. If this happens, turn off the television set, and then turn it on after 15 to 30 minutes. If the problem persists, move the speaker system away from the television set.
- Make sure that the speaker cable cores do not become exposed and make contact with other cable cores. This may cause malfunction of the product.
- Do not allow the speaker cable core to come into contact with the receiver body.
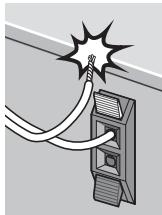
- If the speaker cable core comes into contact with any metal portion of the receiver's body, it may damage the speakers and cause smoke and fire. Insert speaker cables securely into the terminals and check that the cable does not come out of easily.

Note
- There is no difference between L and R speakers.
Connecting antennas
Connect the AM loop antenna and the FM wire antenna as shown below. To improve reception and sound quality, connect external antennas (see Using external antennas below).
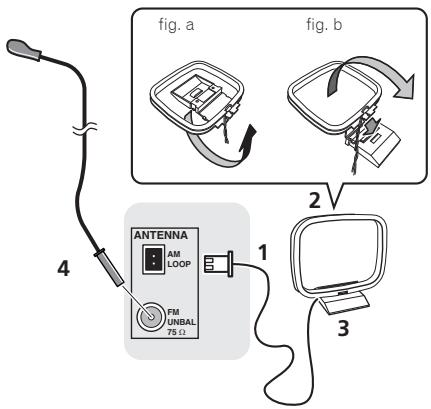
1 Connect the AM antenna wires.
Hold the terminal part of the wire when connecting.
2 Fix the AM loop antenna to the attached stand.
To fix the stand to the antenna, bend in the direction indicated by the arrow (fig. a) then clip the loop onto the stand (fig. b).
3 Place the AM antenna on a flat surface and in a direction giving the best reception.
4 Connect the FM wire antenna into the FM antenna socket.
For best results, extend the FM antenna fully and fix to a wall or door frame. Don't drape loosely or leave coiled up.
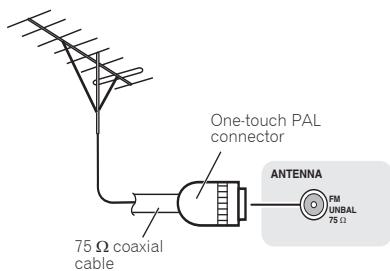
Using external antennas
To improve FM reception
Use a PAL connector (not supplied) to connect an external FM antenna.
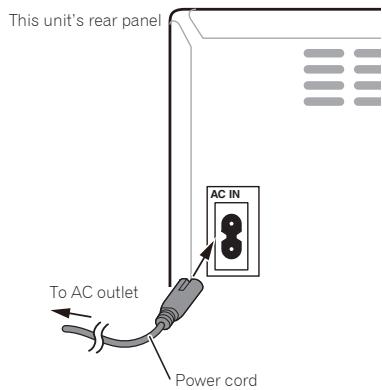
Plugging in
CAUTION
- Do not use any power cord other than the one supplied with this unit.
- Do not use the supplied power cord for any purpose other than that described below.
Before making or changing the connections, switch off the power and disconnect the power cord from the AC outlet. After you've finished making all connections, plug the unit into an AC outlet.
Chapter 4:
Getting started
To turn the power on
Press the STANDBY/ON to turn the power on.
After use:
Press the STANDBY/ON to enter the power stand-by mode.

Note
- In standby mode, if iPod/iPhone/iPad is connected, the unit turns charge mode.
Setting the clock
1 Press STANDBY/ON to turn the power on.
2 Press CLOCK/TIMER on the remote control.
"CLOCK" is shown on the main display.
3 Press ENTER.
4 Press to set the day, then press ENTER.
5 Press to set the hour, then press ENTER.
6 Press / to set the minute, then press ENTER to confirm.
7 Press ENTER.
To confirm the time display:
Press the CLOCK/TIMER. The time display will appear for about 10 seconds.
To readjust the clock:
Perform "Setting the clock" from step 1.

Note
- When power supply is restored after unit is plugged in again or after a power failure, reset the clock.
General control
Input function
When the INPUT on main unit is pressed, the current function will change to different mode. Press the INPUT repeatedly to select desired function.
Display brightness control
Press DIMMER to dims the display brightness. The brightness can be controlled in four steps.
Volume auto setting
If you turn off and on the main unit with the volume set to 31 or higher, the volume starts at 30 and sets in to the last set level.
Volume control
Turn the VOLUME on the unit or press VOLUME + / - on the remote control to increase or decrease the volume.
CAUTION
- The sound level at a given volume setting depends on speaker efficiency, location, and various other factors. It is advisable to avoid exposure to high volume levels. Do not turn the volume on to full at switch on. Listen to music at moderate levels. Excessive sound pressure from earphones and headphones can cause hearing loss.
Muting
The volume is muted temporarily when pressing the MUTE on the remote control. Press again to restore the volume.
Sound controls
Equalizer
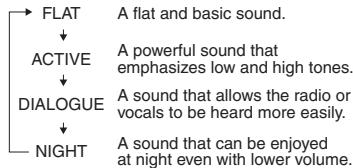
When the EQUALIZER is pressed, the current mode setting will be displayed. To change to a different mode, press the EQUALIZER repeatedly until the desired sound mode appears.
P.BASS control
When the power is first turned on, the unit will enter the P.BASS mode which emphasises the bass frequencies. To cancel the P.BASS mode, press the P.BASS on the remote control.
Bass/treble control
Press the BASS/TREBLE, then press / / to adjust the bass or treble.
Note
Simultaneous operation of EQUALIZER, P.BASS and BASS/TREBLE is not possible. Only the functions that you have selected will be active.
If you select one of three functions, features that are not selected will be set as follows.
1 If you change the settings of P.BASS (ON/OFF).
- EQUALIZER:FLAT
BASS/TREBLE:BASS=0,TREBLE=0
2 If you change the settings of EQUALIZER.
P.BASS:OFF
BASS/TREBLE:BASS=0,TREBLE=0
3 If you change the settings of BASS/TREBLE.
P.BASS:OFF
- EQUALIZER:FLAT
Setting the wake-up timer
Used to change the existing timer setting, or to set a new timer.
1 Press STANDBY/ON to turn the power on.
2 Press and hold CLOCK/TIMER.
3 Press / to select "ONCE" or "DAILY", then press ENTER.
ONCE - Works once only at a preset time.
DAILY - Works at the preset time on a preset day.
4 Press / to select "TIMER SET", then press ENTER.
5 Press / to select the timer playback source, then press ENTER.
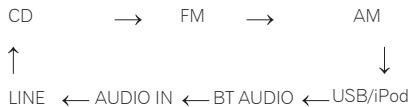
CD, FM, AM, USB/iPod, USB, BT AUDIO, AUDIO IN and LINE can be selected as the playback source.
6 Press / to select the timer day, then press ENTER.
7 Press / to set the hour, then press ENTER.
8 Press / to set the minute, then press ENTER.
- Set the time to finish as in steps 7 and 8 above.
9 Adjust the volume press VOLUME + / - , then press ENTER.
10 Press STANDBY/ON to enter the power standby mode.
- The TIMER indicator lights up.
Calling the wake-up timer
An existing timer setting can be reused.
1 Follow steps 1 to 3 in "Setting the wake-up timer".
2 Press / to select "TIMER ON", then press ENTER.
Cancelling the wake-up timer
Turn off the timer setting.
1 Follow steps 1 to 3 in "Setting the wake-up timer".
2 Press / to select "TIMER OFF", then press ENTER.
Using the wake-up timer
1 Press STANDBY/ON to turn the power off.
2 At the wake-up time, this unit will turn on automatically and play the selected input function.

Note
- If at the wake-up time an iPod/iPhone/iPad is not connected to the unit or a disc is not inserted, the unit will be turned on but will not play back the track.
Some discs may not be played automatically at the wake-up time. - When setting the timer set at least one minute between the start and end time.
Using the sleep timer
The sleep timer switches off the unit after a specified time so you can fall asleep without worrying about it.
1 Press SLEEP repeatedly to select a switch off time.
Choose between 10 min, 20 min, 30 min, 60 min, 90 min, 120 min, 150 min, 180 min or OFF. The newly set value displays for 3 seconds, and then the setting is completed.

Note
- The sleep timer can be set by pressing SLEEP while the remaining time is displayed.
Using Headphones
Insert the headphone's jack plug into the connector.
When the headphones are connected, there is no sound output from the speakers.
- Do not turn the volume on to full at switch on and listen to music at moderate levels. Excessive sound pressure from earphones and headphones can cause hearing loss.
Before plugging in or unplugging the headphone, reduce the volume. - Be sure your headphone has a 3.5 ~mm diameter plug and impedance between 16 and 50 . The recommended impedance is 32 .
Audio from the iPod/iPhone/iPad cannot be heard via the headphones connected to the unit. "HP MUTE" will be displayed if you connect the headphones when the iPod/iPhone/iPad function is selected.
Chapter 5:
iPod/iPhone/iPad playback
Merely by connecting your iPod/iPhone/iPad to this unit, you can enjoy high-quality sound from your iPod/iPhone/iPad. Playback setting for iPod/iPhone/iPad music can be performed from this unit or the iPod/iPhone/iPad itself.
Confirming what iPod/iPhone/iPad models are supported
The iPod/iPhone/iPad playable on this unit are shown below.
| iPod/iPhone/iPad | USB Terminal (Audio only) |
| iPod nano 3G/4G/5G/6G/7G | ✓ |
| iPod touch 1G/2G/3G/4G/5G | ✓ |
| iPhone 5 | ✓ |
| iPhone 5s | ✓ |
| iPhone 5c | ✓ |
| iPhone 4s | ✓ |
| iPhone 4 | ✓ |
| iPhone 3GS | ✓ |
| iPhone 3G | ✓ |
| iPhone | ✓ |
| iPad mini | ✓ |
| iPad (4th generation) | ✓ |
| iPad (3rd generation) | ✓ |
| iPad 2 | ✓ |
| iPad | ✓ |

Note
- Pioneer does not guarantee that this unit plays iPod/ iPhone/iPad models other than the ones specified.
- Some functions may be restricted depending on the model or software version.
- iPod/iPhone/iPad is licensed for reproduction of noncopyrighted materials or materials the user is legally permitted to reproduce.
- Features such as the equalizer cannot be controlled using this system, and we recommend switching the equalizer off before connecting.
- Pioneer cannot under any circumstances accept responsibility for any direct or indirect loss arising from any inconvenience or loss of recorded material resulting from iPod/iPhone/iPad failure.
-
For detailed instructions on using the iPod/iPhone/iPad, please refer to the manual supplied with the iPod/ iPhone/iPad.
-
This system has been developed and tested for the software version of iPod/iPhone/iPad indicated on the website of Pioneer (http://pioneer.jp/homeav/support/ios/eu/).
- Installing software versions other than indicated on the website of Pioneer to your iPod/iPhone/iPad may result in incompatibility with this system.
- This unit cannot be used to record CD, tuner or other content on an iPod/iPhone/iPad.
Connecting your iPod/iPhone/iPad
Connecting iPod/iPhone/iPad using supplied stand
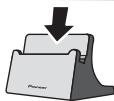
1 Connect the iPod/iPhone/iPad cable to the unit.
2 Pass the iPod/iPhone/iPad cable through the bottom of the stand and connect it to the iPod/ iPhone/iPad.
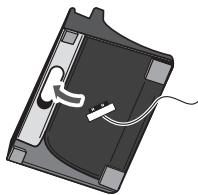
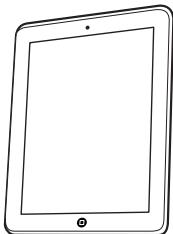
3 Set the iPod/iPhone/iPad on the stand.
Playing iPod/iPhone/iPad
1 Connect your iPod/iPhone/iPad.
- If an iPod/iPhone/iPad is connected while the unit is turned on, playback of the iPod/iPhone/iPad will not begin.
2 Press USB as the input source.
"USB/iPod" is shown on the main display.
3 When the recognition is completed, will begin playing automatically.

Note
- For detailed instructions on using the iPod/iPhone/iPad, please refer to the manual supplied with the iPod/ iPhone/iPad.
- iPod/iPhone/iPad recharging occurs whenever an iPod/iPhone/iPad is connected to this unit. (This function is supported in standby mode as well.)
- When input is switched from USB/iPod to another function, iPod/iPhone/iPad playback is temporarily stopped.
- When iPod/iPhone/iPad is not playing and no operations have been performed for more than 30 minutes, the unit will automatically power off.

Important
If this unit cannot play your iPod/iPhone/iPad, perform the following troubleshooting checks:
- Check whether the iPod/iPhone/iPad is supported by this unit.
- Reconnect the iPod/iPhone/iPad to the unit. If this doesn't seem to work, try resetting your iPod/iPhone/iPad.
- Check that iPod/iPhone/iPad software is supported by the unit.
If the iPod/iPhone/iPad cannot be operated, check the following items:
- Is the iPod/iPhone/iPad connected correctly? Reconnect the iPod/iPhone/iPad to the unit.
- Is the iPod/iPhone/iPad experiencing a hangup? Try resetting the iPod/iPhone/iPad, and reconnect it to the unit.
Chapter 6:
Disc playback
This system can play back a standard CD, CD-R/RW in the CD format and CD-R/RW with MP3 or WMA files, but cannot record on them. Some audio CD-R and CD-RW discs may not be playable due to the state of the disc or the device that was used for recording.
MP3:
MP3 is a form of compression. It is an acronym which stands for MPEG Audio Layer 3. MP3 is a type of audio code which is processed by significant compression from the original audio source with very little loss in sound quality.
- This system supports MPEG-1/2 Audio Layer 3 (Sampling rates: 8kHz to 48kHz ; Bit rates: 64 kbps to 384 kbps).
- During VBR file playback, time counter in the display may differ from its actual playback time.
WMA:
WMA (Windows Media Audio) files are Advanced System Format files that include audio files which are compressed with Windows Media Audio codec. WMA is developed by Microsoft as an audio format file for Windows Media Player.
- This system supports WMA (Sampling rates: 32 kHz/44.1 kHz/48 kHz; Bit rates: 64 kbps to 320 kbps).
- During VBR file playback, time counter in the display may differ from its actual playback time.
Playing discs or files
1 Press STANDBY/ON to turn the power on.
2 Press CD on the remote control or INPUT repeatedly on the main unit to select CD input.
3 Press OPEN/CLOSE to open the disc tray.
4 Place the disc on the disc tray, label side up.
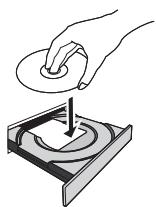
5 Press OPEN/CLOSE to close the disc tray.
6 Press /II to start playback.
After the last track is played, the unit will stop automatically.
CAUTION
- Do not place two discs in one disc tray.
- Do not play discs of special shapes (heart, octagon, etc). It may cause malfunctions.
- Do not push the disc tray whilst it is moving.
- If the power fails whilst the tray is open, wait until the power is restored.
- Be sure to place 8cm disc in the middle of the disc tray.

Note
- Due to the structure of the disc information, it takes longer to read an MP3/WMA disc than a normal CD (approximately 20 to 90 seconds).
- When the beginning of the first track is reached during fast reverse, the unit will enter the playback mode (only for CD).
- Rewritable multi-session discs with unfinished writing, can still be played.
- If TV or radio interference occurs during CD operation, move the unit away from the TV or radio.

Tip
- When no operation has done in CD mode and the audio file is not played for more than 30 minutes, the power will automatically turn off.
Various disc functions
| Function | Main unit | Remote control | Operation |
| Play | →" | →" | Press in the stop mode. |
| Stop | - | - | Press in the playback mode. |
| Pause | →" | →" | Press in the playback mode. Press ➔/II to resume playback from the paused point. |
| Track up/down | ←← → | ← | Press in the playback or stop mode. If you press the button in the stop mode, press ➔/II to start the desired track. |
| Fast forward/reverse | ←← → | ← | Press and hold down in the playback mode. Release the button to resume playback. |
Advanced CD or MP3/WMA disc playback

Direct track search
By using the numeric buttons, the desired tracks on the current disc can be played.
Use the numeric buttons on the remote control to select the desired track whilst playing the selected disc.

Note
- A track number higher than the number of tracks on the disc cannot be selected.
To stop playback:
Press
Repeat play
Repeat play can play one track, all tracks or a programmed sequence continuously.
To repeat one track:
Press REPEAT repeatedly until "REPEATONE" appears. Press ENTER.
To repeat all tracks:
Press REPEAT repeatedly until "REPEAT ALL" appears. Press ENTER.
To repeat desired tracks:
Perform steps 1 to 5 in "Programmed play (CD or MP3/WMA)" section on next page and then press REPEAT repeatedly until "REPEAT ALL" appears. Press ENTER.
To cancel repeat play:
Press REPEAT repeatedly until "REPEAT OFF" appears. Press ENTER.

Note
After performing repeat play, be sure to press Otherwise, the disc will play continuously.
During repeat play, random play is not possible.
Random play
The tracks on the disc can be played in random order automatically.
To random play all tracks:
Press RANDOM repeatedly until "RANDOM ON" appears. Press ENTER.
To cancel random play:
Press RANDOM repeatedly until "RANDOM OFF" appears. Press ENTER.

Note
- In random play, the unit will select and play tracks automatically. (You cannot select the order of the tracks.)
- During random play, repeat play is not possible.
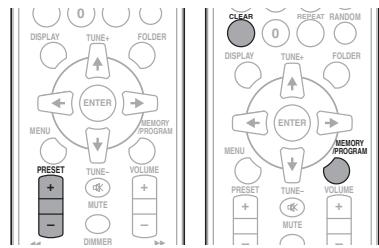
Programmed play (CD or MP3/WMA)
You can choose up to 32 selections for playback in the order you like.
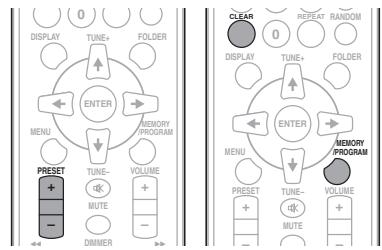
1 Whilst in the stop mode, press MEMORY/PROGRAM on the remote control to enter the programming save mode.
2 Press or the numeric buttons on the remote control to select the desired tracks.
3 Press ENTER to save folder and track number.
4 Repeat steps 2 to 3 for other folder/tracks. Up to 32 tracks can be programmed.
- If you want to check the programmed tracks, press MEMORY/PROGRAM.
- If you make a mistake, the last programmed tracks will be canceled by pressing CLEAR.
5 Press /II to start playback.
To cancel the programmed play mode:
To cancel the programmed play, press twice on the remote control. The display will show "PRG CLEAR" and all the programmed content will be cleared.
Adding tracks to the program:
Press the MEMORY/PROGRAM. Then follow steps 2 to 3 to add tracks.
Note
- When a disc is ejected anything programmed is cleared.
- If you press the STANDBY/ON to enter the standby mode or change the function from CD to another, the programmed selections will be cleared.
- During the program operation, random play is not possible.
About downloading MP3/WMA
There are many music sites on the internet that you can download MP3/WMA music files. Follow the instructions from the website on how to download the music files. You can then play back these downloaded music files by burning them to a CD-R/RW disc.
- Your downloaded song/files are for personal use only. Any other usage of the song without owner's permission, is against the law.
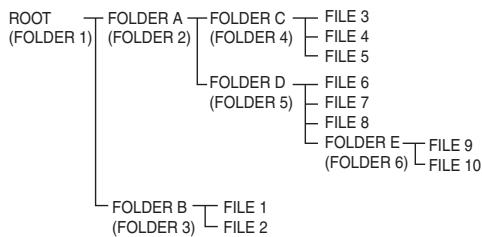
About folder playback order
If MP3/WMA files are recorded in several folders, a folder number will be set to each folder automatically.
These folders can be selected by the FOLDER on the remote control. If there is no supported file formats inside the selected folder, the folder is skipped and the next folder will be selected.
Example: How the folder numbers are assigned if MP3/WMA format files are recorded are as shown below.
1 ROOT folder is set as FOLDER 1.
2 As for folders inside ROOT folder (FOLDER A and FOLDER B), the folder which is recorded earlier on the disc will be set as FOLDER 2 and FOLDER 3.
3 As for folder inside FOLDER A (FOLDER C and FOLDER D), the folder which is recorded earlier on the disc will be set as FOLDER 4 and FOLDER 5.
4 FOLDER E that is inside FOLDER D will be set as FOLDER 6.
- The folder and file order information which is recorded on the disc depends on the writing software. There maybe possibilities that this unit will playback the files not according to our expected playback order.
- From a disc with MP3/WMA files up to 255 folders and 999 files (including non playable files) can be read.
Specify the folder to play
To specify the folder to play, perform the following steps.
1 Press CD, and load an MP3/WMA disc.
2 Press FOLDER, and press ↑/↓ to select desired playback folder.
3 Press ENTER.
Playback will start from the first song of the selected folder.
Even if it is stopped, it is possible to press / , to select a folder.
Switch the display contents
1 Press DISPLAY.
If the title, artist and album name has been written to the file, that information will be displayed. (The unit can only display alphanumeric characters. Non-alphanumeric character are displayed as **.)
Number of track, playback time display
Title/Artist/Album display

File type display

Number of folder/track display

Note
Copyright protected WMA files" or "Unsupported files cannot be played back. In these case the files will be skipped automatically.
- There may be cases where no information can be displayed.
- Displaying title, artist and album name is only supported for MP3 files.
Chapter 7:
USB playback
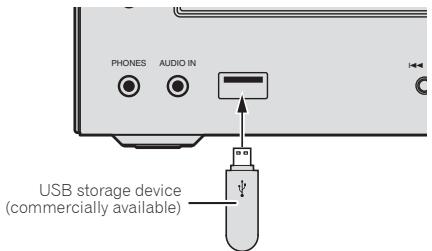
Playing USB storage devices
It is possible to listen to two-channel audio using the USB interface on the front of this receiver.
- Pioneer does not guarantee that any file recorded on a USB storage device will play or that power will be supplied to a USB storage device. Also note that Pioneer will accept no responsibility whatsoever for loss of files on USB storage devices caused by connection to this unit.
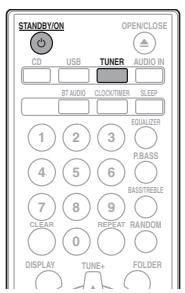
1 Press USB as the input source.
"USB/iPod" is shown on the main display.
2 Connect the USB storage device.
The number of folders or files stored on the connected USB storage device appear on the main display automatically.
- This receiver does not support a USB hub.
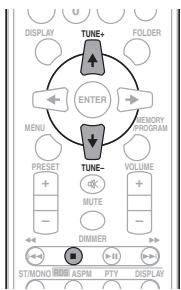
3 When the recognition is completed, press / II to start playback.
- When changing to a different input source, stop the USB memory playback first before changing.
4 Disconnect USB storage device from the USB terminal.
Turn the power off before removing the USB storage device.
Note
- USB flash drive that supports USB 2.0 can be used.
This unit may not recognize a USB storage device, play files or supply power to a USB storage device. For details, see When a USB storage device is connected on page 31. - When a USB storage device is not playing and no operations have been performed for more than 30 minutes, the unit will automatically power off.
Repeat play
Repeat play can play one track, all tracks or a programmed sequence continuously.
To repeat one track:
Press REPEAT repeatedly until "REPEATONE" appears. Press ENTER.
To repeat all tracks:
Press REPEAT repeatedly until "REPEAT ALL" appears. Press ENTER.
To repeat desired tracks:
Perform steps 1 to 5 in "Programmed play (CD or MP3/WMA)" section on next page and then press REPEAT repeatedly until "REPEAT ALL" appears. Press ENTER.
To cancel repeat play:
Press REPEAT repeatedly until "REPEAT OFF" appears. Press ENTER.

Note
- After performing repeat play, be sure to press. Otherwise, the file of USB storage device will play continuously.
During repeat play, random play is not possible.
Random play
The file of USB storage device can be played in random order automatically.
To random play all tracks:
Press RANDOM repeatedly until "RANDOM ON" appears. Press ENTER.
To cancel random play:
Press RANDOM repeatedly until "RANDOM OFF" appears. Press ENTER.

Note
- In random play, the unit will select and play tracks automatically. (You cannot select the order of the tracks.)
- During random play, repeat play is not possible.
Specify the folder to play
To specify the folder to play, perform the following steps.
1 Press USB, and connect the USB storage device.
2 Press FOLDER, and press / to select desired playback folder.
3 Press ENTER.
Playback will start from the first song of the selected folder.
Even if it is stopped, it is possible to press / , to select a folder.
Switch the display contents
The unit can display the information recorded in the USB storage device. For details, see Switch the display contents on page 20.
Playing in the desired order (Programmed Play)
The unit can play folders stored on a USB storage device in the desired order. For details, see Programmed play (CD or MP3/WMA) on page 19.
Chapter 8:
Using the tuner
Listening to the radio broadcasts
The following steps show you how to tune in to FM and AM radio broadcasts using the automatic (search) and manual (step) tuning functions. Once you are tuned to a station you can memorize the frequency for recall later. See Saving station presets below for more on how to do this.
Tuning
1 Press the STANDBY/ON to turn the power on.
2 Press TUNER repeatedly to select desired frequency band (FM or AM).
3 Press TUNE +/- on the remote control to tune in to the desired station.
Automatic tuning:
Press and hold TUNE +/- , scanning will start automatically and the tuner will stop at the first receivable broadcast station.
Manual tuning:
Press the TUNE +/- repeatedly to tune in to the desired station.
Note
- When radio interference occurs, automatic tuning may stop automatically at that point.
Automatic tuning will skip weak signal stations. - To stop the automatic tuning, press.
- When an RDS (Radio Data System) station is tuned in, the frequency will be displayed first. Finally, the station name will appear.
Full auto tuning can be achieved for RDS stations using Auto Station Program Memory (ASPM) mode, see page 25.
To receive an FM stereo transmission:
- Press ST/MONO to select stereo mode and "AUTO" will be displayed.
Improving poor FM reception:
1 Press ST/MONO repeatedly to select MONO.
This will change the tuner from stereo to mono and usually improve the reception.
Saving station presets
If you often listen to a particular radio station, it's convenient to have the receiver store the frequency for easy recall whenever you want to listen to that station (Preset tuning). This saves the effort of manually tuning in each time. This unit can memorize up to 45 stations.
(FM 30 stations/AM 15 stations)
1 Tune to a station you want to memorize.
See Tuning above for more on this.
2 Press MEMORY/PROGRAM.
The preset number will flash.
3 Press PRESET + / - to select the preset channel number.
4 Press MEMORY/PROGRAM to store that station in memory.
If the preset number has changed from flashing to lighting, before the station is memorised, repeat the operation from step 2.
- Repeat steps 1 to 4 to set other stations, or to change a preset station. When a new station is stored in the memory, the station previously memorised for that preset channel number will be erased.

Note
- The backup function protects the memorised stations for a few hours should there be a power failure or the AC power cord become disconnected.
To recall a memorised station
1 Press PRESET + / - to select the desired station.
To scan the preset stations
The stations saved in the memory can be scanned automatically. (Preset memory scan)
1 Press and hold PRESET + / -
The preset number will appear and the programmed stations will be tuned in sequentially, for 5 seconds each.
2 Press PRESET + / - again when the desired station is located.
To erase entire preset memory
1 Press TUNER on the remote control.
2 Press CLEAR until "MEMORY CLEAR" appears.

Note
All stations will be erased.
Using the Radio Data System (RDS)
An introduction to RDS
Radio Data System (RDS) is a system used by most FM radio stations to provide listeners with various kinds of information—the name of the station and the kind of show they're broadcasting, for example.
One feature of RDS is that you can search by type of program. For example, you can search for a station that's broadcasting a show with the program type. JAZZ.
You can search the following program types:
News - News
Current Affairs - Current Affairs
Information - General Information
Sport-Sport
Education - Educational
Drama - Radio plays, etc.
Cultures - National or regional culture, theater, etc.
Science - Science and technology
Varied Speech - Usually talk-based material, such as quiz shows or interviews.
Pop Music - Pop music
Rock Music - Rock music
Easy Listening - Easy listening
Light Classics M - 'Light' classical music
Serious Classics - 'Serious' classical music
Other Music - Music not fitting above categories
Weather & Metr - Weather reports
Finance - Stock market
reports, commerce, trading, etc.
Children's Progs - Programs for children
Social Affairs - Social affairs
Religion - Programs concerning religion
Phone In – Public expressing their views by Phone
Travel & Touring - Holiday-type travel rather than traffic announcements
Leisure & Hobby - Leisure interests and hobbies
Jazz Music-Jazz
Country Music - Country music
National Music - Popular music in a language other than English
Oldies Music - Popular music from the '50s and 60s
Folk Music - Folk music
Documentary - Documentary
Alarm Test - Broadcasting when testing emergency broadcast equipment or receivers.
Alarm - Alarm!
Searching for RDS programs
You can search a program type listed above.
1 Press TUNER on the remote control.
RDS is only possible in the FM.
2 Press RDS PTY on the remote control.
"SELECT" will appear for about 6 seconds.
3 Press to select the program type you want to hear.
Each time the button is pressed, the program type will appear. If the button is held down, the program type will appear continuously.
4 Whilst the selected program type is displayed (within 6 seconds), Press RDS PTY again.
After the selected program type has been lit for 2 seconds,
"SEARCH" will appear, and the search operation will start.

Note
-
If the display has stopped flashing, start again from step 2. If the unit finds a desired program type, the corresponding channel number will be lit for about 8 seconds, and then the station name will be displayed.
-
If you want to listen to the same program type of another station, press the RDS PTY whilst the channel number or station name is flashing. The unit will look for the next station.
- If no station can be found, "NOT FOUND" will appear for 4 seconds.
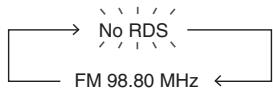
Information provided by RDS
Each time the RDS DISPLAY is pressed, the display will switch as follows:

When tuning in to a station other than an RDS station or to an RDS station which sends weak signal, the display will change in the following order:
Using the Auto Station Program Memory (ASPM)
Whilst in the ASPM operation mode, the tuner will automatically search for new RDS stations. Up to 30 stations can be stored.
If you have already stored some stations in memory, the number of new stations you can store will be less.
1 Press TUNER on the remote control.
2 Press and hold down RDS ASPM on the remote control.
After "ASPM" has flashed for about 4 seconds, scanning will start (87.5 MHz to 108 MHz).
After scanning, the number of stations stored in memory will be displayed for 4 seconds, and then "END" will appear for 4 seconds.
To stop the ASPM operation before it is complete:
Press whilst it is scanning for stations. The stations which are already stored in memory will be kept there.

Note
- If the same station is broadcasting on different frequencies, the strongest frequency will be stored in memory.
- Any station which has the same frequency as the one stored in memory will not be stored.
- If 30 stations have already been stored in memory, the scan will be aborted. If you want to redo the ASPM operation, erase the preset memory.
- If no station have been stored in memory, "END" will appear for about 4 seconds.
- If the RDS signals are very weak, station names may not be stored in memory.
- The same station name can be stored in different channels.
- In a certain area or during certain time periods, the station names may temporarily be different.
Notes for RDS operation
If any of the following events occur, it does not mean that the unit is faulty:
- "PS", "NO PS" and a station name appear alternately, and properly.
- If a particular station is not broadcasting properly or a station is conducting tests, the RDS reception function may not work properly.
- When you receive an RDS station whose signal is too weak, information like the station name may not be displayed.
- "NO PS", "NO PTY" or "NO RT" will flash for about 5 seconds, and then the frequency will be displayed.
Notes for radio text:
- The first 16 characters of the radio text will appear and then they will scroll across the display.
- If you tune in to an RDS station which is not broadcasting any radio text, "NO RT" will be displayed when you switch to the radio text position.
- Whilst radio text data is received or when the text contents change, "RT" will be displayed.
Chapter 9:
Other connections

CAUTION
- Before making or changing the connections, switch off the power and disconnect the power cord from the AC outlet.
Connecting auxiliary components
Connect the front panel AUDIO IN mini-plug jack to your auxiliary playback component.
- This method can be used to play music on this unit from iPods/iPhones/iPods that do not support use of an iPod Dock and USB terminal.
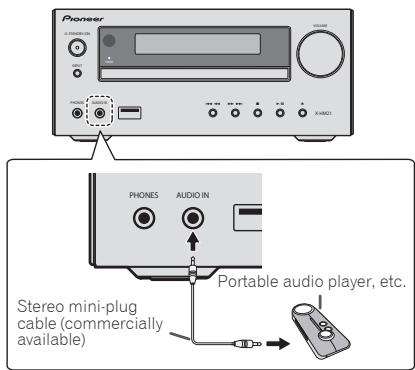
1 Press AUDIO IN as the input source.
When AUDIO IN is selected "AUDIO IN" will be displayed on the main display.

Note
- If the AUDIO IN miniplug jack is connected to auxiliary phones jack, the volume of the unit will be adjusted by the volume on the playback component. If the sound is distorted after you lower the volume of the unit, try lowering the volume on the auxiliary playback component.
Connect the rear panel LINE IN audio jacks to your auxiliary playback component.
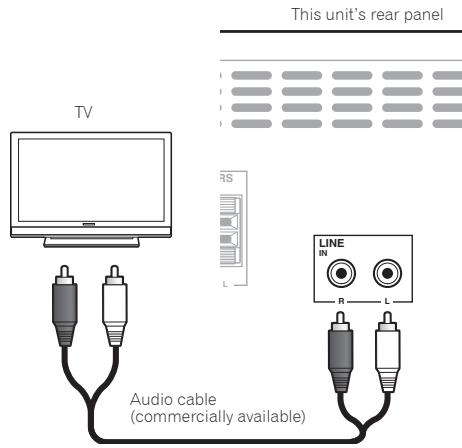
1 Press AUDIO IN twice as the input source.
When LINE is selected "LINE" will be displayed on the main display.
Chapter 10:
Bluetooth® Audio playback
Music playback using Bluetooth wireless technology

The unit is capable of playing back music stored on Bluetooth capable devices (cell phones, digital music players etc.) wirelessly. You can also use a Bluetooth audio transmitter (sold separately) to enjoy music from devices that do not have Bluetooth functionality. Please refer to the user's manual for your Bluetooth capable device for more details.

Note
- The Bluetooth® word mark and logos are registered trademarks owned by Bluetooth SIG, Inc. and any use of such marks by PIONEER CORPORATION is under license. Other trademarks and trade names are those of their respective owners.
- The Bluetooth wireless technology enabled device must support A2DP profiles.
- Pioneer does not guarantee proper connection and operation of this unit with all Bluetooth wireless technology enabled devices.
Pairing with the unit (Initial registration)
In order for the unit to playback music stored on a Bluetooth capable device, pairing must first be performed. Pairing should be performed when first using the unit with the Bluetooth capable device, or when the pairing data on the device has been erased for any reason.
Pairing is a step required to allow communication using Bluetooth wireless technology to be carried out.
- Pairing is only performed the first time that you use the unit and the Bluetooth capable device together.
- In order to allow communication using Bluetooth wireless technology to take place, pairing must be performed on both the unit and the Bluetooth capable device.
After pressing the BT AUDIO and switching to BT AUDIO input, perform the pairing procedure on the Bluetooth capable device. If pairing has been performed correctly, you will not need to perform the pairing procedures for the unit as shown below.
Please refer to the user's manual for your Bluetooth capable device for more details.
1 Press the STANDBY/ON and turn the power to the unit on.
2 Press the BT AUDIO.
The unit switches to BT AUDIO and PAIRING will be displayed.
3 Turn on the power to the Bluetooth capable device that you wish to pair with, and perform pairing procedure on it.

Note
-
This unit will be displayed as "X-HM21BT" on all Bluetooth capable devices that you have.
airing will start. -
Place the Bluetooth capable device close to the unit.
- Please refer to the user's manual for your Bluetooth capable device for details on when pairing can be performed and the procedures required for pairing.
- When PIN code entry is requested, enter "0000." (This unit does not accept any PIN code setting other than "0000.")
4 Confirm on the Bluetooth capable device that pairing has been completed.
If pairing with the Bluetooth capable device has been completed correctly, the name of the Bluetooth capable device will be displayed on the front panel of the unit. (Only single-byte alphanumeric characters can be displayed. Any character that cannot be displayed will be indicated by a **
Listen to music on the unit from a Bluetooth capable device
1 Press the BT AUDIO.
The unit will switch to BT AUDIO input.
2 A Bluetooth connection will be created between the Bluetooth capable device and the unit.
Procedures for connecting to the unit should be performed from the Bluetooth capable device.
- Please refer to the user's manual for your Bluetooth capable device for details of the connection procedures.
3 Playback music from the Bluetooth capable device.

Note
- When Bluetooth capable devise is not playing and no operations have been performed for more than 30 minutes, the unit will automatically power off.
Radio wave caution
This unit uses a 2.4 GHz radio wave frequency, which is a band used by other wireless systems (see list below). To prevent noise or interrupted communication, do not use this unit nearby such devices, or make sure these devices are switched off during use.
- Cordless phones
- Cordless facsimiles
- Microwave ovens
- Wireless LAN devices (IEEE802.11b/g)
- Wireless AV equipment
- Wireless controllers for game systems
- Microwave-based health aids
Some baby monitors
Other, less common, equipment that may operate on the same frequency:
Anti-theft systems
- Amateur radio stations (HAM)
Warehouse logistic management systems
- Discrimination systems for train or emergency vehicles

Note
- In the event noise appears in your television image, there is the possibility that a Bluetooth wireless technology enabled device or this unit (including products supported by this unit) are causing signal interference with the antenna input connector of your television, video, satellite tuner, etc. In this event, increase the distance between the antenna input connector and the Bluetooth wireless technology enabled device or this unit (including products supported by this unit).
- If there is something obstructing the path between this unit (including devices supported by this unit) and the device equipped with Bluetooth wireless technology (such as a metal door, concrete wall, or insulation containing tinfoil), you may need to change the location of your system to prevent signal noise and interruptions.
Scope of operation
Use of this unit is limited to home use. (Transmission distances may be reduced depending on communication environment).
In the following locations, poor condition or inability to receive radio waves may cause the audio to be interrupted or stopped:
- In reinforced concrete buildings or steel framed or iron-framed buildings.
Near large metallic furniture.
In a crowd of people or near a building or obstacle. -
In a location exposed to the magnetic field, static electricity or radio wave interference from radio communication equipment using the same frequency band (2.4 GHz) as this unit, such as a 2.4 GHz wireless LAN device (IEEE802.11b/g) or microwave oven.
-
If you live in a heavily populated residential area (apartment, townhouse, etc.) and if your neighbor's microwave is placed near your system, you may experience radio wave interference. If this occurs, move your unit to a different place. When the microwave is not in use, there will be no radio wave interference.
Radio wave reflections
The radio waves received by this unit include the radio wave coming directly from the device equipped with Bluetooth wireless technology (direct wave) and waves coming from various directions due to reflections by walls, furniture and building (reflected waves). The reflected waves (due to obstacles and reflecting objects) further produce a variety of reflected waves as well as variation in reception condition depending on locations. If the audio cannot be received properly due to this phenomenon, try moving the location of the device equipped with Bluetooth wireless technology a little. Also note that audio may be interrupted due to the reflected waves when a person crosses or approaches the space between this unit and the device equipped with Bluetooth wireless technology.
Precautions regarding connections to products supported by this unit
- Complete connections for all devices supported by this unit, including all audio cords and power cables before connecting them to this unit.
After completing connections to this unit, check the audio and power cables to confirm that they not twisted together. - When disconnecting this unit, confirm that you have sufficient working space in the surrounding area.
- When changing connections of audio or other cables for products supported by this unit, confirm that you have sufficient working space in the surrounding area.
Chapter 11:
Additional information
Troubleshooting
Incorrect operations are often mistaken for trouble and malfunctions. If you think that there is something wrong with this component, check the points below. Sometimes the trouble may lie in another component. Investigate the other components and electrical appliances being used. If the trouble cannot be rectified even after exercising the checks listed below, ask your nearest Pioneer authorized service center or your dealer to carry out repair work.
- If the unit does not operate normally due to external effects such as static electricity disconnect the power plug from the outlet and insert again to return to normal operating conditions.
General problem
| Problem | Check | Remedy |
| Settings you have made have been cleared. | Was the power cord unplugged? | When power cord is unplugged, the settings you have made is cleared. Please set the clock again. If you do not want to clear the settings, do not unplug the power cord. |
| Difference in volume between CDs, MP3, WMA, iPod/Phone/iPad, Tuner, AUDIO IN and LINE. | This is not a problem with this unit. | The volume may sound differently depending on the input source and recording format. |
| This unit cannot be operated with the remote control. | Are you operating from far away? | Operate within 7 m, 30° of the remote sensor on the front panel (page 5). |
| Is the remote control sensor exposed to direct sunlight or strong artificial light from a fluorescent bulb, etc.? | The remote control signals may not be received properly if the remote control sensor is exposed to direct sunlight or strong artificial light from a fluorescent bulb, etc. | |
| Are the batteries dead? | Replace the batteries (page 5). | |
| Disc cannot be played or disc is ejected automatically. | Is the disc scratched? | Scratched discs may not play. |
| Is the disc dirty? | Wipe the dirt off the disc (page 34). | |
| Is this unit placed in a humid location? | There could be condensation inside. Wait a while for the condensation to evaporate. Do not place this unit near an air-conditioner, etc. (page 34). | |
| Folder or file names are not recognized. (WMA, MP3). | Have you exceeded the maximum number of folder or file names this unit can recognize? | Up to 255 folders can be recognized on one disc. Up to 999 files can be recognized within one folder. Depending on the folder structure, however, this unit may not be able to recognize certain folders or files. |
| The unit turns off automatically. | If no play back and no operation has done for 30 minutes or more, the unit turns off automatically. | |
| Unable to connect to aBluetooth capable device, no sound comes out at all or sound cuts out when connected. | Are there any devices nearby that emit electromagnetic waves in the 2.4 GHz band (microwaves, wireless LAN devices, other Bluetooth capable devices etc.)? | If so, either move these devices away from the unit, or stop using other devices that emit electromagnetic waves. |
| Is the Bluetooth capable device too far away from the unit, or is there something between them? | Place the Bluetooth capable device inside the same room, with no obstacles between them, and within a range of 10 m *. * Only a suggested range. The actual possible communication range may change depending upon the surrounding environment. | |
| Is the Bluetooth capable device set to a mode that allows for Bluetooth wireless communication? | Check the settings on the Bluetooth capable device. | |
| Has pairing not been completed successfully, or has either the unit or the Bluetooth capable device erased the previous pairing setting? | Perform the pairing operation again. | |
| Does the device you are trying to connect have a supported profile? | Please use a Bluetooth capable device that supports A2DP. |
When a USB storage device is connected
| Problem | Check | Remedy |
| USB storage device is not recognized. | Is the USB storage device properly connected? | Connect the device securely (all the way in). |
| Is the USB storage device connected via a USB hub? | This unit does not support USB hubs. Connect the USB storage device directly. | |
| Is the USB storage device supported by this unit? | This unit only supports USB mass storage class devices. | |
| This unit supports portable flash memory and digital audio playback devices. | ||
| Only the FAT16 and FAT32 file systems are supported. Other file systems (exFAT, NTFS, HFS etc.) are not supported. | ||
| USB flash drive that supports USB 2.0 can be used. | ||
| This device does not support the use of external hard disc drives. | ||
| This is not a problem with this unit. | Turn the power off then back on. | |
| Some USB storage devices may not be recognized properly. | ||
| File cannot be played. | Is the file copyright-protected (by DRM)? | Copyright-protected files cannot be played. |
| This is not a problem with this unit. | Files stored on a computer cannot be played. | |
| It may not be possible to play some files. | ||
| Folder or file names are not displayed or are not properly displayed. | Do the folder or file names contain more than 30 characters? | The maximum number of characters displayable for the folder and file names is 30. |
| Folder or file names are not displayed in alphabetical order. | This is not a problem with this unit. | The order in which the folder and file names are displayed depends on the order in which the folders or files were recorded on the USB storage device. |
| Much time is required to recognize the USB storage device. | What is the USB storage devices capacity? | Some time may be required to load the data when large capacity USB storage devices are connected (this could take several minutes). |
| Power is not supplied to the USB storage device. | Is AUTH ERROR displayed on the front panel display? No power is supplied if the power consumption is too high. | Turn the power off then back on. |
| Turn the power off, then disconnect and reconnect the USB storage device. | ||
| Press INPUT to switch to the other input, then switch again to the USB/iPod input. |
When an iPod/iPhone/iPad is connected
| Problem | Remedy |
| Can't operate the iPod/iPhone/iPad by the remote control. | Make sure the iPod/iPhone/iPad is connected correctly (refer to Connecting your iPod/iPhone/iPad on page 15). |
| Can't operate the iPod/iPhone/iPad. | Make sure the iPod/iPhone/iPad is connected correctly (refer to Connecting your iPod/iPhone/iPad on page 15).If the iPod/iPhone/iPad is experiencing a hangup, try resetting the iPod/iPhone/iPad, and reconnect it to the unit. |
Playable discs and formats
| Audio CD | • Commercially available audio CDs • CD-R/ -RW/ -ROM discs containing music recorded in the CD-DA format |
| WMA | WMA files recorded on CD-R/ -RW/ -ROM discs or USB storage devices |
| MP3 | MP3 files recorded on CD-R/ -RW/ -ROM discs or USB storage devices |
Only the discs that have been finalized can be played.
- Disks recorded in packet write mode (UDF format) are not compatible with this unit.
Only discs recorded in ISO9660 Level 1, Level 2 and Joliet can be played.
- Files protected by DRM (Digital Rights Management) cannot be played.
- Corporation and product names mentioned herein are trademarks or registered trademarks of the respective corporations.
Note
- This unit does not support multisession discs or multiborder recording.
- Multisession/multiborder recording is a method in which data is recorded on a single disc in two or more sessions/borders. A "session" or "border" is one recording unit, consisting of a complete set of data from lead-in to lead-out.
Regarding copy protected CDs
This unit is designed to conform to the specifications of the audio CD format. This unit does not support the playback or function of discs that do not conform to these specifications.
Supported audio file formats
- This unit does not support lossless encoding.
Cautions on use
When moving this unit
When moving this unit, be sure to first check that there is no disc loaded and disconnect the iPod/iPhone/iPad. Then press STANDBY/ON, wait for "STAND BY" disappears on main display to turn off, then unplug the power cord. Damage may occur if the unit is transported or moved with a disc inserted, or when another device is connected to the USB terminal or AUDIO IN mini Plug jack.
Place of installation
- Choose a stable place near the TV or stereo system being used with this unit.
- Do not place this unit on top of a TV or color monitor. Also install it away from cassette decks and other devices easily affected by magnetic forces.
Avoid the following locations:
- Places exposed to direct sunlight
- Humid or poorly ventilated places
- Extremely hot places
- Places exposed to vibrations
- Places in which there is much dust or cigarette smoke
- Places exposed to soot, steam or heat (kitchens, etc.)
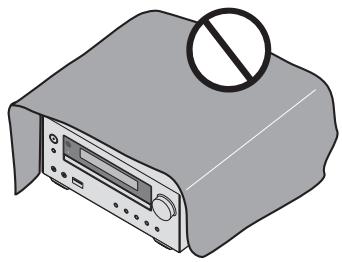
Do not place objects on this unit
Do not place any objects on top of this unit.
Do not obstruct the ventilation holes.
Do not use this unit on shaggy rugs, beds, sofas, etc., or wrapped in cloth, etc. Doing so will prevent the heat from dispersing, leading to damage.
Do not expose to heat.
Do not place this unit on top of an amplifier or other component that generates heat. When rack mounting it, to avoid the heat given off by the amplifier or other audio component, place it on a shelf below the amplifier.
- Turn off the unit's power when not using it.
- Depending on signal conditions, striped patterns may appear on a TV screen and noise may enter the sound of radio broadcasts when the unit's power is on. If this happens, turn the unit's power off.
About condensation
If this unit is moved suddenly from a cold place into a warm room (in winter, for example) or if the temperature in the room in which this unit is installed rises suddenly due to heater operation, etc., water droplets (condensation) may form inside (on operating parts and the lens). When condensation is present, this unit will not operate properly and playback is not possible. Let this unit stand at room temperature for 1 or 2 hours with the power turned on (the time depends on the extent of condensation). The water droplets will dissipate and playback will become possible. Condensation can also occur in the summer if this unit is directly exposed to the air flow from an air-conditioner. If this happens, move this unit to a different place.
Cleaning the product
- Unplug the power cord from the power outlet when cleaning this unit.
- Clean this unit using a soft cloth. For tough dirt, apply some neutral detergent diluted in 5 to 6 parts water to a soft cloth, wring out thoroughly, wipe off the dirt, then wipe again with a soft, dry cloth.
- Alcohol, thinner, benzene, insecticides, etc., could cause the print or paint to peel off. Also, leaving rubber or vinyl products in contact with this unit for long periods of time could mar the cabinet.
- When using chemical-impregnated wipes, etc., read the cautions included with the wipes carefully.
Cleaning the lens
- This unit's lens should not become dirty in normal use, but if for some reason it should malfunction due to dust or dirt, consult your nearest Pioneer authorized service center. Although lens cleaners for players are commercially available, we advise against using them since some may damage the lens.
Handling discs
Storing
Always place discs in their cases and store them vertically, avoiding hot, humid places, places exposed to direct sunlight and extremely cold places.
- Be sure to read the cautions included with the disc.
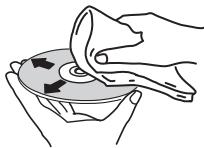
Cleaning discs
- Discs may not play if there are fingerprints or dust on them. In this case, use a cleaning cloth, etc., to gently wipe the disc from the inside towards the outside. Do not use dirty cleaning cloths.
- Do not use benzene, thinner or other volatile chemicals. Also do not use record spray or antistatic agents.
- For tough dirt, apply some water to a soft cloth, wring out thoroughly, wipe off the dirt, then wipe off the moisture with a dry cloth.
- Do not use damaged (cracked or warped) discs.
- Do not let the signal surface of discs get scratched or dirty.
- Do not attach pieces of paper or stickers to discs. Doing so could warp discs, making it impossible to play them. Also note that rental discs often have labels attached to them, and the label's glue may have oozed out. Check that there is no glue around the edges of such labels before using rented discs.


About specially shaped discs
Specially shaped discs (heart-shaped, hexagonal, etc.) cannot be played on this unit. Do not attempt to play such discs, as they could damage this unit.

About iPod/iPhone/iPad
Made for

iPod

iPhone

iPad
Bluetooth technology works with iPhone 5s, iPhone 5c, iPhone 5, iPhone 4s, iPhone 4, iPhone 3GS, iPhone 3G, iPhone, iPad (3rd and 4th generation), iPad 2, iPad mini, and iPod touch (2nd through 5th generation).
USB works with iPhone 5s, iPhone 5c, iPhone 5, iPhone 4s, iPhone 4, iPhone 3GS, iPhone 3G, iPhone, iPad (3rd and 4th generation), iPad 2, iPad, iPad mini, iPod touch (1st through 5th generation) and iPod nano (3rd through 7th generation).
"Made for iPod," "Made for iPhone," and "Made for iPad" mean that an electronic accessory has been designed to connect specifically to iPod, iPhone, or iPad, respectively, and has been certified by the developer to meet Apple performance standards. Apple is not responsible for the operation of this device or its compliance with safety and regulatory standards. Please note that the use of this accessory with iPod, iPhone, or iPad may affect wireless performance.
iPad, iPhone, iPod, iPod nano and iPod touch are trademarks of Apple Inc., registered in the U.S. and other countries.
Restoring all the settings to the defaults
Use the steps below to restore the all settings to their defaults.
1 Press STANDBY/ON to turn the power on.
2 Press CD on the remote control or INPUT on the main unit repeatedly to select CD input.
3 Press OPEN/CLOSE to open the disc tray.
4 Press STANDBY/ON while pressing.
Use the buttons on this unit's top panel. "DEFAULT" is displayed while the settings are being restored. Power is turned off.
Specifications
- Amplifier section
RMS Power Output: 15 W + 15 W (1 kHz, 10 %, T.H.D., 8 Ω)
Tuner section
Frequency Range (FM) 87.5 MHz to 108 MHz Antenna Input (FM). .75Ω unbalanced Frequency Range (AM) 522 kHz to 1620 kHz Antenna (AM) Loop antenna
Bluetooth
Version. Bluetooth Specification Ver. 2.1 + EDR
Output. Bluetooth Specification Class 2
Estimated line-of-sight transmission distance
About 10 m
Frequency range. .2.4 GHz
Modulation
FH-SS (Frequency Hopping Spread Spectrum)
Supported Bluetooth profiles. A2DP
Supported Codec. SBC (Subband Codec)
Supported contents protection. SCMS-T
The line-of-sight transmission distance is an estimate.
Actual transmission distances supported may differ depending on surrounding conditions.
Miscellaneous
USB terminal 5V,2.1A
Power source. AC 220 V to 240 V,50 Hz/60 Hz
Power consumption Power on .30 W Power stand-by .0.5W or less
Dimensions. 215mm W × 95 mm H × 315 mm D) Weight (without package) 2.0 kg
Speaker
Magnetically shieled speaker system
Type 2-way type speaker system 5 cm Tweeter 10 cm Woofer
Maximum input power. 15 W Impedance. 8 Dimensions.. 130~mm W × 211.5 mm H × 240 mm D Weight 2.0 kg/each
- Accessories
Remote control 1
AAA batteries (R03) 2
AM antenna cable 1
FM wire antenna 1
Power cord
iPad Stand
Warranty card
Operating instructions (This document)

Note
- The specifications are applicable when the power supply is 230 V.
- Specifications and the design are subject to possible modifications without notice, due to improvements.
© 2013 PIONEER CORPORATION. All rights reserved.
ATTENTION
POUR EVITER TOUT RISQUE D'ÉLECTROCUTION, NE PAS ENLEVER LE COUVERCLE (NI LE PANNEAU ARRÊRIÈRE). AUCUNE PIECE REPARABLE PAR L'UTILISATEUR NE SE TROUVE À L'INTERIEUR. CONFIER TOUT ENTRETION À UN PERSONNEL QUALIFIÉ UNIQUÉMENT.
D3-4-2-1-B1_Fr
AVERTISSEMENT
(30 stations FM / 15 stations AM)
Education - Education
Drama - Pièces
© 2013 PIONEER CORPORATION.
Uber iPod/iPhone/iPad 35
Varied Speech - Furr
gewöhnlich
Uber iPod/iPhone/iPad
Made for

iPod

iPhone

iPad
© 2013 PIONEER CORPORATION.
Education -Programmi educativi
FH-SS (Frequency Hopping Spread Spectrum) Profili Bluetooth supportati A2DP
Codec supportati. SBC (Subband Codec)
© 2013 PIONEER CORPORATION.
KLASSE 1 LASERPRODUCT
D58-5-2-2a A1_NI
WAARSCHUWING NETSNOER
(FM 30 stations/AM 15 stations)

Education - Educatief
- RDS is alleen可能导致 in FM.
© 2013 PIONEER CORPORATION.
Education - Material educativo
Drama - Radionovelas, etc.
Cultures-Cultura nacionalegional,teatro,etc.
Varied Speech - Material
Children's Progs -Programas infants
Social Affairs - Asuntos sociales
JI3EPHbI IPOOyKT KJIACC 1
D58-5-2-2a_A1_Ru
MEPbI IPEIOCTOPOXHOCTN IPIN OBPAUHIN C CETEBIM UHYPOM
Держinte сeteвои shyp 3a вилky. He ByItackinbaiteve Bnky, B38BUnbc 3a shyp, И НКОду He KacaiTece ceteBOro shuya, ecIn BaWu pyKn BnaXhIbe,Тak kaz 3TO mOteKet npRBeCTN K KOPOTKOM 3ambKaHINU INI noparKeHHIO 3neKtpnueckm TOKOM. He CTabTe annapat,прдмтby MeBENI nT.d. Na ceteBOw SHyp, He 3aKIMmaTe erO. He 3aB3bBAJBte y3IOB Ha shHype n He CB3bBAJBte erO c DpyrMnshypamn CeteBIEb shHybI dONKHNb JekaTb Taq, YTO6bI ha NHX HEnb3a 6blIO NaCTynTB. NOBpExJdeHHN ceteBOi shhyp MoKet cStaTb npuHNO BO3HKnHOBEHH NOkapa INI npora3NTB Bac 3eNKTPnueckm TOKOM. Bpem oT BpEmEHnpOBepIte ceteBOi shUp. B cnUyae 06hApuyEHHo NOBpEXdHnO b6paTIteCb 3a ZAMeHOn B 6bnKJauHNI opNuaMaJIbHbN cepBcHbN ceHTpФmpBi PIONEER INI K BaWseMy dinepy.
S002*A1Ru
He yctahabnabaTe rpoMkoROBOpntenHa ypOBHe BbIe TOnoBbI Ha NOTONOK mNn HcSTEny.3aunTHapeWtKa IPOeKtUpyeTcBcEMHO n, COOTBeTCTBEHNO, OHMa OJteY naCTb n HAeCTNu yep6 nNn TpaBMy npn yctahOBKe HAD TOnOBO.
SGK004_A1_Ru
HOpMaunI nnb3oBateNe no c6opy u ytnn3aunn 6bIBwero B 3Kcnnyataunu o6opydOBaHnN u OTPa6otabux 3JeMeHTOB nHTAHN
0603haeHne 1nnaobpyoBaHn

0603HaeyHnA nIy 3neMeHTOB NITaHnA

3TN 0603NaueHnHa IpoDyKuHn, ynaKOBKe, H/IIIN cOpBOOHTeJIbHIX OOKyMeHTAX O3NaHIOT, YTO 6BbIaB N EKcIJIpyaTAlHH 3JEKTPOTeXHHueCKaN H 3JEKTPOHnA PIOUdKIIH N OTRpOaTahHbE 3JEmtBbTI pIHaTHn HE DIOJIHKbI BbIpaCbIbATcb C MeCTe C ObIuHbIM 6bITOBM MycOpOM.
IITTO TIOO bIaHAA 6bIbIa B YnOtpe6JIeHH INpOlyKIIIN H OTePAoToAHBHe 3IeMeHTb IITAHANb COOTBeTcYIOUIM Obpa3OM Ope6AOTbY, yTHIN3HPOBAHb I NpepeoTAbHI, IOKaJIyCTa, IpeEJaIte H X B COOTBeTcYIOUIM IIyHKT C6Opa HcNOJIb3OBAHbIX 3JIeKTOHHx H3dJIeHN B COOTBeTcBNI C MeCTHbIM 3AKOHDAteJIbCTBOM.
YTHIN3HpyaDHHbE yctpoBCTBa HJIeMeHTbIITaHIIHIIpaBnIbHO, BblIOmoraTe coxpanHTb IHeHbIe pecSybIu HnpelOTBpArNTb BO3MOXbIe HeatnBHeIe IOcJIeCTBnI DII 3IOPOBbIIOJIei N OKpyKaIIOJIe cpeBIs, KOTOpBe MOrTy BO3HNKHyTb Bpe3yJIbTaTe HECOOTCBTByIOUeO YdaJIeHNOTXTOID.
IJIIOJIyENHJIOJIINHTIEBHOH INHOpMAUHN O IpaBUNbHbIX CnOcO6aX c6opa n yTHJIN3AQUH OTAPoTABIIWBOO6OpYIOBAHIN H NCIIOJI3OBAOHBHX 3JIeMEHTOB INITAHNN O6paIHaiTeB CooTBeCTBYIOJIme MeCTHbE oPraHbCaMOyIPaBLEHH, B IEHTpbI yTHJIN3AQUH OTOXIOB HII IO MeCTy IOKYIKN DAHHOF NO3JIeHN.
01 Pered nauanom pa6oTbI
KOMIIJEKTIOCTaBKN 5
YcTaHOBka 6aTapeek B IVJIbT INCTaHIOHHO
yipabJIeHn 5
HcIOJIb3OBaHHe IyIbTa HnCTaHnOHnHO ynpabJeHH ... 5
02 Ha3BaHnuaCTeN uФyHKcMn
IyIbT IY 6
Akyctnuecka cnCTema 7
IpeHnaHeJIb 8
Диспел … 9
03 Podknouhenia
IIOKJIIOUeHHe IpOMKOROBOpHTeJIeI 10
IIOKJIIOUeHHe aHTeHH 11
HcnoJIb3OBAHHe BHeIIHHx aHTeHH 11
IoiKJIIOUeHHe 11
04 Haayano pa6oTbI
IIIBKJIIOUeHnI\PHTaHHN 12
HacrpoKa qacob 12
O6iueyipabJIeHne 12
_HKII BBOa 12
PeryIipOBaHHe IpkocTH DnCIIeA 12
ABTomatHueckay yCTaHOBka rPOMKocTH 12
PeryJInpoBaHHe rPOMKocTH 12
IIprHJIyIeHHe 3Byka. 12
YIIpaBJIeHHe 3BYKOM 13
Kbaii3ep. 13
PerjHpoBaHHe Hn3KHX qAcTOT (peKm P.BASS). 13
PeryIINPOBka TEM6pa Hn3KHX/ByICOKHX qactot 13
HacpoKa TaIMepa BKIOUeHENr 13
Bb3OB TaIIMepa BKJIIOueHHN 14
OTMeHa TaIepeBa BKJIIOueHn. 14
HcnoJIb3OBAHHe TaMepa BKIOUoyEHn 14
HcnoJIb3ObaHHe TaIMepa OTKJIIOueHnna 14
HcIOJIb3OBaHHe HayIIHHKOB 14
05 Bocnpoun3BedeHne iPod/iPhone/iPad
Bocpon3BeHHe BcIyauHoi IocJeIOBaTeJbHOCTn... 18
3aiporpaMMNPOBaHHoe BOCIIpOH3BeJeHHe (CD HIN MP3/
WMA). 19
O 3aŋpy3ke ΦaiIOB MP3/WMA. 19
O IopRJaKe BocIipOn3BeJeHnHaPiKn 19
Bb6op IaIKN IJI BOCIIPOH3BeJeHH. 20
IpekeJIOueHHe COeepKHMOrO IHCIIIEA. 20
07 Bocnpo3BedeHne c USB
BocpoH3BeIeHne 3aIOMHaIOx yCtpoIcTB USB .21
IIOBTOPHoe BOCINPOH3BeJeHHe 21
BocnpoH3BeDHe B cIyauHoi NocJeIOBaTeJbHOCTH. 21
Bb6op IaIKN IJI BocIpOn3BeJeHn 22
IpekeJIIOueHHe coIEpKHMOrO IHCIIeJ 22
BocpoH3BeJeHHe B XeJIaemOM IopRJaKe
(3aiporpaMMHPOBAHHoe BOCIIPOH3BeJeHHe) 22
08 NcnoB3ObaHne TIOhepa
IpoclyuHbAHne paAnOppea.. 23
Hacroka 23
CoxpaHHeHne 3aIporpamMnpoBaHHbIX paAnocTaHmII. 23
IIIBbI3OBA 3aHeceHHoB B IaMaTb CTaHINH 24
IIaCKaHnpoBaHHIpeyucTaHOBJIeHHbIX cTahu. 24
IIIIOIHORO CTnpaHn IpeDyCTaHOBJIeHHo IIAMrTH .24
HcIOJIb3OBAHHe cHCTeMbI paIHOJauHHbIX (RDS) 24
3HaKOMCTBO C CHCTeMOI RDS 24
IIOnCK IIporpaMM CNCTeMbI paHIOHaHHbIX RDS. 24
Hhopmaun, IpeIOCTabJIeMaJ CnCTeMoR RDS. 25
HcnoJIb3OBAHHe aBTOMaTHueCKo HAcTPOKn Ha
IpeBapHTeJIbHO 3aIOMHeHHbIe IporpaMMbl (paJIOCTaHcH)
(ASPM) 25
IIpHMeuHaHHI IIO peKHMy RDS 25
09Дуггелюкlioуеня
IIOIOEINHHeH IOIOJIHNTeJbHbIX KOMIOHOHTOB 26
10 Bocnpon3BedeHne Bluetooth® Audio
BocpoH3BeHeHne My3bIKN C NOMOuHIO 6ecpnoBOHOH
TEXHOJIOHN Bluetooth 27
CnapBaHnnc aannapatom (IepBnHnapeHCTpaHn) .27
IPOcJUHbBAHne MByBkN HA anPiapare C yctpOHTbOM cIOJIepKkO Bluteoth 28
IpeIOcTepeKeHHe IIO paIHOBOJIHaM 28
Pamkn IeiCTBna. 28
OtpaKeHHpaIOHOJIH 29
MepbI IpeIOCTOPOKHOCTN, KacaIOUINEcS coeINHeHn C
aIIIapataMn, IIOJIePKHBAeMbIM DaHHbIM yCTpoiCTBOM..29
11 DononHntelbHaH INΦOpMaun
YcTpaHHe HEnoJaIOK 30
BocipnoH3BOIDMbIe HnCKn H opMaTbI 33
OTHOCTeJIbHO KOMIIaKT-ⅡHCKOB C 3aIHTOIT O
KoIIHPOBaHHa 33
IIOJIepKHaembe opMaTb ayHNoaJIOB 33
MepbI IpeIOCTOPOKHOCTH IIPIN 3KcIIyatauIN .33
IIpiIepemEeHHyctpOcTba. 33
MecTo yCTaHOBKn 33
He pa3MeiHaTe IIpeIMeTb Ha ycToPoIcTBe 33
O KOHJeHcauHH 34
UHCTKa H3JeJIHa 34
UHCTKaJIINH3bI 34
O6paIeHHe c IINCKaMn 34
XpaHeHne 34
UHCTKa IINCKOB. 34
O INCKaX CIIeHaJIbHOJ opMbI. 35
iPod/iPhone/iPad 35
C6poc Bcex Hactpoek Ha 3HaueHnI IO yMOJIaHHIO .35
TexHHueckHe xapaKtepHcTHKN 36
Pazelen1:
4 LInΦροBsIe KHOπKn (OTo 0 Do 9)
HcnoJIb3yIte IJI BBOJa HOMepa (ctp. 18).
5 CLEAR
HcNohJIyIeIaIyOuOHCTKN3aIPOrpAMmHPoBaHnHOro BocIpOn03BdEHHa (ctp. 19).
6 KhoPkn ynpaBneHnpeCnBepom CD DISPLAY
Hajmhte IJIpeKJIIOUeHHI HcIJIe IPIH BocipOn3BeJeHHI IeCen c CD HJN USB (ctp. 20).
FOLDER
HcnoIb3yIe IJIa Bb6Opa IaIIKN IIuCKa MP3/WMA IINI 3aIOMHHaIOero yctpoHCTBa 6oiJIIOI eMKoCTh USB (ctp.19).
MENU
HcnoIb3yETcTJIO OTo6paKeHHN 3KpaHa MeHIO iPod/iPhone.
MEMORY/PROGRAM
HcnoJIb3yIteJdJIa3aIOMHHaHHN HINI pOgrpAMmHPOBaHHa HnCKa MP3/WMA (ctp.19).
7 ↑/↓/←/→ (TUNE +/−), ENTER
HcNIOIb3yIeI IaIb6pa/NEpeKIOUeHNHEA TcPoeK cTcTeMbI eKpHMOB HII NIOITBepKdEHN DEiETBN.
KHOIIKN TUNE +/- MORYT HCNIOJIb3OBaTBcA DIII IIOHcKa paIHOuHAcTOT (ctp. 23).
8 PRESET + / -
HcnoJIb3yIte IJIa BbIb6opa 3aInporpaMmHpObaHHbIX paIHOCTaHI (ctp.24).
9 MUTE
OTKJIIOUeHHe/BCJIIOUeHHe 3ByKa (cTp.12).
10 Khonkn ynpaBHeHn BocpOn3BeHeHnEM
HcnoJIb3yIte IJIIyIpaJIeJIHnKaJIOI yHKIIeH NocIe ee BbIbOpa C NOMOIIbO KHOIIOK yHKIIINBXOJa (ctp. 17).
11 KhoIKN ynpaBneHn Tuner ST/MONO
HcnoJIb3yETcI,IIaIpeKIOUOHeHHpeKHM3BvUHmIeKMJy cTepeofoHNueckHM INMOHOFOHNueckHM peKHMamH. (ctp.23)
RDS ASPM
HcnoIb3yIte IJIIOHcKa ATOBMATuHEeCKo HA CTPOKHN Ha IIpeJbAPHTeJIbHO 3aONMHeHHBe IIOpARMMb (paHIOCTaHH) IJIY cHcTeMBi RDS (ctp.24).
RDS PTY
HcnoIb3yetyraIIIOHsKa TnIOB IporpamRDS (ctp.24).
RDS DISPLAY
Hajkmhte DIII IpekeIIOueHHa HcIIJIe RDS dIy peKHMa HHΦopMaIH (ctp. 24).
12 OPEN/CLOSE
HcnoJIb3yIte IJIA OTKpbITnHa HJIN 3aKpbITnHa JOTKa IJIA INCKOB (ctp.17).
13 KhoNkynpapBneHn 3Bykom
PeryinpyIOTKaueCTBO3Byka(cTp.13).
14 RANDOM
Bocipno3BeHnHeIopOkeBcIyuaHNOIocIeIOBaTeJIbHOCTN C CD,IPOH USB (ctp.18).
15 REPEAT
Hajmte JIA H3MeHeHHaCTPOiKN HOBTOHPORO BOCIPHOH3BeJeHHc CD, iPod HIN USB (ctp. 18).
16 Khonkn ynpabJeHnra Volume
HcnoJIb3yIteIpepyIINpOBKNypOBNrgPOMKoCTH npocIyIHHBaHHa (ctp.12).
17 DIMMER
PeyIINPOBKA JRPKoCTH INCIIJIe. HMeETcR YeTbIpe yPOBHa N3MeHeHHa JRPKoCTH (ctp. 12).
Akyctnuecka cnTeMa

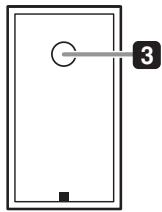
1 BbICOKOaCToTHbI INHaMnK
2 Hn3KoayactOTbIy DnHaMnK
3 Φa3oHbEpToPbI nOpT

BAXHO
- Ipi CHHTH 3aIHTHnx pewetok rpoMKOTOBOPHTeJIy ybeJIntteB oTcYtCTBHH KOHTAKTa c dHaqpaMmH rpoMKOTOBOPHTeJIy.
PepednnaheB
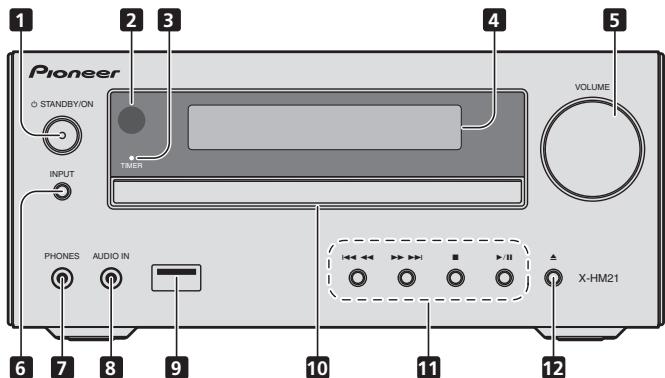
1 Khonka 品 STANDBY/ON
HcnoJIb3yETcI IJI BkJIIOueHHpe cIbBepa HJIero IepeKJIIOueHHn BpeKHM OKNJaHH (ctp.12).
2 DaTtHK DnCTaHcUOHHO ynpabHeHHA
PnHHMaet cHHaJIbIOT NJIbTa YV.
3 HndkaTop TIMER
3aropaetcya, KOrla INHTaHHe yctpoIeTba bIKIOuaeTcya, Ho aKTHBHPyETcya YCTAHOBKA TaHMepa.
4 CnmboJIbHbI dncJIpei
CM. Jucnnei Ha ctp. 9.
5 PerynipoBaanr pomKoCTn
HcnoJIb3yIe nIa peryJInpOBKn yOPOBNr pOMKoCTn pOciUyINBAHNI (ctp. 12).
6 KhoNka INPUT
HcnoIb3yertcaIJIaBbI6opaHcTOUHkaBXOJa.
7 He3do dna HayuHnKOB
IcnoI53yIteI IIOIIOJIIOUOeHNI HauHHIKOB.IPiI IOJIIOUeHINH HauHHIKOB 3ByaunHe He 6ydet BOICpOH3BOIDHTbc8pe3r pOMKOrOBOPRtEIN (ctp.14).
8 The Audio IN (aydnoBxoJ)
HcnoJIb3yeTcIyIIOJIKIOUChENHBCINOMORATEJIbHOrO KOMIOHEHTa CIMOIOBILKAbEJIa CMMHATOpHbIMCTepeo paBemOm (ctp. 26).
9 Pa3beM USB
HcnoIb3yctraIgNoIPOkIIOUeHnB KauceTBe HCTOuHnKa ayHNO 3aONMOHaIeO yctpoIcb7Ba6bIooI eMkoCTN USB hIn yctpoIcTa BApplle iPod/iPhone/iPad (crp.21).
10ItoKdIaDnCKOB
IIomeCTHTe IINCK, CTOpOHOH C 3THKKTIOB BBExP (CTp.17).
11 Khonkn ynpabJeHnB OBCpnOn3BeDeHneM
HcnoJIb3yetydIy Blyb6opa Tpe6yemOIpoKKn HJH faiJaIaIbBocipn03BeDHeHH。OctaHObKa TekyuIeTO BOCipn03BBeDHeHH。OctaHObKa BOCipn03BeDHeHH NIIb HO2o5bHOBLeHHeBocipn03BeDHeHH cToUKHpa3b.
12 KhoNka OTKpbITn/3aKpbITn JOTKa DnIgDnCKOB
HcnoJIb3yIte IaIg OTKpbIITH NII 3aKpBTHN IOTKa IJINCKOB (ctp.17).
Ducnnei

1 ④
BbCBeuHbaeTc npn pnprrnyiueHHN 3Byka.
Приимechаиме
3NaOK IIpHIIyIeHHa 3Byka 6yIeT OTObpaKaIbCa KpaChbIM ICBETOM.
2
3aynck Bocnpon3BedeHn.
3 II
Pay3a B BocnpOn3BcEJHnN.
4 ①
JaHeKHO BCTABte KaJIHr TpOMKOTOBOPRITeJIeB 3AaKHMIbI y6beITtCe, YTO KaJIeB E He BnAIaTeN I3 AaKHMa.
Пиимецанne
- MeKdI rPOMKOROBOPHTeJIaMn L H R HeT pa3HIIbI.
IopknIOUeHne aHTeHH
IIOKJIIOUHTTE pAMOCHYIO aHTENHYY AM H IPOBOIOUHYIO aHTENHYY FM, KAK IOKIA3AO HNIE.ДЯ уLYuTHENII pIHEMA n KaCyCTBa 3BNYKA IOKJIIOUHTTE BHEUNHII aHTENHBI (cm. pa3JIcI HcnoJIb3o6aHnue bHeunHAnmenn HnKe).
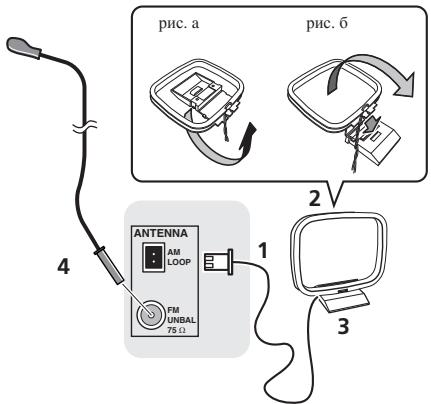
1 POncoeHnHTe npoB0a aHTehhbl AM.
IpiHIOKJIIOUeHHN IepKHTecb 3a pa3bEmHyu qactb ka6eJIA.
2 PpKpeHnTe paMoUHy oAHTeHny AM K CteuaJIbHOI CTOnKe.
T'Qb6I IIpHKpeITINb AteHNeK K CToiKe, OToTHnTe CToiKy B HnapBaJIeHNCHTEJKN (pHc. a), 3aTeM zKaPeHTe paMOuHyO AHTeHNH Ya CToiKe C I moIOJIz 3aKIma (pHc. 6).
3 YctaHOBnTe aHTeHHy AM Ha pIoCKyo NOBepXHOCTb B HappaBHeHn HauLyUwero npneMa.
4 PtoKIOHOTe npoBOJOnHyO aHTEHy FM K pa3bemy aHTEHbI FM.
YtOb6yIyyUHbI pIeHM,IOJIHOCTbO bHTBNIte IPOBOLOUHyo aHTEHy FM iIHHKpeINTE ee K CTHe NIn IDBepHO pame. He OJNYcKaIte, YtOb6aHTHeNA CBEUIHbAJaB, NIn cIIyTbMAbJaB.
NcNoJIb3OBAHHe BHeUHnx aHTeHH
YnyuueHneKaueCTBa npnema FM
Дя ПОКЛIOUChENH BHEIHeF FM-aHTeHbI HcNoJIb3yIte PALcoEDHHTeIb (ПИнбретаETСТОДЛБНO).
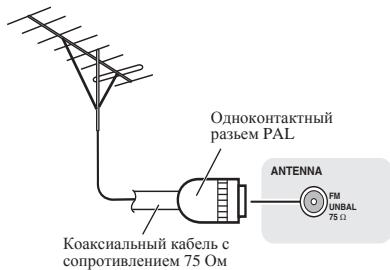
Поdkлочени
PNEyUNPEXDEHNE
IcHIOJIy3eTOJIbKO KaBJIb IITAHJIN, BXOJIaII B KOMJIIEK NTocTABKN DAHHORO YCTOBTHA.
IcnoIb3yInePiNlaAemaJI Ka6JIbIITNaHJI TObKIO IeroI pIbOMy HAHnAEHHU, KAK OINCAHO HJKe.
Ipeel bIIIOJIeHem IIN IHH MImeHHeHm COeIHN HeH BIKJIOHTe IITAHNE HOTcOIIeIHN KabeJIb IIITAHN OIT CEBOI PO3tHK.
KoJraBbIIOJIeHHe BCEx CoOEJIHEnH 6yTeT 3aBepHeHO, BCTABtBE BNJIky IITaTHN yUcPoIHCTBa B pO3ETKY cEtN IIpeHMEHOrO TOKA.
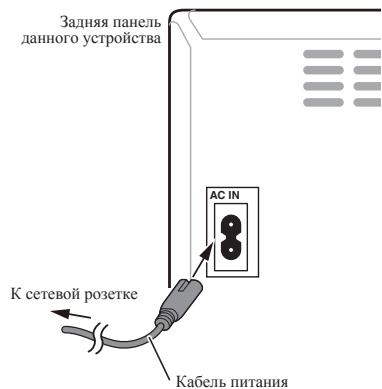
TnaBa 4:
Hauano paBOTbI
ДяВКlioуевпNTань
HaKMHTe KHOIIky STANDBY/ON IJIy BKJIIOUeHnI IITaHnI.
Iocne nCIOJb3ObaHnA:
HaKMHTe KHOIIky O STANDBY/ON, YTObI BOITN B peKHM OKHJaHH.

Приимейанne
B peKHMe OxHJdHnA, eCIN IIOJKIIOHaETc8yCTPOHCTBO iPod/iPhone/iPad, anIIapar IpeKJIIOHaETc8 B peKHM 3apJKN.
HacrpoKa yacOB
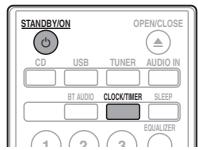
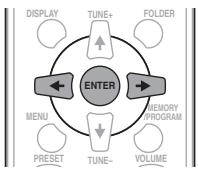
1 Haxmnte STANDBY/ON, yTo6bl BKJIOUHTb NtAHne.
2 Haxmnte CLOCK/TIMER Ha nyIbTe DnCTaHcNoHHOro ynpabJeHn.
HaTJIaBHomIINcIIJIeOTo6paKaJaTeCra CLOCK>
3 HaxmTe ENTER.
4 Haxmnte KhoNk ,yTo6bI yCTaHOBtB DeHb, 3aTeM haxmnte ENTER.
5 Haxmnte KhoNk ,yTo6bI yCTaHOBNTb acsb, 3aTeM Haxmnte ENTER.
6 HaxMnte KhoNk / ,YTObIyCTaHOBtB MHyTb,3aTeM HaxMnte ENTER nOdTBePxKDeHn.
7 Haxmnte ENTER.
- EQUALIZER:FLAT
BASS/TREBLE: BASS = 0 TREBLE = 0
2 Ecnn Bbln3MeHReTe HacTpoiKNEQUALIZER.
P.BASS:OFF
BASS/TREBLE: BASS = 0 TREBLE = 0
3 EcIN Bbl N3MeHReTe HaCTpoKn BASS/ TREBLE.
P.BASS:OFF
- EQUALIZER:FLAT
HactpoKa TaMepa BkIIOUeHnA
HcnoJIb3yETcraI H3MeHeHHeTeKyuIeYcTaHOBKn TaHMePa HIN dIaYcTaHOBKn HOBOrTO TaHMepa.
1 Haxmnte STANDBY/ON, yTo6bl BkIIOHTb NtAHne.
2 HaxmTe n ydepxnBaIte KhONky CLOCK/ TIMER.
3 Haxmnte KhoNk / ,YTO6bI Bb16paTb napamTp 《ONCE》Hnn «DALY》,3aTe m Haxmnte KhoNky ENTER.
ONCE-CpaabTaBbAeTToJIbKO OINH pa3 B 3aJaHHoe BpeMa.
DAILY - Cpa6aTbIbAeT B3aJAHHOe BpeM B 3aJAHHbI JIeHB.
4 HaxmTe KhoNk / ,YTO6bI BblpaTb napaMeTp «TIMER SET》,3aTeHaxmTe ENTER.
5 Haxmnte KhoNk / ,TTO6bl BbIbpaTb HCTOuHnK BOCnPOn3BeDeHnC TaMepom, 3aTeM Haxmnte ENTER.
B KaucheCTBe HctOHHka BocIpOnH3BdEJIeMn MOxHO BbI6pBATy CD, FM, AM, USB/iPod, USB, BT AUDIO, AUDIO IN LINE.
6 Haxmnte KhoNKn / ,yTo6bIyctaHOBnTb DeHb Ha Taimepe, 3aTeM Haxmnte ENTER.
7 Haxmnte KhoNk / ,YTo6bIyCTaHOBnTb acsb, 3aTeM Haxmnte ENTER.
8 HaxMNTe KhoNKn / ,YTObIyCTaHOBnTb MNHyTb,3aTEM HaxMNTe ENTER.
- YCTAHOBHTE OKOHMATeJIbHO BpEMa, KAK OIIHcHOb H IIarax 7 N B8IIHe.
9 Otperyu npuyte rpoMkoctb haxkTneM VOLUME + / - 3aTe m haxmTe ENTER.
10 HaxmTe KhoNky STANDBY/ON, YTo6bI BOITN BpeKIM OxNiDaHn.
- 3aropaeTcHnIHKaTOp TIMER.
BbI3OB TaIMepa BKJIIOUeHnA
TekyuIyU yctaHOBky TaMepa MoKHO HcIOJIb3ObaTb MHOrOKpaTHo.
1 BbInOpHnTe ⅢaIc 1 Do 3 B pa3dene «Setting the wake-up timer».
2 HaxmTe / BBi6epnte «TIMER ON» n HaxmTe ENTER.
OTmeHa TaMepa BkIIOueHnA
BbKJIIOUeHHe TaIMepa.
1 BbInonHnTe 7aHc 1 Do 3 B pa3dene «Setting the wake-up timer».
2 HaxmTe / = BBi6epnte «TIMER OFF» n HaxmTe ENTER.
IcnoB3OBAHne taMepa BKIOUeHnA
1 Haxmnte STANDBY/ON, yTo6bl BbIKIOUHTb NITaHne.
2 Pn HactynIeHn BpeMeHn BKIOueHn DaHHoe yCTpoICTBO aBTOMaTHueCKN BKIOHTcN HaCHET BOCIpOu3BeDeHne Ha BbIpaHHo FyHKun BXOJa.

Приимеанne
Ecln BO BVPBRA BKIOHEn HPOd/IPhone/IPad HE NOIKIIOUeH KIIAPATy, HIN HE BCTABJIENK, ANIAPAT BKIOHOTcR, HO He 6JbET BCIOPNBOBINTB DOpOJKY.
HeKOTOpbIe IINCKH He MOrT BOCIIPOH3BOIDtbcABTOMATNHeCckn IIpH HAcTyIJIeHHBpeMeHH BKIOUeHHe.
- Ipnh yctahOBke Taimepa 3aabaBae He Meehe OJHOH MmHTy MeKdy BpeMeHn HauJaA hOKOHuaHH.
IcnoJb3ObaHne TaMepa OTKJIHOUeHnI
TahMepOTKIOHOUHNNOTIOHOAETYCTPOICTBOUepe3zADAHNBI IEPNOBVPEMEHNIPOBILCIOKIOHIOZACbINATb,HE6cIOKOBcO HEOxIOIMOHCTBNBIKIOHENyCTPOITCbA.
1 Haxmnte SLEEP HeckoIbko pa3, YTo6bl BbIpaTb BpeM OTKJIIOUeHn.
Bb6epHTe MeKJy 3HaueHNMaM B MHHytax 10 min, 20 min, 30 min, 60 min, 90 min, 120 min, 150 min, 180 min HIN OFF (BbIK). BBohBa 3aJaHHeo 3aHuEne OTo6paXaetcB TeeuHne 3cekyHd, NocJe TReO BbIOJIHeHNe HAcTPOIKN 3AbePteHo.

Приимеанne
TaimepMOTKJIOHCHENMOQKHTOYACHOBHTB HAKATHESEM SLEEP BO BYPMA OTO6bPAKCEHHO OCTABIHTOC BPEMHN.
UcnOJIb3OBAHHe HayUHNKOB
BctabBeIITKepeHayIIHHKOBVTHe3IO.
\Pi\Pi\NII\KIOUHEN HAYIINHKOB 3BYK He 6yET BoCnPOH3BOIDHTBCYepe3 rPOMKOROBOPHTEHJ.
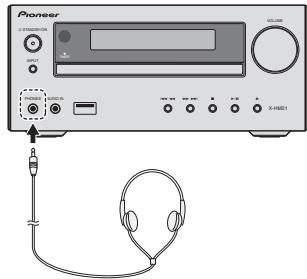
He BKJIOUaHTe rPOMKoCTb Ha IOJIHyIO MOIIHOCTb IIpH BKJIIOUeHHI aIIIapara H cIyIaHTe My3bIKy IIpH cpeIHx yPOBHX rPOMKoCTn. H3bItoYHoe 3BYKOBoE dABJIENHe I3 HayIHHKOB H ITOIBHbIX TeIeFOHOH MOKeT BbI3BaTb IOTepHO cIyxa.
IpeepiIOKJIIOUeHHEm HINOTKJIIOUeHHEm HayIHHKOB yMeHbIIHTe rPOMKoCTb.
Y6dHTeCb, YTO BAIIH HAYIHHKIN HMEIOIT TEIEKEP INAMETPM 3,5 MM NHMIEAHCOT 16do 50 OM. PekomeHJyEmB MHNJIAEHC COCTABJIET 32 OM.
3BykOT iPod/iPhone/iPad He cIbIeH epe3 HauHHKN, pIckIIOHueHNbke AIIAPATy. Ecln pInh BIVoBope yHKINi iPod/iPhone iBb IIOKIOUaete rPOMKOOBOpHTeJH, oTO6pa3NTcA HINDAKAaJIH «HP MUTE».
Глaba 5:
Воссанзveдени iPod/iPhone/iPad
Iprodctoe IIOcoeINHeHne iPd/iPhone/iPad K daHHOMy yctroBCTYIO3BOILET npocIJuHBATb BVCOKOKAueCTBEHNBI 3ByK c iPd/iPhone/iPad. HactRoJIa BOcIIPOH3BeJENnMy3bIKn dIi Pd/iPhone/IDp MoKet bblIOJIHHTbc J daHHORo anIAPAata nHmCaMOrO yctroCTBa iPd/iPhone/iPad.
Ecln iPod/iPhone/iPad nIcknoaetcK, KOrJa dAnhbl anaparBkNocen, Bocpon3BcEneHne iPod/iPhone/iPad he HauHETc.
2 Haxmnte USB dIy BbIbopa BaKauEcTBe BXoDHoro NCTOCHNka.
Ha oCHOBHOM INHCIIIEIPOKA3bIBaETc HNINKAAHIAI «USB/iPod»
3 Pocne 3aBepseHn paCno3HaBaHn aBTOMaTnueckn HauHcTe CBOcPOn3BeDeHne.
Приимechаиме
ДллолученинpoллбхиннсструкшгоTNCHITELHBOHIOJIb3OBaHHn iPod/iPhone/iPad obpauaHTecь kpykoBOJCTBHy,прilnaIaEMOMy к iPod/iPhone/iPad.
-Плдзаряка iPod/iPhone/iPad Бьллгьяетс Всеглд,коглд iPod/iPhone/iPad пол decorиненК Данному усторчы. (Даннадунд).
Ecln BxOJIpekeKIOHaeTcS C USB/iPod Ha.IpyTuO ykuHIIIO,BOcIPOn3BSeDeHHe iPod/iPhone/iPad bpeMeHNO octaHABINHaeTc.
KorJaIpOiP/IOpe/IPad he pa6oTaet, H B TeueHHe 6olee Yem 30 MHHyT He bblnoJIaETc HnKaIKN DeIeTbH, AIIAPAT abOMATHueCKN BHKIOHvITTC.
BAXHO
Ecln dAnhoe yctpoiCTBO He moKet BoCpIPOImABcTeH iPod/iPhone/ iPad, BbInOJIHnTe cIeDyUIOHe IpoBepKn IIN IOncKa H uctpaHEnHe HenoJIaJoK:
I\PoIIpeBte,IOIeJepKBAaETcE JIN IOIcOeIINHeHHN I POD/ IPhone/IPaID JaHmH yctPOnCTbOM.
- IpeenolocdoenHITe iPod/Internet/Android K cytoptictbY.
Ipeen3a1yHTne iPod/Internet, ecln 3TO he cpa6abtaBaert.
IObpeBte,IOUeKHeKBaETeJIN IInpOgrPAMHoo 06bcceueHHe iPod/IOphone/iPad daHHbM anHapatom.
Ecln HET BO3MOKHOCTH ynpabJIaTb iPod/iPhone/iPad, npOBepTe cIeJyOuNHe napametpbI:
- IpaBnIbHO HINIOKIDKIOHENoI PODIP/INhoneP/IPa? IpePiOnIOSeODHHIneIPOdIP/INhoneP/IPk YcTpoPICTbY.
- He 3aBnC IN iPod/iPhone/iPad?Пиоюбугte ВИнДИНТБсбрпс actropek iPod/iPhone/iPad И перендоевднHTe iPod/iPhone/iPad к устриCTBY.
TJaBa6:
Bocnpon3VeJeHne Dncka
B3T0I CHTE M OYRT BOCIPIN3BODITc8 CTANDAHTRHbI HNCKH CD.CD-R/RW bΦoPMAe CD-R/CD-RwC hO HCDR/W WMA.HO 3aHNb HA NHE BOZ3MOKHa. HeKOTOpBE HNCKH ayHNO CD-R h CD-RW MOrTy HE BOCIPIN3BODITc8 H3-3a COCTOBHH IKNKa HUYyTOPTCHBA, HcNIO3EyMORO IaI ZAHINH.
MP3:
MP3 yIIEETcFOPMATOM CzAHTH. 3TO a66peBHTaTpy, KOtOpAR oO3HaaeT MPEG Audio Layer 3. MP3 npECTABLIET HTH ayDIO KoDEKA, KOtOpB 06ab4btaeCTC O3HauNTbHM bckAHTHEM OTepBOHAuHbHO aUYINHOCTOHHKA pIH OHUEb MaIbX NOTEPAX B KaYteh3B 38yAHUn.
JaKeEcINBocIPoH3BeJeHHeOCTaHaBJIbBaetcMoKHO HkaTaTb↑/,YTObbl6paTbPiKy.
IpeekloueHne coepxmoTO dncnpey
1 Haxmte DISPLAY.
EclnBΦaJIaIINCAHNAHΦopMaHINo Ha3BaHHNIEcHH,NHeMHN HCIOJIHTEJIH NHa3BaHHNJIb6OMA,TO 3Ta HΦopMaHIN6yDET OTObpaKaTb6 HA nCIIeE.(JaHHnBIAnHPaT MoKET OTObpaKaTb TOJIbKO 6yKBHeHO-IIIpDOBbIe CHMBOJIb.He 6yKBHeHO-IIIpPOBoB I CMBOI OTbOpaKaTeC,KaK «**)
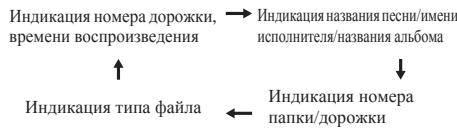
Приимechанинe
:《Фаиь WMA,oxpaняемы aBTopcKHM IIpaBOM》HIN《HeIOJIeRpKJBaEmaIbe(faiIbI》,BOCIIPOIHBOIHTbHEO3MOJHO.B3THX cIyuaqx faiJI 6yTeT aBTOMaTHUeCKHIpOniuyuEN.
Bo3MoKbI cIyauH, KOJa He oTo6paKaetcHnKaKoHHΦopMaunH.
- OTo6paJKeHHe Na3BaHNH IeCNH, HMeHN HcIIOJIHTteJI H Na3BaHNH aIb6Oma IIOJIdepKHNBAeTc TOnJIbKO dIaIy bAOB MP3.
Pa3dien 7:
Bocnpon3BveJeHne c USB
Bocnpoun3BeDeHne 3aONMnHaUOxuycTpoiCTVB USB
C nOMOuHnHTepFeiCA USB Ha nepeJHnePianeHn 3TOrO peCHeBa moKHO npocJIyHbATb IByXKaHaJIbHbN 3ByK c USB -ycptObTb.
Pioneer He rapaTHpyet,HTO 6yET BOCIPOIN3BOJNTBcJIIO60I qaiH,3aHNCHHHa H3aONMHaIOUeM yctpoiCTBE USB,HNt 7TO 6yET IOABATbC IIHTAHHe 3aONMHaIOUeE yctpoiCTBO USB.Takke 6oPAITHe BHAMHHe,HTO KOMnIHnA Pioneer He Hecet HnKaOKIOTBTCTBEHOCTn 3aIO6yIO notepHO qaiLOB Ha 3aONMHaIOUHX yctpoiCTBX USB B CB3N CIOIKJIOUeHEM K DAHNOHY cTPOiCTBY.
1 Haxmnte USB nIy BbIbopa B KaueCTBe BXoDHORIO NCTOCHNka.
Ha OCHOBHOM IINCIJIe IOKa3bIbAeTcI HNIIKauIaIg «USB/iPod».
2 PtoKIOUHTe 3aONMHaIOOee yCTPOIcTBO USB.
Homepa napanok nii panIOB, coxaPAHEHNHe Ha nIOxKIOHOeHHOM 3aONMHaIOoem yctpoCTbe USB, IIOBAJIHOcTc HA oCHOBHm DnIJIeae ATOmatuHeckn.
-Даннbi pechBep He IOJIeprKHaBaet USB KOHHTpaTOp.
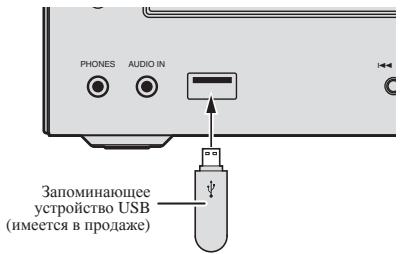
3 Pocne 3aBepseHn paCno3HaBaHnna HaxMNTe /II nra 3anycka BocnpOn3BeHeHn.
-ПипескioчeyннHaДугь BXOДH NOH HCTOчнК ChaJaO octahOBHTe BOCIPnoH3BVeDHeNc c yctpoIcTbA pAmTn USB.
4 OToeHNHe 3aONMHaUoOee yCTpOiCTBO USB ot pa3bema USB.
Ipeel 3Hbueyehnem 3aONMHa0ioeO yctpoiCTBA USB OTKJIQUHTI INITAHNE.
PpimmeaHne
- MoKHO HcIOJIb3OBAt bΦIⅢI-HaKOIIHTeJB USB 2.0.
Даанhoeустбго может He paio3habatb 3aioMHaIOOe yctroIstBO USB, He Bocipno3BOIHTb faJIbI nIHe noIbaTb IITaHne Ha 3aioMHaIOoee yctpoIstBO USB.ПIoPboOeHc,cm.Ko0aNoKIOuHeno 3anoMuaIOoee ycmpoiCm6o USB na ctr.31.
KorJa3aONMHaIoOe yctPoIcTBO USB He BOCPOHn3B0DInTcN, H B TceHHe 6oJIee Yem 30 MmHyT He BbIOJHHaETcN HHKaHX DeIcTBN, aIInapat ABTomaTHueckn BbIKIOHTcN.
IOBTOPHOE BOCnpon3BeJeHne
Пи ВОТБОН ВОДИЗЕДENNOМУНОПЕРБИЗВОПИЗНБОДЛС ДЮДОКЧ, СЕ ДОПОЖК HИД ДОПОЖК B3ANIPORGMINOBAHN IOSCIJIEDOBATIELBOHOCNTI.
Дя NOBTOpa OJHOn OJDOPOXKn:
Hajmmite NeceboJko pa3 REPEAT, NOKA He IPOBHTC8 HINDKAUIIa "REPEAT ONE". Hajmmite ENTER.
Education - o6p3a0BaTeIbHAA HnDopmauni
Drama -paHOCNEKTAJIH N.T.I.
Cultures - HauHohAJIbHaN He MeCCTHaK KyIbTpyHaaJKN3b, TeATPn T.I.D.
Science-Hayka H TexHHKA
Varied Speech -IPOrpaMMbI, nocTpoEHnHE Ha 6ececde HIN oBHeHHH, HapHPmep BHKTOPnHHb IHN HHTEPbUHO.
Pop Music - MY-MY3BJKA
Rock Music - DKY-MY3BJK
Easy Listening - Jętkaemia
Light Classics M-JeKAKJIKAChueKcMyBka
Serious Classics - cepb3eHaa KJIACSSUeCKAMyBzHa
Other Music - MY3bka, He COOTBETCTBYIOIIa IIpeuCNLEHNHM KATOTEPOMH
Weather & Metr - CBOJKN INIPOGRHO3BIOFOJIO
Finance - 6BpKBeBb CBOIKN, KOMMepChecBa,TOPROBa HINoPOMnH uT N. T.
Children's Progs - nporpammbu dya detei
Social Affairs - 06ueCTBENHAA JIN3HB
Religion - npgrpAMMb o peJIHHI
PhoneIn-IPoRpaMMbI,
PpeUcMATpHbAoIOHe
OcbyJckHeNc KaKoi-JIb6 TeMbI N
ObuJeHHe co cIyIaTeJIaMn IIO
TeJIeFOHy
Travel & Touring -
IyTeIIeCTBnH OITbIX
Leisure & Hobby - CBO6DIOHOE BPEM, INHTEPCEbI Xo66H
AIIIapat IpeKJIIOUHTcHa BxOJ BT AUDIO.
2 MexkyucpoiCTBOM CnoDaeRkoB Bluetooth n annapaTOM 6ydt CO3daHo noKnluoyene Bluetooth.
PnHaeIpybI IIOJIKHOHENI K IIAPATy IOJIKHb BIIOHOHTBcY cYoptroTBcI NOIeDPKeKo Bluetooth.
IIOIO6HOCTNIOPOUeUPyAXIOKIOHoueHNcM.B pykoBOCTBEIOJIb3OBAteJIYycTPOJCTBaCIOIePJKKO BlTeuoth.
3 Bocnpon3BeHHe My3bIKn C yctpoiCTBa c noDaeppKoi Bluetooth.
Приимechанинe
KorJaCyToBcOIIOJIepKkOIBeothuHe pa6Otaert, H bTeueHHe 6oJIeCeem 30 MmHT He bAIOJIHOHTcR HKAKHX DeIcTBn, IaIIapar ABTOMATUeCKN BbIKJHOHTcR.
PpeoctepexeHne no paHOBJHnAm
DaHnHoe yctpoiCTBO paobotaet ha paJIOHuaCTOe 2,4TtU,KOTOPaMOT HeNJIb30ABt5cBpyHMH6ecPiPOBdHMn CHTeMAmM (cm.CINCOK HNHE).BoI36KeAHHe IyMaI HII npePbBAHHn CB73H, HeNCHIOJIyIte ydaHNBJAnIHAPAT Bo3JIe TaTKHx yctpoiCTB, HJIY b6EJIHTec, TTO tAKHe yCTPOCTBA OTKJIIOUEHb BO BPMe HNCHIOJI3OBAHIN.
BecnpoBOHbTeJefoHBI
BecnpoBOHbIe faKCHMnJIbHbIe aIIIapatbI
MHKPOBOJIHOBBIEIeH
- BeccnpoBOdHbIe ycTpOoiCTBa (IEEE802.11b/g)
- BecpOBoIHOe ayHIO-BnIeO o6OpyIOBaHHe
- BeccnpoBODhIbe KOHTpOJIepeBpy IJIa HrPoBbIX cHCTeM
MeHKaMeHTO3HbIe cpeIcTBA, OCHOBaHHbIe Ha MHKpOBOJIHax
- HeKOTOpbIe paIHOHrHi
He pa3meiainTe KaKHe-JIb6 IpEaMeTbHa yctpoiCTBe CBepxy.
He 3akpbibaiTe BEHTNIAUHOHbIe OTBepCTnA.
He hCIOJIb3yIte DaHHOe yCTPOiE TBO Ha BOPCHCTbIX KObPax, KOBaTbIX, IINBaHAn H T. D.II INI 3ABePHyTbM B TKAhB I T. D. 3TO MOKET HOMeIHaTb PaccEHBAHHIO TEIIJa, YTO MOKET IIpHBecTHN IOJOMKe.
He noDBepraIte pecnBep BO3dIeCTBnIO Tena.
He pa3MeIaIe yctpoIcTBO cBepxy Ha ycHJIteJIe HIN pyrTom KOHIOHENTe, TRepehpyHOEM TEIIIO. IIPh YCTAHOBKe B CToiKy, YTObI 36EkaTb BO3JeCTBNIa TEIIIA, OTBOIMORO OT ycHlHTeJIa HIN HNOro AyIOKOMIOHENTa, YctahAbIHBAIte peCnHBep Ha NIOKY HNKe yCHlHTeJIa.
KoJHa yctPoIcTbO He hCIOJIb3yETc, OTKJIIOUaIteero tINHAnHe.
B 3abHcMocTH OT ycIbH cnHnHa, Ha TeJIeBH3HOHOM 3Kpahe MOry TOT oObrpKaatbCnIOJocH, H MoKET IOHaTbI yWM B 3ByuHHe paIHOTpaHcJIaIIIN, KOJa IIHTaHHe yctPoHCTBa BKJIOHeo. B TakOM cIyuae OTKIOUHTe IIHTaHHe yctPoHCTBa.
OKHdEHCaUN
Пин 6ьстор Ипелемшений Ндамогу устор CTBA H3 XLOJHORO MecTa B TEлго NOMeHENHe (HahpIMep, 3MmO) ИИн пир p3KOM NOBIIshmen IOI BO3ДЕCTBHEm paObToI bO6OrpeBATEJI r T.I. TEMIIepaTpybI B NOMeSHENH, B KOTOPOM yctahOBJIeHO uSTPOHCTBO, BHITN yUcTPOCTBHA (Ha pa6OuHx IetaiJX IIIN3E) MOrTy 6ob30BbBATcS KaIIIN BOIy (KOHDeCAHnI).Пин HAIJIHN CHOIKeHANI DAHNOE UYcTOB CTBO He 6yET paObToI bHdJIeKaIHM O6pa3OM, H BCIOPOH3BeHEnHe 6yET HeBO3MOJHo. OCTabTe UYcTOB tpoI pKOMHATNo TEmpePAtHa 1 IIN2 Yaca c BKVIIOneHHM IMITaHHeM (Bpem 3aBNCHT ot CTeNEH NOKOHDAHm).KAIIN BOIy HICAPRTC, H NOCIPOH3BeHEne CTAHET BO3MOJHbM. KOHDECAHnI MOKET TAKKe 6ob40BHbATbcI JETOM, ECJY UcTOBCTBO OTKpHbTO B03DEHTBTHO pIpyMbIX NtOKOB BO3DyA xO KOTIHIOHepaBO3DyA. Ecln 3TO pIpoON3dTe, PINECTMEHAnOe USTPOCTBO B dpyrOe MeTO.
UncTa n3dennia
- IpeKem tet napeCTYHHTB K ONUCTke DAnHORO yCTPOHCTBA, OTOeOHNHITE KAbEJIb INTAHINAR oPT3EKn.
ДИМСТКДANHOROYCTPOIcTBa HCSIOJI3YIte MANKIyO TKAHBJIPINJIIHIIeIbIIIMCMOUITE MANKIYIO TKAHBJEKOTOPIMKOJIHyeCTOBM HeITPAIIBHO MOIOJIeO CpeCDTBA,pa36abJIeHORO5do6JCACTMAI BOJI,TIaTeJIbHO BbIKMHTeTKAHBJ,COTPHeIbJIbIa3ATMeBbITpHE IIOBEpXHOCTMbIKOJI,CyOJI KTHaHI.
CInnpt, pactBopHTeJIb, 6eH3HH, HHeCKTHIIHJH T.II. MoryT BBy3BaTb paccJIaHBAHHe IeUATn IIN KpACKn. TaKKe H3eGERaTe IeJIbHOrO KOtAKTa pe3HHOBbIX HIN BHINHOBJHX H3JeJIH cAOHbIM yCTpoIbTcBOM, TAK KaK 3TO MoKET HcNOpTbTb KOpNc. - IPrh HcNIOH3OBAHHH YCHCTAHHTKAHei, CMOUeHHbIX XHMpeAKTHBAMn H T.II., BHNMaTeJIbHO IPOuHTHe HHCTpyKcHIN IIO IH PpHMeEHHHIO.
UHCTKaJINH3bl
- IPh HOpMaJIbIbIbX yCJIOBHNX 3KcIIyataaIHIN JInH3a 06bUHO He 3aqr3nHETcH, Ho cEONHa IOn KAKoT-To pNHPue HAHTe paOABtTaH npePABuHb HO-3a rPtBN HIN IIIN, O6pATITcB b 6JIHKaiHH ABTOPH3OBAHHb CepBNCbH IIENTP Pioneer. XOTa B IPOJaAke HmEOrCTc BQHTcK HIN3I DIA IpnOHrpblBaTeJIH, HcIOJIb3OBaTHb HT He peKOMeHJyETcH, TAK KAK HEKOTOpBe cpeDCTbMA QMOY TNOBPeHTb JInH3Y.
06paueHne c dnckamn
XpaHeHne
BcerIa HomeiaiHe IINCKH BHX KOPo6Kn H xpaHHTe Hx B BeTHKJIbHOMIOJIoKeHHN, H36eRaTROPuHN, CbIbIX MecT, NIOBpeKeHHbX BO3JeCTBHOIOPIpMaBX COJIHeHbX JUeyH CJIINIKOM HINKHX TEMEPATyP.
IpoUHTaTE MepbI IpeIOCTOpOKHOctN, BLOKeHHBe BmecTe CJNCKOM.
UHCTKa UNCKOB
- IINCKH MOrYIte BOCnPOH3BOIHTbC8eCLH Hn HHX OCTaOTcER OTIEATKHN PJIbIeB IIN IIbIb. B 3OTM CUYae, HcNIOB3yIte CHT3IHyTO KAHb H T.II, CTOb6OctOpOxHO BVtpeTb INCK OT BHTpTeHHCTOpBOH K HApUKHO. He IIOJ3yITecb Rpy3bHMN YCHSTIIHMN TKAHMI.
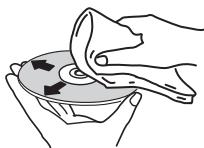
He HcnoIb3yIte 6eH3HH, pactBroptTeJI HII HIIbe IeTpyHe xHMKATb. TAKKe He HcnoIb3yIte cpeCTBa IJH CTKn BHNHa JHn AHNTCTaTHKn.
Дпгшпшшппллсн CMOHTE MRTKYIO TKAHBOILOI, TIIATeJIbHO BbKMHTe ec, COTPHTe IIbJIb H 3ATcM BbITpHTE BJIary cyxOH KTAHIO.
He hNIOJIb3yIe NOBPEJKeHNHbIe (TpeCHYIIHne IINN KOPO6BJENHbIe)UdCNK.
HeDIOIyckaiTeIaapaIaHHaIIH3aIpy3HeHHpa6OeH IOBepxHOCTIN DHCOB.
He npHJIeJIHte KycOcHNbMaHn HIN CTHKepbHa HINCKN. 3TO MOKet JOBpeHITDNCKHsTAK, TQHO HEB03MOKHO 6yJET BOCPOHN3BCTN.TAKKe YUHTNE, TQHO HAB3BtHX HAPOKAT DHCkAX qACTo KJIeT 3THKETKH, a KJIe C 3THKETKH MOTek IPOCauHbTaBc HApYKy.IIpeE HcNOlb3OBaHHem B3bIX HAPOKat DNTCKOB IIPOBepbTe, He BbCTyJaT JIn KJIe IN KOAPM TAKHX 3THKETOK.


C6poc Bcex HacTpoek Ha 3NaYeHnIyMOnJUaHnIO
ДИВOCSTAHOBJIENHBExCNtPOeKIOYMOJUAHHHBOBIIONJHINTEJIbTHN,ONIHCHAHHEHKNE
1 Haxmnte STANDBY/ON, yTo6bl BKJIouHTb Ntahne.
2 Haxmnte CD ha npIbTe Dy nn HeckoIbKO pa3 KhoNky INPUT Ha oChOBHom 6IoKe, YTo6bl BbIbpaTb yHKnIO CD.
3 Haxmnte OPEN/CLOSE, yTo6bIOTKpbITb ILOTOKdIaNCKOB.
4 HaxmTe STANDBY/ON, Haxmma npn 3TOM
IcnoJIb3yIte KhoIKNHa BepXHeN IaHeJIn yCTpoIcTBA.Ioka HETIpoeecc BOCTaONBHeJIe NactPoK,OToObpaKaTeC<“DEFAULT”.IIHTaHne OTKIOHuaTeC.
TexHnueckne xapaKTepeNCTNKn
- ycnjnteJb
BbIXOJIaHcpeIeHEKBAIpaTHeueckaMoIIOCTb: .15BT+15BT(1kTt,10%ko9ΦhIeHTrapMOHnK,8OM)
- Cekzma Tiohepa
JACTOTBIIINAHAN3OH (FM). 87.5 MΓIIO 108 MΓBxOJI ANTEHNHb (FM). 75 OM Hecc6aJIAnHCpOBaHNHIIJACTOTBIIINAHAN3OH (AM) 522 KΓIIO 1620 KΓAANTEHNA (AM). PAMOCHAA TENTHa
Bluetooth
Bepn .Ctanhapt Bluetooth Bep.2.1+EDR
BbIXoI .CtAnapr Bluetooth kJaacc 2
Pn6JIH3HeIbHaJa DaJIbHoCTb IpeaCh NIO JINHH INpMoH BHNMOCTH*. .PiHmepHO 10 M
FH-SS (Frequency Hopping Spread Spectrum)
IooepKbAeMbIe KOHgpyaHnbluetooth. A2DP
Bec (6e3 yIaKOBKN) 2,0 K
- FrpomkoorOBopnteB
Akyctuuecka cHCTeMa c MaHHTHBm 3KpaHHpOBAHHem
TnI
CnCTema rPOMKOROBOPHTeJIe 2-IOJIOCHORo TIIa
BbICOKOyactOTHbI rPOMKOrOBOpHTeJIb 5cm
Hn3KoYAcTObHbI DnHaMnK 10 cm
MaKcHmAJbHaB BxOJHaM MoIIOHocTb. 15BT
CoppothBJIeHHe 8OM
Pa3mepb1. 130 MM (III) x 211,5 MM (B) x 240 MM (Γ)
Bec. 2,0 kT/kaxkIbI
- PpHaJaIeXHoCTN
IyIbT dHCTaHIOHO yIpaBJIeHH. 1
BatapeiAAA (R03) 2
Ka6eJIb aHTeHHbI AM. 1
IpoBoJIoUHna aHTeHHa FM 1
Ka6eJIb IITaHnIa
Плставka дд iPad
JapaHTHbIe cepTHQKAT
© PIONEER CORPORATION, 2013.
Bce npaba 3aunneHbI.
Daty n3rTOBnEHNIOOBpyOBAHnMOxHO ONpeJeNtB NO cepINHOMy HOMepy, KOToPbI COePrXHT INHOpMaUIO O MeCaue I rOe IPOUN3BOvCTBa.
CepnHbI Homep
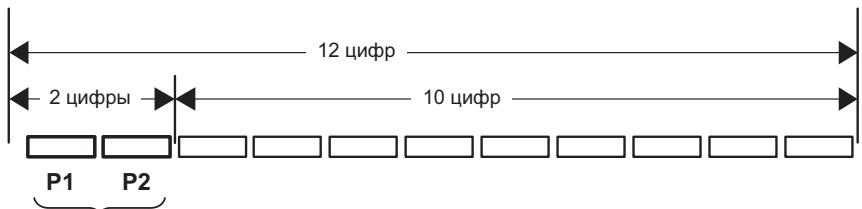
Data n3roTOBneHnOBOpyOBAHn
P1 - FoiuN3rOToBJIeHnA
| Гор | 2001 | 2002 | 2003 | 2004 | 2005 | 2006 | 2007 | 2008 | 2009 | 2010 |
| Симboл | A | B | C | D | E | F | G | H | I | J |
| Гор | 2011 | 2012 | 2013 | 2014 | 2015 | 2016 | 2017 | 2018 | 2019 | 2020 |
| Символ | К | L | M | N | О | P | Q | R | S | T |
P2-Mecu n3roTOBneHn
| Месац | 1 | 2 | 3 | 4 | 5 | 6 | 7 | 8 | 9 | 10 | 11 | 12 |
| Символ | A | B | C | D | E | F | G | H | I | J | K | L |
D3-7-10-7_A1_Ru
Declaration of Conformity with regard to the R&TTE Directive 1999/5/EC
Manufacturer:
PIONEER CORPORATION
1-1, Shin-ogura, Saiwai-ku, Kawasaki-shi, Kanagawa 212-0031, Japan
EU Representative's:
Pioneer Europe NV
Haven 1087, Keetberglaan 1, 9120 Melsele, Belgium
http://www.pioneer.eu
[+] X-HM21BT-K, X-HM21BT-S
C E
English:
Hereby, Pioneer, declares that this [ ] is in compliance with the essential requirements and other relevant provisions of Directive 1999/5/EC.
Suomi:
C hactoJSeTo, Pioneer DeKnapupa, Ye To3n [+] OTROBapHa OCHOBHInTe N3NCKBaHnI IN DpyrN CbOTBeTHn NOCTaHOBJIeHnHa NIpEeKTIbA 1999/5/EC.
Polski:
© 2013 PIONEER CORPORATION.
All rights reserved.
© 2013 PIONEER CORPORATION.
HmnpTeP: OOO "TMOHEP PUC"
125040, Pocca, r. MockBa, yI. IpaBbl, d.26 TeI.: +7(495) 956-89-01
PIONEER ELECTRONICS (USA) INC.
P.O. BOX 1540, Long Beach, California 90801-1540, U.S.A. TEL: (800) 421-1404
PIONEER ELECTRONICS OF CANADA, INC.
340 Ferrier Street, Unit 2, Markham, Ontario L3R 2Z5, Canada TEL: 1-877-283-5901, 905-479-4411
PIONEER EUROPE NV
Haven 1087, Keetberglaan 1, B-9120 Melsele, Belgium TEL: 03/570.05.11
PIONEER ELECTRONICS ASIACENTRE PTE. LTD.
253 Alexandra Road, #04-01, Singapore 159936 TEL: 65-6472-7555
PIONEER ELECTRONICS AUSTRALIA PTY. LTD.
5 Arco Lane, Heatherton, Victoria, 3202, Australia, TEL: (03) 9586-6300
PIONEER ELECTRONICS DE MEXICO S.A. DE C.V.
Blvd.Manuel Avila Camacho 138 10 piso Col.Lomas de Chapultepec, Mexico, D.F. 11000 TEL: 55-9178-4270
K002*B5Ru
CdeIaHO B Kntae
YOM200153-0013>