
S-DJ50X-W - Studio Monitor PIONEER - Free user manual and instructions
Find the device manual for free S-DJ50X-W PIONEER in PDF.

User questions about S-DJ50X-W PIONEER
0 question about this device. Answer the ones you know or ask your own.
Ask a new question about this device
Download the instructions for your Studio Monitor in PDF format for free! Find your manual S-DJ50X-W - PIONEER and take your electronic device back in hand. On this page are published all the documents necessary for the use of your device. S-DJ50X-W by PIONEER.
USER MANUAL S-DJ50X-W PIONEER
The Pioneer DJ support site shown above offers FAQs, information on software and various other types of information and services to allow you to use your product in greater comfort.
Thank you for buying this Pioneer product.
Please read through these operating instructions so you will know how to operate your model properly. After you have finished reading the instructions, put them away in a safe place for future reference.
CAUTION
TO PREVENT THE RISK OF ELECTRIC SHOCK, DO NOT REMOVE COVER (OR BACK). NO USER-SERVICEABLE PARTS INSIDE. REFER SERVICING TO QUALIFIED SERVICE PERSONNEL.
D3-4-2-1-1_B1_En
WARNING
This equipment is not waterproof. To prevent a fire or shock hazard, do not place any container filled with liquid near this equipment (such as a vase or flower pot) or expose it to dripping, splashing, rain or moisture.
D3-4-2-1-3_A1_En
WARNING
To prevent a fire hazard, do not place any naked flame sources (such as a lighted candle) on the equipment.
D3-4-2-1-7a_A1_En
Operating Environment
Operating environment temperature and humidity: +5 ^ to +35 ^ ( +41 ^ to +95 ^ ); less than 85% RH (cooling vents not blocked)
Do not install this unit in a poorly ventilated area, or in locations exposed to high humidity or direct sunlight (or strong artificial light)
D3-4-2-1-7c*A1En
CAUTION
The POWER switch on this unit will not completely shut off all power from the AC outlet. Since the power cord serves as the main disconnect device for the unit, you will need to unplug it from the AC outlet to shut down all power. Therefore, make sure the unit has been installed so that the power cord can be easily unplugged from the AC outlet in case of an accident. To avoid fire hazard, the power cord should also be unplugged from the AC outlet when left unused for a long period of time (for example, when on vacation).
D3-4-2-2-2a*A1En
For Finland customers
For Norway customers
Apparatet mä tilkopies jordet stikkontakt
For Sweden customers
Do not attach these speakers to the wall or ceiling, as they may cause injury in the event of a fall.
SGK007*A1_EN
This product is for general household purposes. Any failure due to use for other than household purposes (such as long-term use for business purposes in a restaurant or use in a car or ship) and which requires repair will be charged for even during the warranty period.
K041_A1_En
POWER-CORD CAUTION
Handle the power cord by the plug. Do not pull out the plug by tugging the cord and never touch the power cord when your hands are wet as this could cause a short circuit or electric shock. Do not place the unit, a piece of furniture, etc., on the power cord, or pinch the cord. Never make a knot in the cord or tie it with other cords. The power cords should be routed such that they are not likely to be stepped on. A damaged power cord can cause a fire or give you an electrical shock. Check the power cord once in a while. When you find it damaged, ask your nearest PIONEER authorized service center or your dealer for a replacement.
S002*A1_EN
WARNING
This product equipped with a three-wire grounding (earthed) plug - a plug that has a third (grounding) pin. This plug only fits a grounding-type power outlet. If you are unable to insert the plug into an outlet, contact a licensed electrician to replace the outlet with a properly grounded one. Do not defeat the safety purpose of the grounding plug.
D3-4-2-1-6_A1_En
VENTILATION CAUTION
When installing this unit, make sure to leave space around the unit for ventilation to improve heat radiation (at least 30cm at top, 30cm at rear, and 30cm at each side).
WARNING
Slots and openings in the cabinet are provided for ventilation to ensure reliable operation of the product, and to protect it from overheating. To prevent fire hazard, the openings should never be blocked or covered with items (such as newspapers, table-cloths, curtains) or by operating the equipment on thick carpet or a bed.
D3-4-2-1-7b*A1En
Private households in the member states of the EU, in Switzerland and Norway may return their used electronic products free of charge to designated collection facilities or to a retailer (if you purchase a similar new one).
For countries not mentioned above, please contact your local authorities for the correct method of disposal.
By doing so you will ensure that your disposed product undergoes the necessary treatment, recovery and recycling and thus prevent potential negative effects on the environment and human health.
K058b_A1_En
Introduction
Main Features
Diffuser on the waveguide improves sound directivity and provides spacious sound.
Aramid fiber woofer cone is light and extremely rigid, which provides the best bass response.
Grooves on the bass-reflex duct improve the airflow and provide loss-less bass performance.
Confirm All Accessories
Power cord (1)
- Operating Instructions (this document)
Warranty card
Names and Functions of Parts
Front Panel Facilities
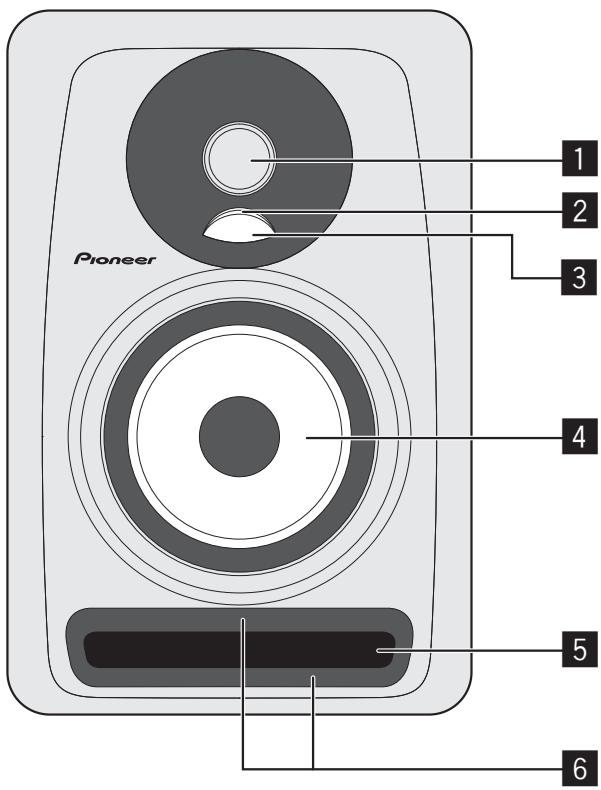
1 1-inch high-resolution soft dome tweeter
2 Illumination (POWER indicator)
Lights up according to whether the power is on or off. The indicator does not light up when the speakers are in standby mode.
Diffuser
Improves the directionality and diffusion of high-frequency sounds.
4 Aramid fiber woofer
Light and extremely rigid cones provide the best bass response.
5 Bass-reflex duct
Groove
Regulates the flow of air in the bass-reflex duct to enable powerful low-frequency sounds with little loss in sound.
Rear Panel Facilities
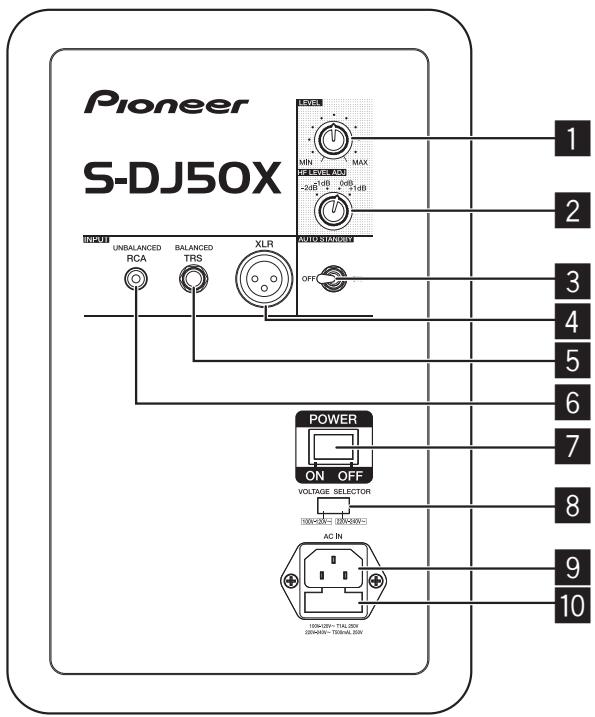
* The S-DJ50X is shown in the illustration.
LEVEL dial
Use to adjust the sound level (volume).
HF LEVEL ADJ dial
Use to adjust high-frequency sounds.
You can select from -2dB -1dB 0 dB, and 1 dB.
3 AUTO STANDBY switch
Use to turn the auto standby function on or off. When the auto standby function is turned on, the speakers automatically enter standby mode if no input signal is received for a certain period of time (approximately 25 minutes) and power consumption can be reduced. When an input signal is received while the speakers are in standby mode, the speakers will automatically resume from standby mode.
- The illumination (POWER indicator) on the front panel turns off when the speakers enter standby mode.
- When the input signal is weaker than a certain level, the speakers may not automatically resume from standby mode. In such cases, turn off the [AUTO STANDBY] switch to use the speakers.
- To force the speakers to resume from standby mode, turn off the [POWER] switch on the rear panel once, and turn it back on after a few seconds.
4 XLR INPUT connector
XLR type balanced input connector. The connector's pin array is as follows: No. 1 Ground, No. 2 Hot, and No. 3 Cold.
TRS INPUT jack
Balanced-input phone jack.
CAUTION
Do not connect to both the XLR INPUT connector and the TRS INPUT jack at the same time.
6 RCA INPUT jack
RCA pin-type unbalanced input jacks.
7 POWER switch
Use to turn the power on and off.
CAUTION
Before turning on the power, make sure to check that the [VOLTAGE SELECTOR] switch is set to the appropriate voltage for the country or region where the speakers will be used. If the [VOLTAGE SELECTOR] switch is not correctly set, contact a Pioneer service center and request that the set voltage be changed and the fuse be replaced. At the time of shipment, a fuse with the appropriate voltage setting is set in the product. When it becomes necessary to change the voltage setting, the fuse must be replaced.
8 VOLTAGE SELECTOR switch
This switch is used to select the appropriate voltage settings for the country/region of use. It is not to be used by the customer directly.
9 AC IN
Connect the accessory power cord here and to an AC power outlet. Do not plug in the power cord until all other connections have been completed. Use only the furnished accessory power cord.
10 Fuse holder
Installation and Connections
How to Install
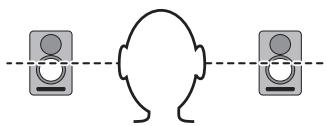
A speaker's playback sound is delicately influenced by conditions in the listening room. To produce optimum listening conditions, take due consideration of the conditions of your installation location before beginning actual installation.
- Place the speakers at ear level.
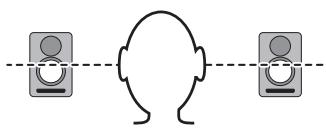
-
For a natural stereo effect, the right and left speakers should be installed in symmetrical and equidistant positions from the listening position.
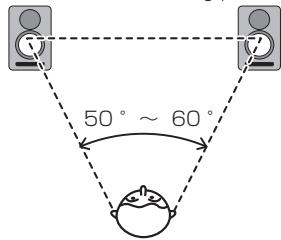
-
Speakers should ideally be located at 30^ angles from the listening position (together forming a total 60^ angle), and rotated inward to face the listening position.
CAUTION
To promote proper cooling, please assure that sufficient space is preserved between the speakers and nearby walls or other components (minimum 30 cm or more above, behind, and to right and left sides of each speaker). Leaving insufficient space between the speaker and walls or other components may lead to rising interior temperatures, leading to malfunction or damage.
Connections
- When making or changing connections, always turn off the power and disconnect the power cord from its outlet.
- Also, be sure to read the operating instructions for the other components to which you are connecting these speakers.
- Do not plug in the power cord until all other connections have been completed.
-
Use only the furnished accessory power cord.
-
Do not connect to both the XLR INPUT connector and the TRS INPUT jack at the same time.
- Make sure to set the sound level at an appropriate level as the input signals to the XLR INPUT connector (or TRS INPUT jack) and RCA INPUT jack will be mixed together, affecting the sound level.
Additional Information
Troubleshooting
If you think you are experiencing a malfunction with this unit, check the following items. Also check other devices connected to the unit. If the problem persists, consult your dealer for service.
- On occasion, the unit may fail to operate properly due to static electricity or other external conditions. In this event, disconnect the power cord and wait for five minutes or more, then reconnect the power cord and check for proper operation.
| Symptom | Items to Check | Remedy |
| No power | Is power cord connected properly? | Connect power cord to outlet. |
| No sound from connected audio devices, or sound is very small. | Has connected audio device been set properly? | Set device's external input and sound volume properly. |
| Is connection cable connected properly? | Connect cables properly. | |
| Are connectors or plugs dirty? | Clean connectors and plugs before connecting. | |
| Is the sound volume set properly? | Turn the [LEVEL] dial on the rear panel clockwise and turn up the volume. | |
| Is the power turned on? | Turn on the [POWER] switch on the rear panel. | |
| Is the auto standby function on? | Turn off the [POWER] switch on the rear panel once, wait a few seconds, and then turn it back on. | |
| Illumination (POWER indicator) remains turned off. | Is the power turned on? | Turn on the [POWER] switch on the rear panel. |
| Is the auto standby function on? | Turn off the [POWER] switch on the rear panel once, wait a few seconds, and then turn it back on. | |
| Speakers do not resume (turn on) from standby mode. | Is the level of the input signal low? | Increase the level of the input signal. |
| Turn off the [AUTO STANDBY] switch to turn off the auto standby function. | ||
| Sound is distorted. | Is the sound level set properly? | Slowly turn the [LEVEL] dial on the rear panel counterclockwise and turn down the volume. |
| Is the output level of the connected audio device set properly? | Adjust the output level of the connected audio device properly. | |
| Feedback (continuous howling sound) | Is the sound volume set properly? | Slowly turn the [LEVEL] dial on the rear panel counterclockwise and turn down the volume. |
Trademarks
- Pioneer is a registered trademark of PIONEER CORPORATION.
- Other listed company names and a product name are the registered trademark of the companies or trademarks.
Specifications
| S-DJ50X/S-DJ50X-W | S-DJ60X | S-DJ80X | |
| Type | Bi-amp 2-way active speaker | ||
| Amplifier | |||
| LF amp | 30 W | 50 W | 70 W |
| HF amp | 15 W | 20 W | 20 W |
| Input connectors (balanced input) | XLR × 1, TRS (1/4 inch Phone) × 1 | ||
| Input connectors (unbalanced input) | RCA × 1 | ||
| Impedance | 10 kΩ | ||
| Speaker | |||
| Enclosure | Bass reflex | ||
| Enclosure material | MDF | ||
| Woofer (LF driver) | 13 cm cone | 15 cm cone | 20 cm cone |
| Tweeter (HF driver) | 2.5 cm soft dome | ||
| Playback response | 50 Hz to 20 kHz | 45 Hz to 20 kHz | 40 Hz to 20 kHz |
| Power unit/other | |||
| Supported voltages | 100 V to 120 V (50 Hz to 60 Hz) / 220 V to 240 V (50 Hz to 60 Hz) conversion | ||
| Power consumption | 100 W | 140 W | 160 W |
| Power consumption during standby mode | 0.5 W or less | ||
| External dimensions W × H × D | 197 mm × 301 mm × 262 mm | 228 mm × 342 mm × 295 mm | 276 mm × 401 mm × 315 mm |
| Weight | 6.5 kg | 8.5 kg | 11.8 kg |
Specifications and design subject to possible modification without notice, due to improvements. © 2013 PIONEER CORPORATION. All rights reserved.
4 Woofer in fibra aramidica
WAARSCHUWING NETSNOER
4 Conector XLR INPUT
4 Conector XLR INPUT
1 NobopoTbI peyJrTop LEVEL
IcnoJIb3yETcTdIpeRyInpOBKn yOpBn3Byka (rPOMKocTn).
2Поворотн布局perулгTop HF LEVEL ADJ
IcnoIb3yETcIaI NaHacTPOKn BbICOKnx CaCTOT. MoXHO BbIbpaTb-2D6,-1D6,0D6nn1D6.
3Переключateь AUTO STANDBY
IcnoIb3yeTcIЯBVKIOUeHnIyBkIOUeHnI cyHKunI abTOMaTNUeCKORepeXoDaBpeKIM OxNDAHnI. KOrdaФуHKUNABTOMaTNUeCKORepeXoDaBpeKIM OxNDAHnIBKIOUeHa, KOLOHka aTOMaTNUeCKInepexODiHTBpeKM OxNDAHnI,ecJIN BXOHOH CnTHaIOTcyTCTByET B TeueHne ONpeJeJIeHHOROpepNoDA BpEmEHn (np6bNI3ntelbHo25MNHT),3aCtYeOCHNaJaETcNOTpe6JIeHne 3NeKTPO3HePrrn.EcJIN NoCTyAetBXOHOChnAH, KOrdaKOLOHKA HaxoDITcBpeKIM OxNDAHnI, KOLOHKa ABTOMaTNUeCKINBbXODIT N3peKIMa OxNDAHnI.
Korda KonoHka nepexoDNT B pexnme OxuaHna, noCDBeTka (Hndnkatop POWER) ha fpoHTaBHO naHeN rachET.
- Ecni ypoBeHb BXoHOrO cRHaHa hXoDITcR HnKe
onpeIeJIeHOrO yPoBnR, KOJIOHa KMOeT He Be bIXoDITb
n3 peKIMa OxJaHnA aBOMtUHeCckn. B TAKIN CnYuaX
nepeBdIte nepeKInouateB [AUTO STANDBY] B
BbIKNHOeHHoe NIOJoxHeNe, YTObI NCIOJIb3OBAtB KOJIOHky.
- UTo6bI npInHydntBbHO BbIEcTn KOLOHkU n3 peKIma OxJaDHaN, BblKnIOuHTe nepeKNOuTaTeJIb [POwER] Ha 3aJHei NaHei, a CnyCTra HeckOJbKO cekyHd ChOba BKnIOuHTe.
4 Pa3beM XLR INPUT
CmmMeTpHbI BXoHnO pa3bEm XLR. KoHTaKtbl pa3bema: Ng 1 3a3eMJIeHne, Ng 2 PIIoc, Ng 3 MInyc.
5 THe3do TRS INPUT
CmmMeTpnuHb BxOHDn pa3bEm IJna NpOkJIuOeHn HayuHnKOB.
BHHMAHNE
He nCnoIb3yIte oNHOBpeMeHNO pa3bem XLR INPUT n rHe3do TRS INPUT.
6 THe3do RCA INPUT
HecmmMeTpUHbIe UThbPkOBbIe BxOdHbIe pa3beMbI RCA.
7 PepekJIouaTeJb POWER
IcnoJb3yETcraIJI BkJIIOUeHnI OTKJIIOUeHnI NITaHnI.
A BHIMAHNE
IpepeBkIIOUeHnEMPiTahnYy6eINTEcB,HTOpeEKnIOuateHB[VOLTAGE SELECTOR] yCTaHOBnEN B NOIOJKeHne, COOTBeTCTByIOUee HAprrXeHNIO,IPmEmHeMOMY B CTrpaHe IINPERIOHE NcNOb3OBAHN KOnOHKn. EcII INpeKKnOuATEHB[VOLTAGE SELECTOR] yCTaHOBnEN HeNPaBnIbHO, O6pATNTCeB CepBnCbHc YcENTP KOMpanHn Pioneer C npocboi N3MeHnTB yCTaHOBnEHoe HAprrXeHNc 3aMeHnTB pIaNkIn NpeDOxPAHnTEb.Ppn OTpNABKe C 3aBOda-n3rTOBnTeBA N3dJIeNy UCTaHOBnEN HpeDOxPAHnTEb C COOTBeTCTBYIOUM YCTaHOBnEHbIM HAprrXeHNcEM.B Cnyue HeoBXoDMocTN N3MeHnEr NcTAHOBnEHHO HAprrXeHNy PIABKnINpeDOxPAHnTEb CLeDyET 3aMeHnTB.
8 PepekJIouaTeIb VOLTAGE SELECTOR
3TOT nepeKniOuateIb IcNoIb3yeTcA DnBbIbOpa yCTaHOJIeHHORo HApXKeHINy DnTcPaHb/ peNHOHa IcNoIb3ObaHIn. OH NepeHa3NaHEn DnHENOPcEpdCTBeHHORo IcNoIb3ObaHIn KJIneHTOM.
9 Pa3bem AC IN
ПодсоeДиНTe Cинов Кабел K 3ToMу pa3bEmy I K po3eTke CETи NepeMeHnHO TToK. He ПодсоeДиHЯIte Cинов Кабел DoTexnop, NOKa He 6ByUT BblINOnHeNbI BCE OCTaBHBie COeDInHNeu.ИспОльЗУтЕТоЛьКО Cинов Кабел, BXOДЯш尼В KOMPЛеKT NOCTaBKn.
10 DepekaTeIb IpaBko npedeoxpaHnteIa
YctaHOBka N NOdKJIIOUeHne
Ppabnla yctaHOBKn
YcNoBnB N omeHn npocnyuBaHnO kAsbIaOT ToHKoe BInaHne Ha 3ByaHnBe BOCpON3BOIMbIX KOJOHKAMn 3ByKOB. IJa DoCTNKeHn ONTmAlNbHbX yCNoBnPocNyuBaHn, nepeD Tem KAc npCTyNTb K yctAHOBke, ObaPntHe NaIJIeKaUee BINMaHne H a YcNoBn B MeCTe yCTaHOBKn.
- YctanabnBaIte KOLOHKn Ha ypOBHe ysei.
Дяпюуehня ecteBENHOrO CTpeofoHnueckoro 3ФФeKta JEBaRи npabRa KJONHKn DoJXHbI 6bITb yCTaHOBJHebl CmmMeTpnuHo Ha OUnHaKObOM paCCTOraHIN OT cnUshaTeJIa.
BⅡeaihOMcnyae KOIOHKn DIOJXHbI paCNOJaratbcnno yIOM 30^ no OTHoUeHNIO K CnyuataJIIO (Obpa3yMeJdy coboi yroJ 60 日 ) n bIb oBpaUeHbI BCTOPOHy CNYaTeJIa.

A BHIMAHNE
B ueJx oecneueHnnaeXaIero oxnaXdeHnna, noXaIyIcTa, ocTabJIte DoCTaTOUHoe IpocTpaHCTBO MeJdy KOIOHNKAMn 6JIHKaIIHMIM CTeHAMn IIN dpYrIMN KOMNOHEHTAMM (MNHNYM3 30 cm nIb6oJIbe CBepyx, c3aDn, cnpaba nCleBa KaJdoi KOIOHNK). HeIOCTaTOUHoe CBo6OdHoe IpocTpaHCTBO MeJdy KOIOHKOI n CTeHAMn IIN dpyrIMN KOMNOHEHTAMM MOKeT npINBeCTN K NOBbIeHnIO TempeApTybl BHYTpNI KOPNyCa N Bb3bIBaTB HeNoJaKn IIN NOBpeJDeHnI.
CoeHHeneHn
-ПиьИБИЛОЛНЕСИМ ИИЗМЕСЕСЕСЕСЕСЕСЕВCEGERDA BVIKNHOUaHTe NITAHNE IOTCOEDINHЯTE CINOBОI KABEBI OT CEteBOI pO3ETKII.
Takxe obra3aTeNbHO uHTaTe HNCTpyKUIM NO 3KcPiLyatauIN DpyrIX KOMIOHEHTOB, K KOTOpBIM NOKJIHOuaHOTc3TN KOJONHKI.
He noDcoeDnHnIe CnIOBoi Ka6JIb Do Tex nOp, NOKa He 6byT BbINONHeHb BCE OCTaIbHbIe COeDInHeHnI.
IcnoJIb3yIteToJIbKO CINIOBOKa6eJIb,BXODaIuN B KOMIIJEKT NocTAbKN.
- He IncnoJIb3yIte OndHOBpeMeHHo pa3bem XLR INPUT n rHe3do TRS'INPUT.
- O6raTeIbHO yctaHaBnBaIte Heo6xOIMbIy uPoBeHb 3bKa, nOcKOBky BxOdBHe CnHAbI, KOtOpBle NpOaHO TcR Ka3bemy XLR INPUT (nnr rHe3dy TRS INPUT) and rHe3dy RCA INPUT, cMeuBaIOTc, qTo BInraT ha UpoBbe 3bYa.
P2-Mecrau n3roTOBJeHnA
| Мессяц | 1 | 2 | 3 | 4 | 5 | 6 | 7 | 8 | 9 | 10 | 11 | 12 |
| Символ | A | B | C | D | E | F | G | H | I | J | K | L |
D3-7-10-7_A1_Ru
© 2013 PIONEER CORPORATION.
All rights reserved.
© 2013 PIONEER CORPORATION.