U-AA Power - Smartphone INTEX - Free user manual and instructions
Find the device manual for free U-AA Power INTEX in PDF.

User questions about U-AA Power INTEX
0 question about this device. Answer the ones you know or ask your own.
Ask a new question about this device
Download the instructions for your Smartphone in PDF format for free! Find your manual U-AA Power - INTEX and take your electronic device back in hand. On this page are published all the documents necessary for the use of your device. U-AA Power by INTEX.
USER MANUAL U-AA Power INTEX
Dear INTEX customer,
Congratulations on becoming a proud owner of INTEX product. You have now joined the fraternity of millions of satisfied INTEX customers spread across the globe.
Intex Technologies is one of the fastest growing IT Hardware, Mobile Phones and Electronics Company. A well established brand, INTEX has kept pace with the technology needs of millions of IT hardware & electronics consumers and has been serving them with more than 300 user friendly, high quality, state-of-the-art yet simple products/solutions. The products have been in the market since 1996 and conform to global standards.
Brand INTEX covers a wide range of computer peripherals and accessories such as Computer Multimedia speakers, Cabinets, Keyboards, Mouse, UPS, Add-on cards, Webcams, Headphones,
Laptop bags, etc. As a part of its diversification strategy, Intex also offers an interesting range of PCs, TFT-LCD Monitors, Consumer Electronics (DVD Players), Home UPS & Mobile Phones.
Every INTEX product goes through a rigorous process of sample evaluation and approval before commercial launch. Customers look upon the brand as a value-for-money & feature-rich offering, supported by efficient after sales service.
We look forward to your patronage.
It would be our pleasure to receive feedback and suggestions you may have for improvements in the product(s) you are using.
Intex Technologies (1) Ltd
info@intextechnologies.com
www.intextechnologies.com
Helpline No· 1800-103- 8822 (India)
Intex Way Gulf LLC
service@intexuae.com
www.intexuae.com
Toll Free No· 800-468- 39823 (Dubai)
Tel: 00971 04 3931991
SAFETY TIPS
Use of wireless hands-free system (headphone, headset) with a low power Bluetooth emitter.
Make sure the cell phone has a low SAR.
Keep your calls short or send a text message (SMS) (instead. This advice applies especially to children, adolescents and pregnant women.
Use cell phone when the signal quality is good.
People having active medical implants should preferably keep the cell phone at least 15 cm away from the implant.
Contents
- HEALTH & SAFETY......7
- ABOUT YOUR DEVICE......11
- GETTING STARTED 18
- CALL FUNCTIONS......27
- TEXT ENTRY 30
-
MENU OPERATION......32
-
MENU FUNCTIONS....33
-
TECHNICAL INFORMATION......54
-
HEALTH & SAFETY
Read these concise guidelines. Not following them may be dangerous or illegal.
ROAD SAFETY
Always keep your hands free to operate the vehicle while driving. Park your vehicle safely before using your device.
SWITCH OFF OR USE FLIGHT MODE IN AIRCRAFT
Wireless devices can cause interference in aircraft. Using them in aircraft is both dangerous and illegal. Switch off your device or
switch to fight mode before on board.
SWITCH OFF IN HOSPITALS
Follow relevant regulations or rules. Switch your device off near medical equipment.
SWITCH OFF WHEN REFUELING
Switch off your device at a refueling point or near fuels or chemicals.
SWITCH OFF NEAR BLASTING
Don't use your device where blasting is in progress. Observe restrictions, and follow any regulations or rules.
INTERFERENCE
All wireless phones may be susceptible to interference, which could affect the performance.
HEALTH
Use of wireless hands-free system (headphone, headset) with a low power Bluetooth emitter.
Keep your calls short or send a text message (SMS) (instead.
This advice applies especially to children, adolescents and pregnant women.
Use cell phone when the signal quality is good.
People having active medical implants should preferably keep the cell phone at least 15 cm away from the implant.
USE PROPERLY
Use in the normal position explained in the product documentation. Don't touch the antenna unnecessarily.
ACCESSORIES AND BATTERIES
Use only the approved accessories and batteries. Do not connect to incompatible products.
EMERGENCY CALLS
Ensure the phone is switched on and in service. Enter the emergency number, and then press the talk key. Give your location. Do not end the call without permission.
- About your device
2·1 Appearance
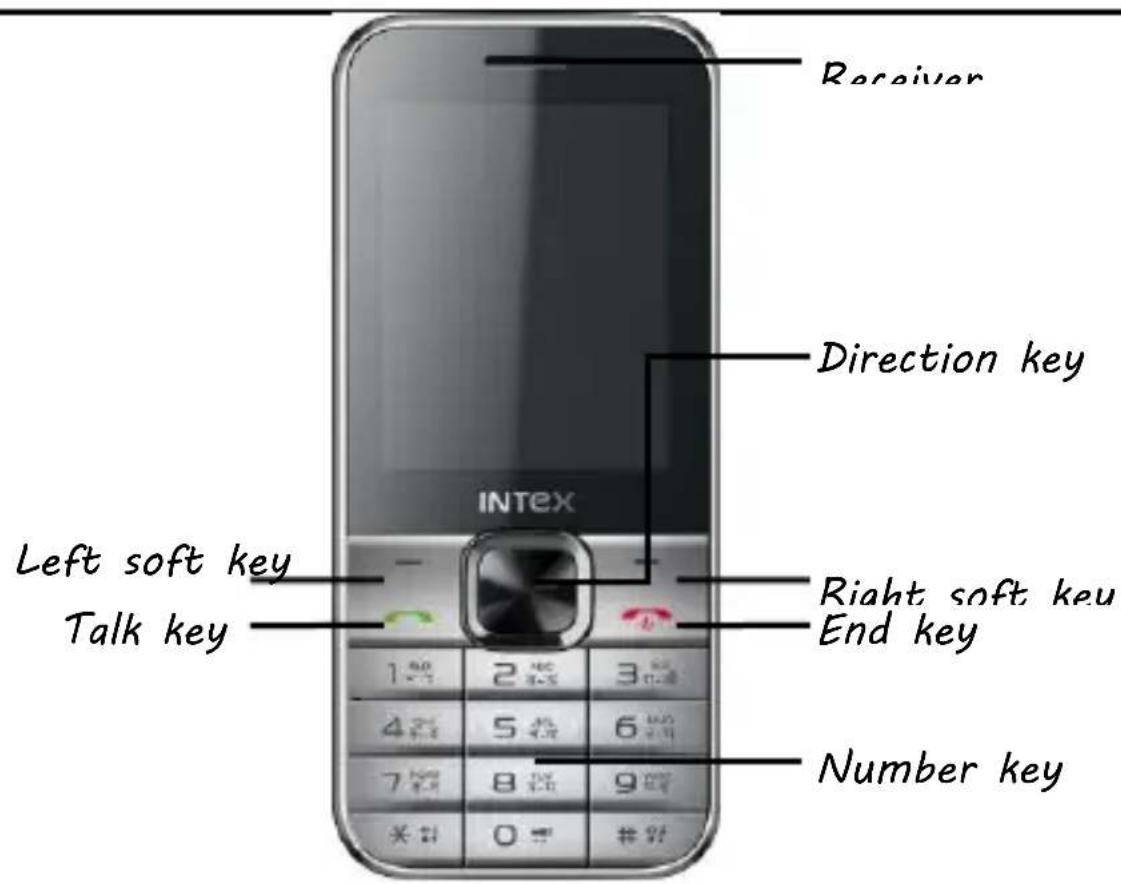
2·2 Keys instruction
| Keys | Descriptions |
| Direction key | Up/down/left/right key. It has different functions in different menus. Center key means OK. |
| Talk key | Press it to make a call or answer a call. At the standby mode, press it to access Call log. |
| Left soft key | It depends on the display text above it |
| Right soft key | It depends on the display text above it |
| End key | Press it to end the current call; Return from any menu to standby mode;Long press to power your device on or off; |
| Number keys | To input numbers, letters and special characters. |
| * key | In Edit Interface, press it to enter a list of symbols |
| # key | It has different functions in different menus.At the standby mode, long press it to switch between the current profile and the silent profile; In Edit Interface switch input methods; |
2·3 Icons
| Icons | Descriptions |
 | Show the SIM1's current network sign level. |
 | Show the SIM2's current network sign level. |
 | Show the power level of Battery. |
 | You have unread SMS in SIM1. |
 | You have unread SMS in SIM2. |
 | You have missed calls |
 | Alarm is set on |
 | The headset is plugged in. |
 | In Profiles, Alert type is set as Ring only. |
 | In Profiles, Alert type is set as Silent. | ||
 | In Profiles, Alert type is set as Vibrate on. | ||
 | In Profiles, Alert type is set as Vibrate and Ring. | ||
 | Bluetooth is powered on. | ||
 | The keypad is locked. |
3. Getting started
3.1 Battery
Please use the approved batteries, and only use the battery charger approved by the device producer to charge your battery.
3·1·1 Install & remove battery
Remove: (1) Remove the back cover of the device by pushing forwards;
(2)Uplift the battery from its slot and take it out.
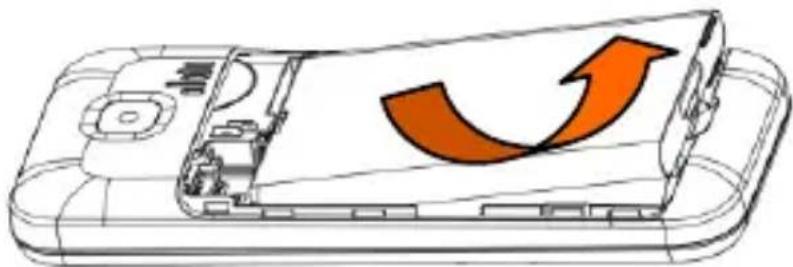
natural_image
Diagram of a smartphone showing internal components and an orange curved arrow indicating rotation (no text or symbols)Install: (1)Match the metal contacts of battery separately with the battery compartment metal contacts, and put the battery base into the slot;
(2) Slide the back cover toward the top of the phone to lock the cover into its place.
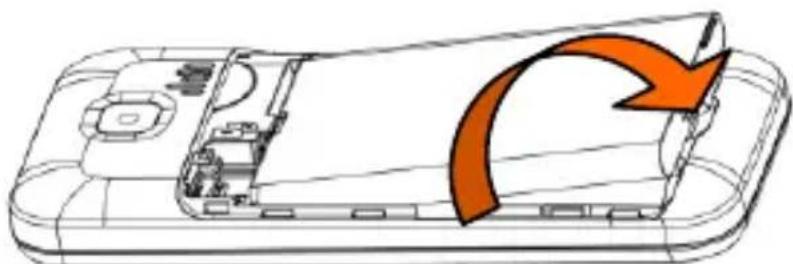
natural_image
Diagram of a smartphone showing internal components and an orange curved arrow indicating rotation (no text or symbols)3.1.2 Charging
Connect the charger to a power supply, and then plug in the charger pin to the charger jack on the bottom.
Charger animation will be displayed if the device is powered off. When it is powered on, the power status icon at the top right corner of the screen will blink circularly.
Disconnect the charger from handset and power supply when battery is full.
Note:
1 During charging, don't remove or move the battery to prevent the battery circuit from burning out.
2 During charging, it is normal that the phone and charger will become heated.
3 If the battery is completely empty, it may take a period of time before the charging icon appears on the screen.
3·2 SIM card installation
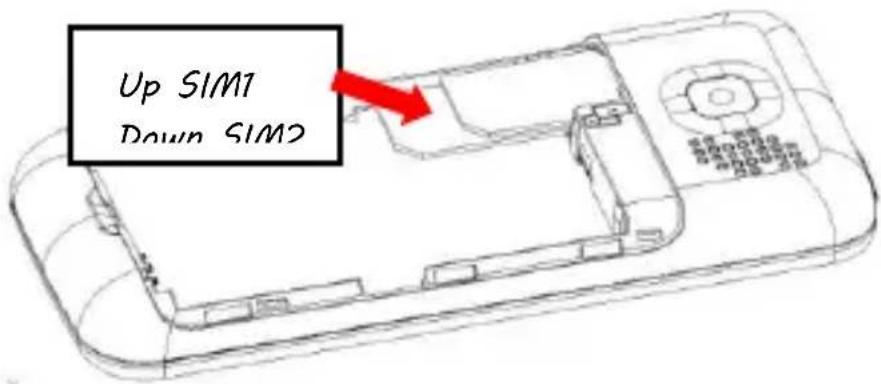
Keep the metallic face of a SIM card downward, and slide it gently to the position of SIM 1.
Keep the metallic face of the other SIM card downward, and slide it gently to the position of SIM 2.
To remove a SIM card, please power off your device first, remove the battery and slide the card out gently.
3.3 Memory card installation

Keep the metallic face of a memory card downward, and slide it gently to the position of Memory card.
To remove Memory card, please remove the back cover first and slide the memory card out gently.
3·4 Headset
Insert the headset into the headset jack on the top side of the device if required.
3·5 File manager
File manager is used to manage the memory cards respectively.
1. Connect to a computer
The USB function of the device is available, no matter the device is powered on or off.
While the device is powered off, it will start charging and open File manager after the USB cable is plugged in. When the device is powered on, it will enter the “USB Config” interface automatically after the USB cable is plugged in. In the interface, select “Mass storage” to start File manager. If your memory cards are inserted, the computer will pop up removal disks, respectively
representing your device and memory cards.
After you enter, you will find some preset files or folders. For the sake of normal use, please put related files into relevant directories, that is, videos into Videos, photos into pictures, records into Audio and Bluetooth received into Received. After the operation is completed, if you want to exit, click the USB icon on the lower right side of the PC desktop, select to stop the USB devices, and remove them after the pop-up warning "USB devices can be removed now" appears.
2. Format
If you format Phone or Memory card, all files in it will be deleted.
You can format Phone or Memory card in two ways:
Use the phone to format directly.
Steps: Select File manager > Memory card > Format.
Use PC to format
To better complete the formatting, please follow the following steps:
(1) Right click My computer to select Manage > Storage > Disk management;
(2) Right click the disk of a memory card, and select Format.
(3) In Allocation Unit Size, select Default and then confirm.
Press and hold the End key to switch your device on/off.
If SIM lock or Phone lock is activated, please enter the password as required.
3·6 Power on and off
4. Call functions
4.1 Make a call
When the sign of a network operator appears on the idle screen, you can make or answer calls.
4.1.1 Make a domestic call
Enter a phone number, including the area code if you are calling a fixed phone number (excluding local numbers). Press Talk key to make a call via your desired SIM card.
4.1.2 Make an extension call
When making an extension call, you can press * key to switch until the extension prefix “P” appears. After a switchboard number is dialed, the device will pause automatically for a few seconds then dial your desired extension number. Input the following one by
one: Area code -Switchboard number - P - Extension number. Then press Talk key to make a call via your selected SIM card.
4.1.3 Make an international call
Enter the country code, the area code and the phone number. Press Talk key to make a call via your selected SIM card. “+” is required when you enter the country code. You can press * key to switch until + appears.
4.1.4 Make a call from Phonebook
Access Contact menu to select a contact, and press Talk key to make a call via your selected SIM card.
4.1.5 Redial a call by Call log
Access Call log, scroll to a desired number or name, and press Talk key to make a call via your selected SIM card.
4.2 Answer a call
When there is an incoming call, there will be reminding information of the corresponding SIM card. The caller's name or number will appear in the screen if you have activated the Caller ID Display service. At this time, you can press Talk key to answer it.
If an incoming call arrives during your operation in sub window, a new window will pop up to inform you and your operation will be interrupted. If you miss it, when you return to the standby screen, you will be reminded that there is a missed call of SIM 1 or SIM 2.
4·3 Call options
During a call, you can press the left soft key to enter Call options. The options differ according to your call status. Here below are a few of them: Hold single call, End single call, New call, Phonebook
Call history, Messages, Sound recorder, Mute, DTMF, Volume.
5. Text entry
During use, You can input texts, letters, numbers or symbols (including punctuations).
5.1 Switch input methods
In any Text Editor, press # key to switch input methods.
5·2 English input method
Switch to ABC or abc input method. Following the sequence of
letters on a key, you can press the key once to insert the first letter on the key, twice for the second letter, etc., until the highlight is on your desired letter. Then release the key to input it.
5·3 Hindi input method
Switch to HI input method. Following the sequence of letters on a key, you can press the key once to insert the first letter on the key, twice for the second letter, etc., until the highlight is on your desired letter. Then release the key to input it
5.4 Input punctuations and symbols
No matter what input method you are using, press * key to display a list of punctuations and symbols for you to select.
5·5 Input numbers
Switch to Numeric input method. Directly press the number keys
to input numbers.
6. Menu operation
6·1 Access menus
You can press the left soft key or short press OK key to view menus of all levels.
6·2 Access shortcuts
At the standby mode, press left or right direction key to enter shortcuts. You can edit according to your requirement.
7. Menu functions
7.1 Contacts
After you enter contacts, you can select a number to View, Send text messages, call, Edit, Delete, Copy, Add to Blocklist, Phonebook settings
Note:
- Files in File manager can be set as ring tone only after they are sent to Ring tone list.
- When you are copying entries from Phone to SIM1/SIM2 only the names and numbers of entries will be copied.
7·2 Messages
7·2·1 Write message
Access this menu to edit and send SMS. When you are writing a message, you can insert template, insert contacts. After a message is completed, you can select to send from or save to SIM 1 / SIM 2.
7·2·2 Inbox
View all received SMS messages.
When there is a new message in SIM1 or SIM2, the device will play the preset message tone and the corresponding unread message icon will appear on top of the screen. You can tap and view the new message, or enter Inbox to read it.
After the message is read, you can press Options to View, Forward,
Delete, and Advanced.
7·2·3 Drafts
In Drafts, you can view the saved SMS messages. You can select one to Send, Edit or Delete.
7·2·4 Outbox
In Outbox, you can view the uncompleted saved sent SMS messages. You can select one to Resend, Edit or Delete.
7·2·5 Sent messages
In Outbox, you can view the saved sent SMS messages. You can select one to Resend, Edit or Delete.
7·2·6 Schedule SMS
In this function you can edit schedule SMS, when time sending set on, SMS will sent if time is up
7·2·7 SMS Templates
There are five predefined templates in the device. You can edit or use them while writing a message.
7·2·8 SMS settings
Access this menu to configure the following settings of SIM 1 or SIM 2, Memory status, Save sent message, Preferred storage
7·2·9 Message block list:
You can set its Status and Blocklist number here. If the status is set on, messages from numbers in the list will be blocked. If the status is set off, all the messages will be received normally.
7·3 Call log
Select Call log to view recent calls in SIM1 and in SIM2, including
Dialed calls, Missed calls, Received calls, Delete call log, Call time, Call cost, SMS counter
7.4 Settings
7.4.1 Profiles
The device provides you with several profiles so that you can customize the following settings to meet your different needs: alert type, ring type, incoming call, ringtone volume, message, message volume, keypad, keypad volume, power on, power off, system alert prompt tone and answer mode. The profiles available are General, Silent, Meeting, Outdoor.
7.4.2 Phone
In Phone settings, you can configure the settings below: Time and
date, Schedule on/off, Language, Preferred Input method, Flight mode:
7·4·3 Display
In Phone settings, you can configure the settings blew: Wallpaper, Show date and time, LCD backlight.
7.4.4 Call
In this function, you can configure SIM 1 call settings, SIM 2 call settings and advanced settings.
SIM 1/SIM 2 call settings
-Call waiting
If the network supports, during calling, the network will remind you of a new incoming. You can hold the current incoming and answer the other one.
To make this function available, please contact local network operator.
-Call divert
Call divert is a network function. With this function, an incoming can be diverted to another phone number or voice mailbox, avoiding missing it.
There are several diverts available: Divert all voice calls, Divert if unreachable, Divert if no answer, Divert if busy, Divert all data calls, and Cancel all (diverts).
-Call barring
If the network supports, this function will enable you to restrict the incoming or outgoing calls.
-Call Firewall
You can set the status of blocklist, When blocklist is set on, incomings from numbers in the blocklist will be automatically rejected.
-Auto redial
You can set it on/off to activate or deactivate this function.
-Call time reminder
You can set a fixed time or a time period to remind you during your call.
--Call vibrate
You can set on/off. When it's set on, the phone will vibrate to remind you when a dialed call is answered.
7.4.5 Network
In this function, you can configure network settings for SIM1,
SIM2, including Network selection.
7·4·6 Security
You can configure the security settings for Phone, SIM1 and SIM2 to protect your device or SIM cards from unauthorized use.
The preset password of your phone is 1234. Please revise it to be yours immediately.
-SIM1/SIM2 security
PIN lock
This option makes you select whether to use PIN code or not.
The preset PIN code is 1234. After three consecutive incorrect
PIN code entries, the code will be locked, and you need the PUK code to unlock it.
If you have activated SIM lock, you are required to input the PIN
code each time you power the device on to use the locked SIM card.
- Phone lock
Phone lock can be activated to avoid unauthorized use.
If you have activated Phone lock, you will be required to input the password each time you power the device on.
—Auto keypad lock
Auto keypad lock can prevent from unintentional operations on keypad.
At the standby mode, hold and press OK to lock the keypad. When the keypad is locked, you can hold and press OK or press left key+ * to unlock the keypad
- Change password
You can change phone password here.
7.4.7 Reset
In this function, when you input phone lock password and confirm, related parameters will be restored to factory settings.
7·5 Media
7·5·1 Camera
After you enter camera, you can view the captured picture through the screen; at the same time, in the preview status, you can press Left soft key to conduct the following settings and set detailed parameters: Switch to video recorder, Image viewer, Camera settings, Image settings, White balance, Scene mode, Effect settings, Restore default. After all settings are done, press
Center key to capture.
7·5·2 Image viewer
In Album, you can operate on a photo: View, Image information, Browse style, Send, Use as, Rename, Delete, Whether your operation can be done successfully is subject to such factors as the screen size etc,
In addition, when viewing a photo, you can press the left key and press1or 3 key to rotate,
7·5·3 Video recorder
Enter Video recorder to see video preview interface. Press Options menu: Switch to camera, To player, Camcorder settings, Video settings, White balance, Effect settings,
After configuration, tap the record icon to start or pause. When
the recording is completed, press OK key, press Right soft key to stop recording. You will be reminded to save the video clip. Note: For video recorder review, press 1 to check Video Quality, press 2 to check White Balance, and press 3 for Effect Settings, press 4 to switch to Night Mode. pass 0 switch videos.
7·5·4 Videos
Enter Video to select your favorite video clip to play. The device supports MP4/3GP/AVI. While playing, you can press the */# key to adjust the volume, press the left/right key, control the playing progress.
7·5·5 Audio player
Access this function to play your favorite mp3 songs. In the player interface, press the center key to play/pause. Press the left/right
key to switch to another song. Press the */# key to adjust the volume Press Options to display the following menus:
Play: song playing.
Details: Display the information of the playing song.
Refresh list: Manually update songs
Settings: List auto gen, Repeat, Shuffle, Background play.
7·5·6 Sound recorder
In this function you can start new record, set audio quality or listen your own sound clips.
7.5.7 FM
In the FM radio interface, you can customize Settings, enter Channel list, Turn on/off or switch to another channel.
Player interface:
Press the up key to auto search, press down key to start record, press*/# key to adjust volume
, press the center key to stop, press the left/right key to switch to another channel (+/-0·1MHz).
Channel list: Display the names and numbers of channels that are saved.
Manual input: Enter the FM frequency manually.
Auto search: Search all channels available and save them in the channel list automatically.
Settings: You can activate or deactivate background play (FM is active while you are operating in other interfaces) and FM loud speaker, and Audio quality.
Record: You can record the current FM program.
Append: Add the current FM content to an existing record file.
File list: View record files in File manager.
Search mode: When Search is activated, you can press the left/right key to start auto search until an active program is acquired.
Note: you must insert earphone before start play FM.
7·6 Files
This enables you to view multimedia files in the memory cards.
You can also select one to View, Rename, Copy, Delete etc.
Note: Before formatting, please back up important files to avoid data loss due to formatting.
7.7 Tool
7·7·1 Charger
In this function you can charge other phones. Get into the menu and insert the charging cable, your phone can output 5V voltage. After you connect the other phone with the USB cable, you can charge the phone. Press the minimize key or the end key, you can charge in background. Press the quit key to stop the charger function
7·7·2 Torch
Enter Torch > Settings > On to activate Torch. The torch on top of the device will be turned on for illumination.
7·7·3 Alarm
You can set 5 alarms at most. And alarm is still active when you
power the device off. In the list of Alarm, select one alarm. You can configure these settings: Status, Time, Alert type, etc.
7.7.1 Calendar
In this function, you can view calendar at any time. You can click to view other dates:
7·7·2 Bluetooth
The device supports Bluetooth. You can establish connections between the device and other devices (Bluetooth headset, PC or handheld Bluetooth device etc) to realize voice calls, data exchange, data synchronization etc. Settings are as follows:
—Power: Activate or deactivate Bluetooth.
- Visibility: Set whether Bluetooth of the device can be found or not.
—My device: Display the current or once connected device, and inquiry new ones.
— Inquiry BT headset(Inquiry audio device): Search for a Bluetooth headset and pair them.
—Change device name: Display online Bluetooth devices
—Advanced: Advanced settings of Bluetooth, as follows: Audio path: Change sound output device.
My address: Display Bluetooth address of the device.
7·7·3 Calculator
The device can be used as a calculator to do some simple arithmetic work.
7.7.4 STK
This function is provided by network providers. If your SIM card
and network provider don't support it, this function will be unavailable. For more information, please contact your network provider.
7.8 Intex Zone
7.8.1 Mobile tracker
When the SIM card is replaced, the device will automatically send a message to your preset number.
7.8.2 Peer control
You can set Peer control item and Peer control setting. When you send the preset setting to the device, it will complete your preset Peer control items.
7·8·3 Auto call record
When the function is on, it will auto call record during the call.
7.8.4 Games
this device have magic sushi game, you can play and enter games setting menu for set game parameter
7·9 Services
Your device supports WAP. After necessary settings, you can surf the Internet in your device. In Internet, you can browse web pages, add bookmark, view history, receive service information and configure settings related to WAP.
8. Technical Information
Model: U-AA Power
Size Length: 117·5mm ×Width: 51·0mm ×Depth: 13·3mm
Battery: 2100mAh
Networks: GSM 900/1800 MHz
SAR Values: GSM900: 0·764W/Kg GSM1800: 0·761W/Kg
Weight: 101 · 5 ± 5 gram (with battery)
Battery Type: Lithium Battery
Model: BR 2101G-2
Nominal voltage: 3·7v
Max. Voltage: 4·2v
Capacity rating: 2100mAh
Operation Temperature: -10\~+55 °C
The operation time of the battery depends on conditions such as:
• Transmitting power level
• Signal (distance between the phone and the base station)
• Network parameters defined by the operator
• Phone use (WAP, games, SMS)
- Charging procedure used
Exclusions:
Subject to the exclusions contained below:
- Damage due to the improper use.
- User does not follow the manual.
Explanation:
The company has the final right of the explanation for this
document·
Software upgrades will not be announced.
All pictures are for reference only in the instruction book; please refer to the actual phone.
Disclaimer
© Intex· All rights reserved·
Features and specifications are subject to change without prior notice. Certain mobile phone features may not be activated by your service provider, and / or their network setting may limit the feature's functionality. Services and some features such as GPRS, email may be dependent on the network, SIM card, as well as on the compatibility of the devices used and content formats
supported and may require network/service subscription/solutions. Data transfers speeds are network dependent. Always contact your service provider for details or help. Talk and standby time is quoted in digital mode and are approximate; battery performance and the signal reception depend on network configuration, signal strength, type of SIM card, operating temperature, features selected as well as voice, data and other application usage pattern. The phones supports Bluetooth, A2DP, in order for Bluetooth devices to communicate with one another, they must utilize the same Bluetooth Profile. To determine the profiles supported by other Intex products, visit www.intextechologies.com, for other devices, contact their respective manufacturers. Always demand for original Intex mobile
phones to protect against buying tinkered and/or used, refurbished or tampered phones. The warranty is applicable only for Intex phones; the company is not responsible for any loss or theft. Always use Intex original Enhancements (including batteries) for safety. The use of any other type may invalidate and approval or warranty applying to the mobile phone and may be dangerous. The phone is designed to operate using Li-ion batteries approved by the phone manufactures. Using non approved batteries with the phone may result in poor performance and damage to the phone or its enhancements. The display and products visualization here are illustrative purposes only; Display / color of the phone may differ from that shown on the manual. All features, functionality and other product specifications are based on the
latest available information and are correct at the time of printing; however such product specifications are subject to change without notice. Copyrights are reserved. Intex is the trademark of INTEX TECHNOLOGIES (INDIA) LTD. which is registered. The unauthorized copying of copyrighted material is not legalized is inimical to the provisions of the copyright laws of India and other countries.
INFORMATION UNDER E-WASTE (MANAGEMENT AND HANDLING) RULES, 2011
For disposal of e-waste, please call our helpline no· or visit our website.
E-waste Helpline no· 1800-103-8822
Weblink:http://intextechnologies.com/window_self/Waste%20Disposal.html
- Do's for disposal of product
a) Always drop your used electronic products, batteries, and packaging materials after the end of their life in nearest collection point or collection center
b) Separate the packaging material according to responsible waste disposal options and sorting for recycling.
c) The battery can easily be removed from the product for recycling.
- Don't disposal of equipment
a) Never dump E-waste in garbage bins or municipal solid waste stream.
b) Do not dispose of your product as unsorted municipal waste.
c) Do not throw used batteries into household waste.
d) Do not dispose damaged or leaking Lithium Ion (Li-Ion) battery with normal household waste.

natural_image
Pure electrical circuit lines without any symbols- Information on the consequences of improper handling, accidental breakage damage and improper recycling of the end of life product.
a) If batteries are not properly disposed of, it can cause harm to human health or the environment.
b) Placing of batteries or devices on or in heating devices, such as
microwave ovens, stoves, or radiators and improper disposal of batteries may lead to explosion.
c) If the battery terminals are in contact with metal objects, it may cause a fire.