
SE-DIR800C - Wireless Headphones PIONEER - Free user manual and instructions
Find the device manual for free SE-DIR800C PIONEER in PDF.

| Product Type | Wireless headphone with infrared transmitter |
| Transmitter model | TRE-D800 |
| Headphone model | SE-DHP800 |
| Transmitter dimensions (W x H x D) | 209 x 50 x 104 mm |
| Transmitter weight | Approx. 520 g |
| Headphone weight (without batteries) | Approx. 250 g |
| Transmitter power supply | DC 9 V via supplied AC adapter |
| Headphone power supply | 2 LR6 (R6)/AA batteries (supplied Ni-MH rechargeable or alkaline) |
| Battery charging time | Approx. 10 hours (for 16 h operation) |
| Headphone battery life | Rechargeable batteries: approx. 16 h; alkaline batteries: approx. 27 h |
| Transmission distance | Approx. 8 m in front of the transmitter (±30° field) |
| Frequency response | 12 Hz - 22 kHz |
| Dolby Headphone modes | DH1, DH2, DH3, OFF |
| Dolby Pro Logic II modes | AUTO, MOVIE, MUSIC, OFF |
| Built-in decoders | Dolby Digital, Dolby Pro Logic II, DTS, PCM (44.1/48 kHz) |
| Audio inputs | 1 optical digital, 1 coaxial digital, 1 stereo analog (RCA) |
| Wired headphone jack | 3.5 mm stereo mini-jack on the transmitter |
| Included accessories | AC adapter, 2 Ni-MH rechargeable batteries, coaxial digital cable, warranty card |
| Care and cleaning | Clean with a soft, dry cloth; do not use solvents |
| Safety | Do not expose to moisture, shocks or extreme temperatures; use only the supplied adapter |
| Spare parts and repairability | Contact Pioneer after-sales service for replacement of rechargeable batteries or repair |
Frequently Asked Questions - SE-DIR800C PIONEER
User questions about SE-DIR800C PIONEER
0 question about this device. Answer the ones you know or ask your own.
Ask a new question about this device
Download the instructions for your Wireless Headphones in PDF format for free! Find your manual SE-DIR800C - PIONEER and take your electronic device back in hand. On this page are published all the documents necessary for the use of your device. SE-DIR800C by PIONEER.
USER MANUAL SE-DIR800C PIONEER
Digital cordless surround headphone
Operating Instructions
Mode d'emploi
The lightning flash with arrowhead, within an equilateral triangle, is intended to alert the user to the presence of uninsulated "dangerous voltage" within the product's enclosure that may be of sufficient magnitude to constitute a risk of electric shock to persons.
CAUTION
RISK OF ELECTRIC SHOCK DO NOT OPEN
CAUTION:
TO PREVENT THE RISK OF ELECTRIC SHOCK, DO NOT REMOVE COVER (OR BACK). NO USER-SERVICEABLE PARTS INSIDE. REFER SERVICING TO QUALIFIED SERVICE PERSONNEL.

The exclamation point within an equilateral triangle is intended to alert the user to the presence of important operating and maintenance (servicing) instructions in the literature accompanying the appliance.
D1-4-2-3_En
IMPORTANT NOTICE – THE SERIAL NUMBER FOR THIS EQUIPMENT IS PRINTED ON A STICKER ON THE PRODUCT LABEL LOCATED ON THE UNDERSIDE OF THE TRANSMITTER.
PLEASE WRITE THIS SERIAL NUMBER ON YOUR ENCLOSED WARRANTY CARD AND KEEP IN A SECURE AREA. THIS IS FOR YOUR SECURITY.
D1-4-2-6-1_En
POWER-CORD CAUTION
Handle the power cord by the plug. Do not pull out the plug by tugging the cord and never touch the power cord when your hands are wet as this could cause a short circuit or electric shock. Do not place the unit, a piece of furniture, etc., on the power cord, or pinch the cord. Never make a knot in the cord or tie it with other cords. The power cords should be routed such that they are not likely to be stepped on. A damaged power cord can cause a fire or give you an electrical shock. Check the power cord once in a while. When you find it damaged, ask your nearest PIONEER authorized service center or your dealer for a replacement. S002_En
This product is for general household purposes. Any failure due to use for other than household purposes (such as long-term use for business purposes in a restaurant or use in a car or ship) and which requires repair will be charged for even during the warranty period. K041_En
* Manufactured under license from Dolby Laboratories.
"Dolby", "Pro Logic", and the double-D symbol are trademarks of Dolby
Laboratories.
G003_En
Information to User
Alteration or modifications carried out without appropriate authorization may invalidate the user's right to operate the equipment.
D8-10-2_En
[For Canadian model]
This Class B digital apparatus complies with Canadian ICES-003.
IMPORTANT SAFETY INSTRUCTIONS
READ INSTRUCTIONS — All the safety and operating instructions should be read before the product is operated.
RETAIN INSTRUCTIONS — The safety and operating instructions should be retained for future reference.
HEED WARNINGS — All warnings on the product and in the operating instructions should be adhered to.
FOLLOW INSTRUCTIONS — All operating and use instructions should be followed.
CLEANING — The product should be cleaned only with a polishing cloth or a soft dry cloth. Never clean with furniture wax, benzine, insecticides or other volatile liquids since they may corrode the cabinet.
ATTACHMENTS — Do not use attachments not recommended by the product manufacturer as they may cause hazards.
WATER AND MOISTURE — Do not use this product near water — for example, near a bathtub, wash bowl, kitchen sink, or laundry tub; in a wet basement; or near a swimming pool; and the like.
ACCESSORIES — Do not place this product on an unstable cart, stand, tripod, bracket, or table. The product may fall, causing serious injury to a child or adult, and serious damage to the product. Use only with a cart, stand, tripod, bracket, or table recommended by the manufacturer, or sold with the product. Any mounting of the product should follow the manufacturer's instructions, and should use a mounting accessory recommended by the manufacturer.
CART — A product and cart combination should be moved with care. Quick stops, excessive force, and uneven surfaces may cause the product and cart combination to overturn.

VENTILATION — Slots and openings in the cabinet are provided for ventilation and to ensure reliable operation of the product and to protect it from overheating, and these openings must not be blocked or covered. The openings should never be blocked by placing the product on a bed, sofa, rug, or other similar surface. This product should not be placed in a built-in installation such as a bookcase or rack unless proper ventilation is provided or the manufacturer's instructions have been adhered to.
POWER SOURCES — This product should be operated only from the type of power source indicated on the marking label. If you are not sure of the type of power supply to your home, consult your product dealer or local power company.
LOCATION – The appliance should be installed in a stable location.
NONUSE PERIODS – The power cord of the appliance should be unplugged from the outlet when left un-used for a long period of time.
GROUNDING OR POLARIZATION
- If this product is equipped with a polarized alternating current line plug (a plug having one blade wider than the other), it will fit into the outlet only one way. This is a safety feature. If you are unable to insert the plug fully into the outlet, try reversing the plug. If the plug should still fail to fit, contact your electrician to replace your obsolete outlet. Do not defeat the safety purpose of the polarized plug.
- If this product is equipped with a three-wire grounding type plug, a plug having a third (grounding) pin, it will only fit into a grounding type power outlet. This is a safety feature. If you are unable to insert the plug into the outlet, contact your electrician to replace your obsolete outlet. Do not defeat the safety purpose of the grounding type plug.
POWER-CORD PROTECTION — Power-supply cords should be routed so that they are not likely to be walked on or pinched by items placed upon or against them, paying particular attention to cords at plugs, convenience receptacles, and the point where they exit from the product.
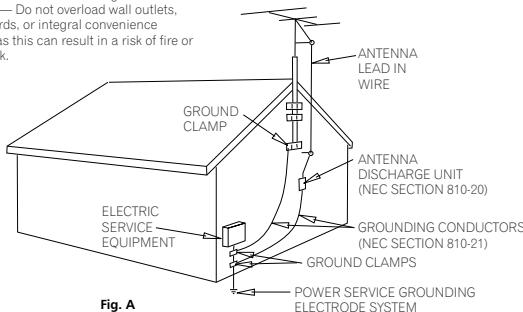
OUTDOOR ANTENNA GROUNDING — If an outside antenna or cable system is connected to the product, be sure the antenna or cable system is grounded so as to provide some protection against voltage surges and built-up static charges. Article 810 of the National Electrical Code, ANSI/NFPA 70, provides information with regard to proper grounding of the mast and supporting structure, grounding of the lead-in wire to an antenna discharge unit, size of grounding conductors, location of antenna-discharge unit, connection to grounding electrodes, and requirements for the grounding electrode. See Figure A.
LIGHTNING — For added protection for this product during a lightning storm, or when it is left unattended and unused for long periods of time, unplug it from the wall outlet and disconnect the antenna or cable system. This will prevent damage to the product due to lightning and power-line surges.
POWER LINES — An outside antenna system should not be located in the vicinity of overhead power lines or other electric light or power circuits, or where it can fall into such power lines or circuits. When installing an outside antenna system, extreme care should be taken to keep from touching such power lines or circuits as contact with them might be fatal.
OVERLOADING — Do not overload wall outlets, extension cords, or integral convenience receptacles as this can result in a risk of fire or electric shock.
OBJECT AND LIQUID ENTRY — Never push objects of any kind into this product through openings as they may touch dangerous voltage points or short-out parts that could result in a fire or electric shock. Never spill liquid of any kind on the product.
SERVICING — Do not attempt to service this product yourself as opening or removing covers may expose you to dangerous voltage or other hazards. Refer all servicing to qualified service personnel.
DAMAGE REQUIRING SERVICE — Unplug this product from the wall outlet and refer servicing to qualified service personnel under the following conditions:
- When the power-supply cord or plug is damaged.
- If liquid has been spilled, or objects have fallen into the product.
- If the product has been exposed to rain or water.
- If the product does not operate normally by following the operating instructions. Adjust only those controls that are covered by the operating instructions as an improper adjustment of other controls may result in damage and will often require extensive work by a qualified technician to restore the product to its normal operation.
- If the product has been dropped or damaged in any way.
- When the product exhibits a distinct change in performance — this indicates a need for service.
REPLACEMENT PARTS — When replacement parts are required, be sure the service technician has used replacement parts specified by the manufacturer or have the same characteristics as the original part. Unauthorized substitutions may result in fire, electric shock, or other hazards.
SAFETY CHECK — Upon completion of any service or repairs to this product, ask the service technician to perform safety checks to determine that the product is in proper operating condition.
WALL OR CEILING MOUNTING — The product should not be mounted to a wall or ceiling.
HEAT — The product should be situated away from heat sources such as radiators, heat registers, stoves, or other products (including amplifiers) that produce heat.
text_image
— Do not overload wall outlets, ds, or integral convenience is this can result in a risk of fire or c. GROUNDS CLAMP ELECTRIC SERVICE EQUIPMENT ANTENNA LEAD IN WIRE ANTENNA DISCHARGE UNIT (NEC SECTION 810-20) GROUNDING CONDUCTORS (NEC SECTION 810-21) GROUND CLAMPS POWER SERVICE GROUNDING ELECTRODE SYSTEM Fig. ANEC — NATIONAL ELECTRICAL CODE
D1-4-2-2_En
WARNING – TO PREVENT FIRE OR SHOCK HAZARD, DO NOT EXPOSE THIS APPLIANCE TO RAIN OR MOISTURE.
D1-4-2-1_En


Dear Customer:
Selecting fine audio equipment such as the unit you've just purchased is only the start of your musical enjoyment. Now it's time to consider how you can maximize the fun and excitement your equipment offers. This manufacturer and the Electronic Industries Association's Consumer Electronics Group want you to get the most out of your equipment by playing it at a safe level. One that lets the sound come through loud and clear without annoying blaring or distortion-and, most importantly, without affecting your sensitive hearing.
Sound can be deceiving. Over time your hearing “comfort level” adapts to higher volumes of sound. So what sounds “normal” can actually be loud and harmful to your hearing. Guard against this by setting your equipment at a safe level BEFORE your hearing adapts.
To establish a safe level:
- Start your volume control at a low setting.
- Slowly increase the sound until you can hear it comfortably and clearly, and without distortion.
Once you have established a comfortable sound level:
- Set the dial and leave it there.
Taking a minute to do this now will help to prevent hearing damage or loss in the future. After all, we want you listening for a lifetime.
We Want You Listening For A Lifetime
Used wisely, your new sound equipment will provide a lifetime of fun and enjoyment. Since hearing damage from loud noise is often undetectable until it is too late, this manufacturer and the Electronic Industries Association's Consumer Electronics Group recommend you avoid prolonged exposure to excessive noise. This list of sound levels is included for your protection.
Decibel Level Example
30 Quiet library, soft whispers
40 Living room, refrigerator, bedroom away from traffic
50 Light traffic, normal conversation, quiet office
60 Air conditioner at 20 feet, sewing machine
70 Vacuum cleaner, hair dryer, noisy restaurant
80 Average city traffic, garbage disposals, alarm clock at two feet.
THE FOLLOWING NOISES CAN BE DANGEROUS UNDER CONSTANT EXPOSURE
90 Subway, motorcycle, truck traffic, lawn mower
100 Garbage truck, chain saw, pneumatic drill
120 Rock band concert in front of speakers,
140 Gunshot blast, jet plane
180 Rocket launching pad
thunderclap
Information courtesy of the Deafness Research Foundation.


S001_En
NOTE: This equipment has been tested and found to comply with the limits for a Class B digital device, pursuant to Part 15 of the FCC Rules. These limits are designed to provide reasonable protection against harmful interference in a residential installation. This equipment generates, uses, and can radiate radio frequency energy and, if not installed and used in accordance with the instructions, may cause harmful interference to radio communications. However, there is no guarantee that interference will not occur in a particular installation. If this equipment does cause harmful interference to radio or television reception, which can be determined by turning the equipment off and on, the user is encouraged to try to correct the interference by one or more of the following measures:
– Reorient or relocate the receiving antenna.
– Increase the separation between the equipment and receiver.
- Connect the equipment into an outlet on a circuit different from that to which the receiver is connected.
- Consult the dealer or an experienced radio/TV technician for help.
D8-10-1-2_En
CAUTION: This product satisfies FCC regulations when shielded cables and connectors are used to connect the unit to other equipment. To prevent electromagnetic interference with electric appliances such as radios and televisions, use shielded cables and connectors for connections. DB-10-3
D8-10-3a_En
[For European model]
WARNING: The apparatus is not waterproofs, to prevent fire or shocks hazard, do not expose this apparatus to rain or moisture and do not put any water source near this apparatus, such as vase, flower pot, cosmetics container and medicine bottle etc. D3-4-2-1-3_En
WARNING:
BEFORE PLUGGING IN THE UNIT FOR THE FIRST TIME, READ THE FOLLOWING SECTION CAREFULLY. The voltage of the available power supply differs according to country or region. Be sure that the power supply voltage of the area where this unit will be used meets the required voltage (e.g., 230V or 120V) written on the rear panel. D3-4-2-1-4_En
WARNING: No naked flame sources, such as lighted candle, should be placed on the apparatus. If naked flame sources accidentally fall down, fire spread over the apparatus then may cause fire.
D3-4-2-1-7a_En
WARNING: Slot and openings in the cabinet are provided for ventilation and to ensure reliable operation of the product and to protect it from overheating, to prevent fire hazard, the openings should never be blocked and covered with items, such as newspapers, table-cloths, curtains, etc. Also do not put the apparatus on the thick carpet, bed, sofa, or fabric having a thick pile. D3-4-2-1-7b_En
Operating Environment
Operating environment temperature and humidity: +5 °C – +35 °C (+41 °F – +95 °F); less than 85 %RH (cooling vents not blocked)
Do not install in the following locations
- Location exposed to direct sunlight or strong artificial light
- Location exposed to high humidity, or poorly ventilated location
D3-4-2-1-7c_En
This product complies with the Low Voltage Directive (73/23/EEC, amended by 93/68/EEC), EMC Directives (89/336/EEC, amended by 92/31/EEC and 93/68/EEC). D3-4-2-1-9a_En
The STANDBY/ON switch is secondary connected and therefore, does not separate the unit from mains power in STANDBY position. Therefore install the unit suitable places easy to disconnect the MAINS plug in case of the accident. The MAINS plug of unit should be unplugged from the wall socket when left unused for a long period of time. D3-4-2-2a_En
When disposing of used batteries, please comply with governmental regulations or environmental public instruction's rules that apply in your country/area. D3-4-2-3-1_En
Contents
01 Before you start
Features 7
What's in the box 8
Controls and displays 9
Transmitter (top) 9
Transmitter (front).... 10
Transmitter (rear).... 11
Headphones 12
02 Getting started
Loading the batteries 13
Charging the batteries 13
Notes on battery charging 14
Setting up 15
Connecting up 17
Connecting the transmitter to digital sources 17
Connecting the transmitter to analog sources 18
Plugging in 19
03 Operation
Using the system 20
Dolby Headphone 22
Dolby Pro Logic II 22
Listening with additional headphones ..... 23
04 Additional information
Troubleshooting.... 24
Precautions.... 26
Specifications....27
Chapter 1
Before you start
Features
High performance and quality
- Dolby Headphone technology allows you to enjoy high quality surround sound from any kind of audio/video source, including DVD, TV, VCR, game console and PC.
- Noiseless, wide-band audio is delivered to the listener using an uncompressed digital infrared transmission system.
- The system features Dolby* Digital, Dolby Pro Logic II and DTS** decoders built in.
- 24-bit A/D and D/A conversion and digital processing ensures sound quality is maintained.
- 40mm driver units in the headphones deliver dynamic sound.
Easy to use
- Connection to audio and video components is easy, using just a single cable. Operation is simplified with many automatic functions.
- Low profile, modern design.
- The transmitter can be placed horizontally or vertically.
- Phones jack and volume control available for corded headphones.
- Rechargeable nickel-metal hydride batteries (included) or dry-cell batteries (sold separately) can be used to power the headphones.
- Large volume control knob on the headphones makes for easy adjustment.
- Comfortable ear-pads with jersey cover.
* Manufactured under license from Dolby Laboratories. "Dolby", "Pro Logic", and the double-D symbol are trademarks of Dolby Laboratories.


** "DTS" and "DTS VIRTUAL" are trademarks of Digital Theater Systems, Inc.

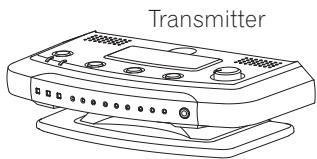
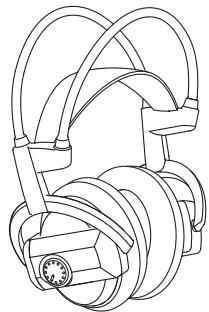
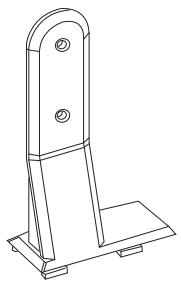
What's in the box
Check that all of the components and accessories are included before setting up the system.
Transmitter
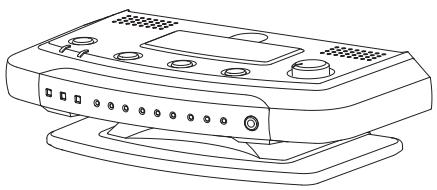
natural_image
Line drawing of a computer monitor with ports and buttons (no text or symbols)Headphones

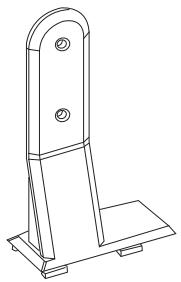
natural_image
Technical line drawing of a mechanical assembly with no visible text or symbolsVertical stand
natural_image
Technical line drawing of a metal bracket with mounting base (no text or symbols)AC power adaptor
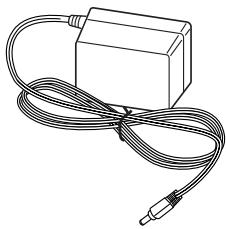
natural_image
Line drawing of a rectangular electronic device with coiled cable (no text or symbols)Rechargeable nickel-metal hydride batteries (2)
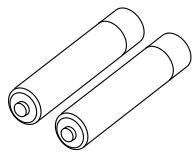
natural_image
Line drawing of two cylindrical batteries (no text or symbols)Coaxial digital cable
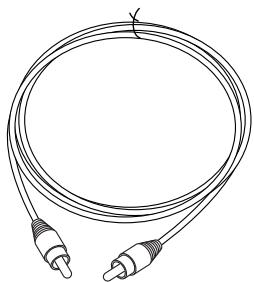
natural_image
Line drawing of a double-up cable with two connectors (no text or symbols)Operating instructions and Warranty card
Controls and displays
Transmitter (top)
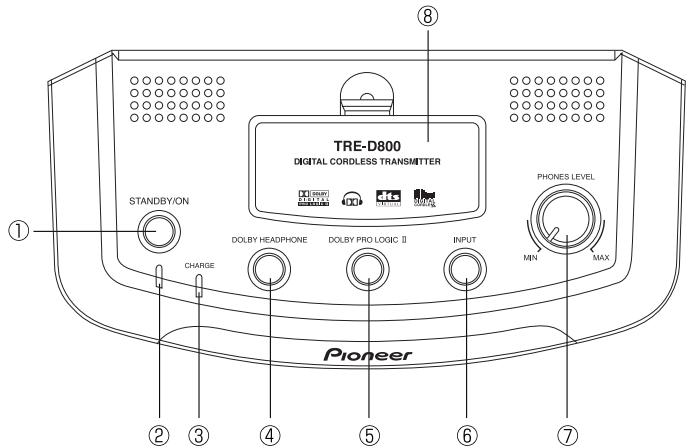
text_image
TRE-D800 DIGITAL CORDLESS TRANSMITTER STANDBY/ON CHARGE DOLBY HEADPHONE DOLBY PRO LOGIC II INPUT PHONES LEVEL MIN MAX Pioneer ① ② ③ ④ ⑤ ⑥ ⑦1 STANDBY/ON button
Press to turn the transmitter on / off.
2 Standby indicator
Lights when the transmitter is in standby. The indicator is unlit when the transmitter is on.
3 CHARGE indicator
Lights when the rechargeable batteries are being charged. The indicator is unlit when the batteries are fully charged.
4 DOLBY HEADPHONE button
Press to select the source input (DIGITAL 1 / DIGITAL 2 / ANALOG).
7 VOLUME control
Use to adjust volume level of headphones (sold separately) connected to the PHONES jack on the front panel.
8 Battery compartment
Use to recharge the supplied rechargeable batteries.
Transmitter (front)
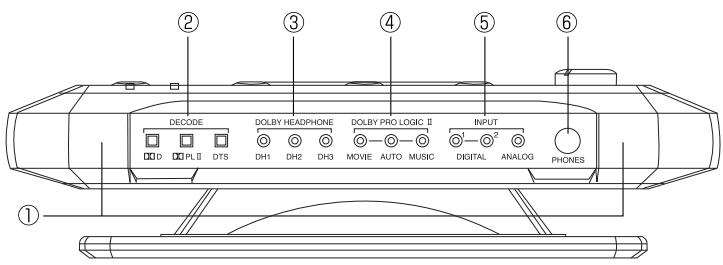
1 Infrared transmitters
Infrared transmitters are located on either side of the unit. Make sure there is an unobstructed path from the transmitter to your listening position.
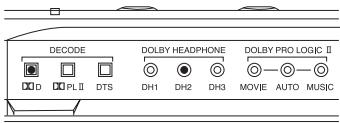
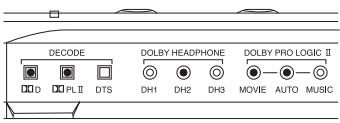
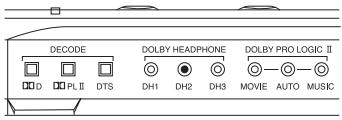
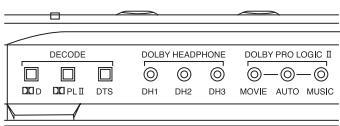
2 DECODE indicators
Light to indicate the automatic decoding mode for the current source:
D: Dolby Digital
DOPL II: Dolby Pro Logic II decoding of analog or digital source.
DTS: DTS
3 DOLBY HEADPHONE mode indicators
The corresponding indicator lights up to show the selected input mode (DIGITAL 1 / DIGITAL 2 / ANALOG).
6 PHONES jack
Use for connecting corded headphones.
Transmitter (rear)
text_image
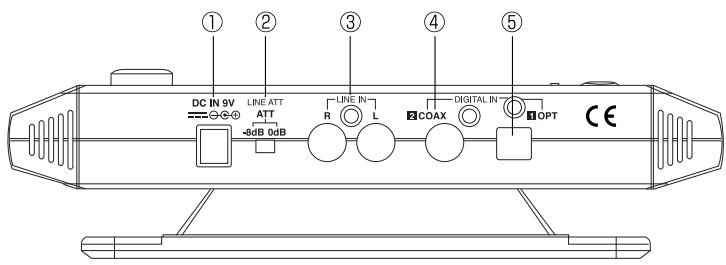
① ② ③ ④ ⑤ DC IN 9V LINE ATT ATT -8dB 0dB R L COAX DIGITAL IN IOPT CE1 DC IN jack (See page 19 for details)
Connect the supplied AC power adaptor to this jack. (Use only the supplied AC power adaptor. Using adpators with different plug polarities or other characteristics could cause malfunction.)
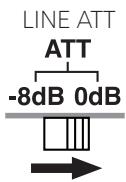
2 ATT switch (See page 18 for details)
Switches the analog input level between -8dB and 0dB for compatibility with a wide range of analog equipment.
3 LINE IN jacks (See page 18 for details)
Analog input jacks for connection to audio/video equipment such as a VCR or TV.
4 DIGITAL IN 2 COAX (See page 17 for details)
Coaxial digital input for connection to digital audio/video equipment such as a DVD player, LD player or CD player.
5 DIGITAL IN 1 OPT (See page 17 for details)
Optical digital input for connection to digital audio/video equipment such as a DVD player, LD player or CD player.
Headphones
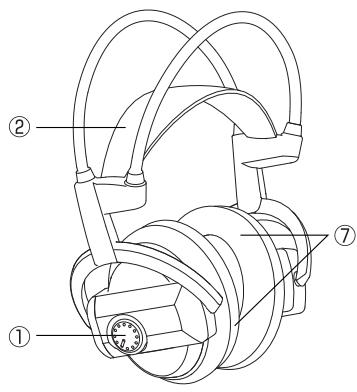
text_image
Technical diagram of a mechanical device with numbered components labeled ①, ②, and ⑦.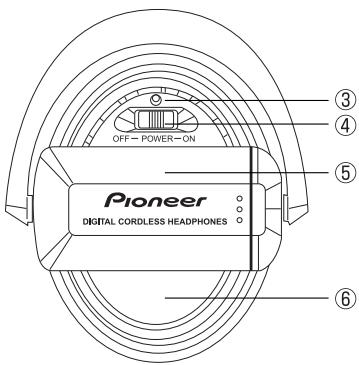
text_image
OFF - POWER - ON Pioneer DIGITAL CORDLESS HEADPHONES ③ ④ ⑤ ⑥1 VOL (Volume) control
Use to adjust the volume.
2 Self-adjusting headband
The headband automatically adjusts when you put the headphones on.
3 POWER indicator
Lights when the headphones are on.
4 POWER switch
Press to turn on / off.
5 Battery compartment
Press and slide where indicated to open the cover. Use with the supplied rechargeable batteries or size AA/LR6 (R6) dry-cell batteries.
6 Infrared sensor
Infrared sensors are located on either side.
7 Ear pads
Chapter 2
Getting started
Loading the batteries
1 Press and slide the cover as indicated to open.
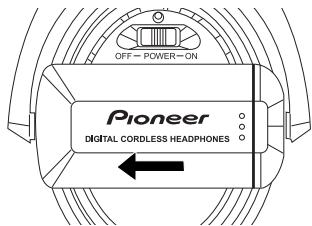
text_image
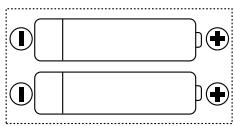
OFF - POWER-ON Pioneer DIGITAL CORDLESS HEADPHONES2 Load the batteries, making sure to put them in the right way around (as indicated).
natural_image
Two parallel batteries with one fully filled and two partially filled, each with a battery symbol (no text or labels)3 Slide the battery compartment cover back on.
About batteries
Use the supplied rechargeable batteries or size AA/LR6 (R6) dry-cell batteries to power the headphones. Use batteries of the same kind.
Replacing batteries
Replace the batteries when the POWER indicator on the headphones no longer lights and there is no sound from the headphones. For the supplied rechargeable batteries, see Charging the batteries below. If you are using dry-cell batteries, replace with new ones.
Approximate usage time is as follows:
Supplied rechargeable batteries (fully-charged): .... Approx. 16 hours
Size AA/LR6 alkaline batteries: Approx. 27 hours
Size AA/R6 manganese batteries: ..... Approx. 10 hours

Note
- Usage time may vary according to the temperature and other conditions.
Charging the batteries
1 Connect the supplied AC power adaptor to DC IN jack on the transmitter. Plug the adaptor into the wall outlet.
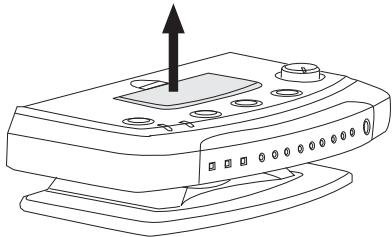
2 Open the battery compartment on the top of the transmitter.
natural_image
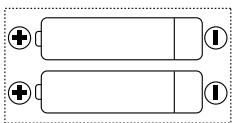
Line drawing of a device with a black upward arrow and circular buttons on top (no text or symbols)3 Insert the supplied rechargeable batteries making sure to put them in the right way around (as indicated).
natural_image
Two parallel batteries with positive and negative terminals, no text or symbols present4 The charging indicator lights up and charging starts.
The rechargeable batteries take about 10 hours to charge. The charging indicator will go off once the batteries are fully charged.
Charging indicator (See page 9 for details)
Red light ..... Charging
If the charging indicator does not light up, the batteries will not charge. Check the following points:
- Batteries are fully inserted.
- The batteries are the right way around according to the + and - markings.
- Charging terminals are not dirty.
- Only the supplied rechargeable batteries should be used.
If the charging indicator light switches off five seconds after charging starts, the batteries may have become unuseable. Replace them with new ones, available from your nearest Pioneer service center.
Be sure to charge the supplied rechargeable batteries before you start the system for the first time.
When the batteries are insufficiently charged, the POWER indicator does not light and the headphones will not work.
Charging and usage time
| Charging time | Usage time |
| 2 hours | Approx. 4 hours |
| 10 hours | Approx. 16 hours |

Note
- Usage time may vary according to the temperature and other conditions.
Notes on battery charging
- Battery performance is influenced by the surrounding temperature. Charge the supplied rechargeable batteries within a temperature range of 10 to 35 degrees celcius.
- Do not overcharge batteries. In order to protect batteries, do not repeatedly charge the batteries that are already fully charged.
- Batteries become slightly warm when charging. This is not a malfunction.
- Use only the supplied AC power adaptor with this unit. Using other AC adaptors may cause malfunction.
- For your safety, only the supplied rechargeable batteries can be charged by this unit. Other types of rechargeable batteries and dry-cell batteries cannot be charged.
- Rechargeable batteries should be replaced with new ones when they last only a short time after recharging. New batteries can be ordered from your nearest Pioneer service center.
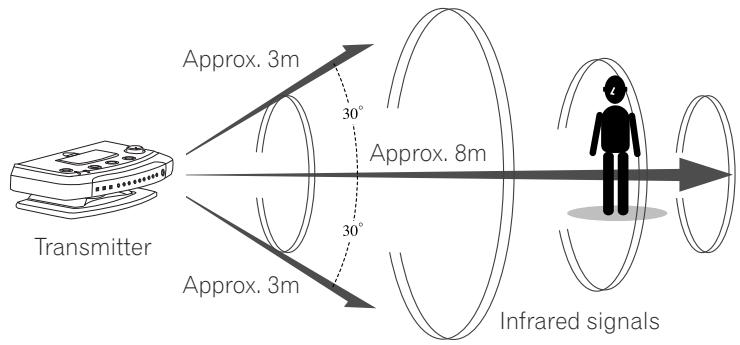
Setting up
The diagram below shows the approximate infrared transmission area from the transmitter. Set up the transmitter so that your listening position falls within this range, with no obstacles between the transmitter and headphones.
When the headphones are out of range they will automatically mute.
text_image
Transmitter Approx. 3m Approx. 8m Approx. 3m 30° 30° Infrared signalsThe transmitter can be placed horizontally or vertically. Out of the box, it is set for horizontal use.
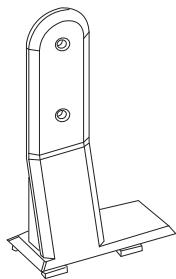
Setting up vertically
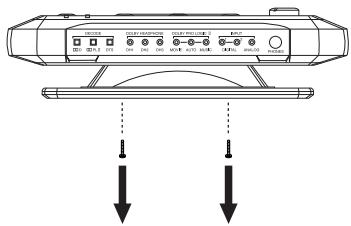
Use a screwdriver to remove the two screws fixing the stand to the bottom of the transmitter.
text_image
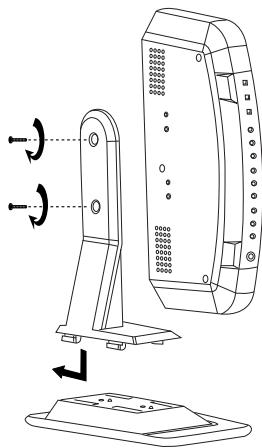
Diagram of a device with labeled ports and two downward arrows indicating measurement or dislocation points.Attach the top half of the vertical stand to the base, as shown below.
Use the two screws to fix the transmitter to the stand.
natural_image
Technical line drawing of a device with a vertical panel and base plate, showing rotational indicators (no text or symbols)
Note
- Infrared signals do not pass through walls or opaque glass. Set the transmitter in a location where there are no obstructions between the transmitter and headphones when used.
- Place the transmitter on a stable surface.
- Brightness of the infrared transmitter indicator may vary. However, it does not affect the transmission area.
Connecting up
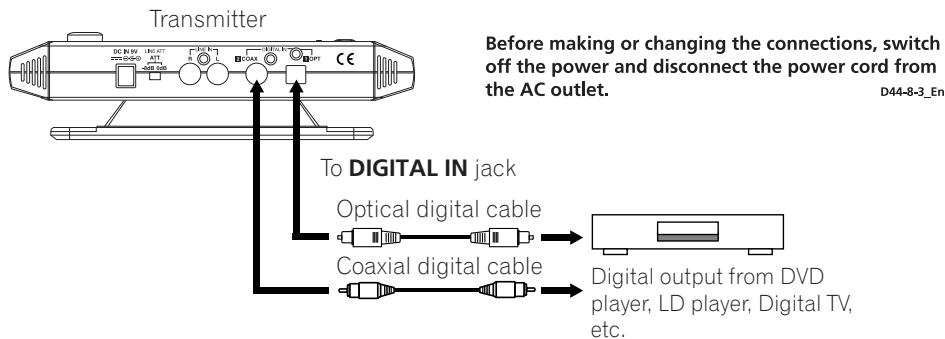
Connecting the transmitter to digital sources
You can connect the digital output of a DVD player, LD player, digital TV, etc. directly to one of the DIGITAL IN jacks on the transmitter unit using either the supplied coaxial digital cable, or a commercially available optical digital cable.
text_image
Transmitter Before making or changing the connections, switch off the power and disconnect the power cord from the AC outlet. To DIGITAL IN jack Optical digital cable Coaxial digital cable Digital output from DVD player, LD player, Digital TV, etc. D44-8-3_En
Note
- The optical digital cable is an extremely high-precision device and is sensitive to jolts and external pressure. Be careful when inserting and removing the cable plug.
- An AC-3 RF input is not provided with this system. AC-3 RF signals from LD players cannot be directly input.
- The digital inputs supports only 44.1kHz or 48kHz sample rates. (The DIGITAL indicator on the front panel flashes if the sample rate is not compatible.) Set the digital output of your DVD player to 48kHz.
- Use the analog inputs when playing DAT tapes in LP mode (with 32kHz sample rate).
- This system does not support MPEG-2 AAC format.
About DTS
- A DTS-compatible DVD player is required for playback of DVDs with DTS audio. (For further details, see the operating instructions of the DVD player.)
- When playing DTS LDs and CDs, you may hear noise when scanning. This is not a malfunction.
- Make sure that the DVD player is set to output DTS digital audio. (See the operating instructions for the DVD player.) Depending on the disc, you may also have to select DTS audio from the disc's menu.
- Depending on the DVD player, you may not be able to hear DTS audio from the analog outputs. In this case, use the digital output.
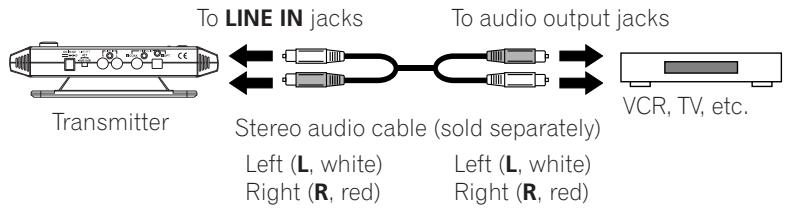
Connecting the transmitter to analog sources
Use a commercially available stereo audio cable with RCA/pin plugs to connect the audio output jacks of a VCR, TV or other component to the LINE IN (L/R) jacks on the transmitter.
text_image
To LINE IN jacks Transmitter Stereo audio cable (sold separately) Left (L, white) Right (R, red) To audio output jacks VCR, TV, etc.For equipment that has only a mini jack headphone output, such as a personal CD player, use a commercially available stereo mini plug to RCA/pin plug x 2 cable. Note that the signal may be noisy if the volume on the player is set too low.
Setting the input level
Set the ATT (attenuator) switch to 0dB if the volume is low using analog input.
text_image
LINE ATT ATT -8dB 0dB| Setting | Components connected |
| 0dB | TV, portable players and others with a low output level |
| -8dB | Other components (initial setting) |

Note
- Be sure to lower the volume before setting the ATT switch.
Set the ATT switch to -8dB if audio input to the LINE INPUT jacks is distorted (sometimes noise can be heard at the same time).
Plugging in
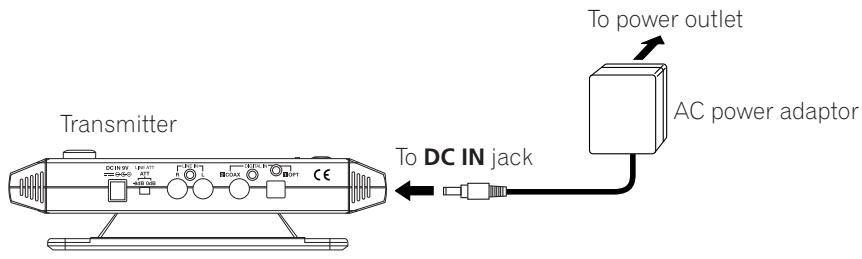
text_image
Transmitter DC IN jack AC power adaptor To power outlet To DC IN jack
Note
- Use only the supplied AC power adaptor. Using other AC power adaptors with different plug polarity or other characteristics can cause product failure.
- Even AC power adaptors with the same voltage and plug polarity can damage this product due to the current capacity or other factors.
Chapter 3
Operation
Using the system
1 Turn on your source component.
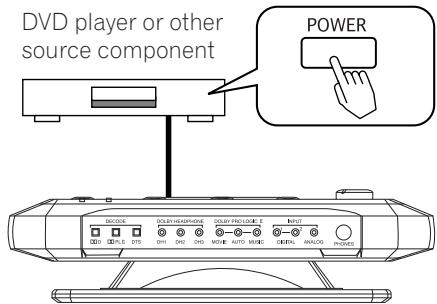
text_image
DVD player or other source component POWER DECODE DOLEY HEADPHONE DOLEY PRO-LOCK E INPUT STYLE STS DH1 DH2 CHS MOVIE AUTO MUSIC DIGITAL ANALOG PONIES2 Press STANDBY/ON to turn on the transmitter.
The STANDBY indicator goes out when the unit is on.
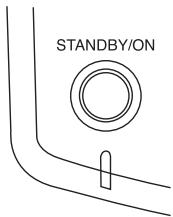
text_image
STANDBY/ON
text_image
TRE-D800 DIGITAL CORDLESS TRANSMITTER STANDBYON DOLLEY HEADPHONE DOLLEY PRO LOGIC E RINT Pione's LEVEL Pioneer3 Slide the POWER switch on the headphones to ON.
The POWER indicator lights when the headphones are on.
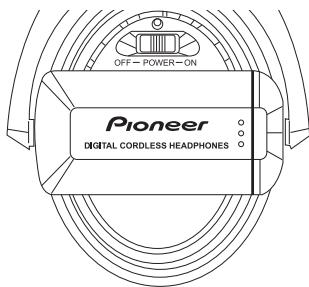
text_image
OFF - POWER - ON Pioneer DIGITAL CORDLESS HEADPHONES4 Press INPUT to select the source component you want to listen to.
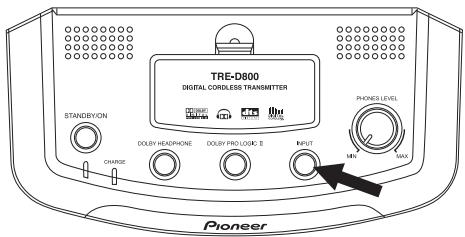
text_image
TRE-D800 DIGITAL CORDLESS TRANSMITTER STANDBYON ORANGE DOLBY HEADPHONE DOLBY PRO LOGIC 2 INPUT MIPL MAX PIONEER| Indicator | Selected sound source |
| DIGITAL 1 | Source connected to the DIGITAL IN 1 (OPT) jack |
| DIGITAL 2 | Source connected to the DIGITAL IN 2 (COAX) jack |
| ANALOG | Source connected to the LINE IN jack |

Note
- To listen to dual audio (main/sub) sound sources, connect to the LINE IN jack, and then select the channel(s) you want to listen to on the source.
5 Start playback of your source component.
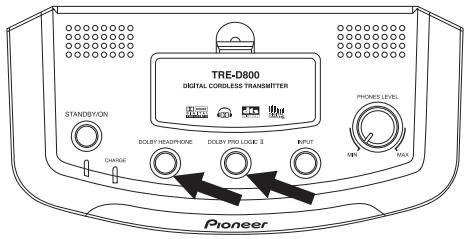
6 Use the DOLBY HEADPHONE and DOLBY PRO LOGIC II buttons to select the output mode (surround sound effect).
Press repeatedly to change playback modes (see the table below).
text_image
TRE-D800 DIGITAL CORDLESS TRANSMITTER STANDBYON CHANGE DOILEY HEADPHONE DOILEY PRO LOGIC 3 INPUT PRONES LEVEL MINI MAX PioneerIndicator
Output mode (Surround effect)
Multi-channel source DH mode
Dolby Headphone playback for multichannel Dolby Digital or DTS sources.
This setting recreates 5.1 channel (front left/right, center, surround left/right and subwoofer) playback through headphones.
Dolby Headphone playback, for stereo sources, with Dolby Pro Logic II decoding for surround sound.
This setting creates 5.1 channel (front left/right, center, surround left/right and subwoofer) playback from stereo sources through headphones.
Dolby Headphone playback, for stereo sources, without Dolby Pro Logic II decoding.
This setting recreates stereo playback from speakers in front of you through headphones.
Dolby Headphone mode OFF
Regular headphone playback.
7 Adjust the volume.

text_image
DIGITAL CORDLESS Pioneer VOL DIGITAL CORDLESS HEADPHONESTo adjust the volume of headphones connected to the PHONES jack, use the PHONES LEVEL knob.
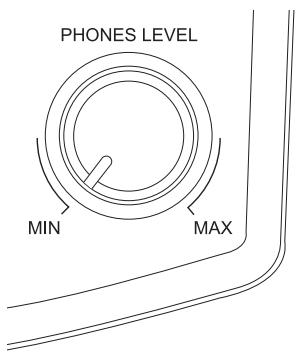
text_image
PHONES LEVEL MIN MAXDolby Headphone
This system incorporates Dolby Headphone technology. Dolby Headphone allows you to enjoy multichannel surround sound effects with two-channel stereo headphones. Dolby Headphone works with both multichannel sources, such as Dolby Digital and DTS DVDs, and stereo sources. Surround sound from stereo sources is achieved using Dolby Pro Logic II decoding.
About Dolby Headphone effects
Music and movie soundtracks through headphones can sound rather unnatural. This is because they are mixed and produced to be listened to through speakers some distance in front of you (or around you in the case of multichannel sources).
Dolby Headphone recreates the sound of speakers in a room, thereby making the sound through headphones more natural for the listener.
You can choose between three room types:
DH1: Mixing room with very little reverberation.
DH2: Ordinary listening room with moderate reverberation (default setting).
Dolby Pro Logic II is a decoding technology for playing two-channel sources in 5.1 channel surround. Like Dolby Digital, the main five channels are full bandwidth. Dolby Pro Logic II decoding has minimal impact on sound quality and creates a very natural surround sound effect.
Dolby Pro Logic II surround effects AUTO (default setting)
This mode automatically selects the
MOVIE or MUSIC mode according to the input source.
MOVIE mode is selected when playing DVDs (digital or analog input).
MUSIC mode is selected when playing CDs (digital input).
MOVIE
This mode is suitable for stereo TV programs and sources encoded with Dolby Surround. The effect is close in quality to discrete 5.1 channel surround.
MUSIC
This mode is suitable for all music sources and reproduces the sound field of a listening room with good acoustic characteristics.
Listening with additional headphones
Connect your wired headphones to the PHONES jack to enjoy the surround sound experience.

Note
- When unplugging headphones from the PHONES jack, pull out the plug holding the plug body. Never pull on the cable.
natural_image
Line drawing of a device with labeled components, no text or symbols presentnatural_image
Line drawing of a pair of headphones with attached cables (no text or symbols)Chapter 4
Additional information
Troubleshooting
If you run into any problems using this headphone system, refer to the following checklist. Incorrect operation may result in some problems. In addition, the problems may be caused by malfunctions on the components connect to this system. Should any problem persist, consult your nearest Pioneer service center or your dealer to carry out repair work.
| Symptom | Cause and remedy |
| No sound.Sound intermittent. Noise. | Check the batteries are placed in correct polarities.Batteries are completely used up.Check the connection between the AC power adaptor and the wall outlet.Check the connection between the system and the AV components.Turn on the AV components connected to the transmitter and start the program (playback).Check that you have selected the component you want to listen to.If you connect toLINE IN(analog input) on the transmitter, raise the volume level on the connected AV component.Raise the headphone volume.Check the transmitter is turned on.You are trying to play a DTS audio track on a DVD player that does not support DTS. Either use a DVD player that supports DTS or select a Dolby Digital or PCM audio track.You are playing back a DVD disc recorded in DTS when DTS digital output setting for the DVD player (including game machines) is off. Refer to the operating instructions of the DVD player and switch the DTS digital output on.You are playing back a DVD disc recorded in DTS when the DVD player (including game machines) and transmitter are analog connected.The headphones are not receiving infrared signals from the transmitter. Check that there are no obstacles between the transmitter and headphones. Use the headphones nearer to the transmitter, or change the position or angle of the transmitter. Make sure your hands and hair do not cover the infrared sensor on the headphones.The headphones are picking up stray infrared signals from other equipment. Make sure that the infrared sensor on the headphones is not exposed to direct sunlight. Do not use this system near a plasma display panel.Occasionally, clock accuracy problems with equipment connected to one of the digital inputs may result in loss of sound or intermittent sound. In these cases, change the connection to analog. |
| DIGITAL inputIndicator flashing. | This system supports 44.1kHz and 48kHz digital audio. Set the digital output of your DVD player to 48kHz, or use the analog connection. |
| DTS sources do not play. | Your source component must support DTS playback. Check the operating instructions of the connected source component for DTS compatibility. |
| Distorted sound (or noise). | Set the ATT switch on the transmitter to -8dB.If you connected your source component to this system from the headphone output, lower the volume level of the source component. |
| Quiet sound. | Set the ATT switch on the transmitter to 0dB.If you connected your source component to this system from the headphone output, raise the volume level of the source component.Raise the headphone volume. |
| The surround sound effect is not obtained. | The DH mode is set to OFF.The audio being played is not multichannel. The surround sound effect does not work for monaural sound sources. |
| DD indicator does not light up. | The digital audio output setting for the DVD player (including game machines) is set to PCM. Refer to the operating instructions supplied with the DVD player and change the setting to Dolby Digital.The source is not Dolby Digital encoded.The audio in the current chapter is not Dolby Digital encoded. |
| DOPL II indicator does not light up. | The DH mode is set to OFF.The source is DTS encoded.The source is non-stereo Dolby Digital encoded.Dolby Pro Logic II is set to OFF. |
| DTS indicator does not light up. | The DTS digital output setting on the DVD player (including game machines) is set to OFF. Refer to the operating instructions supplied with the DVD player and set the DTS digital output setting to ON.The source is not DTS encoded.The audio in the current chapter is not DTS encoded.The DVD player does not support DTS format. Use a DVD player that supports DTS. |
| The batteries will not charge. | Dry-cell batteries or rechargeable batteries other than the ones supplied are being used. Use only the supplied rechargeable batteries.The rechargeable batteries are exhausted. Replace them with new rechargeable batteries. |
This system may not work properly due to external effects such as static electricity. Unplug the AC power adaptor and plug it in again. If this does not correct the problem, please consult your nearest Pioneer service center.
Precautions
Listening at high volume
Listening to headphones at high volume for an extended period can result in hearing damage. Please be careful not to set the volume too high, especially when listening in a noisy environment.
Please also note that some sound may leak from the headphones when listening at higher volume levels.
Ear pads
The color of the ear pad material may fade with use.
Cleaning
Use a soft and dry cloth for cleaning. Use a soft cloth slightly moistened with mild detergent solution, if necessary. Do not use solvents such as thinner, benzene or alcohol as these may damage the surface.
About safety
- Do not drop, hit or otherwise expose the transmitter or headphones to strong shocks of any kind. This could damage the product.
- Do not disassemble or attempt to open any parts of the system.
Power source and placement
- If you are not going to use the system for a long time, unplug the AC power adaptor from the outlet. When removing the plug, grip the AC power adaptor. Do not pull on the cord.
- Do not place the system in any of the following locations:
- Location exposed to direct sunlight, in a car with all the windows closed, near a heater, or other extremely high-temperature locations.
- Dusty location.
- On an unsteady or inclined surface.
- Location exposed to large amounts of vibration.
- Bathroom or other high-humidity locations.
When something is wrong with the product
- If something goes wrong with the product, or if a foreign object gets inside the unit, immediately turn off the power and consult your nearest Pioneer service center.
- When taking the system to Pioneer service center, be sure to take both the headphones and transmitter.
Specifications
Transmitter TRE-D800
Decoder function .... Dolby Digital .... Dolby Pro Logic II .... DTS .... PCM (Fs=44.1kHz, 48kHz)
Secondary carrier wave frequency... 3.75MHz
Transmission distance Approx. 8m to the front
Transmission range.... 12Hz - 22kHz
Distortion rate.... 1% or less (1kHz)
Audio input ..... Optical digital input (rectangular type) x 1 ..... Coaxial digital input (RCA terminal) x 1 ..... Analog input (RCA terminal L/R) x 1
Power source.... DC 9V .... (from the supplied AC power adaptor)
Dimensions..... 209 (W) x 50 (H) x 104 (D) mm
Mass..... Approx. 520g
Headphones SE-DHP800
Playback frequency range...... 12Hz - 22kHz
Power source..... DC 2.4V
(supplied rechargeable battery x 2)
DC 3V
(size AA/LR6 (R6) dry cell battery x 2)
Mass..... Approx. 250g (excluding batteries)
Accessories
AC power adaptor (9V 800mA) ....1
Rechargeable nickel-metal hydride battery (size AA) 2
Coaxial digital cable (1.5m) 1
Vertical stand 1
Operating instructions ....1
Warranty card 1

Note
- Design and specifications are subject to change without notice.
IMPORTANT

This Class B digital apparatus complies with Canadian ICES-003.
natural_image
Line drawing of a computer monitor with ventilation slots and buttons (no text or symbols)Casque
natural_image
Technical line drawing of a mechanical assembly with no visible text or symbolsSupport vertical
natural_image
Technical line drawing of a mechanical bracket or support structure (no text or symbols)natural_image
Line drawing of a rectangular electronic device with coiled cable and connector (no text or symbols)natural_image
Two cylindrical batteries shown in line drawing style (no text or symbols)natural_image
Line drawing of a double-up cable with two connectors (no text or symbols)text_image
① ② ③ ④ ⑤ DC IN 9V LINE ATT ATT -8dB 0dB R L COAX DIGITAL IN IOPT CEtext_image
Technical diagram of a mechanical device with numbered components labeled ①, ②, and ⑦
text_image
OFF- POWER-ON Pioneer DIGITAL CORDLESS HEADPHONES ③ ④ ⑤ ⑥natural_image
Two parallel batteries with one fully filled and two partially filled, each with a battery symbol (no text or labels)natural_image
Line drawing of a mechanical device with a central knob and an upward arrow indicator (no text or symbols)natural_image
Two parallel batteries with positive and negative terminals, no text or symbols presenttext_image
Diagram showing a device with labeled ports and two downward arrows indicating directional flow or signal flow.natural_image
Technical line drawing of a device with a base, showing mechanical components and directional arrows (no text or symbols)
A Noter
text_image
LINE ATT ATT -8dB 0dBtext_image
STANDBY/ON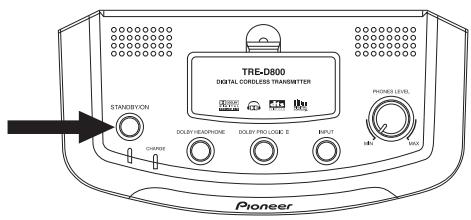
text_image
TRE-D800 DIGITAL CORDLESS TRANSMITTER STANDBIVION DOLLEY/VEACHSTONE DOLLEY PRO LOGIC 2 INPUT PHONES LEVEL Pioneertext_image
DIGITAL CORDLESS Pioneer DIGITAL CORDLESS HEADPHONESnatural_image
Line drawing of a transmetteur device with control panel and buttons (no text or symbols)Vers la prise PHONES

natural_image
Line drawing of a pair of headphones with attached wires (no text or symbols)Chapitre 4
Autres informations
Dépannage
(2 piles rechargeables fournies)
DC 3V
Support vertical ....1
Mode d'emploi ....1
natural_image
Line drawing of a computer monitor with ventilation slots and buttons (no text or symbols)Auriculares

natural_image
Technical line drawing of a mechanical component with curved and straight lines (no text or symbols)Soporte vertical
natural_image
Technical line drawing of a mechanical bracket or support structure (no text or symbols)natural_image
Line drawing of a rectangular electronic device with coiled cable (no text or symbols)natural_image
Line drawing of two cylindrical batteries (no text or symbols)Cable digital coaxial

natural_image
Line drawing of a double-up cable with two connectors (no text or symbols)7 Control VOLUME (VOLUMEN)
text_image
① ② ③ ④ ⑤ DC IN 9V LINE ATT ATT -8dB 0dB R LINE IN L COAX DIGITAL IN OPT CE4 DIGITAL IN 2 COAX (ENTRADA
text_image
Technical diagram of a mechanical device with numbered components labeled ①, ②, and ⑦.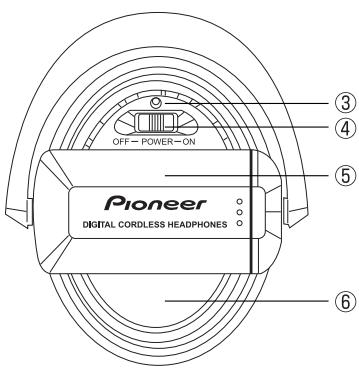
text_image
OFF- POWER-ON Pioneer DIGITAL CORDLESS HEADPHONES ③ ④ ⑤ ⑥1 Control VOL (Volumen)
natural_image
Two parallel batteries with battery symbols (I and +) on each side, no text or labels present.natural_image
Line drawing of a mechanical device with an upward arrow and control buttons (no text or symbols)natural_image
Two parallel batteries with positive and negative terminals, no text or symbols presenttext_image
Diagram of a device with labeled ports and two downward arrows indicating directional flow or measurement.natural_image
Technical line drawing of a device with a base, side-mounted sensor, and top panel (no text or symbols)
Nota
text_image
LINE ATT ATT -8dB 0dBtext_image
DIGITAL CORDLESS Pioneer DIGITAL CORDLESS HEADPHONES VOLnatural_image
Line drawing of a transducer device with labeled components (no text or symbols on the diagram itself)A la toma PHONES (AURICULARES)
natural_image
Line drawing of a mechanical device with coiled components and wires (no text or symbols)Capítulo 4
Cable digital coaxial (1,5m) 1
Soporte vertical ....1
AFTER-SALES SERVICE FOR PIONEER PRODUCTS
Please contact the dealer or distributor from where you purchased the product for its after-sales service (including warranty conditions) or any other information. In case the necessary information is not available, please contact the Pioneer's subsidiaries (regional service headquarters) listed below:
PLEASE DO NOT SHIP YOUR PRODUCT TO THE COMPANIES at the addresses listed below for repair without advance contact, for these companies are not repair locations.
AMERICA
PIONEER ELECTRONICS (USA) INC.
CUSTOMER SUPPORT DIVISION
P.O. BOX 1760, LONG BEACH, CA 90801-1760, U.S.A.
CUSTOMER SERVICE HOTLINE : (800) 421-1404
EUROPE
PIONEER EUROPE NV
EUROPEAN SERVICE DIVISION
HAVEN 1087, KEETBERGLAAN 1, B-9120 MELSELE, BELGIUM
ASEAN
PIONEER ELECTRONICS ASIACENTRE PTE. LTD.
SERVICE DEPARTMENT
253, ALEXANDRA ROAD #04-01 SINGAPORE 159936
JAPAN AND OTHERS
PIONEER CORPORATION (HEAD OFFICE)
CUSTOMER SUPPORT CENTER
Published by Pioneer Corporation.
Copyright © 2004 Pioneer Corporation.
All rights reserved.
Publication de Pioneer Corporation.
© 2004 Pioneer Corporation.
PIONEER ELECTRONICS (USA) INC.
P.O. BOX 1540, Long Beach, California 90810-1540, U.S.A. TEL: (800) 421-1404
PIONEER ELECTRONICS OF CANADA, INC.
300 Allstate Parkway, Markham, Ontario L3R OP2, Canada TEL: (905) 479-4411
PIONEER EUROPE NV
Haven 1087, Keetberglaan 1, B-9120 Melsele, Belgium TEL: 03/570.05.11
PIONEER ELECTRONICS ASIACENTRE PTE. LTD.
253 Alexandra Road, #04-01, Singapore 159936 TEL: 656-472-1111
PIONEER ELECTRONICS AUSTRALIA PTY. LTD.
178-184 Boundary Road, Braeside, Victoria 3195, Australia, TEL: (03) 9586-6300
PIONEER ELECTRONICS DE MEXICO S.A. DE C.V.
Blvd.Manuel Avila Camacho 138 10 piso Col.Lomas de Chapultepec, Mexico,D.F. 11000 TEL: 55-9178-4270
K002E