PDK-TS06 - Audio accessory PIONEER - Free user manual and instructions
Find the device manual for free PDK-TS06 PIONEER in PDF.

| Product type | Plasma display stand |
| Brand | PIONEER |
| Model | PDK-TS06 |
| Compatibility | Pioneer PDP-614MX plasma screen (61 inches) |
| Dimensions (W x H x D) | 1125 x 207.4 x 440 mm (44.3 x 8.2 x 17.3 inches) |
| Weight | 8.8 kg (19.4 lbs) |
| Material | Metal |
| Operating conditions | Temperature: 0°C to 40°C, humidity: 20% to 80% |
| Storage conditions | Temperature: -10°C to 50°C, humidity: 10% to 90% |
| Installation | By a qualified technician, at least 3 people |
| Safety | Do not modify parts, use appropriate screws, avoid unstable surfaces |
| Package contents | Stand, screws, bar, handling instructions |
| Fall prevention | Use the provided tip-over prevention strap |
| Maintenance and cleaning | Clean with a soft, dry cloth, avoid moisture and dust |
| Repairability | Spare parts available from the dealer |
Frequently Asked Questions - PDK-TS06 PIONEER
User questions about PDK-TS06 PIONEER
0 question about this device. Answer the ones you know or ask your own.
Ask a new question about this device
Download the instructions for your Audio accessory in PDF format for free! Find your manual PDK-TS06 - PIONEER and take your electronic device back in hand. On this page are published all the documents necessary for the use of your device. PDK-TS06 by PIONEER.
USER MANUAL PDK-TS06 PIONEER
Operating instructions
Mode d'emploi
取掇説明書
AFTER-SALES SERVICE FOR PIONEER PRODUCTS
Please contact the dealer or distributor from where you purchased the product for its after-sales service (including warranty conditions) or any other information. In case the necessary information is not available, please contact the Pioneer's subsidiaries (regional service headquarters) listed below:
PLEASE DO NOT SHIP YOUR PRODUCT TO THE COMPANIES at the addresses listed below for repair without advance contact, for these companies are not repair locations.
AMERICA
PIONEER ELECTRONICS (USA) INC.
CUSTOMER SUPPORT DIVISION
P.O. BOX 1760, LONG BEACH, CA 90801-1760, U.S.A.
CUSTOMER SERVICE HOTLINE : (800) 421-1404
EUROPE
PIONEER EUROPE NV
EUROPEAN SERVICE DIVISION
HAVEN 1087, KEETBERGLAAN 1, B-9120 MELSELE, BELGIUM
ASEAN
PIONEER ELECTRONICS ASIACENTRE PTE. LTD.
SERVICE DEPARTMENT
253, ALEXANDRA ROAD #04-01 SINGAPORE 159936
JAPAN AND OTHERS
PIONEER CORPORATION (HEAD OFFICE)
CUSTOMER SUPPORT CENTER
Published by Pioneer Corporation.
Copyright © 2004 Pioneer Corporation.
All rights reserved.
八才二株式会社
PIONEER ELECTRONICS (USA) INC.
P.O. BOX 1540, Long Beach, California 90810-1540, U.S.A. TEL: (800) 421-1404
PIONEER ELECTRONICS OF CANADA, INC.
300 Allstate Parkway, Markham, Ontario L3R OP2, Canada TEL: 1-877-283-5901
PIONEER EUROPE NV
Haven 1087, Keetberlaan 1, B-9120 Melsele, Belgium TEL: 03/570.05.11
PIONEER ELECTRONICS ASIACENTRE PTE. LTD.
253 Alexandra Road, #04-01, Singapore 159936 TEL: 65-6472-7555
PIONEER ELECTRONICS AUSTRALIA PTY. LTD.
178-184 Boundary Road, Braeside, Victoria 3195, Australia, TEL: (03) 9586-6300
PIONEER ELECTRONICS DE MEXICO S.A. DE C.V.
Blvd. Manuel Avila Camacho 138 10 piso Col.Lomas de Chapultepec, Mexico,D.F. 11000 TEL: 55-9178-4270
Operating Instructions
Thank you for purchasing the PDK-TS06 Plasma Display Stand.
Before using this product, please read this Operating Instructions thoroughly so that you can use this product at its full functionality.
After reading, retain this Operating Instructions in an easily accessible location so that you can refer to this manual whenever you have a problem or trouble during use.
- This plasma display stand is designed specifically for use with PIONEER 61-inch plasma displays(PDP-614MX).
Notes on Installation Work:
This product is marketed assuming that it is installed by qualified personnel with enough skill and competence.
Always have an installation specialist or your dealer install and set up the product.
PIONEER cannot assume liabilities for damage caused by mistake in installation or mounting, misuse, modification or a natural disaster.
Attention: Sales Agents and Technicians
To ensure the user's safety, be sure to select a place sufficiently strong to bear the weight of the Plasma Display and the different units.
Installation should be performed by a minimum of three persons.
Be careful not to lose removed screws, etc.
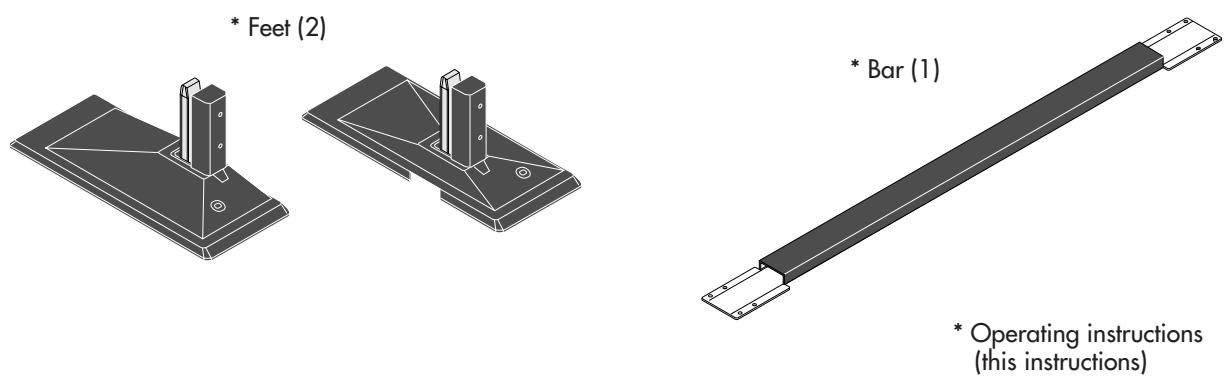
Parts Included
Stand assembly screws M4 x 14 (8)

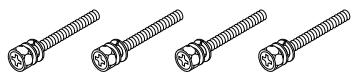
Display mounting screws M6 x 50 (4)
* Operating instructions (this instructions)
Specifications
Model: PDK-TSO6
External dimensions: (W) 1125 × (H) 207.4 × (D) 440 ~mm
(W) 44.3 × (H) 8.2 × (D) 17.3 inches
Weight: 8.8kg
19.4 lbs
Operating conditions: Temperature 0° to 40°C / 32°F to 104°F Humidity 20%~80%
Storage conditions: Temperature -10° to 50°C / 14°F to 122°F Humidity 10%~90%
Before Use…
Symbols
Various symbols are used in this Handling Instructions for the safe and proper use of the product as well as preventing any injury or damage to persons or property. These symbols and their meanings are described below. Please have a good understanding of these matters before reading the main text of the manual.
WARNING

Ignoring this indication and improper handling could be the cause of personal injury such as a serious injury or death.
CAUTION

Ignoring this indication and improper handling could cause injury to a person or damage to the surrounding household belongings.
Examples of Symbols

This symbol informs that there are contents that demand caution (including warnings). Concrete details of the caution are written within the diagram.

This symbol indicates a prohibited matter.
Concrete details of the prohibition are written within the diagram.

This symbol indicates something that must be done. Concrete details of the prohibition are written within the diagram.

WARNING

- Be sure to have the Plasma Display installed by your store of purchase following the instructions in this manual. If installed incorrectly, the Plasma Display could tip over, resulting in injury.

- To ensure safety, tighten bolts and screws securely. Failure to do so could cause the Plasma Display to tip over, resulting in injury.

- Do not modify parts. Doing so could cause the Plasma Display to tip over, resulting in injury.

- Do not use damaged parts. Doing so could cause the Plasma Display to tip over, resulting in injury. If a part should be damaged, contact the store of purchase.

- Each unit is designed specifically for use with PIONEER 61-inch(PDP-614MX) plasma displays. Please do not mount any other equipment with these items. Doing so may cause the item to fall over and result in injury.

- Do not set on shaky stands, tilted surfaces or other unstable places. Doing so could cause the Plasma Display to tip over or fall, resulting in injury. Moreover, Do not install into a vehicle.

CAUTIONS

- Do not obstruct the Plasma Display's ventilation holes.
If the ventilation holes are covered, the heat will build up inside, and this could lead to fire.
For example, do not install the Plasma Display in narrow spaces where ventilation is poor, do not place covers over it, etc.

- Do not install the Plasma Display near air conditioner air outlets or in places where vibrations are strong.
Doing so could lead to fire or electric shock.

- Do not install the Plasma Display in humid or dusty places or places exposed to soot or vapor (such as in kitchens, near humidifiers, etc.). Doing so could lead to fire.
Do not install the Plasma Display outdoors. Doing so could lead to fire or electric shock.

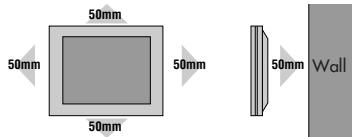
- When installing the Plasma Display, leave sufficient space around it, as shown in the diagram. Failure to do so could cause heat to build up inside, leading to fire.

- Hold the Plasma Display securely when mounting the units on it. Failure to do so could cause the Plasma Display to fall, resulting in injury.

- When installing the Plasma Display on a stand with casters, be sure to block the casters. If the stand should move, the Plasma Display could fall, resulting in injury.

- The Plasma Display is heavy, so be sure to install in a stable place and take measures to prevent it from tipping over and causing injury.
The Plasma Display has a high center of gravity. It should be unpacked and moved by a minimum of three people, holding it at the top and bottom. Failure to do so could cause the Plasma Display to fall, resulting in injury.
NOTES
Avoid dusty or humid rooms and rooms filled with soot or cigarette smoke.
The Plasma Display's screen could get dirty, resulting in poor picture quality.
Avoid places where the screen is exposed to direct sunlight or strong artificial light.
If surrounding light should shine on the screen, the screen will appear white and be hard to see.
Do not install in places where the temperature is high or low.
Doing so could result in damage.
Additional fall prevention measures
- Either use the tip prevention fitting included with the display to fix the plasma display to a wall, pillar or other strong place or use the holes on the back on the stand to fix to a table, etc..(Do not use with the separately sold wall mount unit.)
- Pay attention to the rope when moving the Plasma Display.
- The screws for fastening the display to the wall, a pillar or a stand are not included. Please obtain screws suited for the surface on which the display is to be mounted.
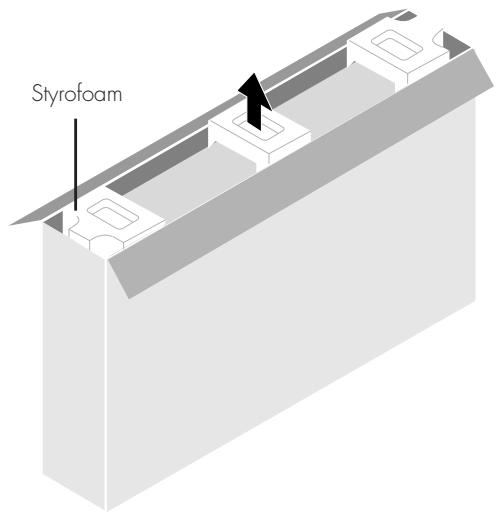
Preparations Unpack the plasma display.
-
Open the top of the cardboard in which the plasma display is packed and remove the three pieces of styrofoam.
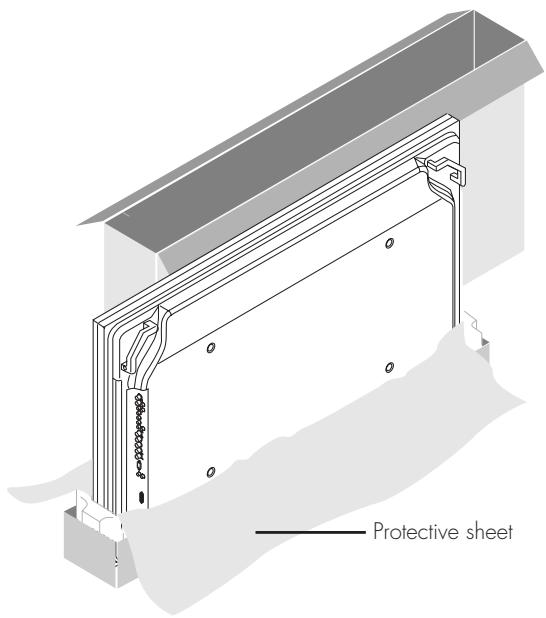
-
Remove the cardboard from the top and open the protective sheet.

CAUTION:
Set up the Plasma Display promptly after unpacking. Leaving it could result in the display falling over and breaking.
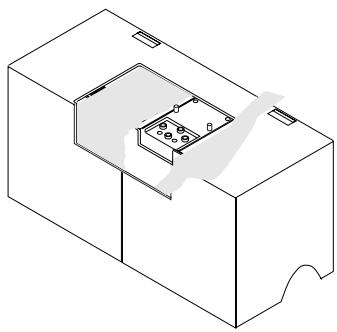
1. Open the package and take out the cardboard and accessories (screws and handling instructions).
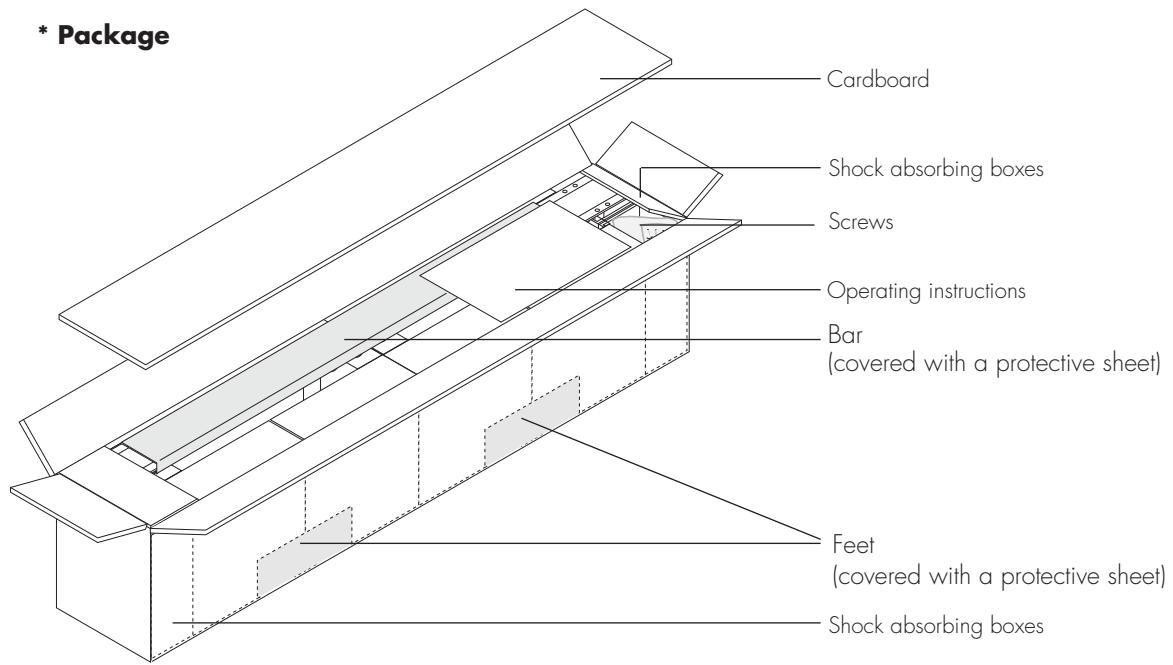
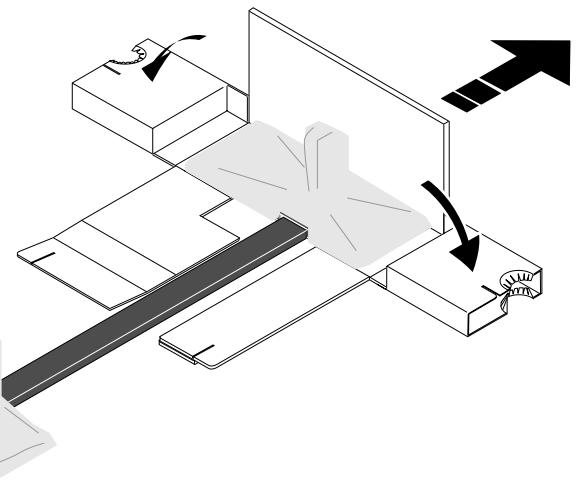
- Take out the bar and remove the shock absorbing boxes from both sides.
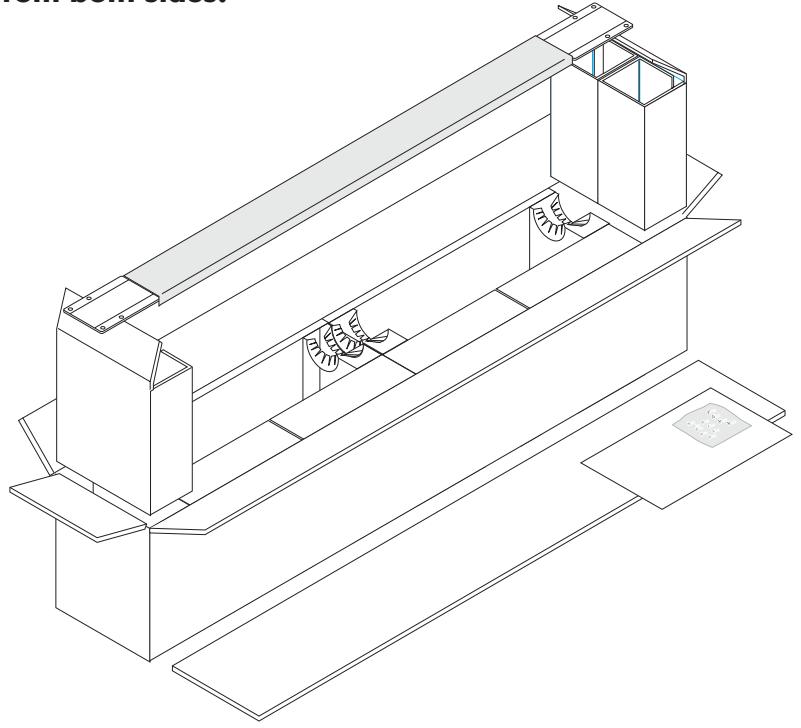
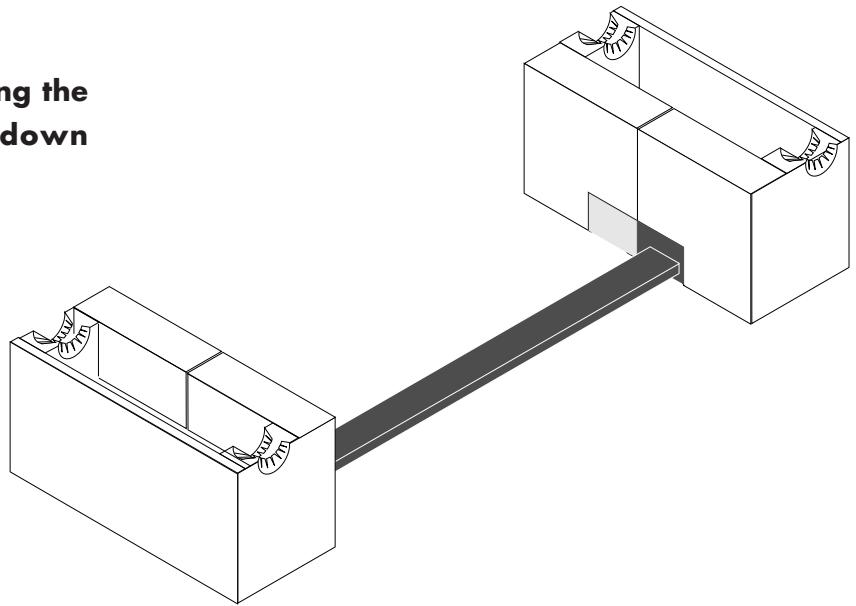
- Remove the two boxes containing the feet and set them upside-down.
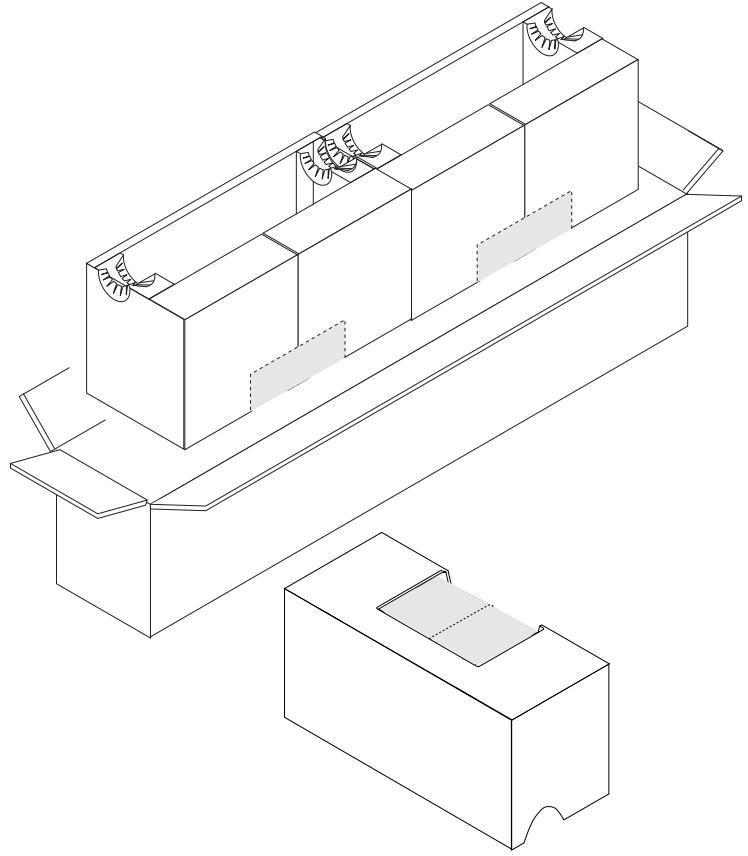
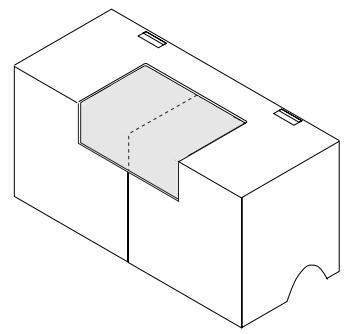
- Lift up the protective sheet covering the foot starting from the perforated line in the center to reveal the mounting surface.
Perforated line
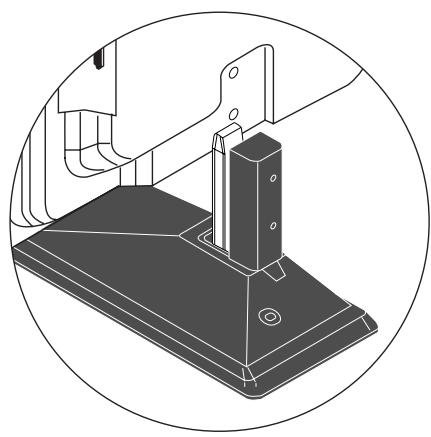
- Remove the cover of the bar removed in step 2, insert the bar on the guide pins, and tighten with the included stand assembly screws.
CAUTION:
Tighten the screws securely.
If not, the monitor could tip over, resulting in injury.

guide pins
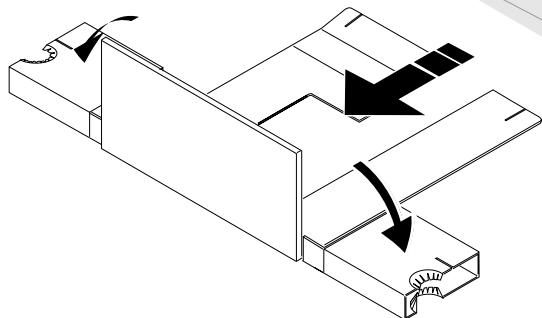
- Grasp the two boxes containing the feet and turn them upside-down again.
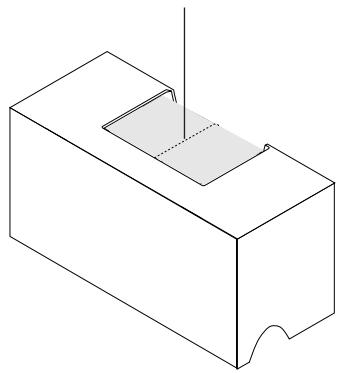
- Lift the section stuck into the slit upwards, pull it out, then fold it down.
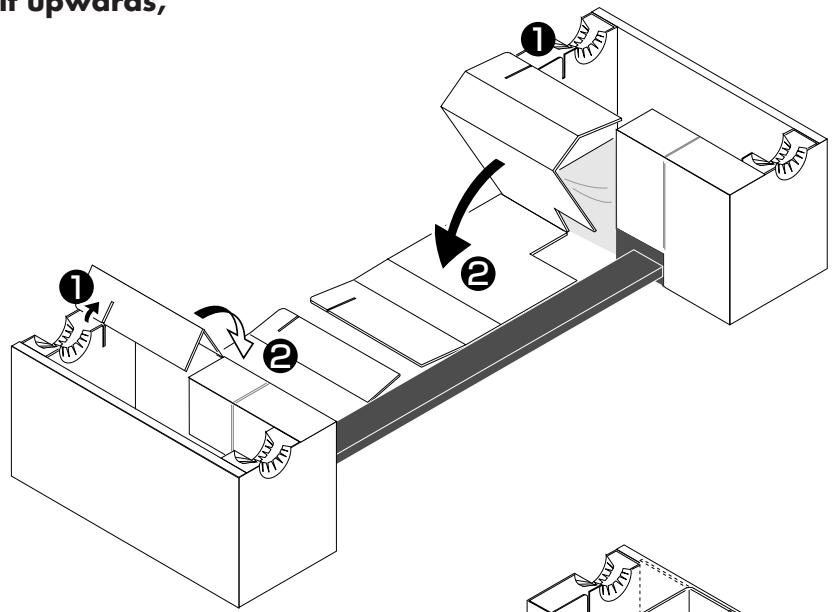
- On the bar side, after pulling out the slit section, bend as shown in the diagram then fold down.
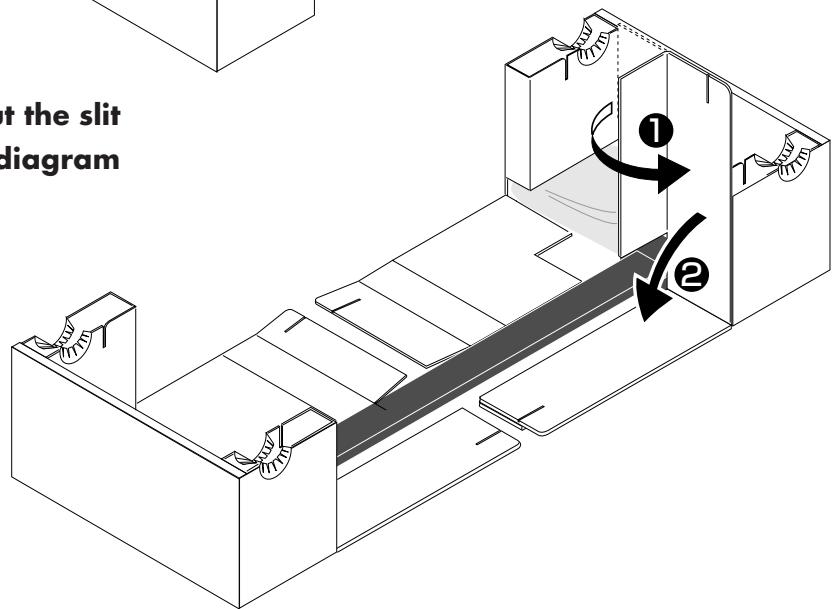
- Fold down the front and rear of the box and remove the stand. Remove the cover from the foot.
Mounting the plasma display on the stand
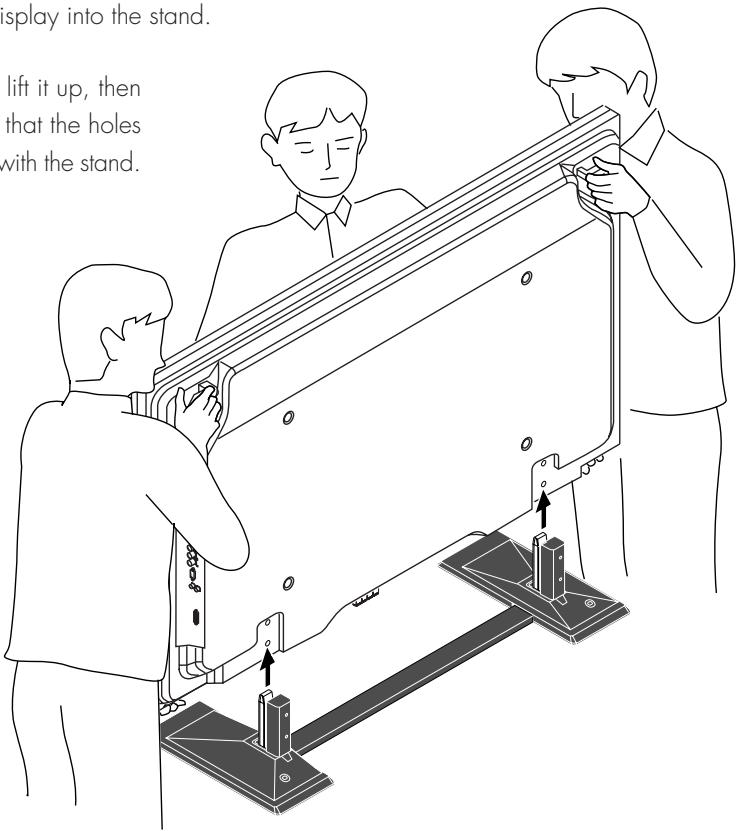
1. Insert the plasma display into the stand.
Check that the stand and plasma display are facing the proper direction, then insert the plasma display into the stand.
This procedure should be done by at least three persons, since the plasma display is heavy and has a high center of gravity. Hold the bottom and the grips on the back of the plasma display and support the top when inserting the plasma display into the stand.
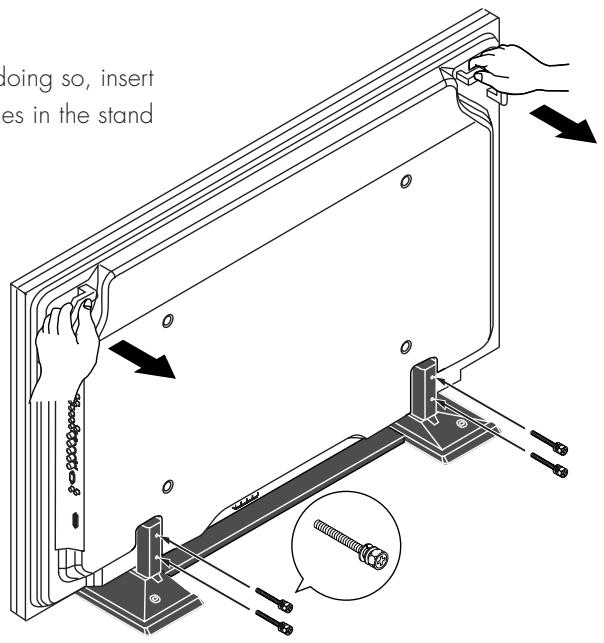
Hold both sides of the plasma display and lift it up, then place the plasma display onto the stand so that the holes located at the bottom of the display engage with the stand.
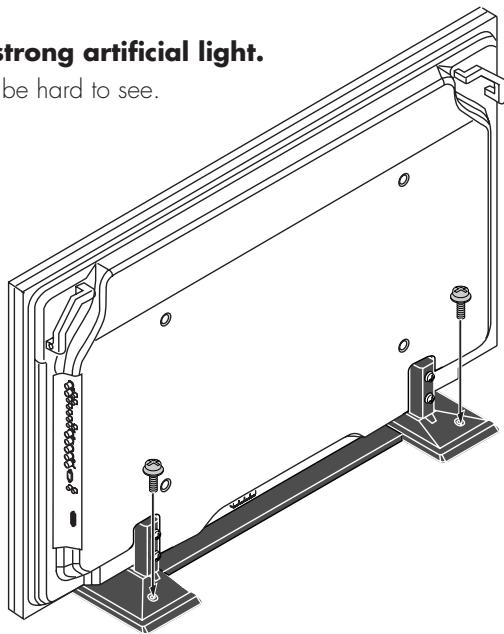
2. Fasten the plasma display and stand.
Pull the top of the plasma display forward and while doing so, insert the four supplied display mounting screws into the holes in the stand and tighten them.

CAUTION:
Tighten the screws immediately after placing the display on the stand. If not, the display could tip over, resulting in injury.