
CP-ST100 - Projector PIONEER - Free user manual and instructions
Find the device manual for free CP-ST100 PIONEER in PDF.

| Product Type | Speaker Stand |
| Brand | Pioneer |
| Model | CP-ST100 |
| Dimensions (largest assembly) | 300 mm (W) x 1,113 mm (H) x 300 mm (D) |
| Weight (largest assembly) | 5.8 kg |
| Maximum load per arm | 1.1 kg |
| Maximum total load (3 arms) | 3.3 kg |
| Maximum number of arms | 3 |
| Included accessories | Stand bases, long/short supports, caps, arms, angle brackets, cable ties, gaskets, screws (M4xL6, M4xL8, M5xL10), instruction manual |
| Material | Metal and plastic |
| Compatible speaker types | Pioneer speaker systems (up to 3 speakers) |
| Care and cleaning | Soft cloth dampened with water and mild detergent (dilute 5-6 times with water). Never use alcohol, thinner, benzene, or insecticide. |
| Safety | Do not exceed maximum load, use only the screws provided, place on a flat and stable surface, do not sit on the speakers, do not let children play. |
| Spare parts | Antislip pads (SEB1343), screws (M4xL12, M4xL8), polyethylene bags, protective sheet, packaging carton - available from Pioneer. |
| General information | Designed for front/standard Surround installation. Assembly requires a Phillips screwdriver. Specifications subject to change without notice. |
Frequently Asked Questions - CP-ST100 PIONEER
User questions about CP-ST100 PIONEER
0 question about this device. Answer the ones you know or ask your own.
Ask a new question about this device
Download the instructions for your Projector in PDF format for free! Find your manual CP-ST100 - PIONEER and take your electronic device back in hand. On this page are published all the documents necessary for the use of your device. CP-ST100 by PIONEER.
USER MANUAL CP-ST100 PIONEER
Discover the benefits of registering your product online at http://www.pioneer.co.uk (or http://www.pioneer.eu).
Thank you for buying this Pioneer product. Please read through these operating instructions for proper assembly and use. After you have finished reading the instructions, put them away in a safe place for future reference.
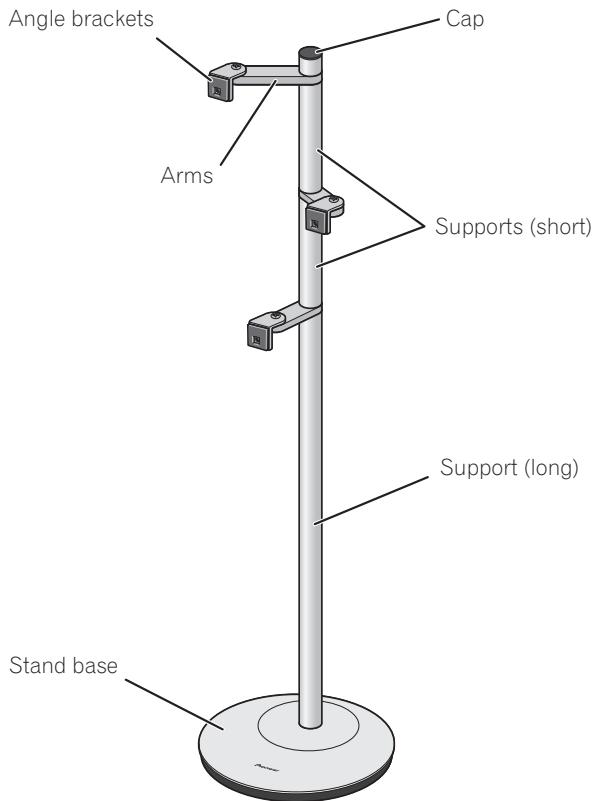
Assembly Hints
These stands have been designed to allow the mounting of up to three speakers each, but the number actually mounted will depend on the speaker system used (surround setting). When assembling the stands, use only that number of support arms actually required for the speakers to be mounted.
- For more information regarding various surround setups, consult the owners manuals furnished with your speakers and home theater system.
Setup examples:
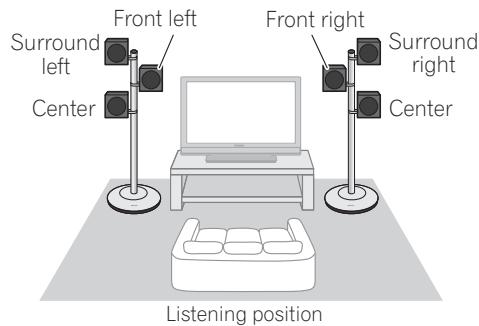
- Front surround setup (using dual center speakers)
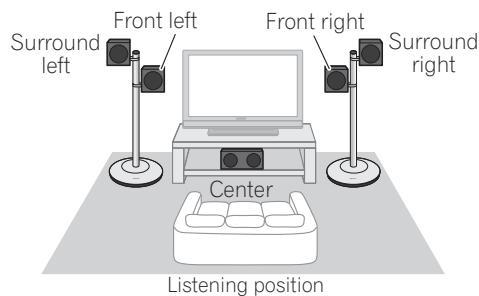
- Front surround setup
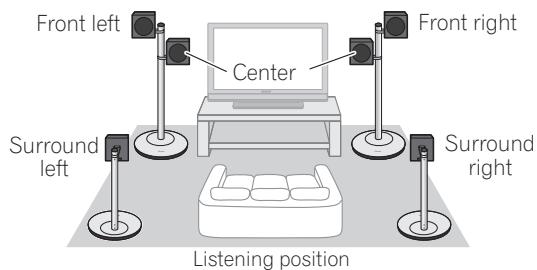
- Standard surround setup (using dual center speakers)
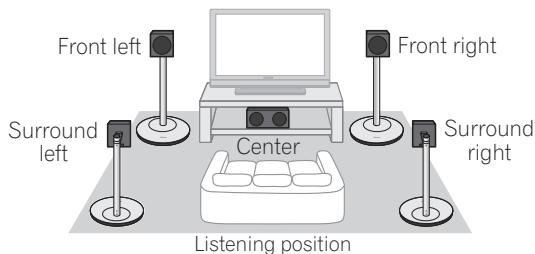
- Standard surround setup
Additional stands will be required if they are used to support surround (rear) speakers as well.
Confirm your Accessories
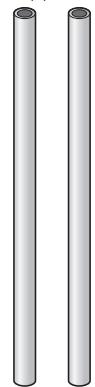
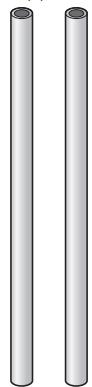
Supports (long) × 2

- Caps x 2
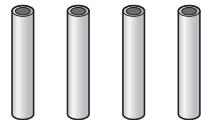
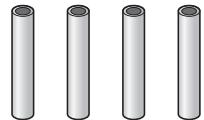
Supports (short) × 4
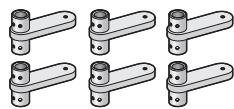
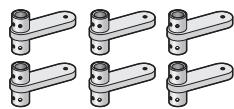
Arms x 6
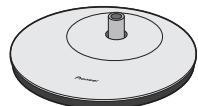
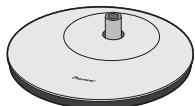
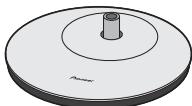
- Stand bases × 2

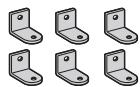
Angle brackets × 6

- Screws (Flat countersunk head, M4xL6), for assembling supports x 16


- Pad gaskets x 6

- Screws (Bind head, M4xL8), for assembling arms x 6

- Wire clips × 6

- Screws (Bind head, M5xL10) for mounting speakers x 6
These operating instructions
Before you start
Before setting up your speaker system, we recommend reading the operating instructions for your system thoroughly.

Caution
- This stand has been designed to support weights up to 1.1kg per arm, or a maximum of 3.3kg (when 3 arms are used). Exceeding these limits may result in falling or breakage.
- Only use the screws supplied when fixing the speaker to the speaker stand. Speakers may fall and incur damages if not fixed in place properly.
- Do not use with any speaker system other than the one for which the unit was designed. The stand may collapse and be damaged and/or the speaker may fall and cause injury.
- Be careful when assembling and moving the speaker stand, as it may cause damage or injury in the event of a fall.
- Placing the stand on an unstable surface can be dangerous. Be sure to place it on a flat, firm surface.
- Make sure you assemble the stand on a flat surface that is relatively soft (such as a carpet).
- Do not sit or stand on the speaker, or let children play on the speaker. Doing so could provoke the speaker to fall, causing damages or bodily injury.
Assembling the speaker stands

Caution
- Pioneer is not responsible for any accidents or damage that result from improper installation, misuse or modification of the product, or natural disasters.
Assemble the speaker stands as illustrated below. Please note that a medium-sized Phillips screwdriver is required for assembly.
The accompanying illustration shows the fully assembled speaker stand, without speakers or wires.
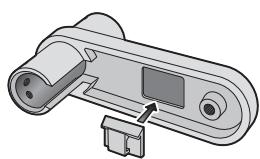
1 Fasten the wire clips to the arms.
Peel the protective paper backing from the clip and affix the clip to the indentation on the underside of the arm as shown.
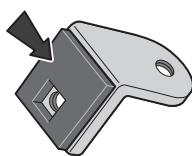
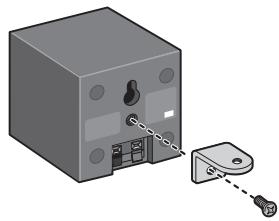
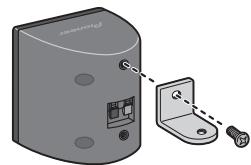
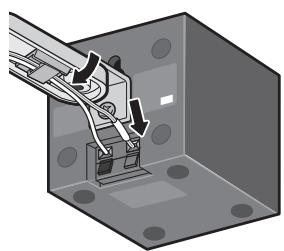
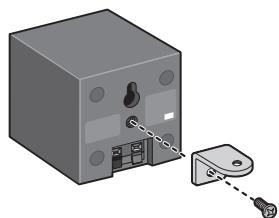
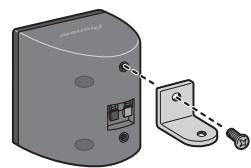
2 Fasten angle brackets to speakers.
Peel the protective paper backing from the gasket and affix the gasket to the angle bracket as shown.
- Affix the gasket to the square surface of the angle bracket. Be sure to confirm the direction of the gasket so as to properly align the gasket's hole with the screw hole in the angle bracket.
Fasten the angle bracket to the speaker. Orient the gasket material with the rear surface of the speaker, and align the screw hole in the angle bracket with the speaker's screw hole, then use the furnished screw (M5xL10) to securely fasten the angle bracket to the speaker.
- In the event the speaker is furnished with two screw holes, fasten the angle bracket to the upper of the two holes.
- The angle bracket has been originally designed to be mounted with the rounded angle arm oriented upwards, but in the event interference occurs with speaker terminals, the rounded angle arm may also be mounted downward.
Speaker Installation Examples
(In the event of interference between speaker terminals and angle bracket)

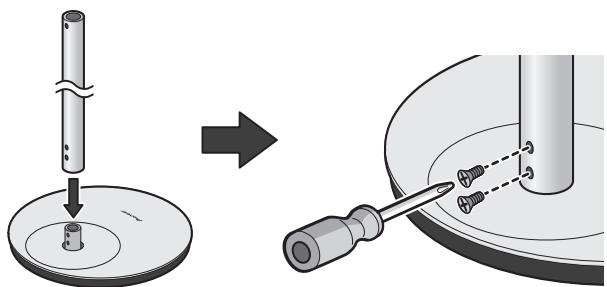
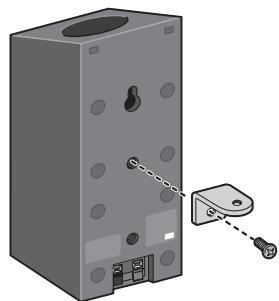
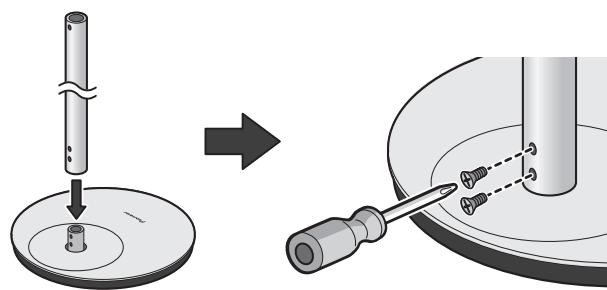
3 Place a support (long) over the mounting post in the stand base, and fasten securely with two countersunk screws (M4xL6).
- The screw holes in the stand base are oriented to the rear side.
- The support (long) is designed with specific up-down orientation. Confirm the orientation before assembling.
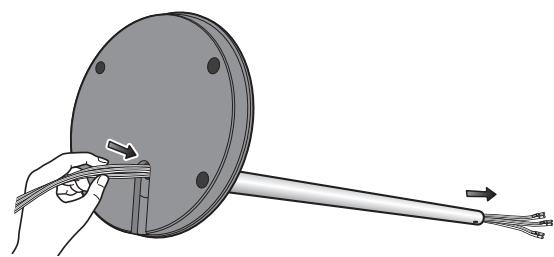
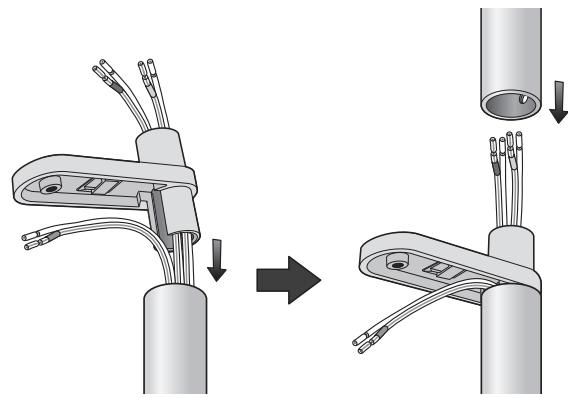
4 Lay the stand on its side, and pass the speaker wires into the hole in the stand base and through the support.
Consult the owner's manual for the speaker system and confirm the proper wires to be used (wires may be color coded).
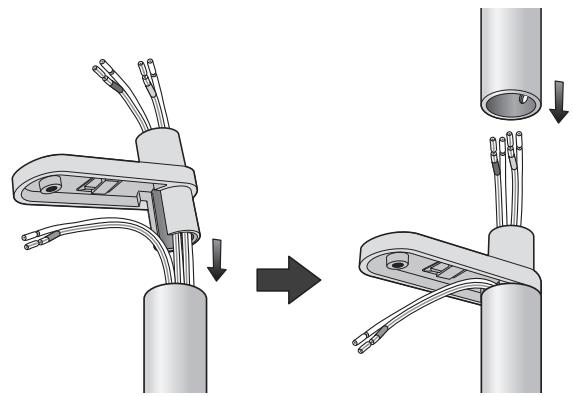
5 Assemble the arm and support (short) and pass each speaker wire through in order as shown.
- The arms are designed with specific up-down orientation; confirm that the side with the wire clip is oriented downward during assembly.
Pass the appropriate speaker wire through each arm and mount the assembled arms in order on the long support. In the case of the speaker wire for the lowest arm, do not pass the wire through the arm, but allow the wire to exit the cutaway portion of the arm as shown, then affix a cap to the top of the arm.
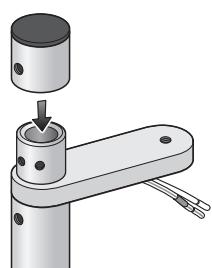
Place cap on top of uppermost arm.
6 Decide on the directional orientation for each speaker, then fix in place with the furnished countersunk screws.
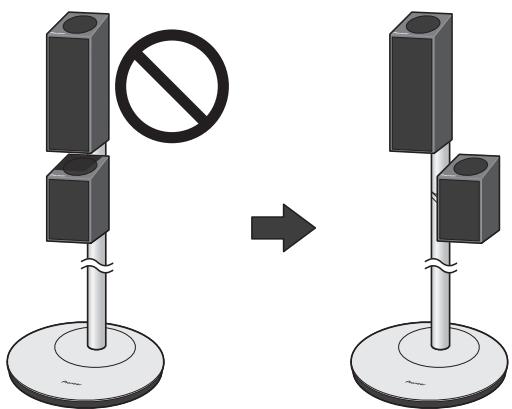
- Each arm can mounted facing forward, or pointing 60^ to right or left. If a lower speaker unit has an upward-pointing speaker, orient its direction away from the speaker above it. When fixing the speakers in place, also consult the section "Assembly Hints" on page 2.
Examples of stand with mounted speakers
Assemble the stands so that the screw holes in the supports are all oriented toward the rear side of the stand, then insert the furnished countersunk screws and tighten securely.


Caution
-
Do not attempt to insert screws when the supports holes are oriented at a diagonal angle from the rear of the stand.
-
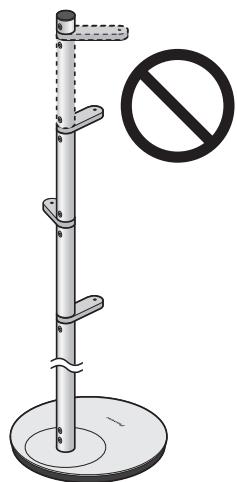
Do not attempt to use more than three arms on a single stand, since the stand may fall and cause damage or injuries.

7 Fasten the speakers to the arms.
Be sure the speakers are oriented toward the listening position when fastening in place.

Align the screw holes in the arm and angle bracket, and use the furnished bind head screws (M4xL8) to fasten securely.
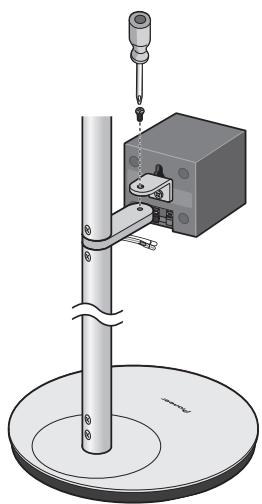
After fastening the speakers to the arms, attach each speaker wire to its terminal on the rear of the speaker. Use the wire clips to hold the wires in place as required.
Stand maintenance
With normal use, wiping with a soft cloth should be sufficient to keep the stand clean. If necessary, clean with a cloth dipped in a neutral cleanser diluted five or six times with water, and wrung out well. Do not use furniture wax or cleansers. Never use alcohol, thinners, benzine, insecticide sprays or other chemicals on or near this unit since these will corrode the surfaces. When using chemically-treated cloths, be sure to carefully read their accompanying instruction manual.
Specifications
External dimensions (largest assembly) 300 mm (W) x 1113 mm (H) x 300 mm (D) Weight (largest assembly) 5.8 kg
Supplied accessories
Stand bases [SXG1187] 2
Supports (long) [SNH1102] 2
Supports (short) [SNH1098] 4
Caps [SXG1198] 2
Arms [SNH1099] 6
Angle brackets [SNA1511] 6
Wire clips [SEP1381] 6
Pad gaskets [SEB1341] 6
Screws (Flat countersunk head, M4xL6) [SBA1303] 16
Screws (Bind head, M4xL8) [SBA1304] 6
Screws (Bind head, M5xL10) [SBA1305] 6
Operating instructions [SRD1366] 1
Replacement part numbers
Non-skid pads [SEB1343]
Screws (Bind head, M4xL12) [BPZ40P120FTB]
Screws (Bind head, M4xL8) [BMZ40P080FTB]
Polyethylene bag S2 [SHL1295]
Polyethylene bag S0 [SHL1314]
Polyethylene bag S0 [SHL1329]
Polyethylene bag S3 [SHL1429]
Polyethylene bag S0 [SHL1438]
Polyethylene bag S4 [SHL1457]
Polyethylene bag S0 [SHL1478]
Protection sheet [SHC1844]
Protector (Top) [SHA2633]
Protector (Bottom) [SHA2634]
Packing case [SHG2832]
The product numbers are listed above in square brackets.
- Specifications and design subject to possible modification without notice, due to improvements.

If you want to dispose this product, do not mix it with general household waste. There is a separate collection system for used electronic products in accordance with legislation that requires proper treatment, recovery and recycling.
Private households in the member states of the EU, in Switzerland and Norway may return their used electronic products free of charge to designated collection facilities or to a retailer (if you purchase a similar new one). For countries not mentioned above, please contact your local authorities for the correct method of disposal. By doing so you will ensure that your disposed product undergoes the necessary treatment, recovery and recycling and thus prevent potential negative effects on the environment and human health.
Published by Pioneer Corporation.
Copyright © 2008 Pioneer Corporation.
All rights reserved.
Supports (longs) × 2
- Capuchons x 2

Supports (courts) × 4
- Bras x 6
- Bases de socle x 2
Supports d'angle x 6

Publication de Pioneer Corporation.
© 2008 Pioneer Corporation.
Copyright © 2008 Pioneer Corporation.
PpIMepbI yCTaHOBKn DnHaMnKOB
(B cIyuae ecJIN paCIOJIooKeHHe yIIOBOI cKO6bI 6yJeT MEIIaTb IOCTuyIY K KOHTaKTaM IHHaMHKA)
3 PacnoJIOxHnTe onOpHbI WToK (dNHHbI) NOBepx MOHTaXHo NpOINOPKn B OCHOBE CTOIKN HaJeXHO 3aKpeHnTe C NOMoCbHbDByX BNHTOB C yTONJIeHNHO roNoBko (M4xL6).
BnHTOBbIe OTBepCTHb B OCHObE cToiKn paCIOJIOKeHbI c 3aJIHei CTOpOHbI.
- OIIOPHbI IITOK (JIINHHbI) HmeeT OIIpeJeJIeHHyIO opHeHTaIHOBepx-Hn3. IIpeE c6OpKo y6eIHTecb B IIpaBnJIbHOCTNopHeHTaIH.
4 ПОJOXиTe cToiKy Ha 6ok n npOnyCTnTe npOBoDa dHAmnka chee3 OTBepCTne B OCHOBe cToiKn n chee3 Tpy6ky onOpHoro uToKa.
O6paHTtecb K pyKOBODCTBy IOJIb3OBAteJIЯ IJIa AkycTHueckoI chCTeMbI, YTO6bI y6eINTbcR B IIpaBnJIbHOcTH OpHeNTaIIHH HcIOJIb3yEmbIX IPOBOIDOB (IPOBOda MOrYt HMetb IIBeTobyIO mapKnipOBky).

5 C6epeTe KPOHHTeH N OONpHbI MtOK (KOPOTKn) I npOnyCTte npOBOda DInHaMnKa No nopAky, KaK 3To noka3aHO Ha pncyHke.
KpoHHTeHbI HMeIOT OIIpeJIeHNHyIOpHeHTaIINo Bepx-Hn3; y6eIHTeCbB TOM, YTO CTOpOHa, Ha KOTOpOHMeTcRc Kc06a KpeIIeHnna JIeKTKpONpOBOdKn, HAnpAbJeHa BnH3.
Пюпстпс COOTBETCTBYUOИМ ПЮВОД ДИНAMHkaЧepe3 Kaждь КрOHHTeHи CMOHTNpyIte CO6paHHbIe KPOHHTeHbI IIO IOPaIKy Ha DIIHHHOI ONOPHOr Tpy6Ke. YTO KACAETcI ПЮВOD ДИнAMHka ДЯ HIXKHeO KPOHHTeHa, He IpoPusckaIte ПЮВОД Chepe3 KPOHHTeH, a BbIBeIHTe ETo Chepe3 BbIpe3 B KPOHHTeHNe, KaK 3TO NOKa3aHo H Na PnCyHKe, a 3aTeM IIpHKpeIITe 3aJLyUk Ky K BePxHne QuactN KPOHHTeHa.
http://www.pioneer.co.uk
http://www.pioneer.fr
http://www.pioneer.de
http://www.pioneer.it
http://www.pioneer.nl - http://www.pioneer.be
http://www.pioneer.es
http://www.pioneer-rus.ru
http://www.pioneer.eu
Published by Pioneer Corporation.
Copyright © 2008 Pioneer Corporation.
All rights reserved.
Publication de Pioneer Corporation.
© 2008 Pioneer Corporation.
PIONEER ELECTRONICS (USA) INC.
P.O. BOX 1540, Long Beach, California 90801-1540, U.S.A. TEL: (800) 421-1404
PIONEER ELECTRONICS OF CANADA, INC.
300 Allstate Parkway, Markham, Ontario L3R 0P2, Canada TEL: 1-877-283-5901, 905-479-4411
PIONEER EUROPE NV
Haven 1087, Keetberglaan 1, B-9120 Melsele, Belgium TEL: 03/570.05.11
PIONEER ELECTRONICS ASIACENTRE PTE. LTD.
253 Alexandra Road, #04-01, Singapore 159936 TEL: 65-6472-7555
PIONEER ELECTRONICS AUSTRALIA PTY. LTD.
178-184 Boundary Road, Braeside, Victoria 3195, Australia, TEL: (03) 9586-6300
PIONEER ELECTRONICS DE MEXICO S.A. DE C.V.
Blvd. Manuel Avila Camacho 138 10 piso Col.Lomas de Chapultepec, Mexico,D.F. 11000 TEL: 55-9178-4270
- Assembly Hints
- Setup examples:
- Confirm your Accessories
- Before you start
- Caution
- Assembling the speaker stands
- Fasten the wire clips to the arms.
- Fasten angle brackets to speakers.
- Speaker Installation Examples
- Place a support (long) over the mounting post in the stand base, and fasten securely with two countersunk screws (M4xL6).
- Lay the stand on its side, and pass the speaker wires into the hole in the stand base and through the support.
- Assemble the arm and support (short) and pass each speaker wire through in order as shown.
- Decide on the directional orientation for each speaker, then fix in place with the furnished countersunk screws.
- Fasten the speakers to the arms.
- Stand maintenance
- Specifications
- Supplied accessories
- Replacement part numbers
- PpIMepbI yCTaHOBKn DnHaMnKOB
- PacnoJIOxHnTe onOpHbI WToK (dNHHbI) NOBepx MOHTaXHo NpOINOPKn B OCHOBE CTOIKN HaJeXHO 3aKpeHnTe C NOMoCbHbDByX BNHTOB C yTONJIeHNHO roNoBko (M4xL6).
- ПОJOXиTe cToiKy Ha 6ok n npOnyCTnTe npOBoDa dHAmnka chee3 OTBepCTne B OCHOBe cToiKn n chee3 Tpy6ky onOpHoro uToKa.
- C6epeTe KPOHHTeH N OONpHbI MtOK (KOPOTKn) I npOnyCTte npOBOda DInHaMnKa No nopAky, KaK 3To noka3aHO Ha pncyHke.
- PIONEER ELECTRONICS OF CANADA, INC.
- PIONEER EUROPE NV
- PIONEER ELECTRONICS AUSTRALIA PTY. LTD.
- PIONEER ELECTRONICS DE MEXICO S.A. DE C.V.
Brand : PIONEER
Model : CP-ST100
Category : Projector