BG-UHD-44M - Router BZBGear - Free user manual and instructions
Find the device manual for free BG-UHD-44M BZBGear in PDF.

User questions about BG-UHD-44M BZBGear
0 question about this device. Answer the ones you know or ask your own.
Ask a new question about this device
Download the instructions for your Router in PDF format for free! Find your manual BG-UHD-44M - BZBGear and take your electronic device back in hand. On this page are published all the documents necessary for the use of your device. BG-UHD-44M by BZBGear.
USER MANUAL BG-UHD-44M BZBGear
3. Panel Description ....4
3.1 Front Panel....4
3.2 Rear Panel 5
4. System Connection ....6
5. Front Panel Control ....7
5.1 Multi-views Selection....7
5.2 Video Signal Switching....7
5.3 Video Switching Status Inquiry....8
5.4 Audio Select....8
5.5 Config Button 8
6. IR Remote 9
7. GUI Control....10
7.1 Multiview Tab.... 11
7.2 Audio Tab 13
7.3 Resolution Tab 14
7.4 RS232 Tab 14
7.5 CEC Tab 15
7.6 EDID Tab....17
7.7 Network Tab 18
7.8 Tags Tab 19
7.9 Security Tab....19
7.10 GUI Update ....20
8. RS232 Control....21
8.1 System Control....21
8.2 Signal Switching....22
8.3 Audio Switching....23
8.4 Function Setting 24
8.5 CEC Command 28
8.6 Special Command....31
9. Firmware Upgrade....33
10. Warranty 34
11. Mission Statement....34
1. Product Introduction
The 4K Multi-view switcher is seamless video scaler designed to enable a true 4K display. The switcher features four HDMI inputs and one HDMI output which allows you to display four video sources on one display. It also provides a line input, 1 mix input, 1 SPDIF output and 1 analog output for audio processing.
Control is quick and comprehensive, whether you are using the front panel, the remote control, RS232 commands, or the fully featured web GUI.
1.1 Features
- 4 HDMI inputs, 1 HDMI output.
• Supports 4K@30Hz 4:4:4, HDCP 2.2.
- Seamless switch between 4 input ports.
- Auto Scaler in each source input.
- Supports audio embedding and mixing.
• Supports audio de-embedding.
● Auto-switching at single window.
- Cycles through the windows from A to D by swap button.
- Base on FPGA Technology, layout and size of the windows can be customized.
- Resizes the windows in 3 different sizes.
• 16 pre-defined layouts for multi-view.
- Multiple control methods, including an assignable front panel, IR remote, web GUI and RS232 port.
1.2 Package List
• 1x 4K 4x1 Seamless Switcher
- 4x Plastic Cushions
- 4x Mounting Screws
• 1x RS232 Cable (3-pin to DB9)
- 1x User Manual
- 1x IR Remote
- 2x Mounting Ears
- 2x 3-pin Terminal Block
• 1x Power Adapter (24V DC 1.25A)
Note: Please contact your distributor immediately if any damage or defect in the components is found.
2. Specification
| Video | |
| Video Input | (4) HDMI IN (1~4) |
| Video Input Connector | (4) Type-A female HDMI |
| HDMI Input Resolution | Up to 4K@30Hz 4:4:4 |
| Video Output | (1) HDMI |
| Video Output Connector | (1) Type-A female HDMI |
| HDMI Output Resolution | Up to 4K@30Hz RGB |
| HDMI Standard | HDMI 1.4 |
| HDCP Version | Up to HDCP 2.2 |
| Audio IN | |
| Audio In | (1) LINE IN, (1) MIX IN. |
| Audio In Connector | (2) 3-pin terminal connectors |
| Frequency Response | 20Hz to 20kHz, ±3dB |
| Max Input Level | 2.0Vrms ± 0.5 dB. 2V=16 B headroom above -10dBV (316 mV) nominal consumer line level signal. |
| L-R level deviation | < 0.3dB, 1kHz sine at 0dBFS level (or max level before clipping) |
| Input Impedance | >10kohm |
| Audio Format | PCM 2CH |
| SPDIF OUT | |
| SPDIF Out | (1) SPDIF |
| Audio Out Connector | (1) Toslink |
| Max Output level | ±0.05dBFS |
| Frequency Response | 20Hz ~ 20kHz, ±1dB |
| THD+N | < 0.05%, 20Hz ~ 20kHz bandwidth, 1kHz sine at 0 dBFS level (or max level) |
| Signal-to-Noise Ratio | >90dB, 20Hz-20 kHz bandwidth |
| Crosstalk isolation | <-70dB, 10kHz sine at 0dBFS level (or max level before clipping) |
| Noise | -90dB |
| Audio Format | PCM 2CH |
| AUDIO OUT | |
| Audio Out | (1) AUDIO |
| Audio Out Connector | (1) 3.5mm mini jack |
| Frequency Response | 20Hz ~ 20kHz, ±1dB |
| Max Output Level | 2.0Vrms ± 0.5dB. 2V=16dB headroom above -10dBV (316 mV) nominal consumer line level signal |
| THD+N | < 0.05%, 20Hz ~ 20kHz bandwidth, 1kHz sine at 0dBFS level (or max level) |
| Signal-to-Noise Ratio | >80dB, 20Hz ~ 20kHz bandwidth |
| Crosstalk Isolation | <-80dB, 10kHz sine at 0dBFS level (or max level before clipping) |
| L-R Level Deviation | < 0.05dB, 1kHz sine at 0dBFS level (or max level before clipping) |
| Output Load Capability | 1kohm and higher (supports 10x paralleled 10kohm loads) |
| Noise | -80dB |
| Control | |
| Control port | (1)RS232, (1)TCP/IP |
| Control Connector | (1) 3-pin terminal connector, (1) RJ45. |
| General | |
| Operation Temperature | -5°C ~ +55°C |
| Storage Temperature | -25°C ~ +70°C |
| Relative Humidity | 10% ~ 90% |
| External Power Supply | Input: AC 100~240V, 50/60Hz; Output: 24V DC 1.25A. |
| Power Consumption | 13w(Max) |
| Dimension (W*H*D) | 285mm x 27mm x 172.5mm |
| Net Weight | 1.24Kg |
Note: The resolution 1080i 60Hz and HDR are not supported.
3. Panel Description
3.1 Front Panel

text_image
INPUT /AUDIO SELECT SELECT /FULL SCREEN CONFIG MULTI-WAY 1 2 3 4 AUTO A B C D SNAP RESET 5 6① POWER LED: The LED illuminates green when it is working, and the LED illuminates red when it is standby.
② IR LED: Built-in IR sensor, receive IR signal sent from IR remote.
③ INPUT/AUDIO SELECT:
- Press 1\~4 button to select corresponding HDMI input, its LED illuminates yellow when there is a video signal, it will illuminate blue when the video signal is chosen as input source.
- In multi-view mode, press and hold 1\~4 button at least 3 seconds to select the corresponding HDMI audio source for output, and its LED will illuminate blue, and then it will go out when no operation within 3 seconds.
- Press AUTO button to enable auto switching mode, its LED will illuminate blue.
- In multi-view mode, press and hold AUTO button at least 3 seconds to select LINE audio for output.
④ FOUR SELECT/FULL SCREENS: Press the buttons to select corresponding input source as Full Screen, its LED illuminates blue when it is selected.
⑤ CONFIG: Press SWAP button to select window display screen anti-clockwise direction. its LED illuminates blue when it is selected. Press the RESIZE button to readjust the windows size, its LED illuminates blue when it is pressed.
⑥ THREE MULTI-VIEWS: Press the buttons to choose different available Multi-view modes, its LED illuminates blue when it is selected.
3.2 Rear Panel

text_image
HDMI IN 1 2 3 4 LREN / WTR L 4 R OUTPUT HOM SPDF AUDIO RS222 TS + TS RS222 TOPP FIRMWARE 8-6-8 DC 24V ① ② ③ ④ ⑤ ⑥ ⑦① HDMI IN: Four type-A female HDMI input ports to connect HDMI source devices.
② LINE IN: 3-pin terminal block to connect audio source device like mobile phone or computer to embed in HDMI audio sources.
MIX IN: 3-pin terminal block to connect audio source device like mobile phone or computer to mix HDMI audio sources.
③ HDMI OUTPUT: Type-A female HDMI output port to connect display device.
SPDIF OUTPUT: Toslink for audio de-embedding from HDMI output.
AUDIO OUTPUT: 3.5mm mini jack for audio de-embedding from HDMI output.
④ RS232: 3-pin terminal block to connect the RS232 control device (e.g. PC) or a third-party device to be controlled by RS232 commands.
⑤ TCP/IP: RJ45 port to connect the control device (e.g. PC) to control the switcher by GUI.
⑥ FIREWARE: Type-A USB port for firmware upgrade.
⑦ DC 24V: DC connector for power adapter connection.
4. System Connection

flowchart
graph TD
    A["1 Laptop"] --> B["4K TV"]
    C["2 Laptop"] --> B
    D["3 Laptop"] --> B
    E["4 Laptop"] --> B
    F["Audio Player"] --> B
    B --> G["Central Control System"]
    G --> H["Laptop"]
    G --> I["Amplifier"]
    B --> J["Layout"]
    style B fill:#f9f,stroke:#333
    style G fill:#ccf,stroke:#333
    style H fill:#cfc,stroke:#333
Cascade Connection:
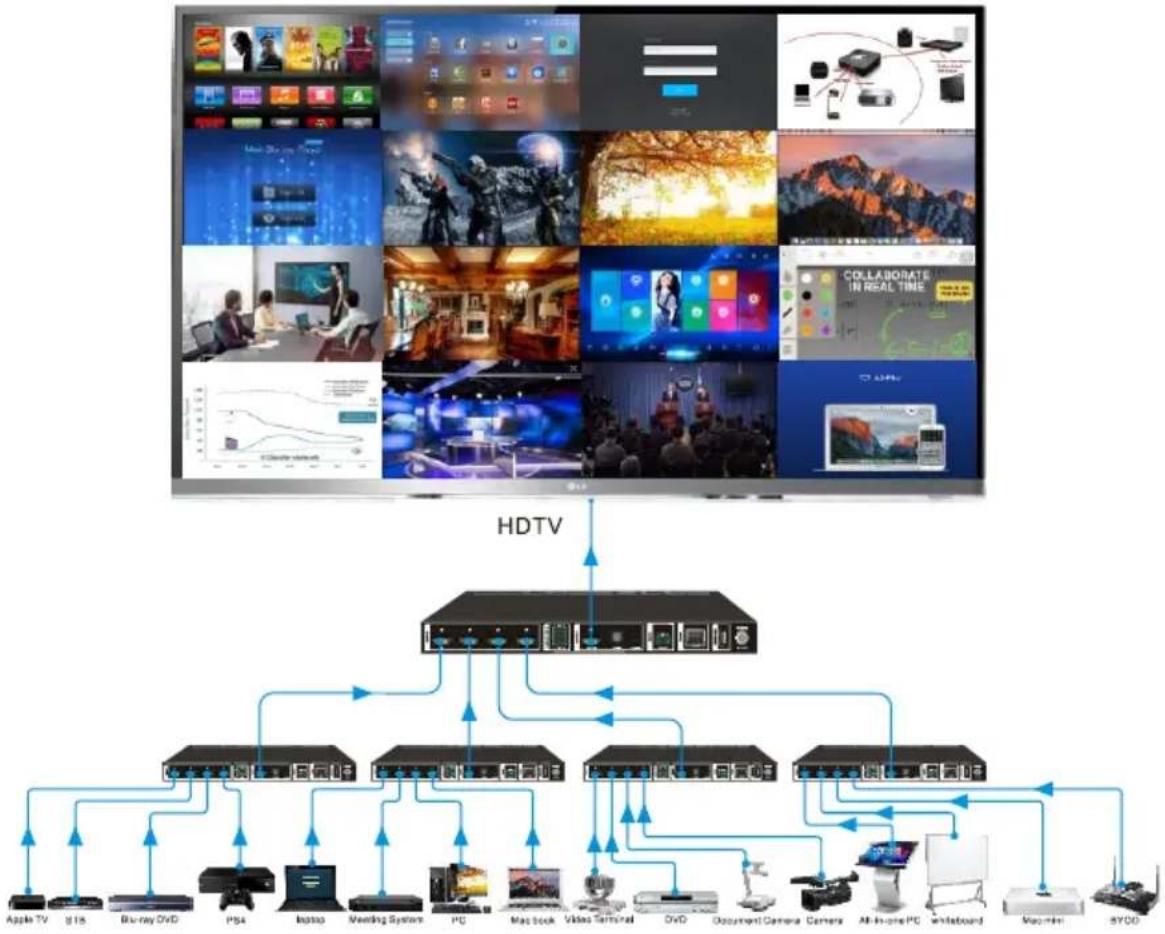
flowchart
graph TD
    A["Top Panel"] --> B["HDTV"]
    B --> C["Central HDTV Interface"]
    C --> D["Device 1: Apple TV, 815, Blu-ray OVD, PS4, Laptop, Vending System, PC, MacBook Video Terminal, OVD, Document Camera Camera, All-In-One PC, Billboard, Macrom, BYDD"]
    C --> E["Device 2: Apple TV, 815, Blu-ray OVD, PS4, Laptop, Vending System, PC, MacBook Video Terminal, OVD, Document Camera Camera, All-In-One PC, Billboard, Macrom, BYDD"]
    C --> F["Device 3: Apple TV, 815, Blu-ray OVD, PS4, Laptop, Vending System, PC, MacBook Video Terminal, OVD, Document Camera Camera, All-In-One PC, Billboard, Macrom, BYDD"]
    C --> G["Device 4: Apple TV, 815, Blu-ray OVD, PS4, Laptop, Vending System, PC, MacBook Video Terminal, OVD, Document Camera Camera, All-In-One PC, Billboard, Macrom, BYDD"]
    C --> H["Device 5: Apple TV, 815, Blu-ray OVD, PS4, Laptop, Vending System, PC, MacBook Video Terminal, OVD, Document Camera Camera, All-In-One PC, Billboard, Macrom, BYDD"]
5. Front Panel Control
5.1 Multi-views Selection
Factory default is four quarter views, and factory default input and output corresponding relation is input1 -> window A, input2 -> window B, input3 -> window C, input 4-> window D. Press one of the other two multi-view buttons to change layout. And its multi-view mode and corresponding windows LEDs illuminate blue.
Full Screen mode: Press Windows A\~D button to select the corresponding window to display in full-screen. Meanwhile, the corresponding input source button LED and window button A LED illuminate blue, other window buttons and previous multi-view mode button LED goes out.
5.2 Video Signal Switching
• In the Multi-view mode
Operation: Inputs# + Windows#
Example: Switch Input 1 to Windows B:
Press INPUT 1(The input 1 LED illuminates blue, the windows A-D LEDs flash.) →
Press Windows B (The windows A, C and D LEDs go out, then input 1 and windows B LED flash three times, last, input 1 LED goes out and windows A-D LEDs illuminate blue.)
• In the Full Screen mode
1) Manual Switching
Operation: Inputs# + Windows#
Example: Switch Input 2 to Windows A:
Press INPUT 2 (The input 2 LED illuminates blue.) → Press Windows A (The input 2 and windows A LEDs illuminate blue).
2) Auto Switching
Press AUTO button to enter auto-switching mode, and the corresponding LED illuminate blue.
When in the AUTO mode, signal switching complies with the following principles:
√ Four input sources priority: HDMI 1 > HDMI 2 > HDMI 3 > HDMI 4. When input source and output window are connected, the corresponding LEDs illuminate blue.
√ Once detecting a new input signal, the switcher will switch to this new signal automatically.
√ The switcher will memorize last input source when power off
√ Manual switching is enabled in the auto switching mode and does not exit it.
√ When full screen mode changes into multi-view mode, the AUTO mode will not exit.
5.3 Video Switching Status Inquiry
In the Multi-view mode (Window A, B, C or D LED illuminate blue).
Operation: Windows#
Example: Long press Windows B button for more than 3s (Window A, C and D LEDs go out, and then corresponding input source LED will illuminate blue). After 3 seconds, Window A, B, C and D LEDs illuminate blue.
5.4 Audio Select
Factory default is HDMI IN1 audio source. In the Multi-view mode, long press any INPUT buttons for more than 3s to replace all output audios with corresponding input audio source, meanwhile, the input LED illuminates blue. No operation within 3s, the input LED will go out.
Long press AUTO button for 3s to replace all output audios with LINE IN audio source.
5.5 Config Button
SWAP: Press Swap button to select window display screen anti-clockwise direction, the SWAP LED lights once when press its button once.
Example: In the Multi-view mode

flowchart
graph LR
    A["1->A"] -->|SWAP| B["2->A"]
    B -->|SWAP| C["3->A"]
    C -->|SWAP| D["4->A"]
Example: In the Full Screen mode

flowchart
graph LR
    A["1->A"] -->|SWAP| B["2->A"]
    B -->|SWAP| C["3->A"]
    C -->|SWAP| D["4->A"]
RESIZE: Press RESIZE button to readjust the windows size. Please refer the GUI Multi-view Tab on page 12 for more details.
Example: In the PIP mode

flowchart
graph LR
    A["A"] -->|RESIZE| B["B"]
    B --> C["A"]
    C -->|RESIZE| D["B"]
6. IR Remote

text_image
INPUTS 1 2 3 4 AUTO SELECT / FULL SCREEN A B C D CONFIG SWAP RESIZE MUTE RES MULTIVIEW A B A B A B A B USER 1 USER 2 USER3 USER 4 Multiview Switcher 1 2 3 4① INPUTS: Press 1-4 button to select the input sources. Press AUTO button to automatically detect the input sources.
② SELECT / FULL SCREEN: Press A-D button to display corresponding input as full-screen mode.
③ CONFIG: Press SWAP button to select window display screen anti-clockwise direction. Press the RESIZE button to adjust the windows size. Press MUTE button to control the basic function, such as adjusting volume, pause, play and switch and so on. Press RES button to adjust the output resolution.
④ MULTIVIEW: The MULTIVIEW includes eight buttons, the first four buttons to choose different multi-views mode, and USER1-4 button to enter user-defined multi-views mode via GUI control.
Note: There is no long pressing function on this IR remote, and its button functions are the same as the front panel buttons.
7. GUI Control
The switcher can be controlled via TCP/IP. The default IP settings are:
IP Address: 192.168.0.178
Subnet Mask: 255.255.255.0
Type 192.168.0.178 in the internet browser, it will enter the below log-in webpage:
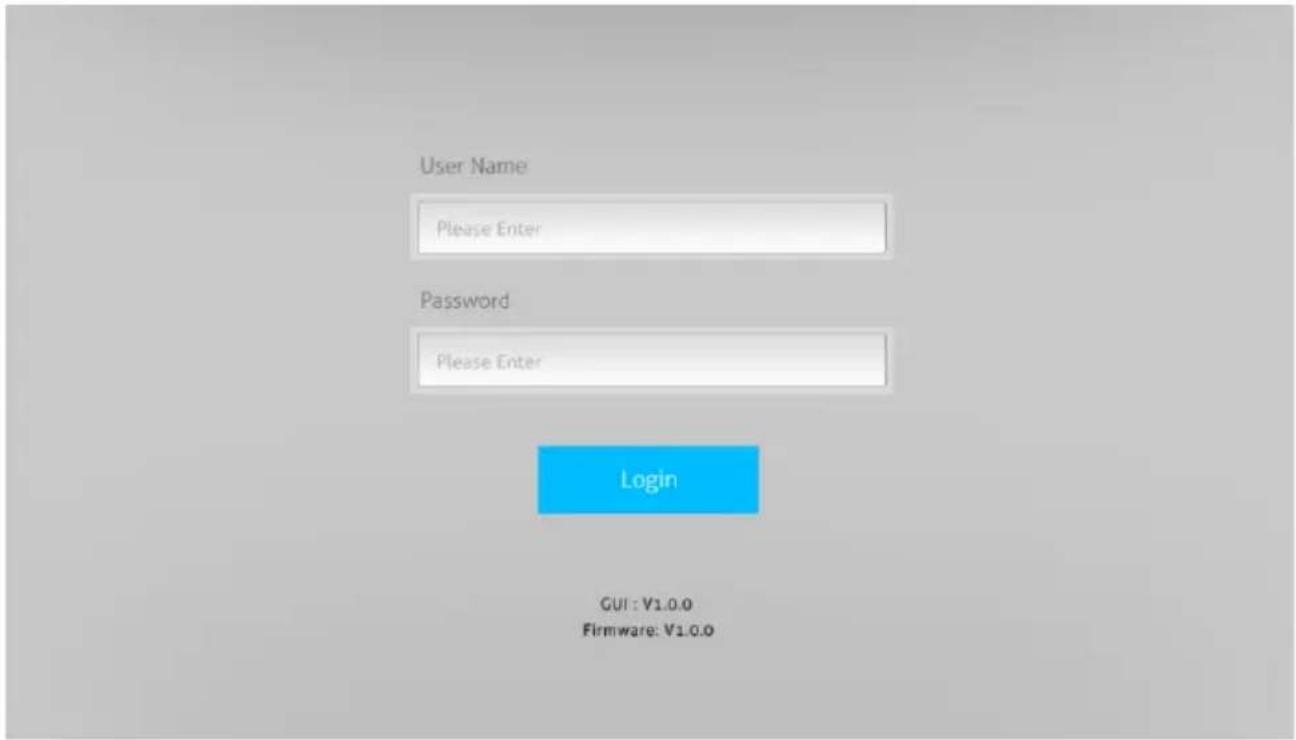
text_image
User Name Please Enter Password Please Enter Login GUI : V1.0.0 Firmware: V1.0.0Username: admin
Password: admin
Type the user name and password, and then click Login to enter the section for video switching.
7.1 Multiview Tab
Type the default user name and password, and then click Login to enter the Multiview Tab shown as below:
① Pre-defined
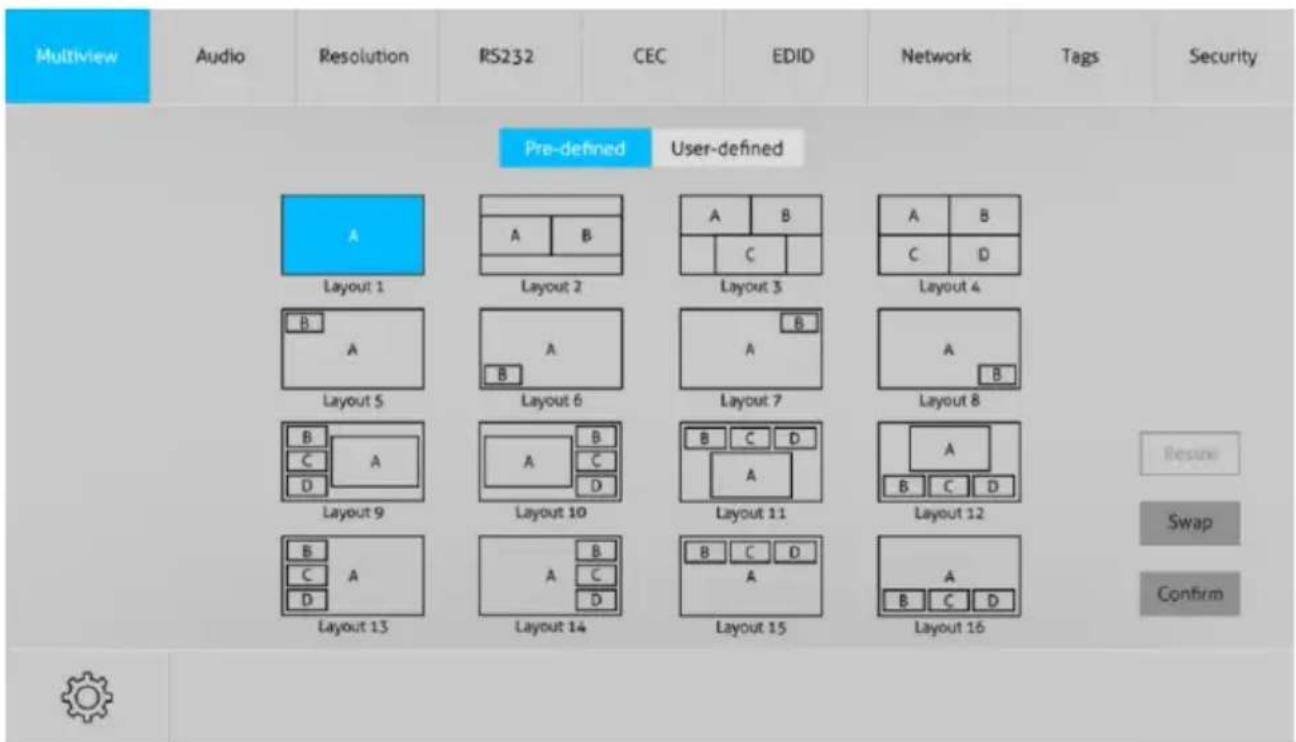
text_image
Multiview Audio Resolution RS232 CEC EDID Network Tags Security Pre-defined User-defined Layout 1 Layout 2 Layout 3 Layout 4 Layout 5 Layout 6 Layout 7 Layout 8 Layout 9 Layout 10 Layout 11 Layout 12 Layout 13 Layout 14 Layout 15 Layout 16 Resume Swap Confirm■ Pre-defined:
√ Click the corresponding button (Layout1\~16) to select video input view and mode.
√ Click the Layout2, Layout5\~Layout8, Layout9\~Layout12 buttons to enable the Resize function.
√ Press SWAP button to select window display screen anti-clockwise direction.
√ Click Confirm button complete the selection.
Note: Only layout2, layout5\~8 and layout9\~12, 9 layouts in total, can be resized.

text_image
Multiview Audio Resolution RS232 CEC EDID Network Tags Security Setting X Window Select Input 1 Input 2 Input 3 Input 4 Window A Window B Window C Window D Confirm Cancel Reset Swap Confirm√ Click Setting button to enter Window Select, and select any one of input sources and corresponding output shown windows.
② User-defined

text_image
Multiview Audio Resolution RS232 CEC EDID Network Tags Security Pre-defined User-defined User Layout Window Select None Input 1 Input 2 Input 3 Input 4 Start Position(0~100) End Position(0~100) Window A [X, Y] 0, 0 [X, Y] 20, 20 Window B [X, Y] 0, 0 [X, Y] 10, 10 Window C [X, Y] 5, 5 [X, Y] 50, 50 Window D [X, Y] 50, 50 [X, Y] 80, 80 Save Recall Default√ Click 1, 2, 3, or 4 button to choose User Layout.
√ Select the corresponding input, set the size and position for each window that you want to display on the layout.
√ Click Save button to present the results above selected.

text_image
Multiview Audio Resolution RS232 CEC EDID Network Tags Security Pre-defined User-defined User Layout Window Select Note! Bandwidth limit exceeded, please change the resolution or window sizes. OK Start Position End Position Save Recall Default End Position(0-100) End Position(0-100) Y 0, 0 [X, Y] 100, 100 Y 10, 10 [X, Y] 100, 100 Y 20, 20 [X, Y] 100, 100 Y 30, 30 [X, Y] 100, 100√ Click OK button to exit the current interface and reselect User-defined if the Bandwidth limit exceeded.
7.2 Audio Tab
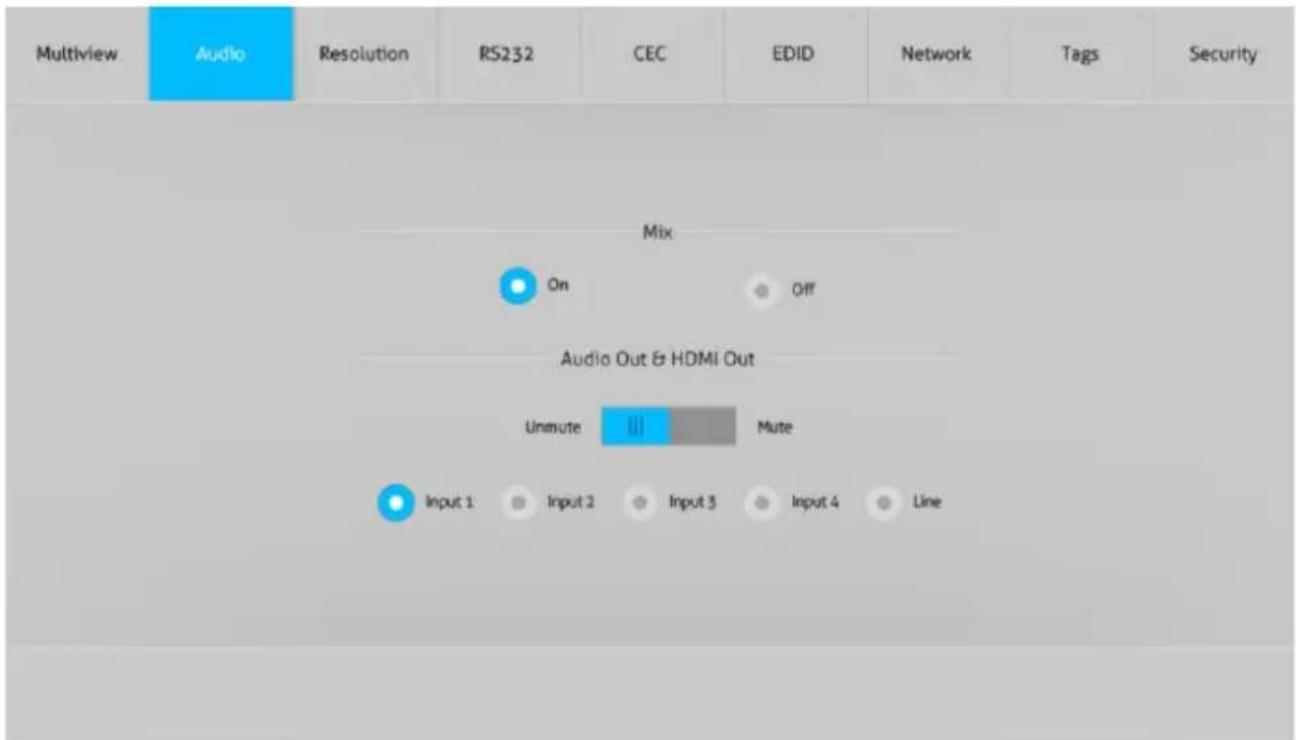
text_image
Multiview Audio Resolution RS232 CEC EDID Network Tags Security Mix On Off Audio Out & HDMI Out Unmute Mute Input 1 Input 2 Input 3 Input 4 Line√ Click On button to enter Mix mode, Click Off button to exit Mix mode.
√ Click Unmute or Mute button to control Audio Output.
√ Select one audio input among input 1-4 and line audio to set as output audio.
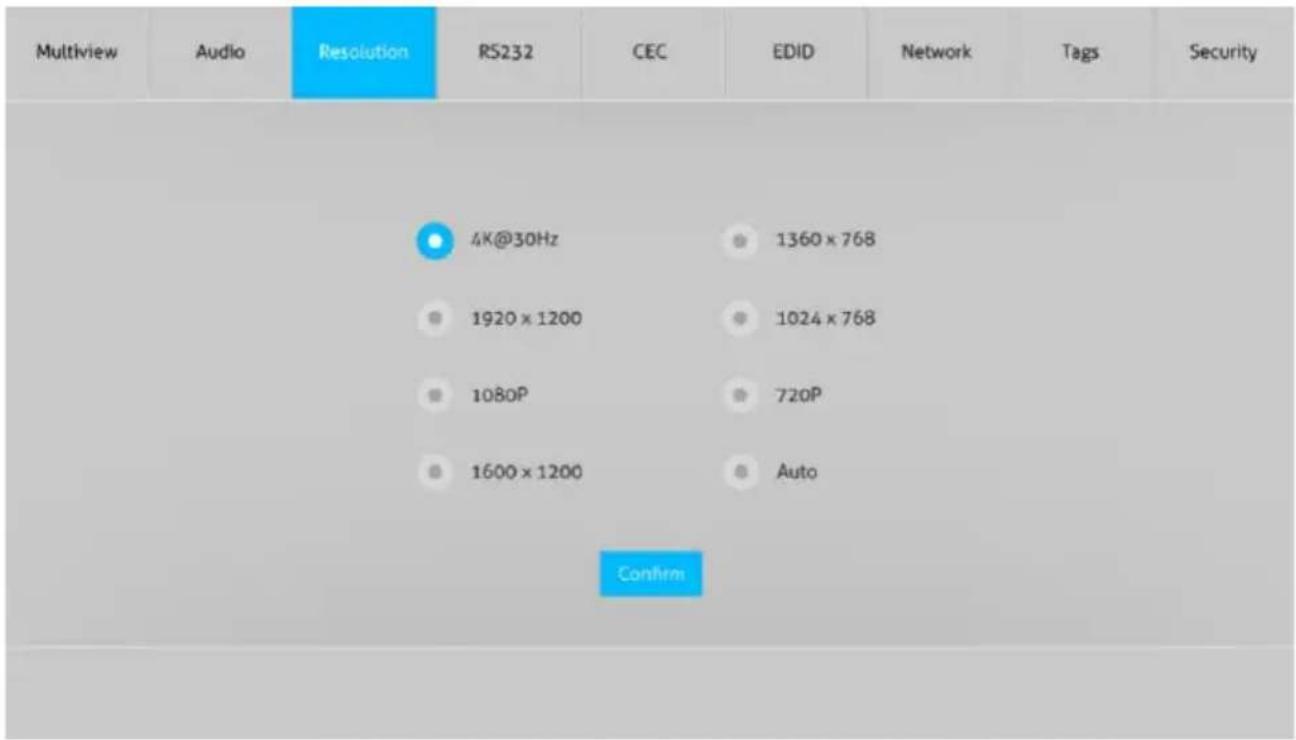
7.3 Resolution Tab
other
| Metric | Value | | :--- | :--- | | 4K@30Hz | 1360 x 768 | | 1920 x 1200 | 1024 x 768 | | 1080P | 720P | | 1600 x 1200 | Auto | | Confirm |√ Click any one of built-in resolutions for the selected input source device, click Auto button to show the resolution from third-party display device automatically.
√ Click Confirm button when the selection is completed.
7.4 RS232 Tab

text_image
Multiview Audio Resolution RS232 CEC EDID Network Tags Security ASCII HEX Baud Rate: 9600 ▼ Display On: Send Command Ending: NULL Command: xxxxxx Display Off: Send Send√ ASCII or HEX command format can be selected.
√ Baud Rate: Supports 2400, 4800, 9600, 19200, 38400, 57600 or 115200.
√ Command Ending: NULL, CR, LF or CR+LF can be chosen.
√ Command: Type the command in this box to control the third-party device which is connected to the RS232 port of the switcher.
√ Display On: Send the Display ON via RS232 command.
√ Display Off: Send the Display OFF via RS232 command.
7.5 CEC Tab
① Source
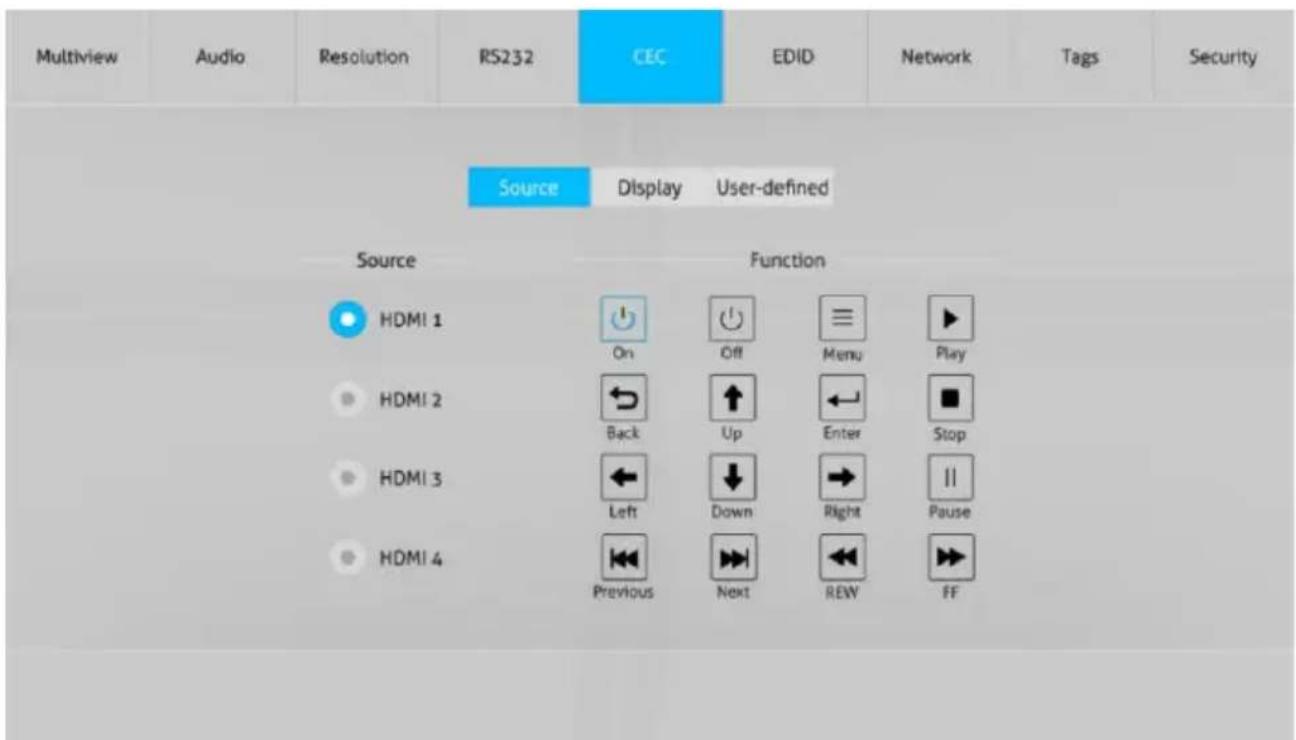
text_image
Multiview Audio Resolution RS232 CEC EDID Network Tags Security Source Display User-defined Source Function HDMI 1 On Off Menu Play HDMI 2 Back Up Enter Stop HDMI 3 Left Down Right Pause HDMI 4 Previous Next REW FF√ Click Source button to select HDMI input source, and click Function to enter the basic control.
② Display
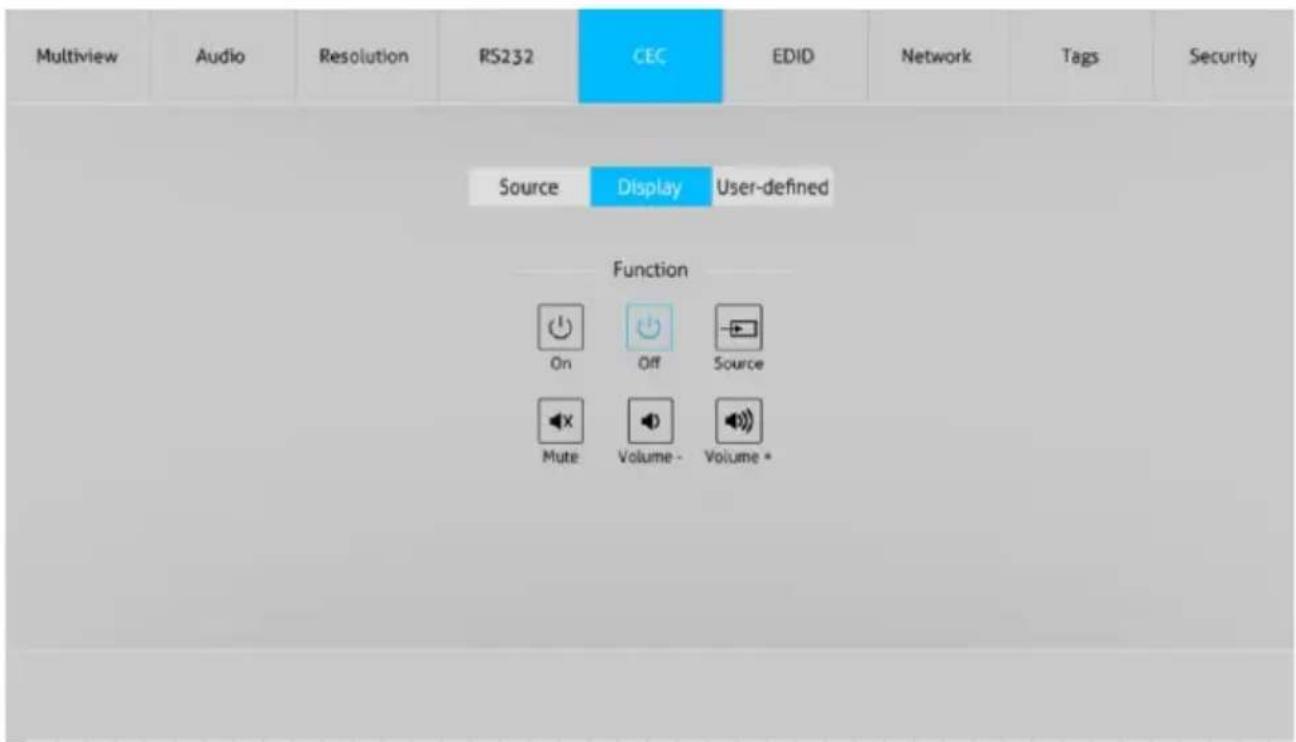
text_image
Multiview Audio Resolution RS232 CEC EDID Network Tags Security Source Display User-defined Function On Off Source Mute Volume - Volume *√ Click Display buttons to control the third-party display devices.
③ User-defined
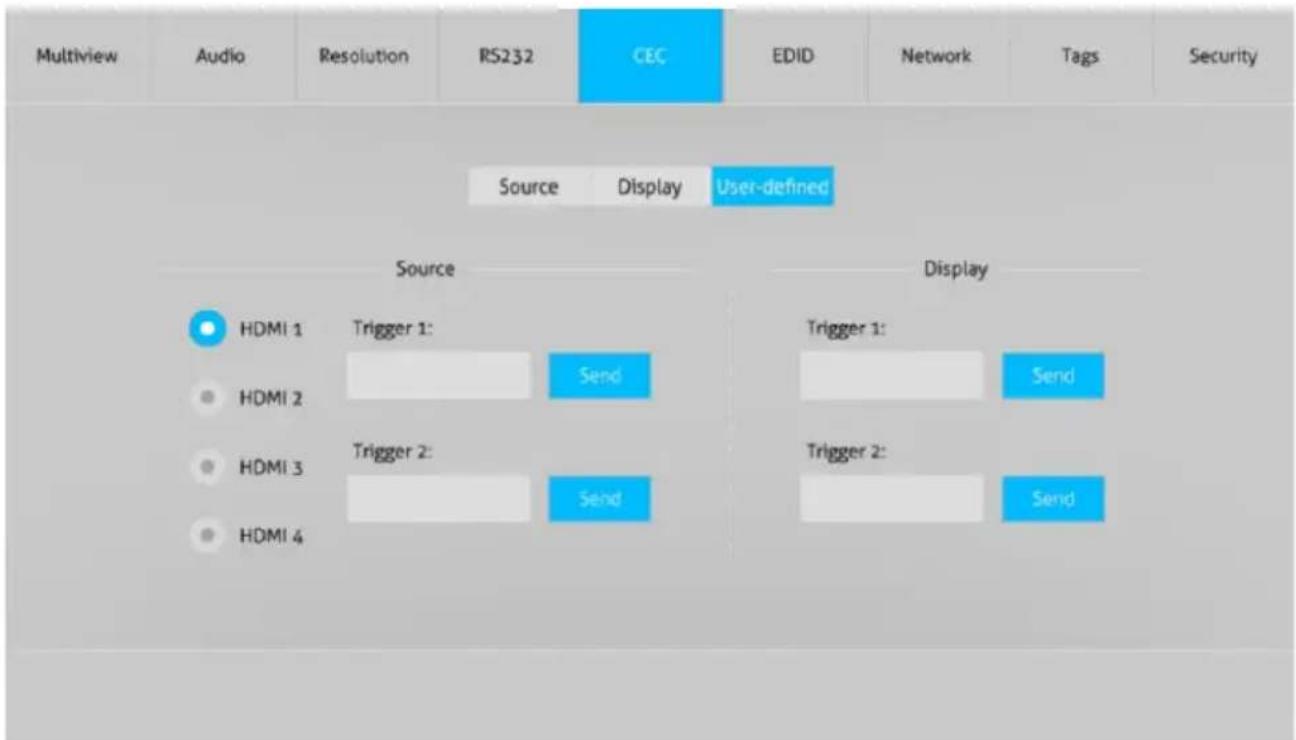
text_image
Multiview Audio Resolution RS232 CEC EDID Network Tags Security Source Display User-defined Source Display HDMI 1 Trigger 1: Send Trigger 1: Send HDMI 2 HDMI 3 Trigger 2: Send Trigger 2: Send HDMI 4√ Select corresponding input source devices and display devices to control via CEC commands.
7.6 EDID Tab
① Upload
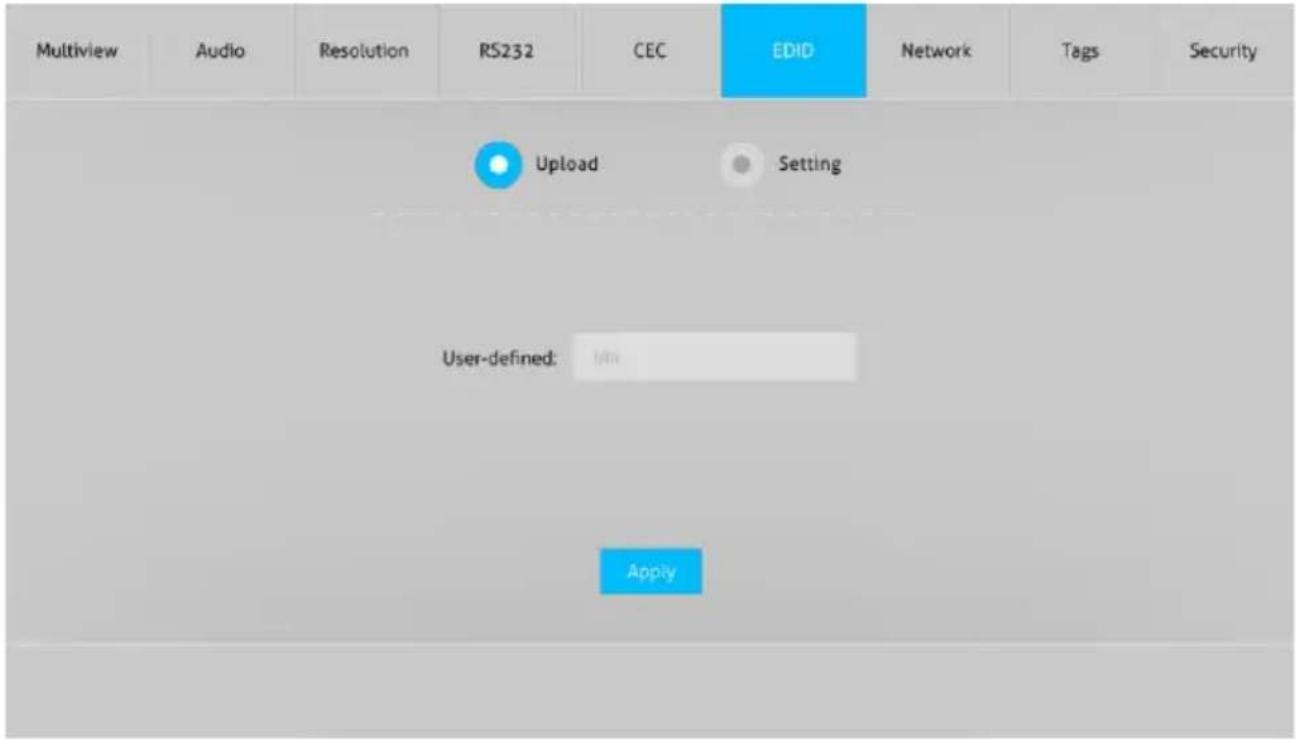
text_image
Multiview Audio Resolution RS232 CEC EDID Network Tags Security Upload Setting User-defined: 100 Apply√ User-defined EDID can be customized by the below steps:
Step 1: Prepare the EDID file (.bin) on the control PC.
Step 2: Select the EDID file (.bin) according to the tooltip.
Step 3: Click Apply to upload the user-defined EDID.
② Setting
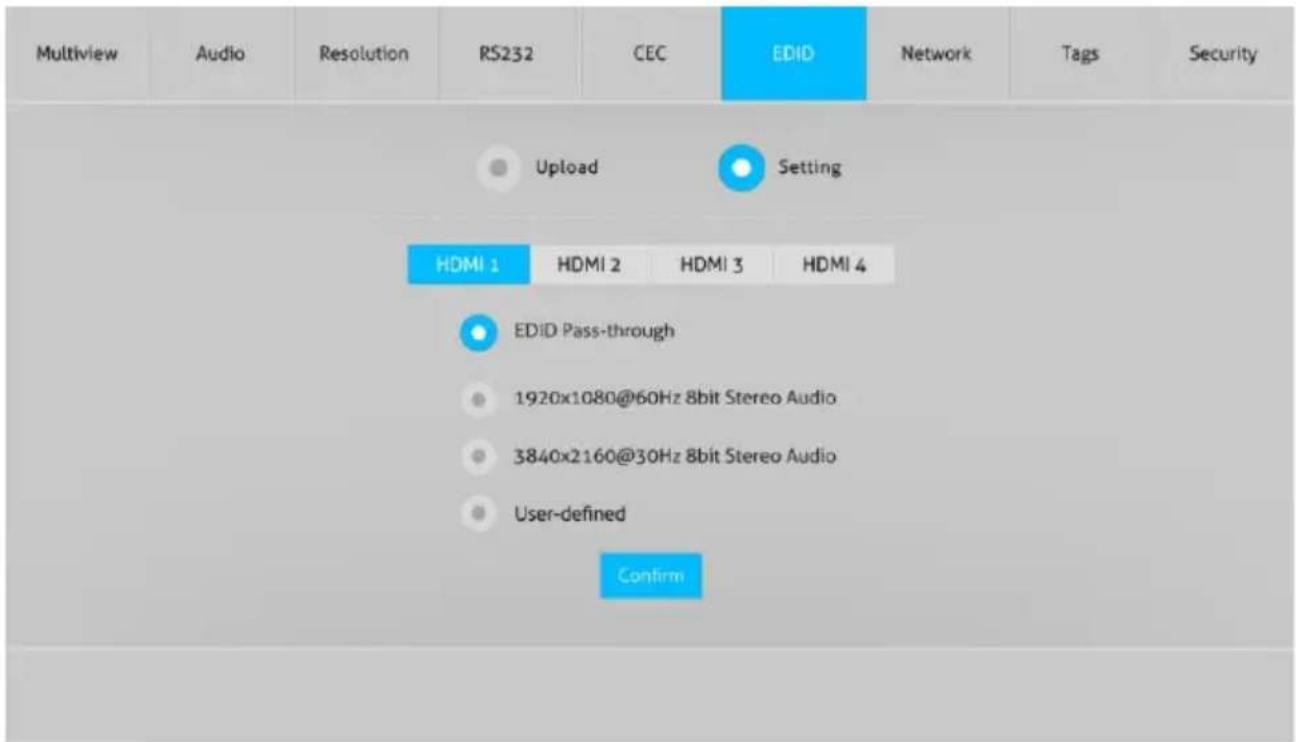
text_image
Multiview Audio Resolution RS232 CEC EDID Network Tags Security Upload Setting HDMI 1 HDMI 2 HDMI 3 HDMI 4 EDID Pass-through 1920x1080@60Hz 8bit Stereo Audio 3840x2160@30Hz 8bit Stereo Audio User-defined Confirm√ Click Setting button to set built-in EDID.
√ Click HDMI 1-4 button to select input source.
√ Click any one of built-in EDIDs for the selected input source device.
7.7 Network Tab
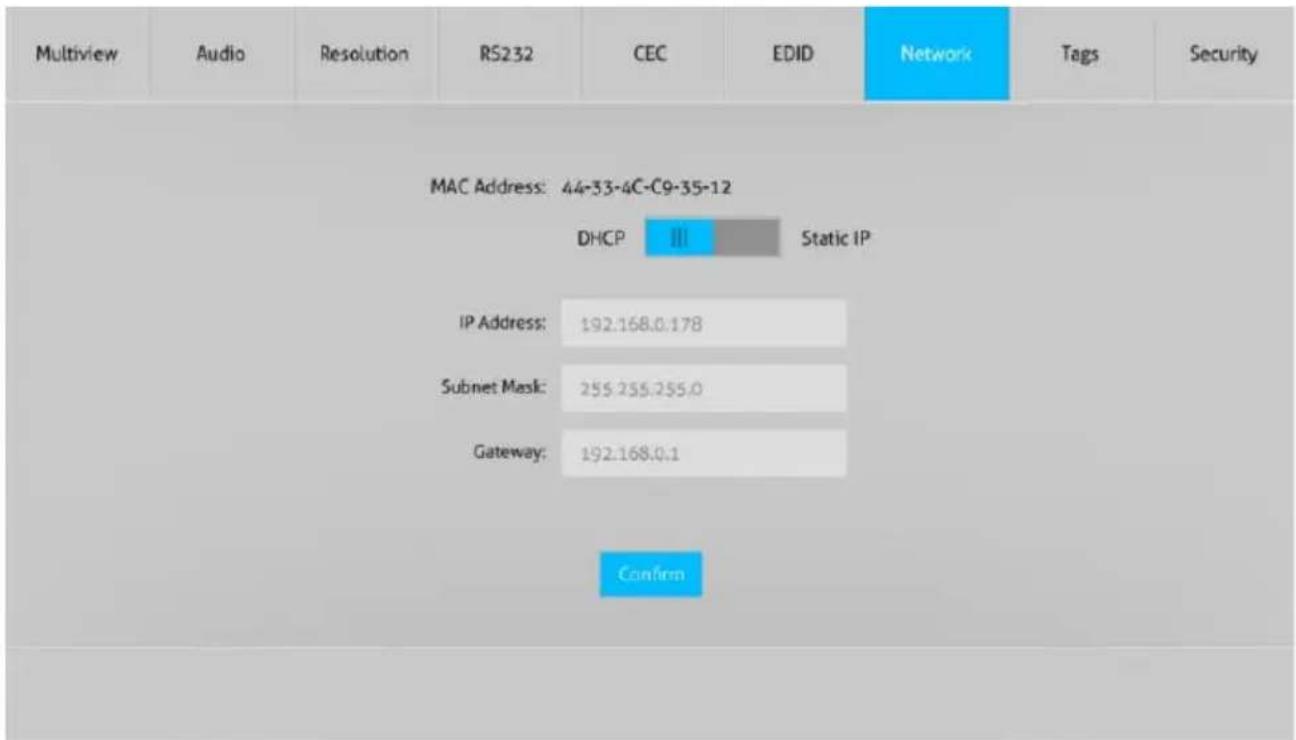
√ Static IP or Dynamic Host Configuration Protocol (DHCP).
√ Modify the static IP Address, Subnet Mask, and Gateway.
7.8 Tags Tab
| Multiview | Audio | Resolution | RS232 | CEC | EDID | Network | Tags | Security |
| Layout 1 | Layout 2 | Layout 3 | Layout 4 | |||||
| Layout 5 | Layout 6 | Layout 7 | Layout 8 | |||||
| Layout 9 | Layout 10 | Layout 11 | Layout 12 | |||||
| Layout 13 | Layout 14 | Layout 15 | Layout 16 | |||||
| User Layout 1 | User Layout 2 | User Layout 3 | User Layout 4 | |||||
| Confirm | ||||||||
√ Modify the input button labels.
7.9 Security Tab
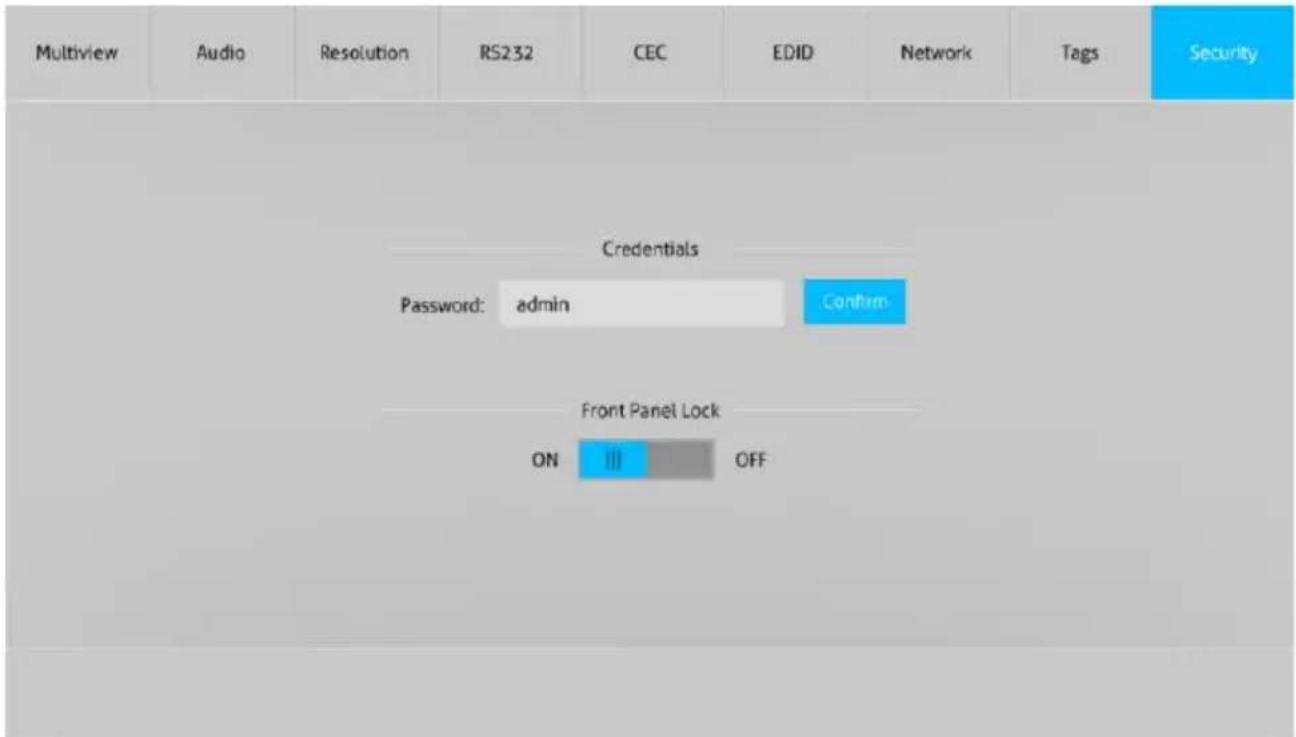
text_image
Multiview Audio Resolution RS232 CEC EDID Network Tags Security Credentials Password: admin Confirm Front Panel Lock ON III OFF√ Modify the login password.
√ Lock or unlock the front panel buttons.
7.10 GUI Update
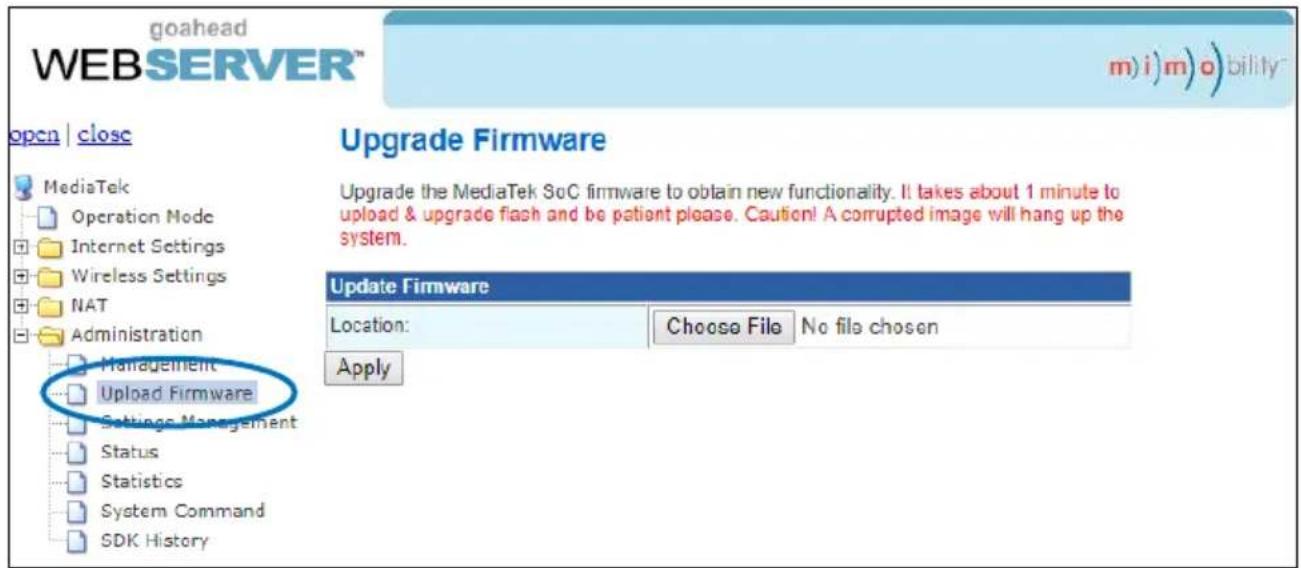
Web-based GUI for the Seamless Switcher supports online update in http://192.168.0.178:100. First, the Switcher is running. Type the username and password (the same as the GUI log-in settings, modified password will be available only after rebooting) to log in the configuration interface. After that, click Administration at the source Tab to get to Upload Program as shown below:
text_image
goahead WEBSERVER™ m) i) m) o) bility™ open | closc Upgrade Firmware Upgrade the MediaTek SoC firmware to obtain new functionality. It takes about 1 minute to upload & upgrade flash and be patient please. Caution! A corrupted image will hang up the system. Update Firmware Location: Choose File No file chosen Apply MediaTek Operation Mode Internet Settings Wireless Settings NAT Administration Management Upload Firmware Settings Management Status Statistics System Command SDK HistorySelect the desired update file and press "Apply", it will start upgrading then. Last, check whether where is a reminder named check ok, if yes, the GUI was updated successfully, otherwise, the GUI updating is fail, and then follow the above steps to update again.
8. RS232 Control
Connect the RS232 port to control device (e.g. PC) with RS232 cable. The switcher can be controlled by sending RS232 commands.
The below command lists are used to control the switcher. The RS232 control software (e.g. docklight) needs to be installed on the control PC to send RS232 commands.
After installing the RS232 control software, please set the parameters of COM number, bound rate, data bit, stop bit and the parity bit correctly, and then you are able to send command in command sending area.
Baud rate: 9600
Data bit: 8
Stop bit: 1
Parity bit: none
Note:
- In the commands, “[”and “]” are symbols for easy reading and do not need to be typed in actual operation.
- Type the command carefully, it is case-sensitive.
8.1 System Control
The ending mark of command is "
| Command | Description | Command & Feedback Example |
| #GET_FIRMWARE_VERSION | Get the firmware version | @V1.0.0 |
| #FACTORY_RESET | Factory Default | @FACTORY_RESET |
| #REBOOT | System reboot | @REBOOT |
| #HELP [PARAM] | Get the command details[PARAM]=Any command (Random commands and without symbol “#”, it means the feedback command is described its usage).[PARAM]=Null (Report all commands). | #HELP SET_AV |
| @Select the input source.#SET_AV INPARAM TO OUTPARAMINPARAM = 1 ~ 41 - HDMI 12 - HDMI 23 - HDMI 34 - HDMI 4OUTPARAM = A ~ D | ||
| #GET_IP_ADDR | Get the IP to access GUI. | @IP_ADDR:192.168.0.178@SUBNET_MASK:255.255.255.0@GATEWAY:192.168.0.1 |
8.2 Signal Switching
The ending mark of command is "
| Command | Description | Command & Feedback Example |
| #SET_AV [INPARAM] TO [OUTPARAM] | Switch an input AV signal to one or more outputs.[INPARAM]=1 ~ 41 - HDMI 12 - HDMI 23 - HDMI 34 - HDMI 4[OUTPARAM]=A ~ D.[OUTPARAM]=Null. Switch any input to window A. | #SET_AV 1#SET_AV 1 TO |
| @AV 1 TO A | ||
| #GET_AV [PARAM] | Get the current AV switching status of input or output channel.[PARAM]=A ~ D.[PARAM]=Null. Get all switching status. | #GET_AV |
| @VIDEOOUT A B C DIN 1 2 3 4@AUDIO_SRC 1 | ||
| #SET_AUTO_SWITCH [PARAM] | Enable/disable auto switching mode.[PARAM]=0~1.0 - Disable1 - Enable | #SET_AUTO_SWITCH 1 |
| @AUTO_SWITCH 1 | ||
| #GET_AUTO_SWITCH | Get the auto switching status. | @AUTO_SWITCH 1 |
8.3 Audio Switching
The ending mark of command is "
| Command | Description | Command & Feedback Example |
| #SET_AUDIO_MUTE [PARAM] | Mute/Unmute audio.[PARAM]=0~1.0 - Disable1 - Enable | #SET_AUDIO_MUTE 1 |
| @AUDIO_MUTE 1 | ||
| #GET_AUDIO_MUTE | Get the audio mute status. | @AUDIO_MUTE 1 |
| #SET_AUDIO_SRC [PARAM] | Set the audio output source.[PARAM]=1 ~ 51 - HDMI 12 - HDMI 23 - HDMI 34 - HDMI 45 - LINE IN | #SET_AUDIO_SRC 1 |
| @AUDIO_SRC 1 | ||
| #GET_AUDIO_SRC | Get the audio output source. | @AUDIO_SRC 1 |
| #SET_AUDIO_MIX [PARAM] | Enable/Disable audio mix.[PARAM]=0~1.0 - Disable1 - Enable | #SET_AUDIO_MIX 1 |
| @AUDIO_MIX 1 | ||
| #GET_AUDIO_MIX | Get audio mix status. | @AUDIO_MIX 1 |
| #SET_FULL_SWAUD [PARAM] | Enable/disable whether the audio follows the video switching when full-screen mode is selected.[PARAM]=0~1.0 - Disable1 - Enable | #SET_FULL_SWAUD 1 |
| @FULL_SWAUD 1 | ||
| #GET_FULL_SWAUD | Get whether the audio follows the video switching when full-screen mode is selected. | @FULL_SWAUD 1 |
8.4 Function Setting
The ending mark of command is "
| Command | Function | Command & Feedback Example |
| #SET_RS232_BAUD [PARAM] | Set the RS232 baud rate.[PARAM]=1 ~ 71 - 1152002 - 576003 - 384004 - 192005 - 96006 - 48007 - 2400 | #SET_RS232_BAUD 0 |
| @RS232_BAUD 5 | ||
| #GET_RS232_BAUD | Get the RS232 baud rate | #GET_RS232_BAUD @RS232_BAUD 5 |
| #SET_OUTPUT_RES [PARAM] | Set the output resolution.[PARAM]= 1 ~ 81 - 1024x768 60 HZ2 - 1280x720 60 HZ3 - 1360x768 60 HZ4 - 1600x1200 60 Hz5 - 1920x1080 60 HZ6 - 1920x1200 60 HZ7 - 3840x2160 30 HZ8 - Auto | #SET_OUTPUT_RES 7 |
| @OUTPUT_RES 7 | ||
| #GET_OUTPUT_RES | Get the output resolution | @OUTPUT_RES 4 |
| #GET_INPUT_RES [PARAM] | Get the input resolution.[PARAM]=1 ~ 41 - HDMI 12 - HDMI 23 - HDMI 34 - HDMI 4 | @INPUT_RES: 1920x1080 60HZ |
| #SET_OUTPUT_HDCP [PARAM] | Set the HDCP mode for output port.[PARAM]=1 ~ 31 - HDCP1.42 - HDCP2.23 - OFF | #SET_OUTPUT_HDCP 1 |
| @OUTPUT_HDCP 1 | ||
| #GET_OUTPUT_HDCP | Get the HDCP mode of output port. | @OUTPUT_HDCP 1 |
| #SET_EDID_MODE [PARAM1] [PARAM2] | Set the EDID of HDMI input.[PARAM1]=1 ~ 41 - HDMI 12 - HDMI 23 - HDMI 34 - HDMI 4[PARAM2]=1 ~ 41 - 1920x1080 60HZ PCM 2CH2 - 3840x2160 30HZ PCM 2CH3 - BYPASS4 - USER | #SET_EDID_MODE 1 1 |
| @EDID_MODE 1 1 | ||
| #GET_EDID_MODE [PARAM] | Get the EDID of input.[PARAM]=1 ~ 41 - HDMI 12 - HDMI 23 - HDMI 34 - HDMI 4 | #GET_EDID_MODE 1 |
| @EDID_MODE 1 1 | ||
| #UPLOAD_USER_EDID | Upload the user defined EDID. | @USER_EDID READY PLEASE SEND EDID DATA IN 10S OK |
| #SET_KEYPAD_LOCK [PARAM] | Lock/unlock the keypad.[PARAM]=0~1.0 - Unlock.1 - Lock. | #SET_KEYPAD_LOCK 1 |
| @KEYPAD_LOCK 1 | ||
| #GET_KEYPAD_LOCK | Get the keypad locking status | #GET_KEYPAD_LOCK |
| #SET_POWER [PARAM] | Enter/exit standby mode[PARAM]=0 ~ 10 - Standby mode.1 - Power on mode. | #SET_POWER 1 |
| @POWER 1 | ||
| #GET_POWER | Get the standby status | @POWER 1 |
| #SET_MV_MODE [PARAM] | Set multiview mode. [PARAM]=1 ~ 201 - 1 WINDOWS Full2 - 2 WINDOWS PBP3 - 3 WINDOWS 2U1D4 - 4 WINDOWS SAME SIZE5 - 2 WINDOWS PIP LU6 - 2 WINDOWS PIP LD7 - 2 WINDOWS PIP RU8 - 2 WINDOWS PIP RD9 - 4 WINDOWS PBP 3L1R10 - 4 WINDOWS PBP 1L3R11 - 4 WINDOWS PBP 3U1D12 - 4 WINDOWS PBP 1U3D13 - 4 WINDOWS PIP 1F3L14 - 4 WINDOWS PIP 1F3R15 - 4 WINDOWS PIP 1F3U16 - 4 WINDOWS PIP 1F3D17 - USER CONFIG 118 - USER CONFIG 219 - USER CONFIG 320 - USER CONFIG 4 | #SET_MV_MODE 1 |
| @MV_MODE 1 | ||
| #GET_MV_MODE | Get multiview mode | @MV_MODE 1 |
| #GET_STATUS | Get the system status | @V1.0.0@VIDEOOUT A B C DIN 1 2 3 4@AUDIO_SRC 1@OUTPUT_RES 7@AUTO_SWITCH 1@EDID_MODE 1 2... |
| #SET_SWAP_SRC | Swap input source | @SWAP_SRC@VIDEOOUT A B C DIN 1 2 3 4@AUDIO_SRC 1 |
| #SET_RESIZE_WIM | Resize display windows. | @RESIZE_WIM |
| #SET_SYNCACT_CEC [PARAM] | #SET_SYNCACT_CEC 1 | |
| Enable/Disable whether automatically send corresponding CEC command when detecting Power on/off signal. [PARAM]= 0 ~ 10 - Disable1 - Enable | @SYNC ACT_CEC 1 | |
| #GET_SYNC ACT_CEC | Get whether automatically send corresponding CEC command when detecting Power on/off signal. | #GET_SYNC ACT_CEC |
| @SYNC ACT_CEC 1 | ||
| #SET_SYNC ACT_RS232 [PARAM] | Enable/Disable whether automatically send corresponding RS232 command when detecting Power on/off signal. [PARAM]= 0 ~ 10 - Disable1 - Enable | #SET_SYNC ACT_RS232 1 |
| @SYNC ACT_RS232 1 | ||
| #GET_SYNC ACT_RS232 | Get whether automatically send corresponding RS232 command when detecting Power on/off signal. | #GET_SYNC ACT_RS232 |
| @SYNC ACT_RS232 1 | ||
| #SET_DTIME [PARAM1]:[PARAM2] | Set the delay time of auto sending Display OFF command when no signal is detected. [PARAM1]=0 ~ 30 minus [PARAM2]=0 ~ 1800 seconds (PS: All the time in 0s ~ 30m) | #SET_DTIME 1:30 |
| @DTIME 1:30 | ||
| #GET_DTIME | Get the delay time of auto sending Display OFF command when no signal is detected. | @DTIME 1:30 |
| #SET_AUTO_POWER [PARAM] | Enable/Disable auto standby function. [PARAM]=0 ~ 10 - Disable1 - Enable | #SET_AUTO_POWER 1 |
| @AUTO_POWER 1 | ||
| #GET_AUTO_POWER | Get the auto standby function status. | @AUTO_POWER 1 |
| #SET_OFF_CNT [PARAM] | Set the number of times to send the DISPLAY OFF command. [PARAM]=1 ~ 2 | #SET_OFF_CNT 1 |
| @OFF_CNT 1 | ||
| #GET_OFF_CNT | Get the number of times to send the DISPLAY OFF command. | @OFF_CNT 1 |
| #SET_OFF_DELAY [PARAM] | Set the sending interval between two Display OFF commands. [PARAM]=5 ~ 100 (1=100ms) | #SET_OFF_DELAY 5 |
| @OFF_DELAY 5 | ||
| #GET_OFF_DELAY | Get the the sending interval between two Display OFF commands. | @OFF_DELAY 5 |
8.5 CEC Command
The ending mark of command is "
| Command | Function | Command & Feedback Example |
| #SET_SRC_MENU [PARAM] | Send CEC MENU command to source device.[PARAM]=1 ~ 41 - HDMI 12 - HDMI 23 - HDMI 34 - HDMI 4 | #SET_SRC_MENU 1 |
| @SRC_MENU 1 | ||
| #SET_SRC_UP [PARAM] | Send CEC UP command to source device.[PARAM]=1 ~ 41 - HDMI 12 - HDMI 23 - HDMI 34 - HDMI 4 | #SET_SRC_UP 1 |
| @SRC_UP 1 | ||
| #SET_SRC_DOWN [PARAM] | Send CEC DOWN command to source device.[PARAM]=1 ~ 41 - HDMI 12 - HDMI 23 - HDMI 34 - HDMI 4 | #SET_SRC_DOWN 1 |
| @SRC_DOWN 1 | ||
| #SET_SRC_LEFT [PARAM] | Send CEC LEFT command to source device.[PARAM]=1 ~ 41 - HDMI 12 - HDMI 23 - HDMI 34 - HDMI 4 | #SET_SRC_LEFT 1 |
| @SRC_LEFT 1 | ||
| #SET_SRC_RIGHT [PARAM] | Send CEC RIGHT command to source device.[PARAM]=1 ~ 41 - HDMI 12 - HDMI 23 - HDMI 34 - HDMI 4 | #SET_SRC_RIGHT 1 |
| @SRC_RIGHT 1 | ||
| #SET_SRC_BACK [PARAM] | Send CEC BACK command to source device.[PARAM]=1 ~ 41 - HDMI 12 - HDMI 23 - HDMI 34 - HDMI 4 | #SET_SRC_BACK 1 |
| @SRC_BACK 1 | ||
| #SET_SRC_ENTER [PARAM] | Send CEC ENTER command to source device.[PARAM]=1 ~ 41 - HDMI 12 - HDMI 23 - HDMI 34 - HDMI 4 | #SET_SRC_ENTER 1 |
| @SRC_ENTER 1 | ||
| #SET_SRC_ON [PARAM] | Send CEC ON command to source device.[PARAM]=1 ~ 41 - HDMI 12 - HDMI 23 - HDMI 34 - HDMI 4 | #SET_SRC_ON 1 |
| @SRC_ON 1 | ||
| #SET_SRC_OFF [PARAM] | Send CEC OFF command to source device.[PARAM]=1 ~ 41 - HDMI 12 - HDMI 23 - HDMI 34 - HDMI 4 | #SET_SRC_OFF 1 |
| @SRC_OFF 1 | ||
| #SET_SRC_STOP [PARAM] | Send CEC STOP command to source device.[PARAM]=1 ~ 4 | #SET_SRC_STOP 1 |
| 1 - HDMI 12 - HDMI 23 - HDMI 34 - HDMI 4 | @SRC_STOP 1 | |
| #SET_SRC_PLAY [PARAM] | Send CEC PLAY command to source device.[PARAM]=1 ~ 41 - HDMI 12 - HDMI 23 - HDMI 34 - HDMI 4 | #SET_SRC_PLAY 1 |
| @SRC_PLAY 1 | ||
| #SET_SRC_PAUSE [PARAM] | Send CEC PAUSE command to source device.[PARAM]=1 ~ 41 - HDMI 12 - HDMI 23 - HDMI 34 - HDMI 4 | #SET_SRC_PAUSE 1 |
| @SRC_PAUSE 1 | ||
| #SET_SRC_PREV [PARAM] | Send CEC PREV command to source device.[PARAM]=1 ~ 41 - HDMI 12 - HDMI 23 - HDMI 34 - HDMI 4 | #SET_SRC_PREV 1 |
| @SRC_PREV 1 | ||
| #SET_SRC_NEXT [PARAM] | Send CEC NEXT command to source device.[PARAM]=1 ~ 41 - HDMI 12 - HDMI 23 - HDMI 34 - HDMI 4 | #SET_SRC_NEXT 1 |
| @SRC_NEXT 1 | ||
| #SET_SRC_REW [PARAM] | Send CEC rewind command to source device.[PARAM]=1 ~ 41 - HDMI 12 - HDMI 23 - HDMI 34 - HDMI 4 | #SET_SRC_REW 1 |
| @SRC_REW 1 | ||
| #SET_SRC_FF [PARAM] | Send CEC fast-forward command to source device.[PARAM]=1 ~ 41 - HDMI 12 - HDMI 23 - HDMI 34 - HDMI 4 | #SET_SRC_FF 1 |
| @SRC_MENU 1 | ||
| #SET_DIS_ON | Send CEC ON command to display device. | @DIS_ON |
| #SET_DIS_OFF | Send CEC OFF command to display device. | @DIS_OFF |
| #SET_DIS_SOURCE | Send CEC SOURCE command to display device. | @DIS_SOURCE |
| #SET_DIS_MUTE | Send CEC MUTE command to display device. | @DIS_MUTE/UNMUTE |
| #SET_DIS_VOL+ | Send CEC volume plus command to display device. | @DIS_VOL+ |
| #SET_DIS_VOL- | Send CEC volume minus command to display device. | @DIS_VOL- |
8.6 Special Command
Note: The below commands don't need ending mark.
| Command | Description | Command & Feedback Example |
| #SET_ON_[PARAM]:XXXX | Set the ASCII command to be sent to display device when power on the switcher.[PARAM]= 01~0701 - 11520002 - 5760003 - 3840004 - 1920005 - 960006 - 480007 - 2400XXXX= ASCII data to be sent (Up to 48 characters). | #SET_ON_05:1234567 |
| @@BAUDRATE: 9600@DISPLAY ON TOSEND:1234567 | ||
| #SET_H_ON_[PARAM]:XX XX | Set the HEX command to be sent to display device when power on the switcher.[PARAM]= 01~0701 - 11520002 - 5760003 - 3840004 - 1920005 - 960006 - 480007 - 2400XX XX= HEX data to be sent (X = 0~9, A~F and up to 20 XX). | #SET_H_ON_05:30 31 32 33 34 |
| @BAUDRATE: 9600@DISPLAY ON HEX TO SEND:30 31 32 33 34 | ||
| #SET_OF_[PARAM]:XXXX | Set the ASCII command to be sent to display device when the switcher enter power off or standby mode.[PARAM]= 01~0701 - 11520002 - 5760003 - 3840004 - 1920005 - 960006 - 480007 - 2400XXXX= ASCII data to be sent (Up to 48 characters). | #SET_OF_05:ABCDEFG |
| @BAUDRATE: 9600@DISPLAY OFF TO SEND:ABCDEFG | ||
| #SET_H_OF_[PARAM]:XX XX | Set the HEX command to be sent to display device when the switcher enter power off or standby mode.[PARAM]= 01~0701 - 11520002 - 5760003 - 3840004 - 1920005 - 960006 - 480007 - 2400XX XX= HEX data to be sent (X = 0~9, A~F and up to 20 XX). | #DET_OF_05:41 42 43 44 45 46 |
| @BAUDRATE: 9600@DISPLAY OFF HEX TO SEND:41 42 43 44 45 46 |
9. Firmware Upgrade
1) Prepare the latest upgrade file (.bin) and rename it as "FW_MV bin" on PC.
2) Power off the switcher and connect the FIRMWARE port of switcher to the PC with Type-A USB cable.
3) Power on the switcher and then the PC will automatically detect a U-disk named of "BOOTDISK".
4) Directly copy the latest upgrade file (.bin) to the "BOOTDISK" U-disk.
5) Reopen the U-disk to check whether where is a filename "SUCCESS.TXT", if yes, the firmware was updated successfully, otherwise, the firmware updating is fail, the name of upgrade file (.bin) should be confirm again, and then follow the above steps to update again.
6) Remove the Type-A USB cable after firmware upgrade.
7) After firmware upgrade, the switcher should be restored to factory default by sending command.
10. Warranty
BZBGEAR wants to assure you peace of mind. We're so confident in the quality of our products that along with the manufacturer's one-year limited warranty, we are offering free second-year warranty coverage upon registration*!
Taking advantage of this program is simple, just follow the steps below:
- Register your product within 90 days of purchase by visiting BZBGEAR.com/warranty.
- Complete the registration form. Provide all necessary proof of purchase details, including serial number and a copy of your sales receipt.
For questions, please call 1.888.499.9906 or email support@bzbgear.com.
For complete warranty information, please visit BZBGEAR.com/warranty or scan the QR code below.

*Terms and conditions apply. Registration is required.
11. Mission Statement
BZBGEAR manifests from the competitive nature of the audiovisual industry to innovate while keeping the customer in mind. AV solutions can cost a pretty penny, and new technology only adds to it. We believe everyone deserves to see, hear, and feel the advancements made in today's AV world without having to break the bank. BZBGEAR is the solution for small to medium-sized applications requiring the latest professional products in AV.
We live in a DIY era where resources are abundant on the internet. With that in mind, our team offers system design consultation and expert tech support seven days a week for the products in our BZBGEAR catalog. You'll notice comparably lower prices with BZBGEAR solutions, but the quality of the products is on par with the top brands in the industry. The unparalleled support from our team is our way of showing we care for every one of our customers. Whether you're an integrator, home theater enthusiast, or a do-it-yourselfer, BZBGEAR offers the solutions to allow you to focus on your project and not your budget.