M 2500 - Microwaves AEG-ELECTROLUX - Free user manual and instructions
Find the device manual for free M 2500 AEG-ELECTROLUX in PDF.
User questions about M 2500 AEG-ELECTROLUX
0 question about this device. Answer the ones you know or ask your own.
Ask a new question about this device
Download the instructions for your Microwaves in PDF format for free! Find your manual M 2500 - AEG-ELECTROLUX and take your electronic device back in hand. On this page are published all the documents necessary for the use of your device. M 2500 by AEG-ELECTROLUX.
USER MANUAL M 2500 AEG-ELECTROLUX
Operating instructions
Mode d'emploi
text_image
1 B C D A E F G H PULSE 0 1 2 J M K L
natural_image
Pure electrical circuit lines without any symbols2


natural_image
Diagram of a mechanical device with directional arrows indicating motion or force (no text or symbols)3
natural_image
Diagram showing a hand holding a mechanical component with an arrow indicating motion or force (no text or symbols present)4
natural_image
Illustration of a hand using a tool to cut a mechanical component, showing a curved arrow indicating rotation (no text or symbols present)5
natural_image
Diagram of a mechanical device with rotating components and directional arrows indicating motion (no text or symbols)6
natural_image
Diagram of a mechanical device with rotating components and directional arrows (no text or symbols)7
natural_image
Technical line drawing of a mechanical component with an arrow indicating motion or force (no text or symbols)8
3
D
Please read these instructions carefully. Pay special attention to the safety instructions on the first pages. Keep the instructions in a safe place for future reference. Give them to any new owners of the appliance.
Description (Figure 1)
A Tank
B Pouring outlet
C Filler hole with cup (locking)
D Lid
E Blade assembly
F Rubber seal
G Motor housing
H Pulse-Button
J Speed selector
K Non-slip feet
L Cord storage drawer (on the bottom of the appliance)
M Rating label (on the bottom of the appliance)
! Safety Instructions
This appliance corresponds to accepted technological standards with regards to safety and to the German Appliance Safety Law. As the manufacturers, we nevertheless feel we should bring to your attention the following points on safety.
General Safety
- The appliance should only be connected to mains supplies with the same voltage and frequency ratings as those indicated on the Ratings Label.
- Never pull the plug out of the power socket by pulling on the cord.
-
Never try to operate the blender if – the casing has been damaged, – the cord has been damaged.
-
If the power cord for this appliance has been damaged, it should only be replaced, for safety reasons, by the manufacturer or Customer Service, or by a suitably qualified person.
- Repairs to this appliance may only be carried out by qualified service engineers. Considerable danger may result from improper repairs. If repairs become necessary, please contact the Customer Care Department or your authorised dealer.
- This appliance is not intended for use by persons (including children) with reduced physical, sensory or mental capabilities, or lack of experience and knowledge, unless they have been given supervision or instruction concerning use of the appliance by a person responsible for their safety.
Child Safety
- Do not leave the appliance running while unattended, or let children near the appliance unsupervised!
- Children should be supervised to ensure that they do not play with the appliance.
When operating the appliance:
- Never operate the appliance with your hands bare.
- Plastic parts should never be dried at or near direct sources of heat.
- The appliance must not be used for mixing dyes (paints, or lacquer, etc.). This can cause explosions!
- Do not pour hot liquids into the blender tank.
- When you have finished using the appliance, before cleaning, switch off and pull the plug out of the socket.
- The blade assembly should only be disassembled by an authorised technician.
- Never clean the motor casing under running water or soapy water.
- Caution! The blade assembly is very sharp. Be careful when taking the
GB
blender apart and re-assembling. It may cause injury if handled incorrectly
- Do not leave hard objects (for example spoons) in the blade assembly while running, and do not grasp the appliance with the hand inside the blender tank. This may cause injury!
- The manufacturer will not be responsible for any damage due to inappropriate use or incorrect operation.
CE This appliance conforms with the following EC Directives:
- Low Voltage Directive 2006/95/EC
• EMC Directive 89/336/EEC with amendments 92/31/EEC and 93/68/EEC
Technical Data
Mains voltage: 230/240 V Power consumption: 500 W
Possible applications
The blender can be used for mixing a wide variety of drinks, crushing ice, reducing fruit and vegetables, whipping cream, etc.
Cord storage drawer (Figure 2)
The appliance is fitted with a storage drawer at the bottom. If the connection cord to the power outlet is too long, it can be fed back into the drawer until it is the required length.
Disassembling the Apliance
Take the plug out of the socket.
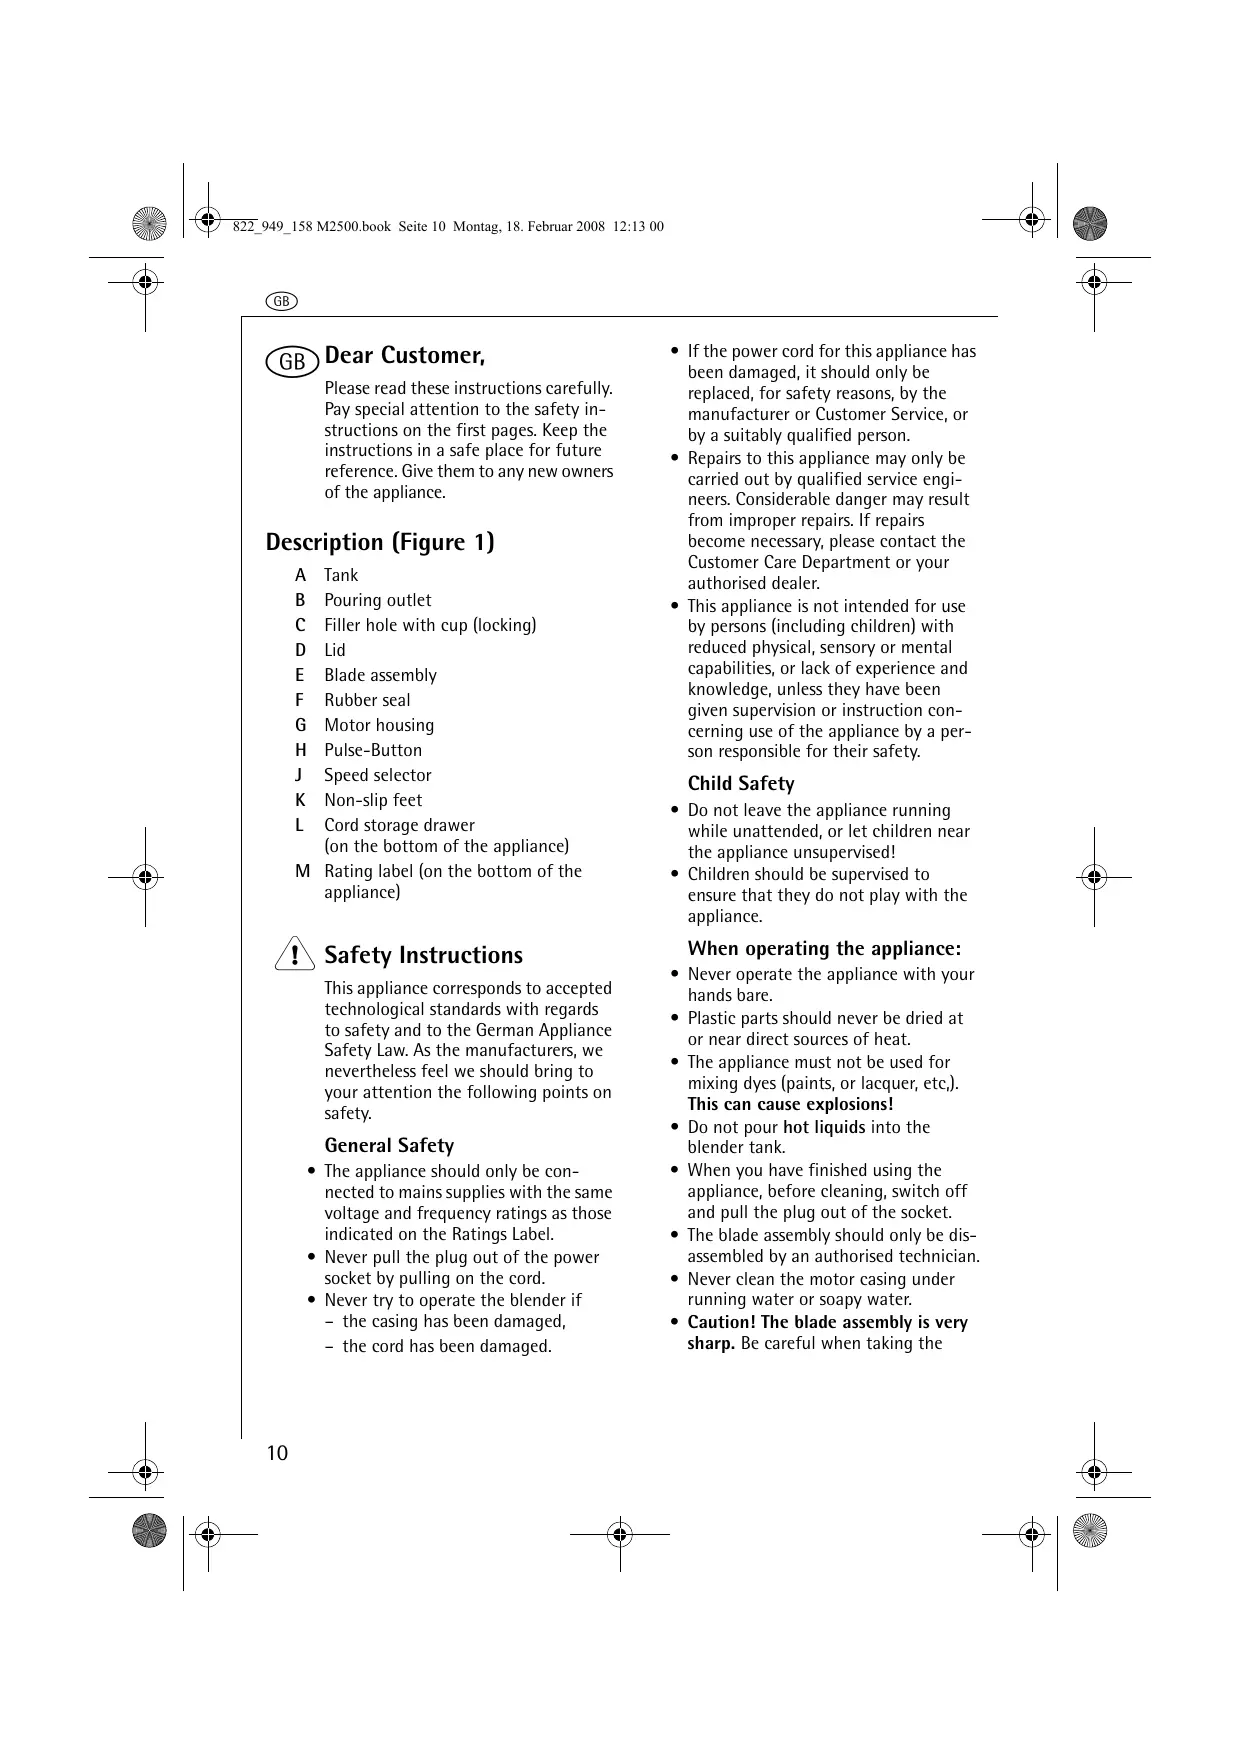
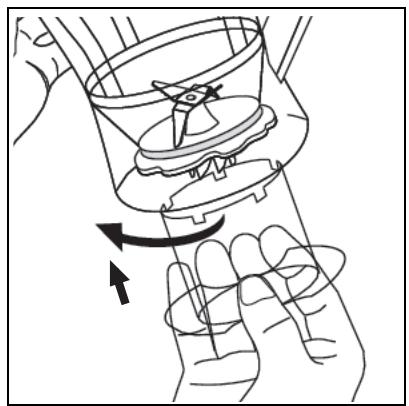
Turn the tank clockwise and remove (Figure 3).
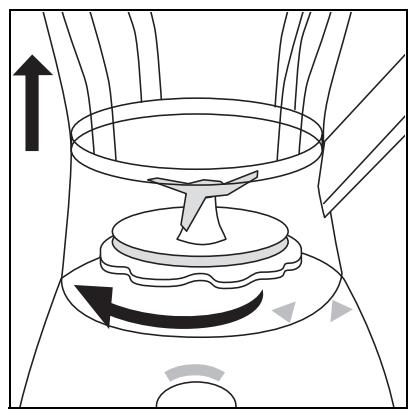
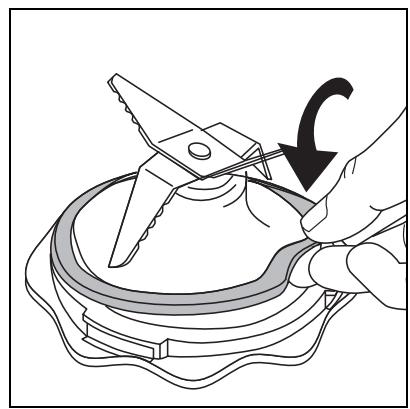
Turn the blade assembly counterclockwise using the filler cup (Figure1/C) as tool and remove (Figure 4). The grooves of the filler cup fit the ribs of the blade assembly.
Caution! the blade assembly is very sharp. It can cause injury if handled incorrectly.
Caution! Do not use force when taking the blade assembly out of the blender, as this might cause damage. If necessary, tilt it slightly when removing.
Assembling the blender
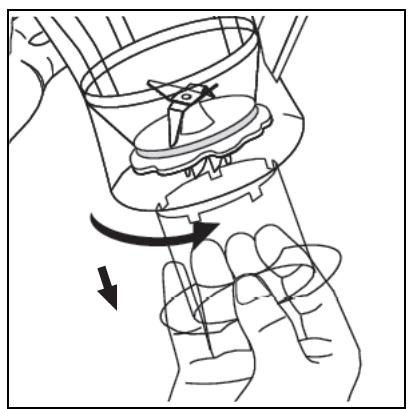
Place the rubber seal on the blade assembly (Figure 5).
Insert the blade assembly holding the blender downwards. Turn it clockwise to fasten it using the filler cup as tool (Figure 6). Caution! Handle carefully!
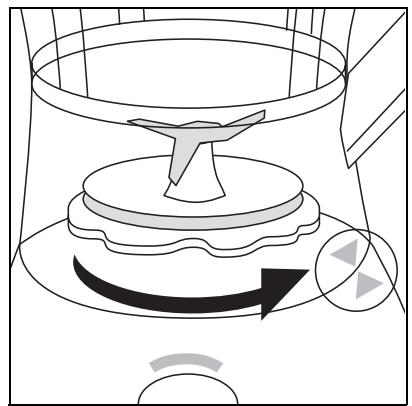
Place the tank on the motor casing and turn it counterclockwise till it reaches the end stop. The two arrows should be aligned (Figure 7).
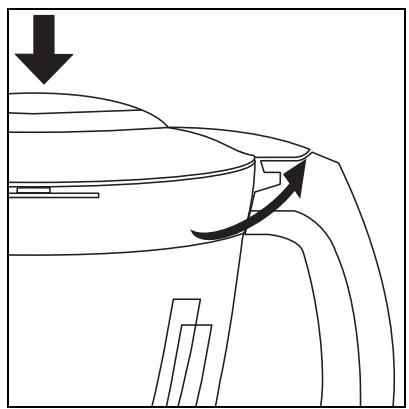
Set the lid on the tank and turn it till the nose is located directly over the handle (Figure 8).
The dual safety device only allows the blender to be operated if the tank and lid are correctly positioned (Figures 7 and 8). See paragraph on the "Dual Safety System".
Insert the filler cup (Figure 1/C), and lock it in.
Operating the Blender
Place the blender on a level, dry surface.
Open the lid (Figure 1/D) and put all the required ingredients in the tank. Important! Do not exceed the maximum capacity of 1.5 litres.
You can add other ingredients through the filler hole while the blender is running. You can use the filler cup in the lid to do this (Figure 1/C). Close the filler hole immediately after, to avoid splashing.
Start the blender by turning the selector (Figure 1/J) to the right, or by pressing the Pulse Button (Figure 1/H).
i We recommend starting with blender Speed 1, then progressing to Speed 2.
GB
The Pulse Button runs the blender at full speed.

When you have finished using the blender, turn the tank clockwise and remove. Then turn the lid clockwise and remove.

Do not let the blender run for more than 3 minutes at a time. After running for 3 minutes, the blender should be left to cool for at least 10 minutes.
Dual Safety System
The appliance has a dual safety feature. This prevents the blender from being operated if the lid or the tank have not been positioned correctly.

You should nevertheless still keep children away from the appliance.
Ice crushing
The blender can be used for crushing ice. Always add a little water to the tank before using the blender to crush ice.

Pour the water into the tank.

Switch the blender on. Either speed may be selected. However, we recommend using the Pulse Button, as this will crush the ice more quickly.

You can add more ice through the filler hole in the lid while the blender is running.
Care and Cleaning

Before cleaning the blender, take the plug out of the socket.

Make sure that no liquids get inside the motor casing!

Clean the casing with a damp cloth. Never immerse in water or clean under running water.

The tank and blade assembly can be cleaned quickly and safely using the Pulse Button.

Pour warm water into the tank, with a few drops of washing-up liquid.

Mix the water and wahing-up liquid, by pushing the Pulse Button briefly.

Finally, rinse the tank under running water.

If necessary, the blade assembly can also be cleaned separately.

Be careful when rinsing the blade assembly (The blades are sharp!). Use only water and washing-up liquid. Never put parts of the appliance in a dishwasher.
When replacing the blade assembly, turn it clockwise using the filler cup as tool. See paragraph "Assembling the Blender".
Disposal

Packaging material
The packaging materials are environmentally friendly and can be recycled. The plastic components are identified by markings, e.g. >PE<, >PS<, etc. Please dispose of the packaging materials in the appropriate container at the community waste disposal facilities.

Old appliance
The symbol 📁 on the product or on its packaging indicates that this product may not be treated as household waste. Instead it shall be handed over to the applicable collection point for the recycling of electrical and electronic equipment. By ensuring this product is disposed of correctly, you will help prevent potential negative consequences for the environment and human health, which could otherwise be caused by inappropriate waste handling of this product. For more detailed information about recycling of this product, please contact your local city office, your household waste disposal service or the shop where you purchased the product.
Example recipes
| Ingredients | Instructions | |
| Soups/Starters | ||
| Cream of Vegetable Soup | ||
| 250 g | potatoes | Wash and peel the potatoes, carrots, celery, and onion, and chop them into pieces. Add the chopped vegetables to 1/3 of the meat stock and bring to the boil. Cook for 10 minutes. |
| 125 g | carrots | |
| 100 g | celery | |
| 1 | onion | Leave the vegetables and stock to cool, then blend finely at blender Speed 2. Bring the rest of the meat stock to the boil in a pot, add the vegetable purée, and bring briefly to the boil again. |
| 1 l | meatstock | |
| 1 Cup | Crème fraîche or cream | Season to taste with the Crème fraîche, salt and pepper |
| 1 tbsp | chopped herbs salt, pepper | Sprinkle with the chopped herbs, and serve. |
| Cold tomato soup | ||
| 750 g | tomatoes | Cut the tomatoes open crosswise and blanch with hot water. |
| 1 | onion | Skin the tomatoes and cut into large pieces. Peel the onions and cut into pieces. |
| 3 tbsp | olive oil | |
| 1 cup | Crème fraîche | Put the tomatoes and onion in the blender and mix to a fine pure at Speed 2. |
| 1 | lemon | |
| 2 tbsp | Balsamic vinegar | Add the lemon juice, oil, and vinegar. Season to taste with the salt, pepper, and sugar. Stir in the Crème fraîche. |
| 1 tbsp | chopped basil leaves salt, pepper, sugar | |
| Cream of Carrot soup | ||
| 500 g | carrots | Wash and peel the carrots, and chop into pieces. Boil in 1/4 l |
| 1/2 l | vegetable stock | vegetable stock for around 15 minutes. Leave to cool for a short time. Mix at blender Speed 2, then put them back in the pot. Add the rest of the stock and heat up the soup again. |
| 1/8 l | cream | |
| 1/8 l | white wine chervil, parsley, salt, pepper, sugar | Add the white wine and cream to taste. |
GB
| Ingredients | Instructions | |
| Cold cucumber soup | ||
| 750 g | cucumber | Wash and peel the cucumber, halve lengthwise and core it. |
| 500 g | natural joghourt | Chop the flesh into pieces and put in the blender with the garlic. Mix at blender Speed 2. Add the joghourt and mix well. |
| 1 pinch | clove of garlic | Season with sugar, salt, and pepper to taste. |
| sugar,salt, pepper | Garnish with the dill and chives. | |
| 1 bunch | chives | |
| 1 bunch | dill | |
| Humus (Hommos) | ||
| 250 g | cooked chick peas (canned chick peas can be used - rinse well) | Blend all ingredients on setting 2 for 40 seconds or until smooth. |
| 3 table-spoons | olive oil | |
| 30 ml | lemon juice | |
| 4 cloves | garlic | |
| 30 ml | water | |
| Cakes and pastries | ||
| Pancake mix | ||
| 500 ml | milk | Add the ingredients to the blender in the above order. |
| 3 | eggs | Mix to a paste at blender Speed 2. |
| 1 pinch | salt | Meanwhile, scrape off any flour sticking to the sides of the cup. |
| 250 g | flour | Leave the paste to rise for around 15 minutes before using. |
| Melt'n'Mix Cake | ||
| 150 g | S.R. flour | Pre-heat oven to 180 °C. Grease a 20 cm round cake tin. |
| 140 g | caster sugar | Place all ingredients into blender jug. Blend on setting 2 for 50 seconds, or until smooth. |
| 125 g | butter or margarine,melted | Spread mixture into prepared tin and bake for approximately 30-35 minutes, until golden. Cool and ice as desired. |
| 2 | eggs | |
| 1 tea-spoon | vanilla | |
| 60 ml | milk | |
| Drinks/Cocktails | ||
| Iced Coffee | ||
| 2 table-spoons50 ml250 ml 12 cup100 ml | instant coffeesboiling watermilkcrushed icewhipped cream | Dissolve the coffee powder in boiling water, then leave to cool. Pour a little water into the tank, then add the ice and blend it using the Pulse Button. Blend all ingredients except cream on setting 1 for 30-60 seconds.Whip cream for 40 seconds. Pour into glasses and top with cream. Sprinkle with drinking chocolate. |
| Egg Nog | ||
| 250 ml2 table-spoons2 table-spoons1 | hot milkRumhoneyegg nutmeg | Blend milk, rum and honey on setting 2 for 30-60 seconds.Add egg and blend on setting 2 for a further 20 seconds.Sprinkle with nutmeg and serve. |

F
Chère Cliente, Cher Client,
© Copyright by Electrolux
822 949 158 - 04 - 0108
Thinking of you
Electrolux
Share more of our thinking at
www.electrolux.com
Subject to change without notice