
EEA150 - Coffee machine AEG-ELECTROLUX - Free user manual and instructions
Find the device manual for free EEA150 AEG-ELECTROLUX in PDF.
| Brand | AEG-ELECTROLUX |
| Model | EEA150 |
| Appliance type | Espresso machine |
| Power supply | 230 V, 50 Hz, 1000 W |
| Water tank capacity | Approx. 1 L (MIN and MAX marks) |
| Pump pressure | Not specified |
| Main functions | Espresso, steam for cappuccino, hot water |
| Usable coffee types | Espresso ground, individual pods |
| Filters included | 1 cup, 2 cups, individual pod |
| Filter holder | With finger protection, swivel |
| Steam nozzle | Yes, with removable tip and maintenance tool |
| Cup warming tray | Integrated, for preheating cups |
| Drip tray | With grid and level gauge |
| Accessories supplied | Measuring spoon, tamper, maintenance tool |
| Cleaning | Daily cleaning without grinding, quarterly descaling |
| Filter maintenance | Unscrewable for cleaning |
| Safety | Pump safety shut-off, overheating protection |
| Repairs | Only by an authorized specialist |
| Compliance | EC low voltage and EMC directives |
| Color | Not specified |
Frequently Asked Questions - EEA150 AEG-ELECTROLUX
User questions about EEA150 AEG-ELECTROLUX
0 question about this device. Answer the ones you know or ask your own.
Ask a new question about this device
Download the instructions for your Coffee machine in PDF format for free! Find your manual EEA150 - AEG-ELECTROLUX and take your electronic device back in hand. On this page are published all the documents necessary for the use of your device. EEA150 by AEG-ELECTROLUX.
USER MANUAL EEA150 AEG-ELECTROLUX
Sikkerhed under reparation
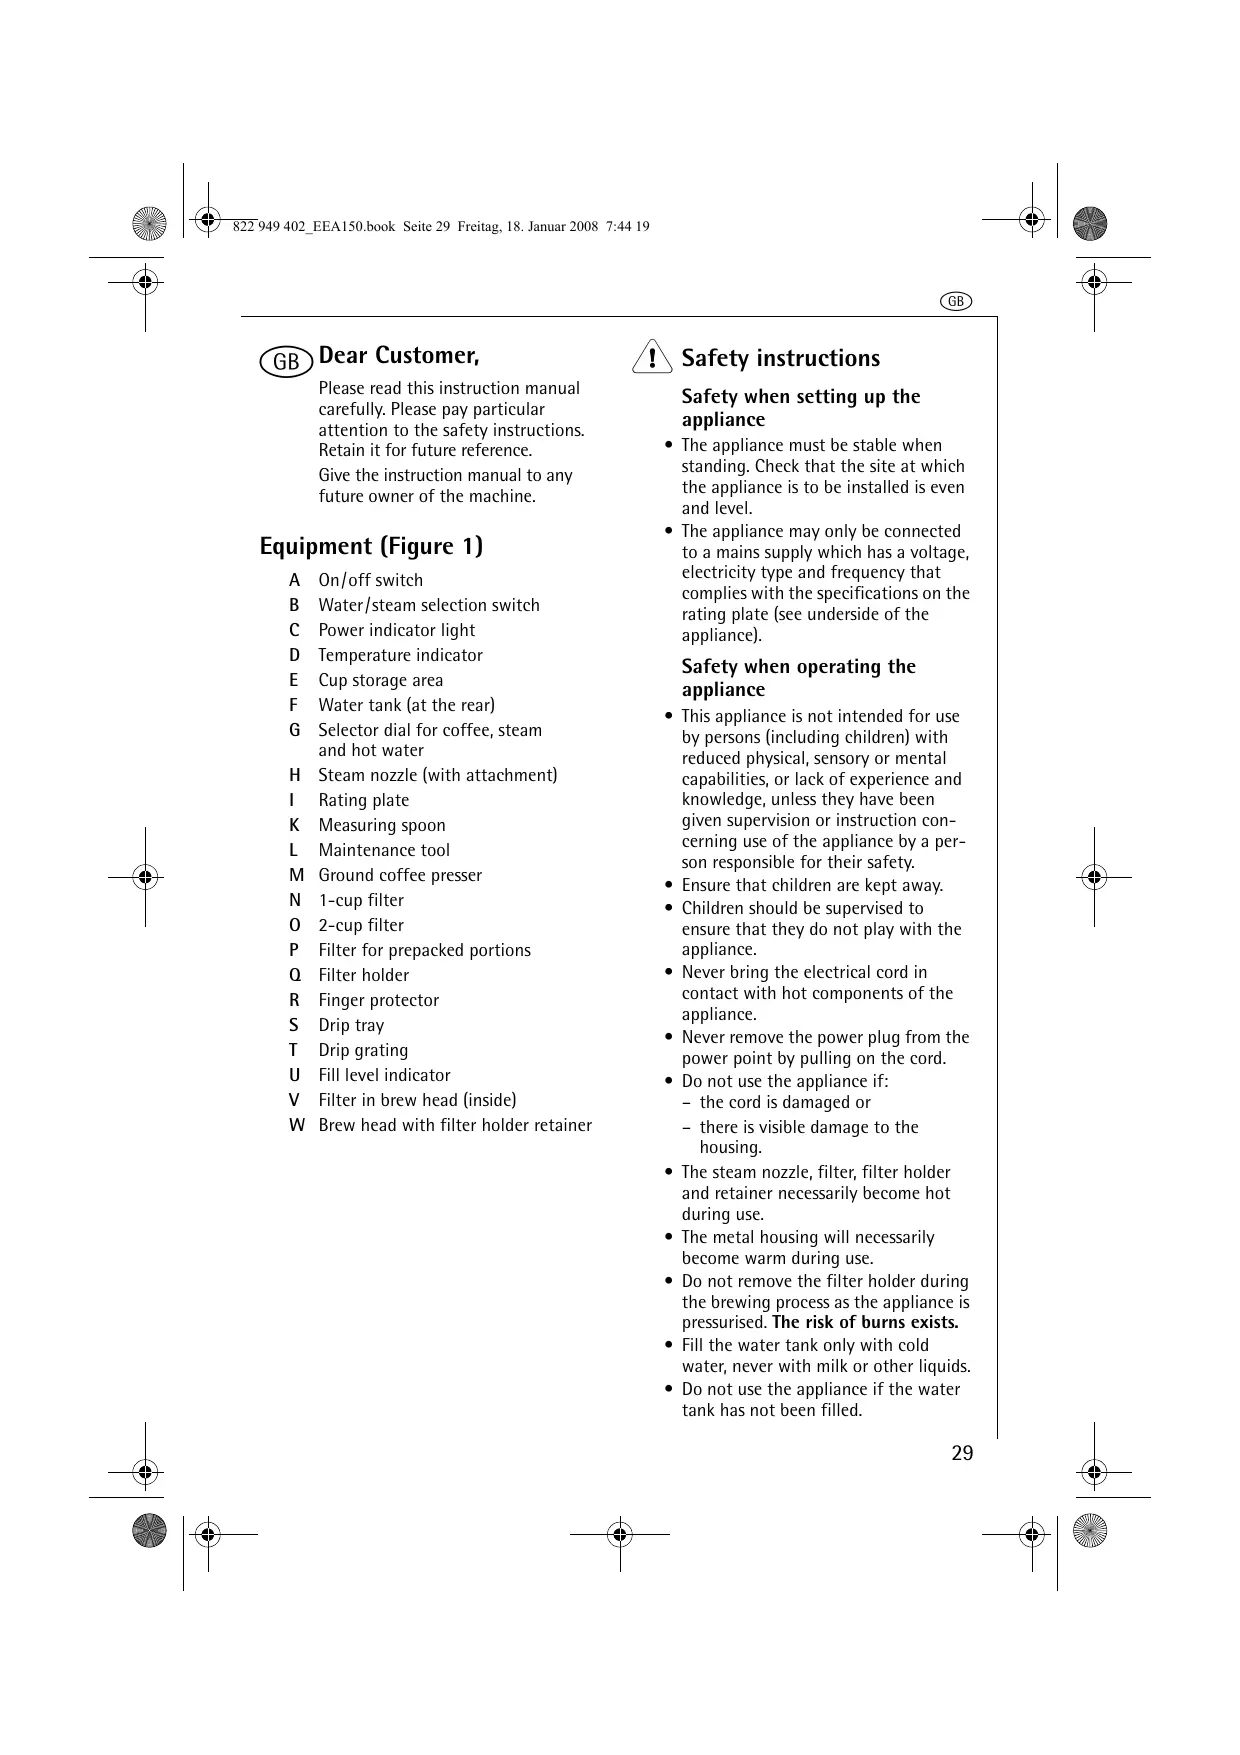
Please read this instruction manual carefully. Please pay particular attention to the safety instructions. Retain it for future reference.
Give the instruction manual to any future owner of the machine.
Equipment (Figure 1)
A On/off switch
B Water/steam selection switch
C Power indicator light
D Temperature indicator
E Cup storage area
F Water tank (at the rear)
G Selector dial for coffee, steam and hot water
H Steam nozzle (with attachment)
Rating plate
K Measuring spoon
L Maintenance tool
M Ground coffee presser
N 1-cup filter
0 2-cup filter
P Filter for prepacked portions
Q Filter holder
R Finger protector
S Drip tray
T Drip grating
U Fill level indicator
V Filter in brew head (inside)
W Brew head with filter holder retainer

Safety instructions
Safety when setting up the appliance
- The appliance must be stable when standing. Check that the site at which the appliance is to be installed is even and level.
- The appliance may only be connected to a mains supply which has a voltage, electricity type and frequency that complies with the specifications on the rating plate (see underside of the appliance).
Safety when operating the appliance
- This appliance is not intended for use by persons (including children) with reduced physical, sensory or mental capabilities, or lack of experience and knowledge, unless they have been given supervision or instruction concerning use of the appliance by a person responsible for their safety.
- Ensure that children are kept away.
Children should be supervised to ensure that they do not play with the appliance. - Never bring the electrical cord in contact with hot components of the appliance.
- Never remove the power plug from the power point by pulling on the cord.
-
Do not use the appliance if:
-
the cord is damaged or
- there is visible damage to the housing.
- The steam nozzle, filter, filter holder and retainer necessarily become hot during use.
- The metal housing will necessarily become warm during use.
- Do not remove the filter holder during the brewing process as the appliance is pressurised. The risk of burns exists.
- Fill the water tank only with cold water, never with milk or other liquids.
- Do not use the appliance if the water tank has not been filled.
GB
- Do not use the appliance without the drip tray or the drip grating.
Safety during cleaning
- Prior to maintenance or cleaning ensure that the appliance has been switched off and that the power plug has been disconnected.
- Follow the instructions referring to decalcification.
- Do not immerse the appliance in water.
Safety during repairs
Repairs to this appliance may only be carried out by qualified service engineers. Considerable danger may result from improper repairs. If repairs become necessary, please contact the Customer Care Department or your authorised dealer.
If the appliance is used for purposes other than those for what it was intended or is operated wrongly, no liability for possible damages can be accepted.
This appliance conforms with the following EC Directives:
Low Voltage Directive 2006/95/EC
EMC Directive 89/336/EEC with amendments 92/31/EEC and 93/68/EEC
Prior to using the appliance for the first time
Please read the safety instructions in order to prevent danger to yourself and damage to the appliance.
Insert the power plug into the power outlet.
Prior to preparing an espresso for the first time you should rinse out the heating system once by filling the tank.
Proceed exactly as described in the section "Making an espresso" and "Frothing milk", but without placing any ground coffee in the filter. Place a container that is as large as possible in the middle of the drip grating
figure 1/T) and under the steam nozzle (figure 1 / H
Making an espresso
After having been brewed, the espresso should be covered with a dense frothy layer, the so-called crema.
To achieve an aromatic espresso with crema, fresh, clear water, the correct size grounds and the water temperature are important.
1. Adding water (Figure 2)
Pull the water tank upwards and out of the appliance (figure 2).
Open the tank lid.
Fill the water tank with cold, clear water only.
Ensure that the water line does not lie below the MIN (minimum) line or above the MAX (maximum) line.
Close the tank lid.
Replace the water tank and press it downwards so that it is sitting firmly in the appliance (figure 2).
You can also lift the tank lid and fold it to the side. This enables you to fill the water tank directly when it is in the appliance, e.g. with a jug.
2. Switching on the appliance / preheating cups
Switch the appliance on using the on/off switch (figure 1/A). The power indicator (figure 1/C, red) and the temperature indicator (figure 1/D, orange) will illuminate.
As soon as the operating temperature has been attained, the temperature indicator will go out. The temperature indicator may illuminate again while the appliance is being used to indicate that the appliance is re-heating.
You can place one or more cups with the opening facing downwards on the cup storage area (figure 1/E).
3.Adding espresso grounds (figures 3,4,5)
Take the filter holder, fold back the finger protector and place the 1-cup filter or the 2-cup filter into the filter holder (figure 3).
When using prepacked portions, insert the filter for prepacked portions (figure 1/P and figure 5).
Fill the filter with espresso grounds. Use: 1 full measuring spoon for the 1-cup filter, 2 full measuring spoons for the 2-cup filter.
Lightly press the espresso grounds into the filter (figure 4) using the ground coffee presser (figure 1/M). Ensure that after pressing the coffee, the filter is still filled to the rim with espresso grounds. Clean any espresso grounds away from the rim of the filter.
1 Do not press the espresso grounds too firmly into the filter. In such an event the flow of water through the coffee can decrease significantly. (See also "What to do if...")
If you grind espresso grounds yourself, choose the "middle" fineness level.
4. Screwing on the filter holder (Figures 6, 7)
Position the filter holder in the filter retainer such that the handle of the filter holder is located below the left white triangle (figure 6, "1").
Twist the filter holder to the right as far as it will go (figure 6, "2"), so that the handle is pointing forwards and is located beneath the white line between the two points (figure 7, "3").
5. Placing cup(s) underneath (Figure 8)
Place one or two cups under the openings in the filter holder (figure 8).
6. Brewing an espresso
Switch the water/steam selection switch (figure 1/B) to the symbol 画 .
When the appliance has attained its operating temperature, turn the selector dial (figure 1/G) to the symbol. The water will now be forced through the espresso grounds under high pressure.
When the desired amount of espresso has been brewed, turn the selector dial left again to the "●" position.
Please note that when making an
espresso the water-steam selection switch (figure 1/B) is always at the position. If the espresso is brewed at the ⑤ position, the taste of the coffee can be adversely affected due to the higher brewing temperature. Each time after making an espresso or after using steam/hot water when the selector dial is turned to the "●" position, any remaining water is directed to the drip tray. Each additional cup is brewed using fresh water. This is how to obtain the total enjoyment out of espresso. This is why the drip tray must be emptied regularly.
7. Removing the drip tray (Figure 9)
Twist the filter holder to the left and out of the retainer.
Fold the finger protector forwards and hold it down. Tap the used espresso grounds out of the filter holder and out of the filter (figure 9).
Rinse the filter holder and the filter with warm water. Do not clean the filter holder in the dishwasher!
If the appliance is not going to be used for a longer period of time, do not screw the filter holder back in. This will increase the life of the seal located on the brew head.
GB
Creating steam/frothing milk (Figures 10, 11)
The hot steam can be used to froth milk for a cappuccino or to heat liquids.
1. Switch on the appliance.
Place the attachment provided onto the steam nozzle (figure 10).
Switch on the appliance using the on/off switch (figure 1/A). Wait until the appliance has attained its operating temperature and the orange temperature indicator has gone out (figure 1/D).
Switch the water/steam selection switch (figure 1/B) to the symbol
2. Creating steam/frothing milk
Pour some milk or other liquid to be heated into a heat-proof container.
Immerse the steam nozzle into the milk or liquid to be heated (figure 11).
Turn the selector dial (figure 1/G) to the left onto the 品 symbol. The appliance will now begin to create steam. At the beginning some drops of water may drip out of the nozzle as well. Important: So as not to prevent the steam from exiting, the steam nozzle must not touch the base of the container.
Stop steam from being emitted by turning the selector dial (figure 1/G) back to the right into the "●" position.
Place the steamed liquid to one side and turn the steam selection switch back to the 品 symbol for a couple of seconds. This will remove any milk residue or residue from other liquids out of the nozzle. Caution: The steam is hot.
To achieve a fine, creamy milk froth it is best to use cool low-fat milk.
Making a cappuccino
Fill a large coffee cup from 12 to 34 full of espresso. Pour the frothed milk over the top. Sprinkle a little cocoa over the milk froth.
3. Heating water
Turn the water/steam selection switch (figure 1/B) to the position.
Place a container under the steam nozzle (figure 1/H).
Turn the selector dial for coffee, steam and hot water (figure 1/G) to the position. Hot water will be emitted from the steam nozzle.
After the desired amount of hot water has been obtained, turn the selector dial for coffee, steam and hot water (figure 1/6) to the "●" position.
Cleaning and care
Daily care
We recommend that, each day prior to the first and after the last espresso, you rinse out the system for approx. 10 seconds without espresso grounds in order to prevent particles coffee from becoming lodged in the appliance. Proceed as for making an espresso, but without using espresso grounds.
Afterwards, turn the selector dial (figure 1/G) briefly to the position.
Pour any remaining water out of the water tank.
Cleaning (figures 12, 13, 14, 15, 16)
Prior to cleaning the appliance, switch it off and disconnect the power plug. Do not clean any part of the appliance in the dishwasher.
Wipe all the appliance's surfaces using a damp cloth. Do not use harsh or scratching cleaning agent.
Rinse out the water tank at least once a week in normal rinse water.
Clean the 1-cup filter and the 2-cup filter from time to time using a brush.
Steam nozzle
Remove the attachment from the steam nozzle and rinse the attachment in normal rinse water.
Wipe the steam nozzle clean using a damp cloth. You can use the maintenance guide (figure 1/L) to screw off the nozzle head to clean it or decalcify it.
Drip grating and drip tray
The drip tray must be emptied when the level indicator (figure 1/U) is protruding above the drip grating.
Insert your fingers into the holes in the drip grating. Remove the drip grating and rinse it under running water (figure 12).
To empty it, hold the drip tray on both sides and pull it forwards and out of the appliance (figure 13).
Remove the plastic attachment with the level indicator and rinse both under running water (figure 14).
Place the plastic attachment with the level indicator back into the drip tray.
Push the clean drip tray back into the appliance and place the drip grating back in.
Cleaning the brew filter
The brew filter through which the hot water flows is located on the brew head. Check from time to time to ensure that the holes in the brew filter have not become blocked by coffee particles.
If the holes have become blocked:
Unscrew the brew filter using a coin (figure 15).
Remove the brew filter and seal (figure 16/1) and remove the brew filter's seal (figure 16/2).
Clean the brew filter with warm water and a brush.
Rinse the seal with warm rinse water.
If the appliance is to be transported at temperatures below zero:
Empty the water tank.
Turn the selector dial (figure 1/G) to the position and let the appliance dry.
Decalcifying
If the espresso is flowing through the filter at a slower rate than usual, it is time for the appliance to be decalcified.
We recommend that you decalcify the machine once every three months with liquid decalcifier. If you live in an area with hard water the decalcifying procedure may have to be carried out more often. When doing this follow the instructions provided by the manufacturer of the decalcifier.
Important: Prior to decalcifying, remove the brew filter (figure 1/V) and the brew filter's seal, as described in the section "Cleaning the brew filter" (figures 15, 16).
First pour the water into the water tank, then add the decalcifier; never in the reverse order. At least 0.5 litres of water must be used. The decalcifier should be added accordingly.
Remove the power plug from the power point and allow the appliance to cool.
Remove the steam nozzle with the attachment (figure 1/H).
Place the filter holder in position without the filter.
Place a sufficiently large container under the filter holder.
Insert the power plug into the power point and switch on the appliance.
Afterwards, turn the selector dial (figure 1/G) to the position and let approx. 1/4 of the decalcifier flow through the system.
GB
Then switch off the appliance and allow the decalcifying solution to act for approx. 10 minutes.
Repeat this procedure with an additional 1/4 of the decalcifying solution.
Turn the selector dial (figure 1/G) to the position. Allow the remaining decalcifying solution to flow over the nozzle and act for another 10 minutes.
Then thoroughly clean the water tank.
Fill the water tank with fresh water and allow half to flow over the brew head and the other half to flow over the nozzle.
Repeat the procedure if there is a lot of limescale.
After decalcifying the appliance, replace the brew filter and seal.
What to do if...
- the espresso temperature is too low:
- Carry out the brewing procedure without using espresso grounds, but using the filter and filter holder, in order to preheat the system.
- Preheat the cups.
- Decalcify the appliance.
- the flow speed decreases noticeably:
- Do not press the espresso grounds too firmly into the filter.
- Do not grind the espresso grounds too finely ("medium" fineness).
- Decalcify the appliance.
- the espresso is flowing out of the side of the filter holder:
- Ensure that the filter holder has been placed in the retainer correctly.
- Twist the filter holder a little more firmly into the retainer.
- Clean any espresso grounds away from the rim of the filter holder.
- no espresso is coming out:
- Ensure that the water tank has been filled and is correctly in place.
-
Ensure that the filter holder has been placed in the retainer correctly.
-
Ensure that the water/steam selection switch (figure 1/B) is in the position and the selector dial for water, steam and hot water (figure 1/G) has been turned right to the position.
- Do not press the espresso grounds too firmly into the filter.
- Clean the brew filter.
-
Decalcify the appliance.
-
the crema is no longer being produced as it should:
-
Ensure that there are enough espresso grounds in the filter.
- Always use fresh espresso grounds.
-
Press the espresso grounds lightly.
-
too little milk froth is created when steaming milk:
-
Always use cool, fresh and low-fat milk.
- Clean the steam nozzle.
the flow increases:
- the espresso grounds have been ground too rough:
-
Ensure that there are enough espresso grounds in the filter.
-
the coffee machine switches itself off while operating:
The appliance pump is equipped with a temperature fuse that protects it from overheating. The temperature fuse interrupts the machine's operation, if the machine is operated for too long or if the pump is run without water.
- Set the on / off switch to "off" and remove the plug from the mains socket.
- Leave the machine to cool for at least 20 minutes. Fill up with water.
- Plug the appliance into the mains again and switch it on. If the appliance still does not work, please contact our Customer Care Department.
Technical data
- Input supply voltage: 230 V,50 Hz
Power consumption: 1000 W
(See rating plate on the underside of the appliance.)
Disposal

Packaging material
The packaging materials are environmentally friendly and can be recycled. The plastic components are identified by markings, e.g. >PE<, >PS<, etc. Please dispose of the packaging materials in the appropriate container at the community waste disposal facilities.

Old appliance

The symbol on the product or on its packaging indicates that this product may not be treated as household waste. Instead it shall be handed over to the applicable collection point for the recycling of electrical and electronic equipment. By ensuring this product is disposed of correctly, you will help prevent potential negative consequences for the environment and human health, which could otherwise be caused by inappropriate waste handling of this product. For more detailed information about recycling of this product, please contact your local city office, your household waste disposal service or the shop where you purchased the product.

Chere cliente, Cher client,
(figures 12, 13, 14, 15, 16)
(Fig. 12, 13, 14, 15, 16)
2. Ligar o aparelho / Pre-aquecer as chavenas
(Figura 12, 13, 14, 15, 16)

Antes de proceder a qualquer limpeza deslgue o aparelho e retire a ficha da tomada de alimentacao.
(rys. 12, 13, 14, 15, 16)

(slike 12, 13, 14, 15, 16)
CbuectByBa onaCHOCT OT n3rapHe.
Пьл海内外песерваоразвогамсамосбсстуданоа ВОДА,нИКORAСМЛЯКОИЛДРУГТЕЧНСТ.
He n3noJI3BaIte ypeIa, aKo pe3epBOApbT 3a BOJa He e HAnbJIHeH.
He n3no3BaIte ypea 6e3 BaHnUkata nn peuTeTkata 3a OTcEJdahe.
БezoinacnoCT npn NOuchTbaHe
- IpeiN 3BbPwBaHe Na NODpBXka NNIOYNCBaHe Ce yBepTe,Ye ypeIbT e N3KJIouH e UeNCEJIbTe e N3BaDeH OT KOHTaKTa.
CnataBaIte HNCTpyKUInTe 3a OTCTpaHyaBeHa KOTJIeH KAMbK.
He notanrTe ypeDa BbB Boda.
БezonaHocT npn pemOHr
IoppaBknTe no ypeDa Tp86Ba da ce n3BbPWBat cAmO OT KbaJInΦnUncpaHn cepBn3HN Texnuc. HenpaBnInHne nonpaBKn MORaT Da IOBeDat Do 3NaHTeJHa onaCHOCT.AKO CE HAnara pemOH, MoJra, CBbPxKeTe ce C OTeJena 3a ObcLnyXBAHe Ha KJIneHTN ININ C JInIeH3npan TbProBCKn IpeDCTabNTen.
He noeMahe HnKaKbO OTROBOpHcT 3a uETN B pe3yIITaT Ha He npBaVJlHO n3NoJ3BaHe Ha ypeJa UJIN n3NoJ3BaHe 3a CEJI, pa3JIuHn OT NOCoHeHnte.
To3n ypei OTROBapra Ha cIeHNHTe DInpeKTHBn Ha EC:
Диuropeктува 3а НИСКО
Напpeхенье 2006/95/EC
EMCДиректва89/336/EECc n3MeHeHn92/31/EECn 93/68/EEC
PnroTbHe Ha kanyuHNo
HanbHHeTe roJMa yawa 3a kaFe ot S do s c ecnPeco. HaneIe MnKOTc nHa OTrope. IocnneMaNKO KAKAO Bbpy nHaTa.
3. 3aŋpaBHe Ha Boda
3abptete konyeto 3a Boda/napa (fngya1/B)Ha no3nua
IocTaBete CbI IOJIOHO3aTa 3a napa (pHr.1/H).
3aBbPteTe KOnyTeO 3a KaFe,napa n ropeua BODa (FInypa 1/G) Ha no3nucna .OT dno3ata 3a npapa ige 3anoyHe da n3n3a ropeua BODa.
CneI DoCTnraHe Ha JxelaHOTOKoInueCTBO ropea BOa,3aBbptete KOnyeto 3a KaFe,papa n ropea BOa (fNpypa 1/G)HaP03nucia "·".
NouchteBaHe n noDpBxka
EkeHHeBHa noDpBxxka
IpeopbUbAmE Bn, BceKn DeH
IpeDn PbPBOTo n CJIeD
IOcJIeNDHO ecnpco, Da
IpomBaTe cNCTemata 3a OKoJIo 10
CEkyHnD 6e3 KaFe c CEi
IpeIDOTBpTaTBAHe 3acJaHaTe H auctuNi KaFe B ypeDa.
IpoCeInpaiTe KaKTO npi
IpiroTBaHe Ha ecnpco, Ho 6e3 da
I3noJI3BaTe KaFe.
CneT OBA 3aBbPteTe KOJIpyTe (ФИг.1/G)3a KpaTKO Ha NO3nIg
I3npa3HeTe BOdaTa, aKO mTaKaBa, OT pe3epBoapa.
Почистван (Фигури 12,13,14,15,16)
! Ppei Da nouchBaTe ypea, ro n3KnHouTe u 3BaJeTe uenCeNa OT KOHTaTa.
He MInTe HnTo eHa OT yAcTnte Ha ypeDa B CbDomnJaHn MaunHa.
3a6bpcbaite BCNUKNI NOBbpxHOCTNHa ypea C BIAJXHO naphe Nlat.He n3PON3BaITe rpy6n nn a6pa3NBHN NOYCTBAUc cpeDCTBA.
I3nJaKaBaiTe pe3epBoapa 3a B0da NOHe eINH nT CeMNUHO C O6nKHOBeHa BOda 3a I3nJaKBaHe.
Почистовпеситбра 3а edha
чаша И TOЗИ 3a ДBE чаши OT
Врeme на Врeme CЧетka.
Дюза 3a napa
CbaIe npictabkata OTIO3aTAYIIN3IIaKHeTe C O6NIKHOBeHa BOJa 3a I3IIaKBaHe.
3a6bpyeteIIO3ata 3a npacBlaJXHa Kbpna. MoKeTe daH3NOJ3BaTe BOda Cha NOdRpXka(ФИг.1/L),3a Da pa3BnTe rJaBaTaHaДIO3aTa,3a DaЯ NOUICTe NOTCTpaHITe KOTJIeHnKaMbK OTHeR.
Baanuka n pewetka 3a otcejdahe
BaHnUkata 3a OTuEJdaHe Tpr6Ba
da ce H3npa3HN, KOrato
HnDnKaTOpbT 3a HNBoto (ΦnI.1/U)
H3JIe3e Na peWetKata 3a
OTcEJdaHe.
IbXHeTnpbCTnTe CN BdyNkTe Ha peWeTKata 3a OTcEJaHe. CbaNeTe peWeTKata 3a OTcEJaHe IЯ n3PJIakHete NOd Teuasa BOda (ФИг.12).
3aДаизпраЗнITE BaHnUkaTа 3a OTцжданe,яXBaHETeOTДВete cTpaHn,I3ДьрnaIteЯHaropeиЯ n3BaJTeOTуpeDA(ФИR.13).
CbaIe INaCTMaCoBata npNCtBaKc C INNkATopa 3a HNBOTO N N3PnAKeHTe N DBeTe qactn PoD Teuasa Boda (fur.14).
Cnoxete o6paTHo IJaCTMaCoBaTa npuctaBka C INDkAtopa 3a HNBOTO BbB BaHnKata 3a OTcExKaHe.
Бут themselves BaHnUka 3a OTeJdaHe ObaPbHO BypeJa n CLOKeTe peWetKaT.
IounCTBaHe Ha qnTbpa
Финтьрт 3a BapeHe,прз които преминава ropeцata BOda, ce Hamima ot Долната CTpaHa Na rnaBata 3a BapeHe. OT Врeme Ha Врeme поверявiate Фиntыр, 3a Да Cte сигурни, Que OTbopinte My He ca ce 3anyuINi C qactnii Kape. Ако OTbopinte ca ce 3anyuINi:
Pa3BnIte pHJTbpa c MoHeTa (pHr. 15).
CbaNete qnIbpa n ynlbTHHeHneTO (qnr. 16/1) n OTCTpaHete ynlbTHHeHneTO Ha qnIbpa (qnr. 16/2).
I Ounctete fuiTbpa c tonna Boda n Yetka.
N3nnaKHeTe yNtBTHHeHMeTo C TOJIa BODa 3a N3nnaKBAHe.
Ako ce haJana TpaHcnpTnpaHeTo Ha ypeJa npi TemnepaTypn noJ Hynata:
N3npa3HeTe pe3epBoapa 3a B0da.
3aBbptete KOnyTe KaFe,napa n ropeza BOJa (fNr.1/G) Ha nO3nIzna NocTabe ypeDa da H3cbxHe.
OTCTpaHЯBaHe Ha KOTJIeH KaMbK
Ako ecnpecoto teue npes
fHNTbpa no-cna6o ot
ObHKHOBeHO, e BpeMe Da Ce
OTCTpaHNI KOTJIeHnT KaMbK.
IpenopbUbaMe da OTCpaHbAte KOTJIeHn KaMbK BeHNbX Ha BCEKN TpN Mececa C Teueh IpeNapat 3a KOTJIeH KaMbK. AKO XNBeeTe B paONC TBbpda BOda,MOKe Da ce HJIOKIN DA N3BbPbBaTe
npoueypaTa 3a OTcTpaHraBaHe Ha KOTJIeHn KaMbK NO-YeCTo. Korato npaBnte TOBa, cna3BaIte HNCTpyKlUnTe Ha nPOn3BOdnteJIa
Ha npenapata 3a OTCTpaHraBaHe Ha KOTJIeH KaMbK.
BaxHo: IpeiN OTcTaPnBaHHeTo Ha KOTJIeH KAMbK, CBAneTe bpa (fni. 1/V) n yIJIbTHHeHNeTO Ha fNIITbpa, KaKe oIncaHO B YacTta "PiouNCTbaH Ha fNIITbpa" (fniR. 15, 16).
PbBO HaneTe BOa B pe3epBoapa 3a BOa, CneT OBa do6abete cpeCTBO 3a OTcPaHraBaHe Ha KOTJIeH KAMbK, HNKORA B o6paTeH peI.
N3noJI3BaIte Hai-MaJIKO 0,5 JIITpa BOJa.ДоЗИраIte CpeIcTBOTO 3a OTCTpaHЯBaHe Ha KOTJIe KaMbK CbIJaCHO INHCTpyKlIInTe.
I3BaTeIeIeIeIaOTKoHTaTuaOCTaBeTe ypeDaIaN3CTnHe.
I3BaJeTe IIO3aTa 3a npapa c npictabkata (fH.1/H).
CnojKeTe IbPkaHa Ha nIITbpaHa MrcTOTo My 6e3 nIITbpa.
CNoXeTe DoCTaTbUHO roJIM cbI NOI dbPkaHa Ha qnITbpa.
BkapaTe ⅢeCenaB KOHTaTb BKNIOUte ypea.
CneT TOBA 3aBbPTeTe KOUeTo (fIg.1/G)Ha nO3nZuN oCTaBeTe OKoNo jOT npenapata 3a OTCTpaHraBaHe Ha KOTJIeH KAMbK Da npOTeue Ipe3 CnCTemata.
Cnei TOBa n3KnIyHe ypeDa n octaBeTe pa3TBopa 3a OTCTpaHЯBaHe Ha KOTJIeH KaMbK Da JeICTBa 3a OKOIO 10 MInHyTn. IOBTopeTe npoceDypaTa c OSe j ot pa3TBopa.
3aBbptete KOnyeto (fH.1/G) Ha 0n3uŋa .OCTaBeTe OCTaTbKa OT pa3TBopa 3a OTcTaPahBaHe Ha KOTJIeH KaMbK da IpOteYe Ipe3 IHO3aTaI Na da JeNCTBa 3a OSe 10 MNHyTN.
CJIeT OToBa IOnHCTe OCHOBHO pe3epBoapa 3a BOda
BG
HaHbHHepepeepBoapa c npracha BOda n OCTaBeTe NOJOBnHaTa OT BOdA Ta Da npemIne ppe3 INaBaTa 3a BapeHe, a dpYrata NIOBnHa - npe3 DIO3aTa.
Iobtope npoceypaTApn HaJIynchHe MHORO KOTJEN KaMbK.
CneO TcPnHaBaHe Ha KOTJIeHnKaMbK OT ypeDa, CNOKeTe o6paTHoФNITbpa 3a BapeHnYIbTHeHNETo.
KaKBO Da HaNpaBNTe, aKO...
- TemnepaTypaHa ecnpecoto e npekaJeHO Hncka:
-ИЗнБЛНЕnpоцелурatura3aВаре,бeздаиЗПОЛЗВATEecпесо,нспocтавенHФNTbpИДьржчHaФИТьpa,3aдаЗагpeeteСИСТЕматanpeДВAPITELNO. - 3aToPJIeTe IpeDbAPHTeHNo YauHInTe.
- OTrtpaHete KOTIeHnKaMbK OType#.
- CKOPOCTTa Ha IOTOKa HamaJIee 3a6eIXMIO:
-He hatackaIte cMJIaHOTO ecnpeco npekaJeHO CNIHO BbB fntba.
-He cmnnaTe kafoTo npekaneHo fHNO ("cpeHa" cTepeH) -
OTrtpaHete KOTJIeHnKaMbK OType#.
ecnpecOTO n3JIN3a OTCTpaHn Ha IbprkaaHa qntbpa:
-ПюверетадпдьржачтНафнтbpа e NOCTaBeH ПраВиноВьBФИКсТОпа.
-3aBbpteteNbpxkaHa Ha cnTTbpa MaIKO NO-CINHO BBB KCaTopa.
IpoHCTeTe p6a Ha IbpxkaHa Ha HnTbpa OT eBENTyaHNo Kafe. -
He n3JIn3a HnKaKBO ecIpeco.
-Пювере Te Далп pe3epBoapbT 3a ВODа e HAnbJIneH И NOCTaBeH Правин Ho Ha MЯCTOTO My.
-Пювере Te Дали БьжачБТ HaФИNTbpa e NOCTaBeHправинHo BbB ФИКcaTopa.
-YBepete Ce,Ye KJIIOUbT 3a BOJa/ napa (fNrypa 1/B) e Ha I03nIyra Nue KJIIOUbT 3a BOJa,napa n ropeua BOJa (fNrypa 1/G) e 3aBBpTaNADCHOHa I03nIyra
-He hatackaiTe cMJIaHOTO ecnpeco npekaeHo CUNHO BbB fntba.
-Почирете Фильба 3а Варе.
- OTeTpaHete KOTJIeHnKaMbK OType#.
-
06pa3yBaHeTo Ha Kpema Ce BLOSh:
-
YBepete ce, Ye BvBФnITbpa nma DoCTaTbUHO ecnPecO.
-Binharu n3noJ3BaIte npaCHO kafe. - Hatnchete cMJIaHOTo ecnPecO JIeKO.
-образува ce npekaJIeHo MaIko ПЯна рпи ИЗПОЛЗВАе На ДЮЗАТа 3a ПЯна:
-Binharu n3noJ3BaIte XlaIko, npraCHO HnCKOMacNeHO MnaKO.
-Почистетдюзата запа.
-
CtpyTa ce yBelenu:
-
ecnpecotoe cMnIHO npeKaJIeHO eJPO:
-
YBepete ce, Ye BBФиNTbpa Иma DoCTaTbUHO ecnPecO.
-
KaΦeMaΨHnHaTa Ce Ι3KJIIOUyBa ΠOBpeme Ha paδoTa:
IomnataHa yctpOCTBOTO mTaempepatyen Ipedna3HTen, KOITo ro 3aunTaba OT IpepPraBaHe. TemnepaTpHnT Ipedna3HTen IpeKbCBA pa0botaHa MaunHata, aKO UpeDbT Ce n3no3Ba IpeKaJIeHO Dblro 6e3 IpekcbAHe IJIn aOIO NOMnata pa0bTu 6e3 BOda.
- CNoXKeTe KInOua 3a BkNIOUvaBe/ N3KlnOuBaHe Ha "off" n 3BaJeTe UeNCeJa OT KOHTaKaTa.
- OctaBeTe MaunHata da ce oxlaIIN noHE 3a 20 MNHyTN. IOneIte BOa.
- IbXHeTe ⅢeB KOnTaI BKnOChTe yPeJa. Ako ypeJbT BCE OSe He pa6oTn, ce CbPKeTe c HauSiOToIe 3a O6cnyKBaHe Ha KIneHTn.
TexHnueckn daHHN
3axpaHbauo
HapexeHne: 230 v, 50 Hz
- KoHcyMaZnHa
eHepr: 1000 W
(BnKTe TaBeIkaTa c OCHOBnHe
daHHN OT DoJIHaTa CTrpaHa Ha
ypeDa.)
3XBbPJIaHe

OnakobbyeH MaTepnaI
Опakobчнite MaTePnAIn He BpeJrT Ha OKoJIHATA cpeJa N MORa Tda ce peuKJlnpaT. ПлacrMaCobNte Yactn ca 603NaeHn CbC 3Haun, HApPmEp >PE<, >PS< n.T.H. MoIy, 1x3xBpIeTe OngOBvHnTe MaTePnAIn B CbOTBtHn. IpeBvIeH 3a Ta3n ZeI KONTHeHep 3a CbBnpaHc Ha OTnaDbU.

Ocταργι ηρεδ
CmBbT Bpxy npOdykTa onakOBkata O3HaUaba, ye He 6nBa da ce TpeTnpa KATO DomaknHcN OTnAbk. BmecTo TOBa Tpr6Ba da ce npeDaJe Ha NyKKT 3a BTOpuHN OTnAbq 3a peuKnIpaHe Ha eJekTpuecko n eJekTPOHNO obOpyDbaHe. I3XbPnIkn
npOyKTA no npabIne HauH, Ie nOMorHete Da ce npedOTbPaTAT NOTenuAHHN OTPuCaTeHn
NocJeuUs 3a OKoHATA CpeJa UOBeWkoTO 3dPaBe, KOtO INaue 6nxA 6nI npEni3BnKaHn OT
He npabNJHOTO n3XBpIhne Ha npOyKTA. 3a nobEue IHOpMaunr OTHOCHO peuKnIpaHeto Ha To3n npOyKT, ce CBpKTe C MeCTHn Cbbet, cnyk6bTa 3a cb6nPaHe Ha OTnAbq nn C mara3nHa,
OTkbDETO CTe 3akynnn npOdykTa.
RUS
RUS
YbKaemar NOKyNaTeNbHnca, YBaKaembI NOKyNaTeMb!
IopkaJyHCTa, BHNMaTeIbHO npOHTaJIte HactoIyIO INCTpyKUIO no 3KcPnyatauIN. IpeXKeB CceO o6paTIne BHNMaHHe Ha yKa3aHHa NO texHnke 6e3OpacHocT! CoxpaHIne 3Ty INCTpyKUIO, C TeM UTo6bl Bbl MORnN o6paAaTbca K Hei B 6yDyuEe. Ppi cIyueae nepedaIte ee cIeMy BnaJeBtu MaSInHbI.
Ochauene (Pnc. 1)
A IpeeknHouateJIb BKn./BbIkn.
B IpeeknouateIb peKIMOB "Boa/ Iap"
C Pa6ochn HnDnKaTOp
D INdikaTOp TemnepaTpybl
E IoDCTaBka dIaWeK
F Pe3epByap IJI B0Dbl (c3aIN)
G IobopOTbI celenkTop dIra KoFe, npapa n ropuey BoDbl
H ConIIO dIaB36bBaHHaMOJNoHOI neHbI (c HacadkoI)
ΦπμmēHHa TaδJIuŋka
K Mepnay loxka
L BcnoMOrateIbHbI INHCTpyMeHT
M YIINIOHTHNTeIb IJI MOnIOTOro KoΦe
N Φиьтдя 1淘汰kofoe
0 Φильтг Дг 2-x чашек кофe
P CnTo DnIa NopCuOnHbIX NaKeTnKOB
Q DepeKaTeIb FInIbTpa
LITOKdIauntbI naibceB
S KanelbHbI IOdoH
T KanenbHaPeWetka
U INIkaTOp 3aONHeHn KaenbHoro NOdOHa
V Φильтзаразочноблoka(Bhутп)
W 3abapouhB 6JOK c KpeHHeHem dIa depKaTeJI pIbTpA
!
Yka3aHnI NO TexHnKeI NaCHOCTN
Mepb6e3onacnoctn npuyctahOBke
MaunHa DoJnxHa CToTb yCTOuHBO. IpocneJeTe 3a TEM, uTo6bl NOBepxHOCTb IJy UCTAHOBKN MaunHbI 6bln poBHOH n TropnOHTaJIbHOH.
Pa3peSeHNOIOKnIOUaTbMaSHInyK 3NeKTPOCETNIISBBTOMcLyuae, ecn HapRjKeHne,BiN uCaTOTa TOKABTOI CETN COOTBeTCTBYIOT DaHHbIMΦnPMeHHO Ta6JIuKN, paONIOJXeHHoHaDNHSeMaSHInh!
Меры 6e3oIaChOCTn npH 3KcnJyatauH
- 3TOT npnbop He npedHa3HaeHdI INCNoJIb3OBAHHIIOBIMN (BKIOUoAH dTei), KOTOpbIE NO npuHHe CBOeI HEONbIHTHOCTNI INHEOCBeDOMJEHOCHTNI HE B COCTOHHM6E3OJaCHO IM ynpabJIaTb, a TaKKe IIODbMI (BKNIOUaJeTei) COrpaHueHHbIMn FIm3HueCKIMN, CEHCOPbIMN INYMCTBEHNBMn CNOC6HOCTAMN. NCKLIQUeHNEM IN3 DAHHORI pabINa RAIBIOTc CnyauN, KOrDa TAKNE IIOIN NOLyauHOT INHCTpykUnn PO 6e3OJaCHOI EKCPIyataunn Ppibopa OTOTBETCTBEHHORo 3a HIX LIua n nepBOe BPemr NOLb3yOTc Ppibopom NOD HaJIIODeHEm 3TOTO LIua.
- YnakoBouhIe MaTeHnJIbI, HApNI Mep, NOnN3TnJIeHOBbI PeNaKeTbI, He DOnJKNbI NOnaDaTb DeTmBpyKn.
He no3B0JIaIe TeIeTAM HaxOJITbcra pIOM C HIMN!
He donyckaTe cOpnKoCHOBENH UHypaPiTaHHcRopuHMN uactMIMaunHb! - Hn B Koem Cnyuae He TAHInTe 3a UHyp, BblHMa CeTEBOI UTeKepe N3 po3eTkn!
-
He BkIIOUaIte MaIINHy, ecJIH: - IOBpeJdeH UHyp NITaHn HII - Ha KOpTyCe KoΦeBaPkn IMeOTcR ABHbIe NOBpeKDeHnR.
-
Паровoe conno, Фньт, deprжateь фньрази Крелене Фньраз BO Врем paBOTBI MaUNHBI CTaHOBTCA ROPYIMN.
- Meṭaŋnɪyeckni Kɔpnyc BO Bpemr paθoTbɪ MaɪnHbɪ ḤarpeBaeTcR.
He n3BlekaTe DeprKaTeIb FInIbTpa BO BpeMa ZnKJa 3aBapuBaHnra, T.K. CnCTema HaxOJNTcI NOI DaBHeHem! MoXHo o6KeUcR!
Bpe3epByapIJI B0DJI 3aJIbAte TOJIbKO XOIOJHyO BOy, HN B KOEM Cnyuae He MOKOn IIN DpyrHe JxIDKOCTn! - He 3anyckaTe MaunHy, ecn pe3epByap dIa BODbI He 3anonHe!
He 3Kcnpnyatpyte MaunHy 6ez KaenbHoro NpDoHa nIN KaenbHOI peuETkn!
PnroTOBneHne kanyuHHo
3aeneKeKoFe 3cnpeccoB60nbuyu yaikyuHa1/2-3/4eeOsbema.
IobabbTe B36HtYIO MONOHyIO neHy. IocbInbTe MOnOHyIO neHy KaKaonopoikOM.
3.HarpeBaHne BoDbl
UCTaHOBtpe napeKIOuateIb peKIMOB "Boa/Plap" (Pnc.1/B) B noLOXKeHne
ПОДСТАБТЕ NOД COПно ДЯ
В36ИВАнЯ MONОЧОН ПЕНь KaКУ-
ЛИБО EMKOCТь (PиC.1/H).
IpeBedeNte NOBOPOTbI cTeKTop DnKa KoFe, napa n ropuey BoDbI (Pnc.1/G) B noJoxKeHne .H3 coPna dJa B36uBaHnRA MOnOuHOI neHbI NOTEuy TROPa BA.
I Oncne TOrO, KaK MaUHnHa BbIdacT HxKHoe KOInueCTBO rOpRyEe BOdBi, IpeBEdIte NOBOPOTbI CEleKTop DnRA KoFe, napa n rOpRyEe BOdBi (Pnc.1/G) cHOBa B nOLOKeHne "·".
UncTka n yxOJ
EkeHHeBHyxOa
YTo6bI npEDoTbpaTnTb HaKunnaHHe
aactnU KoFe Ha CTeHN MaunHbI,
peKOMeHdyem Bam eKeJdHeBHO
nepei nepBbIM n NocLe NocLe
NocLEnHrO NO CHTy PnIRTOBLeHnR
KoFe 3cnpcecco B TeueHne np6bl.10
CEKYD BbINONHbTb NpOMbIBky
CNCTEmbl 6e3 MONOTOro KoFe
3cnpcecco.DeiCTByte npn 3tOM Tak
Jke,Kak ppi npIRTOBLeHnR KoFe,Ho
6e3 HcNOJIb3OBaHnR MOnOTOro KoFe
3cnpcecco.
3aTeMaHaKopoTkoeBpeMaCHOBa nepeBeDHTeNoBOPoTHbIceNeKTOp (Pnc.1/G)BnOJKeHne
BbIeIte n3 pe3epByapa dIЯ BObl OCTaBsuTOcH B HEM BODY.
UHCTka
(Pnc. 12, 13, 14, 15, 16)
! Ppeed npoBeDeHem YnCTKu BCaKn pa3 OTKnOuaTe N MaunHy N BbIHMaJTe cTeBOu IHTeKeP n3 po3ETKn!
Hnkakyo qactb Maunhbl HeIb3MaBtB NocydomoeHoh MaunHe!
Bce noBepxHocTH Maunnbl npOTnpaTe BnaJHoM MaTepeHne. He npImeHnTe oCtpbIX n a6pa3nBhbix qNCTAunx cpeDCTB.
I Mo MeHbWeMpeOdIN pa3 B HeJeIO npOMbIBaIte pe3epByap OboUHOI BOIOI.
ΦnIbTpДЯ1ЧашкИΦnIbTpДЯ2- XчашекКофЕВрмЯOTВрemeHIn npOuHuaJIteUeTkoI.
ConJIO JIJI B36HBAHHaMOJUHOH neHbI
CHHMMTe HacaKy c CONnaДЯ B36HBAHnM OMOUHOI PeHbI IN npOMOHTe ee OObuHOB BOIoN.
TtataelbHo npotpnte conllo BlaakHOI MaTePneI.ДЯ npoBeHeHn YnCTKn UydaJeHn HAKINBb MoKTe OTBnHTnTb
TOLOBKY COJIJA BCNOMORAteJIbHbIM INCTpymeHTOM (Pnc. 1/L).
KaneJbHa paWeTka n KanelbHbI noDOn
EcnHnDnKatop 3anOpHeHHa KaenbHoro noDoHa (Pnc.1/U) NoHNCLBaIe KaenbHoPeWetKN, 3NaHTKaenbHbI NoDOH HeoXoDIMO OnopoXKnTb.
BLOXHTe naIbci B OTBepCTne KaIeNbHO peWETKn. BblbTe KaIeNbHyo peWETky npOMoITe ee eo npOTouHO BOOJ (Pnc. 12).
TTO6bI ONOPOXHITb KanehBblnIOdIOH, BO3bMITEcB 3a Hero C06eHX CTOpOH N BbITAHTE n3MaunHb Ibpeed (Pnc.13).
BbIbTe pIaCTIKOByH hAcIky c HnDnKaTOpOM 3aONJIHeHn KaIeIbHOrO PoIDoHa I nPpOMoIte o6e 3tN DeTaII IN pOToUHO BDOJ (Pnc.14).
BcTaBte nIaCTIKOBYIO HacaIky c HndIkATOpOM 3aONHeHnK KaIeNbHorO NOdoHa ObaTHo B KaIeNbHbI NODHO.
CHOBA 3aADBnHbTe YNCTbI KAneJIbHbI NODIOH B MaunHy I BCTaBbTe KaenbHyIO peWetKy Ha npexHee MecTO.
Ynctka 3abapouHoro fNJIbTpTa
BHytpn 3aBapOuHOro 6JIoKa
hXoDnTcR CneuaJIbHbI 3aBapOuHbI
fNlbTp, Upe3 KOtOpb IpoXoDnT
rOpaar BODa. Bpemr O T BpemeH
npOBeprTe, He 3a6nInc bI rYeKeK
3aBapOuHOro fNlbTp auctncaMn
koFe.
EcnIyueKInΦnIbtra 3aKynopeHbI:
BbIBHHTte 3aBaOpHuB HnIbTp MoHeToi (Pnc.15).
BbIbTe 3aBapOHybI ΦnIbTp c yIIOThHeHEm (Pnc. 16/1) n CHmnte yIIOThHeHne ΦnIbTpa (Pnc. 16/2).
OuHCTHTe 3aBapOHybI ΦnJIbTp TeNIOB BOoN I ΚeTkoN.
IpomoiTe TepnoB BoDoy ynpIoTHeHne.

Ecni Heo6xOdmo TpaHcnpTnpoBaTb MaunHy npMHNycOBI Tempeatype:

Onopokhnte pe3epByap nIy BoIbI.

IpebeDHTe NOBOPHTbI CEJIeKTOp (Pnc.1/G) B nOLOXHeHne Ⅲ TaIte yIeTcHbC HAXOJaUeMycB MaunHe npy.
YdaJIeHHe NaKInn
Ecni KcΦe 3cnpecco npoxoHt uepe3 fNbTp cNlukOM dONrO, npa npOn3BecTH OChCTKy MaunHbI OT HAKIN.
PekomeHdyem exKebBapTaIbHo OunuTaB MaunHy OT HAKINN C NOMOusbO JnIKKO rCpeCTBa DJIYdAeHnra HAKIN. Ecnn BblnpOKHBaete B MeCTHOCTCN C KectKOB BOIOJ, PPOeDpyu ydaJeHnna HAKINB03MOxHNO, PpndTcna POBOIDNTb yaue. Co6JIOaJte pni 3tOM yka3AHn I3rOTOBHTe n CpeDCTBA DJIy YdaJeHnna HAKIN.
Bakhna HhOpmaun: IpeJde yem
PnIcTynIb K ydaJIeHIO HaKIN,
N3BLeKIne N3 MaIIHHb 3aBapOHybI
ΦIbTp (Pnc.1/V) n yPiToHHe
3aBapOHyO ΦIbTpA, KaK OINcHo
B pa3JeIe "UcTka 3aBapOHyO
ΦIbTpA" (Pnc.15, 16).
Chauana 3aene Te B pe3epByap BoNy, n TOIbKO Iocne 3Toro BHeCHTe CpeCTBO dny ydaenHnHaKnPi, Hn BV Koem cnyae He HAO6OpOT. HeoXoIMo hcnOJIb3OBaTb He MeHee 0,5 n Bobl. CpeCTBO dny ydaenHn HaKnPi cneDyET Do3nPoBaTb COOTBETCTBeHHO.

BbHbTe cTeBOI uTeKepe n3 po3eTKn I daIte MaUNHe OCTbITb.

CHIMTE COJIO IJI B36IbHMA MOJUHOI PeHbI BMcTe C HacaIKoI (Pnc.1/H).

BcTaBbTe B KΦeBapKy DepeKHaTeIb ΦIbTpα 6e3 ΦIbTpα.

IoNCTaBbTe NOI dEprKaTeIb ΦIbTpA IOXOAnuIyU NO ObEmY EMKoCTb.
RUS
Bctabte ceTeBOI uTeKeB Bpo3eKU IN BKIOHHTe MaUNHy.
I IepeBcHte noBopOThb ceneKTop (Pnc.1/G) B noloxKeHne H npOnyCTHe uepe3 cnCTeMy npImepHo 1/4 pactBopa dJa ydaJIeHnHaKnII.
После зтORA OTKIQUHTe MaUNHy n npIMepHO Ha 10 MInHyT OCTaBbTe pactBOP DeIcTBOBaTb. TakyUо JKe pnoUeDpy npOBeInte n co CneIyUoSei 14 pactBopa dIy uDaJIeHnI HAKINI.
YctaHOBHTe NOBOPOTHbI CEJIeKTOp (Pnc.1/G) B noJIOKeHne .OcTaTOK pactBopa dny ydaJeHnHaKnPi npOnyCTHe uepe3 cOnIO n CHOba OCTaBBTe erO deiCTBOBaTb B TeueHne 10 MInHyT.
I Oocne 3toro pe3epByap IaBBoDbI CNeDyET TuaTeJIbHO Ipomblb.
3aONHnTe pe3epByap CBExKeI BOIo. OndHy NIOBnHy 3ToI BObl npOnyCTHe uepe3 3abapoHybI 6LoK, dpyryo NIOBnHy -yepe3 cOnlO. Pn HAnuHN 60bnJoro KOnueCTBa NaKnIn NOBTopHe yKa3aHHyIO npOeDpy.
IIO OKOHaHHu ydaJIeHnHaKINCHOBA BCTaBbTe Ha MeCTO3aBaOpHbIΦNlbTp NyPNotHeHne.
UTo DeJaTb,ecnI...
Kofoe 3cnpcecco NOJyuaetcHHeOCTaTOUHO TOPRIMM:
- UTo6bI npOrpeTb cnCTeMy, npOBeDHTe OINH zIKn 3aBapuBaHn8 6e3 MOJOTORO KoΦe 3cnpecco, HO C fNlbTpOM n DePkaTelem fNlbTpA.
- PpeBapnteIbHo IoIorgpeIte YauKn.
- Ouchntte MaunHy OT HaKINH.
-
ПОНУСКHAЯ СПОСОБHOCТь MaшинныЗамETHO CHИЖАЕТС:
-He cInuKOM yNIOTHaTe HaxoJauuNcBΦIbTpE KoFe 3cnpecco. -
He MeiHHe KoΦe 3cnpcecco CnIuKOM TOHKO (TOHKOCTb NOMOla DOnJxHa 6bITb "mittel" (cpeHra).
- OuHCTHTe MaUHHy OT HaKNIN.
KoFe 3cnpcecco BbITEKaET n3 DepeKaTeIa FnIbTpca C6Oky:
- Y6eDInTeScb, yTO DepeJkaTeIb ΦHbTpa IpaBnHbHO BCTaBNeH B CToOpHoe KOnbO.
- Uytb CnIbHee CTaHInTe DeepKaTeIb ΦNtpa CTOnOpHbIM KOJbOm.
OuHCTHTe KpOMKy DepeKaTeIa PhIbTpa OT MONOTORO KoΦe 3cnpecco.
kofoe 3cnpecco nepectaT Teyb:
- Y6eDInTeCb,чTo pe3ePByapДЯ BOdBi 3aONHeHипpaBnIbHO yCTaHOBJIeN.
- Y6eIntecb, yTO IepKxatelb ΦHbTpa IpaBnHbHO BCTaBHeN B CToIopHoe K0JIbIo.
-Y6eHntecb, yTO nepeKluOaTeIb peKIMOB "Boa/Ipap" (Pnc. 1/B) HaxoINTcB nIOJKeHn , a IOBOPHTbI CEJIeKTOp IJIA BOJbl, npapa n ropraue BODbl (Pnc. 1/G) IpeBeDeHn HAppaBO B IIOJKeHne - He cIINsKOM yIINOTHnTe HAXOJAAuNcB V NJIbTpE MOJtBn KOpE 3cnpecco.
-ПочинITEЗаьарочныфнлътр. -
OuHCTHTe MaUHHy OT HaKNIN.
-
KaueCTBO peHKn "KpeMa" yXyDshaetc:
-
Y6eIntecb, yTO B fNbTpe HaxoINTcA DOCTaTOHoe KOJIuYeCTBO MONOTOro KoFe 3cnpecco.
- Bcerda nCOnB3yIte CBexn MOJToB KOΦe əcnpcecco.
- CnErga yNIOHTHHe MOJtBm KOFe 3cnpcecco.
-ПриВЗБИВАПМОЛOKаOBpa3yETСЯManIOпЕнbl:
- IcnoIb3yIte TOnbKO npoxlaHoe, CBexkee H HexinpHoe MOnoko.

- PpOuNCTHc CoPINO DnB B36bHaHnMoJIOUHOI PeHbI.
-ПОНУСКHAн CПОСОбHOCТь MaSHINbI NOBblaETCR:
-
IcnoIb3yembl KoΦe əcnpecco cnHJKOM rpyo nomona:
-
Y6eIntecb, yTO B Φnltpe HaxoIHTcI DOCTaTOH OJNOTOrO KOΦe 3cnpecco.
-
KoФeВapKa BO BpEMa paObTbI OTKJIIOUaETcR: HAcOC MaUNHbIO OCHaUeH TepMO3aUHToN, ppeOxpaHraHOUeMaunHy OT nepeReBa. B clyuae npDoJOLXHTeJbHOH HepepbIBHOpaObTbI MaUNHbI, a TaKHe npn 3aynCke Hacocca 6e3 BoDbI, TepMO3aUHTa ppebIbAet paObTy MaUNHbI.
-YctahOBHTe nepeKlnOuataTeB Ein-/ Aus(Bk./BbIKL.) B noLoJKeHne "Aus" (BbIKL.) n BbIHbte ceteBoi Wtencelh n3 po3eTKn.
-ДаиTe Maшинe Octыт,Длг Yero notpe6уETcH He MeHee 20 MmHT. ДолеиTe BODy Bбak Длг BODbl.
- CHOBA NOIDCOEINHInTe K ΘeKTKPOCETN IN BKNIOUHTe MaUNHy. EcNI nocne 3TOrO MaUNHa He 3apa6oTaET, O6paTnTEcb B HaSh cepBnCHbI ueHTp.
TexHnueckne daHHbIe
- HanpaKeHne nodkluOeHnA: 230B,50T
-ПOTpe6IeMaM MoUHocTb: 1000Bt
(CM.ФирмehnyTo tabnkyHaДнИSe MaUNHbI.)
YTNH3aCnA

YnakobOuHbIe MaTePnabli
YnakoBOUHbI MaTePnAbI
3KOJIOrUeCKN 6e3OJaCHbI
IPnroDhbl DnI BTOpHHO
HCNoJIb3OBAHN.CnHTeTNUeCKNe
Cactn CHa6KeHbI CneuNaIbHO
MapKnPOBko, HapmEp: ^PE^- dIa
POnIaTHInHe, ^PS^- dIa NpIcTIpOla
H dp. PomeaIte ynakOBoUHbI
MaTePnAbI B COOTBetCTBNi C
MapKnPOBko B CneuaNbHbIe
KoHTeHepbl DnI C6opa yTuIN,
yCTaHOBJeHHbIE MeCTHO
KOMMyHaJIbHOcNjXboi.

Ctapbipnpbop

CnMBON Ha n3dennn nnHa erO ynaKOBKe yka3bIbaeT, yTO OHO He NOJLeXHT yTNIN3aunn B KaueCTBe 6bITOBbIX OTXODB.
BmecTo 3Toro ero cneIyET cdaTb B COOTBeTCTByIOuI NyHKT npHeMKn 3JIeKTPoHHORO n
3NeKTPoO6OpyDoBaHnI DnI NocneDyUoSeI yTINn3aunI.
Co6IIOJa npaBnla yTINH3auHH ⅢdJIIny, Bbl NOMOKeTe npedOTbPaTb npuHHeHne OKpykaHSei cpeDe n 3DOpOBbIo HJDei nToEHnAHLbHO yUeP6a, KOTOpBI BO3MOXKeH, B IpOTHBOM Clyuae, BCNeIcTBVe
HENOIOBOAHOJIeO OboaIeHnC NOIOOBHbIMN OTXODAMN.
3a 60onee npdo6Hoi nHOpMaunieo yTHnI3aunn 3TOrO n3DeJINnnpoc6b o6paUaTbcK MeCThBIMBlaCTAM, B CnyK6y NO BvIBO3y INyTHnI3aunn OTXoIOB nIN B MaRa3HN,B KOTOPOM Bbl pno6peu n3dene.oBbIBO3y INyTHnI3aunn OTXoIOB nINBMara3HN,B KOTOPOM Bbl pno6peu n3dene.
UA

山ahOBHHn nokynecb
PnHroTyBaHHe ecnpeco
Писязаварованг ecnpeco notpi6no pOKpTN uINbHM pINHCTMm шapOM, tak 3BaHOIO pIHKOIO. Lio6 otprIMaTH apOMaTHN ecnpecO c pIHKOHO, BaKJIbBO KOpHCTyBaTnCRA YHCTOIO BOJOIO i NOMEJOM праВиьНоу рОзмір;Тakox ВaxKЛИBA TempepaTyA BODI.
1. HanobHeHH BDOIO (ManHOHOK 2)
ПOTЯгнITь EMHICTb ДЛВ BOД NДOROPи BИМITь II 3ПрИАу (MaIHOHOK2).
BiKpniTe KpiuKy eMHocTi.
HaNOBHHoTe EMHICTb TIlbKN XOJIOHO, YNCTOHO BOHO. BaJIbBO, 106 pIBeHb BOIN 6yB He HIXKue PO3NaChn MIN (Minm) i He BUNe PONauchn MAX (MaKcIMym).
3akpiTe KpnuKy EMHOCTi.
BCTaBTe EMHICTb IJN BOIN Ha Micce i HATINCHITb HA HeI, 106 BCTaHOBTn II B npInaD (MaHHOK 2).
Bn taKoJ MoKeTe NiHHTN KPNWky emHOCTi i cKlaCTI II B6ik. Lc I03BOJIaH HAnOBHTN EMHICTb IJRA BOIN, He BInMaIOUCh II 3 npHaNy, HApnPKJa3 rIneuKa.
UA
2. BMHKaHHn npHJaDy / nonepdHe nporpibaHHaawok
BbIMKHiTb npHuaN nepemHKaueM BBIMK/BIMK (MaIIOHOK 1/A). IHINKaTOP XHBnEHHa (MaIOHOK 1/C, YepBOHn) i IHINKaTOP Tempepatpyi (MaIOHOK 1/D, nomapAHyeBn) 3acBITbcr.
KoJIb BCTaHOBtbcr poOOba TeMneparpa, iHdNKatop TeMneparpn 3rache. HdNKatop TeMneparpn MoKe 3acBiITnC8 3HOBy niD qac poOToH npHaNy; ce O3Haac, 10 npHaN HarpiBaetbcr 3HOBy.
Bn mojete noctabHTOn OHy a6o 6iNbwe yawok OTbOpom DOHN3y B BiDin DnA 36epirAHnY yawok (MaHIOHOK 1/E).
3. 3acnnaHHMaIeHOI KaBn (MaJIHOHKn 3,4,5)
Bizbmitbtpmuaiibtpa,BidirHitb npoteKTrop naibuc i nocTaBeiibTp Ha 1 yaiky a6o BinbTp Ha 2 yaikn B trmuaiibtpa (MaiohoK 3).
I KaIO BV BnKOpNCToByeTe po3phiOBAHi nopui, BCTaBte fIbTp dIra po3phiOBAHnx nopui (MaIHOHK 1/P imIoHOK 5).
3acnnte MeJeHy KaBy B fIbTp. KopnCTyBaHn: 1 nobHy mipHy loKky dny fIbtpa Ha 1 yauKy, 2 nobHi mipHi loKKn dny fIbTp aHa 2 yauKn.
Лерко натушить на мени Каву B
фільтpreci (малюнок 4) за дономогою
праза дя мени Кави (малюнок 1
/M).Вадлво,zzo6nicra CTSCKaHHa
Кави ФільтбуВ habOBHeHn
mени Кавою Do краiB.3HIMiTb
Залишки мени Кави 3 оБODka
Фільтра.
He cnpecoByte MeeneHy KaBy B
ΦiNbTpri Dnyke CnIbHo. B TaKOMy
BnnaKy Notik BoDi nCkpi3b KaBy
3HaHuO yNobIbHnTbcr. (DnIBiTcR
TaKoX po3dIn "LTo po6ntn RaKIO...")
I Hkso Bn Mene Te Kaby cami, oBupaTe "cepeHni" po3mip nomey.
4.3arBHHcYBaHHr TpHmaya iJbTpa. (MaHOnKn 6,7)
BctaHObITb TpIMau fIbTpa B
fikcatop fIbTpa TaK, uO6 puYka
TpIMaua fIbTpa 6yNa po3TaWOBaHa
piJ liBIM 6JIIM TpIKyTHNKOM
(MaIIHOHok 6, "1").
IIOBepHITb TpIMauchIbTpBa BnpaBO Do ynpOy (MaIHOHOK 6,2),Tak Oo6 pyka 6yna HapPmNeHa Bnepei 6yna po3aOBAHa Ni d 6IoIO nIHIEOM iIX DBOMA TOKAMI (MaIHOHOK 7,3").
5.YcTaHOBka YaUKN (YaUOK) BHN3y (MaJIHOHOK 8)
BctaHObit oHy a6o DbI yauKn nID OTBOPN B TpImaui fInbTpTa (MaJIIOHOK 8).
6. Ппготуваши ecnpесо
IpepeBedeitb nepemnkau Boda/napa (MaIOHOK)1/B)B nOLOXeHHa
KoJn npuJaD oocrHe pObooI TeMnepaTpyn, noBepHitb kpyrI nepeMnKaU (MaJIHOk 1/G) B noJIOKeHHa .Body bye npOpyuSeHo cKpi3b MeJeHy KaBy niD BHCOKIM TCHKOM.
KoJn 6aKaHn O6'em ecnpecO 6ynde npIroTOBaHO, NOBepHtB kpyrIIN nepemkau BJIBO B nIoJKeHNRA "."
I Bydb nacka 3BepHitb yBary, zo nid cac npiroToYBaHHn ecnpeco nepemHKaay BODa-napa (MaHOHOK 1/B) 3aBXKn 3hAXoDHTbcB B noLoXeHHi .Kkso ecnpeco 3abapOeTbCBy noloxeHHi ,CMaK KaBN MoKe noripuHTncs Chepe3 BNcTy TEMNepaTpy 3abapUOBaHH. KoxHoro pa3y nicna npiroToYBaHHn ecnpco a6o nicna KopnCTyBaHHn napo/rapaHO BOIOO npn noLoXeHHi kpyrIoro nepemHKaay ". BEcb 3aHIoK BoDN cPpAMOByETbcB BA TO Dn CTiKaHH. KoxHa
IdoaTKOba Yauka 3abapIOeTbcB CBIXKO BOIOJ. TaKIM YINOM Bn OTPMaTe HaBNUU HACOIOy Bi ecnpco.Ocb yomy notpiHOp perynpHO BVINBaTH pIDHy i3 Taui dJIa CTiKaHHJ.
7.ЯкзгтутaitioДТСИКАнн(ManIOHOK9)
Поверніть Trпмач Флъту Вию i BNTЯніть НOrO i3 Фikcatopa.
3irHitb npoteKtop nalzubBnepei npHTncHtB noRo. BnTpycitB BnKOpNCtAnHy MeJeHy KaBy i3 TpMmaya fIbTpa i 3 fIbTpa (MaIOHOK 9).
IpomnTe TprMaH cyIbTp y IiBtp TeTPOIO BOIOO. He MInTe TprMaH cyIbTpBa B NocyDomnHi MaunHi!
I KkUo BV He 6yDteKOpNCTyBaTnCpnilaOM IOBnYac,He BCTaBn-NeTpImauΦJIbTa y npinad.Le36ilbUnTB TepMIn EKcNpyataii npOKnAKn,IO 3NaOxOHTBCnHaRONOBuDn3abapIOBaHN.
CTBOpENHn napn/cniHIOBaHHaMOJOKa (MaJIOnKn 10, 11)
Iapya npa MoKe BIKOPNCOTByBaTHcA DnA CnIHOBaHH MOnoka DnA KanyuHO aO DnA NiirpiBaHH pIDH.
1.BbimKHTb npHJa.
BctaHOBIb HacaIky Ha HocNK IJI npn (MaIOHOK 10).
BbIMKHtB npnlaepemHKaueMBBIMK/BIMK(MaJIHOK 1/A).3auekaite,doKN npnlaDocarhepo6ooyi Tempepatypi i nomapaHueBNIHdkaTOpTempepatyn3raghe (MaJIHOK 1/D).
IepeBedeItb nepeMnkau Bda/napa (MaJIOHOK) 1/B) B noJIoKeHNr.
2. CTBOpEHNApH/cNIHOBaHH MoJOKa
HaHnTe MoNoka a6o iHooPiinH, 10 noTpiHO Harpitn, B TeNIOCTiKy EMHiCTb.
3aHypTe HocIK dIJI napIN B MOJOKO a6oBpiDHy,IO NOTpioHO HarpITn (MaHOnOHK 11).
Поверніть кругли поразимькay (малюнок 1/G) Вліво B NOLOженя .Прилад поче CTВОрьати napу.На поатky 3 НOCИК моЖуть ВпастNi Dekiьka Kapeь B Bodи. Важлво: LTO6napa He BIXODиla Na3OBHi, HOCIK ДЯ пари He NOBINHETOPKATNCR OCHOBN EMHOCTI.
LlO6 npnHHnBvXiD napn Ha3OBHIOBepHtB kpyrnnI nepeMnKaU (MaJIHOK 1/G) BnpaBO BnoJIOXKeHHRA.
BicntabTe npiroTOBaHy piHny i nobepHItb nepemHKa npn B noJooKeHHHa DeKilbKa cekyHd. LcE BnBilbHnT 3aJIuKm MONoka a6o 3aIIuKu iHux piDn 3 HocHa. Ybara: Napa rapra.
I JINr OTPMAmHHn HIXHO, rYCTOI MOIOUHOI nIHKn Kpaue BIKOPNCTOByBaTH npOXOJOnHe MOJOKO 3i 3HNKeHOO JnPHicTH.
PnrotybaHHKanyuHo
HanoBHitb BeJIky KoΦeIHy yaIky ecnpco Ha S a6o s. 3aNoBHitb yaIky cniHeHM MOJOKOM Do Bepxv. IocnIte TpoIKN kaKao nobExpM MoJouHOi NiHKn.
3.HarpibAHNA BOHN
ecnpeco He IJIeTbca:
- IpekeKoHaITeCra, 100 eMHiCTb DnB OBDi 6yIa HApOBHeHa i npaBnIbHO BCTaHOBJIeHa.
- IpekeKoHaITeCra, lo TpImaU φIbItpa npabHbHO BCTaHOBNeHO B φIKcAtop.
- IpekeHaiTeec, 10 nepeMkaB Oda/napa (MaIHOK 1/B) B nOLOKeHHi a Kpyrni nepeMkaCnIy BOuN, napi i rapAou BoOn (MaIHOK 1/G) NOBepHeo BnpaBO B nOLOKeHH.
-He cnpecobyIte MeIeHy KaBy BΦIbTpI dYke CnIbHO.
-ПоунстьфлгдзэварюВанн. -
PpOBeiTb npOeIpy DeKaIbUuHaui II pPnlaNy.
-
NiHka He CTBOPHOETbca, RAK NOTpiHO:
IpekeKoHaTecra,IOBΦIbTpioDCTaTHbO MeJeHO KaBN.
- 3aBxJn BnKOpNCToByIe CbIxMyMeJIeHy KaBy.
-He cnpecobuyMeIeHy KaBy DyKe CnIbHo.

- Sikkerhed under reparation
- Equipment (Figure 1)
- Safety instructions
- Safety when setting up the appliance
- Safety when operating the appliance
- GB
- Safety during cleaning
- Safety during repairs
- Prior to using the appliance for the first time
- Making an espresso
- Adding water (Figure 2)
- Switching on the appliance / preheating cups
- 3.Adding espresso grounds (figures 3,4,5)
- Screwing on the filter holder (Figures 6, 7)
- Placing cup(s) underneath (Figure 8)
- Brewing an espresso
- Removing the drip tray (Figure 9)
- Creating steam/frothing milk (Figures 10, 11)
- Switch on the appliance.
- Creating steam/frothing milk
- Making a cappuccino
- Heating water
- Cleaning and care
- Daily care
- Cleaning (figures 12, 13, 14, 15, 16)
- Steam nozzle
- Drip grating and drip tray
- Cleaning the brew filter
- Decalcifying
- What to do if...
- Technical data
- Disposal
- Packaging material
- Old appliance
- Chere cliente, Cher client,
- (figures 12, 13, 14, 15, 16)
- (Fig. 12, 13, 14, 15, 16)
- Ligar o aparelho / Pre-aquecer as chavenas
- (slike 12, 13, 14, 15, 16)
- CbuectByBa onaCHOCT OT n3rapHe.
- БezoinacnoCT npn NOuchTbaHe
- БezonaHocT npn pemOHr
- PnroTbHe Ha kanyuHNo
- 3aŋpaBHe Ha Boda
- NouchteBaHe n noDpBxka
- EkeHHeBHa noDpBxxka
- Почистван (Фигури 12,13,14,15,16)
- Baanuka n pewetka 3a otcejdahe
- OTCTpaHЯBaHe Ha KOTJIeH KaMbK
- BG
- KaKBO Da HaNpaBNTe, aKO...
- TexHnueckn daHHN
- 3XBbPJIaHe
- OnakobbyeH MaTepnaI
- Ocταργι ηρεδ
- RUS
- YbKaemar NOKyNaTeNbHnca, YBaKaembI NOKyNaTeMb!
- Ochauene (Pnc. 1)
- !
- Yka3aHnI NO TexHnKeI NaCHOCTN
- Mepb6e3onacnoctn npuyctahOBke
- Меры 6e3oIaChOCTn npH 3KcnJyatauH
- PnroTOBneHne kanyuHHo
- 3.HarpeBaHne BoDbl
- UncTka n yxOJ
- EkeHHeBHyxOa
- UHCTka
- (Pnc. 12, 13, 14, 15, 16)
- Hnkakyo qactb Maunhbl HeIb3MaBtB NocydomoeHoh MaunHe!
- ConJIO JIJI B36HBAHHaMOJUHOH neHbI
- KaneJbHa paWeTka n KanelbHbI noDOn
- Ynctka 3abapouHoro fNJIbTpTa
- YdaJIeHHe NaKInn
- UTo DeJaTb,ecnI...
- TexHnueckne daHHbIe
- YTNH3aCnA
- YnakobOuHbIe MaTePnabli
- Ctapbipnpbop
- UA
- 山ahOBHHn nokynecb
- PnHroTyBaHHe ecnpeco
- HanobHeHH BDOIO (ManHOHOK 2)
- BMHKaHHn npHJaDy / nonepdHe nporpibaHHaawok
- 3acnnaHHMaIeHOI KaBn (MaJIHOHKn 3,4,5)
- 4.3arBHHcYBaHHr TpHmaya iJbTpa. (MaHOnKn 6,7)
- 5.YcTaHOBka YaUKN (YaUOK) BHN3y (MaJIHOHOK 8)
- Ппготуваши ecnpесо
- 7.ЯкзгтутaitioДТСИКАнн(ManIOHOK9)
- CTBOpENHn napn/cniHIOBaHHaMOJOKa (MaJIOnKn 10, 11)
- 1.BbimKHTb npHJa.
- CTBOpEHNApH/cNIHOBaHH MoJOKa
- PnrotybaHHKanyuHo
- 3.HarpibAHNA BOHN
Brand : AEG-ELECTROLUX
Model : EEA150
Category : Coffee machine