KCH 1761 B E - Range hood Kernau - Free user manual and instructions
Find the device manual for free KCH 1761 B E Kernau in PDF.

User questions about KCH 1761 B E Kernau
0 question about this device. Answer the ones you know or ask your own.
Ask a new question about this device
Download the instructions for your Range hood in PDF format for free! Find your manual KCH 1761 B E - Kernau and take your electronic device back in hand. On this page are published all the documents necessary for the use of your device. KCH 1761 B E by Kernau.
USER MANUAL KCH 1761 B E Kernau
INSTRUKCJA MONTAŻU I OBŁSUGI OKAPU KCH 1761 XE KCH 1761 BE
natural_image
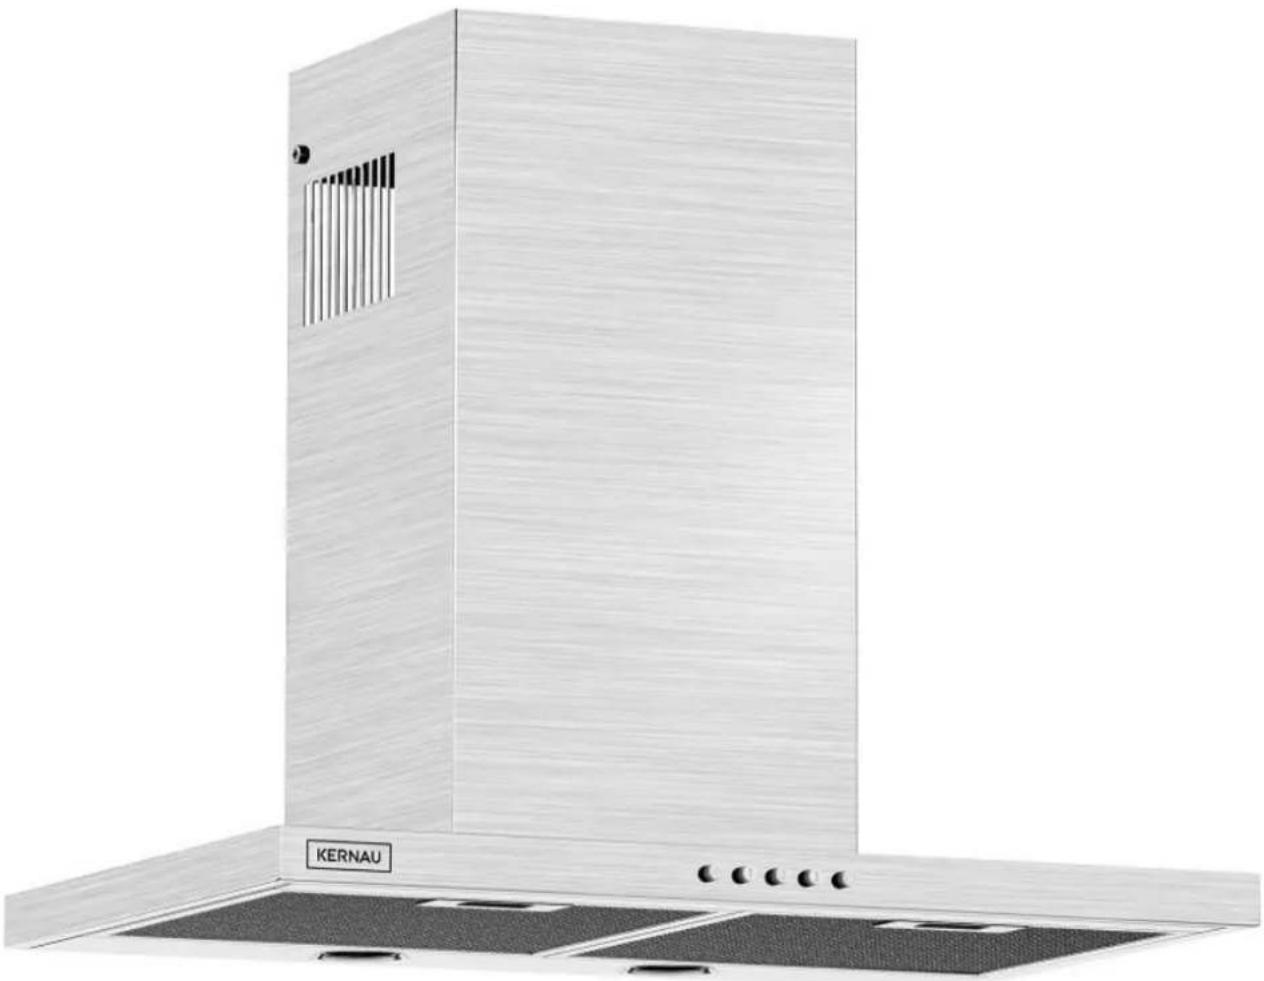
Illustration of a stainless steel kitchen tower with ventilation grilles and a labeled 'KERNAU' on the base (no additional text or symbols)www.kernau.com

natural_image
Pure mechanical diagram showing a lever mechanism with no text or symbolsS1

natural_image
Simple line drawing of a spiral shape with directional arrows, no text or symbols presentS2
S3
S4
natural_image
Technical line drawing of a mechanical component with no visible text or symbolsS5
SZANOWNI KLIENCI,
MANUAL INSTRUCTION OF KITCHEN HOOD
KCH 1761 XE / KCH 1761 BE

natural_image
Exterior view of a stainless steel kitchen tower with visible ventilation slots and a 'KERNAU' label (no additional text or symbols)www.kernau.com

natural_image
Pure mechanical diagram showing a lever and pivot mechanism without any text, numbers, or symbolsS1
natural_image
Simple line drawing of a mechanical or fluidic component with directional arrows, no text or symbols present.S2

S3

S4

natural_image
Technical line drawing of a mechanical component with no visible text or symbolsS5
DEAR CUSTOMER,
You have become users of the latest generation kitchen hood type KCH 1761 XE / KCH 1761 BE. This hood was designed and made especially for fulfillment of yours expectations and it will certainly be part of a modern equipped kitchen. Modern constructions and new technology used in it ensure high functionality and aesthetics.
Please read this manual carefully before installation of kitchen hood. Thanks to this You will avoid incorrect installation and maintenance of the kitchen hood.
We wish ou satisfaction with the choice of our company's hood.
Contents:
Technical parameters....12
Operation conditions....12
Purpose and type of work....14
Power connection....14
Hood installation....15
Maintenance and cleaning....15
rease filter....15
Carbon filter....16
Replacement of lightening....16
Mechanical control....17
Removing used appliances....18
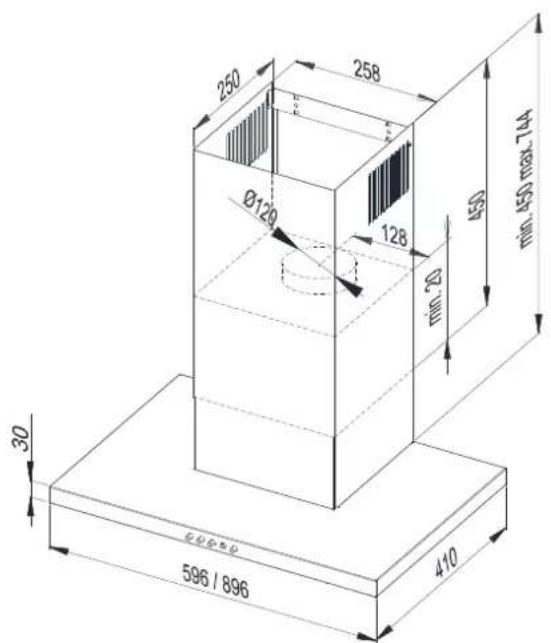
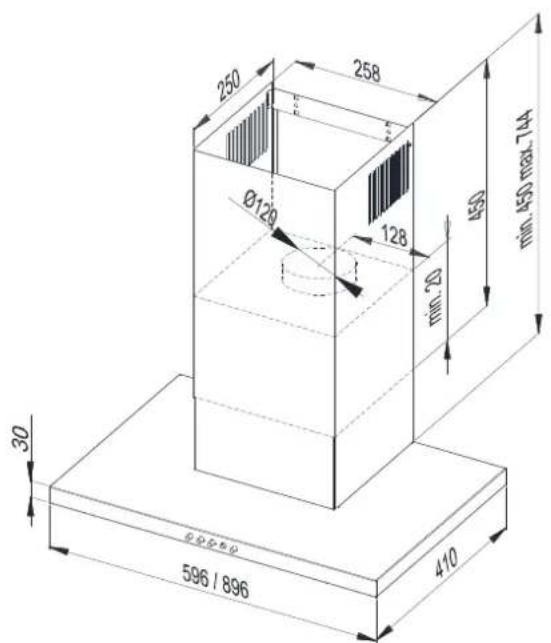
TECHNICAL PARAMETERS
Efficiency 305m3/h
Rated voltage 220-240V \~50Hz
Total power 121 W
Lightbulb power 2x3W (Max 3W, GU10)
Air outlet ∅120mm
OPERATION CONDITIONS
- When installing the device, comply with the conditions and guidelines contained in these instructions for use.
- The manufacturer declines all responsibility for damages resulting from the installation inconsistent with the information given in this manual.
- The hood may differ in appearance from the hood shown in the drawings of this manual, but the recommendations for operation, maintenance and assembly remain unchanged.
- The device is intended for home use. The warranty conditions change when used for the catering business.
- Keep the operating instructions in order to be able to use them at any time. If you sell the device or move out form your residency, make sure that the operating instructions are included with appliance.
- Carefully read the operating instructions, which provide accurate information regarding installation, use and care of the device.
- Do not make any electrical or mechanical changes to the device or the drain lines.
- Do not pull the plug out of the socket by pulling the cord.
- The power cord must not touch a hot surface.
- Do not operate the device if the power cord is damaged.
- Any changes made to the construction of the hood by persons without the appropriate permissions result in exclusion of the manufacturer's liability for the product.
-
The hood should never be used as a support surface, unless such possibility has been clearly indicated.
-
The kitchen hood is used to remove kitchen vapors outside, it should be connected to adequate ventilation duct (do not connect it to chimney, smoke, flue ducts in use).
- If, in addition to the hood, other non-electric devices are used in the room (e.g. liquid fuel stoves, flow heaters, thermostats), sufficient ventilation should be ensured.
- Unplug the appliance from the socket before each cleaning operation, filter change or before carrying out any repair work.
- Do not connect the device to the mains before completing assembly.
- All assembly and maintenance operations should be carried out using protective gloves.
- Before connecting the hood to the mains power supply and checking its proper operation, always check that the power cable has been correctly installed and that it has not been crushed by the hood during installation.
- Never use the hood without properly installed filters.
- To the range necessary for the application of technical and safety measures regarding the discharge of flue gases, the regulations issued by the competent local authorities must be strictly observed.
- The kitchen hood should be cleaned inside and outside (min once at month, according with maintenance tips given in these manual), overheated fat is flammable.
- Under the kitchen hood do not leave the open fire. Set the minimum flame when removing dishes from the burner.
- The use of open fire is dangerous to filters and creates the risk of fire, so do not under any circumstances. When frying, be careful not to overheat the oil so that it does not ignite. Available parts can become very hot if used together with cooking appliances.
- Damaged the power cord should be replaced with special cord available at manufacturer or specialist repair shop.
- The vapors cannot be discharged in the chimney duct used to remove flue gas from appliances burning gas or other fules (do not apply to closed circulation).
- If the cleaning process is not carried out according to the instructions, there is a risk of fire.
-
To aviod electric shock, do not use or leave the hood without correctly installed lightbulbs.
-
This device has markings in accordance with EU Directive 2002/96/EC on waste electrical and electronic equipment (WEEE). By ensuring that this device is disposed properly, you will help reduce the risk of the product's negative impact on environment and human health, which can occur if the product is disposed incorrectly.
CAUTION!
The device is wrapped in foil, which may cause a danger situation. To avoid the risk of an accident, keep the foil away from children. Also do not allow children to play nearby or use the hood.
PURPOSE AND TYPE OF WORK
This hood is intended to work in suction mode witch the discharge the vapors to the outside or to work in filtering mode with internal recirculation, closed circuit.
POWER CONNECTION
The mains voltage should comply with the conditions specified on the rating plate located inside the hood. If the hood is equipped with plug, it should be placed in a socket that meets the requirements of applicable regulations and located in easily accessible place. If the hood is not equipped with plug, installation of the hood entrust to the qualified technician.
CAUTION!
Before reconnection the hood circuit to the power supply and checking if works correctly, should always make sure if the cord is properly mounted. The hood is equipped with special power cord. In case of damage this power cord, please order it in service center.
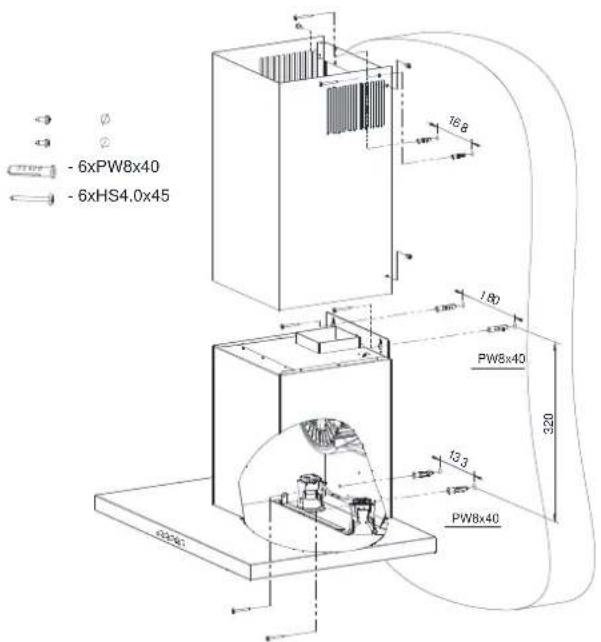
HOOD INSTALATION
The minimum distance between the surface on which the dishes on the heating device are located and the lowest part of the kitchen hood should be not less than 45cm in the case of electric cookers and not less than 65cm in the case of gas or electric-gas cookres. If the heating appliance manual instruction indicates a grater installation distance for the kitchen hood, please follow these indications.
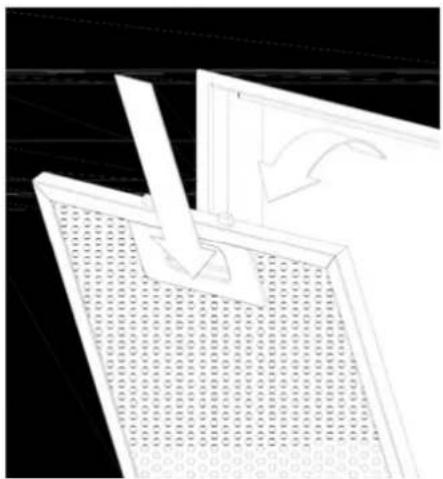
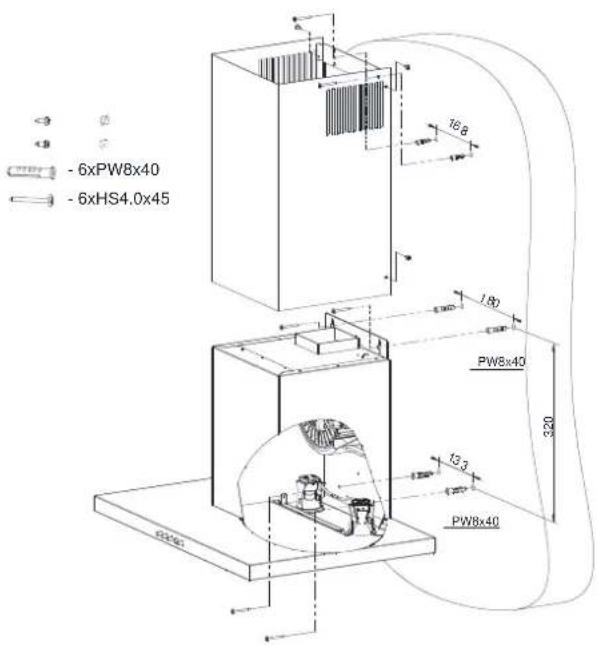
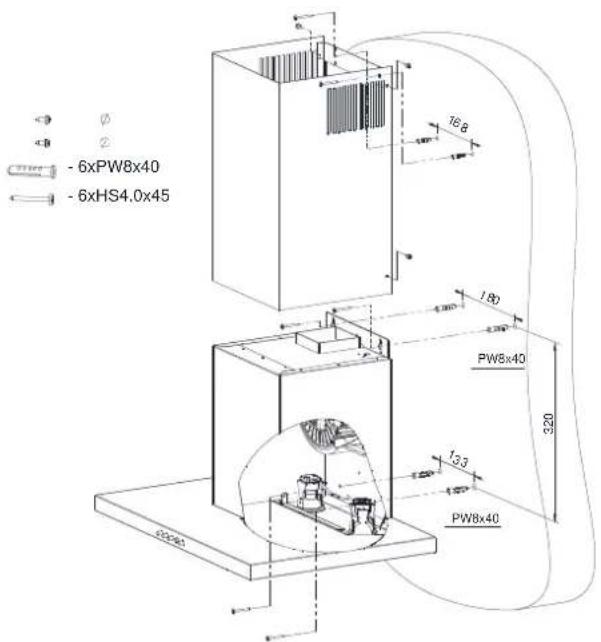
Installation of the hood and the hood casing pipe is shown in Figure S3.
When installing the hood, obey the general regulations regarding the discharge of air from the room. It should be taken into account that the use of spiral aluminium pipes limits the hood's efficiency and increases the volume of air flowing.
MAINTENANCE AND CLEANING
Before undertaking any operations related to the maintenance of the device, disconnect the hood from the power supply network. The device should be washed with specialized agents for surfaces made of stainless steel. The hood should be cleaned with mild agents, do not use abrasives. Regular maintenance will improve the operation of the hood.
DO NOT USE ALCOHOL!
CAUTION!
Failure to comply with the regulations regarding cleaning of the device and replacement of filters creates the risk of fire. It is therefore recommended to follow the given instructions. The manufacturer is not responsible for any damage to the engine or fires resulting from non-compliance with the maintenance rules and the instructions mentioned above.
GREASE FILTER
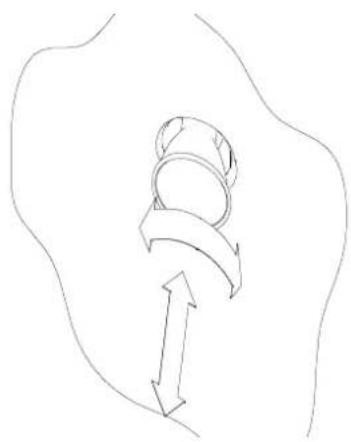
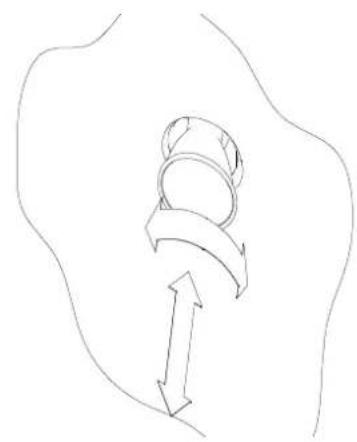
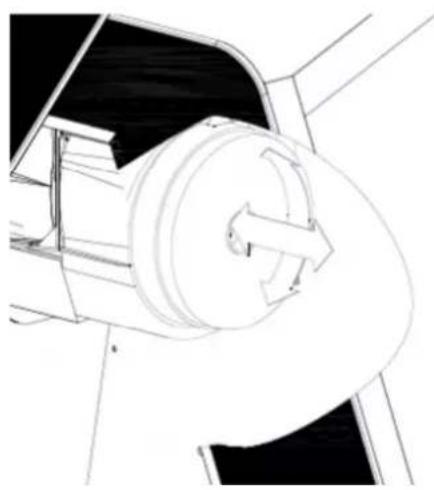
The hood is equipped with an aluminum filter. The filter is removed by moving the locks in the direction shown by the arrow (figure S1). The filter should be washed by hands as follow: by immersing it in water with a liquid at a temperature of 40-50 °C for 15 minutes.
After the 15 minutes, start washing and rinse the filter thoroughly. The filter must be completely dry before placed in the hood again. A filter that is not cleaned regularly reduces hood efficiency an can cause fire. When washing in the dishwasher, filter may change color or discolor, but this does not affect its filtering properties.
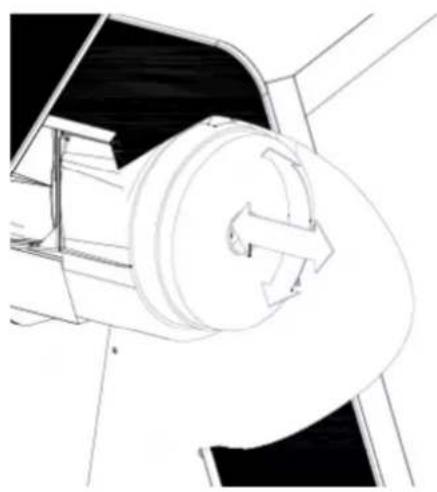
CARBON FILTER (for closed circiut Fig. S5)
The hood may be equipped with the carbon filters. Carbon filters are use only when the hood is not connected to the ventilation duct. Filters should be installed on turbin housing as shown figure S5. In this case, the purified air is forwarded back to the room. The hood should not be connected to the ventilation ducts. In order to ensure proper hood operation and effective odor absorption, the carbon filters should be repalced regularly (every 3 to 6 months) depending on the intensity of use of the hood. The carbon filter is not a standard equipment of the hood ant it is an additional paid option.
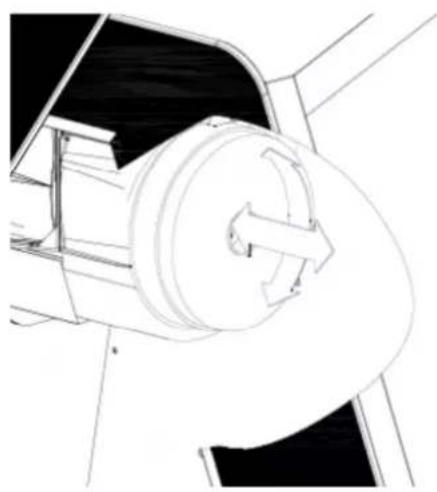
REPLACEMENT OF LIGHTENING (Fig. S2)
Before undertaking any operations related to the replacement of lightbulbs, the hood should be disconnected from the power supply network. If the hood was corectly disconnected from the power supply, please wait a few minutes, and after the cooling the lightbulb, it can be replaced.
CAUTION!
Do not touch light bulbs as long as they are hot. Be careful not to touch directly the halogen bulb with bare hands.
Replacement aluminium filter - fig. S1
Replacement of lightening - fig. S2
Installation of the kitchen hood - fig. S3
Dimensions of the kitchen hood - fig. S4
Replacement carbon filters - fig. S5
MECHANICAL CONTROL
Turbine operation control:
- 0 - turns off the turbine
• 1 - turbine operation at minimum speed
• 2 - turbine operation at average speed
• 3 - turbine operation at maximum speed
Turbine is started by pressing the selected buton. Higher gear means grates air flow.
The button which is located near to the lightbulb symbol, serves to turning on / off the hood light:
WAYS TO REDUCE IMPACT OF COOKING ON ENVIRONMENT
To reduce the consumption of the energy should prepare the meals in the dishes under the lid. The aluminium filters need to be kept clean. Recommended working time of the aluminium filter between its cleanings is 35h of the hood's work.
Keep ventilation ducts clear on regular basis. The turbine operating level during cooking should always be set to the minimum gear that will allow the removal of vendors at the current cooking intensity.
The technical data in this manual and ona the attached labels were obtained by carrying out measurements and calculations in accordance with the requirements of EU Regulations No. 65/2014 and 66/2014.
REMOVING USED APPLIANCES

Rys. A
Rys. B
This device has been designed and manufactured of high-quality reusable materials and components.
The symbol of the crossed waste container placed on the product (Fig. A) means that the product is subject to selective collection in accordance with the provisions of Directive 2012/19/EU of the European Parliament and of the Council. A crossed-out wheelie bin symbol (Fig. B) placed on the product means that the product contains batteries that are subject to separate collection in accordance with the provisions of Directive 2006/66/EC of the European Parliament and of the Council. Such marking informs that electrical and electronic equipment and batteries (if any) must not be disposed of with other household waste after the period of use.
The user is obliged to return waste equipment and batteries (if any) to collection points for waste electrical and electronic equipment and batteries (if any). Collectors of such waste, including waste equipment collectors, treatment plants, distributors (shops), municipal waste separate collection points (municipal units), and other entities specified by law form an appropriate system to return this kind of equipment.
Correct disposal of waste equipment and batteries (if any) allows avoiding consequences that may be harmful to health and the environment, caused by the possible presence of hazardous components in the equipment and batteries, and inappropriate storage and processing of such equipment and batteries. Households play an important role in contributing to the reuse and recovery, including recycling, of waste equipment. At this stage, attitudes are formed, affecting the common good, which is a clean natural environment.
Moreover, households are one of the largest users of small equipment and the rational management thereof at this stage affects the recovery of secondary raw materials.
Penalties may be imposed in accordance with national legislation for improper disposal of this product.
If the device has a lock, please remove it for the safety of all persons who may later come into contact with the device.
Some refrigerators and freezers contain insulation material and CFC refrigerant. Therefore, be careful not to pollute the environment when you dispose of your old refrigerator.
NÁVOD
K MONTÁ IAO L EDI E TO E
KCH 1761 XE
KCH 1761 BE

natural_image
Illustration of a stainless steel kitchen tower with ventilation grilles and a 'KERNAU' label (no additional text or symbols)www.kernau.com
KERNAU
natural_image
Pure mechanical diagram showing a lever and rotating component without any text or symbolsS1
natural_image
Simple line drawing of a curved object with an arrow indicating upward motion (no text or symbols)S2
S3

S4
natural_image
Technical line drawing of a mechanical component with no visible text or symbolsS5
V E A C,
natural_image
Illustration of a stainless steel kitchen tower with ventilation grilles and a 'KERNAU' label (no additional text or symbols)www.kernau.com

natural_image
Pure mechanical diagram showing a lever and curved arrow mechanism without any text or symbolsS1

natural_image
Simple line drawing of a spiral arrow emerging from a curved surface (no text or symbols)S2
S3
S4
natural_image
Technical line drawing of a mechanical component with no visible text or symbolsS5