CK502 - Oven Manta - Free user manual and instructions
Find the device manual for free CK502 Manta in PDF.

User questions about CK502 Manta
0 question about this device. Answer the ones you know or ask your own.
Ask a new question about this device
Download the instructions for your Oven in PDF format for free! Find your manual CK502 - Manta and take your electronic device back in hand. On this page are published all the documents necessary for the use of your device. CK502 by Manta.
USER MANUAL CK502 Manta
natural_image
Abstract black-and-white circular logo with interlocking curved shapes (no text or symbols)MANTA
Gass Cooker
CK502
Instrukcja obsługi
User's Manual
CK502GE
Instrukcja obsługi
UWAGA! 3
NFORMACJE OGÓLNE 5
WAŻNEWSKAZÓWKI 5
INSTALACJA 7
UŻYTKOWANIE KUCHENKI....17
WSKAZÓWKI DOTYCZĄCE UŻYTKOWANIA .....24
NAPRAWY I OBSŁUGI KONSERWACYJNEJ URZĄDZENIA ......24
WSKAZÓWKI DOTYCZĄCE TRANSPORTOWANIA URZĄDZENIA. .....25
WYMIANA LAMPY....27
SPECYFIKACJA....29
Manual
NOTE! 31
GENERAL INFORMATION ....33
IMPORTANT NOTES....33
INSTALLATION 35
text_image
Technical diagram of an open oven with labeled dimensions and component layoutnatural_image
Pure technical line drawing of a mechanical assembly without any text, numbers, or symbolstext_image
Safety warning symbol and diagram showing a crossed-out cigarette and a plug with a plus sign, indicating no need for smoking or discharging.natural_image
Technical line drawings of mechanical components, including a cylindrical component and two circular housing (no text or symbols)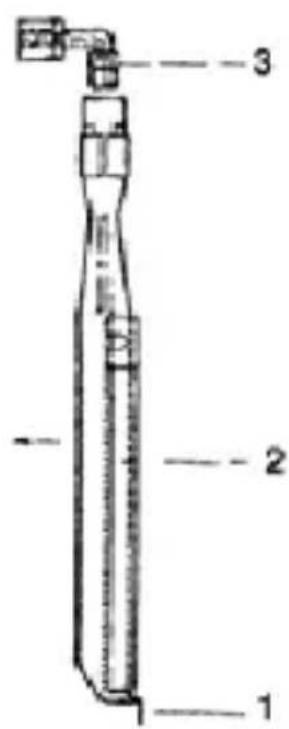
text_image
1 2 3text_image
Exploded view diagram of a kitchen appliance with numbered parts for identificationnatural_image
Simple line drawing of a pot with two crossed lines indicating resistance or crossed-out (no text or symbols)Žle
natural_image
Simple line drawing of a ceramic pot with lid and base (no text or symbols)Dobrze
UŻYTKOWANIE PIEKARNIKA TURBO\*
natural_image
Pure technical diagram of a mechanical component with no text, numbers, or symbolsSystem statyczny
WSKAZÓWKI DOTYCZĄCE UŻYTKOWANIA, NAPRAWY I OBSŁUGI KONSERWACYJNEJ URZĄDZENIA:
natural_image
Simple line drawing of a plug with a circular target symbol inside, no text or labels present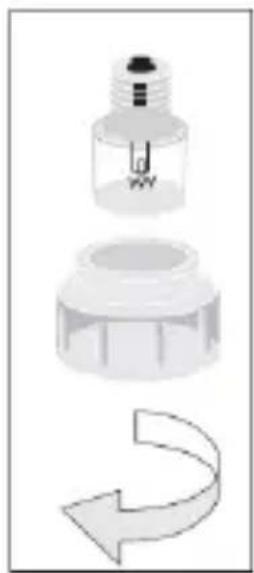
natural_image
Diagram showing a light bulb with internal components and a curved arrow indicating rotation (no text or symbols)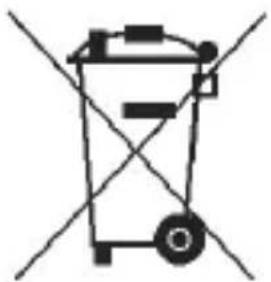
natural_image
Simple line drawing of a trash bin with crossed lines indicating no waste or plastic (no text or symbols)- The equipment should be installed according to the applicable law and used only in well ventilated rooms. READ THE MANUAL BEFORE INSTALLATION AND USE.
- Connecting the oven to the internal gas installation or to a liquid gas cylinder and adjusting it should be only done by a certified installer of gas devices or a technician from an authorised maintenance service, in line with the applicable rules, which should be confirmed in the warranty card for the product. No such confirmation shall make the warranty void.
- Before installing, make sure the local conditions for distribution (gas type and pressure) and the settings of the equipment comply with the conditions specified in the rating plate. It should be installed and connected in accordance with the current regulations related to installation. A special attention should be given to the relevant requirements related to ventilation.
- Using cooking equipment causes heat and humidity in the room it is installed. Make sure the room in which the cooker is located is well ventilated. Make sure the ventilation grid is always open or install a forced ventilation system (kitchen hood).
- Long-standing and intensive use of the equipment may require additional ventilation, e.g. opening windows or improving the efficiency of the ventilation, e.g. mechanic ventilation, if used.
- The product should be installed after being seasoned for 8 hours in the kitchen.
- The positioning of the cooker should comply with the requirements set out in the point „POSITIONING OF THE COOKER”.
-
The manufacturer shall not be liable for injuries or damages caused by the incorrect installation of the equipment or its incorrect usage.
-
In the case of a failure of the equipment, especially when the gas leaks, the cooker must be cut off from the gas and the maintenance service be contacted immediately.
- No independent changes or upgrades are permitted, otherwise the warranty shall be deemed void.
- Cookers should be repaired only by an authorised repair shop. Incorrect repairs may pose a significant threat.
- The cooker must not be lifted by the handle of the oven.
- The packaging materials may be used for recycling.
- A used cooker should be destroyed in a way that prevents its reuse. The doors should be removed as they are a threat, especially for children. Next, the equipment should be disposed of with specialised entities dealing with waste or recycling.
- The cooker becomes hot when operating. Take due care when taking food in and out of the oven. The heating elements inside the oven are very hot.
- When operating the oven, its glass pane and external elements are significantly heated - take note of children when this function is used.
GENERAL INFORMATION
The gas cooker is designed for preparing dishes, in households only.
Using the cooker for other purposes is not permitted!
IMPORTANT NOTES
- The cooker becomes hot when operating. Be careful not to touch the hot elements inside and outside of the burner.
- The connection ducts of the mechanical household appliances used nearby the cooker that is turned on should be away from the hot elements. Make sure they are not trapped by the hot oven door.
- When using the oven, the cover should always be open.
- Use protective gloves when taking food off the gas plate and out of the oven.
- Overheated greases and oils may be ignited. Therefore always supervise the dishes being prepared using them.
- Before closing the lid, turn off all burners.
- Notice if all elements of the burners are correctly positioned before using them.
- Store inflammable objects away from the burners.
- Do not line the oven with aluminium foil, do not place the baking tray on the bottom of the oven.
- Do not store objects that are inflammable or sensitive to higher temperatures.
- When the oven is operated, some parts of the kitchen may be hot. Keep young children away from the equipment.
- Do not overload the open door of the oven. Never sit or stand on it. Keep special attention to children.
- Do not use the equipment for heating rooms.
-
If the gas leaks:
• turn off the valve on the gas installation or the cylinder, -
put out all burners and other inflammable sources,
• air the room thoroughly, open windows, - do not operate electric devices (including the light),
• report the issue in an authorised repair shop or call a certified installer.
15.The user may not:
- independently convert the cooker to run on another type of gas, introduce changes to the oven installations, and move the equipment to another location,
- independently repair the cooker outside of the scope of repairs listed in the operation manual,
- use the equipment in a room with no working ventilation,
- use the cooker in conditions of hindered access.
PREPARATION
- After unpacking, check if the equipment has no visible damages. Never connect the cooker that was damaged in transportation.
- Remove the sticker from the door of the oven and the stickers from the gas plate which secure the burners and the grid. Wash all parts from the remains of the glue from the stickers.
- Parts covered with enamel and made of glass should be cleaned using a soft, moist cloth.
- Take out the equipment of the oven and wash it in warm water with washing-up liquid.
- Check if the individual elements of the burners are positioned correctly.
- Close the door of the oven and turn it on for ca. 30 minutes. After cooling down, wash and dry the oven.
INSTALLATION
The instructions below are meant for a professional installer.
Those instructions are to ensure that the actions related to the installation and maintenance of the equipment are performed professionally.
After unpacking, check if the equipment has no visible damages. Never connect the cooker that was damaged in transportation. Remove the stickers and wash the cooker from the remaining glue from the stickers.
POSITIONING OF THE COOKER
- The kitchen should be dry and airy and have working ventilation in line with the applicable technical regulations. The legal basis, based on which we assess if the gas cooker is fit for installation is the Regulation of the Minister of Infrastructure dated April 12, 2002 on technical conditions that should be met by buildings and their locations (Journal of Laws, 2002, No. 75, item 690).
- The room should be equipped with ventilation system that drives off the combustion fumes from the room. The installation should consist of a ventilation outlet or a hood. The hoods should be installed in line with the instructions from the manuals attached. The positioning of the cooker should guarantee unrestricted access to all controlling elements.
- The room should also guarantee access of fresh air, which is necessary to burn gas correctly. The air supply should not be less than 2 m3/h for burner power of 1 kW. The air may be supplied as a result of direct flow from outside via a duct with a minimum cross-section of 100 cm2, or indirectly from the neighbouring rooms, which are provided with ventilation ducts leading outside.
- If equipment is used intensively and for a long time, it may be necessary to open the window for improved ventilation.
- Liquid gas is heavier than air and therefore it has a tendency to gather at lower levels. The rooms in which the gas cylinders are installed should be equipped with ventilation ducts, led outside, allowing the gas to escape in the case there is a leakage. For the same reason, the gas cylinders, both empty and full ones, should not be either stored or installed in rooms that are situated underground (e.g. cellars). Cylinders may not be located too close to sources of heat (stoves, chimneys, ovens, etc.), which could increase temperature inside the cylinder above 50°C.
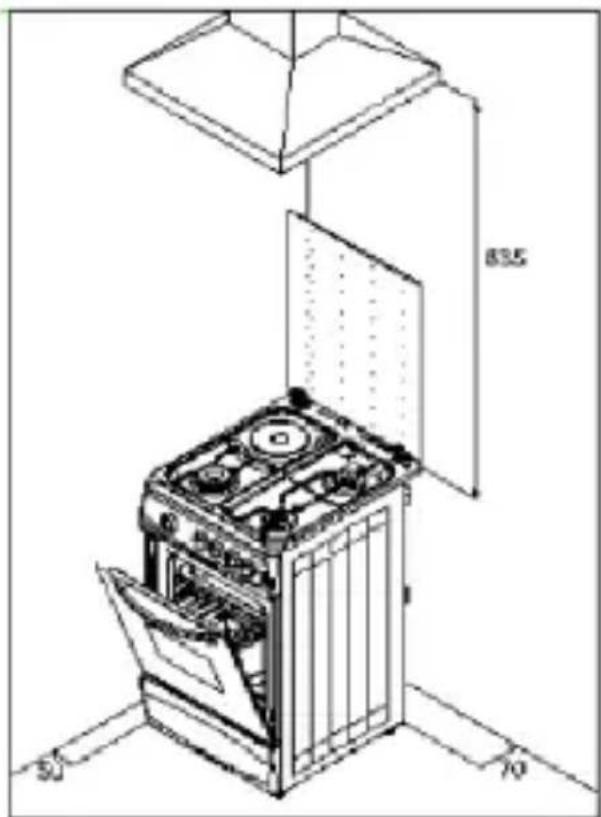
- When installing the gas cooker, put special attention to ensure protection of the surrounding surfaces against overheating; the cooker should be located in line with the dimensions indicated in the figure below. If the cooker is located near furniture, make sure the furniture does not reach beyond the height of the working plate. Furniture above that level is not recommended. Furniture situated near the kitchen must have veneers and glue resistant to the temperature of 100^ . Failure to meet this condition may cause deformations of the surface or veneers peeling. The wall behind the cooker should be resistant to high temperatures.
text_image
Technical diagram of an oven with labeled dimensions and component layout• Fig. Positioning of the cooker
- The cooker should be set on a hard, even floor (do not set on any type of a stand).
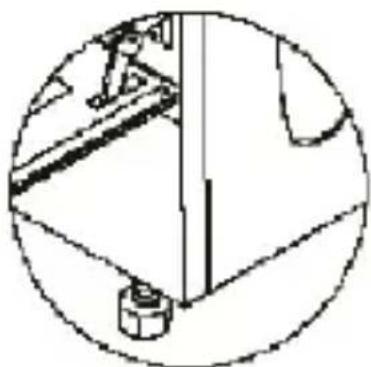
- Before starting to use the cooker, level it, which is especially important to ensure the grease melts evenly on a frying pan. Use the adjustment feet under the cooker.
• The cooker has feet that can be adjusted to level out uneven floors. The feet can be accessed after tilting the cooker to the side.
natural_image
Pure technical line drawing of a mechanical assembly without any text, numbers, or symbols- The positioning of the cooker should guarantee unrestricted access to all controlling elements.
• The cooker should be installed away from combustible materials. The wall of the room adjoining the cooker should not be made of combustible materials.
- In order to limit the negative influence of the draughts on the operation of the burners, the cooker should not be located in line with a window and a door.
- Above the cooker, free space should be provided for the outflow of kitchen vapours. It is best to install a kitchen hood that will absorb or drive off those vapours. The distance between the hood and the plate should be at least 635 mm. No kitchen cabinets should hang over the cooker.
• After positioning it, the cooker should be connected to the internal gas installation or to a gas cylinder.
CONNECTING THE COOKER TO THE GAS INSTALLATION
Before connecting the cooker to the gas installation, make sure if the device complies with the local conditions (type of gas and pressure). If there are inconsistencies, replace the nozzles in the cooker and regulate the gas fittings.
- The cooker may be connected to the internal gas installation or to a
- gas cylinder.
- The cooker is equipped with a 1/2" connection pipe. Connect gas to the
- pipe using suitable equipment.
• Before starting connecting, the gas knob should be turned off.
Connection to natural gas
Connecting the cooker to the internal installation should be done in accordance with the applicable law and the regulations by a certified installer.
- Connection of the cooker may be fixed or using a flexible duct, certified for use.
- The connection of the pipe to the cooker is terminated with a cut-off valve. When the cooker is aligned in a row of kitchen furniture, the cut-off valve should be easily accessible.
Connecting the cooker to a gas cylinder (LPG)
- If the user intends to use a gas cylinder, the cooker should not be installed in a cellar or another room whose floor is below the ground level as liquid gas is heavier than air and it gathers at the floor level.
- When connecting the cooker to the liquid gas cylinder, a certified rubber duct should be used.
• Each time the cooker is connected to the gas cylinder, check the tightness of the valve on the cylinder and the connection of the regulator to the cylinder and its operation.
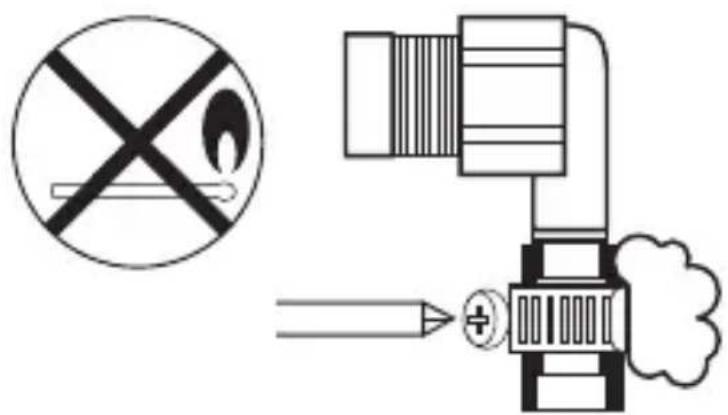
NOTE!
- Never check the tightness using an open flame (e.g. using matches or a candle). It poses the risk of explosion!
- Regularly, check the condition of the hose and the tightness of the connection, in line with the applicable regulations.
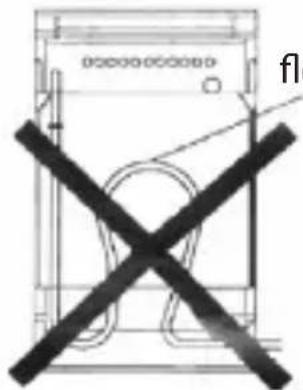
text_image
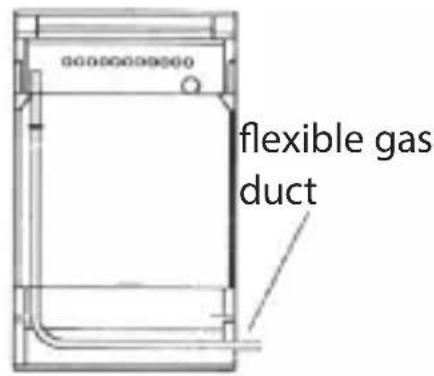
Safety warning diagram showing a no-smoking symbol and a plug inserted into a device with a plus sign, indicating hazard or safety warning.Laying flexible gas ducts
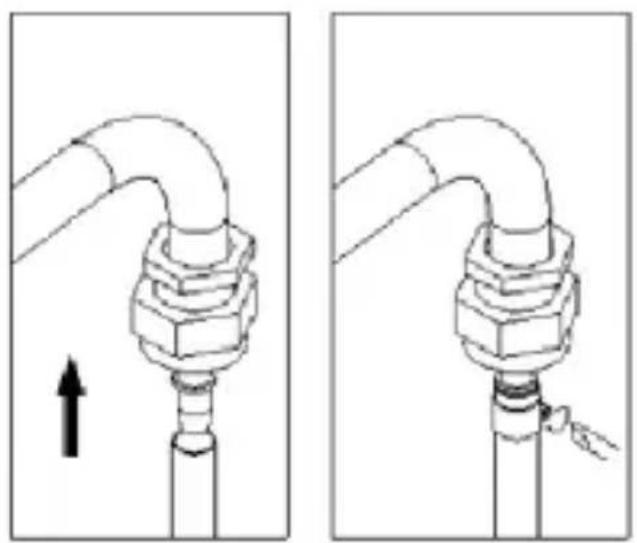
text_image
flexible gas ductCORRECT
text_image
floINCORRECT
flexible gas duct
natural_image
Diagram showing two mechanical pipe fittings with a valve, one upward and one downward (no text or symbols)Connecting a flexible gas duct is done using a duct certified for safety, with the maximum length of 1500 mm. The duct should be slipped on the connection pipe and secured against slipping off with a steel clamping ring.
Replacing the nozzles
The cooker is made to operate with the type of gas and pressure indicated on the rating plate
If gas is changed, replace the nozzles in the cooker and regulate the gas fittings.
Replacing the nozzles
- close the tap cutting off the gas installation or the cylinder from the cooker,
- close all taps in the cooker,
- remove the covers and rings of the burners and replace the nozzles.
-
remove the back panel of the cooker,
-
unscrew the nozzle from the burner's pipe, replace it with a new one,
- regulate the cooker's burners and the tap of the oven's burner,
• regulate the oven's burner,
After replacing the nozzles and regulating the kitchen, check the connections for tightness. Nozzle diameters or the individual types of gas are provided in the table below.
Table Nozzle diameters [mm]
| small burner medium burner large burner | |||
| G20-2E(G750) 0,70 0,93 1,35 | |||
| G30-3B/P(LPG) 0,50 0,60 0,75 | |||
natural_image
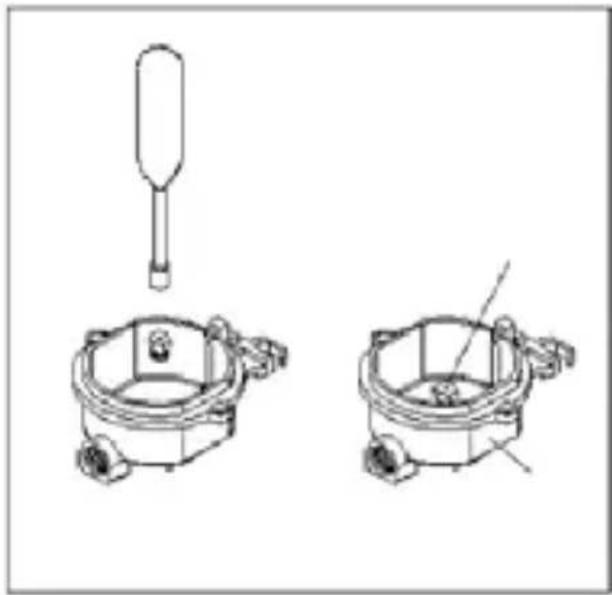
Technical line drawing of two mechanical components with a tool, shown from different angles (no text or symbols)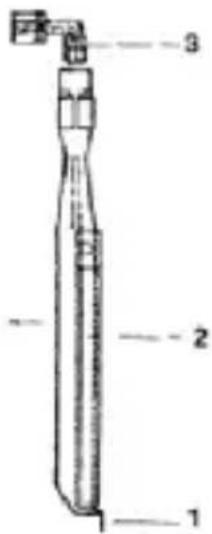
text_image
Technical diagram of a laboratory apparatus with numbered parts labeled 1, 2, and 3.Replacing burner nozzle:
- Unscrew the burner's screw
- Slightly pull out the burner by 2-3 cm and take it out
- Unscrew the nozzle and replace it with a nozzle according to the nozzle diameters table.
text_image
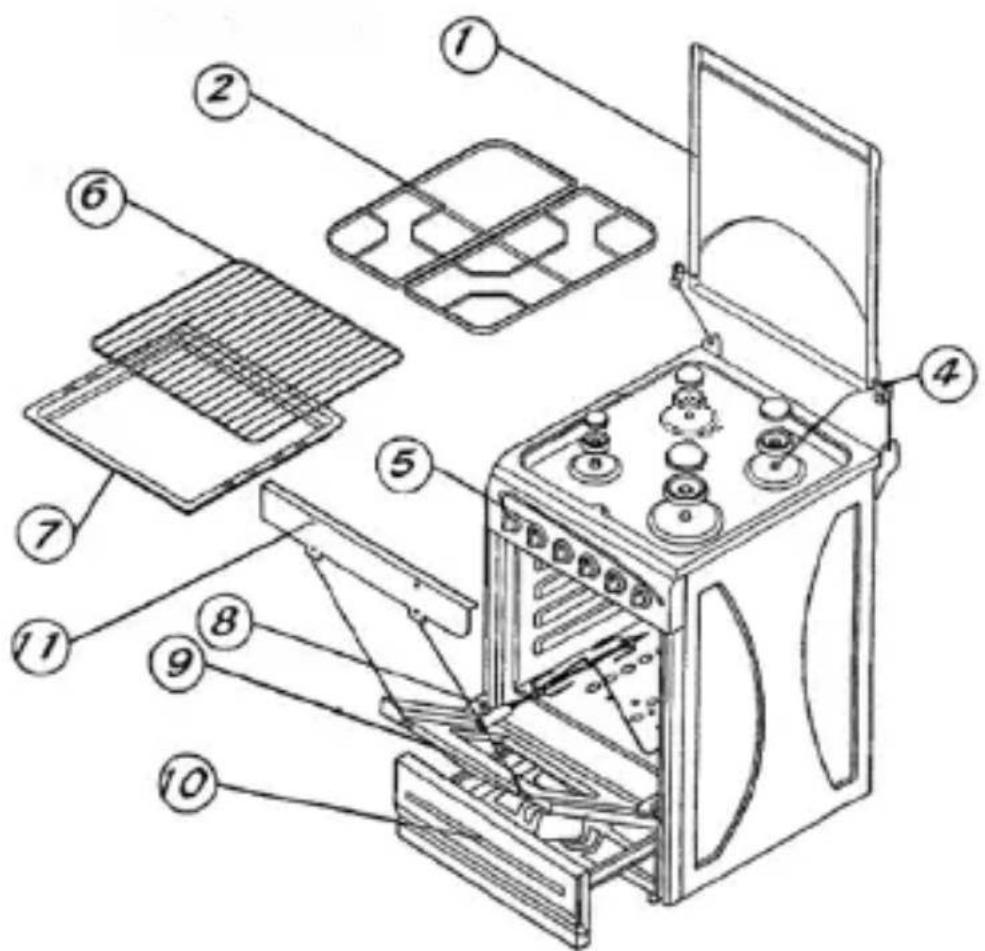
Exploded view diagram of a kitchen appliance with numbered parts for identification- Top cover
- Upper grate
- Gas burners and their covers
- Control desktop
- Grill
- Oven tray
- Rotating spit
- Oven door
- Lower drawer*
11.The tray for the grill
GAS BURNERS
- Do not put deformed or unstable dishes on the grid as they may fall and flood the burners.
- Do not remove the grids to put the dishes directly on the burners.
- Do not put empty dishes over ignited burners.
• Before taking dishes off the burners, reduce the flame or put it out. - The burners should be kept clean, as the dirt has a negative impact on their operation.
- The flow of gas in the individual burners is opened and closed using the gas knobs.
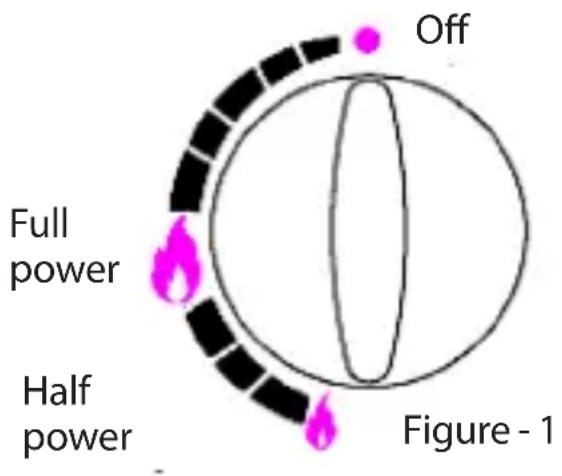
- Before igniting a burner, make sure the knob you want to turn matches the right burner that you want to use. The assignment of the knobs to the burners is presented visually over each knob.
Selecting the flame
- The flame should not reach beyond the bottom of the dish, but cover two-thirds of its surface. Such use will allow to save gas and the flame will not stain dishes.
- The size of the flame depends on the position of the knob. Full flame should be used until the food boils, and cooking further is done best using a smaller, economy flame.
- The size of the flame should be adjusted only between position

and

Igniting and putting out the burners
IGNITING
- press the knob of the selected burner until you feel its resistance, turn it anti-clockwise and put flame or spark to the selected burner,
• after igniting the gas, release the ignition button, - set the size of the flame.
PUTTING DOWN
- Burners are turned off by turning the gas knobs clockwise, to the zero position (burner off).
Before burning the first burner, open the valve on the gas cylinder and follow the directions as above.
When closing off the flow of gas, before turning off the last burner:
- turn off the valve on the gas cylinder,
• after putting down the flame, close the knob for that burner.
When the cooker is not in use, the valve of the gas cylinder should be closed.
Each gas burner is equipped with a gas valve, which has the 'push to turn' security feature.
text_image
Off Full power Half power Figure - 1The use of upper burners with maximum efficiency, follow the table below.
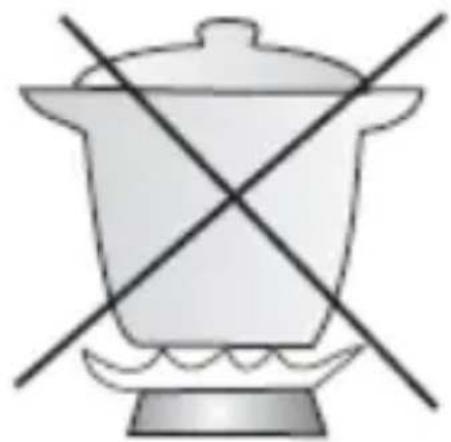
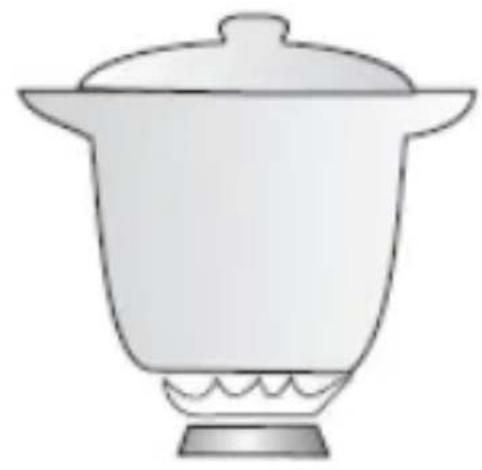
natural_image
Simple line drawing of a pot with two crossed lines indicating resistance or crossed-out (no text or symbols)Incorrect
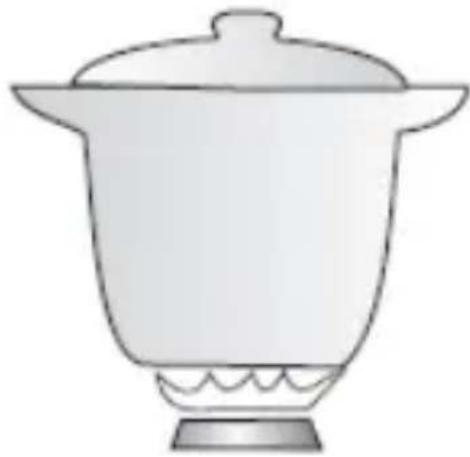
natural_image
Simple line drawing of a ceramic pot with lid and base (no text or symbols)Correct
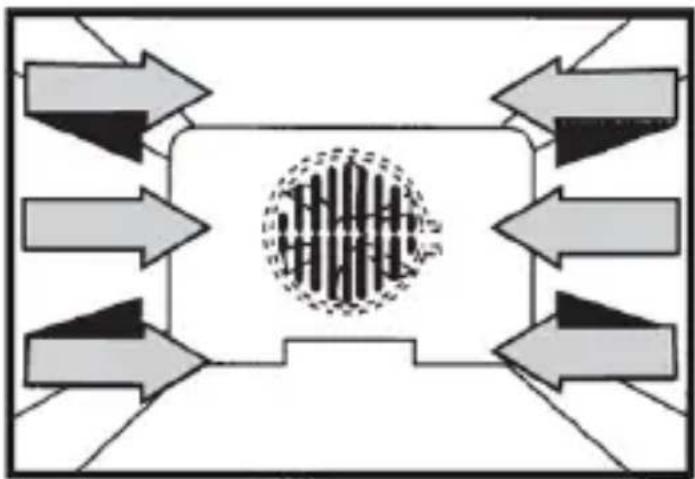
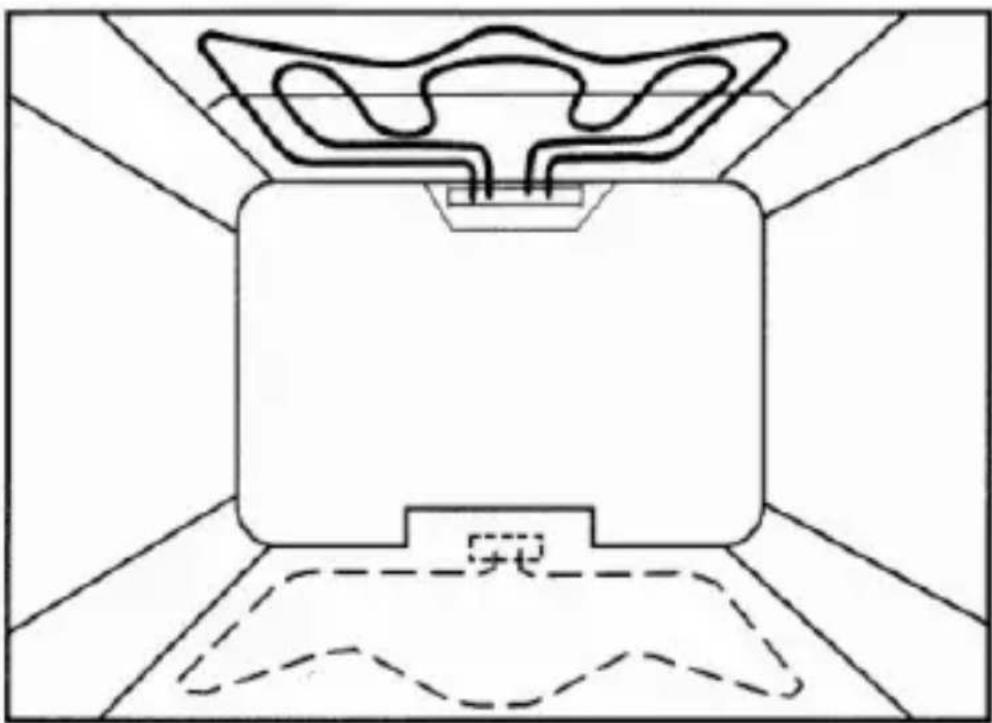
- thanks to the turbo system, more than one dish may be prepared. Therefore, you save time and energy.
• as the air flowing is dry, the smells do not mix. You can prepare such dishes as fish and chicken at the same time.
• as in the turbo system, the flow of hot air encompasses all dishes, they do not have to be turned over when cooking and baking. So the top and bottom part bake the same. - the oven may be used to quickly defrost meat and other frozen food.
• compared to the normal ovens, thanks to the fast circulation of air, the turbo oven cooks perfectly. Because of that, preparing food is more economical.
flowchart
graph TD
    A["Top Left Arrow"] --> B["Center Grid Pattern"]
    C["Top Right Arrow"] --> B
    D["Bottom Left Arrow"] --> B
    E["Bottom Right Arrow"] --> B
    F["Bottom Right Arrow"] --> B
    B --> G["Left Arrow"]
    B --> H["Right Arrow"]
    style B fill:#f9f,stroke:#333,stroke-width:2px
Turbo System
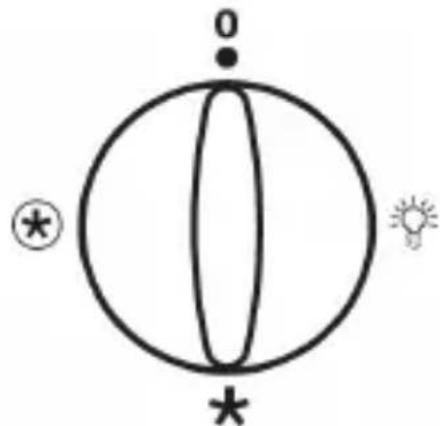
The dial of the oven is turned clockwise to the desired position (defrosting, preparing yoghurt, cooking, frying, or baking/grilling)
text_image
0 *
The internal lamp is turned on.
The oven operates, but its heating elements do not work
The oven's heaters and the ventilator start operating
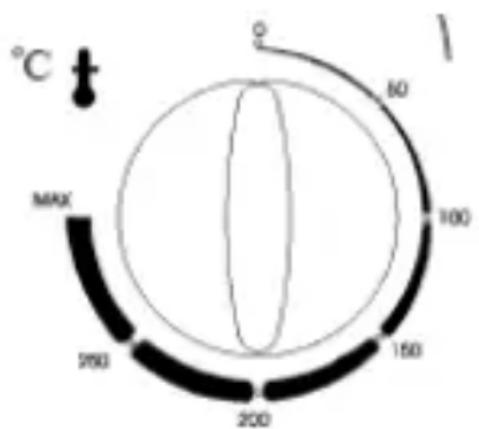
THERMOSTAT :
This function is only available for the electric oven.
By twisting this knob, the desired temperature may be selected according to the recipe.
If the thermostat is in the, OFF' position, the electric oven will not work.
text_image
°C MAX 200 200 150 100 80USING OTHER FUNCTIONS
! The following functions may be used if the cooker is equipped with all of them.
ELECTRONIC IGNITION\*:
By pressing the button ☑ the gas burners of the cooker may be ignited.
LAMP OF THE OVEN:
After pressing the switch with the symbol ☐, the interior of the oven will be lit.
- There are two separate resistance heaters; one at the top and one on the bottom. The thermostatic regulators may be used to set the required temperature - on both heaters or individually.
- The heater of the grill fixed in the upper part of the oven may be used to prepare dishes using the infrared waves. Therefore, you can bake dishes with the door of the oven closed. This helps saving energy and keeps the smell and smoke inside the oven.
natural_image
Pure technical diagram of a mechanical component with no text or symbolsStatic system
GUIDELINES REGARDING USAGE, REPAIR AND MAINTENANCE OF THE EQUIPMENT:
- No inflammable objects should be present near the oven.
- The feet of the oven should be fixed to the floor - they should not rock.
- The location where the equipment stands should be ventilated if such a need arise.
- Our company cannot accept the liability for damages caused by operating the equipment without grounding.
- In the case of a failure, contact the closest maintenance service.
- To prevent the possibility of crushing, the power cable should not be placed near the cover. If damaged, the cable should be replaced by the maintenance service.
- The voltage used should comply with the technical data sheet.
- Pots should be placed only after making sure a burner is burning.
- After cooking is completed, make sure all burners are off.
- Make sure the upper parts of the cooker are correctly assembled.
- Always disconnect the power cable before any repairs.
- For safety, always close the gas installation valve after cooking.
- The gas duct should be located in a ventilated place.
- Often check the gas duct or gas hose for tightness or corrosion.
- Children should not be allowed to play with the equipment.
- Close and open the upper cover with care. Be careful not to damage the enamel coating.
- Do not use the equipment for other purposes than intended (e.g. to heat rooms, etc.).
- Do not hold by the handle when transporting or moving.
GUIDELINES RELATED TO TRANSPORTING THE EQUIPMENT:
- Before moving the cooker in the kitchen, disconnect the power cable and close the gas duct valve. Having disconnected the gas hose from the connection pipe of the cooker, move the equipment without shaking it to the required place. The gas hose connected to the gas pipe should be fixed with steel ring clamps, as described in the previous pages of the user manual. Plug the power. After checking for tightness using the soap method make sure there are no leakages.
- Fix the upper parts of the burners and grate to the cooker to avoid enamel being damaged when transporting to a new home. Such parts as the tray, duct or consoles, etc. may be placed in the drawer, interleaved with paper. The edges of the side panels may be secured with adhesive tape to prevent vibrations that may occur in the drawer, door of the cover. Cover all surfaces of the cooker with boards made of foam or cardboards (best use the original packaging).
- After moving, the nylon bags, foam boards, pins, etc. should be removed, as they might be dangerous for children.
Never lift the equipment by the handle of the door.
CLEANING AND MAINTENANCE:
Note: Do not use equipment for steam cleaning.
Do not use coarse cleaning agents or sharp metal objects for cleaning the glass pane of the door, as they may scratch the surface, which may cause the glass to crack.
- Before cleaning, wait until the cooker cools down.
- Disconnect the power cable before cleaning.
- You may use a cloth saturated in soap solution or liquid detergents. Remove the dampness using a dry cloth. Never use chemicals, such as acids, solvents, benzene, benzile or detergents with solid particles.
- Do not repeat cleaning often as this will shorten the useful life and efficiency of the equipment.
- The upper parts of the burner should be removed individually, cleaned and repositioned.
- Make sure the flame openings of the upper parts of burners are not clogged.
- Make sure the outlet (injection) opening is not clogged.
- No objects should be placed in the outlet opening, e.g. for cleaning.
EXCHANGING THE LAMP
WARNING: To avoid electric shock, make sure the equipment is turned off before exchanging the lamp.
If the oven lamp does not work, the electric bulb may be replaced - it may be purchased in the nearest maintenance service or contact the service
to order the service of replacing the electric bulb.
If the replacement is done individually, perform the following actions:
First, disconnect the power cable. Make sure the oven is cold.
Open the door of the oven, unscrew and remove the protective glass.
Install a new glass and new electric bulb, effecting the above actions in reverse order. Plug the power and check the new lamp, using the oven's regulator. If the fault persists, call the closest technical service.
natural_image
Simple line drawing of a plug with a circular socket (no text or symbols)
natural_image
Diagram showing a light bulb with internal components and a curved arrow indicating rotation (no text or symbols)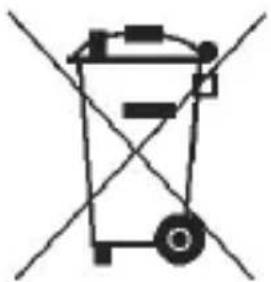
natural_image
Simple line drawing of a trash bin with crossed lines indicating no waste or plastic (no text or symbols)The oven should be scrapped in line with the regulations on environmental protection. This equipment is marked with the symbol of a crossed waste container in line with the EU directive 2002/96/EC and the Polish act on the used-up electric and electronic equipment.
(Journal of Laws, 05, No. 180, item 1495).
Such marking is to inform that after the end of the useful life, the equipment may not be put together with waste from the household.
The user is obliged to leave the cooker with one of the collecting used electric and electronic equipment. The parties collecting such waste, including local collection points, make up a relevant system for collecting the used-up equipment.
Before leaving the cooker in a bulky waste landfill, cut off the power plug. This will prevent possible injuries in children who might play with the used-up equipment.
Danger
Packaging left within children's reach brings a threat of suffocating when playing.
TECHNICAL DATA
| Fuse | 16 A |
| Voltage | 220 – 240 V |
| Frequency | 50 – 60 Hz |
| Rated power | 2400 W |
| Electric bulb of the oven | 25 W |
| Gas pressure (for gas in cylinder - LPG) | 30 mbar |
| Gas pressure (natural gas) | 20 mbar |
| Capacity of the oven | 57 l |
Note!
Product design and Technical parameters may be change without notice. This mainly concerns parameters technical, software and user manual present. Users manual is a general orientation on service product. Manufacturer and distributor do not assume any responsibility as compensation for any inaccuracies errors in the descriptions appearing in this user manual.

MANTA

text_image
RoHS
text_image
© C€CUSTOMER SERVICE
tel: +48 22 332 34 63 or e-mail: serwis@manta.com.pl
FROM MONDAY TO FRIDAY, IN HOURS: 9.00-17.00
The manufacturer reserves the right to introduce changes