
NIO500-D16/NIO500-A16/NIO500-A8D8 - Audio Interface YAMAHA - Free user manual and instructions
Find the device manual for free NIO500-D16/NIO500-A16/NIO500-A8D8 YAMAHA in PDF.
| Product type | Digital and analog audio interface |
| Models | NIO500-D16 (Dante 16x16), NIO500-A16 (Analog 16x16), NIO500-A8D8 (8 analog + 8 Dante) |
| Form factor | 19-inch rack, 1U |
| Sampling rate | Up to 96 kHz |
| Resolution | 24-bit |
| Connectivity | Dante (Ethernet), analog XLR/TRS combo jacks, digital AES/EBU inputs/outputs |
| Power supply | External, AC adapter 100-240 V, 50/60 Hz |
| Power consumption | 30 W max |
| Weight | Approximately 3.5 kg |
| Dimensions (W x D x H) | 480 x 250 x 44 mm |
| Operating temperature | 0 °C to 40 °C |
| Maintenance and cleaning | Unplug the device before cleaning. Use a soft, dry cloth. Do not use solvents. |
| Safety | Use only the supplied adapter. Do not open the enclosure. No user-serviceable parts. |
| Spare parts and repairability | Contact an authorized Yamaha service center for repairs. Spare parts are available from the manufacturer. |
| General information | Warranty: 2 years. Compliant with European directives. Control software available for download. |
Frequently Asked Questions - NIO500-D16/NIO500-A16/NIO500-A8D8 YAMAHA
User questions about NIO500-D16/NIO500-A16/NIO500-A8D8 YAMAHA
0 question about this device. Answer the ones you know or ask your own.
Ask a new question about this device
Download the instructions for your Audio Interface in PDF format for free! Find your manual NIO500-D16/NIO500-A16/NIO500-A8D8 - YAMAHA and take your electronic device back in hand. On this page are published all the documents necessary for the use of your device. NIO500-D16/NIO500-A16/NIO500-A8D8 by YAMAHA.
USER MANUAL NIO500-D16/NIO500-A16/NIO500-A8D8 YAMAHA
- IMPORTANT NOTICE: DO NOT MODIFY THIS UNIT! This product, when installed as indicated in the instructions contained in this manual, meets FCC requirements. Modifications not expressly approved by Yamaha may void your authority, granted by the FCC, to use the product.
- IMPORTANT: When connecting this product to accessories and/or another product use only high quality shielded cables. Cable/s supplied with this product MUST be used. Follow all installation instructions. Failure to follow instructions could void your FCC authorization to use this product in the USA.
- NOTE: This product has been tested and found to comply with the requirements listed in FCC Regulations, Part 15 for Class "B" digital devices. Compliance with these requirements provides a reasonable level of assurance that your use of this product in a residential environment will not result in harmful interference with other electronic devices. This equipment generates/uses radio frequencies and, if not installed and used according to the instructions found in the users manual, may cause interference harmful to the operation of other electronic devices. Compliance with FCC regulations does not guarantee
that interference will not occur in all installations. If this product is found to be the source of interference, which can be determined by turning the unit "OFF" and "ON", please try to eliminate the problem by using one of the following measures: Relocate either this product or the device that is being affected by the interference.
Utilize power outlets that are on different branch (circuit breaker or fuse) circuits or install AC line filter/s.
In the case of radio or TV interference, relocate/reorient the antenna. If the antenna lead-in is 300 ohm ribbon lead, change the lead-in to co-axial type cable.
If these corrective measures do not produce satisfactory results, please contact the local retailer authorized to distribute this type of product. If you can not locate the appropriate retailer, please contact Yamaha Corporation of America, Electronic Service Division, 6600 Orangethorpe Ave, Buena Park, CA90620
The above statements apply ONLY to those products distributed by Yamaha Corporation of America or its subsidiaries.
- This applies only to products distributed by YAMAHA CORPORATION OF AMERICA.
(class B)
COMPLIANCE INFORMATION STATEMENT (DECLARATION OF CONFORMITY PROCEDURE)
Responsible Party : Yamaha Corporation of America
Address: 6600 Orangethorpe Ave., Buena Park, Calif. 90620
Telephone:714-522-9011
Type of Equipment : Audio Interface
Model Name : Nio500-D16/Nio500-A16/Nio500-A8D8
This device complies with Part 15 of the FCC Rules.
Operation is subject to the following two conditions:
1) this device may not cause harmful interference, and
2) this device must accept any interference received including interference that may cause undesired operation.
See user manual instructions if interference to radio reception is suspected.
- This applies only to products distributed by YAMAHA CORPORATION OF AMERICA.
(FCC DoC)
iE
(class b korea)
IMPORTANT NOTICE FOR THE UNITED KINGDOM
Connecting the Plug and Cord
WARNING: THIS APPARATUS MUST BE EARTHED IMPORTANT. The wires in this mains lead are coloured in accordance with the following code:
GREEN-AND-YELLOW : EARTH
BLUE : NEUTRAL
BROWN : LIVE
As the colours of the wires in the mains lead of this apparatus may not correspond with the coloured markings identifying the terminals in your plug proceed as follows:
The wire which is coloured GREEN-and-YELLOW must be connected to the terminal in the plug which is marked by the letter E or by the safety earth symbol or colored GREEN or GREEN-and-YELLOW.
The wire which is coloured BLUE must be connected to the terminal which is marked with the letter N or coloured BLACK.
The wire which is coloured BROWN must be connected to the terminal which is marked with the letter L or coloured RED.
(3 wires)

The above warning is located on the top of the unit.
Explanation of Graphical Symbols
The lightning flash with arrowhead symbol within an equilateral triangle is intended to alert the user to the presence of uninsulated "dangerous voltage" within the product's enclosure that may be of sufficient magnitude to constitute a risk of electric shock to persons.

The exclamation point within an equilateral triangle is intended to alert the user to the presence of important operating and maintenance (servicing) instructions in the literature accompanying the product.
IMPORTANT SAFETY INSTRUCTIONS
1 Read these instructions.
2 Keep these instructions.
3 Heed all warnings.
4 Follow all instructions.
5 Do not use this apparatus near water.
6 Clean only with dry cloth.
7 Do not block any ventilation openings. Install in accordance with the manufacturer's instructions.
8 Do not install near any heat sources such as radiators, heat registers, stoves, or other apparatus (including amplifiers) that produce heat.
9 Do not defeat the safety purpose of the polarized or grounding-type plug. A polarized plug has two blades with one wider than the other. A grounding type plug has two blades and a third grounding prong. The wide blade or the third prong are provided for your safety. If the provided plug does not fit into your outlet, consult an electrician for replacement of the obsolete outlet.
10 Protect the power cord from being walked on or pinched particularly at plugs, convenience receptacles, and the point where they exit from the apparatus.
11 Only use attachments/accessories specified by the manufacturer.
12 Use only with the cart, stand, tripod, bracket, or table specified by the manufacturer, or sold with the apparatus. When a cart is used, use caution when moving the cart/ apparatus combination to avoid injury from tip-over.
13 Unplug this apparatus during lightning storms or when unused for long periods of time.
14 Refer all servicing to qualified service personnel. Servicing is required when the apparatus has been damaged in any way, such as power-supply cord or plug is damaged, liquid has been spilled or objects have fallen into the apparatus, the apparatus has been exposed to rain or moisture, does not operate normally, or has been dropped.
WARNING
TO REDUCE THE RISK OF FIRE OR ELECTRIC SHOCK, DO NOT EXPOSE THIS APPARATUS TO RAIN OR MOISTURE.
(UL60065_03)
Contents
PRECAUTIONS 5
NOTICE 6
Information. 6
Introduction 7
A Message from the Development Team
Included Accessories. 7
Items to Have Ready 7
Precautions for Rack Mounting 8
Connection between the Device and a Computer 8
How to Read the Manual. 8
About Dante 9
Overview. 9
Connection with Dante Enabled Devices 9
Setup 10
Overall Process 10
Connection between the Device and a Computer 10
Setting up the Power Supply 11
Configuring the Audio Routing of the Dante Network 11
Installing TOOLS for NUAGE 11
Configuring the Workgroup on NUAGE 11
Description of the Device 12
Front Panel 12
Rear Panel 14
Description of the Software Programs 17
NUAGE I/O Setup. 17
NUAGE Workgroup Manager 19
Troubleshooting 21
Appendix 21
Firmware Updates 21
Specifications . at the end of the book
Pin Assignment . at the end of the book
Dimensions... .at the end of the book
Block Diagrams . at the end of the book
GNU GENERAL PUBLIC LICENSE .at the end of the book
PRECAUTIONS
PLEASE READ CAREFULLY BEFORE PROCEEDING
- Please keep this manual in a safe place for future reference.

WARNING
Always follow the basic precautions listed below to avoid the possibility of serious injury or even death from electrical shock, short-circuiting, damages, fire or other hazards. These precautions include, but are not limited to, the following:
Power supply/Power cord
- Do not place the power cord near heat sources such as heaters or radiators, and do not excessively bend or otherwise damage the cord, place heavy objects on it, or place it in a position where anyone could walk on, trip over, or roll anything over it.
- Only use the voltage specified as correct for the device. The required voltage is printed on the name plate of the device.
- Use only the supplied power cord/plug. If you intend to use the device in an area other than in the one you purchased, the included power cord may not be compatible. Please check with your Yamaha dealer.
- Check the electric plug periodically and remove any dirt or dust which may have accumulated on it.
- Be sure to connect to an appropriate outlet with a protective grounding connection. Improper grounding can result in electrical shock.
Do not open
- This device contains no user-serviceable parts. Do not open the device or attempt to disassemble the internal parts or modify them in any way. If it should appear to be malfunctioning, discontinue use immediately and have it inspected by qualified Yamaha service personnel.
Water warning
- Do not expose the device to rain, use it near water or in damp or wet conditions, or place on it any containers (such as vases, bottles or glasses) containing liquids which might spill into any openings. If any liquid such as water seeps into the device, turn off the power immediately and unplug the power cord from the AC outlet. Then have the device inspected by qualified Yamaha service personnel.
- Never insert or remove an electric plug with wet hands.
Fire warning
- Do not put burning items, such as candles, on the unit. A burning item may fall over and cause a fire.
If you notice any abnormality
-
When one of the following problems occur, immediately turn off the power switch and disconnect the electric plug from the outlet. Then have the device inspected by Yamaha service personnel.
-
The power cord or plug becomes frayed or damaged.
- It emits unusual smells or smoke.
- Some object has been dropped into the instrument.
- There is a sudden loss of sound during use of the device.

CAUTION
Always follow the basic precautions listed below to avoid the possibility of physical injury to you or others, or damage to the device or other property. These precautions include, but are not limited to, the following:
Power supply/Power cord
- When removing the electric plug from the device or an outlet, always hold the plug itself and not the cord. Pulling by the cord can damage it.
- Remove the electric plug from the outlet when the device is not to be used for extended periods of time, or during electrical storms.
Location
- Do not place the device in an unstable position where it might accidentally fall over.
- Do not block the vents. This device has ventilation holes at the sides to prevent the internal temperature from becoming too high. In particular, do not place the device on its side or upside down. Inadequate ventilation can result in overheating, possibly causing damage to the device(s), or even fire.
- Do not place the device in a location where it may come into contact with corrosive gases or salt air. Doing so may result in malfunction.
-
Before moving the device, remove all connected cables.
-
When setting up the device, make sure that the front-panel power switch can be easily turned ON/OFF. If some trouble or malfunctions occurs, immediately turn off the power switch and disconnect the plug from the outlet.
- If the device is mounted in an EIA standard rack, carefully read the section "Precautions for Rack Mounting" on page 8. Inadequate ventilation can result in overheating, possibly causing damage to the device(s), malfunction, or even fire.
Connections
- Before connecting the device to other devices, turn off the power for all devices. Before turning the power on or off for all devices, set all volume levels to minimum.
Maintenance
- Remove the power plug from the AC outlet when cleaning the device.
Handling caution
- Do not insert your fingers or hands in any gaps or openings on the device (vents, etc.).
- Avoid inserting or dropping foreign objects (paper, plastic, metal, etc.) into any gaps or openings on the device (vents, etc.) If this happens, turn off the power immediately and unplug the power cord from the AC outlet. Then have the device inspected by qualified Yamaha service personnel.
- Do not rest your weight on the device or place heavy objects on it, and avoid use excessive force on the buttons, switches or connectors.
Yamaha cannot be held responsible for damage caused by improper use or modifications to the device, or data that is lost or destroyed.
European Models
Inrush Current based on EN 55103-1:2009
2.0 A (on initial switch-on)
2.0 A (after a supply interruption of 5s)
Conforms to Environments: E1, E2, E3 and E4
The model number, serial number, power requirements, etc., may be found on or near the name plate, which is at the top of the unit. You should note this serial number in the space provided below and retain this manual as a permanent record of your purchase to aid identification in the event of theft.
Model No.
Serial No.
NOTICE
To avoid the possibility of malfunction/ damage to the product, damage to data, or damage to other property, follow the notices below.
Handling and Maintenance
- Do not use the device in the vicinity of a TV, radio, stereo equipment, mobile phone, or other electric devices. Otherwise, the device, TV, or radio may generate noise.
- Do not expose the device to excessive dust or vibration, or extreme cold or heat (such as in direct sunlight, near a heater, or in a car during the day), in order to prevent the possibility of panel disfiguration, unstable operation, or damage to the internal components.
- Do not place vinyl, plastic or rubber objects on the device, since this might discolor the panel.
- When cleaning the device, use a dry and soft cloth. Do not use paint thinners, solvents, cleaning fluids, or chemical-impregnated wiping cloths.
- Condensation can occur in the device due to rapid, drastic changes in ambient temperature — when the device is moved from one location to another, or air conditioning is turned on or off, for example. Using the device while condensation is present can cause damage. If there is reason to believe that condensation might have occurred, leave the device for several hours without turning on the power until the condensation has completely dried out.
- Always turn the power off when the device is not in use.
Information
About copyrights
Copying of the commercially available musical data including but not limited to MIDI data and/or audio data is strictly prohibited except for your personal use.
About this manual
- The illustrations and LCD screens as shown in this manual are for instructional purposes only, and may appear somewhat different from those on your device.
- Windows is a registered trademark of Microsoft® Corporation in the United States and other countries.
- Apple, Mac and Macintosh are trademarks of Apple Inc., registered in the U.S. and other countries.
- The company names and product names in this manual are the trademarks or registered trademarks of their respective companies.
- To view PDF files, you will need to install Adobe Reader on your computer. You can download the latest Adobe Reader at the following website. http://www.adobe.com
Introduction
A Message from the Development Team
Thank you for choosing a NUAGE series NUAGE I/O unit.
The NUAGE series is a professional music and sound production system based around Steinberg Nuendo digital audio workstation software.
Over the 20 years that have elapsed since Yamaha began offering DM and O series digital consoles and other equipment for post production and music production, work schedules have become notably tighter with less time available for individual projects. The NUAGE series was created to respond to the deadline crunch with an optimized working environment that provides unprecedented efficiency as well as final quality.
The core of the system is Steinberg Nuendo, a DAW that is acclaimed for its outstanding workflow efficiency and sonic quality. The NUAGE MASTER (Ncs500-CT control surface) and NUAGE FADER (Ncs500-FD control surface) units were specifically developed to support and enhance Nuendo operability. NUAGE MASTER provides a comprehensive concentration of post production controls in an efficient, easy-access layout. NUAGE FADER integrates seamlessly with the Nuendo mixer window, providing an intuitive hands-on extension to the software.
And then there's the sound. NUAGE I/O audio interface units have been designed to deliver the superior Nuendo sound without compromise. Three models are currently available: the Nio500-D16 with 16 channels of AES/EBU input and output, the Nio500-A16 with 16 channels of analog input and output, and the Nio500-A8D8 with a combination of 8 channels of analog and 8 channels of AES/EBU input and output. The NUAGE I/O units connect to computers running Nuendo via the highly expandable Dante digital audio protocol, allowing multiple NUAGE I/O units to be flexibly incorporated in a wide variety of system configurations. Monitoring latency is near zero for comfortable, stress-free monitoring while recording, even when multiple I/O units are used with cascaded monitor buses. The development team was adamant that near-zero latency would be essential to allow musicians and artists to deliver their full creative and performance potential.
Stability and dependability are essential in any professional working environment. In addition to minimizing latency, the DANTE ACCELERATOR (AIC128-D audio interface card) used in conjunction with the NUAGE I/O units offers stable, reliable communication between I/O units and computer while allowing fast recovery from any problems that do arise. You can concentrate on the job at hand, secure in the knowledge that you'll be able to deliver great results on time.
Thanks to experience with the DM and O series, intensive research, and invaluable feedback from our users, it is our great pleasure to be able to deliver a new level of production support in the NUAGE series. Our technology is there to give you unrestricted creative freedom, and we sincerely hope that the NUAGE series plays a role in your growth and continued success.
The Yamaha NUAGE series development team.
Included Accessories
Power cable
Ferrite core
Rubber stoppers (4)
Operation Manual (this book)
NOTE
- Attach the ferrite core to prevent electromagnetic interference when using the [CASCADE] connector. Fasten it to the Ethernet cable near the [CASCADE OUT] connector.
- When using the unit on a slippery surface, attach the rubber stoppers to the specified location on the bottom panel of this device to prevent sliding.
Items to Have Ready
- Gigabit Ethernet Switch
A network switch that features various functions for controlling and monitoring the network (such as QoS, the ability to assign priority to data flows — e.g., clock synchronization or audio transmission on certain data circuits — and IGMP Snooping, the ability to filter unnecessary multi-cast traffic) is recommended.
- Ethernet cable
A straight type (STP) of CAT5e or better is recommended.
- TOOLS for NUAGE
TOOLS for NUAGE is a software program which is necessary when connecting the device to a computer. When you install TOOLS for NUAGE, NUAGE Workgroup Manager, NUAGE Extension, and NUAGE PT Bridge (Mac only) will be installed. NUAGE Workgroup Manager is an application that allows control over the devices and DAW software applications as a Workgroup on NUAGE system. NUAGE Extension is a program that allows you to link the device with Nuendo (for versions which support the link function). NUAGE PT Bridge is a program that allows you to control Pro Tools (Mac only) using NUAGE FADER and NUAGE MASTER (with the exception of certain functions).
TOOLS for NUAGE is available on the following website. http://www.yamahaproaudio.com/downloads/
Precautions for Rack Mounting
This unit is rated for operation at ambient temperatures ranging from 0 to 40 degrees Celsius. When mounting the unit with other device(s) in an EIA standard equipment rack, internal temperatures can exceed the specified upper limit, resulting in impaired performance or failure. When rack mounting the unit, always observe the following requirements to avoid heat buildup:
- When mounting the unit in a rack with devices such as power amplifiers that generate a significant amount of heat, leave more than 1U of space between NUAGE I/O and other equipment. Also either leave the open spaces uncovered or install appropriate ventilating panels to minimize the possibility of heat buildup.
- To ensure sufficient airflow, leave the rear of the rack open and position it at least 10 centimeters from walls or other surfaces. If the rear of the rack can't be left open, install a commercially available fan or similar ventilating option to secure sufficient airflow. If you've installed a fan kit, there may be cases in which closing the rear of the rack will produce a greater cooling effect. Refer to the rack and/or fan unit manual for details.
Connection between the Device and a Computer
The device can be connected to a computer in one of two ways: with or without the DANTE ACCELERATOR. Using the DANTE ACCELERATOR gives you the added advantages of lower latency, using more channels, and utilization of a redundant network. The descriptions in this manual assume you are using the DANTE ACCELERATOR.
To connect the device and a computer with the DANTE ACCELERATOR, install the Dante Controller to the computer. Dante Controller is a software application that allows configuration and audio routing of the Dante network.
When not using the DANTE ACCELERATOR, install the Dante Controller and DVS (Dante Virtual Soundcard). Dante Controller is a software application that allows configuration and audio routing of the Dante network. DVS is a software application that uses the computer as a Dante-enabled device.
Dante Controller is available on the following website.
http://www.yamahaproaudio.com/
DVS is commercially available on the following website.
http://www.audinate.com/
For details on Dante Controller and DVS, refer to the respective manuals.
How to Read the Manual
Conventions
- Brackets and quotation marks
Brackets [ ] and quotation marks (" ") around names and phrases in this manual are used to indicate the following.
| Mark | Indication target |
| [ ] | • Buttons, switches, indicators, terminals, etc. on the device. • Keys on a computer keyboard. |
| “ ” | • Menus, buttons, tabs, areas, windows, etc. on a computer window or software window. • Excerpts of messages, function names, terms in the manual, etc. |
- Windows or Mac
When the procedures or explanations are specific to only one of the platforms, Windows or Mac, this is properly indicated in the manual. When the platforms do not appear, procedures or explanations are for both Windows and Mac.
Procedures
"→" appears on some procedures in the manual. For example, the string "Devices" → "Device Setup" → "Control Panel" indicates that you should perform the procedures in the following order.
- Click the "Devices" menu.
- Select the "Device Setup" option.
- Click the "Control Panel" button.
- Keyboard Shortcuts
[Windows modifier key]/[Mac modifier key] + [key] shows the shortcut keys. For example, [Ctrl]/[command] + [Z] means "press [Ctrl] under Windows or [command] under Mac, then press [Z]."
- Screens
This manual predominantly uses screenshots of Windows. However, Mac screenshots are used when instructions of the function apply only to the Mac. Also, this manual uses screenshots of Nuendo 6. If you are using another version of Nuendo, the actual screenshots might not be the same. For details, refer to the Nuendo manuals (PDF) opened from the "Help" menu.
Nuendo References
For brevity, the descriptions of Nuendo functions in this manual have been kept simple and basic. For details on Nuendo functions, refer to the Nuendo manuals (PDF) opened from the "Help" menu.
About Dante
Overview
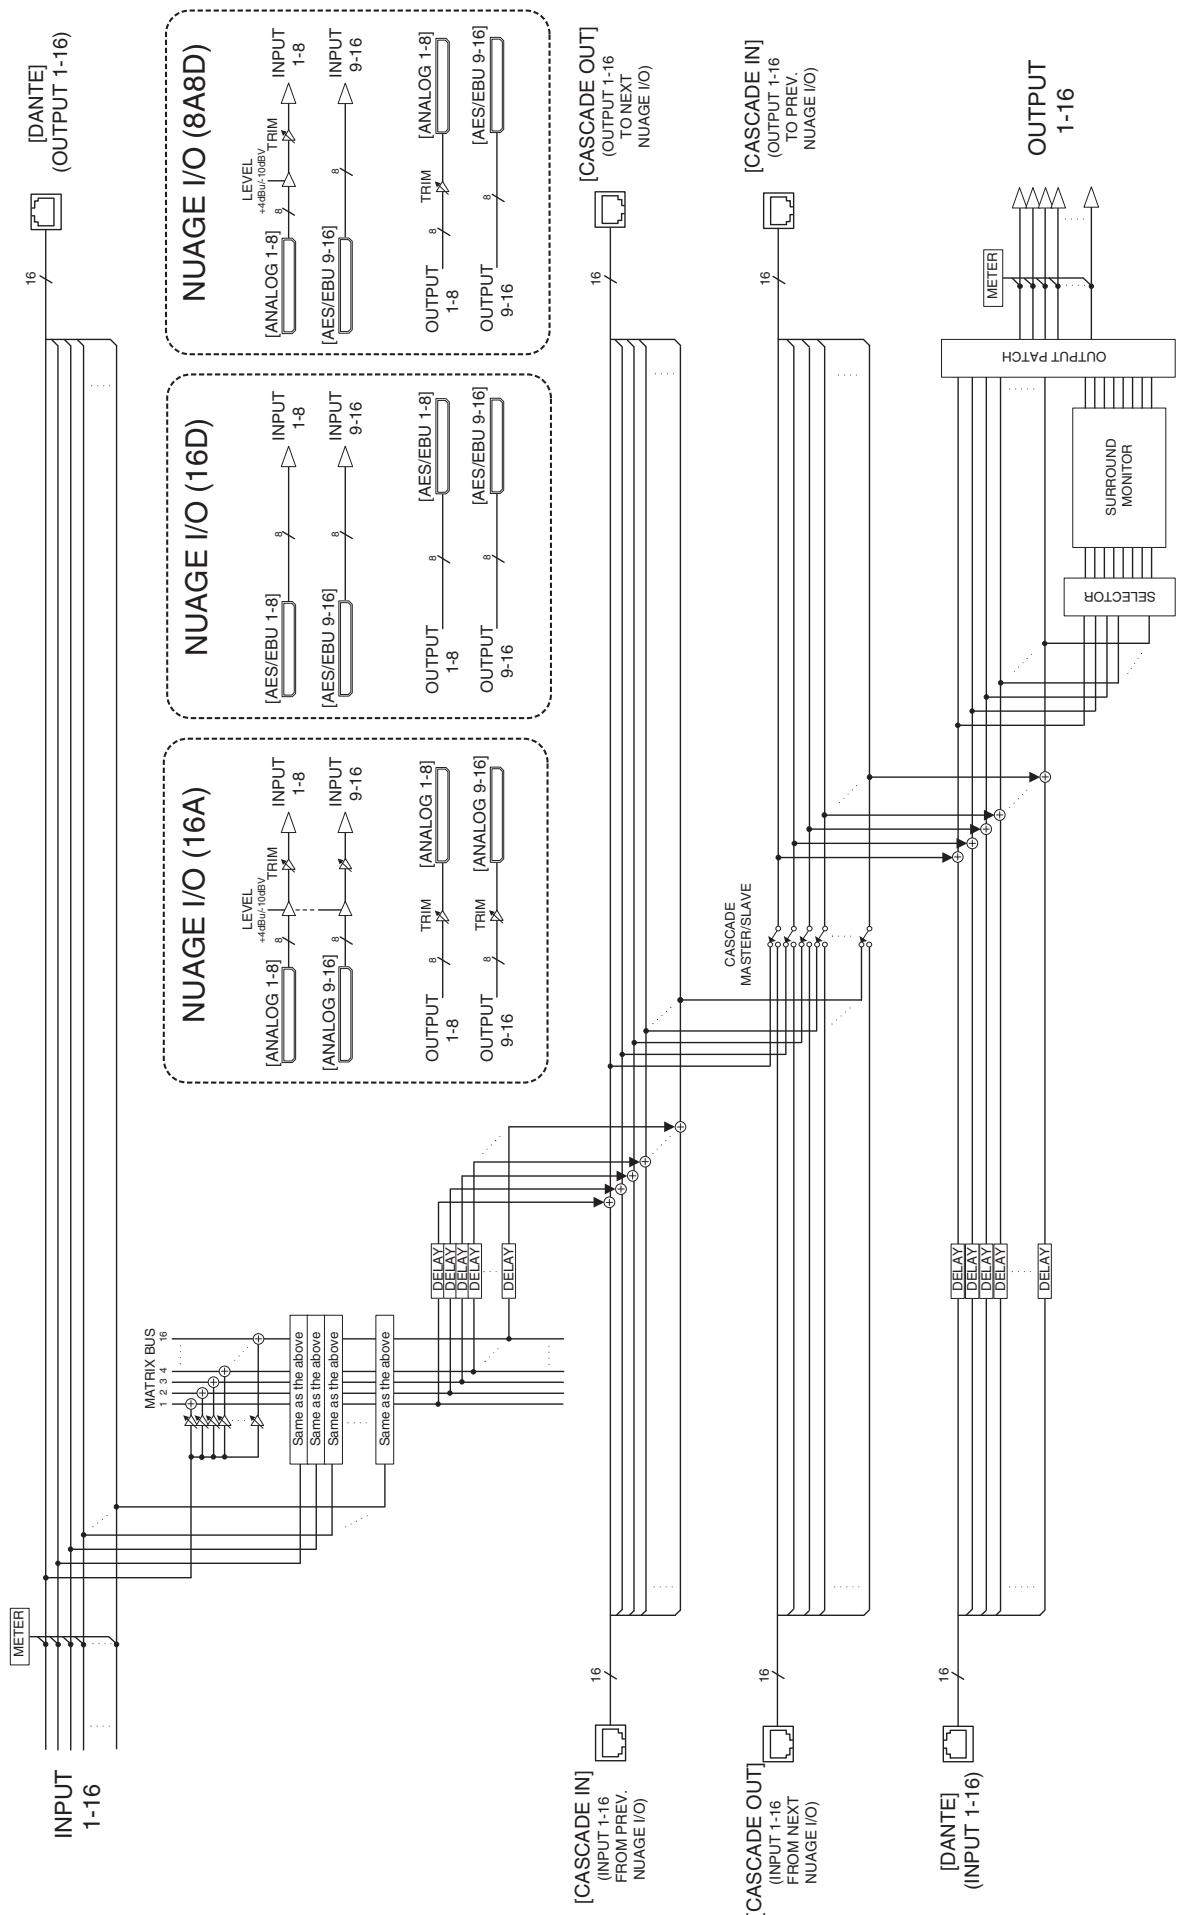
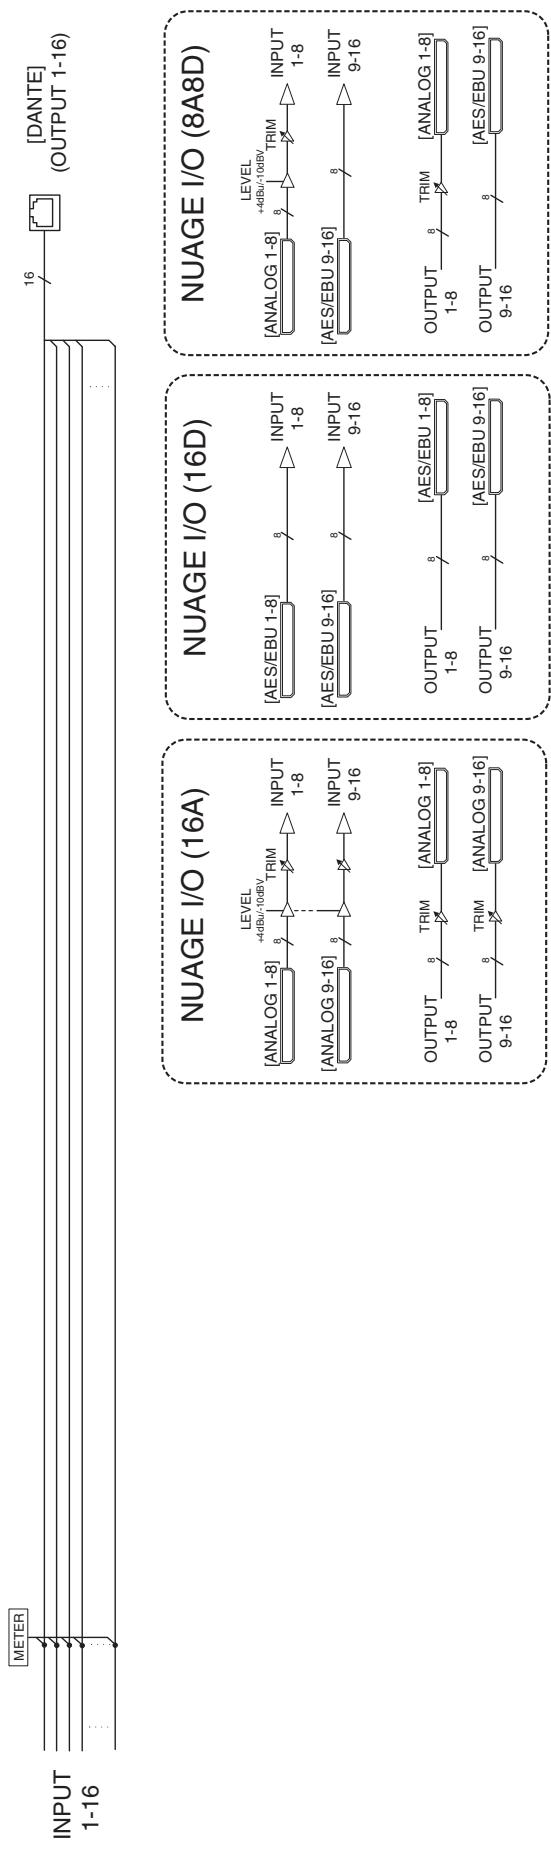
This product features Dante technology as a protocol to transmit audio signals. Dante is a network protocol developed by Audinate. It is designed to deliver multi-channel audio signals at various sampling and bit rates, as well as device control signals over a Giga-bit Ethernet (GbE) network. Dante also offers the following benefits:
- It transmits up to 512 in/512 out, for a maximum total of 1024 audio channels over a GbE network. (The NUAGE I/O series can be accommodate up to eight devices, 128 in/128 out with a 24-bit resolution on a NUAGE system.)
- Dante-enabled devices will automatically configure their network interfaces and find each other on the network. You can label Dante devices and their audio channels with names that make sense to you.
- Dante uses high accuracy network synchronization standards to achieve sample-accurate playback with extremely low latency and jitter.
- Dante supports redundant connections via primary and secondary circuits to defend against unforeseen difficulties.
By taking advantages of these benefits, you can skip any complicated procedures to automate connections and setups of Dante-enabled devices, remotely control I/O racks or amplifiers from a mixing console, or make multi-track recordings to a DAW, such as Nuendo, installed on a computer in the network. Visit Audinate website for more details on Dante.
http://www.audinate.com/
More information on Dante-enabled devices are also posted on the Yamaha Pro Audio website:
http://www.yamahaproaudio.com/
Connection with Dante Enabled Devices
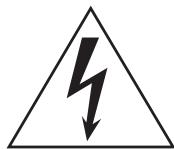
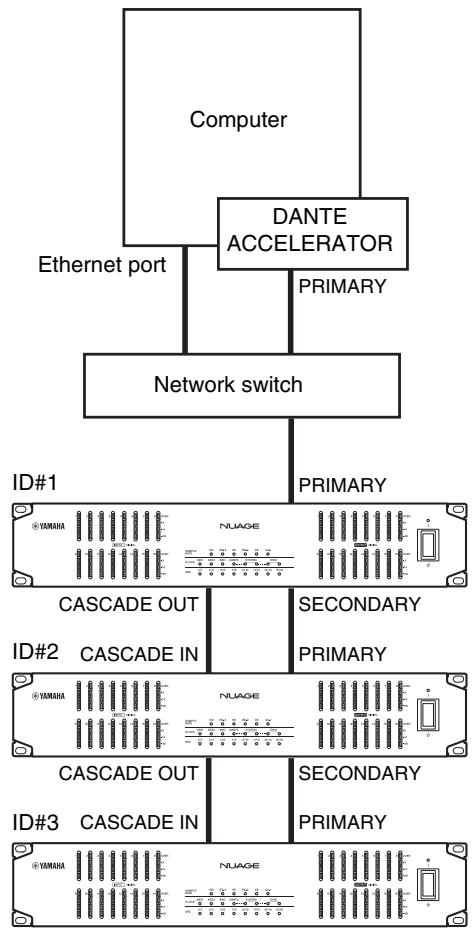
To connect with Dante enabled devices, use a star connection or a daisy chain connection (enabled devices only).
Star Connection
In a star connection, each device is connected to a central network switch. Using a GbE-compatible network switch enables you to configure a wide-band, large-scale network. We recommend a network switch that features various functions to control and monitor the network (such as Qos, the ability to assign priority to data flows — e.g., clock synchronization or audio transmission on certain data circuits.)
With this topology, it is common to configure a redundant network so that an unexpected network problem will not affect any audio or otherwise stable communications.
Redundant Network
A redundant network consists of two circuits, a primary circuit and a secondary circuit. Normally, the network operates on the primary circuit. However, if the primary connection is broken, the secondary circuit will automatically take over communications. Therefore, using a redundant network with a star topology would increase communication stability relative to a daisy chain network.
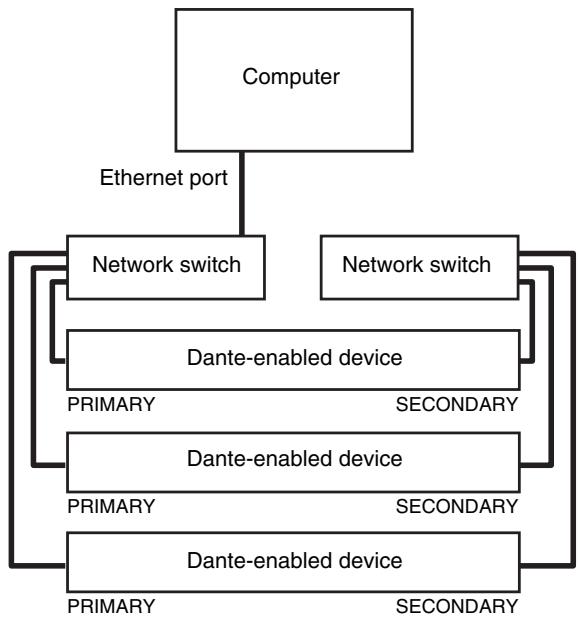
Daisy Chain Connection (enabled devices only)
A daisy chain is a wiring scheme in which multiple devices are connected together in sequence. This connection method is suitable for a simple system with a small number of devices.
However, if a large number of devices are connected, the latency value must be increased. Also, if a connection is broken in a daisy chain network, the signal flow is interrupted at that point and no signal will be transferred beyond that point.
Setup
Overall Process
This section explains how to set up the device for use with the DANTE ACCELERATOR. Before setting up, make sure that the following conditions are met.
- The DANTE ACCELERATOR installed to the computer works properly.
- The Dante Controller has already been installed.
For details, refer to the DANTE ACCELERATOR manual.
- Connect the device to a computer with a Ethernet cable. "Connection between the Device and a Computer" (page 10)
- Connect the power cable then turn the power on. "Setting up the Power Supply" (page 11)
- Configure the audio routing of the Dante network with the Dante Controller. "Configuring the Audio Routing of the Dante Network" (page 11)
- Install TOOLS for NUAGE. "Installing TOOLS for NUAGE" (page 11)
- Configure the Workgroup on NUAGE with the NUAGE Workgroup Manager. "Configuring the Workgroup on NUAGE" (page 11)
Connection between the Device and a Computer
Connect the devices and computer by using a star connection or a daisy chain connection.
Star Connection
This section explains the connections when configuring a redundant network.
- Connect the Ethernet cable as shown below.

- Set the [UNIT ID rotary switch] on the rear panel to a unique ID.
- Turn on (down) the [Dip switch] No.1 on the rear panel.
NOTE
Redundant network operation may not be available on the DANTE ACCELERATOR depending on its firmware version. Make sure that the firmware version currently on the DANTE ACCELERATOR supports a redundant network by checking the following website.
http://www.yamahaproaudio.com/
Daisy Chain Connection
1. Connect the Ethernet cable as shown below.
- Set the [UNIT ID rotary switch] on the rear panel to a unique ID.
- Turn off (up) the [Dip switch] No.1 on the rear panel.
Setting up the Power Supply
- Insert one plug of the power cable into the [AC IN] terminal on the device.
- Insert the other plug of the power cable into a proper AC wall outlet.
- Turn on (I) the power.

WARNING
Only use the included power cable (or an equivalent recommended by Yamaha). Using the wrong cable can result in damage to the device or overheating.

CAUTION
Remove the plug of the power cable from the outlet when the device is not be used for extended periods of time, or during electrical storms.
Configuring the Audio Routing of the Dante Network
- Launch Dante Controller.
- In the "Routing" tab on the "Network View" window, set the audio routing by placing a check mark at the intersection of the desired devices.
To use the link function with Nuendo, set up as follows.
- Set the sample rate and pull-up/pull-down parameters on NUAGE I/O and DANTE ACCELERATOR to the same settings.
- Join the inputs and outputs in the matrix. For example, set channels 1 through 16 on NUAGE I/O to channels 1 through 16 on DANTE ACCELERATOR.
NOTE
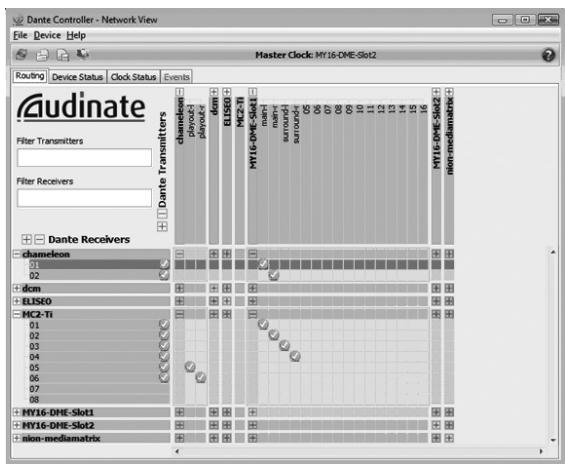
For details on the Dante Controller, refer to the Dante Controller manual.
Installing TOOLS for NUAGE
To install TOOLS for NUAGE, double-click the installer file you have downloaded from the website. For details, refer to the TOOLS for NUAGE installation guide.
Configuring the Workgroup on NUAGE
To configure the Workgroup, open the NUAGE Workgroup Manager then register the devices and DAW software applications to the Workgroup. For details, refer to the NUAGE Workgroup Manager manual (PDF). To open the NUAGE Workgroup Manager manual, double-click the NUAGE Workgroup Manager icon on the task tray (Windows) or menu bar (Mac) for opening the window, then click the "Manual" icon.
The setup is now completed.
Description of the Device
Front Panel
NUAGE I/O (16D)

NUAGE I/O (16A)
NUAGE I/O (8A8D)
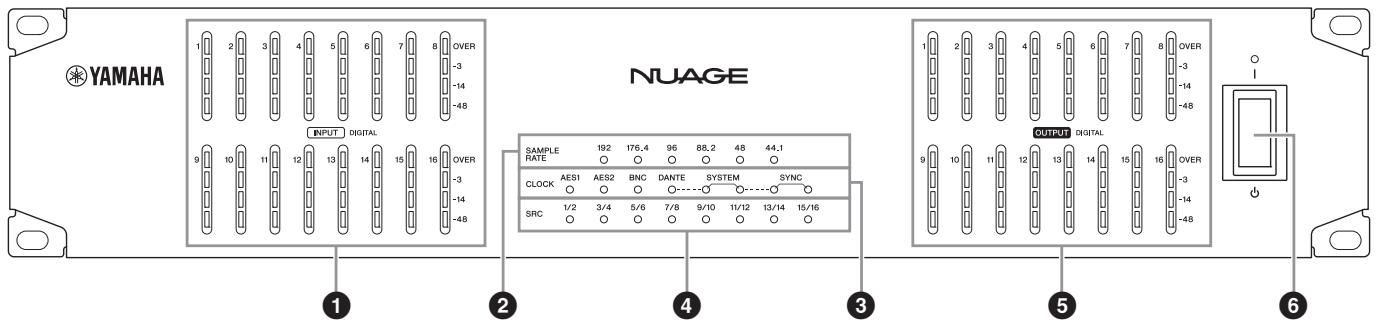
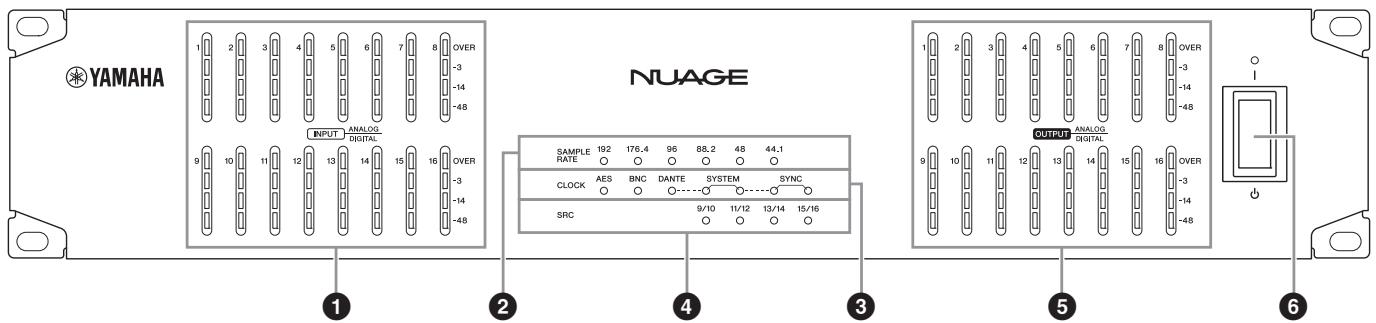
1 [INPUT level meter]
Indicates the input signal level of [ANALOG INPUT] (page 16) or [AES/EBU] (page 16) on the rear panel.
| Lamp | Lighting level |
| Top (red) | 0 dBFS |
| Second (orange) | -3 dBFS or more |
| Third (orange) | -14 dBFS or more |
| Bottom (green) | -48 dBFS or more |
2 [SAMPLE RATE indicator]
Indicates the sample rate of the device. To select the sample rate of the device, use the NUAGE Workgroup Manager (page 19).
[CLOCK indicator]
Indicates the word clock source of the device. To select the word clock source of the device, use the NUAGE Workgroup Manager (page 19).
The [SYSTEM indicator] indicates the system status of the device on the Dante network.
![YAMAHA NIO500-D16/NIO500-A16/NIO500-A8D8 - [CLOCK indicator] - 1](/content/2025/01/115264/images/8eb9b0e27d3054b4d56c62ee1bf6eb1dac4fb88a655ac374e20449e99b2f1c04.jpg)
| Lamp | Status | Description |
| Left (green) | Lit | The device is working properly. |
| Left (green) | Flashes (every second) | The firmware updating is in progress. |
| Right (red) | Lit | The memory on the device does not work properly. |
| Right (red) | Flashes (every second) | The CPU on the device does not work properly. |
The [SYNC indicator] indicates the synchronization status of the device on the Dante network.
![YAMAHA NIO500-D16/NIO500-A16/NIO500-A8D8 - [CLOCK indicator] - 2](/content/2025/01/115264/images/fbb8fdd5e75feb5cc39243f6680f8d454ee31bdfe7a10c7ee33ef96f69683083.jpg)
| Lamp | Status | Description |
| Left (green) | Lit | The device is working as the slave on the Dante network. |
| Left (green) | Flashes (every second) | The device is working as the master on the Dante network. |
| Right (orange) | Lit | Synchronization with the Dante network is in progress. |
| Right (orange) | Flashes (every second) | The device is not synchronized with the Dante network. |
[SRC indicator]
Indicates the status of the SRC (sample rate converter), on (lit) or off (unlit).
When you turn SRC on, even if the sample rate at which the device is operating differs from the sample rate of the audio signal input to the device, the SRC function automatically converts the rate of the signal so that playback will be correct. SRC is available on every two adjacent channels. To turn SRC on/off, use the NUAGE Workgroup Manager (page 19).
[OUTPUT level meter]
Indicates the output signal level of [ANALOG OUTPUT] (page 16) or [AES/EBU] (page 16) on the rear panel.
| Lamp | Lighting level |
| Top (red) | 0 dBFS |
| Second (orange) | -3 dBFS or more |
| Third (orange) | -14 dBFS or more |
| Bottom (green) | -48 dBFS or more |
[Power switch]
Turns the power on (I) and off (O). The lamp lights when the power is on, and is unlit when the power is off.
NOTICE
Rapidly turning the unit on and off in succession can cause it to malfunction. After turning the unit off, wait for at least 6 seconds before turning it on again.
Rear Panel
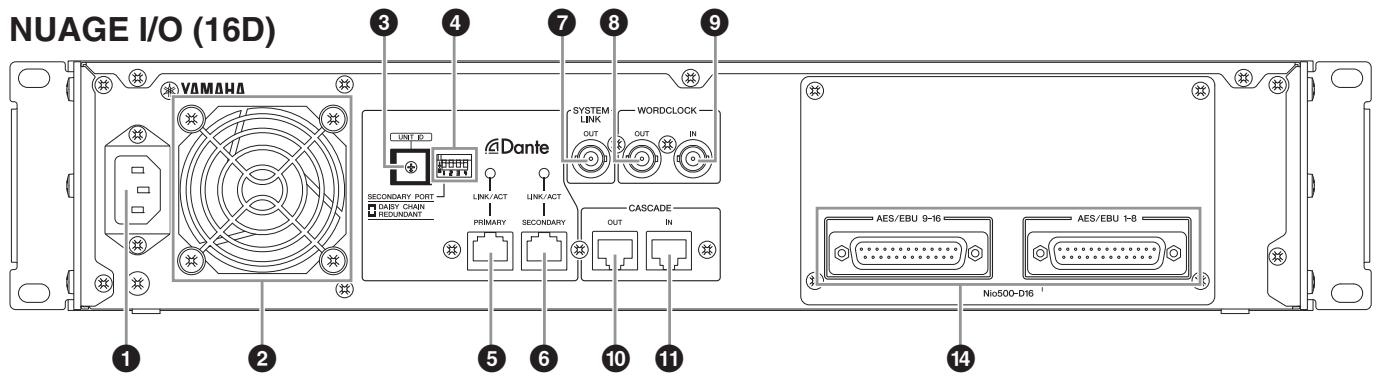
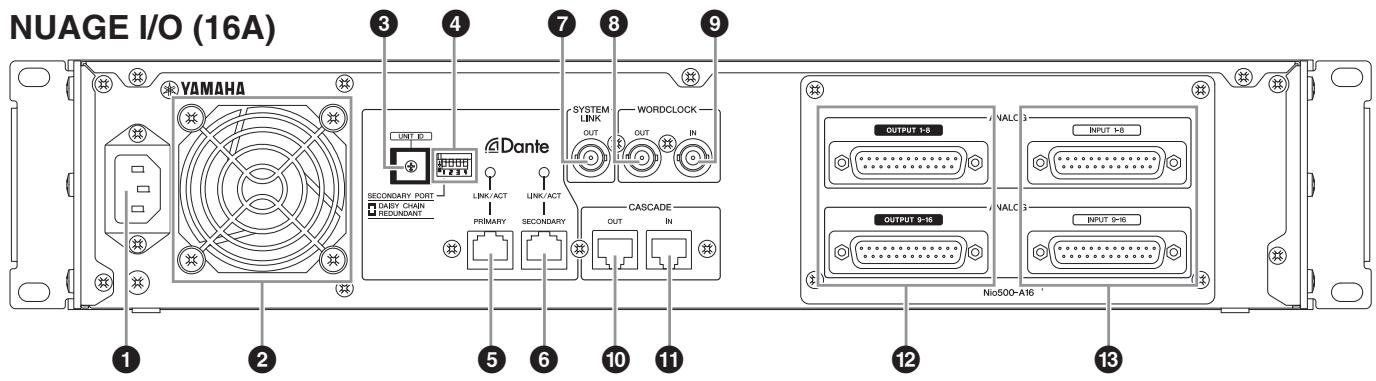
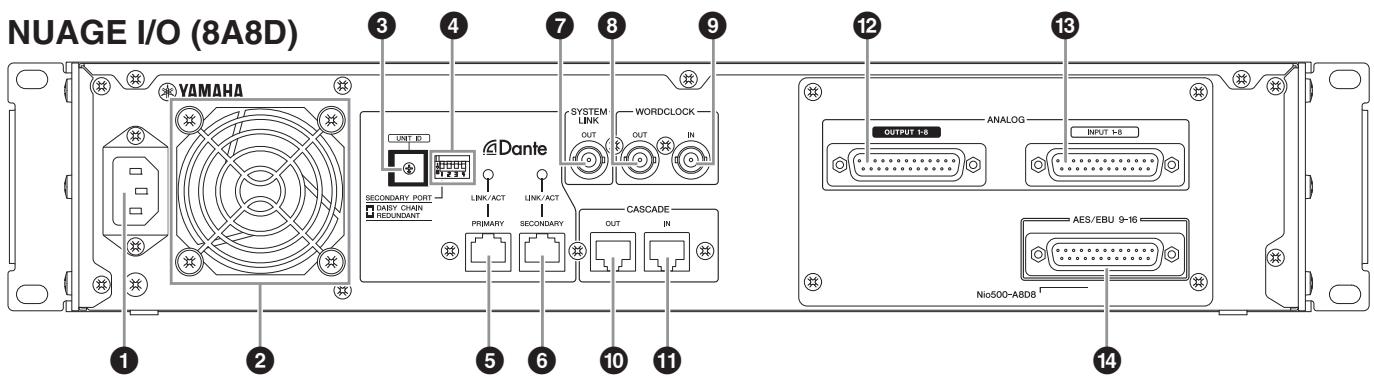
1 [AC IN]
For connection to the power cable.
2 [Fan]
The electric fan for expelling heat and cooling the unit.
[UNIT ID rotary switch]
Sets the device ID on the Dante network. When connecting multiple devices, set the ID on each device to a different number. Note that you can only select the device ID while the power is off. If you change this while the power is on, the new device ID will not be applied.
4 [Dip switch]
Sets the device settings or initializes them. Note that you can only select [Dip switch] while the power is off. If you change this while the power is on, the settings will not be applied.
[Dip switch] Description
1 Selects whether [SECONDARY] (page 15) will operate as a redundant network (page 9) or daisy chain connection (page 9). [SECONDARY] will operate as a redundant network when you turn this on (down), and daisy chain connection when you turn this off (up).
2 Initialized the device settings. Follow the steps below.
- Turn the power of the device off.
- Turn [Dip switch 2] on (down).
- Turn the power of the device on, then wait for the [OUTPUT level meter] of the 16 channels to flash at intervals.
- Turn the power of the device off.
- Turn [Dip switch 2] off (up).
- Turn the power of the device on.
3 Not used. Turn it off (up) at any time.
4 Not used. Turn it off (up) at any time.
[PRIMARY] (RJ-45 connector)
For connection to the Ethernet cable (CAT5e or better recommended). This connector is for construction of the Dante network, and is capable for input/output of sixteen channels of audio. For details on how to connect the devices, refer to "Setup" (page 10).
The lamp on this connector lights when the device is communicating with the Dante network.
NOTE
- Use STP (shielded twisted pair) cable to prevent electromagnetic interference. Make sure that the metal parts of the plugs are electrically connected to the STP cable shield by conductive tape or comparable means.
- Connect only Dante-compatible devices or GbE-compatible devices (including a computer).
[SECONDARY] (RJ-45 connector)
The same as [PRIMARY]. However, the connection configuration varies depending on the settings of [Dip switch] (page 15). For details on how to connect the devices, refer to "Setup" (page 10).
7 [SYSTEM LINK OUT] (BNC connector)
For connection to the BNC coaxial cable. When connecting this connector to NUENDO SyncStation, Nuendo and the devices maintain accurate synchronization with each other.
[WORDCLOCK OUT] (BNC connector)
For connection to the BNC coaxial cable. This connector outputs the word clock signal.
[WORDCLOCK IN] (BNC connector)
For connection to the BNC coaxial cable. This connector receives the word clock signal.
[ASCADE OUT] (RJ-45 connector)
For connection to the Ethernet cable (CAT5e or better recommended). This connector inputs and outputs sixteen channels of audio for the direct monitoring. This is useful when outputting the audio signal to another device with near-zero latency. You can use this function with Nuendo.
When connecting multiple devices, connect this to the [CASCADE IN] terminals on other devices as shown.
![YAMAHA NIO500-D16/NIO500-A16/NIO500-A8D8 - [ASCADE OUT] (RJ-45 connector) - 1](/content/2025/01/115264/images/5d1b73c44a274b16bcfaee20aab24c62d310849b4b34982626a583a583808df2.jpg)
Up to eight devices can be connected in this way.
NOTE
- Use a straight type (STP) cable of less than 3 meters.
- To use direct monitoring, complete "Setup" (page 10) then turn on "Direct Monitoring" in the "Device Setup" menu on Nuendo.
- The device can input and output audio signals for direct monitoring when the sample rate setting on the device is 96 kHz or lower. Direct monitoring is not supported for settings of over 96 kHz.
[1] [CASCADE IN] (RJ-45 connector)
Refer to [CASCADE OUT].
[ANALOG OUTPUT] (D-sub 25-pin connector)
For connection to a 25-pin D-sub analog cable. This connector outputs eight channels of audio.
[ANALOG INPUT] (D-sub 25-pin connector)
For connection to a 25-pin D-sub analog cable. This connector inputs eight channels of audio.
[AES/EBU] (D-sub 25-pin connector)
For connection to a 25-pin D-sub digital cable. This connector inputs and outputs eight channels of audio.
Description of the Software Programs
NUAGE I/O Setup
Overview
This software is for configuring the settings of the device from Nuendo. To open this window, click the Nuendo menu "Device" → "NUAGE I/O Setup."
NUAGE I/O Setup has the following two windows.
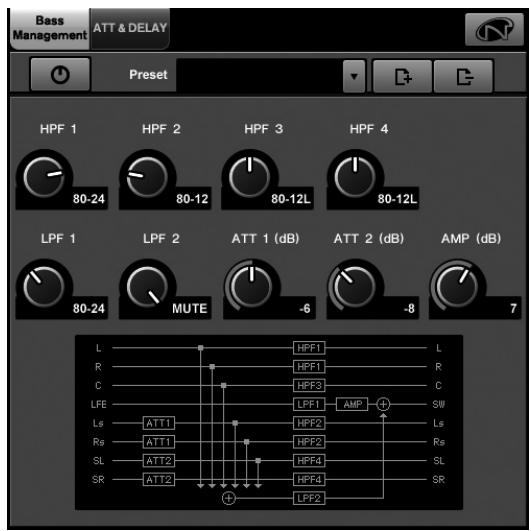
- Bass Management window
- ATT & Delay window
In the Bass Management window, you can separately adjust the bass sound of the output signal from the device in surround sound applications. In the ATT & Delay window, you can adjust the level and delay of the output signal from the device. To select the windows, click the tabs on the upper side of the NUAGE I/O Setup window.
When you press the NUAGE Workgroup Manager button on the upper right of the window, you can open the device settings window opened from the NUAGE Workgroup Manager. However, this is only available when launching the NUAGE Workgroup Manager on the same computer.
NOTE
- To use these functions, complete "Setup" (page 10).
- To use the Bass Management function, create a surround output bus (such as 5.1 channels) in the Nuendo menu "Devices" "VST connection." Also, assign the ports in one NUAGE I/O to the ports of this output bus.
Controls and Functions
Bass Management Window
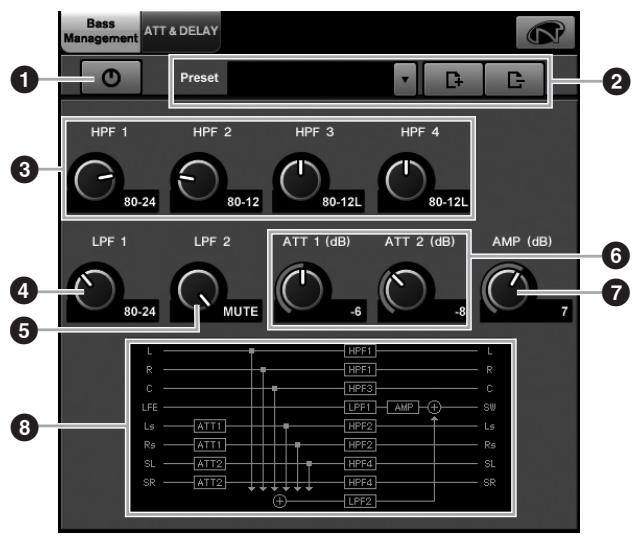
1 On/Off
Turns Bass Management on and off.
Presets
For selecting, storing, and deleting the preset.
The following presets are available in the default settings.
| Preset | HPF 1/2/3/4 | LPF1 | LPF2 | ATT 1/2 | AMP |
| DVD LFE80Hz | 80-12 | 80-24 | 80-24 | 0 | +10 |
| DVD LFE120Hz | 80-12 | 120-42 | 80-24 | 0 | +10 |
| Movie LFE80Hz | 80-12 | 80-24 | 80-24 | -3 | +10 |
| Movie LFE120Hz | 80-12 | 120-42 | 80-24 | -3 | +10 |
| Bypass | THRU | THRU | MUTE | 0 | 0 |
HPF1/2/3/4
Selects the type of high pass filter for each channel.
| Option | Description |
| THRU | The filter is not applied. |
| 80-12 | A Butterworth filter with a cutoff frequency of 80 Hz and -12 dB of attenuation. |
| 80-12L | A Linkwitz filter with a cutoff frequency of 80 Hz and -12 dB of attenuation. |
| 80-24 | A Butterworth filter with a cutoff frequency of 80 Hz and -24 dB of attenuation. |
| 80-24L | A Linkwitz filter with a cutoff frequency of 80 Hz and -24 dB of attenuation. |
LPF1
Selects the type of low pass filter for the LFE channel.
| Option | Description |
| THRU | The filter is not applied. |
| 80-24 | A Butterworth filter with a cutoff frequency of 80 Hz and -24 dB of attenuation. |
| 80-24L | A Linkwitz filter with a cutoff frequency of 80 Hz and -24 dB of attenuation. |
| 120-42 | A Butterworth filter with a cutoff frequency of 120 Hz and -42 dB of attenuation. |
LPF2
Selects the type of low pass filter for the LFE channel which is sent the signal from each channel.
| Option | Description |
| THRU | The filter is not applied. |
| 80-24 | A Butterworth filter with a cutoff frequency of 80 Hz and -24 dB of attenuation. |
| 80-24L | A Linkwitz filter with a cutoff frequency of 80 Hz and -24 dB of attenuation. |
| MUTE | The filter is muted. |
6 ATT1/2
Sets the attenuator for each channel. The setting range is from 0 dB to -12 dB.
7 AMP
Sets the amplifier for the LFE channel. The setting range is from 0 dB to +12 dB.
3 Block diagram
Indicates the position of each parameter in Bass Management.
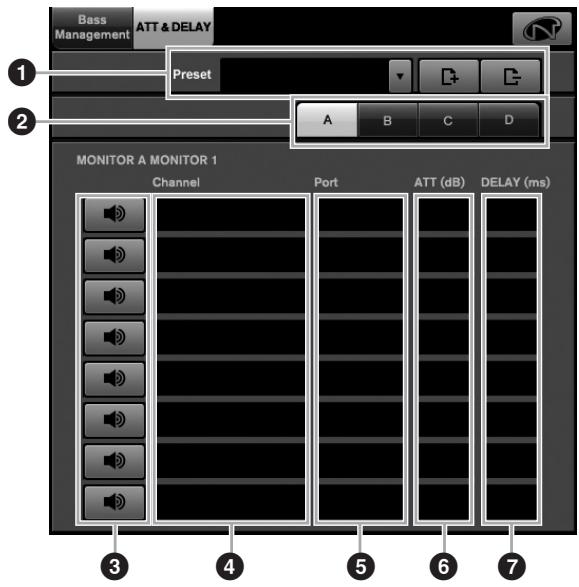
ATT & Delay Window
1 Presets
For selecting, storing, and deleting the preset.
Monitor
Selects the monitor for configuring the settings.
3 Mute on/off
Turns muting of the channel on and off.
4 Channel
Displays the channel.
⑤ Port
Displays the channel port.
6 ATT(dB)
Sets the attenuator/gain for speaker 1 and 2. The setting range is from 0 dB to -12 dB, and the smallest unit is 0.1 dB.
7 DELAY(ms)
Sets the delay for the channel. The setting range is from 0 to 30 milliseconds, and the smallest unit is 0.02 milliseconds.
NUAGE Workgroup Manager
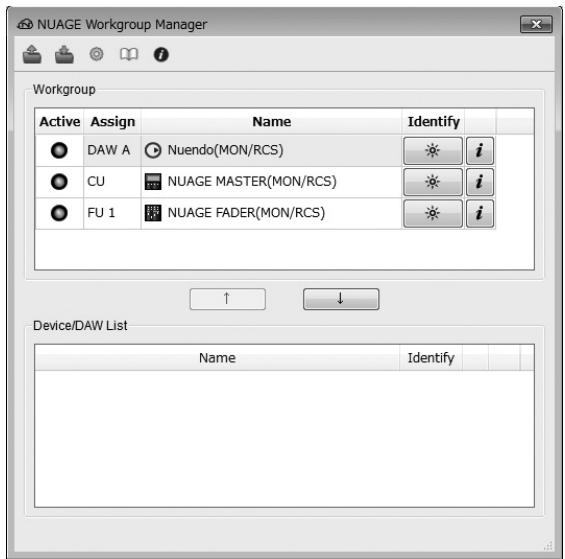
Overview
This is a software application that allows control over the devices and DAW software applications as a Workgroup on NUAGE system. To open this window, double-click the NUAGE Workgroup Manager icon on the task tray (Windows) or menu bar (Mac).
This section provides only the descriptions regarding the device settings on the NUAGE Workgroup Manager. For details on the NUAGE Workgroup Manager, refer to the corresponding manual (PDF) which can be opened from the "Manual" icon.
You can configure the following device settings in the NUAGE Workgroup Manager. However, the setting menu will differ depending on the particular devices being used.
- Adjusting the trim of the analog input and output signals.
- Selecting the level of the analog input signal.
- Selecting the word clock source.
- Turning the SRC (sample rate converter) of the digital input signal on and off.
- Turning the dual wire on and off.
To configure these settings, use the "Property Window" opened by clicking "Property" on the Workgroup area in the Main window.
Controls and Functions
NUAGE I/O (16D)
NUAGE I/O (16A)
NUAGE I/O (8A/8D)
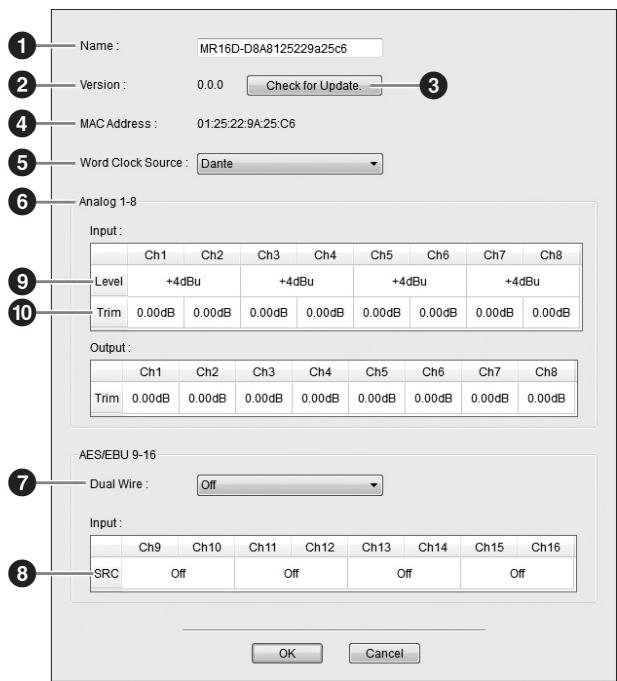
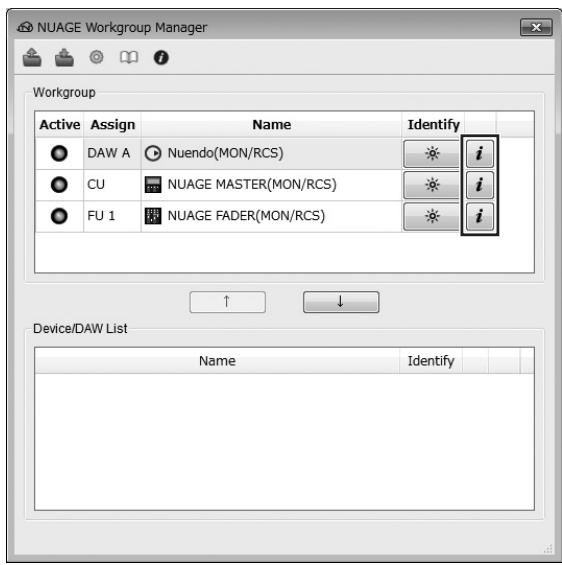
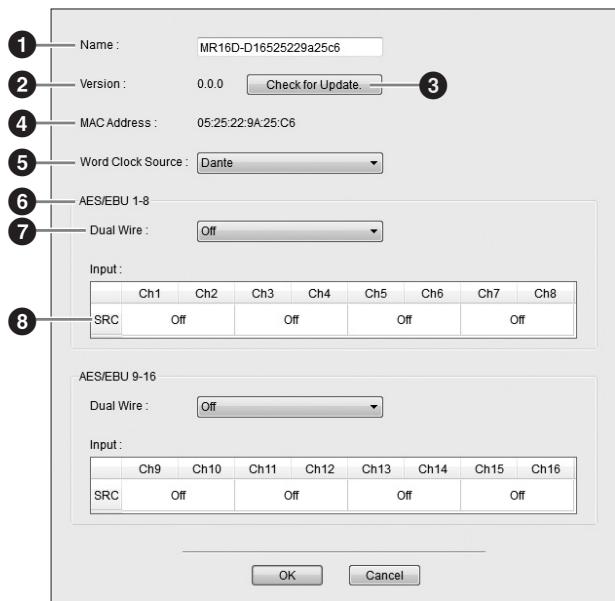
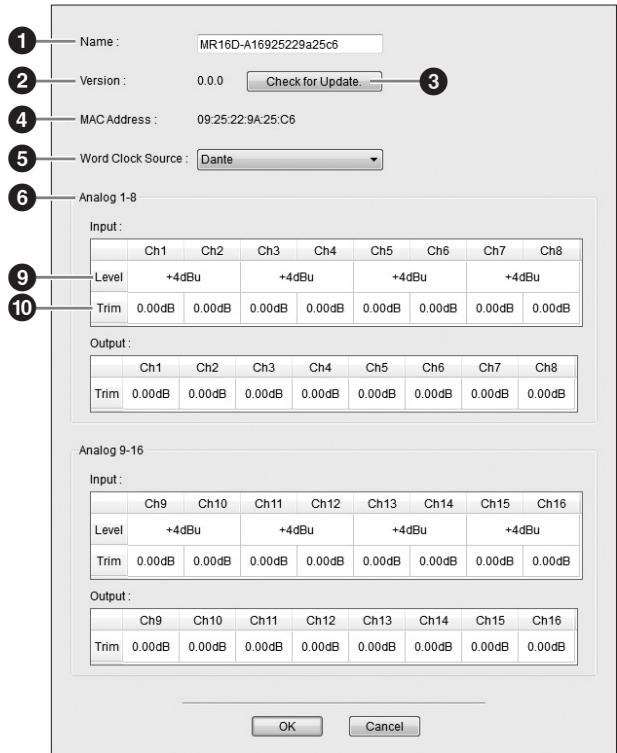
1 Name
Displays the name of the device or DAW software. To change this name, click "Property" on the Workgroup area in the Main window.
2 Version
Displays the version. You can confirm the firmware version in case of devices, or the version of NUAGE Extension in the case of Nuendo, or the version of NUAGE PT Bridge in the case of Pro Tools.
3 Check for Update
Checks whether or not you have the latest software or firmware version. via the Internet. If a new version is found, follow the on-screen instructions for updating.
4 MAC Address
Displays the MAC Address.
⑤ Word Clock Source
Selects the word clock source.
Input and output
Displays the input and output.
Dual Wire
Turns the Dual Wire function on and off. You can turn on and off the Dual Wire by eight channels.
This function is available when the sample rate is set to 88.2, 96, 176.4, and 192kHz , and also the SRC is turned off.
SRC
Turns the sample rate converter on and off. This function is only available when the Dual Wire is turned off.
Level
Selects the input level.
10 Trim
Adjusts the trim.
Troubleshooting
Power does not turn on.
- Is [Power switch] turned on?
- Is the power cable connected to a proper AC outlet?
- Is the power cable plug inserted all the way?
If the power still does not turn on, contact your Yamaha dealer.
Device is not communicating with Nuendo
- Is the Ethernet cable connected properly?
- Has "Installing TOOLS for NUAGE" (page 11) already been completed?
- Has "Configuring the Workgroup on NUAGE" (page 11) already been completed?
- Has "Configuring the Audio Routing of the Dante Network" (page 11) already been completed?
- In case of connecting multiple devices, has the [UNIT ID rotary switch] been set to a unique ID?
- Have the fire wall settings been set property?
Appendix
Firmware Updates
This product enables you to update the unit firmware to improve operations, add functions, and correct possible malfunctions. The following two types of firmware are available for the unit.
- Unit's firmware
Dante module firmware
You must update each type of firmware separately. Details on updating the firmware are available on the following website:
http://www.yamahaproaudio.com/
For information on updating and setting up the unit, please refer to the firmware update guide available on the website.
NOTE
When you update Dante firmware on the unit, be sure to update Dante firmware on other Dante-compatible devices connected to the NUAGE I/O.
Specifications
ELECTRICAL CHARACTERISTICS
| Sampling Frequency | Internal | 44.1kHz/48kHz/88.2kHz/96kHz/176.4kHz/192kHz | |
| External | 44.1kHz+4.1667%/+0.1%/-0.1%/-4.0% | ±200ppm | |
| 48kHz+4.1667%/+0.1%/-0.1%/-4.0% | ±200ppm | ||
| 88.2kHz+4.1667%/+0.1%/-0.1%/-4.0% | ±200ppm | ||
| 96kHz+4.1667%/+0.1%/-0.1%/-4.0% | ±200ppm | ||
| 176.4kHz+4.1667%/+0.1%/-0.1%/-4.0% | ±200ppm | ||
| 192kHz+4.1667%/+0.1%/-0.1%/-4.0% | ±200ppm | ||
| Analog Input/Output | Frequency Response | ±0.5dB, 20Hz - 20kHz, ref to the nominal output level @1kHz, Input&Output Gain: 0dB, Input level +4dBu(typ) | |
| THD+N*1 | Less than 0.005%, input to output, GAIN: 0dB | ||
| Dynamic Range | 120dB typ., ADC120dB typ., DAC | ||
| Crosstalk@1kHz | -100dB, CH1 - 16 , adjacent inputs | ||
ANALOG INPUT CHARACTERISTICS
| Input Terminals | Actual Load Impedance | For Use With Nominal | GAIN | Input level | Connector in Console | |
| Nominal | Max. before clip | |||||
| ANALOG INPUT | 20KΩ (BAL) | 150Ω Lines | 0dB | +4dBu (1.23 V) | +24dBu (12.28V) | D-SUB Connector 25P (Female) |
| 10KΩ (UNBAL) | 600Ω Lines | +12dB | -10dBV (0.32 V) | +10dBV (3.16V) | ||
ANALOG OUTPUT CHARACTERISTICS
| Output Terminals | Actual Load Impedance | For Use With Nominal | GAIN SW | Output level | Connector in Console | |
| Nominal | Max. before clip | |||||
| ANALOG OUTPUT | 75Ω(BAL) | 10kΩ Lines | 0dB | +4dBu (1.23 V) | +24dBu (12.28V) | D-SUB Connector 25P (Female) |
| -6dB | +18dBu (6.16 V) | |||||
DIGITAL INPUT CHARACTERISTICS
| Terminal | Format | Data length | Level | Connector in Console |
| AES/EBU | AES/EBU | 24bit | RS422 | D-SUB Connector 25P (Female) |
DIGITAL OUTPUT CHARACTERISTICS
| Terminal | Format | Data length | Level | Connector in Console |
| AES/EBU | AES/EBU Professional use | 24bit | RS422 | D-SUB Connector 25P (Female) |
DIGITAL INPUT & OUTPUT CHARACTERISTICS
| Terminal | Format | Data length | Level | Connector in Console |
| Primary/Secondary | Dante | 24bit | 1000Base-T | RJ-45 x 2 |
| Cascade | - | 32bit | LVDS*2 | RJ-45 x 2 |
CONTROL I/O CHARACTERISTICS
| Terminal | Format | Level | Connector in Console | |
| WORD CLOCK | IN | - | TTL/75Ω terminated | BNC Connector |
| OUT | - | TTL/75Ω | BNC Connector | |
| System Link Out | - | 1.0±0.2Vp-p/75Ω*3 | BNC Connector | |
General Specifications
| Power Requirements (wattage) | Nio500-D16: 51W Nio500-A16: 51W Nio500-A8D8: 51W |
| Power Requirements (voltage and hertz) | US/Canada: 120V 60Hz Japan: 100V 50/60Hz China: 110 – 240V 50/60Hz Korea: 220V 60Hz Other: 110 – 240V 50/60Hz |
| Temperature Range | Operating temperature range: 0 – 40°C Storage temperature range: -20 – 60°C |
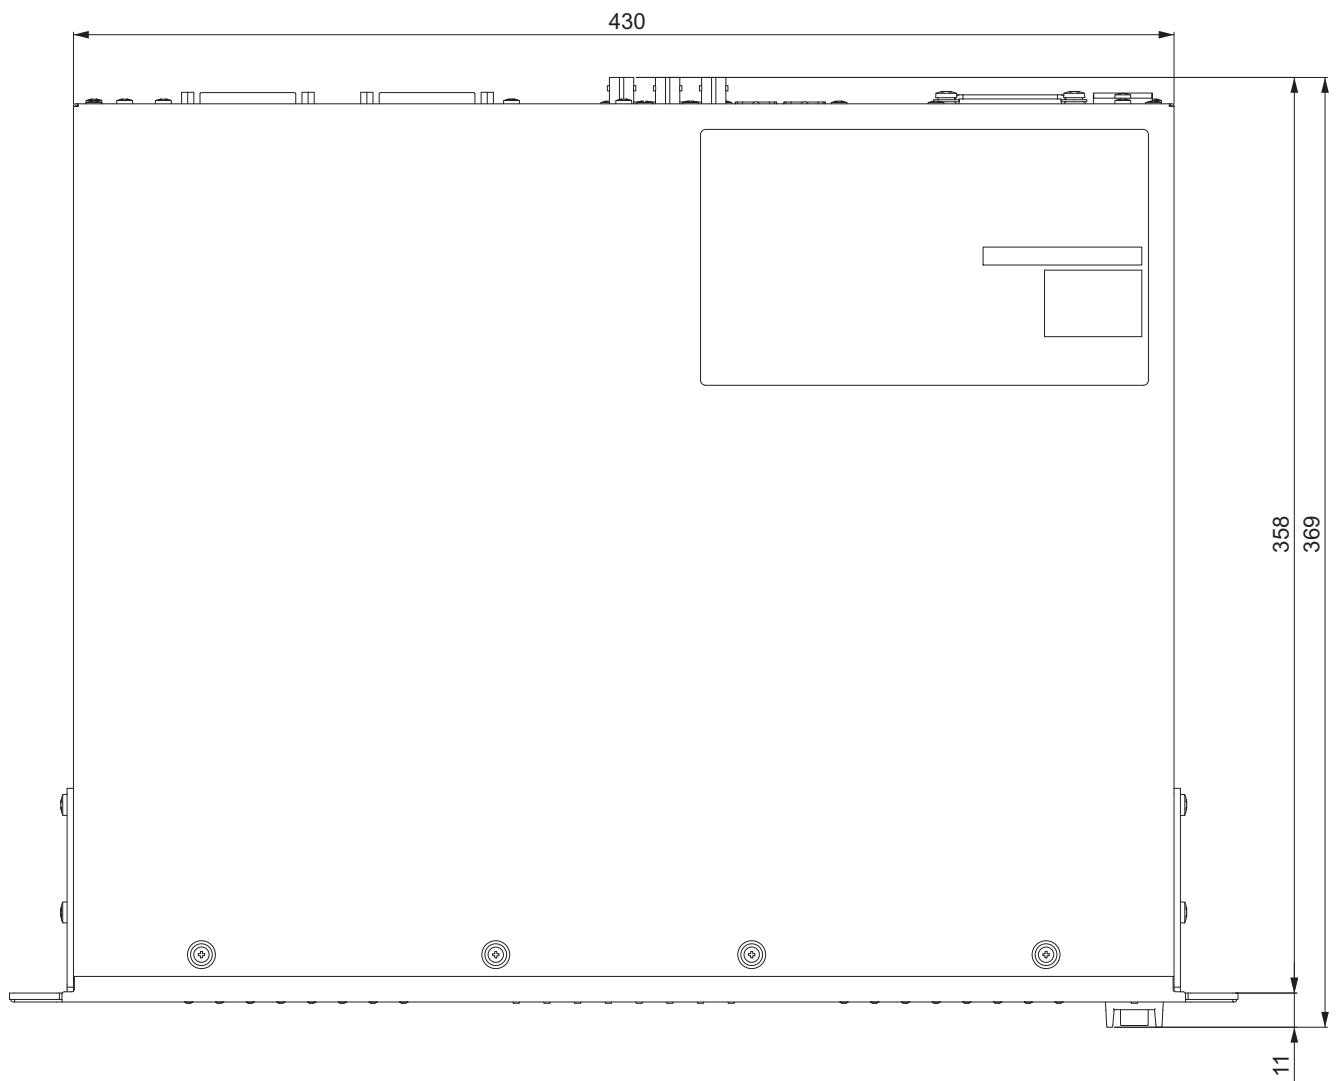
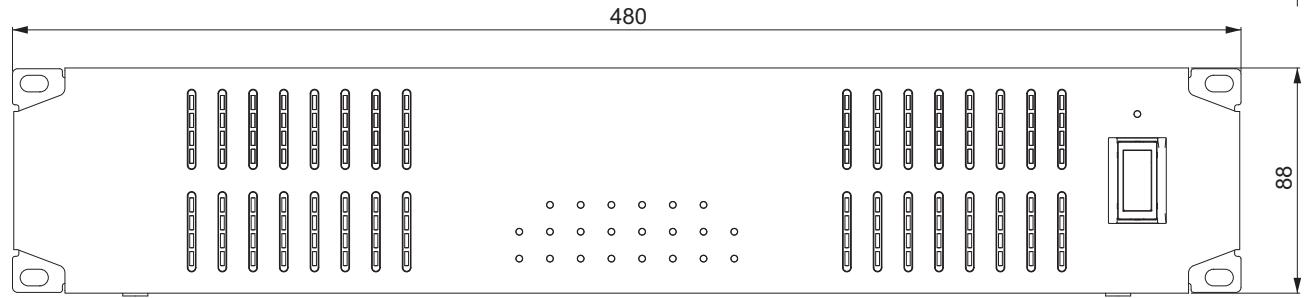
| Dimensions (W x H x D) | 480 x 88 x 369 mm |
| Net Weight | Nio500-D16: 6.4kg Nio500-A16: 6.7kg Nio500-A8D8: 6.7kg |
| Included Accessories | Power cable, Ferrite core, Rubber stoppers (4), Operation Manual |
1 These characteristics are measured with A-weighting filter and/or 30kHz LPF.
2 Hi Speed CML
*3 AES-3id
Pin Assignment
Analog Input
| Signal | Input Ch | Open | GND | ||||||||
| 1 (9) | 2 (10) | 3 (11) | 4 (12) | 5 (13) | 6 (14) | 7 (15) | 8 (16) | ||||
| Pin | Hot | 24 | 10 | 21 | 7 | 18 | 4 | 15 | 1 | 13 | 2, 5, 8, 11, 16, 19, 22, 25 |
| Cold | 12 | 23 | 9 | 20 | 6 | 17 | 3 | 14 | |||
Analog Output
| Signal | Output Ch | Open | GND | ||||||||
| 1 (9) | 2 (10) | 3 (11) | 4 (12) | 5 (13) | 6 (14) | 7 (15) | 8 (16) | ||||
| Pin | Hot | 24 | 10 | 21 | 7 | 18 | 4 | 15 | 1 | 13 | 2, 5, 8, 11, 16, 19, 22, 25 |
| Cold | 12 | 23 | 9 | 20 | 6 | 17 | 3 | 14 | |||
Digital Input & Output
| Signal | Data In Ch | Data Out Ch | Open | GND | |||||||
| 1-2 (9-10) | 3-4 (11-12) | 5-6 (13-14) | 7-8 (15-16) | 1-2 (9-10) | 3-4 (11-12) | 5-6 (13-14) | 7-8 (15-16) | ||||
| Pin | Hot | 1 | 2 | 3 | 4 | 5 | 6 | 7 | 8 | 9, 11 | 10, 12, 13, 22, 23, 24, 25 |
| Cold | 14 | 15 | 16 | 17 | 18 | 19 | 20 | 21 | |||
Specifications and descriptions in this manual are for information purposes only. Yamaha Corp. reserves the right to change or modify products or specifications at any time without prior notice. Since specifications, equipment or options may not be the same in every locale, please check with your Yamaha dealer.
NUAGE I/O (16D) / NUAGE I/O (16A) / NUAGE I/O (8A8D)
NUAGE I/O — 44.1/48/88.2/96kHz
NUAGE I/O — 176.4/192kHz

GNU GENERAL PUBLIC LICENSE
Version 2, June 1991
Copyright © 1989, 1991 Free Software Foundation, Inc.
51 Franklin Street, Fifth Floor, Boston, MA 02110-1301, USA
Everyone is permitted to copy and distribute verbatim copies of this license document, but changing it is not allowed.
Preamble
The licenses for most software are designed to take away your freedom to share and change it. By contrast, the GNU General Public License is intended to guarantee your freedom to share and change free software—to make sure the software is free for all its users. This General Public License applies to most of the Free Software Foundation's software and to any other program whose authors commit to using it. (Some other Free Software Foundation software is covered by the GNU Library General Public License instead.) You can apply it to your programs, too.
When we speak of free software, we are referring to freedom, not price. Our General Public Licenses are designed to make sure that you have the freedom to distribute copies of free software (and charge for this service if you wish), that you receive source code or can get it if you want it, that you can change the software or use pieces of it in new free programs; and that you know you can do these things.
To protect your rights, we need to make restrictions that forbid anyone to deny you these rights or to ask you to surrender the rights. These restrictions translate to certain responsibilities for you if you distribute copies of the software, or if you modify it.
For example, if you distribute copies of such a program, whether gratis or for a fee, you must give the recipients all the rights that you have. You must make sure that they, too, receive or can get the source code. And you must show them these terms so they know their rights.
We protect your rights with two steps: (1) copyright the software, and (2) offer you this license which gives you legal permission to copy, distribute and/or modify the software.
Also, for each author's protection and ours, we want to make certain that everyone understands that there is no warranty for this free software. If the software is modified by someone else and passed on, we want its recipients to know that what they have is not the original, so that any problems introduced by others will not reflect on the original authors' reputations.
Finally, any free program is threatened constantly by software patents. We wish to avoid the danger that redistributors of a free program will individually obtain patent licenses, in effect making the program proprietary. To prevent this, we have made it clear that any patent must be licensed for everyone's free use or not licensed at all.
The precise terms and conditions for copying, distribution and modification follow.
TERMS AND CONDITIONS FOR COPYING, DISTRIBUTION AND MODIFICATION
- This License applies to any program or other work which contains a notice placed by the copyright holder saying it may be distributed under the terms of this General Public License. The "Program", below, refers to any such program or work, and a "work based on the Program" means either the Program or any derivative work under copyright law: that is to say, a work containing the Program or a portion of it, either verbatim or with modifications and/or translated into another language. (Hereinafter, translation is included without limitation in the term "modification".) Each licensee is addressed as "you".
Activities other than copying, distribution and modification are not covered by this License; they are outside its scope. The act of running the Program is not restricted, and the output from the Program is covered only if its contents constitute a work based on the Program
(independent of having been made by running the Program). Whether that is true depends on what the Program does.
- You may copy and distribute verbatim copies of the Program's source code as you receive it, in any medium, provided that you conspicuously and appropriately publish on each copy an appropriate copyright notice and disclaimer of warranty; keep intact all the notices that refer to this License and to the absence of any warranty; and give any other recipients of the Program a copy of this License along with the Program.
You may charge a fee for the physical act of transferring a copy, and you may at your option offer warranty protection in exchange for a fee.
-
You may modify your copy or copies of the Program or any portion of it, thus forming a work based on the Program, and copy and distribute such modifications or work under the terms of Section 1 above, provided that you also meet all of these conditions:
-
a) You must cause the modified files to carry prominent notices stating that you changed the files and the date of any change.
- b) You must cause any work that you distribute or publish, that in whole or in part contains or is derived from the Program or any part thereof, to be licensed as a whole at no charge to all third parties under the terms of this License.
- c) If the modified program normally reads commands interactively when run, you must cause it, when started running for such interactive use in the most ordinary way, to print or display an announcement including an appropriate copyright notice and a notice that there is no warranty (or else, saying that you provide a warranty) and that users may redistribute the program under these conditions, and telling the user how to view a copy of this License. (Exception: if the Program itself is interactive but does not normally print such an announcement, your work based on the Program is not required to print an announcement.)
These requirements apply to the modified work as a whole. If identifiable sections of that work are not derived from the Program, and can be reasonably considered independent and separate works in themselves, then this License, and its terms, do not apply to those sections when you distribute them as separate works. But when you distribute the same sections as part of a whole which is a work based on the Program, the distribution of the whole must be on the terms of this License, whose permissions for other licensees extend to the entire whole, and thus to each and every part regardless of who wrote it.
Thus, it is not the intent of this section to claim rights or contest your rights to work written entirely by you; rather, the intent is to exercise the right to control the distribution of derivative or collective works based on the Program.
In addition, mere aggregation of another work not based on the Program with the Program (or with a work based on the Program) on a volume of a storage or distribution medium does not bring the other work under the scope of this License.
-
You may copy and distribute the Program (or a work based on it, under Section 2) in object code or executable form under the terms of Sections 1 and 2 above provided that you also do one of the following:
-
a) Accompany it with the complete corresponding machine-readable source code, which must be distributed under the terms of Sections 1 and 2 above on a medium customarily used for software interchange; or,
- b) Accompany it with a written offer, valid for at least three years, to give any third party, for a charge no more than your cost of physically performing source distribution, a complete machine-readable copy of the corresponding source code, to be distributed under the terms of Sections 1 and 2 above on a medium customarily used for software interchange; or,
- c) Accompany it with the information you received as to the offer to distribute corresponding source code. (This alternative is allowed only for noncommercial distribution and only if you received the program in object code or executable form with such an offer, in accord with Subsection b above.)
The source code for a work means the preferred form of the work for making modifications to it. For an executable work, complete source code means all the source code for all modules it contains, plus any
associated interface definition files, plus the scripts used to control compilation and installation of the executable. However, as a special exception, the source code distributed need not include anything that is normally distributed (in either source or binary form) with the major components (compiler, kernel, and so on) of the operating system on which the executable runs, unless that component itself accompanies the executable.
If distribution of executable or object code is made by offering access to copy from a designated place, then offering equivalent access to copy the source code from the same place counts as distribution of the source code, even though third parties are not compelled to copy the source along with the object code.
-
You may not copy, modify, sublicense, or distribute the Program except as expressly provided under this License. Any attempt otherwise to copy, modify, sublicense or distribute the Program is void, and will automatically terminate your rights under this License. However, parties who have received copies, or rights, from you under this License will not have their licenses terminated so long as such parties remain in full compliance.
-
You are not required to accept this License, since you have not signed it. However, nothing else grants you permission to modify or distribute the Program or its derivative works. These actions are prohibited by law if you do not accept this License. Therefore, by modifying or distributing the Program (or any work based on the Program), you indicate your acceptance of this License to do so, and all its terms and conditions for copying, distributing or modifying the Program or works based on it.
-
Each time you redistribute the Program (or any work based on the Program), the recipient automatically receives a license from the original licensor to copy, distribute or modify the Program subject to these terms and conditions. You may not impose any further restrictions on the recipients' exercise of the rights granted herein. You are not responsible for enforcing compliance by third parties to this License.
-
If, as a consequence of a court judgment or allegation of patent infringement or for any other reason (not limited to patent issues), conditions are imposed on you (whether by court order, agreement or otherwise) that contradict the conditions of this License, they do not excuse you from the conditions of this License. If you cannot distribute so as to satisfy simultaneously your obligations under this License and any other pertinent obligations, then as a consequence you may not distribute the Program at all. For example, if a patent license would not permit royalty-free redistribution of the Program by all those who receive copies directly or indirectly through you, then the only way you could satisfy both it and this License would be to refrain entirely from distribution of the Program.
If any portion of this section is held invalid or unenforceable under any particular circumstance, the balance of the section is intended to apply and the section as a whole is intended to apply in other circumstances.
It is not the purpose of this section to induce you to infringe any patents or other property right claims or to contest validity of any such claims; this section has the sole purpose of protecting the integrity of the free software distribution system, which is implemented by public license practices. Many people have made generous contributions to the wide range of software distributed through that system in reliance on consistent application of that system; it is up to the author/donor to decide if he or she is willing to distribute software through any other system and a licensee cannot impose that choice.
This section is intended to make thoroughly clear what is believed to be a consequence of the rest of this License.
-
If the distribution and/or use of the Program is restricted in certain countries either by patents or by copyrighted interfaces, the original copyright holder who places the Program under this License may add an explicit geographical distribution limitation excluding those countries, so that distribution is permitted only in or among countries not thus excluded. In such case, this License incorporates the limitation as if written in the body of this License.
-
The Free Software Foundation may publish revised and/or new versions of the General Public License from time to time. Such new versions will be similar in spirit to the present version, but may differ in detail to address new problems or concerns.
Each version is given a distinguishing version number. If the Program specifies a version number of this License which applies to it and "any later version", you have the option of following the terms and conditions either of that version or of any later version published by the Free Software Foundation. If the Program does not specify a version number of this License, you may choose any version ever published by the Free Software Foundation.
- If you wish to incorporate parts of the Program into other free programs whose distribution conditions are different, write to the author to ask for permission. For software which is copyrighted by the Free Software Foundation, write to the Free Software Foundation; we sometimes make exceptions for this. Our decision will be guided by the two goals of preserving the free status of all derivatives of our free software and of promoting the sharing and reuse of software generally.
NO WARRANTY
- BECAUSE THE PROGRAM IS LICENSED FREE OF CHARGE, THERE IS NO WARRANTY FOR THE PROGRAM, TO THE EXTENT PERMITTED BY APPLICABLE LAW. EXCEPT WHEN OTHERWISE STATED IN WRITING THE COPYRIGHT HOLDERS AND/OR OTHER PARTIES PROVIDE THE PROGRAM "AS IS" WITHOUT WARRANTY OF ANY KIND, Either EXPRESSED OR IMPLIED, INCLUDING, BUT NOT LIMITED TO, THE IMPLIED WARRANTY OF MERCHANTABILITY AND FITNESS FOR A PARTICULAR PURPOSE. THE ENTIRE RISK AS TO THE QUALITY AND PERFORMANCE OF THE PROGRAM IS WITH YOU. SHOULD THE PROGRAM PROVE DEFECTIVE, YOU ASSUME THE COST OF ALL NECESSARY SERVICING, REPAIR OR CORRECTION.
- IN NO EVENT UNLESS REQUIRED BY APPLICABLE LAW OR AGREED TO IN WRITING WILL ANY COPYRIGHT HOLDER, OR ANY OTHER PARTY WHO MAY MODIFY AND/OR REDISTRIBUTE THE PROGRAM AS PERMITTED ABOVE, BE LIABLE TO YOU FOR DAMAGES, INCLUDING ANY GENERAL, SPECIAL, INCIDENTAL OR CONSEQUENTIAL DAMAGES ARISING OUT OF THE USE OR INABILITY TO USE THE PROGRAM (INCLUDING BUT NOT LIMITED TO LOSS OF DATA OR DATA BEING RENDERED INACCURATE OR LOSSES SUSTAINED BY YOU OR THIRD PARTIES OR A FAILURE OF THE PROGRAM TO OPERATE WITH ANY OTHER PROGRAMS), EVEN IF SUCH HOLDER OR OTHER PARTY HAS BEEN ADVISED OF THE POSSIBILITY OF SUCH DAMAGES.
END OF TERMS AND CONDITIONS
How to Apply These Terms to Your New Programs
If you develop a new program, and you want it to be of the greatest possible use to the public, the best way to achieve this is to make it free software which everyone can redistribute and change under these terms.
To do so, attach the following notices to the program. It is safest to attach them to the start of each source file to most effectively convey the exclusion of warranty; and each file should have at least the "copyright" line and a pointer to where the full notice is found.
one line to give the program's name and an idea of what it does.
Copyright © yyyy name of author
This program is free software; you can redistribute it and/or modify it under the terms of the GNU General Public License as published by the Free Software Foundation; either version 2 of the License, or (at your option) any later version.
This program is distributed in the hope that it will be useful, but WITHOUT ANY WARRANTY; without even the implied warranty of MERCHANTABILITY or FITNESS FOR A PARTICULAR PURPOSE. See the GNU General Public License for more details.
You should have received a copy of the GNU General Public License along with this program; if not, write to the Free Software Foundation, Inc., 51 Franklin Street, Fifth Floor, Boston, MA 02110-1301, USA.
Also add information on how to contact you by electronic and paper mail.
If the program is interactive, make it output a short notice like this when it starts in an interactive mode:
Gnomovision version 69, Copyright © year name of author
Gnomovision comes with ABSOLUTELY NO WARRANTY; for details type show w'. This is free software, and you are welcome to redistribute it under certain conditions; typeshow c' for details.
The hypothetical commands show w' andshow c' should show the appropriate parts of the General Public License. Of course, the commands you use may be called something other than show w' andshow c'; they could even be mouse-clicks or menu items--whatever suits your program.
You should also get your employer (if you work as a programmer) or your school, if any, to sign a "copyright disclaimer" for the program, if necessary. Here is a sample; alter the names:
Yoyodyne, Inc., hereby disclaims all copyright interest in the program 'Gnomovision' (which makes passes at compilers) written by James Hacker.
signature of Ty Coon, 1 April 1989
Ty Coon, President of Vice
This General Public License does not permit incorporating your program into proprietary programs. If your program is a subroutine library, you may consider it more useful to permit linking proprietary applications with the library. If this is what you want to do, use the GNU Library General Public License instead of this License.
Note on source code distribution
For three years after the final factory shipment, you may request from Yamaha the source code for any portions of the product which are licensed under the GNU General Public License by writing to the following address:
PA Marketing Group Marketing Department Pro Audio Division, YAMAHA Corporation
10-1 Nakazawa-cho, Naka-ku, Hamamatsu, 430-8650, JAPAN
The source code will be provided at no charge; however, we may require you to reimburse Yamaha for the cost of delivering the source code to you.
- Note that we shall bear no responsibility whatsoever for any damage arising from changes (additions/ deletions) made to the software for this product by a third party other than Yamaha (or party authorized by Yamaha).
- Note that re-use of source code released to the public domain by Yamaha is unguaranteed, and Yamaha shall not bear any responsibility whatsoever for the source code.
- The source code can be downloaded from the following address: http://yamahaproaudio.com/
PA Marketing Group Marketing Department Pro Audio Division, YAMAHA Corporation
10-1 Nakazawa-cho, Naka-ku, Hamamatsu, 430-8650, JAPAN
PA Marketing Group Marketing Department Pro Audio Division, YAMAHA Corporation
10-1 Nakazawa-cho, Naka-ku, Hamamatsu, 430-8650, JAPAN
PA Marketing Group Marketing Department Pro Audio Division, YAMAHA Corporation
10-1 Nakazawa-cho, Naka-ku, Hamamatsu, 430-8650, JAPAN
PA Marketing Group Marketing Department Pro Audio Division, YAMAHA Corporation
10-1 Nakazawa-cho, Naka-ku, Hamamatsu, 430-8650, JAPAN
PA Marketing Group Marketing Department Pro Audio Division, YAMAHA Corporation 10-1 Nakazawa-cho, Naka-ku, Hamamatsu, 430-8650, JAPAN
IcxOndbI KOJ NOCTaBJIeTc8 6ecnlaTHo, OdHako BAc MOryT nonpocntb Bo3MeCTnTb KOpnpaun yama h pacxoDbI no ero nepecbJIKe.
CneJyETOTMeTnB,HTO KOpnpaunHe Hecet OTBeCTBeHHocTH3a JIOboy uep6,BO3HKnUIN B Pe3yIbTaTE N3MeHeHNI (DOnJIHeHIN/ ydaJeHNI), npOn3BeDeHHbIX B pOrpamMHom OBeCneHEmN DAnHORo npOyKTA TpeTbIMN IInaMn, He IMeIoUIMN OTHOWeHnK KopnpaunmYama (uIN He JaBIAUImMCs yNoHOMOeHHbIMn npedctabNTeJIaMn KOpnpaunmYama).
- TaKke cIeJyET OTMeTnTb, YTO BTOpUHHe IcNOLb3OBAHne IcxOdHoro KoJa, BblNyUeHHoro IpyNpUHoro IcNOLb3OBAHnI KOpnpaUeM YamaHa, He JABJIETcI ppeMeTOM rapaHTmI N yTO YamaHa He Hecet OTBETCTBeHHocTn 3a JIO6oe IcNOLb3OBAHne TAKoro IcxOdHoro KoJa.
- IcxoHbI KOd MoKHO 3aRpy3ntb c Be6-caI Ta no aIpecy: http://yamahaproaudio.com/
关于源代码分发的注意事项
Information for Users on Collection and Disposal of Old Equipment

This symbol on the products, packaging, and/or accompanying documents means that used electrical and electronic products should not be mixed with general household waste.
For proper treatment, recovery and recycling of old products, please take them to applicable collection points, in accordance with your national legislation and the Directives 2002/96/EC.
By disposing of these products correctly, you will help to save valuable resources and prevent any potential negative effects on human health and the environment which could otherwise arise from inappropriate waste handling.
For more information about collection and recycling of old products, please contact your local municipality, your waste disposal service or the point of sale where you purchased the items.
[For business users in the European Union]
If you wish to discard electrical and electronic equipment, please contact your dealer or supplier for further information.
[Information on Disposal in other Countries outside the European Union]
This symbol is only valid in the European Union. If you wish to discard these items, please contact your local authorities or dealer and ask for the correct method of disposal.
Important Notice: Guarantee Information for customers in European Economic Area (EEA) and Switzerland
| Important Notice: Guarantee Information for customers in EEA* and Switzerland For detailed guarantee information about this Yamaha product, and Pan-EEA* and Switzerland warranty service, please either visit the website address below (Printable file is available at our website) or contact the Yamaha representative office for your country. * EEA: European Economic Area | English |
| Wichtiger Hinweis: Garantie-Information für Kunden in der EWR* und der Schweiz Fürnahme Garantie-Informatique über desses Produkt von Yamaha, sowie über den Pan-EWR* und Schweizer Garantieservice, besuchen Sieitte entweder die folgenden anteile des begebene Internetadresses (eine druckfähige Version befindet sich auf unserer Seiten), oder wenden Sie sich an den für Ihr land zuständigen Yamaha-Vertrieb. * EWR: Europäischer Wirtschaftswärme | Deutsch |
| Remarque importante: informations de garantie pour les clients de l'EEA et la Suisse Pour des informations plus détaillées sur la garantie de ce produit de l'EEA, ou les services de garantie applicable dans l'ensemble de l'EEA ainsi qu'en Suisse, consultez notre site Web à l'adres ci-dessous (le fjichier imprimable est disponible sur notre site Web) ou contactez directement à l'achat de la société de la société en un cas de l'achat de la société en un cas de l'achat de la société en un cas de l'achat de la société en un cas de l'achat de la société en un cas de l'achat de la société en un cas de l'achat de la société en un cas de l'achat de la société en un cas de l'achat de la société en un cas de l'achat de la société en un cas de l'achat de la société en un cas de l'chatte du travail. Belangrête mecedeling: Garantie-informatique voor klanten in de EER* en Zwitserland Voor gegetalleerde garantie-informatique over dit Yamaha-producte en de garantieservice in heel de EER* en Zwitserland, gaat u naar de onderstaande website (u vind een afdrukbaar bestand op once website) of neemt u contact met de vertegenwording van Yamaia in uw land. * EER: Espacie Economique Europeen | Nederland |
| Avisio importante: information sobre la garantia para los clients de l'EEA y Suza Para una informacion detallada sobre este produco Yamaia y sobre el soporte de garantia en la zona EEE* y Suza, visite la direction web que se incluye más bajo (la version del archivo para imprint esta disponible en nuestro situ web) o pongase en contacto con el representante de Yamaia en su pays. * EEE: Espacio Economico Europeo | Espanol |
| Avviso importante: informazioni sulla garanzia per i clienti residenti nell'EEA* e in Swizzera Per informazioni dettaglale sulla garanzia relative a quello prodotto Yamaia e l'assistenza in garanzia nei paesi EEA* e in Swizzera, potete consultare il site Web all'indirizzo rportato di seguito (è disponibile il file in formato stampabile) oppure contattare l'ufficio di rappresentazione locale della Yamaia. * EEA: Area Economica Europea | Italiano |
| Avisio importante: informazioni sobre as garantias para clients da AEE* e da Suza Para tener una informazione potermorizada sobre este produco da Yamaia y sobre o serviceo de garantia na AEE* e na Suza, visite o site a seguir (o arquivo para impressão está dispiwon del noesso site) ou entre em contacto com o escrito/do de representation da Yamaia no seu pais. * AEE: Area EconOMICa Europaia | Português |
| Σημντή Σπειώρος Πλυροφορίες ευγύσους για τοῦ Διατές στόν ΕΟχ* και Ελβείσα Για λεπτομείς Πλυροφορίες ευγύσους σχεπά με το τρόν προίους Ακείας κα το τρόν προίους Ακείας ΕΑΩγύσους σε δέλες τι χωρες τού ΕΟχ κα τι Ελβείσα επικερείς τιν Φιρκάτων τιν Τιρακάτων Πτολελδύθους (Ektrumoumian μρρρι ενλίαδεδύμιη Μτή Φιροελλόθους μας) έπευμυθένει Ετήν ανπρομείας Πτή Φιρκάσα, * EOX: Eupmaia/Kókovoukić/Kókovoukić/Kókovoukić/Kókovoukić/Kókovoukić/Kókovoukić/Kókovoukić/Kókovoukić/Kókovoukić/Kókovoukić/Kókovoukić/Kókovoukić/Kókovoukić/Kókovoukić/Kókovoukić/Kápocos | Eλλννίκα |
| Viktig: Garantiinformation für kunder i EES-omradet'och Schweiz Förder detailerad information on ditta Yamaahprodukt samt garantiiservice i hela EES-omradet'och Schweiz kan du antingen besöka nedanstännde webbadress (en utskriftsvänlig fil finns på webplatsen) ellter kontakte Yamahas officiella représentant i ditt land. * EES: Europeiska Ekonomiska Samarbetssomradet | Svenska |
| Viktig merknad: Garantiinformationson kunder i EOS* og Sveits Detaljert garantiinformationson dittee Yamaahprodukt og garantiiservice for hele EOS-omradet'og Sveits kan fás enten ved à besoke nettadressen nedenfor (utskriftssvorsjren finnes à vare nettsider) Vollte myös ottaa yhtyttä paikalliseen Yamaah-odustajaan. *ETA: Europan talusalue Wagane: Warunki garancjne obowiajuzace w EOG* i Szwajcari Aby dowiedziez giere ni semat warunki gwarancjnyhego tego produccu firmy Yamaia i serwiswu gwarancjnyeigo w calym EOG* i Szwajcari, nalezy odwedzić zskazana ponijez strone internetotw (Plk gotawy do wydruku znajdujie na snazej stronie internetotwej) lub skontaktowac giere z przdstawcieistlem firmy Yamaia w spoim kraju. * EOG - Europejsk Obszar Gospodarczy | Norsk |
| Victig oplysning: Garantioplyninger til kunder i EEO* og Schweiz De danke darifede detailerade garantioplyninger on ditte Yamaahprodukt og den failes garantiiserviceordinfor EOO* (og Schweiz) ved at besage det webdset, der er angivet nedorfenfor (der findes en fil, somkan oduksrds, va pores webdset), ellver ved at contacte Yamaahs nationale representationskontorl i det land, hvor De bor. * EOO: Det Europeaiske Ökonomiska Omrade Tärkä Ilmoitus: Takuutiedot Europonan talusalueen (ETA)* ja Sveitsin asiakaille Tämän Yamaah-tuutteen sekä ETA-aluenen je Sveitsin takuuska koskevat yksityskohaitais tiedot saatte alla olevasta nettosioitse teesta. (Tulostettava tiedosto saatavissa svistollamme.) Voitte myös ottaa yhtyttä paikalliseen Yamaah-odustajaan. *ETA: Europan talusalue Wagane: Warunki garancjne obowiajuzace w EOG* i Szwajcari Aby dowiedziez giere ni semat warunki gwarancjnyhego tego produccu firmy Yamaia i serwiswu gwarancerjnyeigo w calym EOG* i Szwajcari, nalezy odwedzić zskazana ponijez strone internetotw (Plk gotawy do wydruku znajdujie na snazej stronie internetotwej) lub skontaktowac giere z przdstawcieistlem firmy Yamaia w spoim kraju. * EOG - Europejski Obszar Gospodarczy | Suomi |
| Duležite oznámieni: Zárucni informace pro zákovánek y EHO* a ve Švycarsku Podrobné záručni informace o toto producui Yamaia y záručném servissu v celem EHO* a ve Švycarsku nalezene na nière udvenedé webvoce adrese (soubor k tisku je dostupné na našich webovych strankách) nebo meuzzi obrát in zastupeni fimy Yamaia ve své zemi. * EHS: Evropský hospodářský prostor Fontos figyelmeztetis: Garancjna-infernoi éz teruletén észalárlók szamára A jelen Yamaah termekre vanatkozó részlajtes garancjna-infernoi w yedyapitekajr zielugialo zolgaltataś tekvintenetjiben keresse fel webhyyūnetk al alabbi cimen (a webhelyen nyomathathof fajlt is talāl), vagy pedjlen kapsolatiba z azrósagabán mūkōdō Yamañó kóviseletti iridaval. * EGT: Europai Gazdasagi Térseg Ouline markus: Garantiitave Euroopa Majanduspirkonna (EMP*) ji Švysii si klinientele Täpsema teabe saamireks sellée Yamaia toto garantiin ning kogu Europea Majanduspirkonna ji Švysii sljczdu, apemekljel zemák noraditi timkja vries adresi (tmekjla vietne ir piejams drukajams fails) viä sazinieties ar jusu valsti apkalojošn yamaia pärstvniebu. * EEO: Eupmaia Majanduspirkond Svarigs pazinojums: garantijas informacijs klientiem EEOZ* un Švicié Latviešu Lai sāgemtu detaližité garantijas informacijs up soу yamaia yuka ká rígarntjas akpalpošanu EEOZ* un Švicié, lüdzu, apemekljel zemák noraditi timkja vries adresi (tmekjla vietne ir piejams drukajams fails) viä sazinieties ar jusu valsti apkalojošn yamaia pärstvniebu. * EEO: Eupmaia Majanduspirkond Démiso: informaciçă del garantijos pírkijems EEOZ* i Švyciarjus Jei reiklia issamios informacjos apie SJ, 'Yamaia' produktur ir jo technine prieziú riva ojo EEO* i Švyciarjus je, apsilankykite mùsu svetainéje toluia nuvedbjt uvebej silya (svetainéje yra spausdinitas failas) arba kreipkités j, 'Yamaia' atstovbye savo salali. * EEO - Europos ekonominké ergde Doležite upozopornieme: Informació o zrúke przechavnikov EPO* a Švajciarsku Podrobné informació o zrúke sa toto producu odspolɔnosti Yamaia garancjnonn service v EHP* a Švajciarsku nájdete na webovoj struké uvedenej nižsie (na našej webovoj struké je k disipozicii subr na tlač) alebo sa obrate na zastupcu spolɔcnosti Yamaia vo svojej krajine. * EHP: Europayx hospodársky priestor Pomembno obvestilo: Informació o garanciji zi kupce v EGP' in Švici Za podrobné informació o te umyaminem ideltekleri vers celotonnem EGP in Švici, običile splotnoesto mesto, ki je navedeno spodaj (natisjiva datoteka je na volvo na našem spltnem zu, als sie obnitne na Yamaehinae predstavnika v slovj dižržavi. * EGP: Evropskiyospodarski prostdor Baxno Stoboume: Иndorpomuaиз за лимени'tи в БИNTI* и Сльемцаря 3a nopondи Инфомьдза за ратungида за тозюкту на.Yamaia и rapaцьонноюобслочавь в павелорожьков сизуна на ВИNTI* и Сльемцаря посятete посятete посятete no-dolly ueь cait (na нашии убай сима яйсам сима яйсам). « EVO»: Evropékkyo konohomniccko procssentvo Notificare importanta: Informatiçou des garantie pentru clienti din SEE* si Elvejia Pentru informatiță detailae privadice indacte provision Yamaia y si servicii de garantie Pan-SEE* gi Elvejia, vizitatzi site-ul la adress de mai jos (fişierul imprimabit this disponibil pe site-ul nostru) sau contacti biroul reprunenti Yamaia din Jara dumnevaovastra. * SEE: Spatiul Economic European | Lima românnã |
http://europe.yamaha.com/warranty/
For details of products, please contact your nearest Yamaha representative or the authorized distributor listed below.
Yamaha Canada Music Ltd.
135 Milner Avenue, Scarborough, Ontario,
M1S 3R1, Canada
Tel: 416-298-1311
U.S.A.
Yamaha Corporation of America
6600 Orangethorpe Ave., Buena Park, Calif. 90620,
U.S.A.
Tel: 714-522-9011
CENTRAL & SOUTH AMERICA
MEXICO
Yamaha de Mexico S.A. de C.V.
Col. San Jose Insurgentes, C.P. 03900,
Deleg. Benito Juarez, Mexico, D.F.
Tel: 55-5804-0600
BRAZIL
PANAMA AND OTHER LATIN
AMERICAN COUNTRIES/
CARIBBEAN COUNTRIES
Yamaha Music Latin America, S.A.
Torre Banco General, Piso 7, Urbanizacion Marbella,
Sherbourne Drive, Tilbrook, Milton Keynes,
MK7 8BL, England
Tel: 01908-366700
GERMANY
Yamaha Music Europe GmbH
Siemensstraße 22-34, 25462 Rellingen, Germany
Tel: 04101-3030
Branch Switzerland in Zurich
Seefeldstrasse 94, 8008 Zurich, Switzerland
Tel: 044-387-8080
AUSTRIA/BULGARIA
Yamaha Music Europe GmbH Branch Austria
Schleiergasse 20, A-1100 Wien, Austria
Tel:01-60203900
CZECH REPUBLIC/HUNGARY/
ROMANIA/SLOVAKIA/SLOVENIA
Yamaha Music Europe GmbH
Branch Austria (Central Eastern Europe Office)
Schleiergasse 20, A-1100 Wien, Austria
Tel: 01-602039025
POLAND/LITHUANIA/LATVIA/ESTONIA
Yamaha Music Europe GmbH
Branch Poland Office
Yamaha Music Europe GmbH, Branch Italy
Viale Italia 88, 20020 Lainate (Milano), Italy
Tel: 02-935-771
SPAIN/PORTUGAL
Yamaha Music Europe GmbH Ibérica, Sucursal
en España
Ctra.de la Coruna km.17,200,28230
Las Rozas (Madrid), Spain
Tel: +34-902-39-8888
GREECE
Philippos Nakas S.A. The Music House
147 Skiathou Street, 112-55 Athens, Greece
Tel: 01-228 2160
SWEDEN/FINLAND/ICELAND
Yamaha Music Europe GmbH Germany filial
Scandinavia
J. A. Wettergrens Gata 1, Box 30053
S-400 43 Göteborg, Sweden
Tel: 031 89 34 00
DENMARK
Yamaha Music Europe GmbH, Tyskland - filial
Denmark
Generatorvej 6A, DK-2730 Herlev, Denmark
Tel: 44 92 49 00
NORWAY
Yamaha Music Europe GmbH Germany -
Norwegian Branch
Grini Næringspark 1, N-1345 Østerås, Norway
Tel: 67 16 77 70
RUSSIA
Yamaha Music (Russia)
Room 37, bld. 7, Kievskaya street, Moscow,
121059, Russia
Tel: 495 626 5005
OTHER EUROPEAN COUNTRIES
Yamaha Music Europe GmbH
Siemensstraße 22-34, 25462 Rellingen, Germany
Tel: +49-4101-3030
AFRICA
Yamaha Corporation,
Asia-Pacific Sales & Marketing Group
Nakazawa-cho 10-1, Naka-ku, Hamamatsu,
Japan 430-8650
Tel: +81-53-460-2303
MIDDLE EAST
TURKEY/CYPRUS
Yamaha Music Europe GmbH
Siemensstraße 22-34, 25462 Rellingen, Germany
Tel: 04101-3030
OTHER COUNTRIES
Yamaha Music Gulf FZE
LOB 16-513, P.O.Box 17328, Jubel Ali,
Dubai, United Arab Emirates
Tel: +971-4-881-5868
ASIA
THE PEOPLE'S REPUBLIC OF CHINA
Yamaha Music & Electronics (China) Co., Ltd.
2F, Yunhedasha, 1818 Xinzha-lu, Jingan-qu,
Shanghai, China
Tel: 021-6247-2211
INDIA
Yamaha Music India Pvt. Ltd.
Spazedge building, Ground Floor, Tower A, Sector
47, Gurgaon- Sohna Road, Gurgaon, Haryana, India
Tel: 0124-485-3300
INDONESIA
PT. Yamaha Musik Indonesia (Distributor)
PT. Nusantik
Gedung Yamaha Music Center, Jalan Jend. Gatot
SubROTO Kav. 4, Jakarta 12930, Indonesia
Tel: 021-520-2577
KOREA
Yamaha Music Korea Ltd.
8F, 9F, Dongsung Bldg. 158-9 Samsung-Dong,
Kangnam-Gu, Seoul, Korea
Tel: 02-3467-3300
MALAYSIA
Yamaha Music (Malaysia) Sdn., Bhd.
Lot 8, Jalan Perbandaran, 47301 Kelana Java,
Petaling Jaya, Selangor, Malaysia
Tel: 03-78030900
SINGAPORE
Yamaha Music (Asia) PRIVATE LIMITED
Blk 202 Hougang Street 21, #02-00,
Singapore 530202, Singapore
Tel: 6747-4374
TAIWAN
Yamaha KHS Music Co., Ltd.
3F, #6, Sec.2, Nan Jing E. Rd. Taipei.
Taiwan 104, R.O.C.
Tel: 02-2511-8688
THAILAND
Siam Music Yamaha Co., Ltd.
4, 6, 15 and 16th floor, Siam Motors Building,
891/1 Rama 1 Road, Wangmai,
Pathumwan, Bangkok 10330, Thailand
Tel: 02-215-2622
OTHER ASIAN COUNTRIES
Yamaha Corporation,
Asia-Pacific Sales & Marketing Group
Nakazawa-cho 10-1, Naka-ku, Hamamatsu,
Japan 430-8650
Tel: +81-53-460-2303
OCEANIA
AUSTRALIA
Yamaha Music Australia Pty. Ltd.
Level 1, 99 Queensbridge Street, Southbank,
Victoria 3006, Australia
Tel: 3-9693-5111
COUNTRIES AND TRUST
TERRITORIES IN PACIFIC OCEAN
Yamaha Corporation,
Asia-Pacific Sales & Marketing Group
Nakazawa-cho 10-1, Naka-ku, Hamamatsu,
Japan 430-8650
Tel: +81-53-460-2303

YAMAHA
Yamaha Pro Audio Global Web Site http://www.yamahaproaudio.com/
Yamaha Manual Library http://www.yamaha.co.jp/manual/