CSM1019 - Saw Ferm - Free user manual and instructions
Find the device manual for free CSM1019 Ferm in PDF.


| Product type | Circular Saw |
| Brand | Ferm |
| Model | CSM1019 |
| Power supply | 230 V, 50 Hz AC |
| Power consumption | 1200 W |
| No-load speed | 5500 rpm |
| Blade diameter | 190 mm |
| Bore diameter | 20 mm |
| Max. cut depth at 90° | 65 mm |
| Max. cut depth at 45° | 45 mm |
| Weight | 4.2 kg |
| Dimensions (L x W x H) | 350 x 250 x 250 mm |
| Laser guide | Yes, integrated |
| Dust extraction port | Yes, 35 mm |
| Safety features | Spindle lock, double insulation, safety switch |
| Maintenance | Clean after use, check carbon brushes regularly |
| Spare parts availability | Available through authorized service centers |
Frequently Asked Questions - CSM1019 Ferm
User questions about CSM1019 Ferm
0 question about this device. Answer the ones you know or ask your own.
Ask a new question about this device
Download the instructions for your Saw in PDF format for free! Find your manual CSM1019 - Ferm and take your electronic device back in hand. On this page are published all the documents necessary for the use of your device. CSM1019 by Ferm.
USER MANUAL CSM1019 Ferm
UK Subject to change
natural_image
ECONOMY FERNIC cutter blade with visible cutting edge and blade (no text or symbols on the blade itself)UK USERS MANUAL 03
D GEBRAUCHSANWEISUNG 06
E MANUAL DE INSTRUCCIONES 10
P MANUAL DE INSTRUÇÕES 13
1 MANUALEUTILIZZATI17
H HASZNÁLATIUTASÍTÁS21
CZ NÁVODKPOUŽITÍ24
SK NÁVOD NA ODSLUHU 28
PL INSTRUKSJEOBSŁUGI 31
LT EKSPLOATAVIMO INSTRUKCIJA 34
LV LIETOŠANASINSTRUKCIJA 38
RU РУКОВОДСТВО ПО ЭКСПЛУДТАЦИИ 41
UA ІНСТРУКЦІЯ КОРИСТУВАЧА 45
GR OΔΗΓΙΕΣΧΡΗΣΕΩΣ 48
CE
www.ferm.com

Fig. A

Fig. B

Fig. D

natural_image
Technical line drawing of a handheld device with labeled parts (no text or symbols present)Fig. C

Fig. E
2 Ferm
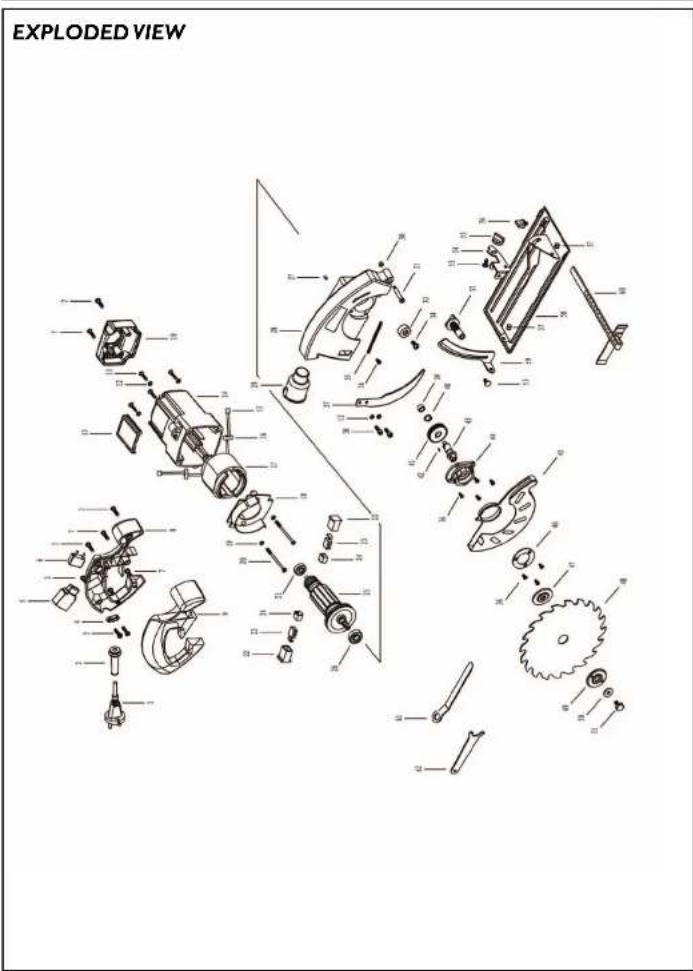
Ferm 55
SPARE PARTS LIST FEKS-160
| REF.NR. | DESCRIPTION | FERMNR. |
| 409430 | SWITCH | 5 |
| 409431 | CARBON BRUSH (SET) | 23 |
| 409432 | DUST CONNECTOR | 29 |
| 409433 | GEAR | 41 |
| 409434 | FLANGE (SET) | 47,49 TILL 51 |
| 409435 | PARALLEL GUIDE | 60 |
| 409436 | SPANNER (SET) | 61,62 |

CIRCULAR SAW
THE PICTURES MENTIONED IN THE TEXT ARE CORRESPONDING WITH THE PICTURES AT PAGE 2.
CONTENTS
-
Technical specifications
-
Safety instructions
- Assembly and adjusting instructions
- Operation
I. TECHNICAL SPECIFICATIONS
Voltage | 230 V\~ Frequency | 50 Hz Power input | 1200 W No load speed | 4500/min. Saw blade dimensions | 160x20x2.8 mm Number of teeth | Z18 Weight | 3.96 kg Lpa (sound pressure level) | 88.0 dB(A) Lwa (sound power level) | 101.0 dB(A) aw(vibration value) | 1.604 m/s ^2
PRODUCT INFORMATION
Fig.A
1. Handgrip
2. Type plate
3. On/off switch
4. Cut depth clamping knob
5. Power cord
6. Riving knife
7. Saw blade safety guard
8. Hexagon screw
9. Soleplate
10. Retaining ring
11.Sawblade
12. Rinfence
13. Rin fence clamping knob
14. Sawing angle clamping kr
- SAVING angle clamping knob
UNPACKING
The circular handsaw is shipped with:
I Ripfence
I TCT Saw blade ∅ 160 mm
! Allen key
Check first whether or not the delivery has been damaged by transport and/or whether all the parts are present.
2. SAFETY INSTRUCTIONS
The following pictograms are used in these instructions for use:
Danger of bodily injury or material damage.
Indicates electrical shock hazard.
CE Conforms to the applicable European safety standards
Class II equipment—double insulated—the plug does not have to be earthed
Read the instructions


Keep bystanders at a distance

Immediately unplug the plug from the mains electricity in the case that the cord gets damaged and during maintenance

Wear eye and ear protectors

Faulty and/or discarded electrical or electronic apparatus have to be collected at the appropriate recycling locations.
Carefully read this manual before using the machine. Make sure that you know how the machine functions and how to operate it. Maintain the machine in accordance with the instructions to make sure it functions properly. Keep this manual and the enclosed documentation with the machine.
ELECTRICAL SAFETY
When using electric machines always observe the safety regulations applicable in your country to reduce the risk of fire, electric shock and personal injury. Read the following safety instructions and also the enclosed safety instructions. Keep these instructions in a safe place!

Always check that the power supply corresponds to the voltage on the rating plate.

The machine is double insulated in accordance with EN50144; therefore no earth wire is required.
Replacing cables or plugs
If the mains cable becomes damaged, it must be replaced with a special mains cable available from the manufacturer or the manufacturer's customer service. Dispose of old cables or plugs immediately after replacing them with new ones. It is dangerous to connect the plug of a loose cable to a socket.
Using extension cables
Only use an approved extension cable suitable for the power input of the machine. The minimum conductor size is 1.5 mm ^2 . When using a cable reel always unwind the reel completely.
BEFORE USING THE CIRCULAR SAW:
- Check the following points:
- does the voltage of the motor correspond with the mains voltage (appliances for a mains voltage of 230 V)
- are the mains lead and the mains plug in a good
condition: solid, without any loose ends or damage;
• is the saw blade missing any teeth or showing
any cracks, it so must be replaced immediately.
• Make sure the blade is secure.
• Use this circular saw to saw only wood, wood-like
products.
- Do not use circular saw blades which are deformed or damaged.
- Do not use HSS blades.
- Only use blades meeting the required dimensions, as well as data and descriptions; Never apply any blades of which the thickness is greater than that of the riving knife.
- Do not stop the blade of a circular saw by pressing the blade from the side.
- Check that the blade guard can freely move and fully closes.
- Never lock-up the guard in the open position.
- Never put sideward pressure on the blade. This may cause the blade to break.
- Be careful when cutting wood with knots, nails or cracks in it and/or dirt on it, as these can cause the blade to get stuck.
- Never leave the circular saw unattended.
- Use this circular saw to saw only wood or wood-like products.
USING THE MACHINE:
- Use clamps or a vice to hold the work.
- Never remove wood chips and saw dust that is close to the saw blade with your hands. If there are small pieces of wood left between the fixed and the movable parts, the circular saw will have to be stopped. The plug needs to be removed from the socket, before any left piece can be removed.
- Check that the blade is suitable for the spindle speed of the circular saw. Do not attempt to cut before the circular saw has reached full speed. Make sure the circular saw runs without load (i.e. is not in contact with the work) when you switch it on. The circular saw must have reached its full speed first.
- Never cut wood that is thicker than the depth of the saw blade.
- When cutting in wooden walls or floors, check there is no wiring or piping where you intend to cut.
- Switch off the tool and wait until the blade has stopped completely before moving the saw away from the work or putting it down. Hearing protection should be worn when using circular saw.
SWITCH OFF THE MACHINE IMMEDIATELY
WHEN YOU DISCOVER:
• A defective mains plug or mains lead:
• A defective switch.
• Overheating of the circular saw.
• Smoke or odeur caused by scorched insulation.
3. ASSEMBLY AND
ADJUSTING INSTRUCTIONS

Before adjusting the saw, make sure the plug is removed from the socket.
SETTING THE SAWING ANGLE (BEVEL)
Fig. B.
• Loosen both knobs (1).
- Rotate the soleplate to the correct position (0° - 45°), and tighten the knobs. The sawing angle (bevel) can be read on the protractor (2).
FITTING THERIP FENCE
Fig. B.
• Loosen knob (3).
- Insert the rip fence into the slots provided (4).
- Set the correct cut width and tighten the knob (3).
SETTING THE CUT DEPTH
Fig. C.
• Loosen knob (1).
- Move the soleplate (2) downwards.
• The cut depth of the saw blade can be read off on the
side of the safety guard.
• Tighten the clamping knob (1) once the correct
depth is set.
EXCHANGING OR CLEANING THE SAW BLADE
Fig. D.
- Next loosen the hexagon screw (3) in the centre of the saw blade, using the Allen key provided.
- Turn the safety guard to the rear, and hold it there with the aid of the knob (1).
- Withdraw the retaining ring and the saw blade, and clean the saw blade, or replace it with a new one.
- Again place the saw blade back on the shaft. Ensure that the teeth of the saw blade are pointing in the same direction as the riving knife (4).
- Ensure that the riving knife is set in such a way that - the gap between it and the toothed wheel rim of the - saw blade does not exceed 5 mm
• and that the toothed wheel does not protrude more than 5 mm beyond the lower edge of the splitting wedge.
• The riving knife must always be used except when cutting into the middle of the workpiece.
- Allow the safety guard to return over the saw blade by releasing the knob (1).
- Refit the retaining ring (5) and tighten the hexagon screw firmly once more.
Use of hearing protection is recommended while operating the circular saw.
SWITCHING ON/OFF
Fig. E.
- Depress knob (B) with your right-hand thumb and keep it depressed.
• Depress knob (A) to start the saw. - Release knob (Å) to stop the saw.
OPERATION
- Hold the work using clamps or a vice to have both hands free to operate the saw.
- Switch on the saw and place the bottom plate on the work.
- Slowly move the saw towards the previously drawn cutting line and slowly press the tool forward.
- Firmly press the bottom plate on the work, otherwise the circular saw may start to vibrate, causing the blade to break more easily.

Let the saw do the job. Do not put undue pressure on the circular saw.
TROUBLESHOOTING
Below we have listed a few probable causes and solutions to which you can refer if your circular saw does not function properly.
I. The temperature of the electric motor exceeds 70^ C.
• The motor has been overloaded by working it too hard.
Cut more slowly and allow the motor to cool down.
• The motor is defective.
Contact your local dealer to have the tool inspected and/or repaired.
- The tool does not work when switched on.
- Damaged cord and/or plug. Check cord and/or plug
- Defective switch. Contact your local dealer to have the switch inspected and/or repaired.
- When cutting it is very difficult to move the work forward in a straight line and the cut is not clean.
• The blade is bent or blunt. Replace the blade. - The circular saw makes a lot of noise and/or does not run smoothly.
• The carbon brushes are worn. Contact your local dealer to have your tool inspected and/or repaired.
5. MAINTENANCE

Make sure that the machine is not live when carrying out maintenance work on the motor.
The Ferm machines have been designed to operate over a long period of time with a minimum of maintenance. Continuous satisfactory operation depends upon proper machine care and regular cleaning.
Cleaning
Keep the ventilation slots of the machine clean to prevent overheating of the engine. Regularly clean the machine housing with a soft cloth, preferably after each use. Keep the ventilation slots free from dust and dirt.
If the dirt does not come off use a soft cloth moistened with soapy water. Never use solvents such as petrol, alcohol, ammonia water, etc. These solvents may damage the plastic parts.
Lubrication
The machine requires no additional lubrication.
Faults
Should a fault occur, e.g. after wear of a part, please contact your local Ferm dealer. In the back of this manual you find an exploded view showing the parts that can be ordered.
ENVIRONMENT
In order to prevent the machine from damage during transport, it is delivered in a sturdy packaging. Most of the packaging materials can be recycled. Take these materials to the appropriate recycling locations. Take your unwanted machines to your local Ferm-dealer. Here they will be disposed of in an environmentally safe way.
GUARANTEE
The guarantee conditions can be found on the separately enclosed guarantee card.
CE DECLARATION OF CONFORMITY (UK)
We declare under our sole responsibility that this product is in conformity with the following standards or standardized documents
EN50144-1, EN50144-2-5,
EN55014-1, EN-55014-2, EN61000-3-2, EN61000-3-3,
in accordance with the regulations.
98/37/EEC, 73/23/EEC 89/336/EEC
from 01-05-2004
ZWOLLENL
W. Kamphof Quality department
D Deutsch
KREISSÄGE
01-05-2004 ZWOLLENL W. Kamphof Quality department

P Português
SERRA CIRCULAR
OS NÚMEROS NO TEXTO SEGUINTE CORRESPONDEM ÀS FIGURAS NA PÁGINA 2.
CONTEÚDOS
TROCAR OU LIMPARA SERRA
Fig. D
98/37/EEC 73/23/EEC 89/336/EEC
01-05-2004 ZWOLLENL V. Kamphofs Kvalitātes departaments

RU Русский
Циркулярная пила
98/37/EEC 73/23/EEC 89/336/EEC
od 01-05-2004 ZWOLLENI
W. Kamphof


- CIRCULAR SAW
- CONTENTS
- TECHNICAL SPECIFICATIONS
- PRODUCT INFORMATION
- UNPACKING
- SAFETY INSTRUCTIONS
- ELECTRICAL SAFETY
- Replacing cables or plugs
- Using extension cables
- BEFORE USING THE CIRCULAR SAW:
- products.
- USING THE MACHINE:
- SWITCH OFF THE MACHINE IMMEDIATELY
- WHEN YOU DISCOVER:
- ASSEMBLY AND
- ADJUSTING INSTRUCTIONS
- SETTING THE SAWING ANGLE (BEVEL)
- Fig. B.
- FITTING THERIP FENCE
- SETTING THE CUT DEPTH
- Fig. C.
- EXCHANGING OR CLEANING THE SAW BLADE
- Fig. D.
- SWITCHING ON/OFF
- OPERATION
- TROUBLESHOOTING
- MAINTENANCE
- Cleaning
- Lubrication
- Faults
- ENVIRONMENT
- GUARANTEE
- CE DECLARATION OF CONFORMITY (UK)
- D Deutsch
- KREISSÄGE
- P Português
- SERRA CIRCULAR
- CONTEÚDOS
- TROCAR OU LIMPARA SERRA
- RU Русский
- Циркулярная пила
Brand : Ferm
Model : CSM1019
Category : Saw